目录
一、MVT说明
1.Model层
2.View层
3.Template层
二、功能说明
三、代码框架展示
四、具体代码实现
models.py
登录界面前端代码
博客界面前端代码(profile.html)
main.py
一、MVT说明
MVT架构是Model-View-Template的缩写,是Django框架的架构。Flask框架本身并没有强制使用MVT架构,但是我们可以通过一些方式来实现类似MVT架构的结构。
以下是一个简单的在Flask中实现MVT的示例:
1.Model层
在Flask中,我们可以使用SQLAlchemy作为ORM框架,用于操作数据库。我们可以在app目录下创建一个models.py文件,并定义我们需要的数据模型类。例如:
from flask_sqlalchemy import SQLAlchemydb = SQLAlchemy()class User(db.Model):id = db.Column(db.Integer, primary_key=True)username = db.Column(db.String(20), unique=True, nullable=False)password = db.Column(db.String(128), nullable=False)email = db.Column(db.String(120), unique=True, nullable=False)
2.View层
在Flask中,我们可以使用Blueprints来组织我们的视图函数。我们可以在app目录下创建一个views.py文件,并创建一个蓝图对象,用于定义我们的视图函数。例如:
from flask import Blueprintbp = Blueprint('main', __name__)@bp.route('/')
def index():return 'Hello, World!'
3.Template层
在Flask中,我们可以使用Jinja2作为模板引擎,用于渲染HTML页面。我们可以在app目录下创建一个templates目录,并在其中创建我们的HTML模板文件。例如:
<!doctype html>
<html><head><title>{{ title }}</title></head><body><h1>Hello, {{ username }}!</h1></body>
</html>
然后,在我们的视图函数中使用render_template函数来渲染模板文件。例如:
from flask import render_template@bp.route('/hello/<username>')
def hello(username):return render_template('hello.html', title='Flask MVT Demo', username=username)
以上就是一个简单的在Flask中实现MVT的示例。通过这种方式,我们可以将应用逻辑、数据库操作和HTML页面渲染分别放在不同的层次中,使代码更加清晰和易于维护。
二、功能说明
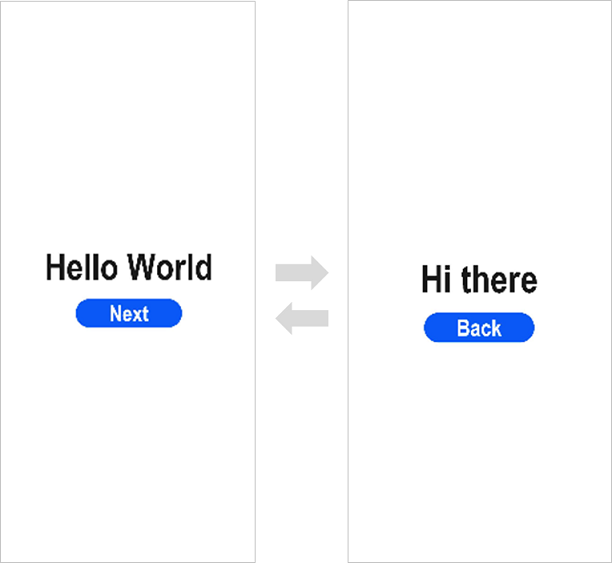
展示了登录界面和博客界面
实现基于初始界面多路由跳转
通过jinja2模板引擎完成html页面的数据替换
使用SQLAlchemy完成数据操作
使用request获取用户提交的参数
使用session实现权限验证,登录登出
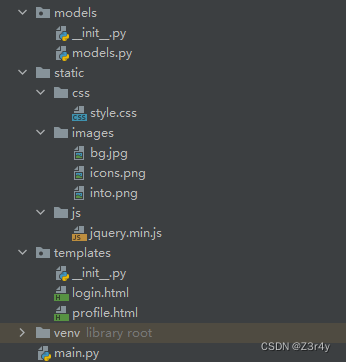
三、代码框架展示

四、具体代码实现
models.py
from sqlalchemy import create_engine
from sqlalchemy import Column,String,Integer
from sqlalchemy.ext.declarative import declarative_base
from sqlalchemy.orm import sessionmaker#链接是需要指定要用到的MySQL数据库
engine=create_engine('mysql+pymysql://root:root@localhost:3306/flask_1?charset=utf8')
Base=declarative_base() #生成SQLORM基类class User(Base):#对应MySQL中数据表的名字__tablename__='user'#创建字段id=Column(Integer,primary_key=True)user_id=Column(String(50),nullable=False)username=Column(String(50),nullable=False)head_img=Column(String(200))short_description=Column(String(300))
登录界面前端代码
简单的Login Form登录页html模板
博客界面前端代码(profile.html)
<!DOCTYPE html>
<!--[if IE 8]> <html lang="en" class="ie8"> <![endif]-->
<!--[if IE 9]> <html lang="en" class="ie9"> <![endif]-->
<!--[if !IE]><!--> <html lang="en"> <!--<![endif]-->
<head>
<title>Home</title>
<!-- Meta -->
<meta charset="utf-8">
<meta http-equiv="X-UA-Compatible" content="IE=edge">
<meta name="viewport" content="width=device-width, initial-scale=1.0">
<meta name="description" content="">
<meta name="author" content="">
<link rel="shortcut icon" href="">
<link href='https://fonts.googleapis.com/css?family=Roboto:400,500,400italic,300italic,300,500italic,700,700italic,900,900italic' rel='stylesheet' type='text/css'>
<!-- Global CSS -->
<link rel="stylesheet" href="assets/plugins/bootstrap/css/bootstrap.min.css">
<!-- Plugins CSS -->
<link rel="stylesheet" href="assets/plugins/font-awesome/css/font-awesome.css"><!-- Theme CSS -->
<link id="theme-style" rel="stylesheet" href="assets/css/styles.css"></head><body><header class="header"><div class="intro"><div class="container text-right"><a href={{url_for('logout')}}>退出登录</a></div><!--//container--><div class="container text-center"><h1 class="name">{{user.username}}</h1><div class="title">Full Stack Developer</div><div class="profile"><p>{{user.short_description}}</p></div><!--//profile--></div><!--//container--></div><!--//intro--><div class="contact-info"><div class="container text-center"><ul class="list-inline"><li class="email"><i class="fa fa-envelope"></i><a href="mailto:someone@example.com">james.doe@website.com</a></li><li><i class="fa fa-phone"></i> <a href="tel: 0123456789">0123 456 7890</a></li><li class="website"><i class="fa fa-globe"></i><a href="#" target="_blank">portfoliosite.com</a></li></ul></div><!--//container--></div><!--//contact-info--></header><!--//header--><div class="wrapper container"><section id="contact-section" class="contact-section section"><h2 class="section-title">Get in Touch</h2><div class="intro"><img class="profile-image" src="assets/images/profile-image.png" alt=""><div class="dialog"><p>I'm currently taking on freelance work. Lorem ipsum dolor sit amet, consectetuer adipiscing elit. Aenean commodo ligula eget dolor. Aenean massa. Cum sociis natoque penatibus et magnis dis parturient montes. Aenean vulputate eleifend tellus. Aenean leo ligula, porttitor eu, consequat vitae, eleifend ac, enim. Aliquam lorem ante, dapibus in, viverra quis, feugiat a, tellus.</p><p><strong>I can help with the following:</strong></p><ul class="list-unstyled service-list"><li><i class="fa fa-check" aria-hidden="true"></i> App development with ReactJS</li><li><i class="fa fa-check" aria-hidden="true"></i> Front-end development with AngularJS</li><li><i class="fa fa-check" aria-hidden="true"></i> Back-end development with Django/Python</li><li><i class="fa fa-check" aria-hidden="true"></i> UI development</li><li><i class="fa fa-check" aria-hidden="true"></i> UX prototyping</li></ul><p>Drop me a line at <a href="mailto:someone@example.com">james.doe@website.com</a> or call me at <a href="tel:01234567890">0123 456 7890</a></p><ul class="social list-inline"><li><a href="#"><i class="fa fa-linkedin" aria-hidden="true"></i></a></li><li><a href="#"><i class="fa fa-twitter" aria-hidden="true"></i></a></li><li><a href="#"><i class="fa fa-google-plus" aria-hidden="true"></i></a></li><li><a href="#"><i class="fa fa-github-alt" aria-hidden="true"></i></a></li><li><a href="#"><i class="fa fa-skype" aria-hidden="true"></i></a></li></ul><!--//social--></div><!--//diaplog--></div><!--//intro--></section><!--//section--></div><!--//wrapper--></body>
</html>
main.py
#1.导入flask
from flask import Flask, redirect, url_for, request, make_response,session
from flask import render_templatefrom models.models import *#2.用flask创建应用对象
app=Flask(__name__)
app.config['SECRET_KEY']='Z3r4y'#3. 用应用对象.route("/index.html")对函数进行装饰,这个函数中写业务逻辑
@app.route("/")
@app.route("/index")
def index():return redirect('profile')@app.route("/profile")    #当调用profile的时候,就相当于profile(user_id=xxx)
#当调用这个函数的时候,意味着用户要访问简历页面,至于是否可以访问,则要检查用户请求中的cookie,如果有,那么就认为可以访问,否则禁止访问
def profile():  #如果想调用profile成功,那么只有user_id这个位置的是纯数字的时候,才可以调用# 如果一个函数它是一个普通的功能的话,它一般包括2个功能:#1.业务方面的数据处理(对变量user_id的使用,例如查询数据库等)#2.模板的替换(对应profile.html的获取以及字符的替换)# with open('profile.html',encoding='utf-8') as f:#     content=f.read().replace("xxxxxxxx",str(user_id))#     return content# conn=pymysql.connect(host='localhost', user='root', password='root', database='flask_1', charset='utf8')# csl=conn.cursor()# params=[user_id]# csl.execute('select * from user where user_id=%s',params)# result=csl.fetchone()# print(result)# csl.close()# conn.close()# login_flag=request.cookies.get('login_flag')# user_id=request.cookies.get('user_id')  #从cookie中提取用户的idlogin_flag=session.get('login_flag')user_id=session.get('user_id')if not (login_flag and login_flag=="success" and user_id):return redirect(url_for('login'))db_session=sessionmaker(bind=engine)() #生成链接数据库的实例user_ret=db_session.query(User).filter(User.user_id==user_id).one()    #将从cookie中查询出来的user_id道数据库中查询这个用户# print(user_ret)db_session.close()# 使用模板(jinja2模板引擎),可以对html的数据处理进行了封装# return render_template("profile.html",user_name="Z3r4y")# return render_template("profile.html",user_name=result[2],short_desc=result[4])  #注意:它会默认到templates文件夹中去找 profile.htmlreturn render_template("profile.html",user=user_ret)@app.route('/login')
def login():#判断用户名以及密码或者还有验证码是否成立,如果成立则告知浏览器用户登录成功,且让浏览器自动跳转主页# print(request.args)if request.args:user_name=request.args.get('Username')password=request.args.get('Password')#1.业务处理print("用户名是",user_name)print("密码是",password)db_session = sessionmaker(bind=engine)()  # 生成链接数据库的实例user_ret = db_session.query(User).filter(User.username == user_name).first()db_session.close()print(user_ret)if user_ret:# response=make_response("<h1>登陆成功</h1>")response=make_response(redirect(url_for('index')))# response.set_cookie("user_id",user_ret.user_id)# response.set_cookie("login_flag","success")session['login_flag']="success"session['user_id']=user_ret.user_idreturn responseelse:return "<h1>登陆失败</h1>"# return redirect('/index')# return redirect(url_for("profile",user_id=2))   #帮助我们动态地生成与路由函数关联的URLelse:return render_template('login.html')@app.route('/logout')
def logout():# #1.清理cookie# response=make_response(redirect(url_for('index')))# response.delete_cookie('login_flag')# response.delete_cookie('user_id')#1.清理sessionsession.clear()# 2.跳转到主页return redirect(url_for('index'))@app.route('/demo')
def demo():return "状态码",404#4.应用程序.run()
app.run(debug=True,port=1337,host="0.0.0.0")     #开启调试模式,意味着如果有代码的改动,flask会自动重启服务器
# app.run()
# print(app.url_map)