前言
学习一样新技术、新框架,最重要的是学习其思想、原理。即原理性思维。
如果是因为工作原因,需要快速上手RabbitMQ,本篇或许适合你。
核心概念
- Connection:publisher/consumer 和 broker 之间的 TCP 连接
- Channel: 消息通道,在客户端的每个连接里,可建立多个channel,每个channel代表一个会话任务
- Exchange: 消息交换机,它指定消息按什么规则,路由到哪个队列
- Queue: 消息队列载体,每个消息都会被投入到一个或多个队列
- VHost: 虚拟主机,一个broker里可以开设多个vhost,用作不同用户的权限分离

安装
- 修改host,添加下面数据
192.168.204.179 rabbit
- 拉取镜像
docker pull rabbitmq:3.8.2-management
- 启动容器
docker run -d --restart=always \--hostname rabbit \--name=rabbitmq \-p 5671:5617 -p 5672:5672 -p4369:4369 -p 15671:15671 -p 15672:15672 -p 25672:25672 \rabbitmq:3.8.2-management
5671:开启管理插件时,管理界面接口
5671、5672:AMQP
4369:守护进程
25672:
用户、Virtual Host管理
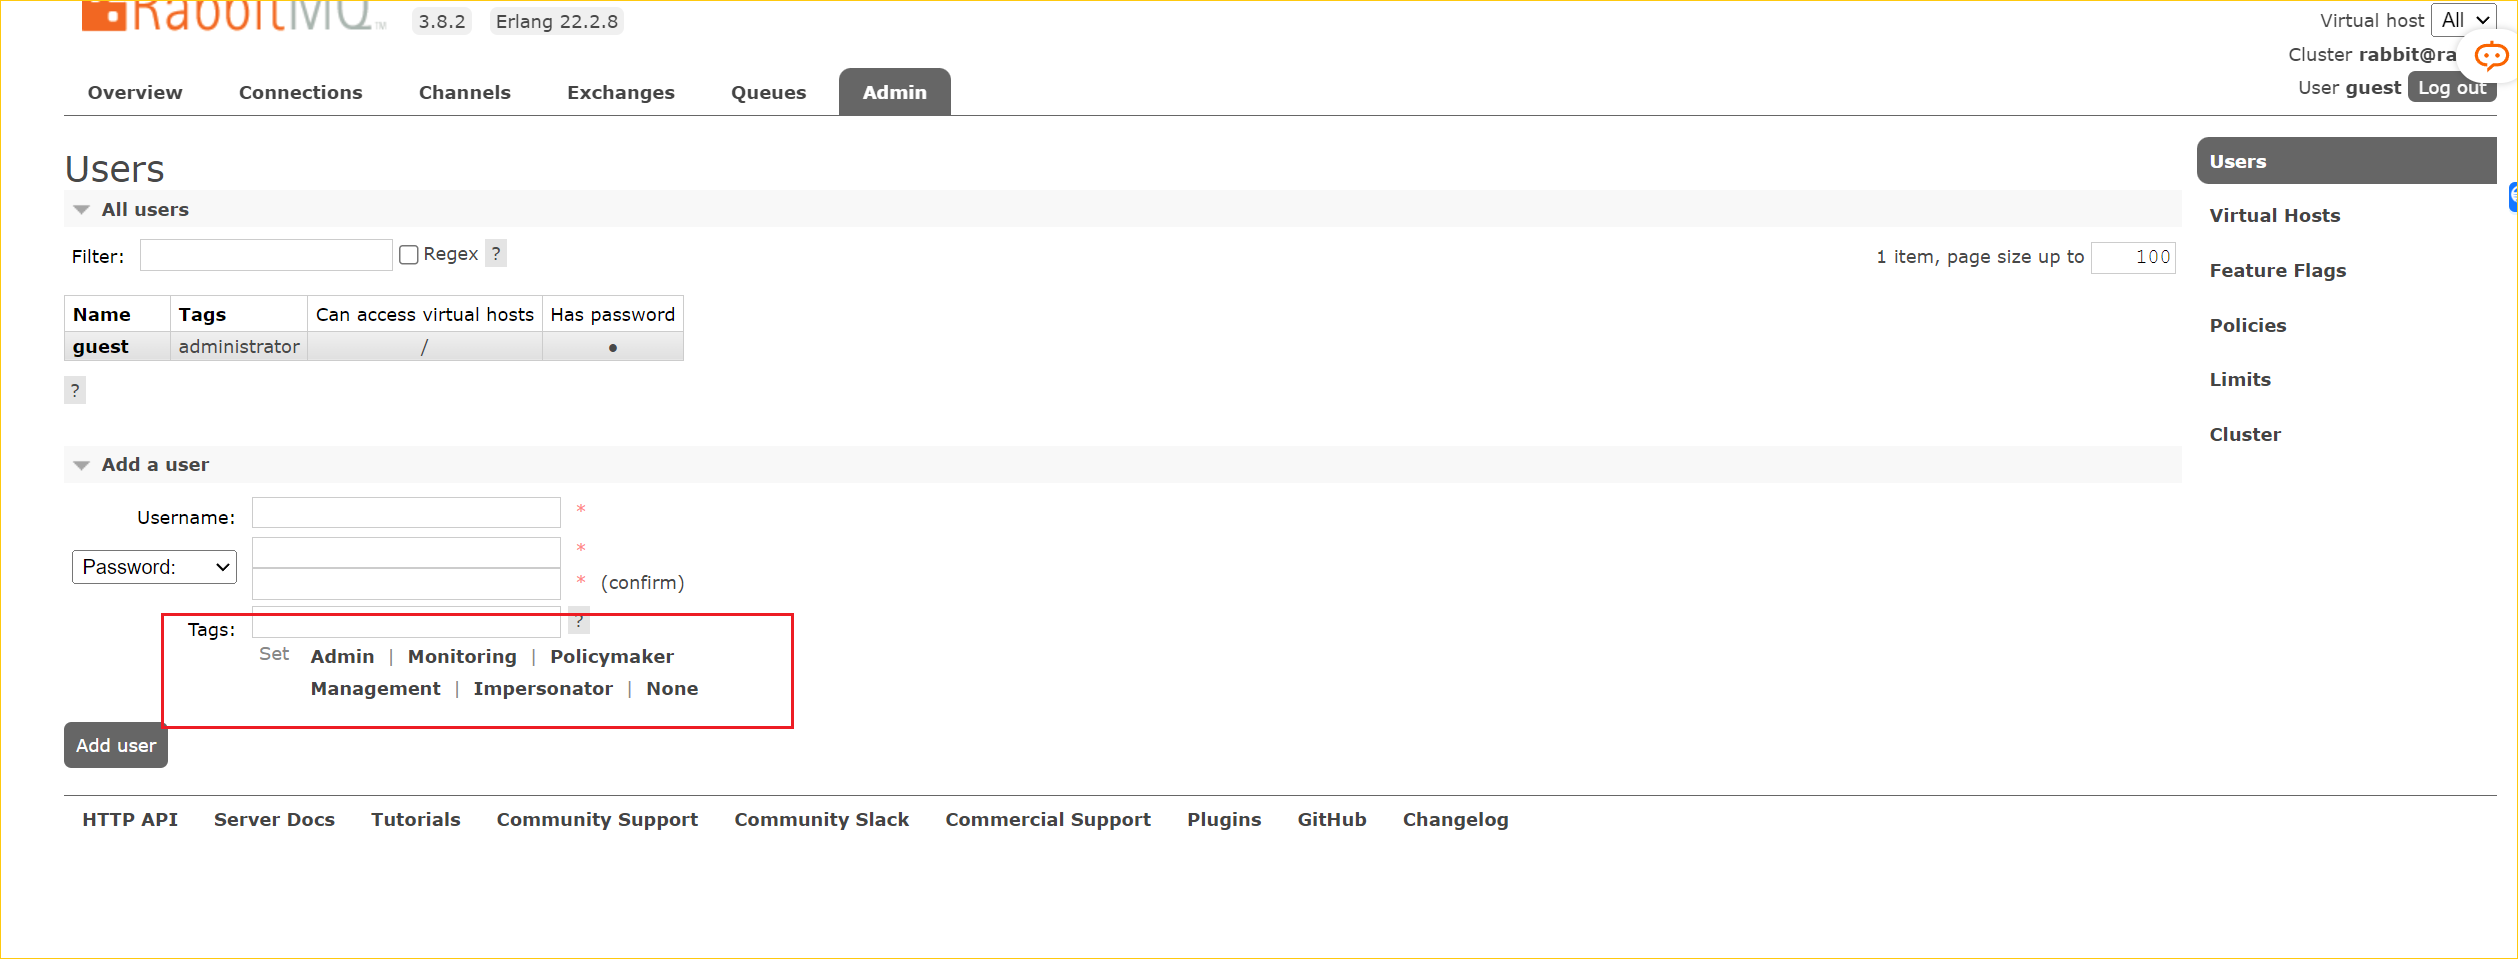
用户角色
访问管理界面:192.168.204.179:15672
默认账号密码:guest
角色列表:
- 超级管理员(administrator)可登陆管理控制台,可查看所有的信息,并且可以对用户,策略(policy)进行操作。
- 监控者(monitoring)可登陆管理控制台,同时可以查看rabbitmq节点的相关信息(进程数,内存使用情况,磁盘使用情况等)
- 策略制定者(policymaker)可登陆管理控制台, 同时可以对policy进行管理。但无法查看节点的相关信息(上图红框标识的部分)。
- 普通管理者(management)仅可登陆管理控制台,无法看到节点信息,也无法对策略进行管理。
- 其他无法登陆管理控制台,通常就是普通的生产者和消费者。
Virtual Hosts配置
每个虚拟主机就相当于一个独立的MQ服务器,虚拟主机之间相互隔离。
- 创建虚拟主机,主机名称一般以/开头:

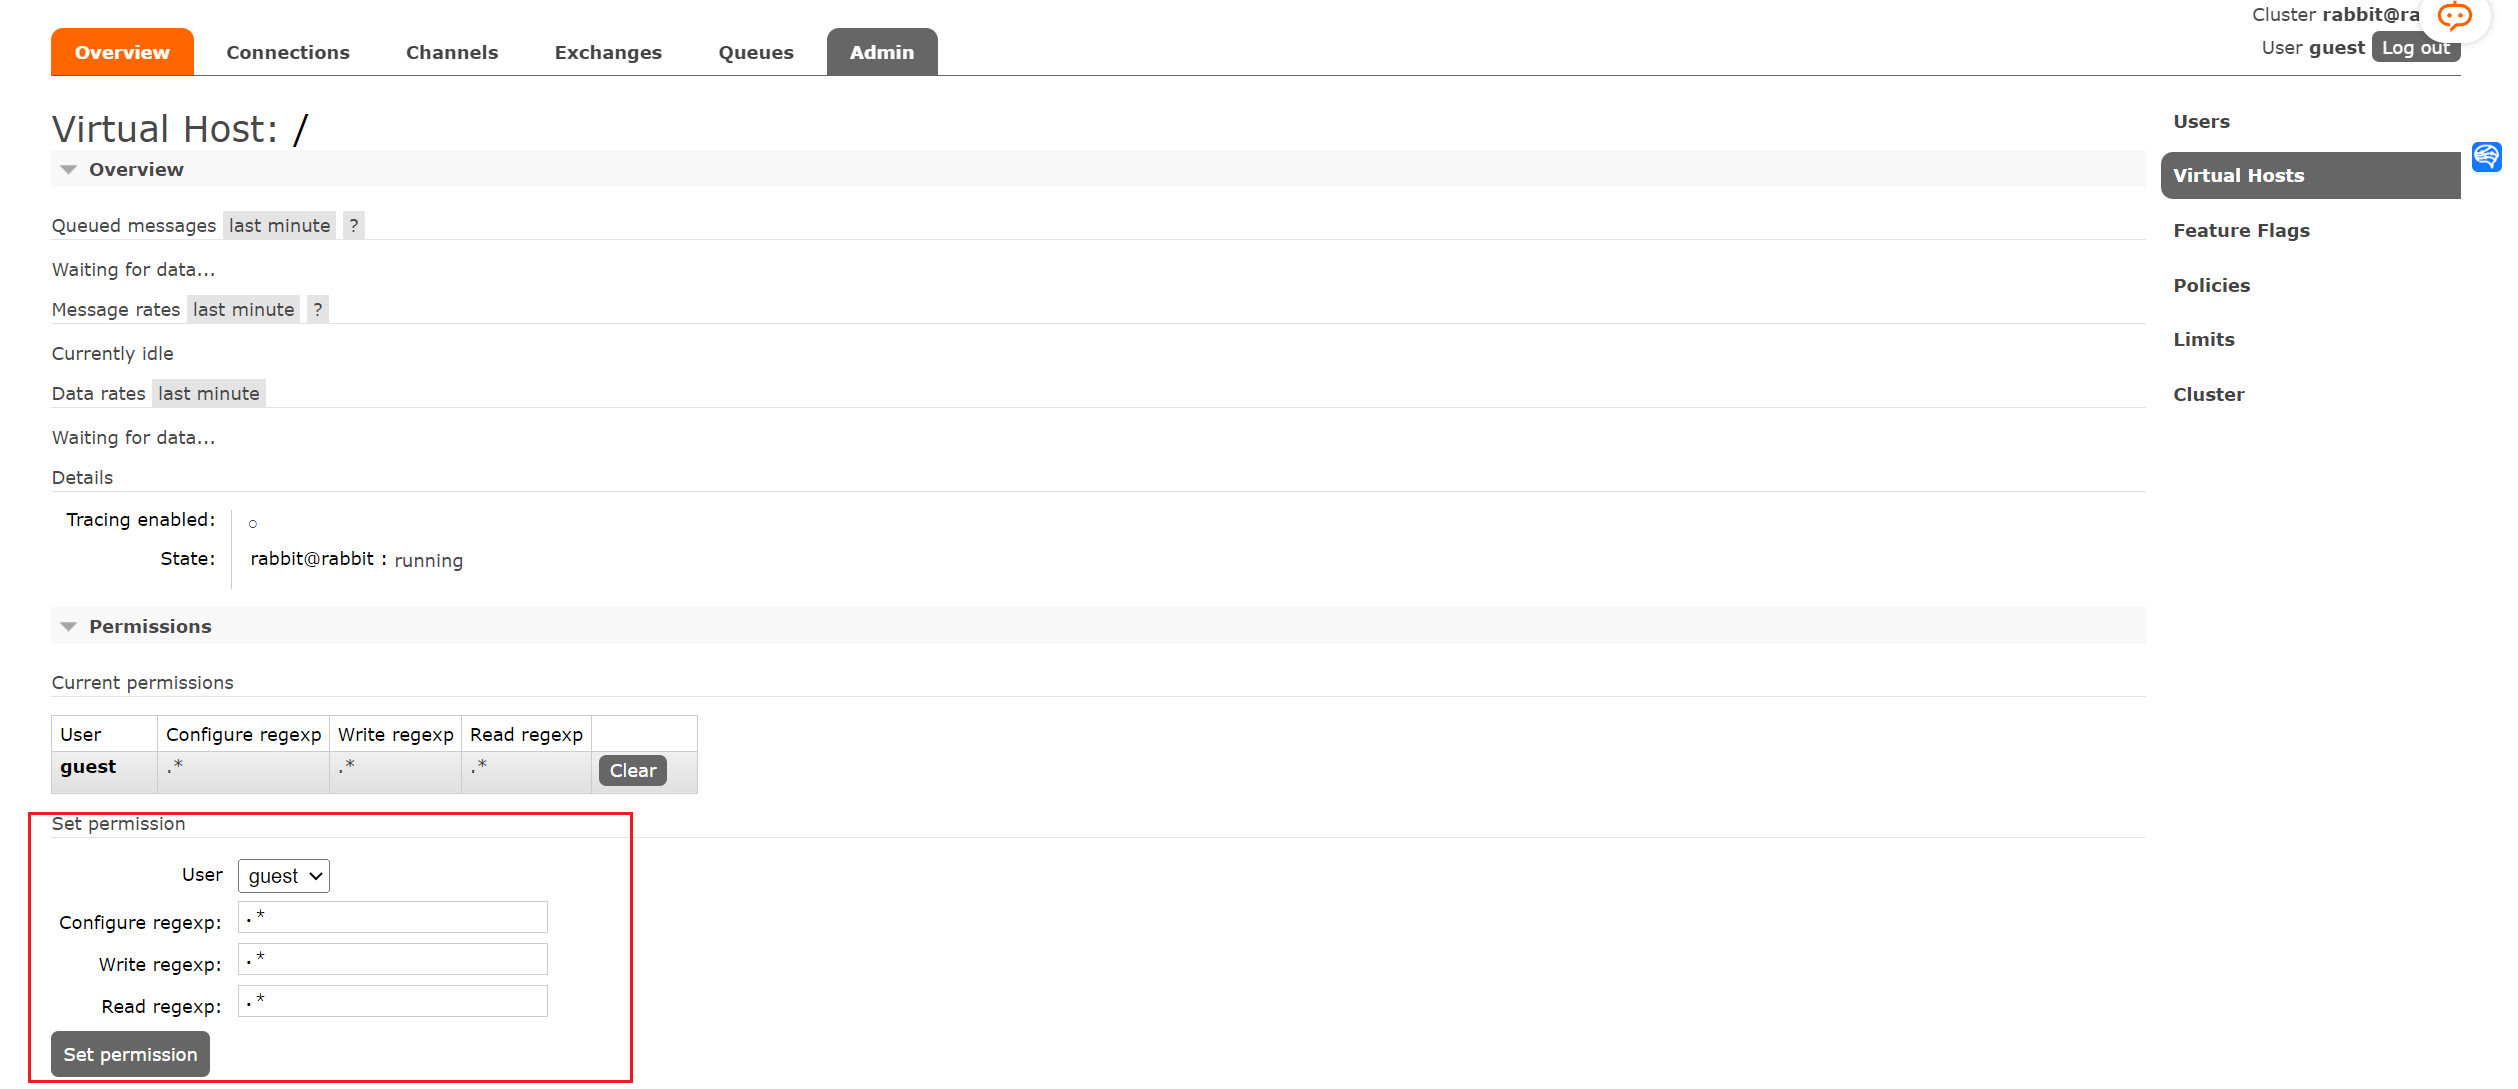
- 权限设置:
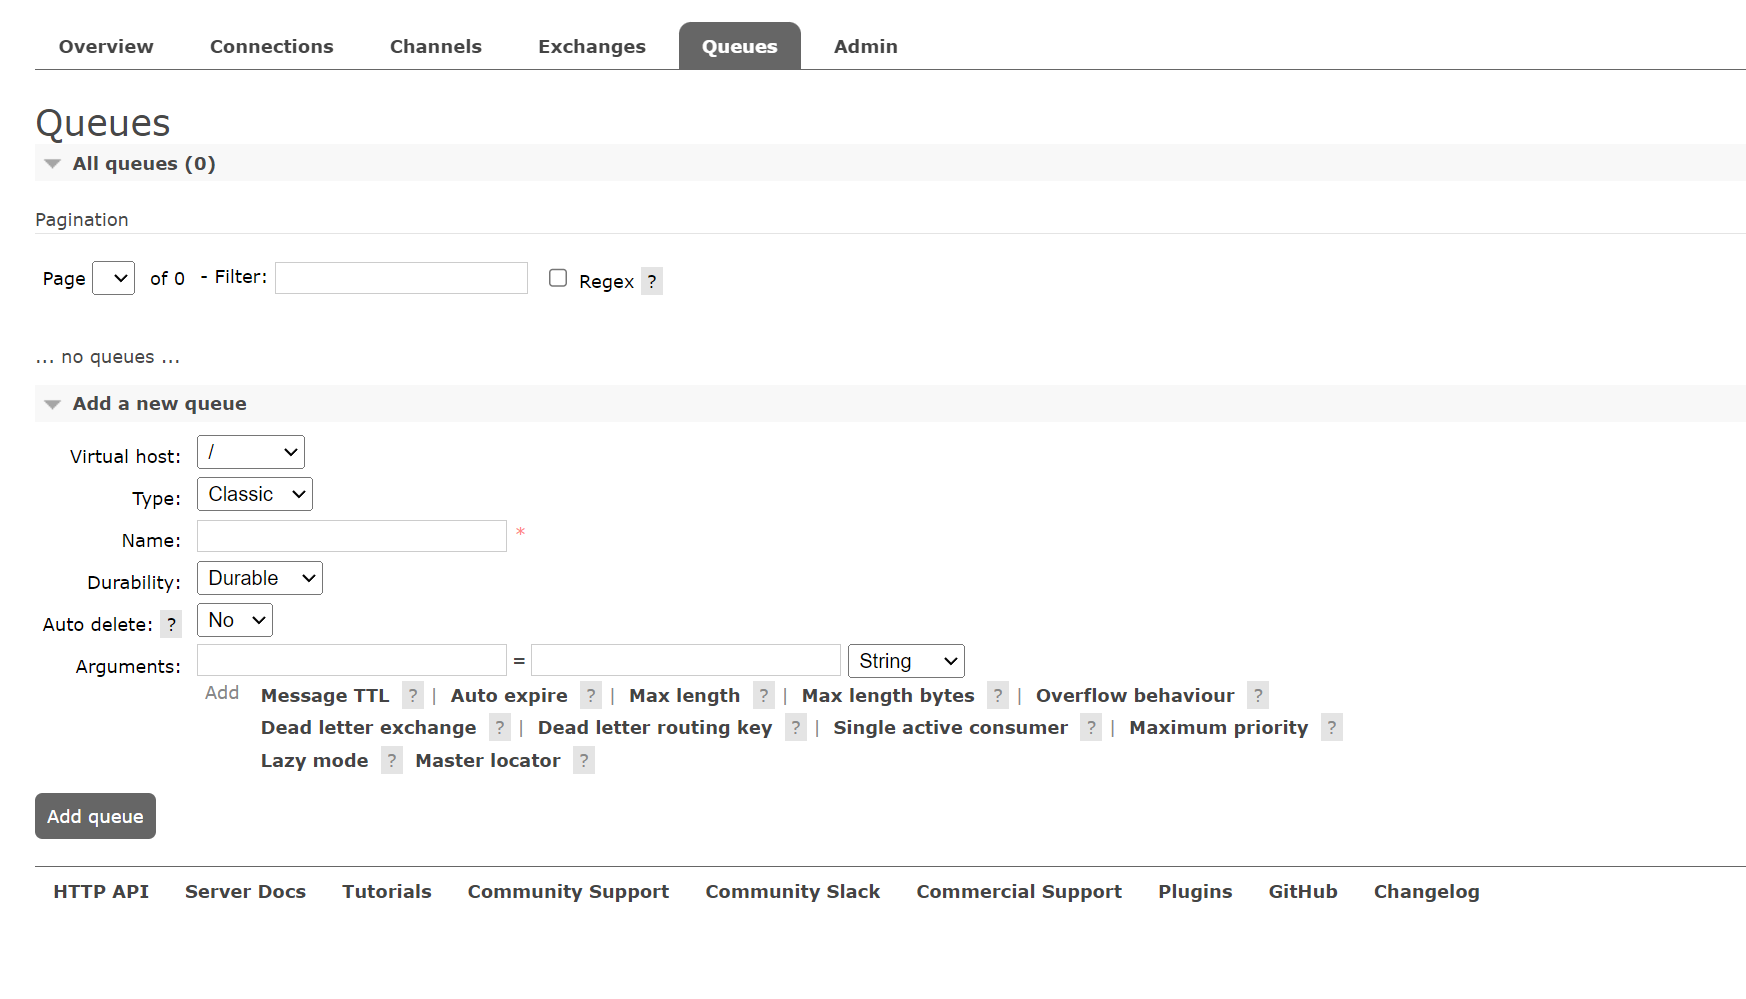
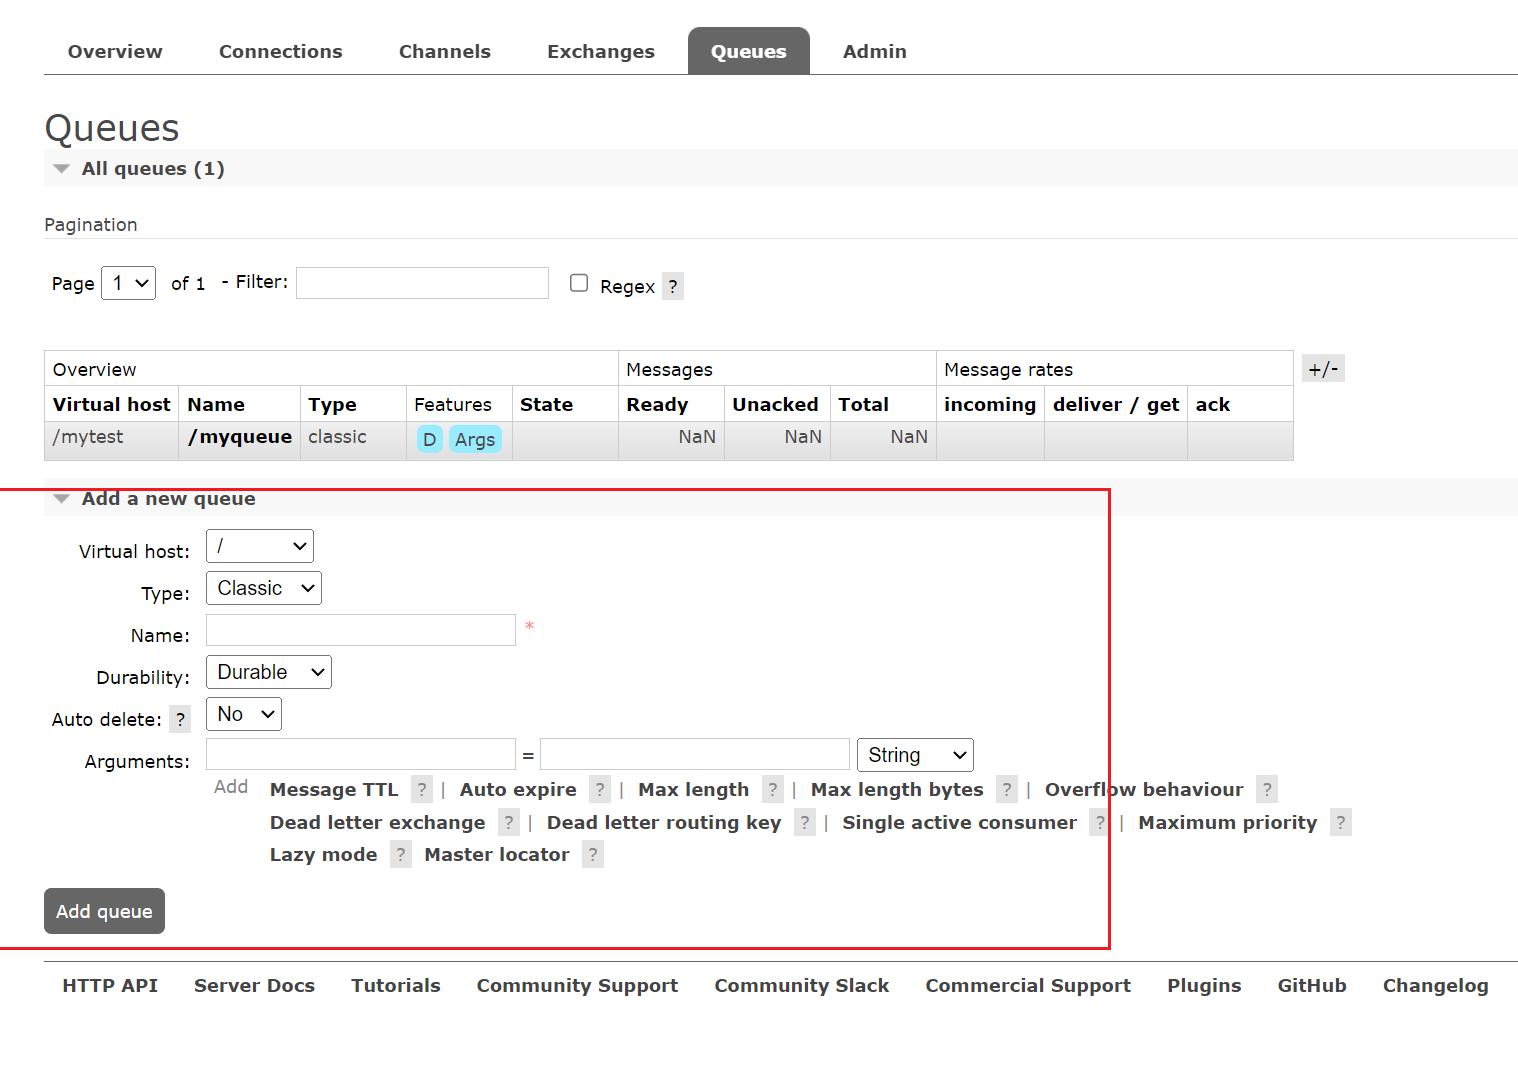
添加队列
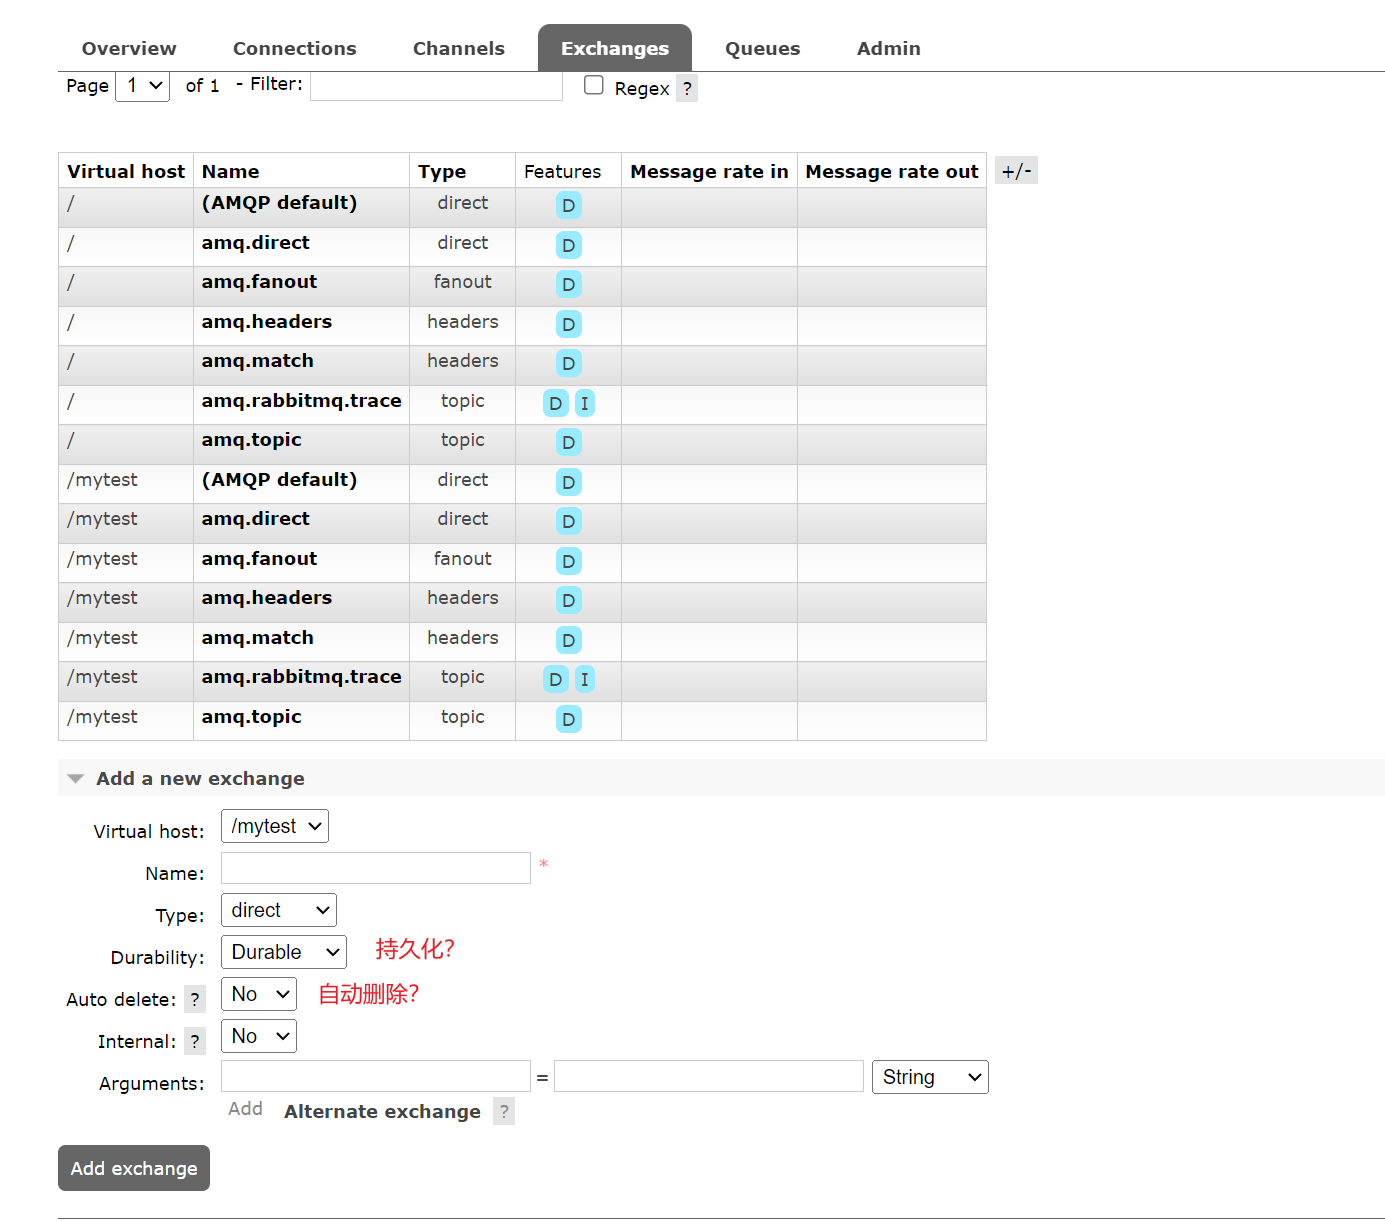
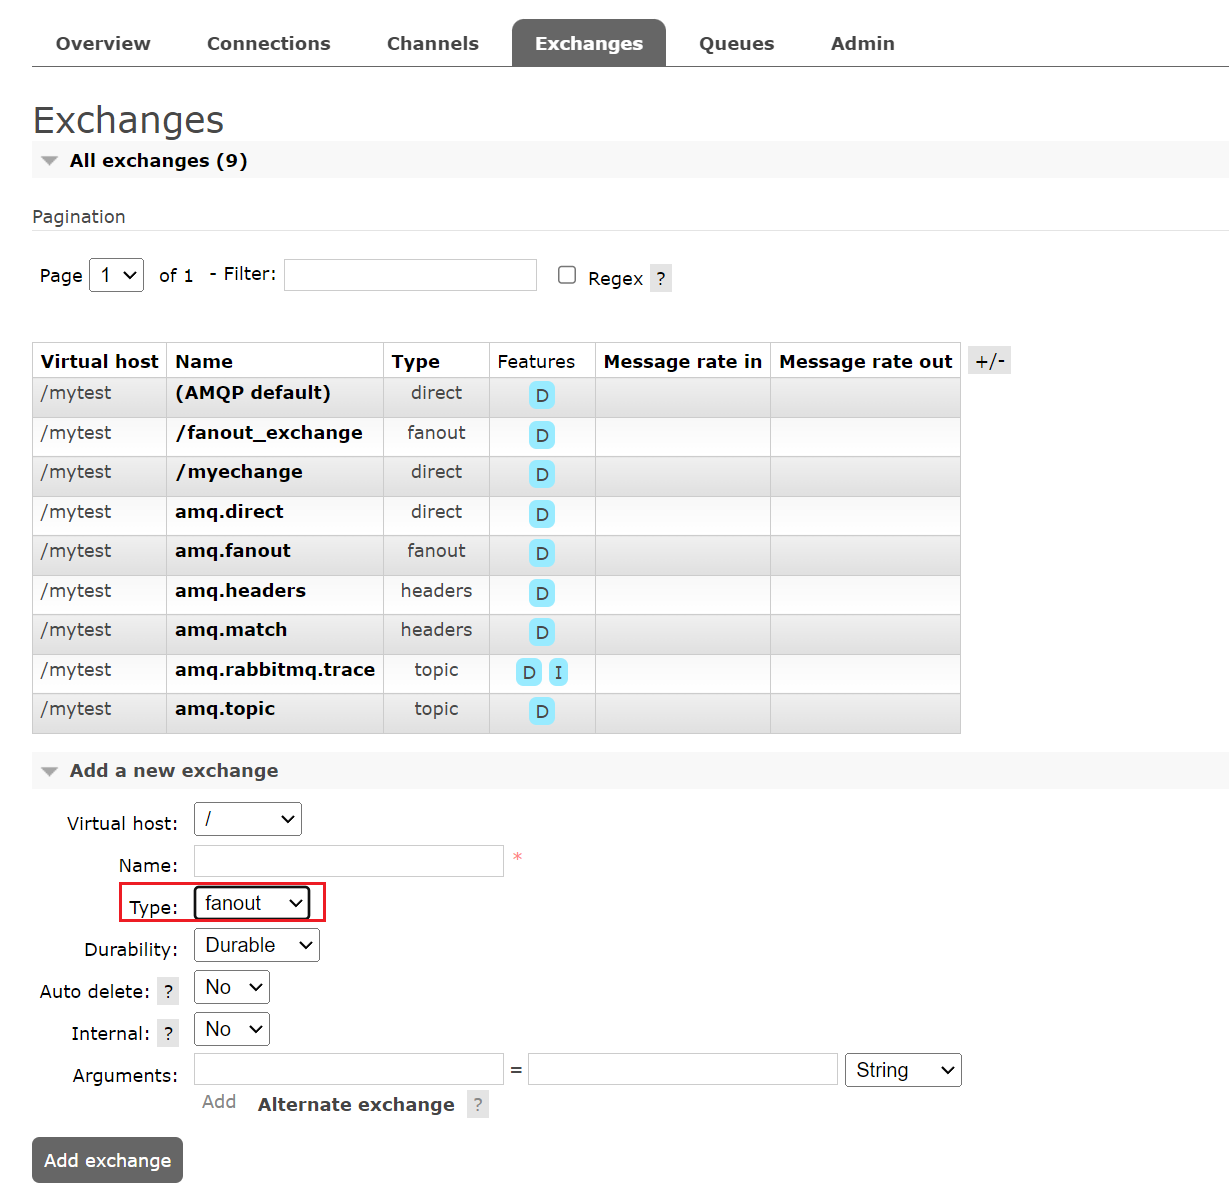
添加交换机
- 添加交换机
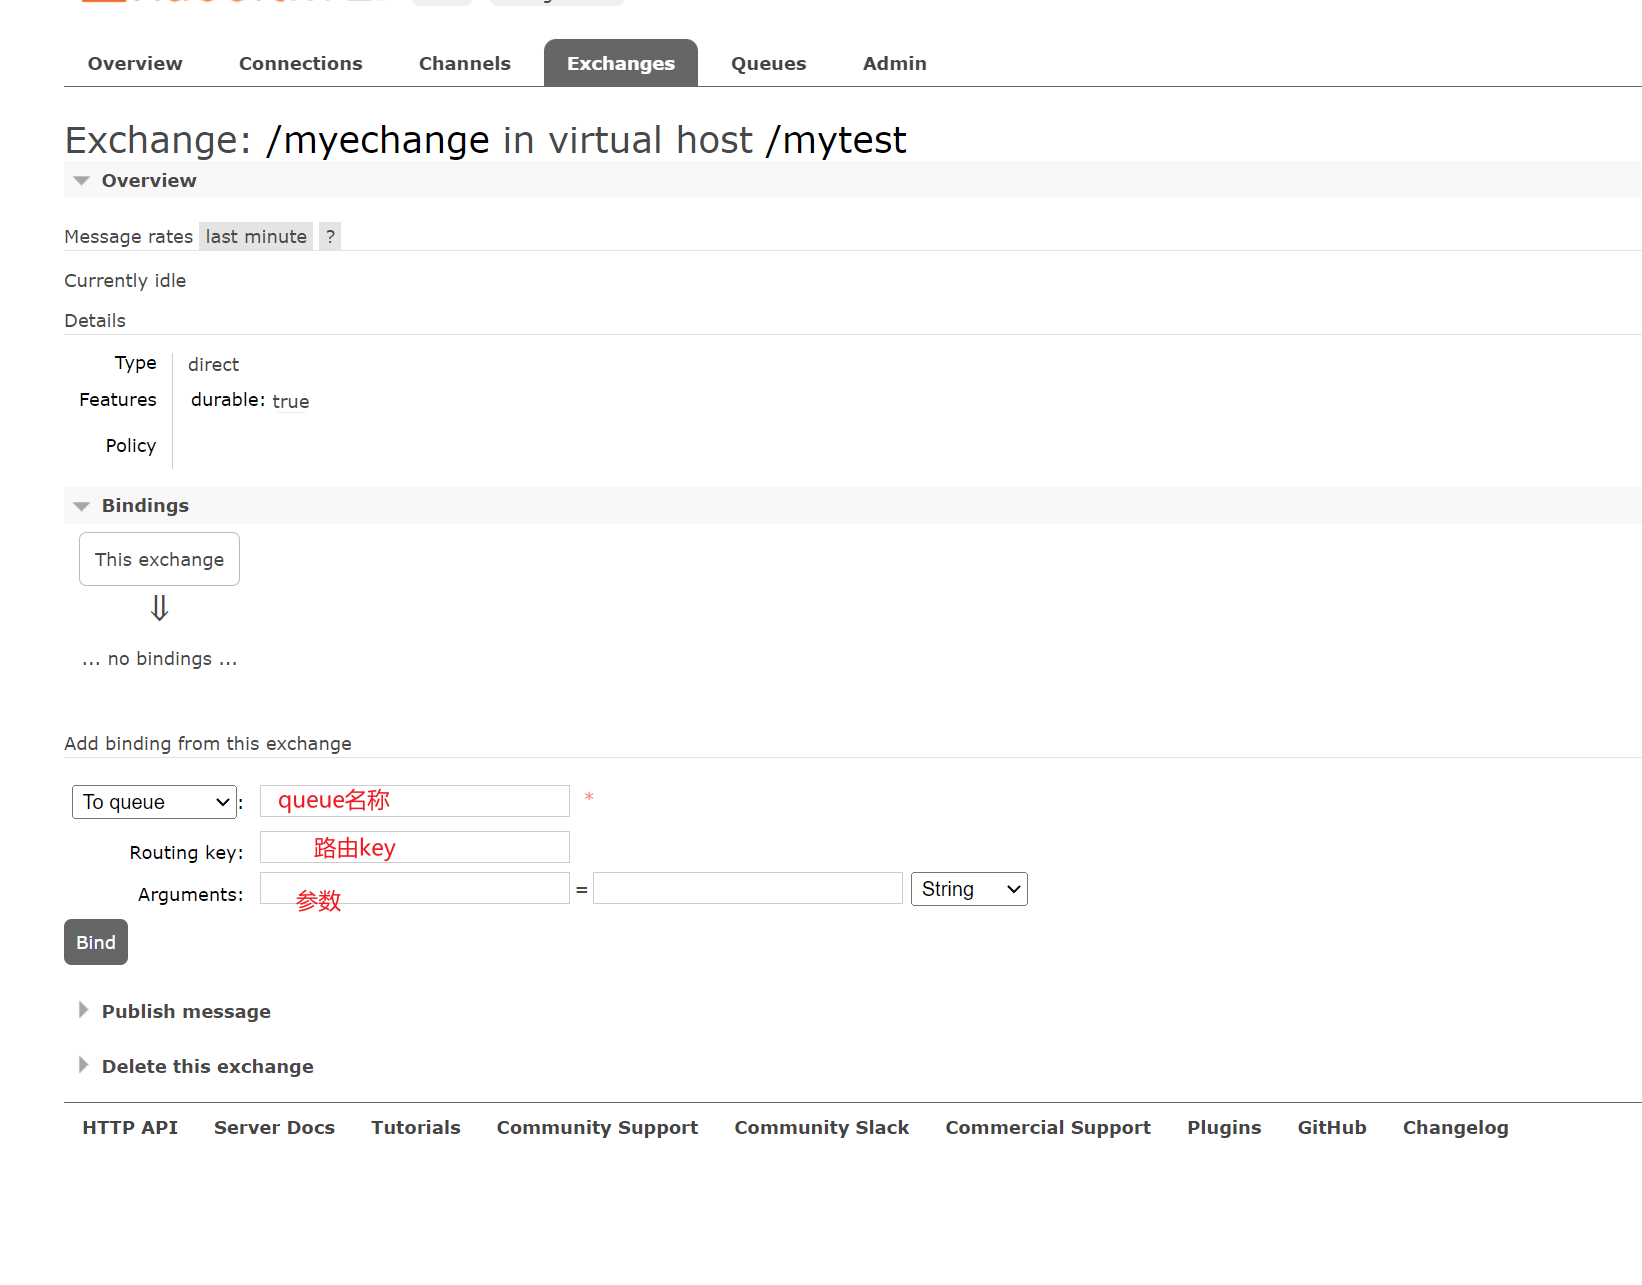
- 绑定Queue
整合SpringBoot
<!--amqp协议的起步依赖坐标--><dependency><groupId>org.springframework.boot</groupId><artifactId>spring-boot-starter-amqp</artifactId></dependency><!--rabbit测试依赖坐标--><dependency><groupId>org.springframework.amqp</groupId><artifactId>spring-rabbit-test</artifactId><scope>test</scope></dependency><!--SpringBoot测试依赖坐标--><dependency><groupId>org.springframework.boot</groupId><artifactId>spring-boot-starter-test</artifactId><scope>test</scope></dependency>
# RabbitMQ 服务host地址
spring.rabbitmq.host=rabbit
# 端口
spring.rabbitmq.port=5672
# 虚拟主机地址
spring.rabbitmq.virtual-host=/mytest
# rabbit服务的用户名
spring.rabbitmq.username=test
# rabbit服务的密码
spring.rabbitmq.password=123456
五种工作模式
1.简单模式

- 先添加一个Queue
- 生产者
@RunWith(SpringRunner.class)
@SpringBootTest(classes = ProducerApplication.class)
public class MQTest {@Autowiredprivate RabbitTemplate rabbitTemplate;@Testpublic void contextLoads() {/*** 参数1:消息队列名称* 参数2:消息内容*/rabbitTemplate.convertAndSend("/myqueue", "hello 小兔子!");}}- 消费者
@Component
@RabbitListener(queues = "/myqueue")
public class SimpleListener {@RabbitHandlerpublic void simpleHandler(String msg){System.out.println("=====接收消息====>"+msg);}
}
2.工作队列模式

相比于简单模式,这个模式下会存在多个消费者。
- 在普通模式基础上,增加订阅者即可:
@Component
@RabbitListener(queues = "/myqueue")
public class SimpleListener2 {@RabbitHandlerpublic void simpleHandler(String msg){System.out.println("=====222接收消息====>"+msg);}
}
- 测试:
@RunWith(SpringRunner.class)
@SpringBootTest(classes = ProducerApplication.class)
public class MQTest {@Autowiredprivate RabbitTemplate rabbitTemplate;@Testpublic void contextLoads() {/*** 参数1:消息队列名称* 参数2:消息内容*/for (int i = 0; i < 10000; i++) {rabbitTemplate.convertAndSend("/myqueue", "hello 小兔子!" + i);}}}
交换机类型

消息将发给交换机,交换机的类型决定了它会怎么处理这个消息:
- Direct(直连交换机):使用消息的 Routing Key 与队列的 Binding Key 进行精确匹配,只有消息的 Routing Key 与队列的 Binding Key 完全相同时,消息才会被路由到该队列。非广播。
- Fanout(扇形交换机):忽略消息的 Routing Key,直接将消息发送到所有与交换机绑定的队列。广播消息。
- Topic(主题交换机):使用通配符匹配的方式将消息路由到多个队列。通配符由字符 “#” 和 “” 组成,其中 “#” 表示匹配零个或多个单词,“” 表示匹配一个单词。支持灵活的消息路由。
- Headers(头交换机):使用消息的 Headers 属性来匹配队列的 Binding Headers,从而确定消息的路由。较少使用,一般情况下使用 Direct、Fanout 或 Topic 类型的交换机就能满足大部分场景。
符号 “#” 匹配一个或多个词,符号""匹配不多不少一个词。因此“audit.#” 能够匹配到“audit.irs.corporate”,但是“audit.” 只会匹配到 “audit.irs”。
总结就是交换机负责消息转发,不进行数据存储,如果没有找到绑定的队列或匹配的队列,消息将会丢失。
3.广播模式
将同一个消息广播到订阅的多个消费者手中。
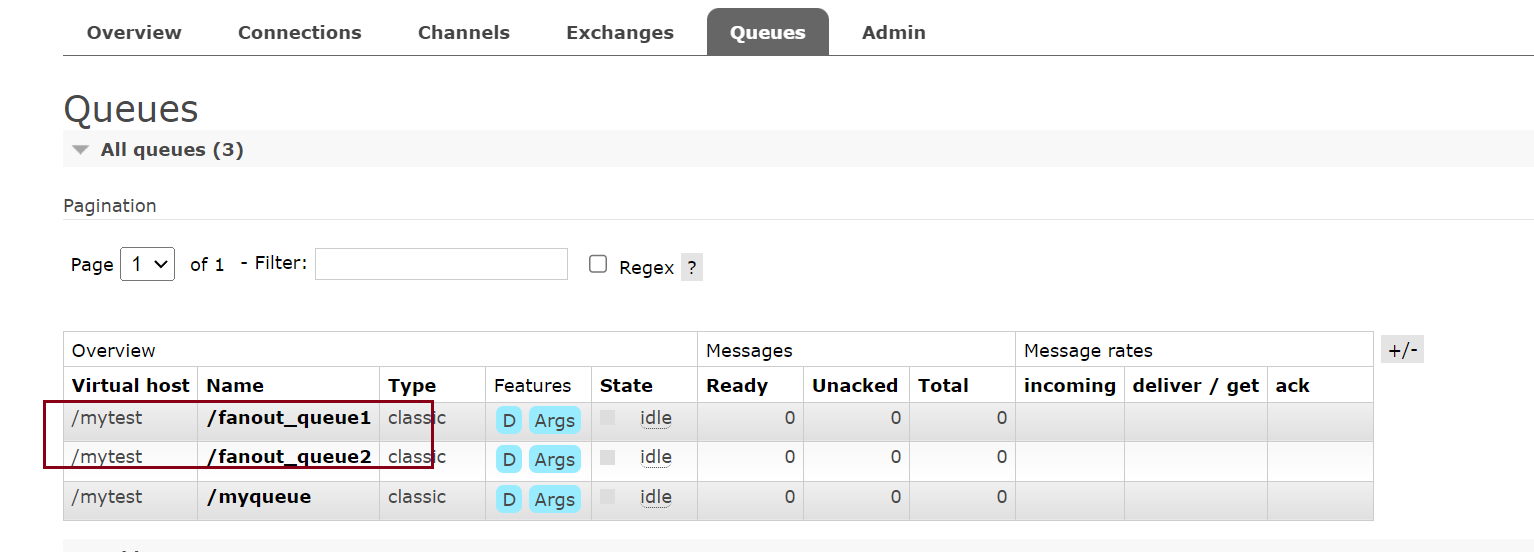
创建队列和交换机
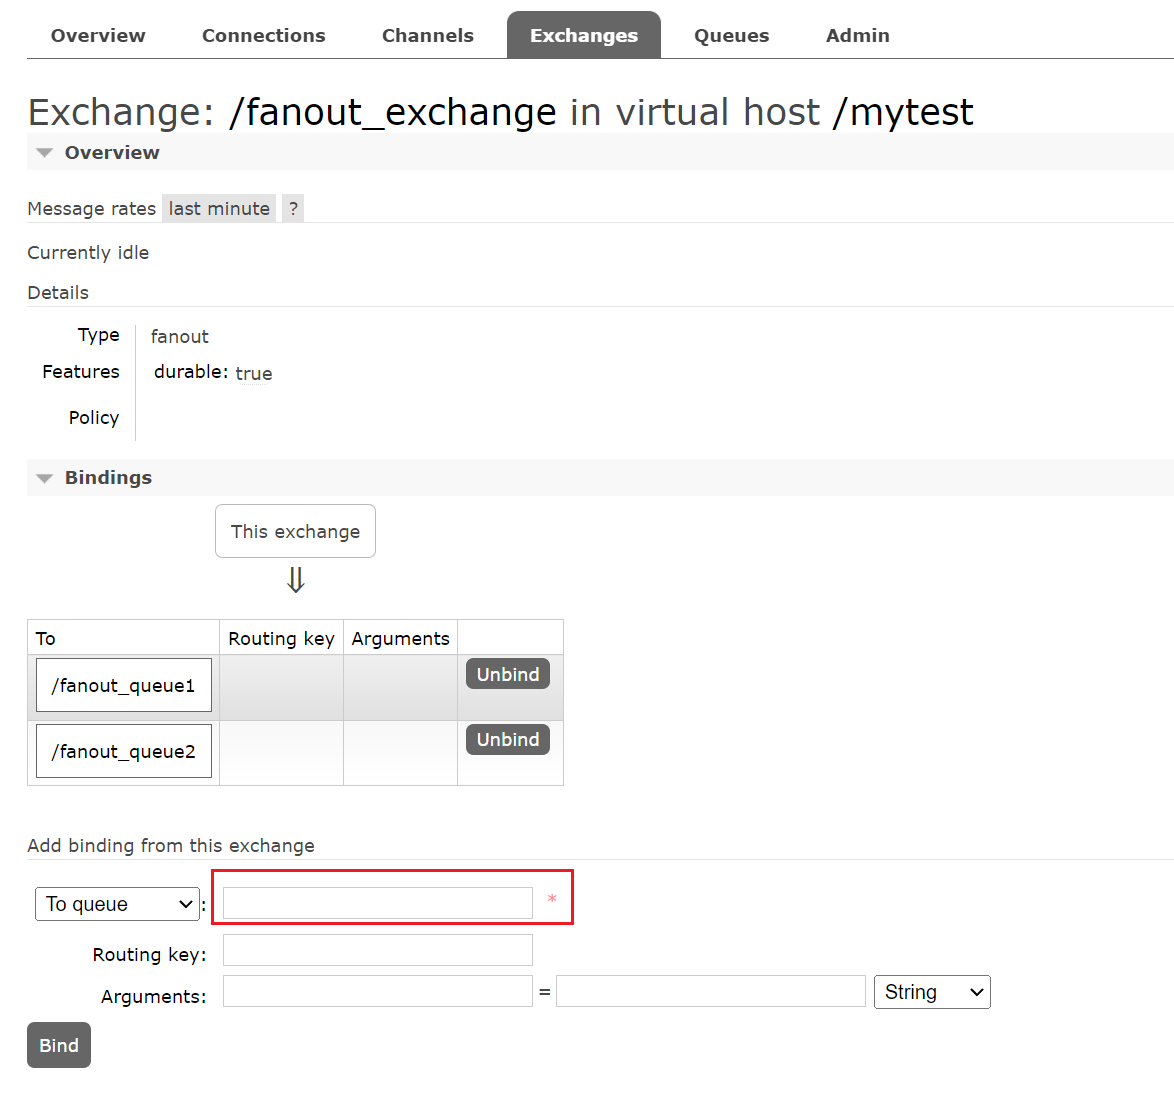
生产者
@RunWith(SpringRunner.class)
@SpringBootTest(classes = ProducerApplication.class)
public class MQSPTest {@Autowiredprivate RabbitTemplate rabbitTemplate;@Testpublic void contextLoads() {/*** 参数1:消息队列名称* 参数2:消息内容*/for (int i = 0; i < 10000; i++) {rabbitTemplate.convertAndSend("/fanout_exchange", null, "hello 小兔子!" + i);}}}
消费者
@Component
@RabbitListener(queues = "/fanout_queue1")
public class SimpleListener_Fanout1 {@RabbitHandlerpublic void simpleHandler(String msg){System.out.println("=====222接收消息====>"+msg);}
}@Component
@RabbitListener(queues = "/fanout_queue2")
public class SimpleListener_Fanout2 {@RabbitHandlerpublic void simpleHandler(String msg){System.out.println("=====3333接收消息====>"+msg);}
}
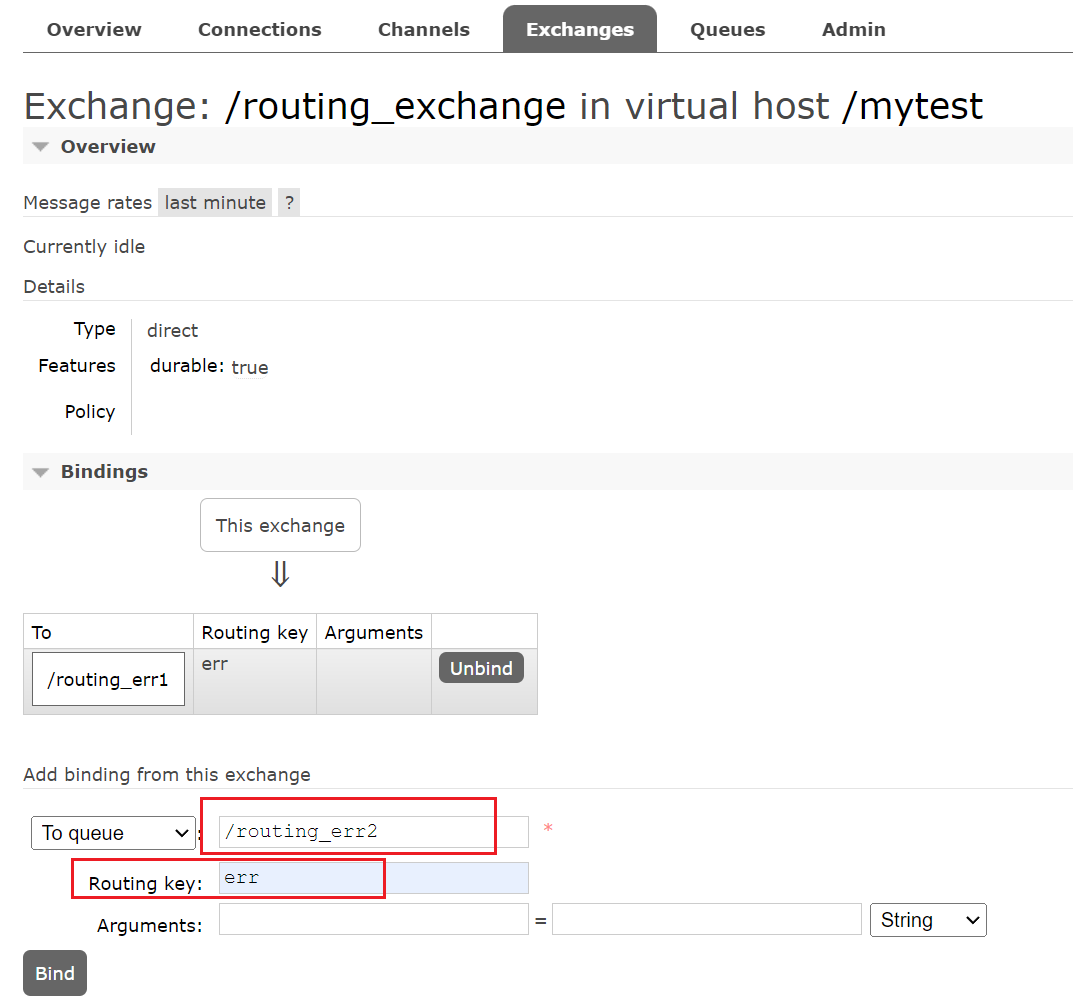
4.路由模式
在将队列绑定到交换机的时候,需要指定路由key;发送消息的时候也要指明路由key。
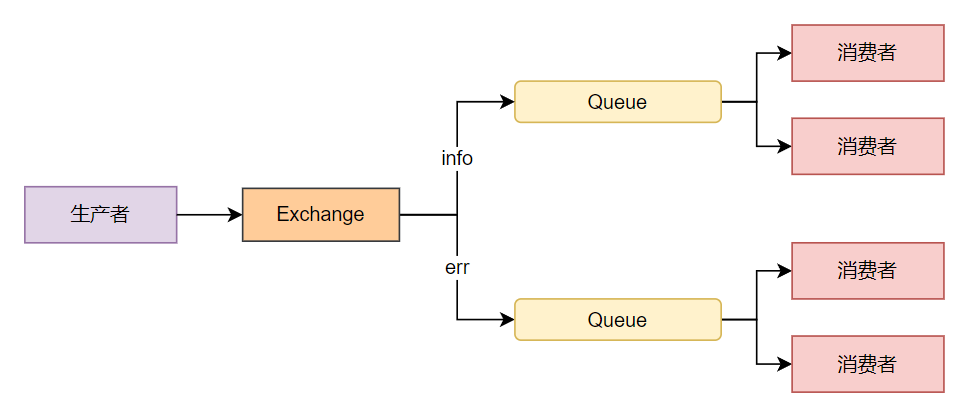
配置交换机
生产者
/*** 路由**/
@RunWith(SpringRunner.class)
@SpringBootTest(classes = ProducerApplication.class)
public class MQRoutingTest {@Autowiredprivate RabbitTemplate rabbitTemplate;@Testpublic void contextLoads() {/*** 参数1:消息队列名称* 参数2:消息内容*/for (int i = 0; i < 10000; i++) {if (i % 2 == 0) {rabbitTemplate.convertAndSend("/routing_exchange", "info", "hello 小兔子!" + i);} else {rabbitTemplate.convertAndSend("/routing_exchange", "err", "hello 小黑子!" + i);}}}}
消费者
@Component
@RabbitListener(queues = "/routing_err1")
public class Routing_Err1 {@RabbitHandlerpublic void simpleHandler(String msg){System.out.println("=====routing_err1接收消息====>"+msg);}
}@Component
@RabbitListener(queues = "/routing_err2")
public class Routing_Err2 {@RabbitHandlerpublic void simpleHandler(String msg){System.out.println("=====routing_err2接收消息====>"+msg);}
}@Component
@RabbitListener(queues = "/routing_info1")
public class Routing_info1 {@RabbitHandlerpublic void simpleHandler(String msg){System.out.println("=====routing_info1接收消息====>"+msg);}
}
5.主题模式(通配符)
#:匹配零个或多个。
*:匹配一个。
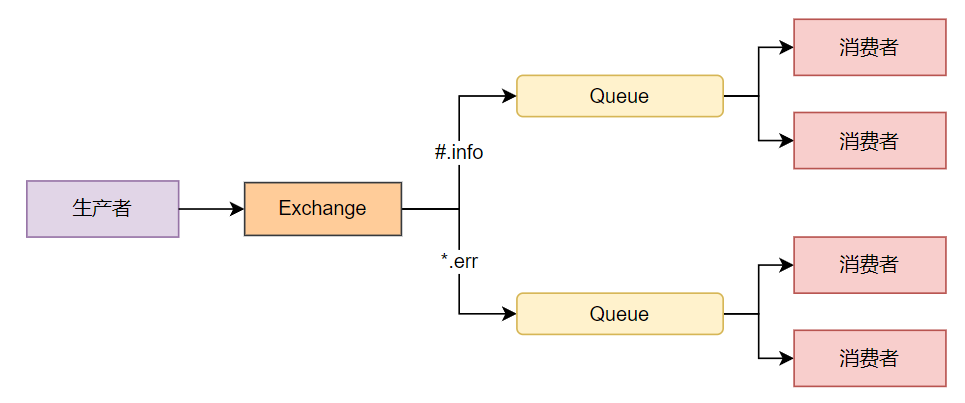
配置
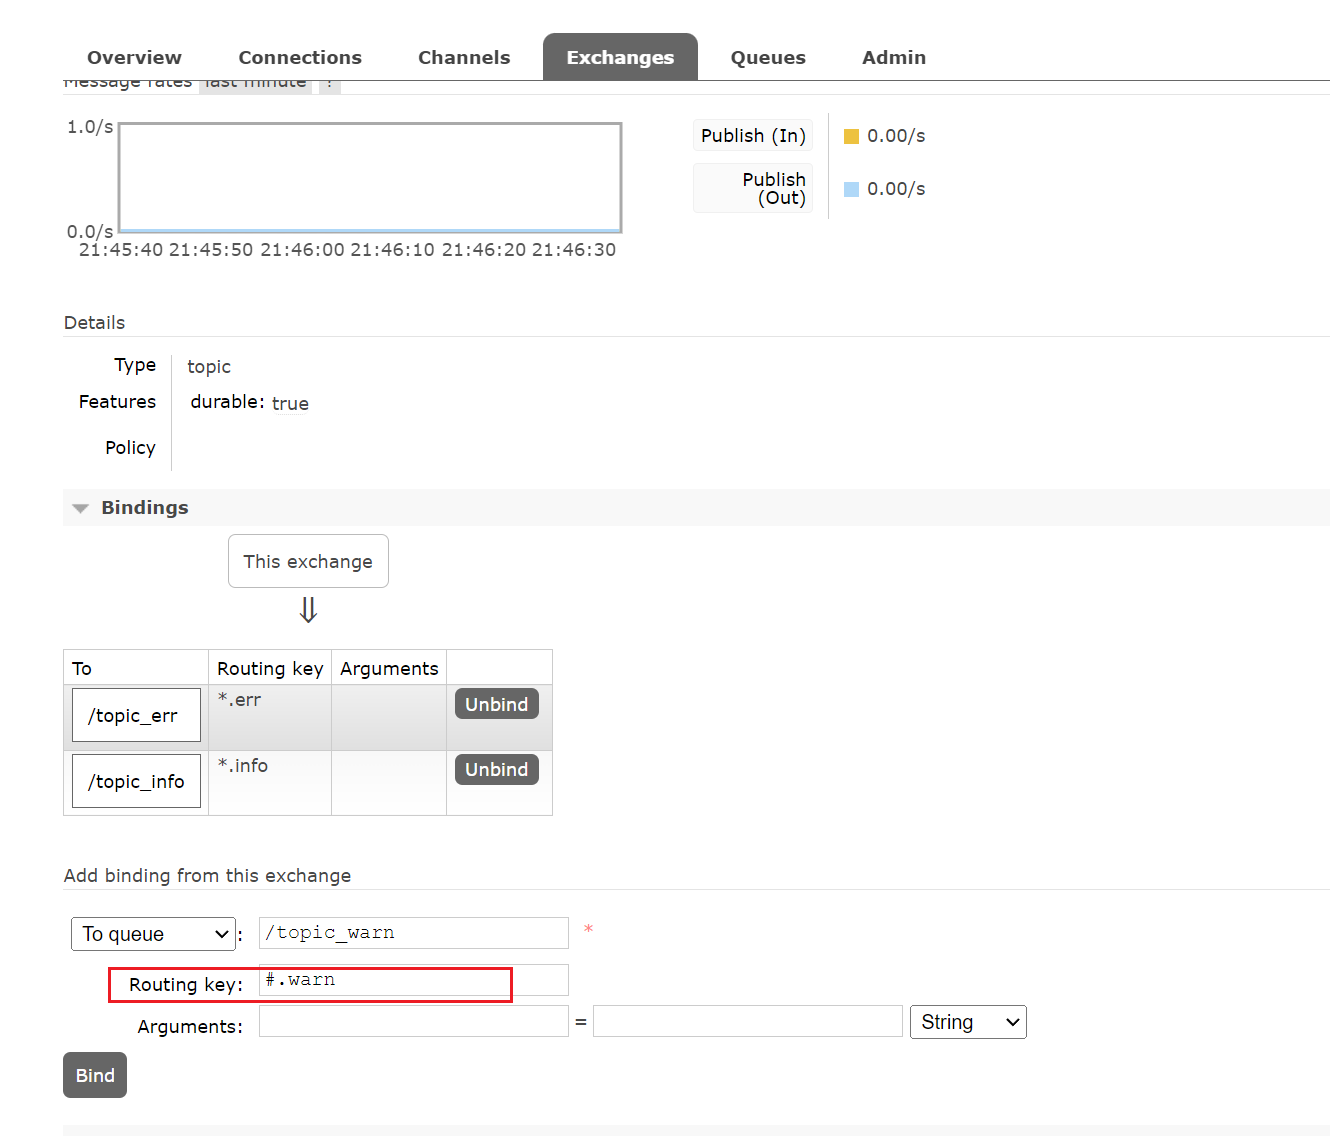
生产者
/*** topc**/
@RunWith(SpringRunner.class)
@SpringBootTest(classes = ProducerApplication.class)
public class MQTopicTest {@Autowiredprivate RabbitTemplate rabbitTemplate;@Testpublic void contextLoads() {/*** 参数1:消息队列名称* 参数2:消息内容*/for (int i = 0; i < 10000; i++) {if (i % 2 == 0) {rabbitTemplate.convertAndSend("/topic_exchange", "test.info", "hello 小兔子!" + i);} else {rabbitTemplate.convertAndSend("/topic_exchange", "test.err", "hello 小黑子!" + i);}rabbitTemplate.convertAndSend("/topic_exchange", "my.test.warn", "hello 小白子!" + i);}}}
消费者
@Component
@RabbitListener(queues = "/topic_info")
public class Topic1 {@RabbitHandlerpublic void simpleHandler(String msg){System.out.println("=====topic_info接收消息====>"+msg);}
}@Component
@RabbitListener(queues = "/topic_err")
public class Topic2 {@RabbitHandlerpublic void simpleHandler(String msg){System.out.println("=====topic_err接收消息====>"+msg);}
}@Component
@RabbitListener(queues = "/topic_warn")
public class Topic3 {@RabbitHandlerpublic void simpleHandler(String msg){System.out.println("=====topic_warn接收消息====>"+msg);}
}
工作模式总结
- 简单模式:一个生产者和一个消费者,无需交换机。
- 工作队列模式:一个生产者,多个消费者(竞争消息),无需交换机。
- 发布订阅模式:fanout类型的交换机。消费广播到每个绑定的queue中。
- 路由模式:direct类型的交换机。消息发送到路由key精确匹配的队列中。
- 通配符模式:topic类型的交换机。消息发送到通配符匹配的路由key的队列中。
高级特性
生产者确认
rabbitmq提供了两种方式来保证投递的可靠性:
- confirm 确认模式:消息发到交换机,不管是否成功,都回调confirmCallback。
- return 退回模式:投递失败会回调returnCallback。
配置
spring:rabbitmq:password: 123456username: testvirtualHost: /mytestport: 5672host: rabbitpublisherReturns: truepublisherConfirmType: SIMPLE案例
@Slf4j
public class RabbitConfirmCallback implements RabbitTemplate.ConfirmCallback{@Overridepublic void confirm(CorrelationData correlationData, boolean ack, String cause) {if (ack) {log.info("消息发送到exchange成功");} else {log.info("消息发送到exchange失败");}}
}@Slf4j
public class RabbitReturnCallback implements RabbitTemplate.ReturnsCallback {@Overridepublic void returnedMessage(ReturnedMessage returnedMessage) {log.info("消息发送失败:{}", returnedMessage.getMessage());}
}@Configuration
public class RabbitCallBackConfig {@Resourceprivate RabbitTemplate rabbitTemplate;@PostConstructpublic void initRabbitTemplate(){rabbitTemplate.setConfirmCallback(new RabbitConfirmCallback());rabbitTemplate.setReturnsCallback(new RabbitReturnCallback());}}@RestController
public class TestController {@Resourceprivate RabbitTemplate rabbitTemplate;@GetMapping("confirmCallBack")public String confirmCallBack() {for (int i = 0; i < 10000; i++) {rabbitTemplate.convertAndSend("/routing_exchange", "err", "hello 小黑子!" + i);}return "ok";}@GetMapping("returnCallBack")public String returnCallBack() {for (int i = 0; i < 10000; i++) {// 不存在的routingkeyrabbitTemplate.convertAndSend("/routing_exchange", "err2", "hello 小黑子!" + i);}return "ok";}}
消费者确认
消费者消息确认有三种类型:
- 无确认:none。收到生产者的消息之后,直接ACK。
- 手动确认:manual。消费者需要显式的告诉RabbitMQ消息已经确认。手动确认更安全。
- 自动确认:auto。客户端收到消息之后,mq自动ACK。
为什么手动确认更安全?
消费者处理消息失败时,可以重新处理消息。其它优势:1.消费者可以根据处理能力控制消费速率;2.批量确认多个信息。
import com.rabbitmq.client.Channel;
import org.springframework.amqp.core.Message;
import org.springframework.amqp.core.MessageProperties;
import org.springframework.amqp.rabbit.listener.api.ChannelAwareMessageListener;
import org.springframework.stereotype.Component;import java.util.concurrent.atomic.AtomicInteger;/*** 自定义监听器,监听到消息之后,立即执行onMessage方法*/
@Component
public class CustomAckConsumerListener implements ChannelAwareMessageListener {private static final AtomicInteger errCount = new AtomicInteger();/*** 监听到消息之后执行的方法** @param message 消息内容* @param channel 消息所在频道*/@Overridepublic void onMessage(Message message, Channel channel) throws Exception {//获取消息内容byte[] messageBody = message.getBody();String msg = new String(messageBody, "UTF-8");System.out.println("接收到消息,执行具体业务逻辑{} 消息内容:" + msg);//获取投递标签MessageProperties messageProperties =message.getMessageProperties();long deliveryTag = messageProperties.getDeliveryTag();// 模拟业务错误if(errCount.getAndIncrement() % 2 == 0) {System.out.println("业务报错,重回队列");channel.basicNack(deliveryTag, false, true);return;}// 签收消息,前提条件,必须在监听器的配置中,开启手动签收模式// 参数1:消息投递标签// 数2:是否批量签收:true一次性签收所有,false,只签收当前消息channel.basicAck(deliveryTag, false);System.out.println("手动签收完成:{}");}
}
import cn.lsj.consumer.listener.CustomAckConsumerListener;
import org.springframework.amqp.core.AcknowledgeMode;
import org.springframework.amqp.rabbit.connection.ConnectionFactory;
import org.springframework.amqp.rabbit.listener.SimpleMessageListenerContainer;
import org.springframework.amqp.rabbit.listener.adapter.MessageListenerAdapter;
import org.springframework.context.annotation.Bean;
import org.springframework.context.annotation.Configuration;@Configuration
public class ListenerConfiguration {/*** 注入消息监听器适配器** @param customAckConsumerListener 自定义监听器对象*/@Beanpublic MessageListenerAdapter messageListenerAdapter(CustomAckConsumerListener customAckConsumerListener) {//创建自定义监听器适配器对象return new MessageListenerAdapter(customAckConsumerListener);}/*** 注入消息监听器容器** @param connectionFactory      连接工厂* @param messageListenerAdapter 自定义的消息监听器适配器*/@Beanpublic SimpleMessageListenerContainer simpleMessageListenerContainer(ConnectionFactory connectionFactory, MessageListenerAdapter messageListenerAdapter) {//简单的消息监听器容器对象SimpleMessageListenerContainer container = new SimpleMessageListenerContainer();//绑定消息队列container.setQueueNames("/routing_err3");//设置连接工厂对象container.setConnectionFactory(connectionFactory);//设置消息监听器适配器container.setMessageListener(messageListenerAdapter);//设置手动确认消息:NONE(不确认消息),MANUAL(手动确认消息),AUTO(自 动确认消息)container.setAcknowledgeMode(AcknowledgeMode.MANUAL);return container;}}
消费端限流
应用场景:
- 宕机恢复之后处理大量的积压消息导致业务系统再次崩溃。
- 短时间大量请求来到,业务系统不支持同时处理那么多的消息。
要求:必须为手动确认消息。
package cn.lsj.consumer.config;import cn.lsj.consumer.listener.CustomAckConsumerListener;
import org.springframework.amqp.core.AcknowledgeMode;
import org.springframework.amqp.rabbit.connection.ConnectionFactory;
import org.springframework.amqp.rabbit.listener.SimpleMessageListenerContainer;
import org.springframework.amqp.rabbit.listener.adapter.MessageListenerAdapter;
import org.springframework.context.annotation.Bean;
import org.springframework.context.annotation.Configuration;@Configuration
public class ListenerConfiguration {/*** 注入消息监听器适配器** @param customAckConsumerListener 自定义监听器对象*/@Beanpublic MessageListenerAdapter messageListenerAdapter(CustomAckConsumerListener customAckConsumerListener) {//创建自定义监听器适配器对象return new MessageListenerAdapter(customAckConsumerListener);}/*** 注入消息监听器容器** @param connectionFactory      连接工厂* @param messageListenerAdapter 自定义的消息监听器适配器*/@Beanpublic SimpleMessageListenerContainer simpleMessageListenerContainer(ConnectionFactory connectionFactory, MessageListenerAdapter messageListenerAdapter) {//简单的消息监听器容器对象SimpleMessageListenerContainer container = new SimpleMessageListenerContainer();//绑定消息队列container.setQueueNames("/routing_err3");//设置连接工厂对象container.setConnectionFactory(connectionFactory);//设置消息监听器适配器container.setMessageListener(messageListenerAdapter);//设置手动确认消息:NONE(不确认消息),MANUAL(手动确认消息),AUTO(自 动确认消息)container.setAcknowledgeMode(AcknowledgeMode.MANUAL);//设置消费端限流,每次拉取消息多少条,默认是250条container.setPrefetchCount(1);return container;}}
TTL(消息存活时间)
消息过期时间到未被消费则被自动清楚。
可以针对消息设置,也可以针对队列设置。
消息过期时间
rabbitTemplate.convertAndSend("/routing_exchange", "err", "hello 小黑子!" + count.getAndIncrement(), m -> {// 10秒m.getMessageProperties().setExpiration(String.valueOf(10000L));return m;
});
队列过期时间
参数message-TTL ,单位毫秒,在创建队列的时候添加。
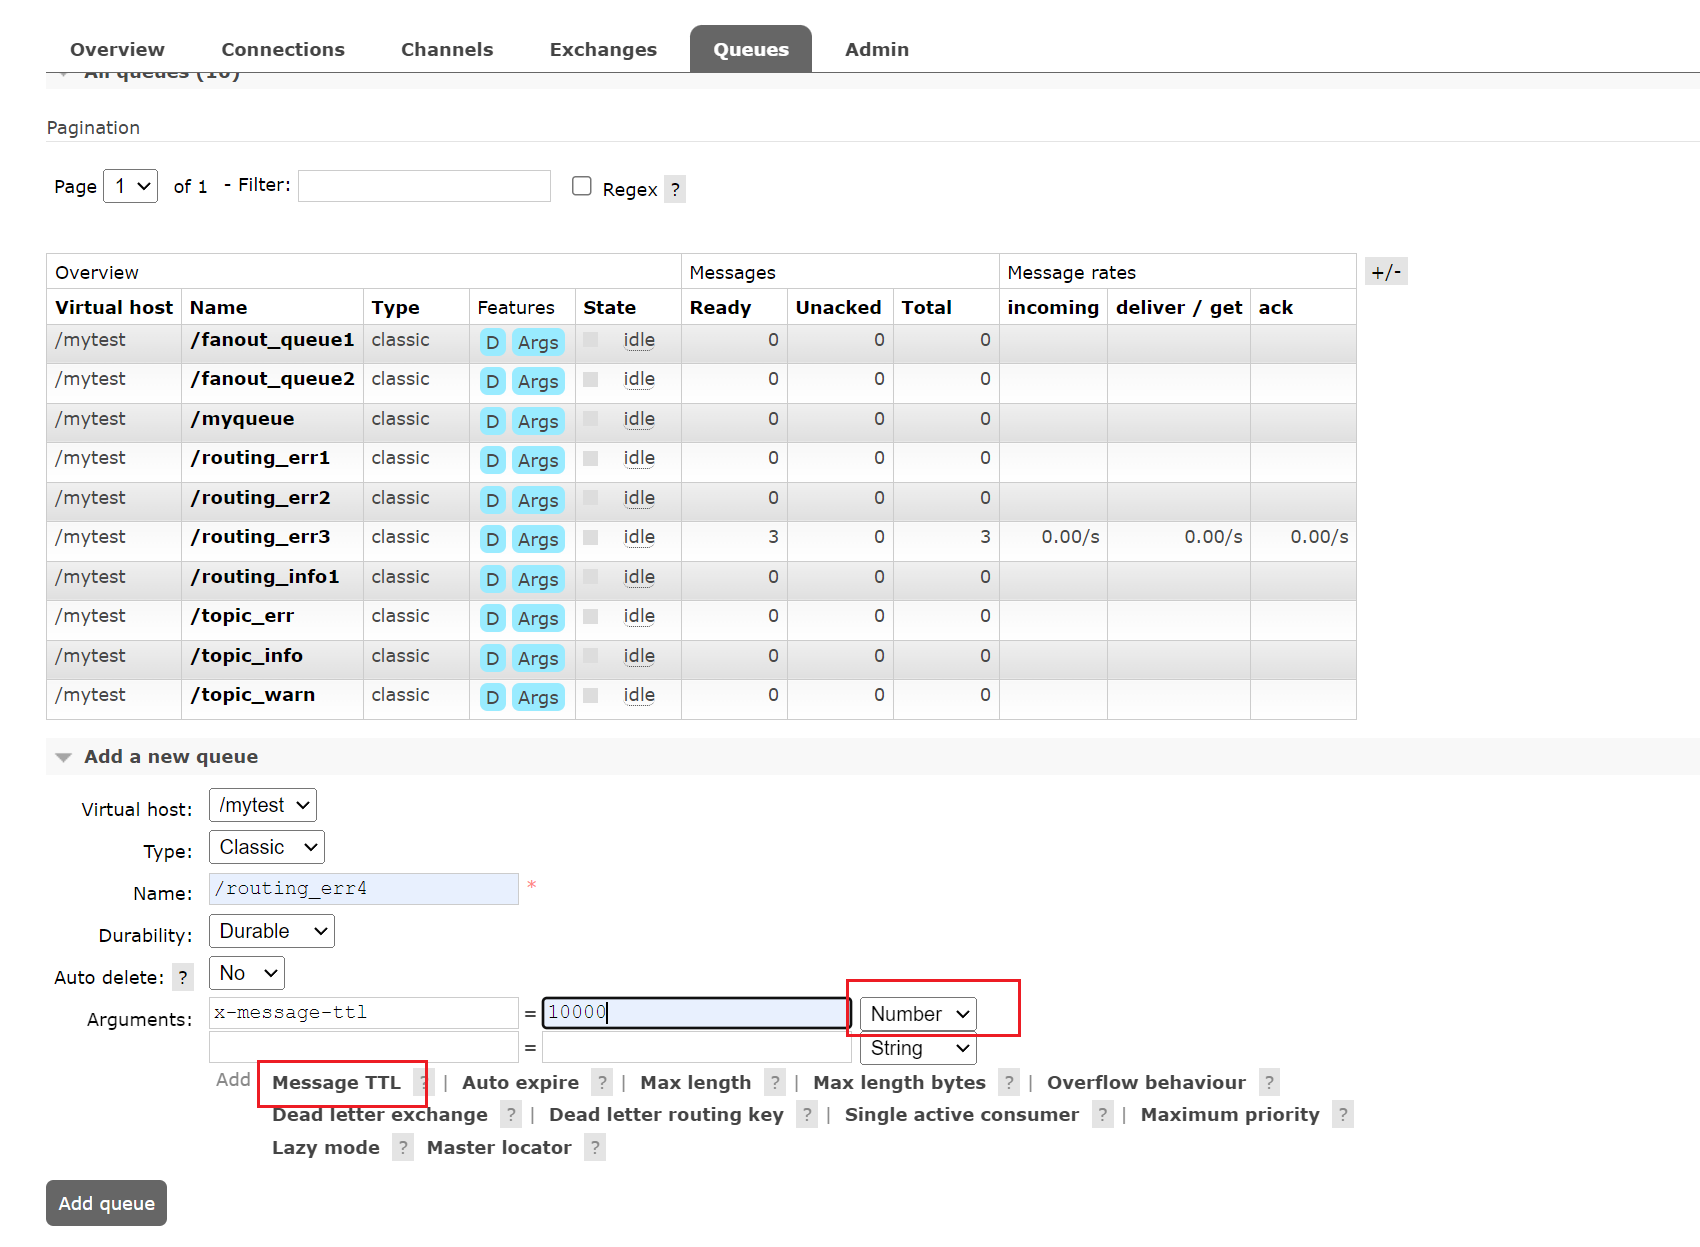
注意点
- 消息过期的优先级高于队列;
- 即使消息已经过期,也要等到前面的消费被消费或删除才进一步处理,所以要注意消息堆积的情况。
死信队列
是什么
当消息过期未消费;当消费者拒接消息且不放回源队列;当队列队列达到最大限度时。
以上三个场景,导致了Dead message(死消息)的产生。

如何设置死信队列
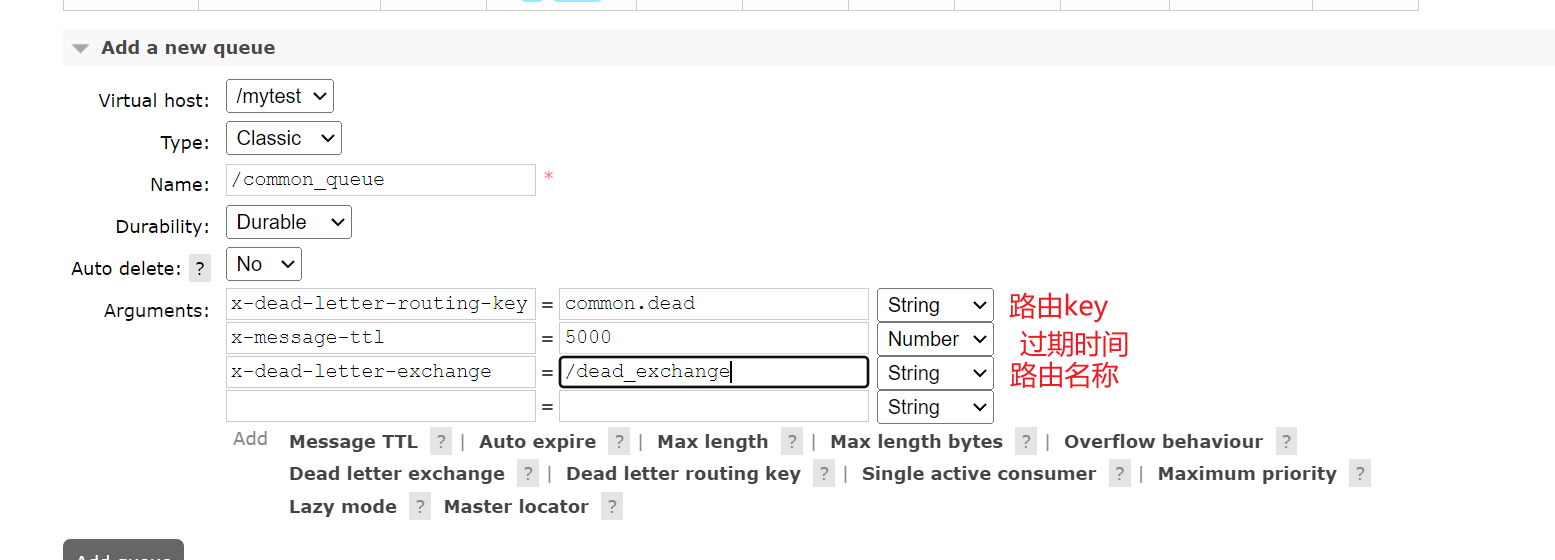
延迟队列
是什么
消息到达队列之后,不会马上被消费,而是等待一段时间之后才会被消费。
应用场景
- 定时任务;
- 订单超时;
- 定时通知;
- 消息重试\错误重试:消息放入延迟队列,过一段时间重试;
如何实现?
死信队列配合过期队列实现延迟队列。
如下图,我们不设置过期队列的消费者,让消息过期之后进入死信队列,达到延迟效果。

