目录
一、简介
二、高可用集群架构说明
三、部署环境说明
四、高可用集群搭建
(1)、初始化所有节点
(2)、修改host文件
(3)、调整内核参数
(4)、所有节点安装Docker
(4-1)、配置 docker 的阿里 yum 源
(4-2)、yum 安装 docker
(4-3)、配置 docker 的镜像源
(4-4)、启动 docker
(5)、所有节点配置K8S源
(6)、所有节点安装kubeadm,kubelet和kubectl
(7)、所有master 节点安装keepalived
(7-1)、安装keepalived
(7-2)、配置keepalived
(7-3)、启动、检查keepalived
(8)、所有master 节点安装haproxy
(8-1)、安装haproxy
(8-2)、配置haproxy
(8-3)、启动和检查haproxy
(9)、安装、初始化master
(9-1)、创建kubeadm配置文件
(9-2)、初始化master节点
(9-3)、按照提示配置环境变量
(9-4)、查看集群状态
(10)、安装集群网络组件
(11)、其他节点加入集群
(11-1)、k8s-master-02加入集群
(11-1-1)、复制密钥及相关文件
(11-1-2)、master加入集群
(11-1-3)、检查集群及pod状态
(11-2)、k8s-node-01、k8s-node-02 加入集群
(11-2-1)、node加入集群
(11-2-2)、检查集群及pod状态
(12)、测试 kubernetes 集群
一、简介
前面我们介绍了使用kubeadm搭建k8s集群,当时只使用了一个master节点,其实是不满足k8s高可用的。因为当master节点发生宕机时,通过node节点将无法继续访问,所以整个集群将无法正常提供服务。
本篇文章,我们将使用kubeadm,配合keepalived、haproxy来实现k8s集群的高可用。
二、高可用集群架构说明
k8s集群的高可用主要体现在master相关组件及etcd,master中apiserver是集群的入口,搭建三个master通过keepalived提供一个vip(虚拟IP)实现高可用,并且添加haproxy来为apiserver提供反向代理的作用,这样来自haproxy的所有请求都将轮询转发到后端的master节点上。如果仅仅使用keepalived,当集群正常工作时,所有的流量还是会转发到具有vip(虚拟IP)的那台master上面,因此加上了haproxy使整个集群的master都能参与进来,集群的健壮性更强。
对应架构图如下所示:

简单来说,就是需要满足下面两个条件:
- 1)、在 node 节点和 master 节点之间,需要一个 LoadBalancer 组件
-
- 【作用 1】负载均衡
- 【作用 2】检查 master 节点的状态
- 2)、对外需要一个统一的 VIP(虚拟IP)
-
- 【作用 1】虚拟 ip 对外进行访问
三、部署环境说明
由于这里使用虚拟机搭建,资源有限,我们采用 2 个 master 节点,2个 node 节点来搭建高可用k8s集群。文中使用到的服务器ip及角色对应如下。
| 主机名称 | ip地址 | 角色 |
| k8s-vip | 192.168.1.39 | 虚拟ip(vip) |
| k8s-master-01 | 192.168.1.35 | master |
| k8s-master-02 | 192.168.1.36 | master |
| k8s-node-01 | 192.168.1.37 | node |
| K8s-node-02 | 192.168.1.38 | node |
四、高可用集群搭建
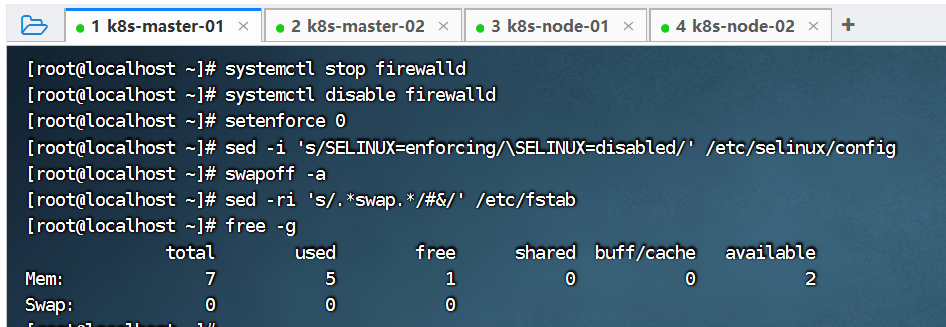
(1)、初始化所有节点
所有节点,需关闭防火墙规则,关闭selinux,关闭swap交换、时间同步。
[root@localhost ~]# systemctl stop firewalld
[root@localhost ~]# systemctl disable firewalld
[root@localhost ~]# setenforce 0
[root@localhost ~]# sed -i 's/SELINUX=enforcing/\SELINUX=disabled/' /etc/selinux/config# 禁用swap, kubeadm会检查当前主机是否禁用了swap,如果启动了swap将导致安装不能正常进行,所以需要禁用所有的swap
[root@localhost ~]# swapoff -a
[root@localhost ~]# sed -ri 's/.*swap.*/#&/' /etc/fstab
[root@localhost ~]# free -gtotal        used        free      shared  buff/cache   available
Mem:              7           5           1           0           0           2
Swap:             0           0           0# 最后执行时间同步
[root@localhost ~]# yum install ntpdate -y
[root@localhost ~]# ntpdate time.windows.com
以k8s-master-01为例,在k8s-master-02、k8s-node-01、k8s-node-02也需要执行。
(2)、修改host文件
根据规划设置主机名分别修改每台服务器的hostname主机名称:
# 根据规划设置主机名【k8s-master-01 节点上操作】
hostnamectl set-hostname k8s-master-01# 根据规划设置主机名【k8s-master-02 节点上操作】
hostnamectl set-hostname k8s-master-02# 根据规划设置主机名【k8s-node-01 节点操作】
hostnamectl set-hostname k8s-node-01# 根据规划设置主机名【k8s-node-02 节点操作】
hostnamectl set-hostname k8s-node-02
然后将上面的内容复制到host文件中,所有节点修改主机名和hosts文件,文件内容如下:
cat >> /etc/hosts << EOF
192.168.1.39 master.k8s.io k8s-vip
192.168.1.35 master01.k8s.io k8s-master-01
192.168.1.36 master02.k8s.io k8s-master-02
192.168.1.37 node01.k8s.io k8s-node-01
192.168.1.38 node02.k8s.io k8s-node-02
EOF
以k8s-master-01为例,在k8s-master-02、k8s-node-01、k8s-node-02也需要执行,注意主机名称不一样。
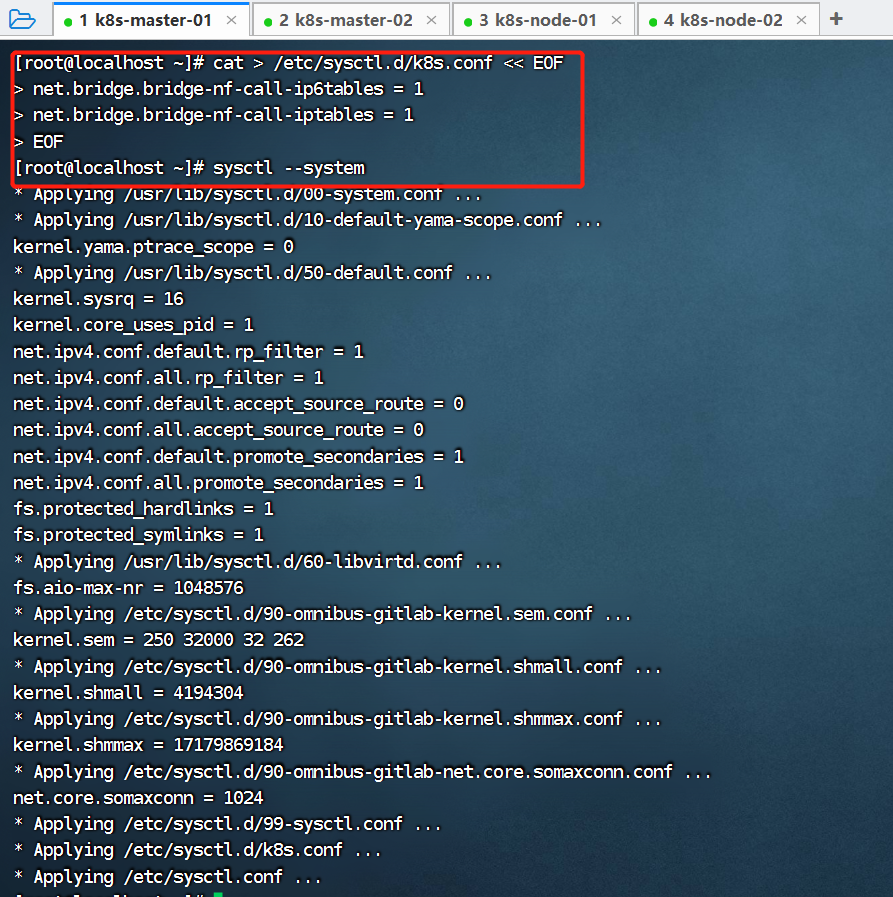
(3)、调整内核参数
将桥接的 IPV4 流量传递到 iptables 链。
cat > /etc/sysctl.d/k8s.conf << EOF
net.bridge.bridge-nf-call-ip6tables = 1
net.bridge.bridge-nf-call-iptables = 1
EOF
以k8s-master-01为例,在k8s-master-02、k8s-node-01、k8s-node-02也需要执行。
修改完成后,在所有节点执行sysctl --system加载参数使其生效:
(4)、所有节点安装Docker
所有节点安装 docker/kubelet/kubeadm/kubectl,Kubernetes 默认 CRI(容器运行时)为 docker,因此先安装 docker,以k8s-master-01为例,在k8s-master-02、k8s-node-01、k8s-node-02也需要执行。
(4-1)、配置 docker 的阿里 yum 源
cat >/etc/yum.repos.d/docker.repo<<EOF
[docker-ce-edge]
name=Docker CE Edge - $basearch
baseurl=https://mirrors.aliyun.com/docker-ce/linux/centos/7/$basearch/edge
enabled=1
gpgcheck=1
gpgkey=https://mirrors.aliyun.com/docker-ce/linux/centos/gpg
EOF
(4-2)、yum 安装 docker
# yum 安装
yum -y install docker-ce# 查看 docker 版本
docker --version
(4-3)、配置 docker 的镜像源
cat >> /etc/docker/daemon.json << EOF
{
"registry-mirrors": ["https://b9pmyelo.mirror.aliyuncs.com"]
}
EOF
(4-4)、启动 docker
systemctl start docker
systemctl enable docker
systemctl status docker
(5)、所有节点配置K8S源
执行下面的命令,定义kubernetes源:
cat > /etc/yum.repos.d/kubernetes.repo << EOF
[kubernetes]
name=Kubernetes
baseurl=https://mirrors.aliyun.com/kubernetes/yum/repos/kubernetes-el7-x86_64
enabled=1
gpgcheck=0
repo_gpgcheck=0
gpgkey=https://mirrors.aliyun.com/kubernetes/yum/doc/yum-key.gpg https://mirrors.aliyun.com/kubernetes/yum/doc/rpm-package-key.gpg
EOF
以k8s-master-01为例,在k8s-master-02、k8s-node-01、k8s-node-02也需要执行:

(6)、所有节点安装kubeadm,kubelet和kubectl
由于版本更新频繁,这里指定版本号1.21.3部署。
[root@localhost ~]# yum install -y kubelet-1.21.3 kubeadm-1.21.3 kubectl-1.21.3以k8s-master-01为例,在k8s-master-02、k8s-node-01、k8s-node-02也需要执行:
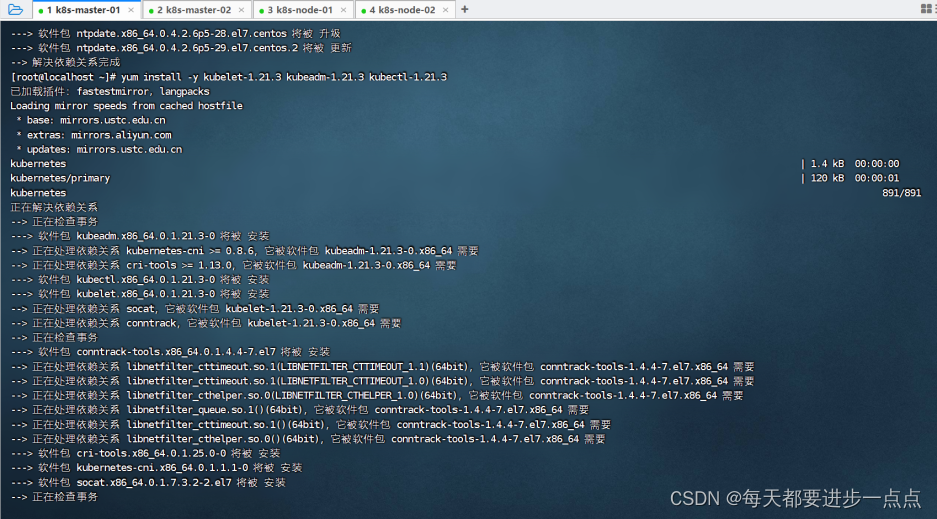
这里根据网速快慢,可能需等待一些时间。
安装完毕之后,如下图。
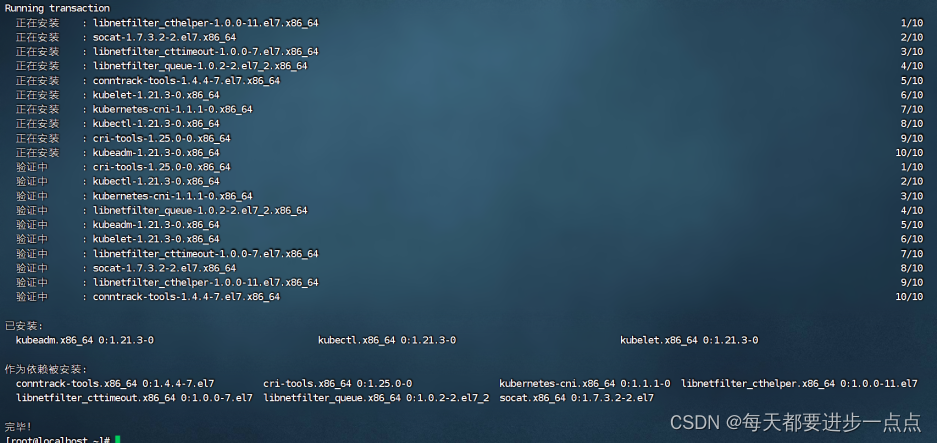
k8s通过kubeadm安装出来以后都是以Pod方式存在,即底层是以容器方式运行,所以kubelet必须设置开机自启。
systemctl enable kubelet(7)、所有master 节点安装keepalived
【k8s-master-01 + k8s-master-02上操作】
(7-1)、安装keepalived
yum install -y keepalived(7-2)、配置keepalived
keepalived中使用track_script机制来配置脚本进行探测kubernetes的master节点是否宕机,并以此切换节点实现高可用。
k8s-master-01节点的keepalived配置文件如下所示,配置文件所在的位/etc/keepalived/keepalived.cfg:
cat > /etc/keepalived/keepalived.conf <<EOF
! Configuration File for keepalivedglobal_defs {router_id k8s
}vrrp_script check_haproxy {script "killall -0 haproxy"interval 3weight -2fall 10rise 2
}vrrp_instance VI_1 {state MASTER interface ens33 mcast_src_ip 192.168.1.35virtual_router_id 51priority 100advert_int 1authentication {auth_type PASSauth_pass ceb1b3ec013d66163d6ab}virtual_ipaddress {192.168.1.39}track_script {check_haproxy}
}
EOF
需要注意几点:
- mcast_src_ip:配置多播源地址,此地址是当前主机的 ip 地址。
- priority:keepalived根据此项参数的大小仲裁master节点。我们这里让 master 节点为kubernetes提供服务,其他两个节点暂时为备用节点。因此k8s-master-01节点设置为100,k8s-master-02节点设置为99。
- state:我们将k8s-master-01节点的state字段设置为MASTER,其他节点字段修改为BACKUP。

配置 k8s-master-02 节点,配置文件内容如下:
cat > /etc/keepalived/keepalived.conf <<EOF
! Configuration File for keepalivedglobal_defs {router_id k8s
}vrrp_script check_haproxy {script "killall -0 haproxy"interval 3weight -2fall 10rise 2
}vrrp_instance VI_1 {state BACKUP interface ens33 mcast_src_ip 192.168.1.36virtual_router_id 51priority 99advert_int 1authentication {auth_type PASSauth_pass ceb1b3ec013d66163d6ab}virtual_ipaddress {192.168.1.39}track_script {check_haproxy}
}
EOF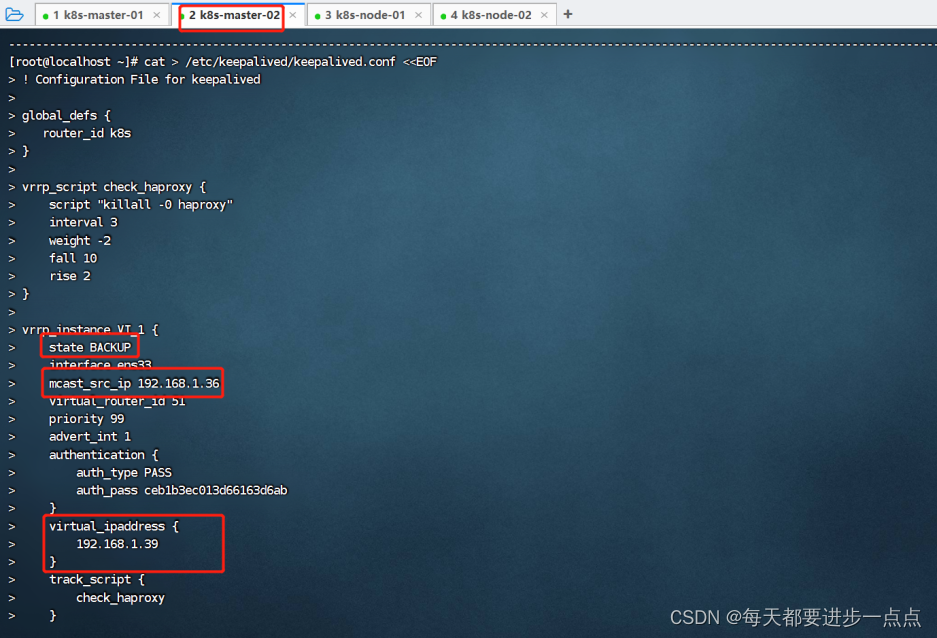
(7-3)、启动、检查keepalived
【k8s-master-01 和 k8s-master-02 均要启动】
# 设置开机启动
systemctl enable keepalived.service# 启动keepalived
systemctl start keepalived.service# 查看启动状态
systemctl status keepalived.service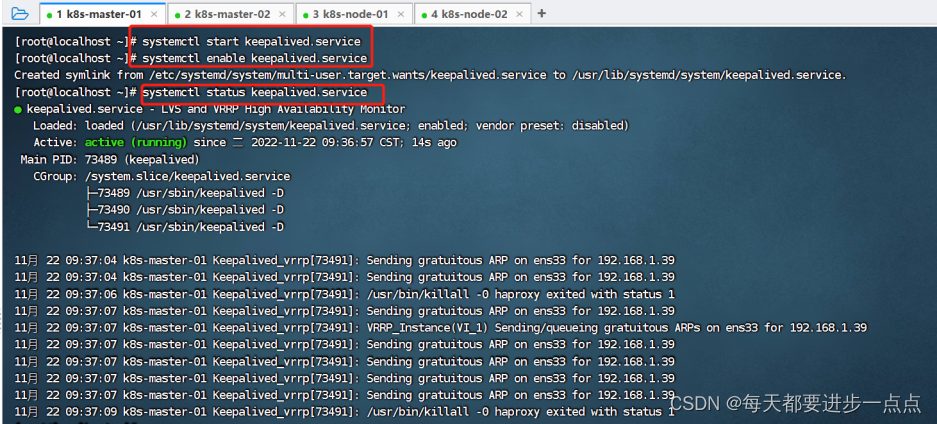
启动成功后,我们通过下面的命令查看 master 网卡信息:
ip a s ens33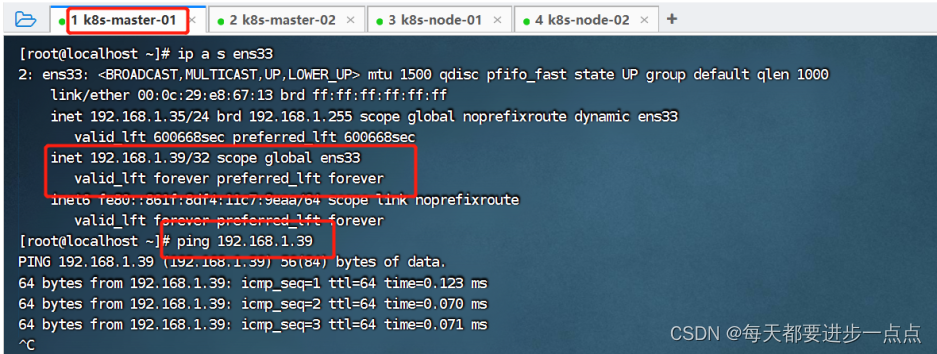
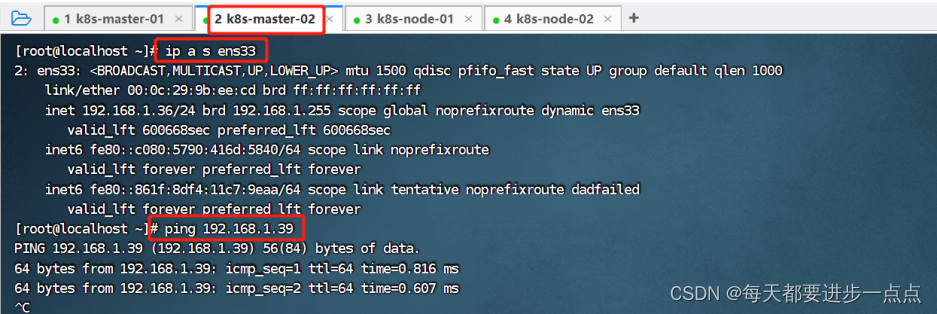 可以看到,当前虚拟IP(192.168.1.39)是飘移到了k8s-master-01这个节点。我们可以尝试停掉k8s-master-01的keepalived服务,查看vip是否能漂移到其他的master,并且重新启动k8s-master-01的keepalived服务,查看vip是否能正常漂移回来,证明配置没有问题。
(8)、所有master 节点安装haproxy
【k8s-master-01 + k8s-master-02上操作】
(8-1)、安装haproxy
yum install -y haproxy(8-2)、配置haproxy
所有master节点的haproxy配置相同,haproxy 的配置文件是/etc/haproxy/haproxy.cfg。
配置中声明了后端代理的两个 master 节点服务器,指定了 haproxy 运行的端口为 16443 等,因此 16443 端口为集群的入口。
cat > /etc/haproxy/haproxy.cfg << EOF
#---------------------------------------------------------------------
# Global settings
#---------------------------------------------------------------------
global# to have these messages end up in /var/log/haproxy.log you will# need to:# 1) configure syslog to accept network log events.  This is done#    by adding the '-r' option to the SYSLOGD_OPTIONS in#    /etc/sysconfig/syslog# 2) configure local2 events to go to the /var/log/haproxy.log#   file. A line like the following can be added to#   /etc/sysconfig/syslog##    local2.*                       /var/log/haproxy.log#log         127.0.0.1 local2chroot      /var/lib/haproxypidfile     /var/run/haproxy.pidmaxconn     4000user        haproxygroup       haproxydaemon # turn on stats unix socketstats socket /var/lib/haproxy/stats
#---------------------------------------------------------------------
# common defaults that all the 'listen' and 'backend' sections will
# use if not designated in their block
#---------------------------------------------------------------------
defaultsmode                    httplog                     globaloption                  httplogoption                  dontlognulloption http-server-closeoption forwardfor       except 127.0.0.0/8option                  redispatchretries                 3timeout http-request    10stimeout queue           1mtimeout connect         10stimeout client          1mtimeout server          1mtimeout http-keep-alive 10stimeout check           10smaxconn                 3000
#---------------------------------------------------------------------
# kubernetes apiserver frontend which proxys to the backends
#---------------------------------------------------------------------
frontend kubernetes-apiservermode                 tcpbind                 *:16443option               tcplogdefault_backend      kubernetes-apiserver
#---------------------------------------------------------------------
# round robin balancing between the various backends
#---------------------------------------------------------------------
backend kubernetes-apiservermode        tcpbalance     roundrobinserver      k8s-master-01   192.168.1.35:6443 checkserver      k8s-master-02   192.168.1.36:6443 check
#---------------------------------------------------------------------
# collection haproxy statistics message
#---------------------------------------------------------------------
listen statsbind                 *:10080stats auth           admin:awesomePasswordstats refresh        5sstats realm          HAProxy\ Statisticsstats uri            /admin?stats
EOF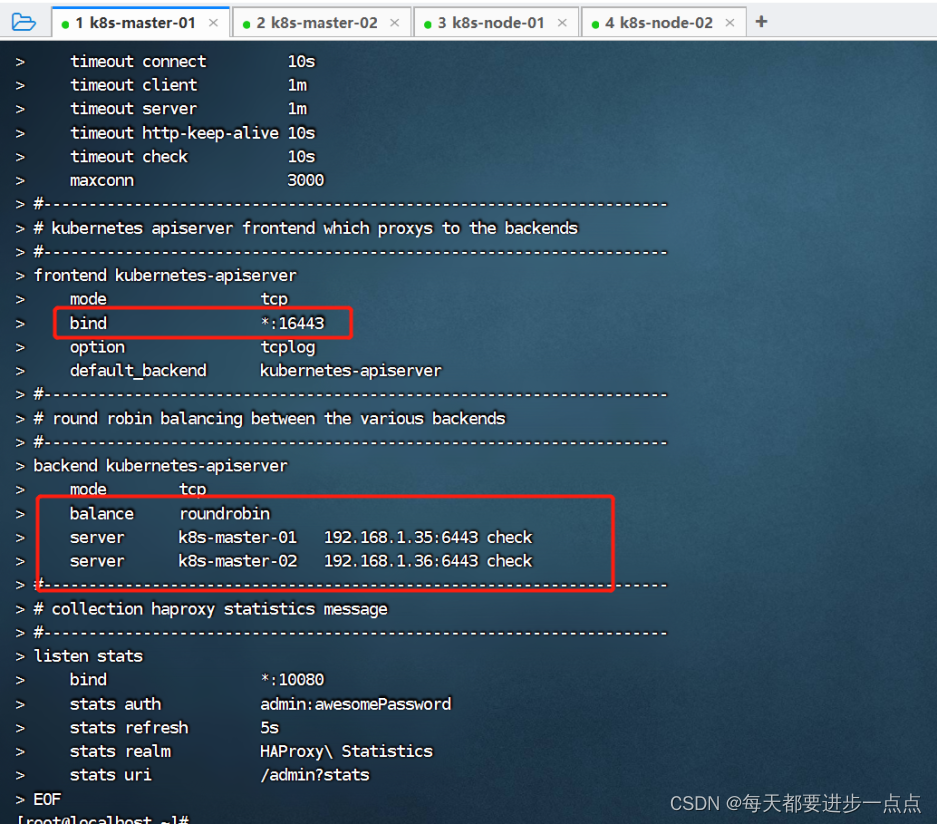
(8-3)、启动和检查haproxy
# 设置开机启动
systemctl enable haproxy# 开启haproxy
systemctl start haproxy# 查看启动状态
systemctl status haproxy# 检查端口
netstat -lntup | grep haproxy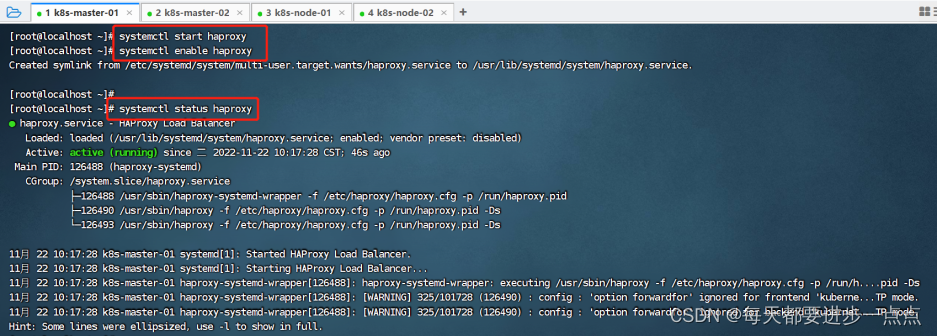

(9)、安装、初始化master
在具有vip的master上操作,这里为k8s-master-01这个节点。
(9-1)、创建kubeadm配置文件
[root@k8s-master-01]# vim kubeadm-config.yaml
apiServer:certSANs:- k8s-master-01- k8s-master-02- k8s-master-03- master.k8s.io- 192.168.1.35- 192.168.1.36- 192.168.1.39- 127.0.0.1extraArgs:authorization-mode: Node,RBACtimeoutForControlPlane: 4m0s
apiVersion: kubeadm.k8s.io/v1beta2
certificatesDir: /etc/kubernetes/pki
clusterName: kubernetes
controlPlaneEndpoint: "master.k8s.io:16443"
controllerManager: {}
dns: type: CoreDNS
etcd:local:    dataDir: /var/lib/etcd
imageRepository: registry.aliyuncs.com/google_containers
kind: ClusterConfiguration
kubernetesVersion: v1.21.3
networking: dnsDomain: cluster.local  podSubnet: 10.244.0.0/16serviceSubnet: 10.1.0.0/16
scheduler: {}
(9-2)、初始化master节点
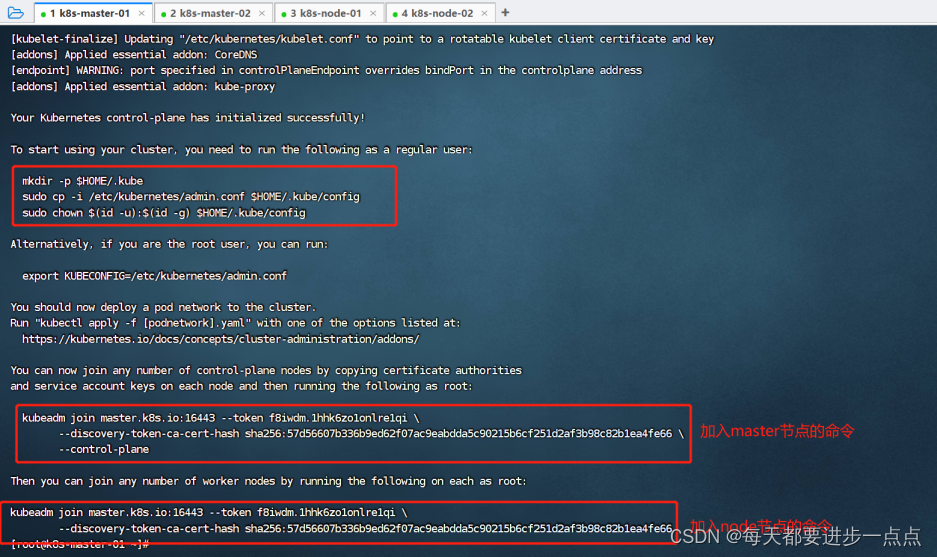
[root@k8s-master-01]# kubeadm init --config kubeadm-config.yaml
执行kubeadm init 初始化,中间会拉取镜像,速度较慢。执行完后,如下图,我们需要提前复制一下下图框起来的几个命令:
(9-3)、按照提示配置环境变量
[root@k8s-master-01]# mkdir -p $HOME/.kube
[root@k8s-master-01]# sudo cp -i /etc/kubernetes/admin.conf $HOME/.kube/config
[root@k8s-master-01]# sudo chown $(id -u):$(id -g) $HOME/.kube/config
(9-4)、查看集群状态
[root@k8s-master-01 ~]# kubectl get cs
Warning: v1 ComponentStatus is deprecated in v1.19+
NAME                 STATUS      MESSAGE                                                                                       ERROR
scheduler            Unhealthy   Get "http://127.0.0.1:10251/healthz": dial tcp 127.0.0.1:10251: connect: connection refused
controller-manager   Unhealthy   Get "http://127.0.0.1:10252/healthz": dial tcp 127.0.0.1:10252: connect: connection refused
etcd-0               Healthy     {"health":"true"}
可以看到,scheduler和controller-manager的状态都是Unhealthy,我们需要修改配置文件:
- vim /etc/kubernetes/manifests/kube-scheduler.yaml
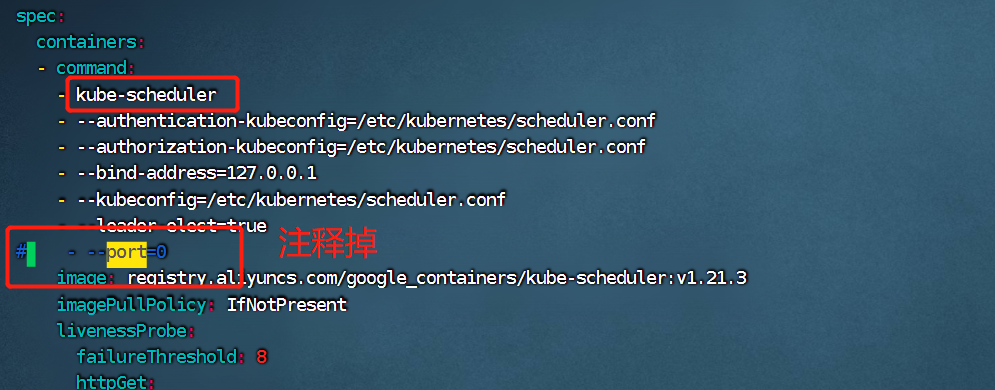
将- --port=0注释掉。
- vim /etc/kubernetes/manifests/kube-controller-manager.yaml

将- --port=0注释掉。
修改完成后,继续查看master状态:
[root@k8s-master-01 ~]# kubectl get cs
Warning: v1 ComponentStatus is deprecated in v1.19+
NAME                 STATUS    MESSAGE             ERROR
controller-manager   Healthy   ok
scheduler            Healthy   ok
etcd-0               Healthy   {"health":"true"}
可以看到, 各个组件的状态都是Healthy健康状态。
查看集群pod:
[root@k8s-master-01 ~]# kubectl get pods -n kube-system
NAME                                    READY   STATUS    RESTARTS   AGE
coredns-59d64cd4d4-jw4s4                0/1     Pending   0          10m
coredns-59d64cd4d4-zp7kk                0/1     Pending   0          10m
etcd-k8s-master-01                      1/1     Running   0          10m
kube-apiserver-k8s-master-01            1/1     Running   0          10m
kube-controller-manager-k8s-master-01   1/1     Running   0          65s
kube-proxy-d6vkg                        1/1     Running   0          10m
kube-scheduler-k8s-master-01            1/1     Running   0          85s[root@k8s-master-01 ~]# kubectl get nodes -n kube-system
NAME            STATUS     ROLES                  AGE   VERSION
k8s-master-01   NotReady   control-plane,master   14m   v1.21.3
如上,集群默认也把coredns安装了,这里处于pending状态的原因是因为还没有安装集群网络组件。
(10)、安装集群网络组件
【 k8s-master-01上操作】
先从GitHub仓库下载kube-flannel.yml:
kubectl apply -f https://raw.githubusercontent.com/coreos/flannel/master/Documentation/kube-flannel.yml国外站点下载很慢,经常连不上:

安装:
kubectl apply -f http://120.78.77.38/file/kube-flannel.yaml安装完CNI网络插件后,节点的状态就变成Ready了。我们使用查看pod状态,可以看到,状态都是Running运行状态。
[root@k8s-master-01 ~]# kubectl  get pod -n kube-system
NAME                                       READY   STATUS    RESTARTS   AGE
coredns-59d64cd4d4-jw4s4                   1/1     Running   0          24m
coredns-59d64cd4d4-zp7kk                   1/1     Running   0          24m
etcd-k8s-master-01                         1/1     Running   0          24m
kube-apiserver-k8s-master-01               1/1     Running   0          24m
kube-controller-manager-k8s-master-01      1/1     Running   0          14m
kube-flannel-ds-amd64-cf9k2                1/1     Running   0          8m
kube-proxy-d6vkg                           1/1     Running   0          24m
kube-scheduler-k8s-master-01               1/1     Running   0          15m[root@k8s-master-01 ~]# kubectl  get node  -n kube-system
NAME            STATUS   ROLES                  AGE   VERSION
k8s-master-01   Ready    control-plane,master   24m   v1.21.3
(11)、其他节点加入集群
【 k8s-master-02 + k8s-node-01 + k8s-node-02上操作】
(11-1)、k8s-master-02加入集群
(11-1-1)、复制密钥及相关文件
在第一次执行init的机器,此处为k8s-master-01上操作,复制文件到k8s-master-02。
ssh root@192.168.1.36 mkdir -p /etc/kubernetes/pki/etcd
scp /etc/kubernetes/admin.conf root@192.168.1.36:/etc/kubernetes
scp /etc/kubernetes/pki/{ca.*,sa.*,front-proxy-ca.*} root@192.168.1.36:/etc/kubernetes/pki
scp /etc/kubernetes/pki/etcd/ca.* root@192.168.1.36:/etc/kubernetes/pki/etcd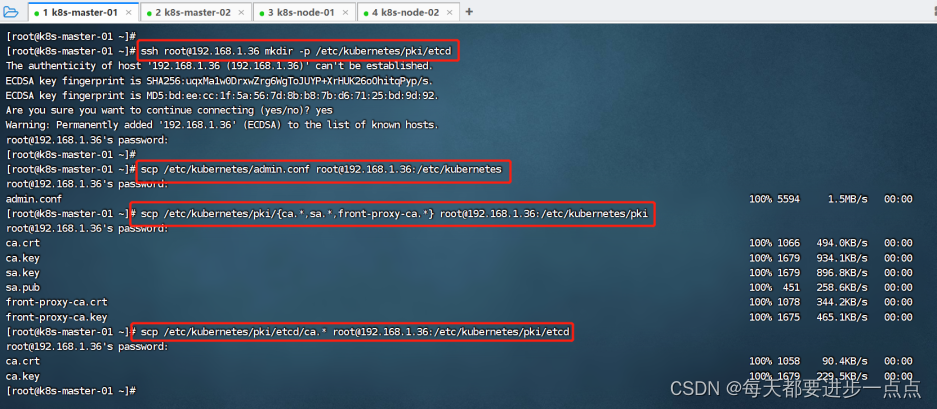
(11-1-2)、master加入集群
在k8s-master-02上操作,执行在k8s-master-01上init后输出的join命令:
kubeadm join master.k8s.io:16443 --token f8iwdm.1hhk6zo1onlre1qi \--discovery-token-ca-cert-hash sha256:57d56607b336b9ed62f07ac9eabdda5c90215b6cf251d2af3b98c82b1ea4fe66 \--control-plane在k8s-master-02上执行join命令,需要带上参数--control-plane表示把master控制节点加入集群。
[root@k8s-master-02 /]# kubeadm join master.k8s.io:16443 --token f8iwdm.1hhk6zo1onlre1qi \
>         --discovery-token-ca-cert-hash sha256:57d56607b336b9ed62f07ac9eabdda5c90215b6cf251d2af3b98c82b1ea4fe66 \
>         --control-plane
[preflight] Running pre-flight checks[WARNING IsDockerSystemdCheck]: detected "cgroupfs" as the Docker cgroup driver. The recommended driver is "systemd". Please follow the guide at https://kubernetes.io/docs/setup/cri/
[preflight] Reading configuration from the cluster...
[preflight] FYI: You can look at this config file with 'kubectl -n kube-system get cm kubeadm-config -o yaml'
[preflight] Running pre-flight checks before initializing the new control plane instance
[preflight] Pulling images required for setting up a Kubernetes cluster
[preflight] This might take a minute or two, depending on the speed of your internet connection
[preflight] You can also perform this action in beforehand using 'kubeadm config images pull'
[certs] Using certificateDir folder "/etc/kubernetes/pki"
[certs] Generating "apiserver" certificate and key
[certs] apiserver serving cert is signed for DNS names [k8s-master-01 k8s-master-02 k8s-master-03 kubernetes kubernetes.default kubernetes.default.svc kubernetes.default.svc.cluster.local master.k8s.io] and IPs [10.1.0.1 192.168.1.36 192.168.1.35 192.168.1.39 127.0.0.1]
[certs] Generating "apiserver-kubelet-client" certificate and key
[certs] Generating "front-proxy-client" certificate and key
[certs] Generating "etcd/healthcheck-client" certificate and key
[certs] Generating "apiserver-etcd-client" certificate and key
[certs] Generating "etcd/server" certificate and key
[certs] etcd/server serving cert is signed for DNS names [k8s-master-02 localhost] and IPs [192.168.1.36 127.0.0.1 ::1]
[certs] Generating "etcd/peer" certificate and key
[certs] etcd/peer serving cert is signed for DNS names [k8s-master-02 localhost] and IPs [192.168.1.36 127.0.0.1 ::1]
[certs] Valid certificates and keys now exist in "/etc/kubernetes/pki"
[certs] Using the existing "sa" key
[kubeconfig] Generating kubeconfig files
[kubeconfig] Using kubeconfig folder "/etc/kubernetes"
[endpoint] WARNING: port specified in controlPlaneEndpoint overrides bindPort in the controlplane address
[kubeconfig] Using existing kubeconfig file: "/etc/kubernetes/admin.conf"
[endpoint] WARNING: port specified in controlPlaneEndpoint overrides bindPort in the controlplane address
[kubeconfig] Writing "controller-manager.conf" kubeconfig file
[endpoint] WARNING: port specified in controlPlaneEndpoint overrides bindPort in the controlplane address
[kubeconfig] Writing "scheduler.conf" kubeconfig file
[control-plane] Using manifest folder "/etc/kubernetes/manifests"
[control-plane] Creating static Pod manifest for "kube-apiserver"
[control-plane] Creating static Pod manifest for "kube-controller-manager"
[control-plane] Creating static Pod manifest for "kube-scheduler"
[check-etcd] Checking that the etcd cluster is healthy
[kubelet-start] Writing kubelet configuration to file "/var/lib/kubelet/config.yaml"
[kubelet-start] Writing kubelet environment file with flags to file "/var/lib/kubelet/kubeadm-flags.env"
[kubelet-start] Starting the kubelet
[kubelet-start] Waiting for the kubelet to perform the TLS Bootstrap...
[etcd] Announced new etcd member joining to the existing etcd cluster
[etcd] Creating static Pod manifest for "etcd"
[etcd] Waiting for the new etcd member to join the cluster. This can take up to 40s
[upload-config] Storing the configuration used in ConfigMap "kubeadm-config" in the "kube-system" Namespace
[mark-control-plane] Marking the node k8s-master-02 as control-plane by adding the labels: [node-role.kubernetes.io/master(deprecated) node-role.kubernetes.io/control-plane node.kubernetes.io/exclude-from-external-load-balancers]
[mark-control-plane] Marking the node k8s-master-02 as control-plane by adding the taints [node-role.kubernetes.io/master:NoSchedule]This node has joined the cluster and a new control plane instance was created:* Certificate signing request was sent to apiserver and approval was received.
* The Kubelet was informed of the new secure connection details.
* Control plane (master) label and taint were applied to the new node.
* The Kubernetes control plane instances scaled up.
* A new etcd member was added to the local/stacked etcd cluster.To start administering your cluster from this node, you need to run the following as a regular user:mkdir -p $HOME/.kubesudo cp -i /etc/kubernetes/admin.conf $HOME/.kube/configsudo chown $(id -u):$(id -g) $HOME/.kube/configRun 'kubectl get nodes' to see this node join the cluster.[root@k8s-master-02 /]#  mkdir -p $HOME/.kube
[root@k8s-master-02 /]# sudo cp -i /etc/kubernetes/admin.conf $HOME/.kube/config
[root@k8s-master-02 /]#  sudo chown $(id -u):$(id -g) $HOME/.kube/config
(11-1-3)、检查集群及pod状态
在其中一台master上执行命令检查集群及pod状态。
[root@k8s-master-02 /]# kubectl get node
NAME            STATUS   ROLES                  AGE   VERSION
k8s-master-01   Ready    control-plane,master   34m   v1.21.3
k8s-master-02   Ready    control-plane,master   84s   v1.21.3[root@k8s-master-02 /]# kubectl get pods --all-namespaces
NAMESPACE     NAME                                       READY   STATUS    RESTARTS   AGE
kube-system   coredns-59d64cd4d4-jw4s4                   1/1     Running   0          34m
kube-system   coredns-59d64cd4d4-zp7kk                   1/1     Running   0          34m
kube-system   etcd-k8s-master-01                         1/1     Running   0          34m
kube-system   etcd-k8s-master-02                         1/1     Running   0          87s
kube-system   kube-apiserver-k8s-master-01               1/1     Running   0          34m
kube-system   kube-apiserver-k8s-master-02               1/1     Running   0          85s
kube-system   kube-controller-manager-k8s-master-01      1/1     Running   1          24m
kube-system   kube-controller-manager-k8s-master-02      1/1     Running   0          81s
kube-system   kube-flannel-ds-amd64-bm9gq                1/1     Running   0          93s
kube-system   kube-flannel-ds-amd64-cf9k2                1/1     Running   0          17m
kube-system   kube-proxy-d6vkg                           1/1     Running   0          34m
kube-system   kube-proxy-s548k                           1/1     Running   0          93s
kube-system   kube-scheduler-k8s-master-01               1/1     Running   1          24m
kube-system   kube-scheduler-k8s-master-02               1/1     Running   0          70s
如上,可以看到,当前集群中有两个node,并且状态都是Ready,并且pod状态也都是Running。
(11-2)、k8s-node-01、k8s-node-02 加入集群
(11-2-1)、node加入集群
在其他两台node节点上操作,执行join命令,在k8s-node-01和k8s-node-02上操作:
(11-2-2)、检查集群及pod状态
[root@k8s-master-02 /]# kubectl get node
NAME            STATUS   ROLES                  AGE     VERSION
k8s-master-01   Ready    control-plane,master   37m     v1.21.3
k8s-master-02   Ready    control-plane,master   4m58s   v1.21.3
k8s-node-01     Ready    <none>                 60s     v1.21.3
k8s-node-02     Ready    <none>                 56s     v1.21.3[root@k8s-master-01 ~]# kubectl get pods -n kube-system
NAME                                       READY   STATUS    RESTARTS   AGE
coredns-59d64cd4d4-jw4s4                   1/1     Running   0          48m
coredns-59d64cd4d4-zp7kk                   1/1     Running   0          48m
etcd-k8s-master-01                         1/1     Running   0          48m
etcd-k8s-master-02                         1/1     Running   0          16m
kube-apiserver-k8s-master-01               1/1     Running   0          48m
kube-apiserver-k8s-master-02               1/1     Running   0          16m
kube-controller-manager-k8s-master-01      1/1     Running   1          39m
kube-controller-manager-k8s-master-02      1/1     Running   0          16m
kube-flannel-ds-amd64-bm9gq                1/1     Running   0          16m
kube-flannel-ds-amd64-cf9k2                1/1     Running   0          32m
kube-flannel-ds-amd64-vz5z9                1/1     Running   0          12m
kube-flannel-ds-amd64-xwpg2                1/1     Running   0          12m
kube-proxy-5kzr8                           1/1     Running   0          12m
kube-proxy-d6mfp                           1/1     Running   0          12m
kube-proxy-d6vkg                           1/1     Running   0          48m
kube-proxy-s548k                           1/1     Running   0          16m
kube-scheduler-k8s-master-01               1/1     Running   1          39m
kube-scheduler-k8s-master-02               1/1     Running   0          15m
如上,可以看到,当前集群中有四个node,并且状态都是Ready,并且pod状态也都是Running。
(12)、测试 kubernetes 集群
在 Kubernetes 集群中创建一个 pod,验证是否正常运行:
# 创建 nginx deployment
[root@k8s-master-01 ~]# kubectl create deployment nginx --image=nginx
deployment.apps/nginx created# 暴露端口
[root@k8s-master-01 ~]# kubectl expose deployment nginx --port=80 --type=NodePort
service/nginx exposed# 查看状态
[root@k8s-master-01 ~]# kubectl get pod,svc
NAME READY STATUS RESTARTS AGE
pod/nginx-6799fc88d8-56nsc 0/1 ContainerCreating 0 14sNAME TYPE CLUSTER-IP EXTERNAL-IP PORT(S) AGE
service/kubernetes ClusterIP 10.1.0.1 <none> 443/TCP 41m
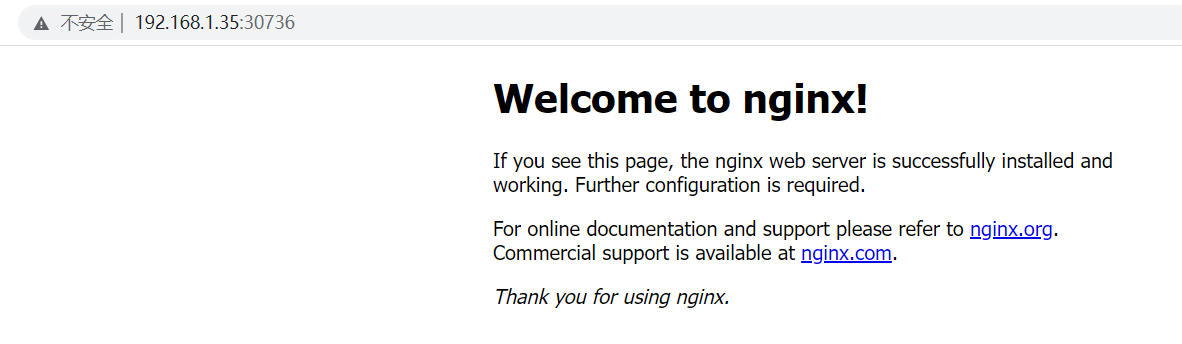
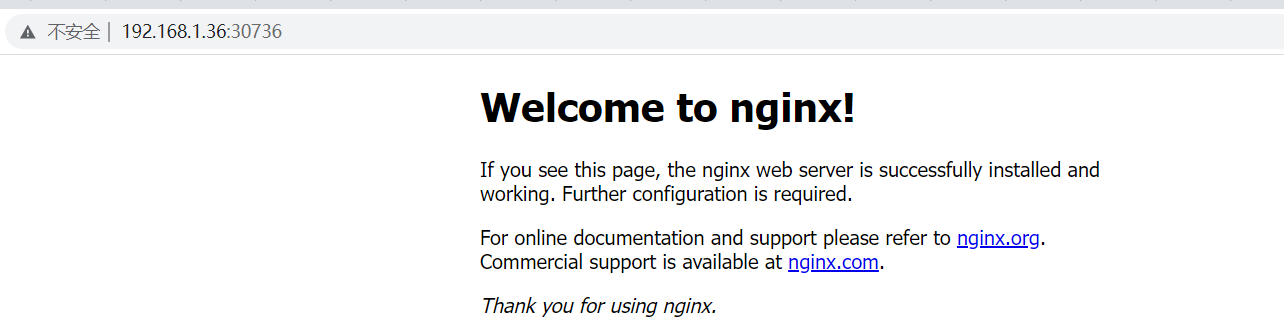
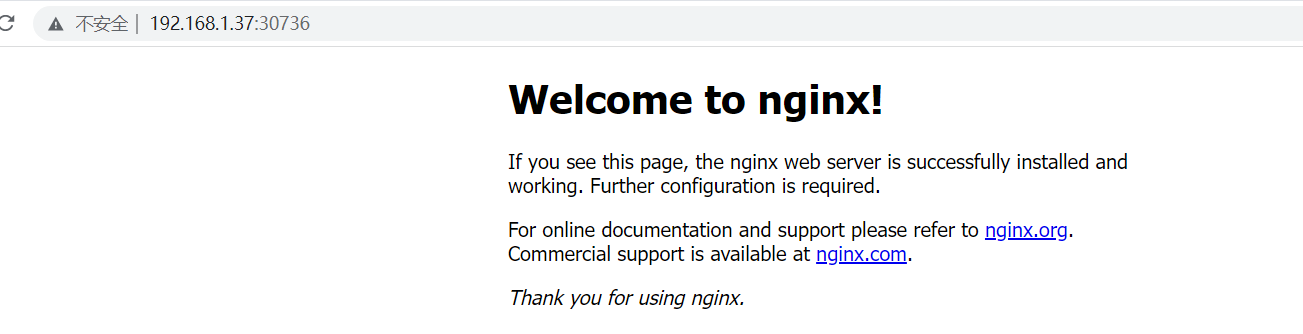
service/nginx NodePort 10.1.196.129 <none> 80:30736/TCP 6s我们看到,对外暴露的端口号是30736,我们可以使用任意一台节点的IP加上端口号,访问:
192.168.1.35:30736
192.168.1.36:30736
192.168.1.37:30736
192.168.1.38:30736

192.168.1.39:30736

接下来,我们尝试停掉k8s-master-01(这里我直接将这台虚拟机关了),测试一下集群是否正常提供服务:
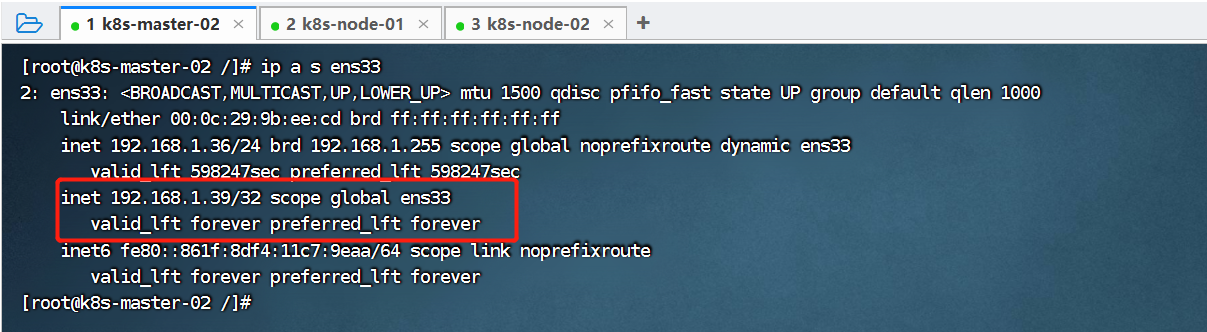
可以看到,虚拟IP(192.168.1.39)已经漂移到k8s-master-02节点上。浏览器再次访问:http://192.168.1.36:30736/、http://192.168.1.37:30736/、http://192.168.1.38:30736/、http://192.168.1.39:30736/,也能正常访问到nginx。