一、概述
1、本文主要介绍如何用S32DS在NXP S32K344 中部署Tensorflow;
2、示例使用了Tensorflow入门代码,主要功能是识别28 * 28 的手写图片的数字;
3、在MCU上开启DSP功能后,最终运行时间在 7ms(64神经元),准确率在 90%左右;
4、Tensorflow Lite Micro为嵌入式环境运行的设计,参考以下链接:
开始使用 TensorFlow Lite
二、资源需求
1、库文件
| 库文件 | 资源地址 | 说明 |
| CMSIS 6 | Release CMSIS 6.1.0 · ARM-software/CMSIS_6 · GitHub | ARM提供,会使用部分头文件 |
| CMSIS-NN | https://codeload.github.com/ARM-software/CMSIS-NN/zip/refs/heads/main | ARM提供ARM Cortex-M 系列微控制器设计的神经网络库 |
| CMSIS-DSP | RTE_Components.h在micro_time.cpp中调用,可手动修改 https://github.com/ARM-software/CMSIS-DSP/tree/main | ARM提供,DSP运算库 |
| tensorflow-lite-micro | https://codeload.github.com/tensorflow/tflite-micro/zip/refs/heads/main | Google tensorflowlite基础版,同宗永好,可以借点东西 |
| tensorflow-lite-micro | https://www.keil.arm.com/packs/tensorflow-lite-micro-tensorflow/versions/ | ARM提供的tensorflowlite ARM版,我们用这个,直接解压缩使用 |
| Flatbuffers | https://github.com/google/flatbuffers/tree/master | |
| Gemmlowp | 头文件低精度计算 https://github.com/google/gemmlowp/tree/master | |
| Ruy | instrumentation.h 需要Ruy中提供,矩阵计算 https://github.com/google/ruy |
2、软件工具
| 工具 | 描述 |
| S32DS | 3.4版本,GCC 10.2编译 |
| Python | 3.7版本 |
| VS Code + copilot | 可选,测试程序由AI帮忙生成,再手动修改 |
| 豆包 | 遇到不会的问问他吧,比自己查资料快多了 |
| Tensorflow | 2.x 机器学习模型构建 |
| Netron | 可选,打开tflite文件 |
| Trace32和 Lauterbach.rc | 可选,Python操作trace32,更新输入数据(原始数据28*28很大) |
三、模型制作
1、机器学习模型
参考 关于TensorFlow | TensorFlow中文官网
import tensorflow as tf
import oscurr_path = os.path.dirname(__file__)
model_path = os.path.join(curr_path, 'model.tflite')mnist = tf.keras.datasets.mnist
(x_train, y_train),(x_test, y_test) = mnist.load_data()
x_train, x_test = x_train / 255.0, x_test / 255.0
first_index_data = x_train[0]# 128 = 12ms
# 64 = 7ms
model = tf.keras.models.Sequential([tf.keras.layers.Flatten(input_shape=(28, 28)),tf.keras.layers.Dense(64, activation='relu'),tf.keras.layers.Dropout(0.2),tf.keras.layers.Dense(10, activation='softmax')
])model.compile(optimizer='adam',loss='sparse_categorical_crossentropy',metrics=['accuracy'])model.fit(x_train, y_train, epochs=5)
model.evaluate(x_test, y_test)# 计算需要的缓存大小,main.cc 会设置
total_memory = 0
for layer in model.layers:for tensor in layer.weights:shape = tensor.shapeelement_size = tensor.dtype.sizetensor_memory = 1for dim in shape:if dim is not None:tensor_memory *= dimtensor_memory *= element_sizetotal_memory += tensor_memory
print(f"Estimated memory usage: {total_memory} bytes")# 转换模型
converter = tf.lite.TFLiteConverter.from_keras_model(model)
tflite_model = converter.convert()# 保存转换后的模型
with open(model_path, 'wb') as f:f.write(tflite_model)
2、转换模型
缓存区大小和转换成TFlite 模型由AI生成。
converter = tf.lite.TFLiteConverter.from_keras_model(model)
tflite_model = converter.convert()
3、量化
生成模型数组,在嵌入式软件中调用。下列脚本保存到model.cc中。
第一种方法:
Convert.py 实现,该脚本由豆包生成
import numpy as np
import tensorflow as tf
import oscurr_path = os.path.dirname(__file__)
model_path = os.path.join(curr_path, 'model.tflite')
output_path = os.path.join(curr_path, 'model.cc')def convert_tflite_to_c_array(tflite_model_path, output_c_file_path):# Load the TFLite modelwith open(tflite_model_path, 'rb') as f:tflite_model = f.read()# Convert the model to a numpy arraymodel_array = np.frombuffer(tflite_model, dtype=np.uint8)# Create the C array as a stringc_array_str = "const unsigned char model_data[] = {\n"c_array_str += ',\n'.join('    ' + ', '.join(f'0x{byte:02x}' for byte in model_array[i:i+12]) for i in range(0, len(model_array), 12))c_array_str += "\n};\n"c_array_str += f"const unsigned int model_len = {len(model_array)};\n"# Write the C array to the output filewith open(output_c_file_path, 'w') as f:f.write(c_array_str)# Example usage
convert_tflite_to_c_array(model_path, output_path)
print(f"Model converted to C array and saved to {output_path}")第二种方法:
许多微控制器平台没有本地文件系统的支持。从程序中使用一个模型最简单的方式是将其以一个 C 数组的形式包含并编译进你的程序。
xxd是个工具(linux/Cygwin/git等中包含)
四、嵌入式软件
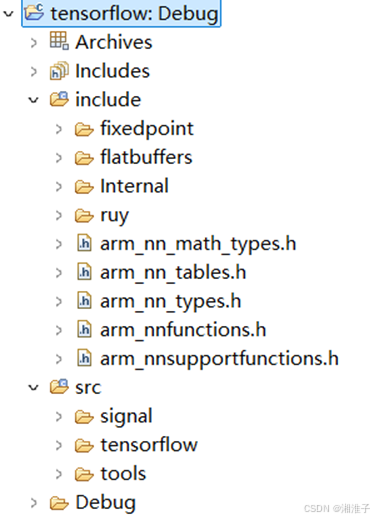
1、库创建
使用tensorflow-lite-micro为基础,创建库工程(C++)。可直接使用编译号的库
已编译的库地址下载(使用以下内容,可跳过“库创建”)
【免费】S32DS编译的S32K3tensorflowlite库,o3优化,DSP开启资源-CSDN文库
A、需要的头都放进去,安装Tensorflow引用的头路径方式
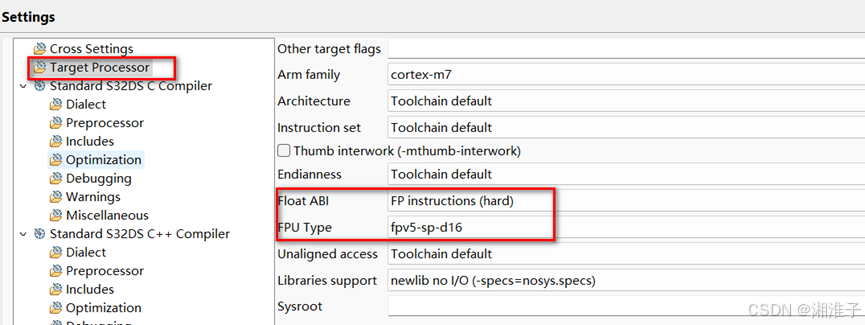
使用DSP编译选项的设置,设置方式参考下一章;S32K3支持该协处理器。
B、可能的问题
| 库路径配置,记得是 C++
|
| ethosu是平台的, AI推理,可以删除 |
| schema_generated.h 屏蔽版本检查 ///static_assert(FLATBUFFERS_VERSION_MAJOR == 23 && /// FLATBUFFERS_VERSION_MINOR == 5 && /// FLATBUFFERS_VERSION_REVISION == 26, /// "Non-compatible flatbuffers version included"); |
| blocking_counter.h error: 'condition_variable' in namespace 'std' does not name a type,直接屏蔽代码(这个是多线程系统时才有操作实体) |
| array.h 从tflite-micro-main拷到ARM下载的中,而不是#include "flatbuffers/array.h", |
| arm_nnfunctions.h 在CMSIS-NN中 |
| instrumentation.h 需要Ruy中提供,矩阵计算 |
| FixPonit 头文件 Gemmlowp 低精度计算 |

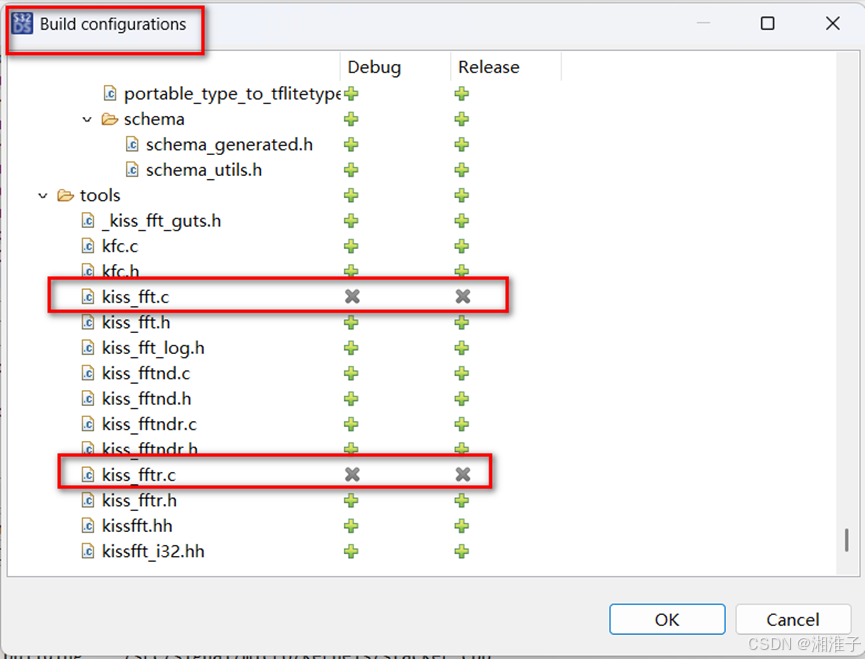
C、重定义问题解决
右击工程“Build configurations Explorer”,这几个文件在其他文件已经“include”了
D、库引用设置(在测试程序中配置)

路径设置:

2、测试程序
创建工程(C++)
Main.c 代码
/** main implementation: use this 'C++' sample to create your own application**/
#include "S32K344.h"
#include "tensorflow/lite/micro/micro_mutable_op_resolver.h"
#include "tensorflow/lite/micro/tflite_bridge/micro_error_reporter.h"
#include "tensorflow/lite/micro/micro_interpreter.h"
#include "tensorflow/lite/schema/schema_generated.h"// 包含模型数据
#include "model.cc"
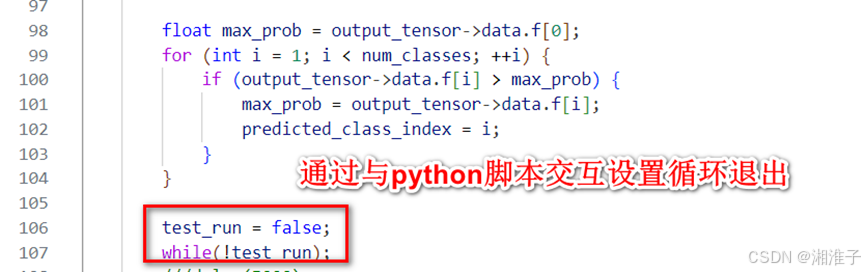
#include "input_data.cc"volatile int predicted_class_index = 0;
float input_data[28 * 28];
volatile bool test_run = false;
const int tensor_arena_size = 40 * 1024;
uint8_t tensor_arena[tensor_arena_size];int main()
{// 定义错误报告器tflite::MicroErrorReporter micro_error_reporter;tflite::ErrorReporter* error_reporter = µ_error_reporter;// 定义操作解析器tflite::MicroMutableOpResolver<10> resolver;resolver.AddAdd();resolver.AddMul();resolver.AddSub();resolver.AddDiv();resolver.AddReshape();resolver.AddFullyConnected();resolver.AddSoftmax();resolver.AddRelu();// 定义模型const tflite::Model* tfmodel = tflite::GetModel(model_data);if (tfmodel == nullptr) {TF_LITE_REPORT_ERROR(error_reporter, "Failed to build tfmodel from buffer");while (1);}// 定义解释器tflite::MicroInterpreter interpreter = tflite::MicroInterpreter(tfmodel, resolver, tensor_arena, tensor_arena_size);// 分配张量TfLiteStatus allocate_status = interpreter.AllocateTensors();if (allocate_status != kTfLiteOk) {TF_LITE_REPORT_ERROR(error_reporter, "Tensor allocation failed");while (1);}// 初始化第一个输入张量for (int i = 0; i < 28 * 28; ++i) {input_data[i] = x_train[i];}// 准备输入数据TfLiteTensor* input_tensor = interpreter.input(0);for (;;) {// 填充输入数据for (int i = 0; i < 28 * 28; ++i) {input_tensor->data.f[i] = input_data[i];}// 运行推理TfLiteStatus invoke_status = interpreter.Invoke();if (invoke_status != kTfLiteOk) {TF_LITE_REPORT_ERROR(error_reporter, "Invoke failed");while (1);}// 获取输出结果TfLiteTensor* output_tensor = interpreter.output(0);// 处理输出数据:找到概率最大的类别索引int num_classes = output_tensor->bytes / sizeof(float);float max_prob = output_tensor->data.f[0];for (int i = 1; i < num_classes; ++i) {if (output_tensor->data.f[i] > max_prob) {max_prob = output_tensor->data.f[i];predicted_class_index = i;}}test_run = false;while(!test_run);}return 0;
}解释器
MicroInterpreter为该示例的解释器,另外一个不使用
增加操作
resolver.AddRelu();根据Netron图中的操作或HelloAi中模型层确定
设置缓存区
uint8_t tensor_arena[tensor_arena_size];
tensor_arena_size根据Hellow.py 中的 total_memory
3、性能测试
输入 28 * 28 个数据,输出 10 个数据;该结果通过TRACE32读取。
| 隐藏层神经元个数 | 48MHz | 48MHz O3优化 DSP使用 | 160MHz O3优化 DSP使用 |
| 128 | 560ms | 32ms | 12ms |
| 64 | / | / | 7ms |
使用DSP编译选项的设置
五、模型预测的正确率测试
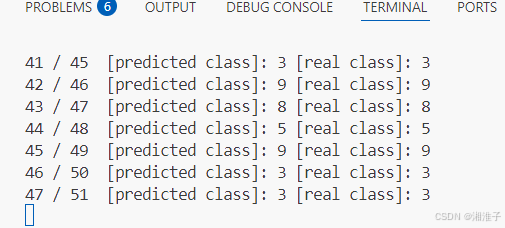
1、测试脚本(先加载训练数据,再传给TRACE32)
import lauterbach.trace32.rcl as t32rc
import tensorflow as tf
import timeif __name__ == "__main__":mnist = tf.keras.datasets.mnist(x_train, y_train),(x_test, y_test) = mnist.load_data()x_train = x_train / 255.0t32debug = t32rc.connect(node = "localhost",port = 20000,packlen = 1024)right_cnt = 0calcu_cnt = 0# input data updatei = 0for x in x_train:calcu_cnt += 1input_datas = x.flatten()varDict = {}j = 0input_checksum = 0readback_checksum = 0for input_data in input_datas:signalName = 'input_data[' + str(j) + ']' # 构建信号名input_data = float(input_data)input_checksum += input_dataj += 1t32debug.variable.write(signalName, input_data)#time.sleep(0.001)readback_checksum += t32debug.variable.read(signalName).value#t32debug.go()# model predict in mircrocontroller, wait finsht32debug.variable.write('test_run', 1)while t32debug.variable.read('test_run').value != 0:time.sleep(0.1)#0.1s#t32debug.trace32_break()# read output dataout_signalname = 'predicted_class_index'predicted_class = t32debug.variable.read(out_signalname).valueif  predicted_class == y_train[i]:right_cnt += 1else:print("predict error!", 'input checksum: ', input_checksum, 'readback checksum', readback_checksum)print(right_cnt, '/', calcu_cnt, ' [predicted class]:', predicted_class, '[real class]:', y_train[i])i += 1print('Accuracy: ', right_cnt / calcu_cnt)print('Total number of test data: ', calcu_cnt)
2、加载训练数据
获取结果与实际进行对比。
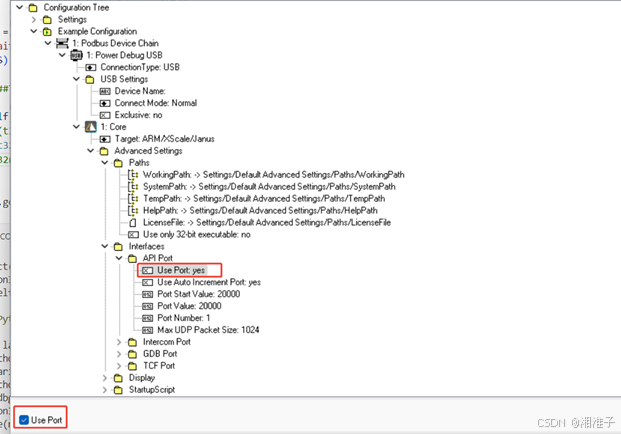
3、TRACE32需要使能Port
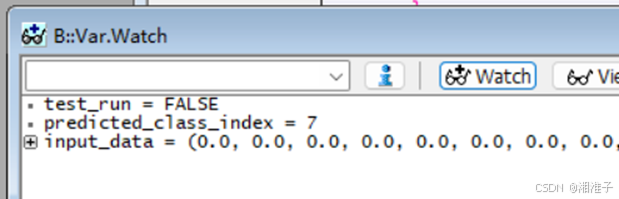
4、TRACE32增加交互的数据
5、执行测试
运行可能不是太快