大家好,我是鱼皮,对不会前端的同学来说,开发 命令行工具 是一种不错的展示系统功能的方式。在 Java 中开发命令行工具也很简单,使用框架,几分钟就能学会啦~
Picocli 入门
Picocli 是 Java 中个人认为功能最完善、最简单易用的命令行开发框架,可以帮助大家快速开发命令行工具。
网上有关 Picocli 框架的教程非常少,最推荐的入门方式除了看鱼皮的教程外,就是阅读官方文档了。
官方文档:https://picocli.info/
推荐从官方提供的快速入门教程开始:https://picocli.info/quick-guide.html
一般我们学习新技术的步骤是:先跑通入门 Demo,再学习该技术的用法和特性。
入门 Demo
1)在 Maven 项目的 pom.xml 文件中引入 picocli 的依赖:
<!-- https://picocli.info -->
<dependency>
    <groupId>info.picocli</groupId>
    <artifactId>picocli</artifactId>
    <version>4.7.5</version>
</dependency>
然后我们在 com.yupi 包下新建 cli.example 包,用于存放所有和 Picocli 入门有关的示例代码。
2)复制官方快速入门教程中的示例代码到 com.yupi.cli.example 包下,并略微修改 run 方法中的代码,打印参数的值。
完整代码如下:
package com.yupi.cli.example;

import picocli.CommandLine;
import picocli.CommandLine.Command;
import picocli.CommandLine.Option;
import picocli.CommandLine.Parameters;

@Command(name = "ASCIIArt", version = "ASCIIArt 1.0", mixinStandardHelpOptions = true)
public class ASCIIArt implements Runnable {

    @Option(names = { "-s", "--font-size" }, description = "Font size")
    int fontSize = 19;

    @Parameters(paramLabel = "<word>", defaultValue = "Hello, picocli",
               description = "Words to be translated into ASCII art.")
    private String[] words = { "Hello,", "picocli" };

    @Override
    public void run() {
        // 自己实现业务逻辑
        System.out.println("fontSize = " + fontSize);
        System.out.println("words = " + String.join(",", words));
    }

    public static void main(String[] args) {
        int exitCode = new CommandLine(new ASCIIArt()).execute(args);
        System.exit(exitCode);
    }
}
看不懂这段代码没关系,官方文档已经给了非常详细的解释:
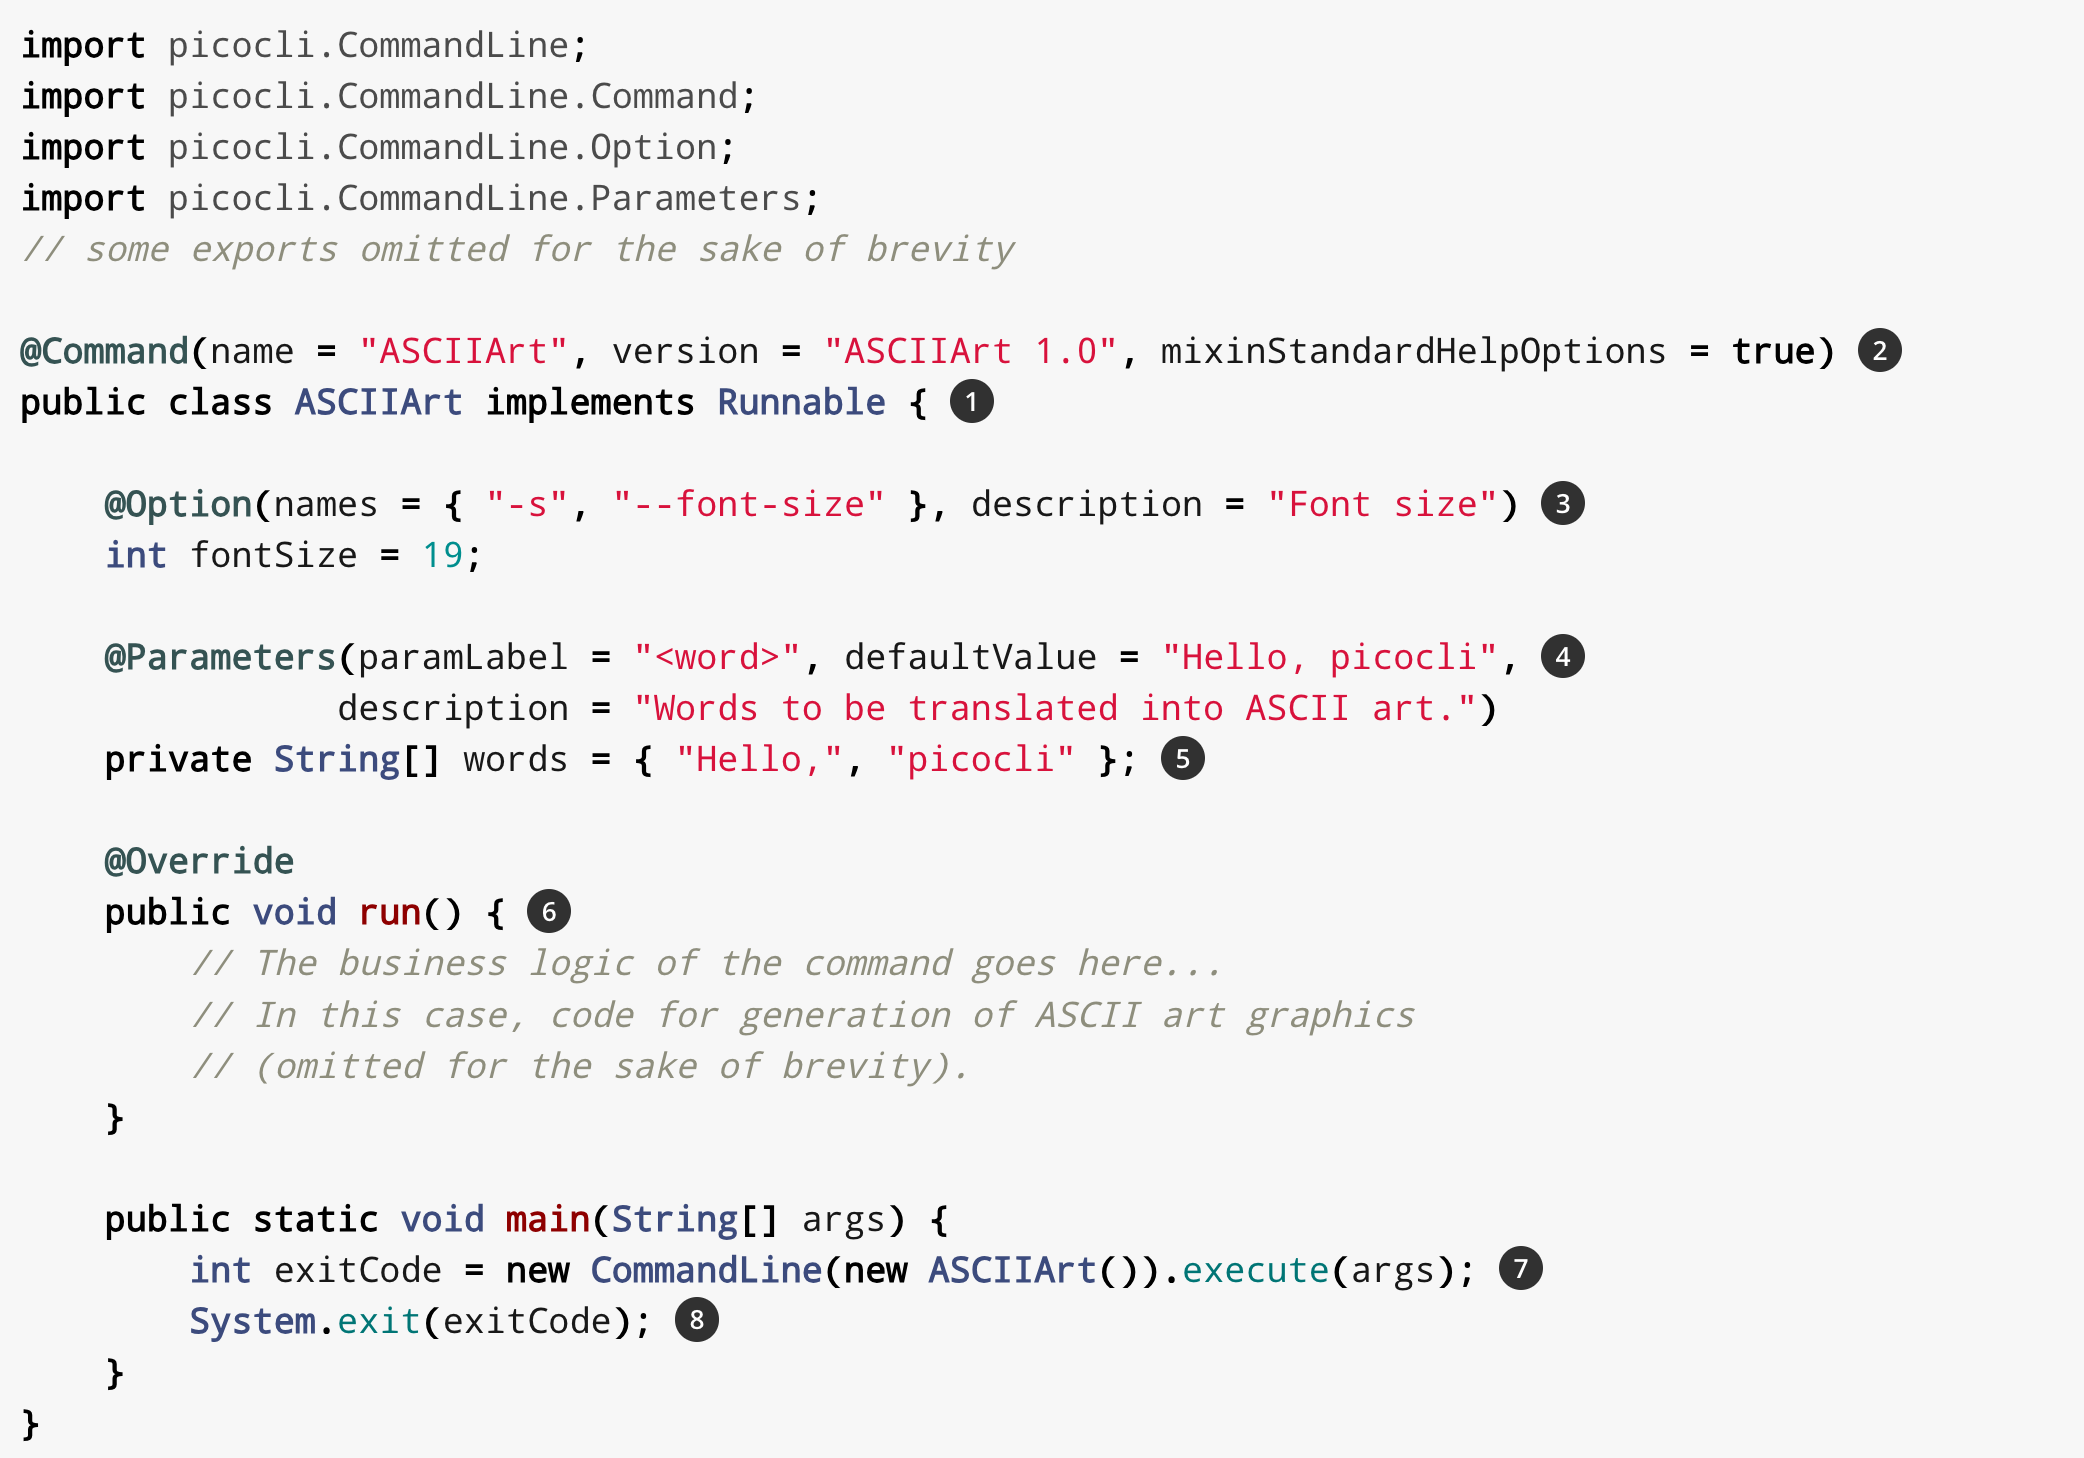
帮大家翻译一下:
-
创建一个实现 Runnable或Callable接口的类,这就是一个命令。 -
使用 @Command注解标记该类并为其命名,mixinStandardHelpOptions属性设置为 true 可以给应用程序自动添加--help和--version选项。 -
通过 @Option注解将字段设置为命令行选项,可以给选项设置名称和描述。 -
通过 @Parameters注解将字段设置为命令行参数,可以指定默认值、描述等信息。 -
Picocli 会将命令行参数转换为强类型值,并自动注入到注解字段中。 -
在类的 run或call方法中定义业务逻辑,当命令解析成功(用户敲了回车)后被调用。 -
在 main方法中,通过CommandLine对象的execute方法来处理用户输入的命令,剩下的就交给 Picocli 框架来解析命令并执行业务逻辑啦~ -
CommandLine.execute方法返回一个退出代码。可以调用System.exit并将该退出代码作为参数,从而向调用进程表示成功或失败。
3)让我们更改主程序的执行参数(args)来测试程序,能够成功看到输出结果,如下图:
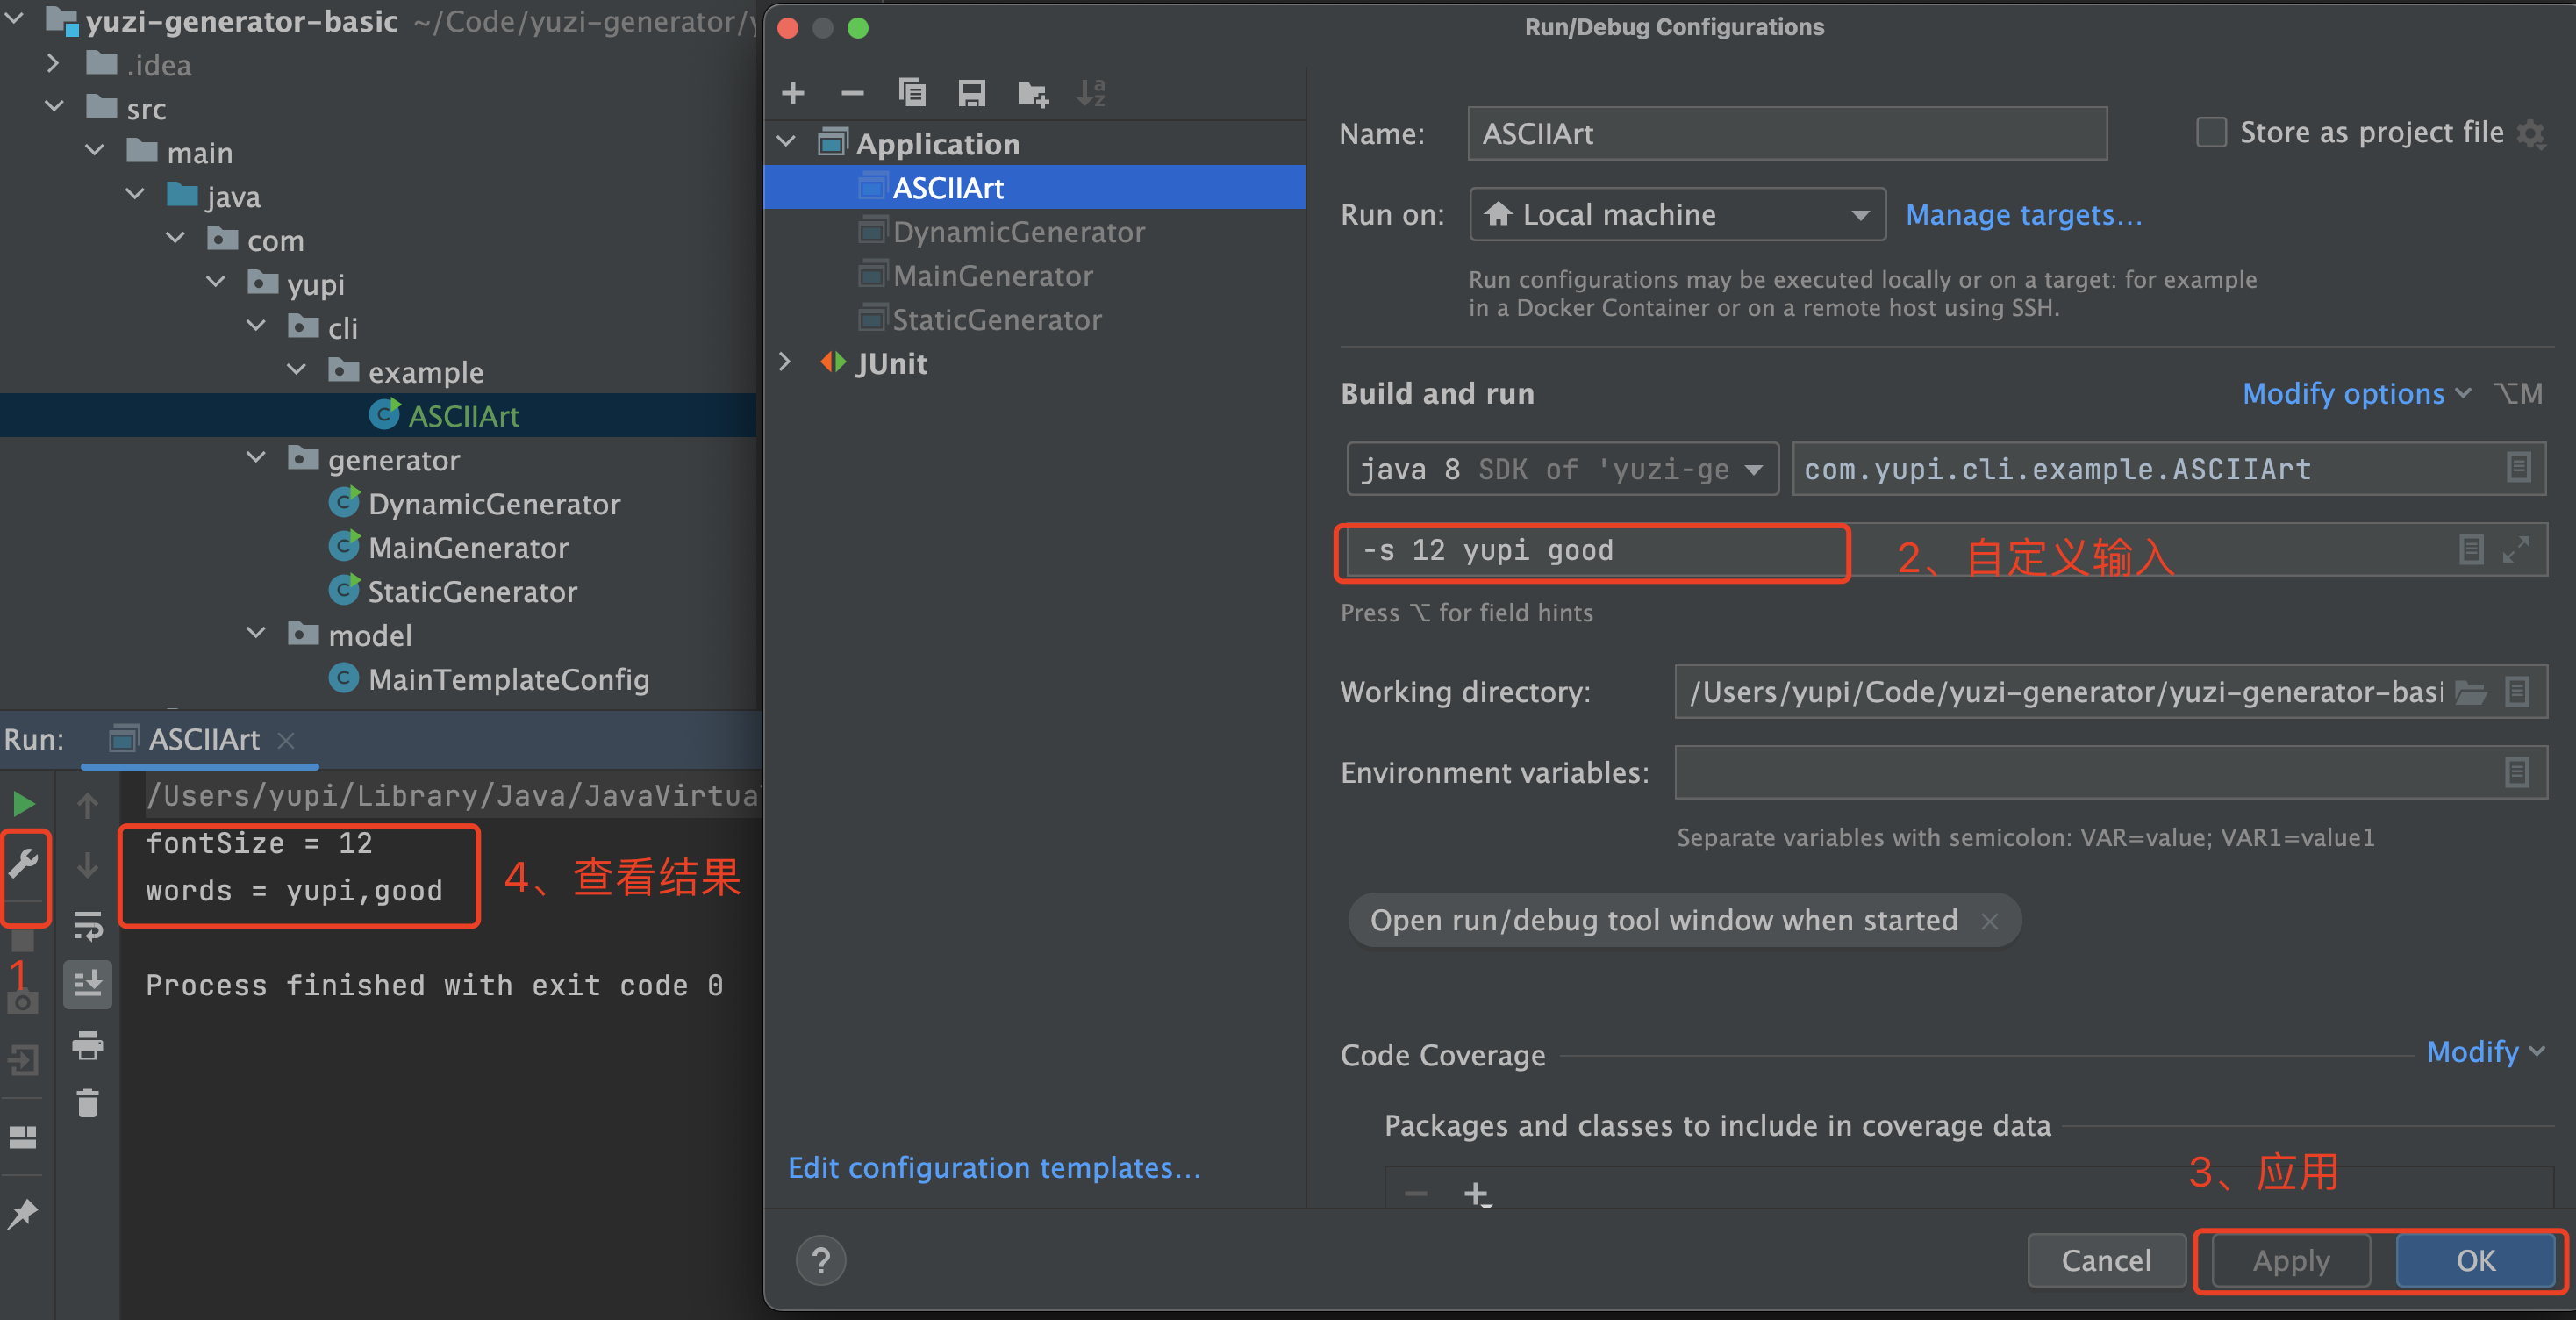
通过这个入门 Demo,我们可以简单总结一个命令的开发流程:
-
创建命令 -
设置选项和参数 -
编写命令执行的业务逻辑 -
通过 CommandLine 对象接受输入并执行命令
在跑通了入门 Demo 后,我们来学习一些 Picocli 开发命令行的实用功能。
实用功能
1、帮助手册
通过给类添加的 @Command 注解参数 mixinStandardHelpOptions 设置为 true 来开启:
@Command(name = "ASCIIArt", mixinStandardHelpOptions = true)
然后将主程序的输入参数设置为 --help 就能打印出命令的帮助手册信息了,如下图:

可以看到,Picocli 生成的帮助手册不仅规范、而且清晰完整。
2、命令解析
Picocli 最核心的能力就是命令解析,能够从一句完整的命令中解析选项和参数,并填充到对象的属性中。
Picocli 使用注解的方式实现命令解析,不需要自己编写代码,整个类看起来非常清晰。
最核心的 2 个注解其实在入门 Demo 中我们已经使用到了:
-
@Option注解用于解析选项 -
@Parameters注解用于解析参数

示例代码如下:
@Option(names = { "-s", "--font-size" }, description = "Font size")
int fontSize = 19;

@Parameters(paramLabel = "<word>", defaultValue = "Hello, picocli",
           description = "Words to be translated into ASCII art.")
private String[] words = { "Hello,", "picocli" };
可以给这些注解指定参数,比较常用的参数有:
1)@Option 注解的 names 参数:指定选项英文名称。
2)description 参数:指定描述信息,从而让生成的帮助手册和提示信息更清晰。
3)@Parameters 注解的 paramLabel 参数:参数标签,作用类似于描述信息。
4)@Parameters 注解的 defaultValue 参数:默认值,参考文档:https://picocli.info/#_default_values
5)required 参数:要求必填,参考文档:https://picocli.info/#_required_arguments
示例代码如下:
class RequiredOption {

    @Option(names = "-a", required = true)
    String author;
}
此外,命令解析天然支持 多值选项,只需要把对象属性的类型设置为数组类型即可,比如:
@Option(names = "-option")
int[] values;
具体可以参考官方文档:https://picocli.info/#_multiple_values
更多关于选项和参数注解的用法,也可以阅读官方文档学习:https://picocli.info/quick-guide.html#_options_and_parameters
3、交互式输入
所谓的交互式输入就是允许用户像跟程序聊天一样,在程序的指引下一个参数一个参数地输入。
如下图:

Picocli 为交互式输入提供了很好的支持,我梳理了大概 4 种交互式输入的模式。
1)基本能力
交互式输入的一个典型应用场景就是:用户要登录时,引导 ta 输入密码。
官方已经为我们提供了一段交互式输入的示例代码,鱼皮对它进行了简化,示例代码如下:
参考官方文档:https://picocli.info/#_interactive_password_options
package com.yupi.cli.example;

import picocli.CommandLine;
import picocli.CommandLine.Option;

import java.util.concurrent.Callable;

public class Login implements Callable<Integer> {
    @Option(names = {"-u", "--user"}, description = "User name")
    String user;

    @Option(names = {"-p", "--password"}, description = "Passphrase", interactive = true)
    String password;

    public Integer call() throws Exception {
        System.out.println("password = " + password);
        return 0;
    }

    public static void main(String[] args) {
        new CommandLine(new Login()).execute("-u", "user123", "-p");
    }
}
让我们分析下上面的代码,主要包含 4 个部分:
1)首先命令类需要实现 Callable 接口
public class Login implements Callable<Integer> {
 ...
}
2)将 @Option 注解的 interactive 参数设置为 true,表示该选项支持交互式输入
@Option(names = {"-p", "--password"}, interactive = true)
String password;
3)在所有参数都输入完成后,会执行 call 方法,可以在该方法中编写具体的业务逻辑:
public Integer call() throws Exception {
    System.out.println("password = " + password);
    return 0;
}
4)在 Main 方法中执行命令并传入参数:
new CommandLine(new Login()).execute("-u", "user123", "-p");
执行上述代码,看到程序提示我们输入密码:

注意,如果以 jar 包方式运行上述程序,用户的输入默认是不会显示在控制台的(类似输入密码时的体验)。从 Picocli 4.6 版本开始,可以通过指定 @Option 注解的 echo 参数为 true 来显示用户的输入,并通过 prompt 参数指定引导用户输入的提示语。
2)多个选项交互式
Picocli 支持在一个命令中指定多个交互式输入的选项,会按照顺序提示用户并接收输入。
在上述代码中再增加一个 checkPassword 选项,同样开启交互式输入,代码如下:
public class Login implements Callable<Integer> {
    @Option(names = {"-u", "--user"}, description = "User name")
    String user;

    @Option(names = {"-p", "--password"}, description = "Passphrase", interactive = true)
    String password;

    @Option(names = {"-cp", "--checkPassword"}, description = "Check Password", interactive = true)
    String checkPassword;

    public Integer call() throws Exception {
        System.out.println("password = " + password);
        System.out.println("checkPassword = " + checkPassword);
        return 0;
    }

    public static void main(String[] args) {
        new CommandLine(new Login()).execute("-u", "user123", "-p");
    }
}
但运行上述代码我们会发现,怎么只提示我输入了密码,没提示我输入确认密码呢?
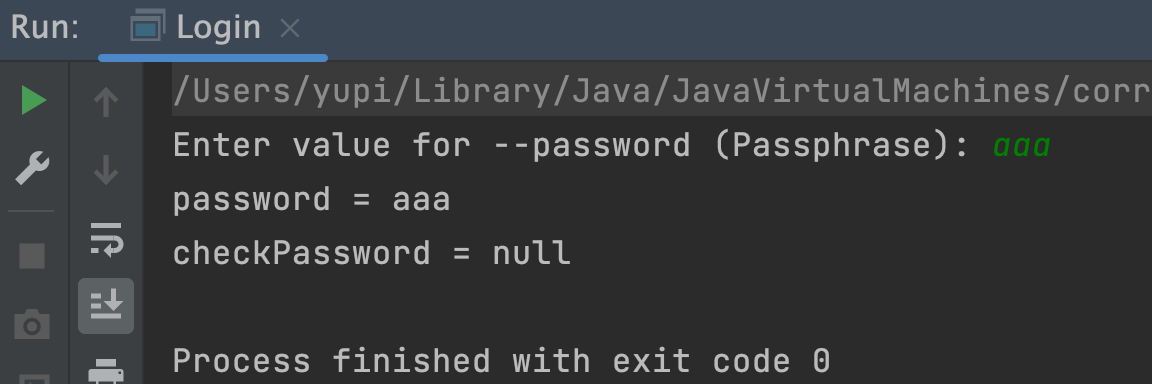
这是由于 Picocli 框架的规则,用户必须在命令中指定需要交互式输入的选项(比如 -p),才会引导用户输入。
所以我们需要修改上述代码中的 main 方法,给命令输入补充 -cp 参数:
public static void main(String[] args) {
    new CommandLine(new Login()).execute("-u", "user123", "-p", "-cp");
}
再次执行,这下程序会依次提醒我们输入两个选项啦:

根据实际使用情况,又可以将交互式输入分为 2 种模式:
-
可选交互式:用户可以直接在整行命令中输入选项,而不用给用户提示信息。 -
强制交互式:用户必须获得提示并输入某个选项,不允许不填写。
下面分别讲解这两种模式。
3)可选交互式
默认情况下,是无法直接在命令中给交互式选项指定任何参数的,只能通过交互式输入,比如命令中包含 -p xxx 会报错。
可选交互式官方文档:https://picocli.info/#_optionally_interactive
让我们测试一下,给上面的示例代码输入以下参数:
new CommandLine(new Login()).execute("-u", "user123", "-p", "xxx", "-cp");
执行效果如下图,出现了参数不匹配的报错:
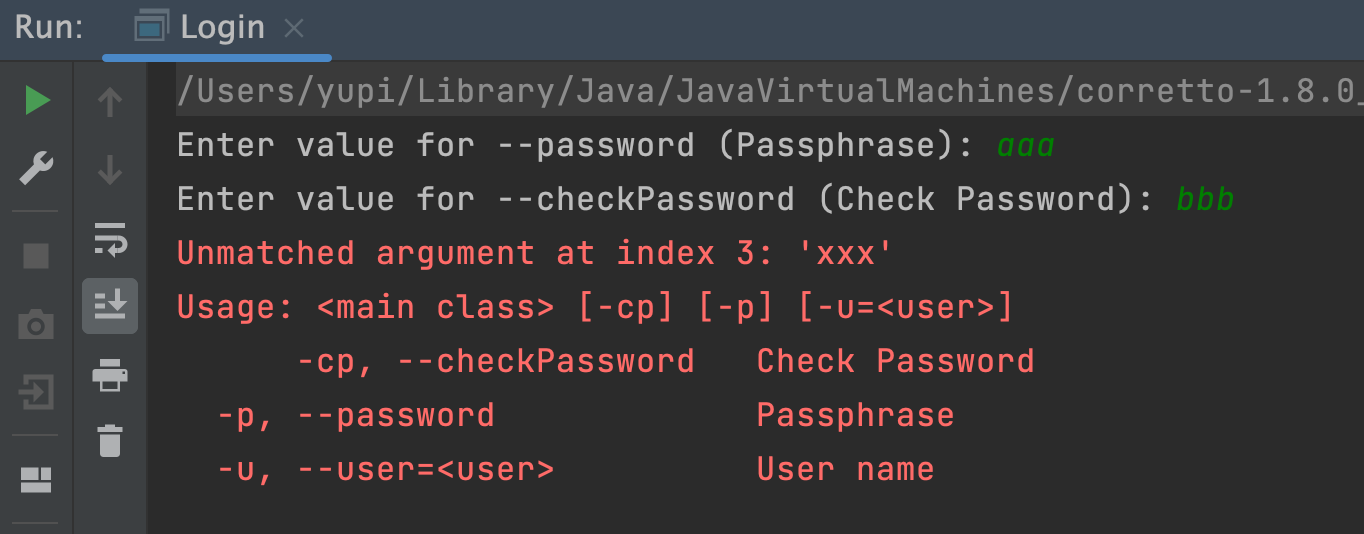
官方提供了可选交互式的解决方案,通过调整 @Option 注解中的 arity 属性来指定每个选项可接受的参数个数,就能解决这个问题。
arity 官方介绍:https://picocli.info/#_arity
示例代码如下:
@Option(names = {"-p", "--password"}, arity = "0..1", description = "Passphrase", interactive = true)
String password;
然后可以直接在完整命令中给交互式选项设置值:
new CommandLine(new Login()).execute("-u", "user123", "-p", "123", "-cp");
执行结果如图,不再提示让用户输入 password 选项,而是直接读取了命令中的值:

这里鱼皮推荐一个最佳实践:建议给所有需要交互式输入的选项都增加 arity 参数(一般是 arity = "0..1"),这样用户既可以在完整命令中直接给选项填充参数,也可以选择交互式输入。
示例代码如下:
public class Login implements Callable<Integer> {
    @Option(names = {"-u", "--user"}, description = "User name")
    String user;

    // 设置了 arity 参数,可选交互式
    @Option(names = {"-p", "--password"}, arity = "0..1", description = "Passphrase", interactive = true)
    String password;

    // 设置了 arity 参数,可选交互式
    @Option(names = {"-cp", "--checkPassword"}, arity = "0..1", description = "Check Password", interactive = true)
    String checkPassword;

    public Integer call() throws Exception {
        System.out.println("password = " + password);
        System.out.println("checkPassword = " + checkPassword);
        return 0;
    }

    public static void main(String[] args) {
        new CommandLine(new Login()).execute("-u", "user123", "-p", "123", "-cp", "456");
    }
}
4)强制交互式
在之前已经提到,如果用户不在命令中输入交互式选项(比如 -p),那么系统不会提示用户输入这个选项,属性的值将为默认值(比如 null)。
举个例子,下列命令中不带 -p 选项:
new CommandLine(new Login()).execute("-u", "user123");
执行就会发现,程序不会提示用户输入 -p 选项的参数,而是直接输出结果,值为 null:

但有些时候,我们要求用户必须输入某个选项,而不能使用默认的空值,怎么办呢?
官方给出了强制交互式的解决方案,参考文档:https://picocli.info/#_forcing_interactive_input
但是,官方的解决方案是需要自己定义业务逻辑的。原理是在命令执行后对属性进行判断,如果用户没有输入指定的参数,那么再通过 System.console().readLine 等方式提示用户输入,示例代码如下:
@Command
public class Main implements Runnable {
    @Option(names = "--interactive", interactive = true)
    String value;

    public void run() {
        if (value == null && System.console() != null) {
            // 主动提示用户输入
            value = System.console().readLine("Enter value for --interactive: ");
        }
        System.out.println("You provided value '" + value + "'");
    }

    public static void main(String[] args) {
        new CommandLine(new Main()).execute(args);
    }
}
个人不是很喜欢这种方案,因为要额外编写提示代码,感觉又回到自主实现了。
鱼皮想出的一种方案是,编写一段通用的校验程序,如果用户的输入命令中没有包含交互式选项,那么就自动为输入命令补充该选项即可,这样就能强制触发交互式输入。
说通俗一点,检测 args 数组中是否存在对应选项,不存在则为数组增加选项元素。
该思路作为一个小扩展点,实现起来并不复杂,大家可以自行实现。(小提示:可以利用反射自动读取必填的选项名称)
4、子命令
子命令是指命令中又包含一组命令,相当于命令的分组嵌套,适用于功能较多、较为复杂的命令行程序,比如 git、docker 命令等。
官方文档:https://picocli.info/#_subcommands
在 Picocli 中,提供了两种设置子命令的方式。
1)声明式
通过 @Command 注解的 subcommands 属性来给命令添加子命令,优点是更直观清晰。
示例代码如下:
@Command(subcommands = {
    GitStatus.class,
    GitCommit.class,
    GitAdd.class,
    GitBranch.class,
    GitCheckout.class,
    GitClone.class,
    GitDiff.class,
    GitMerge.class,
    GitPush.class,
    GitRebase.class,
    GitTag.class
})
public class Git { /* ... */ }
2)编程式
在创建 CommandLine 对象时,调用 addSubcommand 方法来绑定子命令,优点是更灵活。
示例代码如下:
CommandLine commandLine = new CommandLine(new Git())
        .addSubcommand("status",   new GitStatus())
        .addSubcommand("commit",   new GitCommit())
        .addSubcommand("add",      new GitAdd())
        .addSubcommand("branch",   new GitBranch())
        .addSubcommand("checkout", new GitCheckout())
        .addSubcommand("clone",    new GitClone())
        .addSubcommand("diff",     new GitDiff())
        .addSubcommand("merge",    new GitMerge())
        .addSubcommand("push",     new GitPush())
        .addSubcommand("rebase",   new GitRebase())
        .addSubcommand("tag",      new GitTag());
实践
让我们编写一个示例程序,支持增加、删除、查询 3 个子命令,并传入不同的 args 来测试效果。
完整代码如下:
package com.yupi.cli.example;

import picocli.CommandLine;
import picocli.CommandLine.Command;

@Command(name = "main", mixinStandardHelpOptions = true)
public class SubCommandExample implements Runnable {

    @Override
    public void run() {
        System.out.println("执行主命令");
    }

    @Command(name = "add", description = "增加", mixinStandardHelpOptions = true)
    static class AddCommand implements Runnable {
        public void run() {
            System.out.println("执行增加命令");
        }
    }

    @Command(name = "delete", description = "删除", mixinStandardHelpOptions = true)
    static class DeleteCommand implements Runnable {
        public void run() {
            System.out.println("执行删除命令");
        }
    }

    @Command(name = "query", description = "查询", mixinStandardHelpOptions = true)
    static class QueryCommand implements Runnable {
        public void run() {
            System.out.println("执行查询命令");
        }
    }

    public static void main(String[] args) {
        // 执行主命令
        String[] myArgs = new String[] { };
        // 查看主命令的帮助手册
//        String[] myArgs = new String[] { "--help" };
        // 执行增加命令
//        String[] myArgs = new String[] { "add" };
        // 执行增加命令的帮助手册
//        String[] myArgs = new String[] { "add", "--help" };
        // 执行不存在的命令,会报错
//        String[] myArgs = new String[] { "update" };
        int exitCode = new CommandLine(new SubCommandExample())
                .addSubcommand(new AddCommand())
                .addSubcommand(new DeleteCommand())
                .addSubcommand(new QueryCommand())
                .execute(myArgs);
        System.exit(exitCode);
    }
}
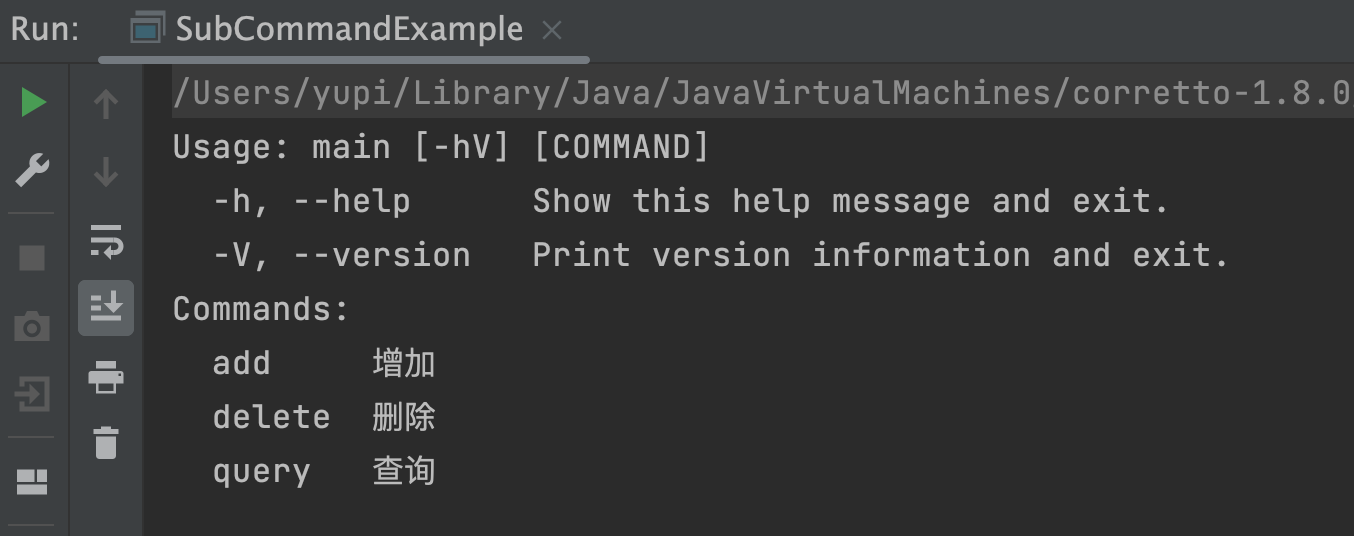
测试运行,发现当输入 --help 参数时,打印出了主命令和所有的子命令信息,证明子命令绑定成功:
实践
编程导航星球的定制化代码生成项目就是使用了 Picocli 来开发命令行应用。
👉🏻 编程导航原创项目教程系列:https://yuyuanweb.feishu.cn/wiki/SePYwTc9tipQiCktw7Uc7kujnCd
OK 就到这里,创作不易,学会的同学点个赞吧~
