转载请注明出处:🔗https://blog.csdn.net/weixin_44013533/article/details/135733479
作者:CSDN@|Ringleader|
参考:
- Input testing
- Getting started with Unity Test Framework
- HowToRunUnityUnitTest
- 如果对Unity的newInputSystem感兴趣可以参看我这篇文章:【Unity学习笔记】第十二 · New Input System 及其系统结构 和 源码浅析
使用步骤
-
打开Unity Test Runner(菜单栏中的 Windows▸General▸Test Runner)
-
添加测试文件夹,在此文件夹下添加assembly definition (菜单栏中: Create > Assembly Definition)

-
点击Assembly文件的Inspector窗口,添加 nunit.framework.dll、UnityEngine.TestRunner、 UnityEditor.TestRunner, 测试Input System时额外添加 Unity.InputSystem 和Unity.InputSystem.TestFramework。
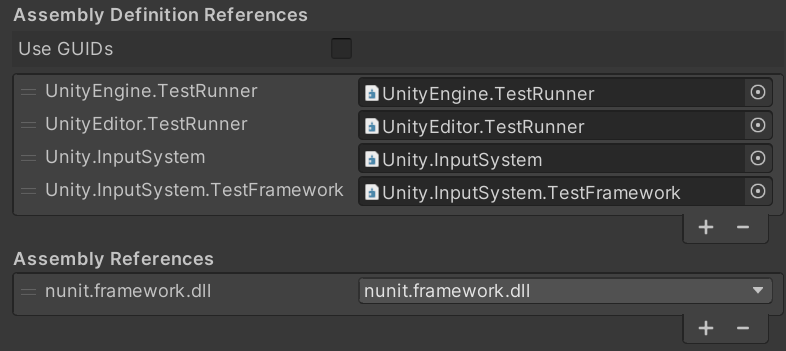
-
文件夹下添加代码,或使用NewInputSystem官方提供的测试用例 Unity-Technologies/InputSystem

-
运行测试

使用案例
放一个NewInputSystem的使用案例:
using System.Diagnostics.CodeAnalysis;
using NUnit.Framework;
using UnityEngine.InputSystem;#pragma warning disable CS0649// As should be obvious from the number of tests in here, the action system rivals the entire combined rest of the system
// in terms of complexity.
namespace Scenes.TestAction
{[SuppressMessage("ReSharper", "AccessToStaticMemberViaDerivedType")]public class TestAction : InputTestFixture{[Test][Category("Actions")]public void Actions_WhenShortcutsDisabled_AllConflictingActionsTrigger(){var keyboard = InputSystem.AddDevice<Keyboard>();var map1 = new InputActionMap("map1");var action1 = map1.AddAction(name: "action1");action1.AddCompositeBinding("2DVector").With("Up", "<Keyboard>/w").With("Down", "<Keyboard>/s").With("Left", "<Keyboard>/a").With("Right", "<Keyboard>/d");var map2 = new InputActionMap("map2");var action2 = map2.AddAction(name: "action2");action2.AddCompositeBinding("2DVector").With("Up", "<Keyboard>/w").With("Down", "<Keyboard>/s").With("Left", "<Keyboard>/a").With("Right", "<Keyboard>/d");var action3 = map2.AddAction(name: "action3", binding: "<Keyboard>/w");map1.Enable();map2.Enable();Press(keyboard.wKey);// All Actions were triggeredAssert.That(action1.WasPerformedThisFrame());Assert.That(action2.WasPerformedThisFrame());Assert.That(action3.WasPerformedThisFrame());}}}