arcgis实现截图/截屏功能
文章目录
- arcgis实现截图/截屏功能
- 前言
- 效果展示
- 相关代码
前言
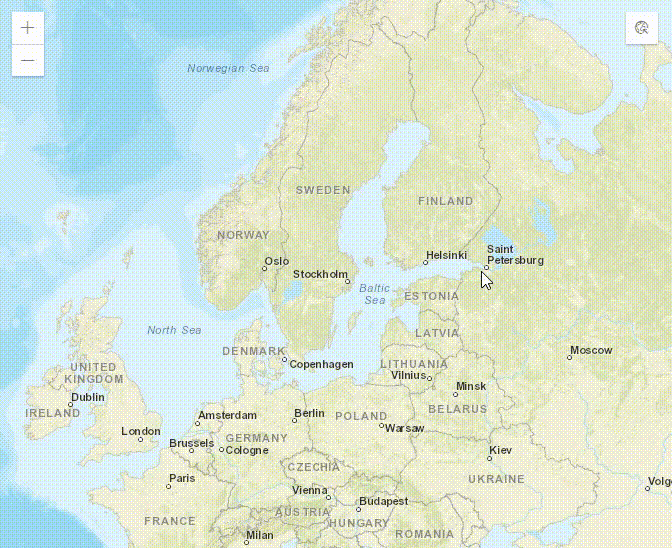
本篇将使用arcgis实现截图/截屏功能,类似于qq截图
效果展示
相关代码
<!DOCTYPE html>
<html>
<head><meta charset="utf-8"><meta name="viewport" content="initial-scale=1,maximum-scale=1,user-scalable=no"><title>4.5 地图截图</title><style>html,body,#viewDiv {padding: 0;margin: 0;height: 100%;width: 100%;}</style><link rel="stylesheet" href="https://js.arcgis.com/4.5/esri/css/main.css"><script src="http://ajax.aspnetcdn.com/ajax/jquery/jquery-1.7.2.min.js"></script><script src="https://js.arcgis.com/4.5/"></script><script>require(["esri/Map","esri/views/MapView","esri/geometry/Extent","esri/geometry/Point","esri/widgets/Print","esri/Graphic","dojo/on","dojo/dom","esri/layers/GraphicsLayer","esri/tasks/PrintTask","esri/tasks/support/PrintTemplate","esri/tasks/support/PrintParameters","esri/views/2d/draw/Draw","esri/geometry/Polygon","esri/geometry/Point","dojo/domReady!"], function(Map, MapView, Extent, Point, Print, Graphic, on, dom, GraphicsLayer, PrintTask, PrintTemplate, PrintParameters, Draw, Polygon, Point) {let map = new Map({basemap: "streets"});let tempGraphicsLayer = new GraphicsLayer();map.add(tempGraphicsLayer);let view = new MapView({container: "viewDiv",map: map,zoom: 4,center: [15, 65] // longitude, latitude});view.ui.add("screenshot", "top-right");view.then(function () {let printTask = new PrintTask("https://sampleserver6.arcgisonline.com/arcgis/rest/services/Utilities/PrintingTools/GPServer/Export%20Web%20Map%20Task");  let printTemplate = new PrintTemplate({format: "jpg",exportOptions: {dpi: 96,width: 700,height: 1100},  layout: "MAP_ONLY",layoutOptions: {"titleText": "","authorText": "","copyrightText": "","scalebarUnit": "",},showLabels: false,preserveScale: false,attributionVisible: false //是否显示地图属性});let draw = new Draw({view: view});let drawAction = null;//允许绘制矩形function enableCreateRectangle(draw, view) {isStartDraw = isEndDraw = false;// create() will return a reference to an instance of PolygonDrawActiondrawAction = draw.create("polygon", {mode: "click"});// focus the view to activate keyboard shortcuts for drawing polygonsview.focus();// listen to vertex-add event on the actiondrawAction.on("vertex-add", drawRectangle);drawAction.on("cursor-update", drawRectangle);drawAction.on("vertex-remove", drawRectangle);drawAction.on("draw-complete", endDraw);}let tempRectangle = [];//   是否开始绘制,是否结束绘制 , 是否最后一次绘制let isStartDraw = false, isEndDraw = false, isLastDraw = false;//   结束绘制        function endDraw(evt){isLastDraw = true;let graphics = drawRectangle(evt);isLastDraw = false;//  改变指针样式$(".esri-view-root").css("cursor", "default");let lonlat = graphics[graphics.length - 1].geometry.rings[0][3];//  添加 “取消”、“保存”按钮let submit = new Graphic({geometry: new Point({x: lonlat[0],y: lonlat[1],z: 0,spatialReference: view.spatialReference}),symbol: {type: "text",declaredClass: "clipBtn",color: [0, 0, 0, 1],haloColor: "black",haloSize: "1px",text: "截屏",xoffset: -12,yoffset: -24,font: { // autocast as Fontsize: 12,//                            weight: "bold",family: "sans-serif"}},attributes: {clipName: "确定"}});tempRectangle.push(submit);tempGraphicsLayer.add(tempRectangle[tempRectangle.length - 1]);let cancel = new Graphic({geometry: new Point({x: lonlat[0],y: lonlat[1],z: 0,spatialReference: view.spatialReference}),symbol: {type: "text",declaredClass: "clipBtn",color: "red",haloColor: "black",haloSize: "1px",text: "取消",xoffset: -48,yoffset: -24,font: { // autocast as Fontsize: 12,//                            weight: "bold",family: "sans-serif"}},attributes: {clipName: "取消"}});tempRectangle.push(cancel);tempGraphicsLayer.add(tempRectangle[tempRectangle.length - 1]);//绘制结束isEndDraw = true;}//   绘制多边形             	function drawRectangle(evt) {//顶点取第一个点和最后一个点let vertices = [evt.vertices[0], evt.vertices[evt.vertices.length - 1]];//判断drawAction类型switch(evt.type){case "vertex-add":    //鼠标按下或鼠标拖动isStartDraw = true;break;case "cursor-update": //鼠标未按下状态时的鼠标移动//判断是否开始绘制,若开始绘制后鼠标抬起,则结束绘制if(isStartDraw){drawAction.complete();isStartDraw = false;}return;break;case "vertex-drag":isStartDraw = true;break;default:break;}//   若未开始绘制,则返回             	if(!isStartDraw){return;}//remove existing graphicclearGraphics();// create a new rectanglelet polygon = createRectangle(vertices);// create a new graphic representing the polygon, add it to the viewtempRectangle.push(createGraphic(polygon));tempGraphicsLayer.add(tempRectangle[tempRectangle.length - 1]);return tempRectangle;}//  创建矩形             function createRectangle(vertices) {let rectangle = new Polygon({rings: vertices,spatialReference: view.spatialReference});//  添加四个角的标记点         	let extent = rectangle.extent.clone();if(extent.xmin != extent.xmax && extent.ymin != extent.ymax){let rings = [];rings.push([extent.xmax, extent.ymax]);rings.push([extent.xmin, extent.ymax]);rings.push([extent.xmin, extent.ymin]);rings.push([extent.xmax, extent.ymin]);let rectangle = new Polygon({rings: rings,spatialReference: view.spatialReference})//   若不是最后一次绘制,则添加四个角点                     //                        if(!isLastDraw){for(let i=0; i<rings.length; i++){let marker = new Graphic({geometry: new Point({x: rings[i][0],y: rings[i][1],z: 0,spatialReference: view.spatialReference}),symbol: {type: "simple-marker", // autocasts as new SimpleMarkerSymbol()color: [0, 0, 0],outline: { // autocasts as new SimpleLineSymbol()color: [0, 0, 0],width: 0.5}},attributes: {clipName: "extent_" + i}});tempRectangle.push(marker);tempGraphicsLayer.add(tempRectangle[tempRectangle.length - 1]);}//                        }return rectangle;}return rectangle;}// 清除截屏的要素               function clearGraphics(){if(tempRectangle.length > 0){for(let i=0; i<tempRectangle.length; i++){tempGraphicsLayer.remove(tempRectangle[i]);}}tempRectangle = [];}//  创建截屏要素              function createGraphic(rectangle) {graphic = new Graphic({geometry: rectangle,symbol: {type: "simple-fill", // autocasts as SimpleFillSymbolcolor: [0, 0, 0, 0.1],style: "solid",outline: { // autocasts as SimpleLineSymbolcolor: [0, 0, 0],width: 1}},attributes: {clipName: "clipRectangle"}});return graphic;}// 截图按钮点击事件let screenshotBtn = document.getElementById("screenshot");screenshotBtn.addEventListener("click", function() {//清除已绘制图形clearGraphics();isEndDraw = false;enableCreateRectangle(draw, view);view.focus();//  改变指针样式$(".esri-view-root").css("cursor", "crosshair");});// 监听地图点击事件             view.on("click", function(event){let screenPoint = {x: event.x,y: event.y};// 开始截屏/取消截屏if(isEndDraw){view.hitTest(screenPoint).then(function(response){if(response.results[0].graphic){let graphic = response.results[0].graphic;if(graphic.attributes.clipName){switch(graphic.attributes.clipName){case "确定":let extent = tempRectangle[4].geometry.extent;clearGraphics();//	       				                	let height = printTemplate.exportOptions.width*extent.height/extent.width;let minPoint = view.toScreen({x: extent.xmin, y: extent.ymin});let maxPoint = view.toScreen({x: extent.xmax, y: extent.ymax});let width = Math.abs(maxPoint.x - minPoint.x);let height = Math.abs(maxPoint.y - minPoint.y);printTemplate.exportOptions.width = width;printTemplate.exportOptions.height = height;//	开始打印       									let printParams = new PrintParameters({view: view,template: printTemplate,extent: extent });printTask.execute(printParams).then(function(evt){//	保存至本地	       						                    	let a = document.createElement('a');a.href = evt.url;a.download = '截图.jpg';a.click();//window.open(evt.url);}, function (evt) {alert("截图失败!");});break;case "取消":clearGraphics();isEndDraw = false;break;default: break;}}}});}});//	截屏范围拖动事件监听           	let isStartDrag = false, isAllDrag = false, dragHandle = {drag: {}}, isEnableDrag = true;let allDrag = {startPoint: [], endPoint: [], orignVertices: [[], []]};let dragVertices = [[], []];view.on("pointer-down", function(event){let screenPoint = {x: event.x,y: event.y};// 开始截屏/取消截屏if(isEndDraw){view.hitTest(screenPoint).then(function(response){if(response.results[0].graphic){let graphic = response.results[0].graphic;if(graphic.attributes.clipName){switch(graphic.attributes.clipName){case "确定":break;case "取消":break;case "clipRectangle":isStartDrag = isAllDrag = true;let sGraphic = tempRectangle[1];let nGraphic = tempRectangle[3];dragVertices = [[sGraphic.geometry.x, sGraphic.geometry.y],[nGraphic.geometry.x, nGraphic.geometry.y]];let point = view.toMap(screenPoint);allDrag.startPoint = [point.x, point.y];allDrag.orignVertices = [].concat(dragVertices);//  禁止地图拖动	       										dragHandle.drag = view.on('drag',function(e){e.stopPropagation()});break;default: if(graphic.attributes.clipName.indexOf("_") > -1){//	  开始拖动顶点     										isStartDrag = true;let index = graphic.attributes.clipName.split("_")[1];let nIndex = parseInt(index) + 2;if(nIndex > 3){nIndex = nIndex - 3 - 1;}let nGraphic = tempRectangle[nIndex];dragVertices[0] = [nGraphic.geometry.x, nGraphic.geometry.y];//  禁止地图拖动	       										dragHandle.drag = view.on('drag',function(e){e.stopPropagation()});}break;}}}});}})//	监听鼠标移动事件           	view.on('pointer-move', function(evt){let screenPoint = {x: evt.x, y: evt.y};let point = view.toMap(screenPoint);if(isEndDraw){//  改变指针样式$(".esri-view-root").css("cursor", "default");view.hitTest(screenPoint).then(function(response){if(response.results[0].graphic){let graphic = response.results[0].graphic;if(graphic.attributes.clipName){switch(graphic.attributes.clipName){case "确定"://  改变指针样式$(".esri-view-root").css("cursor", "pointer");break;case "取消"://  改变指针样式$(".esri-view-root").css("cursor", "pointer");break;case "clipRectangle"://  改变指针样式$(".esri-view-root").css("cursor", "move");break;case "extent_0"://  改变指针样式$(".esri-view-root").css("cursor", "ne-resize");break;case "extent_1"://  改变指针样式$(".esri-view-root").css("cursor", "se-resize");break;case "extent_2"://  改变指针样式$(".esri-view-root").css("cursor", "sw-resize");break;case "extent_3"://  改变指针样式$(".esri-view-root").css("cursor", "se-resize");break;default: break;}}}});}//	若开始拖动           		if(isStartDrag){if(isAllDrag){//整体拖动allDrag.endPoint = [point.x, point.y];//	 xy差值         				let gapX = allDrag.endPoint[0] - allDrag.startPoint[0];let gapY = allDrag.endPoint[1] - allDrag.startPoint[1];dragVertices = [[allDrag.orignVertices[0][0] + gapX, allDrag.orignVertices[0][1] + gapY],[allDrag.orignVertices[1][0] + gapX, allDrag.orignVertices[1][1] + gapY]];let evt = {type: "vertex-drag",vertices: dragVertices}endDraw(evt);}else{//顶点拖动dragVertices[1] = [point.x, point.y];let evt = {type: "vertex-drag",vertices: dragVertices}endDraw(evt);}}});// 监听鼠标移动事件           	view.on('pointer-up', function(evt){let point = view.toMap({x: evt.x, y: evt.y});if(isStartDrag){if(isAllDrag){//整体拖动allDrag.endPoint = [point.x, point.y];//	 xy差值         				let gapX = allDrag.endPoint[0] - allDrag.startPoint[0];let gapY = allDrag.endPoint[1] - allDrag.startPoint[1];dragVertices = [[allDrag.orignVertices[0][0] + gapX, allDrag.orignVertices[0][1] + gapY],[allDrag.orignVertices[1][0] + gapX, allDrag.orignVertices[1][1] + gapY]];let evt = {type: "vertex-drag",vertices: dragVertices}endDraw(evt);//  恢复地图拖动	   dragHandle.drag.remove();isStartDrag = isAllDrag = false;allDrag = {startPoint: [], endPoint: []};}else{dragVertices[1] = [point.x, point.y];let evt = {type: "vertex-drag",vertices: dragVertices}endDraw(evt);//  恢复地图拖动	   dragHandle.drag.remove();isStartDrag = false;}}});        });           });</script>
</head><body><div id="viewDiv"></div><div id="screenshot" class="esri-widget-button esri-widget esri-interactive" title="截图"><a role="tab" data-toggle="tab" class="esri-icon-applications"></a></div>
</body>
</html>
说明:该代码不太好 只实现了功能 在性能上和代码上还需优化!!!