(Beta)使用缩放点积注意力(SDPA)实现高性能 Transformer
原文:
pytorch.org/tutorials/intermediate/scaled_dot_product_attention_tutorial.html译者:飞龙
协议:CC BY-NC-SA 4.0
注意
点击这里下载完整示例代码
作者: Driss Guessous
摘要
在本教程中,我们想要强调一个新的torch.nn.functional函数,可以帮助实现 Transformer 架构。该函数被命名为torch.nn.functional.scaled_dot_product_attention。有关该函数的详细描述,请参阅PyTorch 文档。该函数已经被整合到torch.nn.MultiheadAttention和torch.nn.TransformerEncoderLayer中。
概述
在高层次上,这个 PyTorch 函数根据论文Attention is all you need中的定义,计算查询、键和值之间的缩放点积注意力(SDPA)。虽然这个函数可以使用现有函数在 PyTorch 中编写,但融合实现可以比朴素实现提供更大的性能优势。
融合实现
对于 CUDA 张量输入,该函数将分派到以下实现之一:
-
FlashAttention:具有 IO 感知的快速和内存高效的精确注意力
-
内存高效注意力
-
一个在 C++中定义的 PyTorch 实现
注意
本教程需要 PyTorch 2.0.0 或更高版本。
import torch
import torch.nn as nn
import torch.nn.functional as F
device = "cuda" if torch.cuda.is_available() else "cpu"# Example Usage:
query, key, value = torch.randn(2, 3, 8, device=device), torch.randn(2, 3, 8, device=device), torch.randn(2, 3, 8, device=device)
F.scaled_dot_product_attention(query, key, value)
tensor([[[-1.3321, -0.3489, 0.3015, -0.3912, 0.9867, 0.3137, -0.0691,-1.2593],[-1.0882, 0.2506, 0.6491, 0.1360, 0.5238, -0.2448, -0.0820,-0.6171],[-1.0012, 0.3990, 0.6441, -0.0277, 0.5325, -0.2564, -0.0607,-0.6404]],[[ 0.6091, 0.0708, 0.6188, 0.3252, -0.1598, 0.4197, -0.2335,0.0630],[ 0.5285, 0.3890, -0.2649, 0.3706, -0.3839, 0.1963, -0.6242,0.2312],[ 0.4048, 0.0762, 0.3777, 0.4689, -0.2978, 0.2754, -0.6429,0.1037]]], device='cuda:0')
显式调度控制
虽然函数将隐式分派到三种实现之一,但用户也可以通过使用上下文管理器来显式控制分派。这个上下文管理器允许用户显式禁用某些实现。如果用户想确保函数确实使用了最快的实现来处理他们特定的输入,上下文管理器可以用来测量性能。
# Lets define a helpful benchmarking function:
import torch.utils.benchmark as benchmark
def benchmark_torch_function_in_microseconds(f, *args, **kwargs):t0 = benchmark.Timer(stmt="f(*args, **kwargs)", globals={"args": args, "kwargs": kwargs, "f": f})return t0.blocked_autorange().mean * 1e6# Lets define the hyper-parameters of our input
batch_size = 32
max_sequence_len = 1024
num_heads = 32
embed_dimension = 32dtype = torch.float16query = torch.rand(batch_size, num_heads, max_sequence_len, embed_dimension, device=device, dtype=dtype)
key = torch.rand(batch_size, num_heads, max_sequence_len, embed_dimension, device=device, dtype=dtype)
value = torch.rand(batch_size, num_heads, max_sequence_len, embed_dimension, device=device, dtype=dtype)print(f"The default implementation runs in {benchmark_torch_function_in_microseconds(F.scaled_dot_product_attention,  query,  key,  value):.3f} microseconds")# Lets explore the speed of each of the 3 implementations
from torch.backends.cuda import sdp_kernel, SDPBackend# Helpful arguments mapper
backend_map = {SDPBackend.MATH: {"enable_math": True, "enable_flash": False, "enable_mem_efficient": False},SDPBackend.FLASH_ATTENTION: {"enable_math": False, "enable_flash": True, "enable_mem_efficient": False},SDPBackend.EFFICIENT_ATTENTION: {"enable_math": False, "enable_flash": False, "enable_mem_efficient": True}
}with sdp_kernel(**backend_map[SDPBackend.MATH]):print(f"The math implementation runs in {benchmark_torch_function_in_microseconds(F.scaled_dot_product_attention,  query,  key,  value):.3f} microseconds")with sdp_kernel(**backend_map[SDPBackend.FLASH_ATTENTION]):try:print(f"The flash attention implementation runs in {benchmark_torch_function_in_microseconds(F.scaled_dot_product_attention,  query,  key,  value):.3f} microseconds")except RuntimeError:print("FlashAttention is not supported. See warnings for reasons.")with sdp_kernel(**backend_map[SDPBackend.EFFICIENT_ATTENTION]):try:print(f"The memory efficient implementation runs in {benchmark_torch_function_in_microseconds(F.scaled_dot_product_attention,  query,  key,  value):.3f} microseconds")except RuntimeError:print("EfficientAttention is not supported. See warnings for reasons.")
The default implementation runs in 2263.405 microseconds
The math implementation runs in 19254.524 microseconds
The flash attention implementation runs in 2262.901 microseconds
The memory efficient implementation runs in 4143.146 microseconds
硬件依赖
取决于您在哪台机器上运行上述单元格以及可用的硬件,您的结果可能会有所不同。- 如果您没有 GPU 并且在 CPU 上运行,则上下文管理器将不起作用,所有三次运行应该返回类似的时间。- 取决于您的显卡支持的计算能力,闪光注意力或内存效率可能会失败。
因果自注意力
以下是受Andrej Karpathy NanoGPT仓库启发的多头因果自注意力块的示例实现。
class CausalSelfAttention(nn.Module):def __init__(self, num_heads: int, embed_dimension: int, bias: bool=False, is_causal: bool=False, dropout:float=0.0):super().__init__()assert embed_dimension % num_heads == 0# key, query, value projections for all heads, but in a batchself.c_attn = nn.Linear(embed_dimension, 3 * embed_dimension, bias=bias)# output projectionself.c_proj = nn.Linear(embed_dimension, embed_dimension, bias=bias)# regularizationself.dropout = dropoutself.resid_dropout = nn.Dropout(dropout)self.num_heads = num_headsself.embed_dimension = embed_dimension# Perform causal maskingself.is_causal = is_causaldef forward(self, x):# calculate query, key, values for all heads in batch and move head forward to be the batch dimquery_projected = self.c_attn(x)batch_size = query_projected.size(0)embed_dim = query_projected.size(2)head_dim = embed_dim // (self.num_heads * 3)query, key, value = query_projected.chunk(3, -1)query = query.view(batch_size, -1, self.num_heads, head_dim).transpose(1, 2)key = key.view(batch_size, -1, self.num_heads, head_dim).transpose(1, 2)value = value.view(batch_size, -1, self.num_heads, head_dim).transpose(1, 2)if self.training:dropout = self.dropoutis_causal = self.is_causalelse:dropout = 0.0is_causal = Falsey = F.scaled_dot_product_attention(query, key, value, attn_mask=None, dropout_p=dropout, is_causal=is_causal)y = y.transpose(1, 2).view(batch_size, -1, self.num_heads * head_dim)y = self.resid_dropout(self.c_proj(y))return ynum_heads = 8
heads_per_dim = 64
embed_dimension = num_heads * heads_per_dim
dtype = torch.float16
model = CausalSelfAttention(num_heads=num_heads, embed_dimension=embed_dimension, bias=False, is_causal=True, dropout=0.1).to("cuda").to(dtype).eval()
print(model)
CausalSelfAttention((c_attn): Linear(in_features=512, out_features=1536, bias=False)(c_proj): Linear(in_features=512, out_features=512, bias=False)(resid_dropout): Dropout(p=0.1, inplace=False)
)
NestedTensor和密集张量支持
SDPA 支持 NestedTensor 和 Dense 张量输入。NestedTensors 处理输入为批量可变长度序列的情况,无需将每个序列填充到批量中的最大长度。有关 NestedTensors 的更多信息,请参阅 torch.nested 和 NestedTensors 教程。
import random
def generate_rand_batch(batch_size,max_sequence_len,embed_dimension,pad_percentage=None,dtype=torch.float16,device="cuda",
):if not pad_percentage:return (torch.randn(batch_size,max_sequence_len,embed_dimension,dtype=dtype,device=device,),None,)# Random sequence lengthsseq_len_list = [int(max_sequence_len * (1 - random.gauss(pad_percentage, 0.01)))for _ in range(batch_size)]# Make random entry in the batch have max sequence lengthseq_len_list[random.randint(0, batch_size - 1)] = max_sequence_lenreturn (torch.nested.nested_tensor([torch.randn(seq_len, embed_dimension,dtype=dtype, device=device)for seq_len in seq_len_list]),seq_len_list,)random_nt, _ = generate_rand_batch(32, 512, embed_dimension, pad_percentage=0.5, dtype=dtype, device=device)
random_dense, _ = generate_rand_batch(32, 512, embed_dimension, pad_percentage=None, dtype=dtype, device=device)# Currently the fused implementations don't support ``NestedTensor`` for training
model.eval()with sdp_kernel(**backend_map[SDPBackend.FLASH_ATTENTION]):try:print(f"Random NT runs in {benchmark_torch_function_in_microseconds(model,  random_nt):.3f} microseconds")print(f"Random Dense runs in {benchmark_torch_function_in_microseconds(model,  random_dense):.3f} microseconds")except RuntimeError:print("FlashAttention is not supported. See warnings for reasons.")
/opt/conda/envs/py_3.10/lib/python3.10/site-packages/torch/nested/__init__.py:166: UserWarning:The PyTorch API of nested tensors is in prototype stage and will change in the near future. (Triggered internally at ../aten/src/ATen/NestedTensorImpl.cpp:177.)Random NT runs in 560.000 microseconds
Random Dense runs in 938.743 microseconds
使用 torch.compile 进行 SDPA
随着 PyTorch 2.0 的发布,引入了一个名为 torch.compile() 的新功能,可以在 eager 模式下提供显著的性能改进。缩放点积注意力与 torch.compile() 完全兼容。为了演示这一点,让我们使用 torch.compile() 编译 CausalSelfAttention 模块,并观察结果性能的提升。
batch_size = 32
max_sequence_len = 256
x = torch.rand(batch_size, max_sequence_len,embed_dimension, device=device, dtype=dtype)
print(f"The non compiled module runs in {benchmark_torch_function_in_microseconds(model,  x):.3f} microseconds")compiled_model = torch.compile(model)
# Let's compile it
compiled_model(x)
print(f"The compiled module runs in {benchmark_torch_function_in_microseconds(compiled_model,  x):.3f} microseconds")
The non compiled module runs in  407.788 microseconds
The compiled module runs in  521.239 microseconds
确切的执行时间取决于机器,但对于我的结果是:非编译模块运行时间为 166.616 微秒,编译模块运行时间为 166.726 微秒。这不是我们预期的结果。让我们深入一点。PyTorch 带有一个令人惊叹的内置分析器,您可以使用它来检查代码的性能特征。
from torch.profiler import profile, record_function, ProfilerActivity
activities = [ProfilerActivity.CPU]
if device == 'cuda':activities.append(ProfilerActivity.CUDA)with profile(activities=activities, record_shapes=False) as prof:with record_function(" Non-Compilied Causal Attention"):for _ in range(25):model(x)
print(prof.key_averages().table(sort_by="cuda_time_total", row_limit=10))with profile(activities=activities, record_shapes=False) as prof:with record_function("Compiled Causal Attention"):for _ in range(25):compiled_model(x)
print(prof.key_averages().table(sort_by="cuda_time_total", row_limit=10))# For even more insights, you can export the trace and use ``chrome://tracing`` to view the results
#
# .. code-block:: python
#
#    prof.export_chrome_trace("compiled_causal_attention_trace.json").
-------------------------------------------------------  ------------  ------------  ------------  ------------  ------------  ------------  ------------  ------------  ------------  ------------Name    Self CPU %      Self CPU   CPU total %     CPU total  CPU time avg     Self CUDA   Self CUDA %    CUDA total  CUDA time avg    # of Calls
-------------------------------------------------------  ------------  ------------  ------------  ------------  ------------  ------------  ------------  ------------  ------------  ------------Non-Compilied Causal Attention        18.51%       2.124ms        75.85%       8.703ms       8.703ms       0.000us         0.00%      11.033ms      11.033ms             1aten::matmul         2.23%     256.000us        27.21%       3.122ms      62.440us       0.000us         0.00%       8.156ms     163.120us            50aten::mm        19.17%       2.200ms        23.15%       2.656ms      53.120us       7.752ms        76.53%       8.156ms     163.120us            50aten::linear         1.83%     210.000us        30.51%       3.501ms      70.020us       0.000us         0.00%       7.846ms     156.920us            50ampere_fp16_s1688gemm_fp16_128x128_ldg8_f2f_tn         0.00%       0.000us         0.00%       0.000us       0.000us       5.554ms        54.83%       5.554ms     222.160us            25aten::scaled_dot_product_attention         1.97%     226.000us        18.83%       2.161ms      86.440us       0.000us         0.00%       2.877ms     115.080us            25aten::_scaled_dot_product_flash_attention         3.51%     403.000us        16.86%       1.935ms      77.400us       0.000us         0.00%       2.877ms     115.080us            25aten::_flash_attention_forward         4.62%     530.000us        12.10%       1.388ms      55.520us       2.377ms        23.47%       2.877ms     115.080us            25
void pytorch_flash::flash_fwd_kernel<pytorch_flash::...         0.00%       0.000us         0.00%       0.000us       0.000us       2.377ms        23.47%       2.377ms      95.080us            25
ampere_fp16_s1688gemm_fp16_128x128_ldg8_f2f_stages_3...         0.00%       0.000us         0.00%       0.000us       0.000us       2.198ms        21.70%       2.198ms      87.920us            25
-------------------------------------------------------  ------------  ------------  ------------  ------------  ------------  ------------  ------------  ------------  ------------  ------------
Self CPU time total: 11.474ms
Self CUDA time total: 10.129ms-------------------------------------------------------  ------------  ------------  ------------  ------------  ------------  ------------  ------------  ------------  ------------  ------------Name    Self CPU %      Self CPU   CPU total %     CPU total  CPU time avg     Self CUDA   Self CUDA %    CUDA total  CUDA time avg    # of Calls
-------------------------------------------------------  ------------  ------------  ------------  ------------  ------------  ------------  ------------  ------------  ------------  ------------Compiled Causal Attention         9.79%       1.158ms        93.81%      11.091ms      11.091ms       0.000us         0.00%      10.544ms      10.544ms             1Torch-Compiled Region         8.51%       1.006ms        82.19%       9.717ms     388.680us       0.000us         0.00%      10.544ms     421.760us            25CompiledFunction        41.11%       4.861ms        72.93%       8.622ms     344.880us       0.000us         0.00%      10.544ms     421.760us            25aten::mm         7.96%     941.000us        12.70%       1.502ms      30.040us       7.755ms        76.49%       7.843ms     156.860us            50ampere_fp16_s1688gemm_fp16_128x128_ldg8_f2f_tn         0.00%       0.000us         0.00%       0.000us       0.000us       5.556ms        54.80%       5.556ms     222.240us            25aten::_scaled_dot_product_flash_attention         2.30%     272.000us        15.12%       1.788ms      71.520us       0.000us         0.00%       2.701ms     108.040us            25aten::_flash_attention_forward         4.58%     541.000us        11.52%       1.362ms      54.480us       2.383ms        23.51%       2.701ms     108.040us            25
void pytorch_flash::flash_fwd_kernel<pytorch_flash::...         0.00%       0.000us         0.00%       0.000us       0.000us       2.383ms        23.51%       2.383ms      95.320us            25
ampere_fp16_s1688gemm_fp16_128x128_ldg8_f2f_stages_3...         0.00%       0.000us         0.00%       0.000us       0.000us       2.199ms        21.69%       2.199ms      87.960us            25cudaStreamIsCapturing         0.24%      28.000us         0.24%      28.000us       1.120us     222.000us         2.19%     222.000us       8.880us            25
-------------------------------------------------------  ------------  ------------  ------------  ------------  ------------  ------------  ------------  ------------  ------------  ------------
Self CPU time total: 11.823ms
Self CUDA time total: 10.138ms
前面的代码片段生成了一个报告,列出了消耗最多 GPU 执行时间的前 10 个 PyTorch 函数,分别针对编译和非编译模块。分析显示,GPU 上花费的大部分时间集中在两个模块的相同一组函数上。这里的原因是torch.compile非常擅长消除与 PyTorch 相关的框架开销。如果您的模型启动了大型、高效的 CUDA 内核,比如这里的CausalSelfAttention,那么 PyTorch 的开销就可以被隐藏起来。
实际上,您的模块通常不是由单个CausalSelfAttention块组成的。在与Andrej Karpathy NanoGPT存储库进行实验时,编译模块的时间从每个训练步骤的6090.49ms降至3273.17ms!这是在 NanoGPT 训练莎士比亚数据集的提交ae3a8d5上完成的。
结论
在本教程中,我们演示了torch.nn.functional.scaled_dot_product_attention的基本用法。我们展示了如何使用sdp_kernel上下文管理器来确保在 GPU 上使用特定的实现。此外,我们构建了一个简单的CausalSelfAttention模块,可以与NestedTensor一起使用,并且可以在 torch 中编译。在这个过程中,我们展示了如何使用性能分析工具来探索用户定义模块的性能特征。
脚本的总运行时间:(0 分钟 7.800 秒)
下载 Python 源代码:scaled_dot_product_attention_tutorial.py
下载 Jupyter 笔记本:scaled_dot_product_attention_tutorial.ipynb
Sphinx-Gallery 生成的图库
知识蒸馏教程
原文:
pytorch.org/tutorials/beginner/knowledge_distillation_tutorial.html译者:飞龙
协议:CC BY-NC-SA 4.0
注意
点击这里下载完整示例代码
作者:Alexandros Chariton
知识蒸馏是一种技术,它可以实现从大型、计算昂贵的模型向较小的模型进行知识转移,而不会失去有效性。这使得在性能较弱的硬件上部署成为可能,从而使评估更快速、更高效。
在本教程中,我们将进行一系列旨在提高轻量级神经网络准确性的实验,使用更强大的网络作为教师。轻量级网络的计算成本和速度将保持不变,我们的干预仅关注其权重,而不是其前向传递。这项技术的应用可以在无人机或手机等设备中找到。在本教程中,我们不使用任何外部包,因为我们需要的一切都可以在torch和torchvision中找到。
在本教程中,您将学习:
-
如何修改模型类以提取隐藏表示并将其用于进一步计算
-
如何修改 PyTorch 中的常规训练循环,以包含额外的损失,例如用于分类的交叉熵
-
如何通过使用更复杂的模型作为教师来提高轻量级模型的性能
先决条件
-
1 GPU,4GB 内存
-
PyTorch v2.0 或更高版本
-
CIFAR-10 数据集(通过脚本下载并保存在名为
/data的目录中)
import torch
import torch.nn as nn
import torch.optim as optim
import torchvision.transforms as transforms
import torchvision.datasets as datasets# Check if GPU is available, and if not, use the CPU
device = torch.device("cuda" if torch.cuda.is_available() else "cpu")
加载 CIFAR-10
CIFAR-10 是一个包含十个类别的流行图像数据集。我们的目标是为每个输入图像预测以下类别之一。

CIFAR-10 图像示例
输入图像是 RGB 格式的,因此它们有 3 个通道,尺寸为 32x32 像素。基本上,每个图像由 3 x 32 x 32 = 3072 个数字描述,取值范围从 0 到 255。神经网络中的常见做法是对输入进行归一化,这样做有多种原因,包括避免常用激活函数中的饱和现象,增加数值稳定性。我们的归一化过程包括沿每个通道减去平均值并除以标准差。张量“mean=[0.485, 0.456, 0.406]”和“std=[0.229, 0.224, 0.225]”已经计算出来,它们代表了 CIFAR-10 预定义子集中用作训练集的每个通道的平均值和标准差。请注意,我们也在测试集中使用这些值,而不是从头开始重新计算平均值和标准差。这是因为网络是在减去和除以上述数字产生的特征上进行训练的,我们希望保持一致性。此外,在现实生活中,我们无法计算测试集的平均值和标准差,因为根据我们的假设,在那时这些数据将不可访问。
最后,我们经常将这个留出的集合称为验证集,并在优化模型在验证集上的性能后使用一个单独的集合,称为测试集。这样做是为了避免基于单一指标的贪婪和偏见优化选择模型。
# Below we are preprocessing data for CIFAR-10\. We use an arbitrary batch size of 128.
transforms_cifar = transforms.Compose([transforms.ToTensor(),transforms.Normalize(mean=[0.485, 0.456, 0.406], std=[0.229, 0.224, 0.225]),
])# Loading the CIFAR-10 dataset:
train_dataset = datasets.CIFAR10(root='./data', train=True, download=True, transform=transforms_cifar)
test_dataset = datasets.CIFAR10(root='./data', train=False, download=True, transform=transforms_cifar)
Files already downloaded and verified
Files already downloaded and verified
注意
这一部分仅适用于对快速结果感兴趣的 CPU 用户。只有在您对小规模实验感兴趣时才使用此选项。请记住,代码应该在任何 GPU 上都能运行得相当快速。从训练/测试数据集中仅选择前num_images_to_keep张图片
#from torch.utils.data import Subset
#num_images_to_keep = 2000
#train_dataset = Subset(train_dataset, range(min(num_images_to_keep, 50_000)))
#test_dataset = Subset(test_dataset, range(min(num_images_to_keep, 10_000)))
#Dataloaders
train_loader = torch.utils.data.DataLoader(train_dataset, batch_size=128, shuffle=True, num_workers=2)
test_loader = torch.utils.data.DataLoader(test_dataset, batch_size=128, shuffle=False, num_workers=2)
定义模型类和实用函数
接下来,我们需要定义我们的模型类。这里需要设置几个用户定义的参数。我们使用两种不同的架构,保持在实验中固定滤波器的数量,以确保公平比较。这两种架构都是卷积神经网络(CNN),具有不同数量的卷积层作为特征提取器,然后是一个具有 10 个类别的分类器。对于学生,滤波器和神经元的数量较小。
# Deeper neural network class to be used as teacher:
class DeepNN(nn.Module):def __init__(self, num_classes=10):super(DeepNN, self).__init__()self.features = nn.Sequential(nn.Conv2d(3, 128, kernel_size=3, padding=1),nn.ReLU(),nn.Conv2d(128, 64, kernel_size=3, padding=1),nn.ReLU(),nn.MaxPool2d(kernel_size=2, stride=2),nn.Conv2d(64, 64, kernel_size=3, padding=1),nn.ReLU(),nn.Conv2d(64, 32, kernel_size=3, padding=1),nn.ReLU(),nn.MaxPool2d(kernel_size=2, stride=2),)self.classifier = nn.Sequential(nn.Linear(2048, 512),nn.ReLU(),nn.Dropout(0.1),nn.Linear(512, num_classes))def forward(self, x):x = self.features(x)x = torch.flatten(x, 1)x = self.classifier(x)return x# Lightweight neural network class to be used as student:
class LightNN(nn.Module):def __init__(self, num_classes=10):super(LightNN, self).__init__()self.features = nn.Sequential(nn.Conv2d(3, 16, kernel_size=3, padding=1),nn.ReLU(),nn.MaxPool2d(kernel_size=2, stride=2),nn.Conv2d(16, 16, kernel_size=3, padding=1),nn.ReLU(),nn.MaxPool2d(kernel_size=2, stride=2),)self.classifier = nn.Sequential(nn.Linear(1024, 256),nn.ReLU(),nn.Dropout(0.1),nn.Linear(256, num_classes))def forward(self, x):x = self.features(x)x = torch.flatten(x, 1)x = self.classifier(x)return x
我们使用 2 个函数来帮助我们在原始分类任务上生成和评估结果。一个函数名为train,接受以下参数:
-
model: 通过这个函数训练(更新其权重)的模型实例。 -
train_loader: 我们在上面定义了我们的train_loader,它的工作是将数据馈送到模型中。 -
epochs: 我们循环遍历数据集的次数。 -
learning_rate: 学习率决定了我们朝着收敛的步长应该有多大。步长太大或太小都可能有害。 -
device: 确定要在哪个设备上运行工作负载。可以根据可用性选择 CPU 或 GPU。
我们的测试函数类似,但将使用test_loader来从测试集中加载图像。
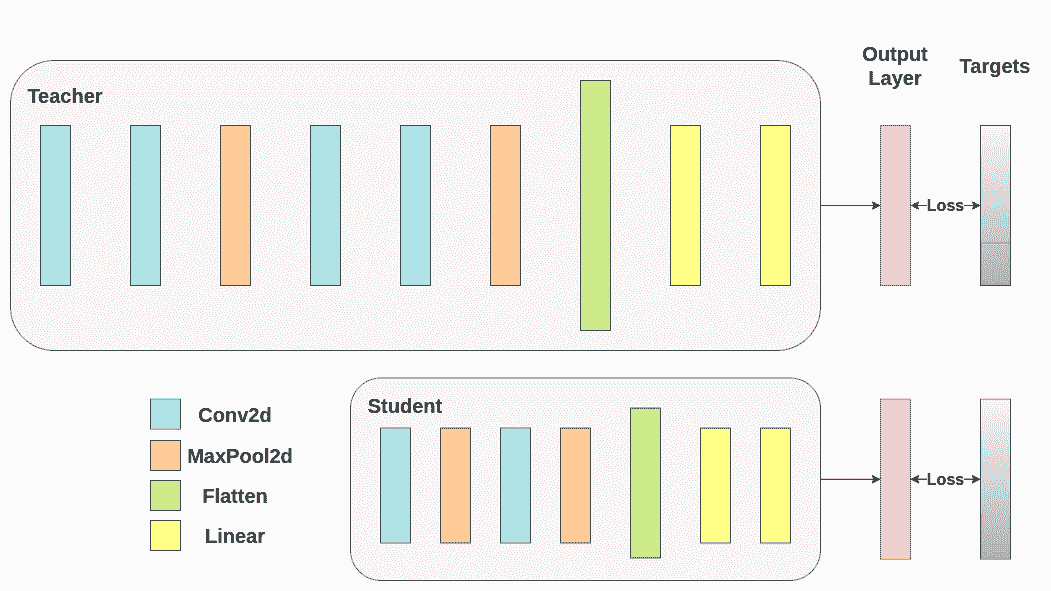
使用交叉熵训练两个网络。学生将被用作基准:
def train(model, train_loader, epochs, learning_rate, device):criterion = nn.CrossEntropyLoss()optimizer = optim.Adam(model.parameters(), lr=learning_rate)model.train()for epoch in range(epochs):running_loss = 0.0for inputs, labels in train_loader:# inputs: A collection of batch_size images# labels: A vector of dimensionality batch_size with integers denoting class of each imageinputs, labels = inputs.to(device), labels.to(device)optimizer.zero_grad()outputs = model(inputs)# outputs: Output of the network for the collection of images. A tensor of dimensionality batch_size x num_classes# labels: The actual labels of the images. Vector of dimensionality batch_sizeloss = criterion(outputs, labels)loss.backward()optimizer.step()running_loss += loss.item()print(f"Epoch {epoch+1}/{epochs}, Loss: {running_loss / len(train_loader)}")def test(model, test_loader, device):model.to(device)model.eval()correct = 0total = 0with torch.no_grad():for inputs, labels in test_loader:inputs, labels = inputs.to(device), labels.to(device)outputs = model(inputs)_, predicted = torch.max(outputs.data, 1)total += labels.size(0)correct += (predicted == labels).sum().item()accuracy = 100 * correct / totalprint(f"Test Accuracy: {accuracy:.2f}%")return accuracy
交叉熵运行
为了可重现性,我们需要设置 torch 手动种子。我们使用不同的方法训练网络,因此为了公平比较它们,最好使用相同的权重初始化网络。首先通过交叉熵训练教师网络:
torch.manual_seed(42)
nn_deep = DeepNN(num_classes=10).to(device)
train(nn_deep, train_loader, epochs=10, learning_rate=0.001, device=device)
test_accuracy_deep = test(nn_deep, test_loader, device)# Instantiate the lightweight network:
torch.manual_seed(42)
nn_light = LightNN(num_classes=10).to(device)
Epoch 1/10, Loss: 1.33431153483403
Epoch 2/10, Loss: 0.8656839088100912
Epoch 3/10, Loss: 0.6777699019597925
Epoch 4/10, Loss: 0.5402812090371271
Epoch 5/10, Loss: 0.4225304535663951
Epoch 6/10, Loss: 0.3173445740243053
Epoch 7/10, Loss: 0.2325386164324058
Epoch 8/10, Loss: 0.17896929922539864
Epoch 9/10, Loss: 0.1499793469581915
Epoch 10/10, Loss: 0.12164150110310148
Test Accuracy: 75.18%
我们实例化了另一个轻量级网络模型来比较它们的性能。反向传播对权重初始化很敏感,因此我们需要确保这两个网络具有完全相同的初始化。
torch.manual_seed(42)
new_nn_light = LightNN(num_classes=10).to(device)
为了确保我们已经创建了第一个网络的副本,我们检查其第一层的范数。如果匹配,则我们可以安全地得出结论,这些网络确实是相同的。
# Print the norm of the first layer of the initial lightweight model
print("Norm of 1st layer of nn_light:", torch.norm(nn_light.features[0].weight).item())
# Print the norm of the first layer of the new lightweight model
print("Norm of 1st layer of new_nn_light:", torch.norm(new_nn_light.features[0].weight).item())
Norm of 1st layer of nn_light: 2.327361822128296
Norm of 1st layer of new_nn_light: 2.327361822128296
打印每个模型中的参数总数:
total_params_deep = "{:,}".format(sum(p.numel() for p in nn_deep.parameters()))
print(f"DeepNN parameters: {total_params_deep}")
total_params_light = "{:,}".format(sum(p.numel() for p in nn_light.parameters()))
print(f"LightNN parameters: {total_params_light}")
DeepNN parameters: 1,186,986
LightNN parameters: 267,738
使用交叉熵损失训练和测试轻量级网络:
train(nn_light, train_loader, epochs=10, learning_rate=0.001, device=device)
test_accuracy_light_ce = test(nn_light, test_loader, device)
Epoch 1/10, Loss: 1.4691094873506394
Epoch 2/10, Loss: 1.157914390344449
Epoch 3/10, Loss: 1.0261659164867742
Epoch 4/10, Loss: 0.9236082335567231
Epoch 5/10, Loss: 0.8480177427191868
Epoch 6/10, Loss: 0.7821924878508234
Epoch 7/10, Loss: 0.7189932451833545
Epoch 8/10, Loss: 0.6598629956050297
Epoch 9/10, Loss: 0.6044211582759457
Epoch 10/10, Loss: 0.5556994059201702
Test Accuracy: 70.60%
正如我们所看到的,根据测试准确性,我们现在可以比较将作为教师使用的更深层网络与我们假定的学生的轻量级网络。到目前为止,我们的学生尚未干预教师,因此这种性能是学生本身实现的。到目前为止的指标可以在以下行中看到:
print(f"Teacher accuracy: {test_accuracy_deep:.2f}%")
print(f"Student accuracy: {test_accuracy_light_ce:.2f}%")
Teacher accuracy: 75.18%
Student accuracy: 70.60%
知识蒸馏运行
现在让我们尝试通过将教师纳入来提高学生网络的测试准确性。知识蒸馏是一种直接的技术,基于这样一个事实,即两个网络都输出一个关于我们的类别的概率分布。因此,这两个网络共享相同数量的输出神经元。该方法通过将一个额外的损失纳入传统的交叉熵损失来实现,这个额外的损失是基于教师网络的 softmax 输出的。假设是,一个经过适当训练的教师网络的输出激活包含了额外的信息,可以在训练过程中被学生网络利用。原始工作表明,利用软目标中较小概率的比率可以帮助实现深度神经网络的基本目标,即在数据上创建一个相似对象映射在一起的结构。例如,在 CIFAR-10 中,如果卡车的轮子存在,它可能被误认为是汽车或飞机,但不太可能被误认为是狗。因此,合理地假设有价值的信息不仅存在于一个经过适当训练模型的顶部预测中,而且存在于整个输出分布中。然而,仅仅使用交叉熵并不能充分利用这些信息,因为对于未预测类别的激活往往非常小,传播的梯度不能有意义地改变权重以构建这种理想的向量空间。
在继续定义引入师生动态的第一个辅助函数时,我们需要包含一些额外的参数:
-
T: 温度控制输出分布的平滑度。较大的T会导致更平滑的分布,因此较小的概率会得到更大的提升。 -
soft_target_loss_weight: 为即将包含的额外目标分配的权重。 -
ce_loss_weight: 分配给交叉熵的权重。调整这些权重会推动网络朝着优化任一目标的方向。
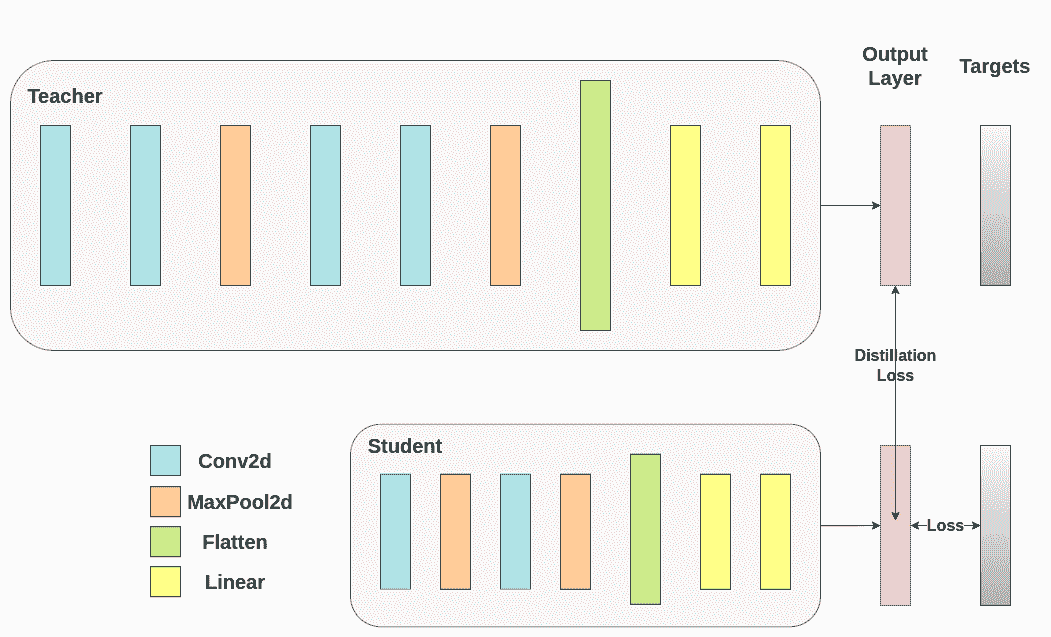
蒸馏损失是从网络的 logits 计算的。它只返回梯度给学生:
def train_knowledge_distillation(teacher, student, train_loader, epochs, learning_rate, T, soft_target_loss_weight, ce_loss_weight, device):ce_loss = nn.CrossEntropyLoss()optimizer = optim.Adam(student.parameters(), lr=learning_rate)teacher.eval()  # Teacher set to evaluation modestudent.train() # Student to train modefor epoch in range(epochs):running_loss = 0.0for inputs, labels in train_loader:inputs, labels = inputs.to(device), labels.to(device)optimizer.zero_grad()# Forward pass with the teacher model - do not save gradients here as we do not change the teacher's weightswith torch.no_grad():teacher_logits = teacher(inputs)# Forward pass with the student modelstudent_logits = student(inputs)#Soften the student logits by applying softmax first and log() secondsoft_targets = nn.functional.softmax(teacher_logits / T, dim=-1)soft_prob = nn.functional.log_softmax(student_logits / T, dim=-1)# Calculate the soft targets loss. Scaled by T**2 as suggested by the authors of the paper "Distilling the knowledge in a neural network"soft_targets_loss = -torch.sum(soft_targets * soft_prob) / soft_prob.size()[0] * (T**2)# Calculate the true label losslabel_loss = ce_loss(student_logits, labels)# Weighted sum of the two lossesloss = soft_target_loss_weight * soft_targets_loss + ce_loss_weight * label_lossloss.backward()optimizer.step()running_loss += loss.item()print(f"Epoch {epoch+1}/{epochs}, Loss: {running_loss  /  len(train_loader)}")# Apply ``train_knowledge_distillation`` with a temperature of 2\. Arbitrarily set the weights to 0.75 for CE and 0.25 for distillation loss.
train_knowledge_distillation(teacher=nn_deep, student=new_nn_light, train_loader=train_loader, epochs=10, learning_rate=0.001, T=2, soft_target_loss_weight=0.25, ce_loss_weight=0.75, device=device)
test_accuracy_light_ce_and_kd = test(new_nn_light, test_loader, device)# Compare the student test accuracy with and without the teacher, after distillation
print(f"Teacher accuracy: {test_accuracy_deep:.2f}%")
print(f"Student accuracy without teacher: {test_accuracy_light_ce:.2f}%")
print(f"Student accuracy with CE + KD: {test_accuracy_light_ce_and_kd:.2f}%")
Epoch 1/10, Loss: 2.7032457148022666
Epoch 2/10, Loss: 2.1822731882105093
Epoch 3/10, Loss: 1.9572431745431613
Epoch 4/10, Loss: 1.7957131417511065
Epoch 5/10, Loss: 1.6697854071931766
Epoch 6/10, Loss: 1.5559934722188185
Epoch 7/10, Loss: 1.464548922865592
Epoch 8/10, Loss: 1.379408223244845
Epoch 9/10, Loss: 1.306471157409346
Epoch 10/10, Loss: 1.2383389463814933
Test Accuracy: 70.57%
Teacher accuracy: 75.18%
Student accuracy without teacher: 70.60%
Student accuracy with CE + KD: 70.57%
余弦损失最小化运行
随意调整控制 softmax 函数软度和损失系数的温度参数。在神经网络中,很容易包含额外的损失函数到主要目标中,以实现更好的泛化。让我们尝试为学生包含一个目标,但现在让我们专注于他们的隐藏状态而不是输出层。我们的目标是通过包含一个天真的损失函数,使得随着损失的减少,传递给分类器的后续展平向量变得更加“相似”,从而将信息从教师的表示传达给学生。当然,教师不会更新其权重,因此最小化仅取决于学生的权重。这种方法背后的理念是,我们假设教师模型具有更好的内部表示,学生不太可能在没有外部干预的情况下实现,因此我们人为地推动学生模仿教师的内部表示。这是否最终会帮助学生并不明显,因为推动轻量级网络达到这一点可能是一件好事,假设我们已经找到了导致更好测试准确性的内部表示,但也可能是有害的,因为网络具有不同的架构,学生没有与教师相同的学习能力。换句话说,没有理由要求这两个向量,学生的和教师的,每个分量都匹配。学生可能达到教师的一个排列的内部表示,这样同样有效。尽管如此,我们仍然可以运行一个快速实验来了解这种方法的影响。我们将使用CosineEmbeddingLoss,其公式如下:

CosineEmbeddingLoss 的公式
显然,我们首先需要解决一件事情。当我们将蒸馏应用于输出层时,我们提到两个网络具有相同数量的神经元,等于类的数量。然而,在跟随我们的卷积层之后的层中并非如此。在这里,老师在最终卷积层展平后拥有比学生更多的神经元。我们的损失函数接受两个相同维度的向量作为输入,因此我们需要以某种方式将它们匹配。我们将通过在老师的卷积层后包含一个平均池化层来解决这个问题,以减少其维度以匹配学生的维度。
为了继续,我们将修改我们的模型类,或者创建新的类。现在,前向函数不仅返回网络的 logits,还返回卷积层后的扁平化隐藏表示。我们为修改后的教师包括了上述的池化操作。
class ModifiedDeepNNCosine(nn.Module):def __init__(self, num_classes=10):super(ModifiedDeepNNCosine, self).__init__()self.features = nn.Sequential(nn.Conv2d(3, 128, kernel_size=3, padding=1),nn.ReLU(),nn.Conv2d(128, 64, kernel_size=3, padding=1),nn.ReLU(),nn.MaxPool2d(kernel_size=2, stride=2),nn.Conv2d(64, 64, kernel_size=3, padding=1),nn.ReLU(),nn.Conv2d(64, 32, kernel_size=3, padding=1),nn.ReLU(),nn.MaxPool2d(kernel_size=2, stride=2),)self.classifier = nn.Sequential(nn.Linear(2048, 512),nn.ReLU(),nn.Dropout(0.1),nn.Linear(512, num_classes))def forward(self, x):x = self.features(x)flattened_conv_output = torch.flatten(x, 1)x = self.classifier(flattened_conv_output)flattened_conv_output_after_pooling = torch.nn.functional.avg_pool1d(flattened_conv_output, 2)return x, flattened_conv_output_after_pooling# Create a similar student class where we return a tuple. We do not apply pooling after flattening.
class ModifiedLightNNCosine(nn.Module):def __init__(self, num_classes=10):super(ModifiedLightNNCosine, self).__init__()self.features = nn.Sequential(nn.Conv2d(3, 16, kernel_size=3, padding=1),nn.ReLU(),nn.MaxPool2d(kernel_size=2, stride=2),nn.Conv2d(16, 16, kernel_size=3, padding=1),nn.ReLU(),nn.MaxPool2d(kernel_size=2, stride=2),)self.classifier = nn.Sequential(nn.Linear(1024, 256),nn.ReLU(),nn.Dropout(0.1),nn.Linear(256, num_classes))def forward(self, x):x = self.features(x)flattened_conv_output = torch.flatten(x, 1)x = self.classifier(flattened_conv_output)return x, flattened_conv_output# We do not have to train the modified deep network from scratch of course, we just load its weights from the trained instance
modified_nn_deep = ModifiedDeepNNCosine(num_classes=10).to(device)
modified_nn_deep.load_state_dict(nn_deep.state_dict())# Once again ensure the norm of the first layer is the same for both networks
print("Norm of 1st layer for deep_nn:", torch.norm(nn_deep.features[0].weight).item())
print("Norm of 1st layer for modified_deep_nn:", torch.norm(modified_nn_deep.features[0].weight).item())# Initialize a modified lightweight network with the same seed as our other lightweight instances. This will be trained from scratch to examine the effectiveness of cosine loss minimization.
torch.manual_seed(42)
modified_nn_light = ModifiedLightNNCosine(num_classes=10).to(device)
print("Norm of 1st layer:", torch.norm(modified_nn_light.features[0].weight).item())
Norm of 1st layer for deep_nn: 7.510530471801758
Norm of 1st layer for modified_deep_nn: 7.510530471801758
Norm of 1st layer: 2.327361822128296
当然,我们需要改变训练循环,因为现在模型返回一个元组(logits, hidden_representation)。使用一个示例输入张量,我们可以打印它们的形状。
# Create a sample input tensor
sample_input = torch.randn(128, 3, 32, 32).to(device) # Batch size: 128, Filters: 3, Image size: 32x32# Pass the input through the student
logits, hidden_representation = modified_nn_light(sample_input)# Print the shapes of the tensors
print("Student logits shape:", logits.shape) # batch_size x total_classes
print("Student hidden representation shape:", hidden_representation.shape) # batch_size x hidden_representation_size# Pass the input through the teacher
logits, hidden_representation = modified_nn_deep(sample_input)# Print the shapes of the tensors
print("Teacher logits shape:", logits.shape) # batch_size x total_classes
print("Teacher hidden representation shape:", hidden_representation.shape) # batch_size x hidden_representation_size
Student logits shape: torch.Size([128, 10])
Student hidden representation shape: torch.Size([128, 1024])
Teacher logits shape: torch.Size([128, 10])
Teacher hidden representation shape: torch.Size([128, 1024])
在我们的情况下,hidden_representation_size是1024。这是学生最终卷积层的扁平化特征图,正如你所看到的,它是其分类器的输入。对于教师来说也是1024,因为我们使用avg_pool1d从2048得到了这个结果。这里应用的损失只影响了在损失计算之前的学生权重。换句话说,它不会影响学生的分类器。修改后的训练循环如下:
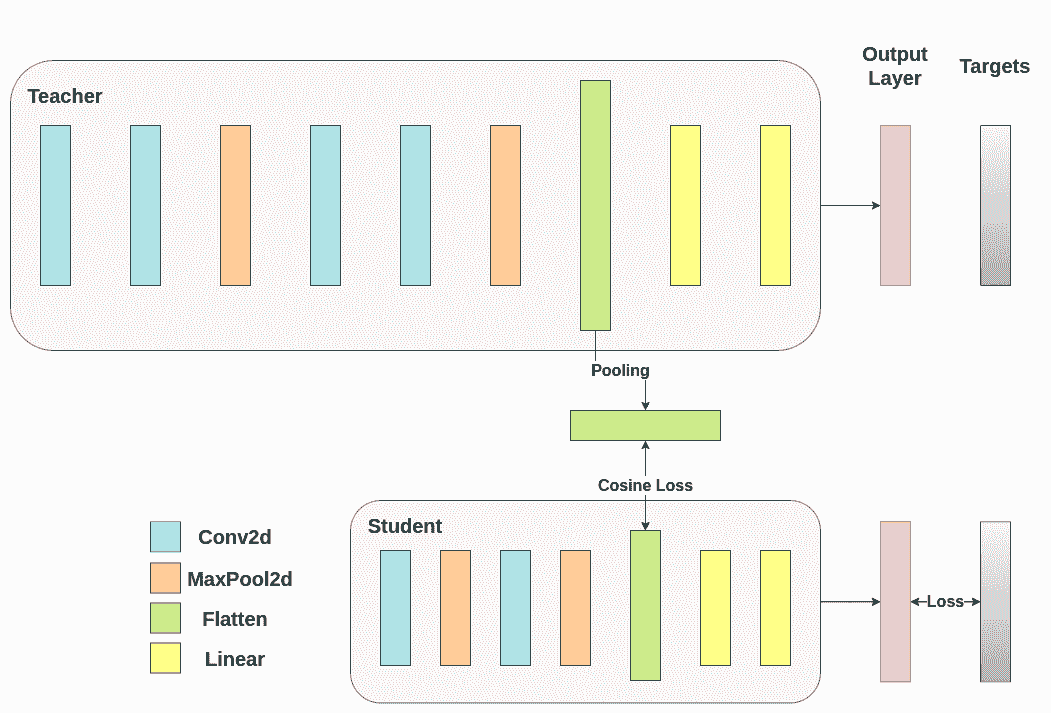
在余弦损失最小化中,我们希望通过向学生返回梯度来最大化两个表示的余弦相似度:
def train_cosine_loss(teacher, student, train_loader, epochs, learning_rate, hidden_rep_loss_weight, ce_loss_weight, device):ce_loss = nn.CrossEntropyLoss()cosine_loss = nn.CosineEmbeddingLoss()optimizer = optim.Adam(student.parameters(), lr=learning_rate)teacher.to(device)student.to(device)teacher.eval() # Teacher set to evaluation modestudent.train() # Student to train modefor epoch in range(epochs):running_loss = 0.0for inputs, labels in train_loader:inputs, labels = inputs.to(device), labels.to(device)optimizer.zero_grad()# Forward pass with the teacher model and keep only the hidden representationwith torch.no_grad():_, teacher_hidden_representation = teacher(inputs)# Forward pass with the student modelstudent_logits, student_hidden_representation = student(inputs)# Calculate the cosine loss. Target is a vector of ones. From the loss formula above we can see that is the case where loss minimization leads to cosine similarity increase.hidden_rep_loss = cosine_loss(student_hidden_representation, teacher_hidden_representation, target=torch.ones(inputs.size(0)).to(device))# Calculate the true label losslabel_loss = ce_loss(student_logits, labels)# Weighted sum of the two lossesloss = hidden_rep_loss_weight * hidden_rep_loss + ce_loss_weight * label_lossloss.backward()optimizer.step()running_loss += loss.item()print(f"Epoch {epoch+1}/{epochs}, Loss: {running_loss / len(train_loader)}")
出于同样的原因,我们需要修改我们的测试函数。在这里,我们忽略模型返回的隐藏表示。
def test_multiple_outputs(model, test_loader, device):model.to(device)model.eval()correct = 0total = 0with torch.no_grad():for inputs, labels in test_loader:inputs, labels = inputs.to(device), labels.to(device)outputs, _ = model(inputs) # Disregard the second tensor of the tuple_, predicted = torch.max(outputs.data, 1)total += labels.size(0)correct += (predicted == labels).sum().item()accuracy = 100 * correct / totalprint(f"Test Accuracy: {accuracy:.2f}%")return accuracy
在这种情况下,我们可以很容易地在同一个函数中包含知识蒸馏和余弦损失最小化。在师生范式中,结合不同方法以获得更好的性能是很常见的。现在,我们可以运行一个简单的训练-测试会话。
# Train and test the lightweight network with cross entropy loss
train_cosine_loss(teacher=modified_nn_deep, student=modified_nn_light, train_loader=train_loader, epochs=10, learning_rate=0.001, hidden_rep_loss_weight=0.25, ce_loss_weight=0.75, device=device)
test_accuracy_light_ce_and_cosine_loss = test_multiple_outputs(modified_nn_light, test_loader, device)
Epoch 1/10, Loss: 1.3057707054230867
Epoch 2/10, Loss: 1.0680991774019988
Epoch 3/10, Loss: 0.9685801694460232
Epoch 4/10, Loss: 0.8937607102686792
Epoch 5/10, Loss: 0.8375817691273701
Epoch 6/10, Loss: 0.7915807698693726
Epoch 7/10, Loss: 0.7496646805797391
Epoch 8/10, Loss: 0.7140546901451658
Epoch 9/10, Loss: 0.6746650690312885
Epoch 10/10, Loss: 0.6464888599065258
Test Accuracy: 71.47%
中间回归器运行
我们天真的最小化并不保证更好的结果,其中一个原因是向量的维度。余弦相似性通常比欧氏距离在更高维度的向量上效果更好,但我们处理的是每个具有 1024 个分量的向量,因此更难提取有意义的相似性。此外,正如我们提到的,朝着老师和学生的隐藏表示匹配并不受理论支持。我们没有充分的理由去追求这些向量的一一匹配。我们将通过引入一个额外的网络称为回归器来提供最终的训练干预示例。目标是首先在卷积层之后提取老师的特征图,然后在卷积层之后提取学生的特征图,最后尝试匹配这些特征图。然而,这一次,我们将在网络之间引入一个回归器来促进匹配过程。回归器将是可训练的,并且理想情况下将比我们天真的余弦损失最小化方案做得更好。它的主要任务是匹配这些特征图的维度,以便我们可以正确定义老师和学生之间的损失函数。定义这样一个损失函数提供了一个教学“路径”,基本上是一个用于反向传播梯度的流程,这将改变学生的权重。针对我们原始网络的每个分类器之前的卷积层的输出,我们有以下形状:
# Pass the sample input only from the convolutional feature extractor
convolutional_fe_output_student = nn_light.features(sample_input)
convolutional_fe_output_teacher = nn_deep.features(sample_input)# Print their shapes
print("Student's feature extractor output shape: ", convolutional_fe_output_student.shape)
print("Teacher's feature extractor output shape: ", convolutional_fe_output_teacher.shape)
Student's feature extractor output shape:  torch.Size([128, 16, 8, 8])
Teacher's feature extractor output shape:  torch.Size([128, 32, 8, 8])
我们为教师模型有 32 个滤波器,为学生模型有 16 个滤波器。我们将包括一个可训练的层,将学生模型的特征图转换为教师模型的特征图的形状。在实践中,我们修改轻量级类以在中间回归器之后返回隐藏状态,以匹配卷积特征图的大小,并且教师类返回最终卷积层的输出,不包括池化或展平。
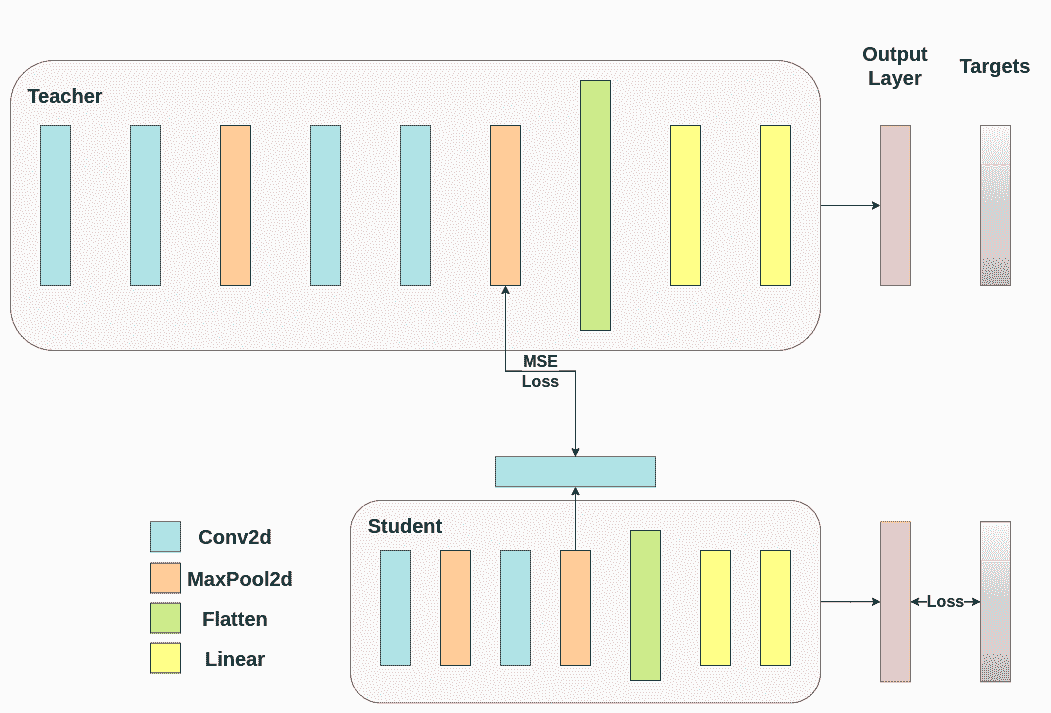
可训练的层匹配中间张量的形状,并且均方误差(MSE)被正确定义:
class ModifiedDeepNNRegressor(nn.Module):def __init__(self, num_classes=10):super(ModifiedDeepNNRegressor, self).__init__()self.features = nn.Sequential(nn.Conv2d(3, 128, kernel_size=3, padding=1),nn.ReLU(),nn.Conv2d(128, 64, kernel_size=3, padding=1),nn.ReLU(),nn.MaxPool2d(kernel_size=2, stride=2),nn.Conv2d(64, 64, kernel_size=3, padding=1),nn.ReLU(),nn.Conv2d(64, 32, kernel_size=3, padding=1),nn.ReLU(),nn.MaxPool2d(kernel_size=2, stride=2),)self.classifier = nn.Sequential(nn.Linear(2048, 512),nn.ReLU(),nn.Dropout(0.1),nn.Linear(512, num_classes))def forward(self, x):x = self.features(x)conv_feature_map = xx = torch.flatten(x, 1)x = self.classifier(x)return x, conv_feature_mapclass ModifiedLightNNRegressor(nn.Module):def __init__(self, num_classes=10):super(ModifiedLightNNRegressor, self).__init__()self.features = nn.Sequential(nn.Conv2d(3, 16, kernel_size=3, padding=1),nn.ReLU(),nn.MaxPool2d(kernel_size=2, stride=2),nn.Conv2d(16, 16, kernel_size=3, padding=1),nn.ReLU(),nn.MaxPool2d(kernel_size=2, stride=2),)# Include an extra regressor (in our case linear)self.regressor = nn.Sequential(nn.Conv2d(16, 32, kernel_size=3, padding=1))self.classifier = nn.Sequential(nn.Linear(1024, 256),nn.ReLU(),nn.Dropout(0.1),nn.Linear(256, num_classes))def forward(self, x):x = self.features(x)regressor_output = self.regressor(x)x = torch.flatten(x, 1)x = self.classifier(x)return x, regressor_output
在那之后,我们必须再次更新我们的训练循环。这一次,我们提取学生的回归器输出,老师的特征图,我们计算这些张量上的MSE(它们具有完全相同的形状,因此它被正确定义),并且基于该损失反向传播梯度,除了分类任务的常规交叉熵损失。
def train_mse_loss(teacher, student, train_loader, epochs, learning_rate, feature_map_weight, ce_loss_weight, device):ce_loss = nn.CrossEntropyLoss()mse_loss = nn.MSELoss()optimizer = optim.Adam(student.parameters(), lr=learning_rate)teacher.to(device)student.to(device)teacher.eval()  # Teacher set to evaluation modestudent.train() # Student to train modefor epoch in range(epochs):running_loss = 0.0for inputs, labels in train_loader:inputs, labels = inputs.to(device), labels.to(device)optimizer.zero_grad()# Again ignore teacher logitswith torch.no_grad():_, teacher_feature_map = teacher(inputs)# Forward pass with the student modelstudent_logits, regressor_feature_map = student(inputs)# Calculate the losshidden_rep_loss = mse_loss(regressor_feature_map, teacher_feature_map)# Calculate the true label losslabel_loss = ce_loss(student_logits, labels)# Weighted sum of the two lossesloss = feature_map_weight * hidden_rep_loss + ce_loss_weight * label_lossloss.backward()optimizer.step()running_loss += loss.item()print(f"Epoch {epoch+1}/{epochs}, Loss: {running_loss  /  len(train_loader)}")# Notice how our test function remains the same here with the one we used in our previous case. We only care about the actual outputs because we measure accuracy.# Initialize a ModifiedLightNNRegressor
torch.manual_seed(42)
modified_nn_light_reg = ModifiedLightNNRegressor(num_classes=10).to(device)# We do not have to train the modified deep network from scratch of course, we just load its weights from the trained instance
modified_nn_deep_reg = ModifiedDeepNNRegressor(num_classes=10).to(device)
modified_nn_deep_reg.load_state_dict(nn_deep.state_dict())# Train and test once again
train_mse_loss(teacher=modified_nn_deep_reg, student=modified_nn_light_reg, train_loader=train_loader, epochs=10, learning_rate=0.001, feature_map_weight=0.25, ce_loss_weight=0.75, device=device)
test_accuracy_light_ce_and_mse_loss = test_multiple_outputs(modified_nn_light_reg, test_loader, device)
Epoch 1/10, Loss: 1.6985262717737262
Epoch 2/10, Loss: 1.325937156787004
Epoch 3/10, Loss: 1.1824340555064208
Epoch 4/10, Loss: 1.0864463061322946
Epoch 5/10, Loss: 1.009828634731605
Epoch 6/10, Loss: 0.9486901266190707
Epoch 7/10, Loss: 0.8957636421903625
Epoch 8/10, Loss: 0.8455343330302811
Epoch 9/10, Loss: 0.8041850715646963
Epoch 10/10, Loss: 0.7668854673500256
Test Accuracy: 70.80%
预计最终的方法将比CosineLoss更好,因为现在我们允许在老师和学生之间有一个可训练的层,这给了学生一些学习的余地,而不是推动学生复制老师的表示。包括额外的网络是提示驱动蒸馏背后的想法。
print(f"Teacher accuracy: {test_accuracy_deep:.2f}%")
print(f"Student accuracy without teacher: {test_accuracy_light_ce:.2f}%")
print(f"Student accuracy with CE + KD: {test_accuracy_light_ce_and_kd:.2f}%")
print(f"Student accuracy with CE + CosineLoss: {test_accuracy_light_ce_and_cosine_loss:.2f}%")
print(f"Student accuracy with CE + RegressorMSE: {test_accuracy_light_ce_and_mse_loss:.2f}%")
Teacher accuracy: 75.18%
Student accuracy without teacher: 70.60%
Student accuracy with CE + KD: 70.57%
Student accuracy with CE + CosineLoss: 71.47%
Student accuracy with CE + RegressorMSE: 70.80%
结论
以上方法都不会增加网络或推理时间的参数数量,因此性能的提升只是在训练过程中计算梯度的小成本。在机器学习应用中,我们主要关心推理时间,因为训练是在模型部署之前进行的。如果我们的轻量级模型仍然太重以至于无法部署,我们可以应用不同的想法,比如后训练量化。额外的损失可以应用在许多任务中,不仅仅是分类,您可以尝试不同的量,比如系数、温度或神经元的数量。请随意调整上面教程中的任何数字,但请记住,如果您改变神经元/滤波器的数量,可能会发生形状不匹配的情况。
更多信息,请参见:
-
Hinton, G., Vinyals, O., Dean, J.: Distilling the knowledge in a neural network. In: Neural Information Processing System Deep Learning Workshop (2015)
-
Romero, A., Ballas, N., Kahou, S.E., Chassang, A., Gatta, C., Bengio, Y.: Fitnets: Hints for thin deep nets. In: Proceedings of the International Conference on Learning Representations (2015)
脚本的总运行时间:(7 分钟 32.632 秒)
下载 Python 源代码:knowledge_distillation_tutorial.py
下载 Jupyter 笔记本:knowledge_distillation_tutorial.ipynb
Sphinx-Gallery 生成的画廊
并行和分布式训练
分布式和并行训练教程
原文:
pytorch.org/tutorials/distributed/home.html译者:飞龙
协议:CC BY-NC-SA 4.0
分布式训练是一种模型训练范式,涉及将训练工作负载分布到多个工作节点,从而显著提高训练速度和模型准确性。虽然分布式训练可用于任何类型的 ML 模型训练,但对于大型模型和计算密集型任务(如深度学习)使用它最为有益。
在 PyTorch 中有几种方法可以进行分布式训练,每种方法在特定用例中都有其优势:
-
DistributedDataParallel (DDP)
-
完全分片数据并行(FSDP)
-
设备网格
-
远程过程调用(RPC)分布式训练
-
自定义扩展
在分布式概述中了解更多关于这些选项的信息。
学习 DDP
DDP 简介视频教程
一系列逐步视频教程,介绍如何开始使用 DistributedDataParallel,并逐步深入更复杂的主题
代码视频
开始使用分布式数据并行处理
本教程为 PyTorch DistributedData Parallel 提供了简短而温和的介绍。
代码
使用 Join 上下文管理器进行不均匀输入的分布式训练
本教程描述了 Join 上下文管理器,并演示了如何与 DistributedData Parallel 一起使用。
代码 ## 学习 FSDP
开始使用 FSDP
本教程演示了如何在 MNIST 数据集上使用 FSDP 进行分布式训练。
代码
FSDP 高级
在本教程中,您将学习如何使用 FSDP 对 HuggingFace(HF)T5 模型进行微调,用于文本摘要。
代码 ## 学习 DeviceMesh
开始使用 DeviceMesh
在本教程中,您将了解 DeviceMesh 以及它如何帮助进行分布式训练。
代码 ## 学习 RPC
开始使用分布式 RPC 框架
本教程演示了如何开始使用基于 RPC 的分布式训练。
代码
使用分布式 RPC 框架实现参数服务器
本教程将带您完成一个简单的示例,使用 PyTorch 的分布式 RPC 框架实现参数服务器。
代码
使用异步执行实现批处理 RPC 处理
在本教程中,您将使用@rpc.functions.async_execution 装饰器构建批处理 RPC 应用程序。
代码
将分布式 DataParallel 与分布式 RPC 框架结合
在本教程中,您将学习如何将分布式数据并行性与分布式模型并行性结合起来。
代码 ## 自定义扩展
使用 Cpp 扩展自定义 Process Group 后端
在本教程中,您将学习如何实现自定义的 ProcessGroup 后端,并将其插入到 PyTorch 分布式包中使用 cpp 扩展。
代码
PyTorch 分布式概述
原文:
pytorch.org/tutorials/beginner/dist_overview.html译者:飞龙
协议:CC BY-NC-SA 4.0
作者:Shen Li
注意
 在 github 中查看并编辑本教程。
这是 torch.distributed 包的概述页面。本页面的目标是将文档分类为不同主题,并简要描述每个主题。如果这是您第一次使用 PyTorch 构建分布式训练应用程序,建议使用本文档导航到最适合您用例的技术。
介绍
截至 PyTorch v1.6.0,torch.distributed 中的功能可以分为三个主要组件:
-
分布式数据并行训练(DDP)是一种广泛采用的单程序多数据训练范式。使用 DDP,模型在每个进程上被复制,并且每个模型副本将被提供不同的输入数据样本。DDP 负责梯度通信以保持模型副本同步,并将其与梯度计算重叠以加快训练速度。
-
基于 RPC 的分布式训练(RPC)支持无法适应数据并行训练的一般训练结构,如分布式管道并行性、参数服务器范式以及 DDP 与其他训练范式的组合。它有助于管理远程对象的生命周期,并将autograd 引擎扩展到机器边界之外。
-
集体通信(c10d)库支持在组内的进程之间发送张量。它提供了集体通信 API(例如,all_reduce和all_gather)以及 P2P 通信 API(例如,send和isend)。DDP 和 RPC(ProcessGroup Backend)构建在 c10d 之上,前者使用集体通信,后者使用 P2P 通信。通常,开发人员不需要直接使用这个原始通信 API,因为 DDP 和 RPC API 可以满足许多分布式训练场景。然而,仍有一些用例可以从这个 API 中获益。一个例子是分布式参数平均化,应用程序希望在反向传播后计算所有模型参数的平均值,而不是使用 DDP 来通信梯度。这可以将通信与计算分离,并允许更精细地控制要通信的内容,但另一方面,也放弃了 DDP 提供的性能优化。使用 PyTorch 编写分布式应用程序展示了使用 c10d 通信 API 的示例。
数据并行训练
PyTorch 提供了几种数据并行训练的选项。对于从简单到复杂、从原型到生产逐渐增长的应用程序,常见的开发轨迹是:
-
如果数据和模型可以适应一个 GPU,并且训练速度不是问题,可以使用单设备训练。
-
使用单机多 GPU DataParallel 来利用单台机器上的多个 GPU 加速训练,只需进行最少的代码更改。
-
如果您希望进一步加快训练速度并愿意写更多代码来设置,可以使用单机多 GPU DistributedDataParallel。
-
如果应用程序需要跨机器边界扩展,请使用多机器DistributedDataParallel和启动脚本。
-
当数据和模型无法放入一个 GPU 时,在单机或多机上使用多 GPU 的FullyShardedDataParallel训练。
-
使用torch.distributed.elastic来启动分布式训练,如果预期会出现错误(例如,内存不足),或者在训练过程中资源可以动态加入和离开。
注意
数据并行训练也可以与Automatic Mixed Precision (AMP)一起使用。
torch.nn.DataParallel
DataParallel 包能够在单机多 GPU 上实现并行计算,且编码难度最低。只需要在应用代码中进行一行更改。教程 Optional: Data Parallelism 展示了一个例子。虽然 DataParallel 很容易使用,但通常性能不是最佳的,因为它在每次前向传播中都会复制模型,并且其单进程多线程并行自然受到 GIL 的影响。为了获得更好的性能,考虑使用 DistributedDataParallel。
torch.nn.parallel.DistributedDataParallel
与DataParallel相比,DistributedDataParallel需要多一步设置,即调用init_process_group。 DDP 使用多进程并行,因此模型副本之间没有 GIL 争用。此外,模型在 DDP 构建时进行广播,而不是在每次前向传递中进行广播,这也有助于加快训练速度。 DDP 配备了几种性能优化技术。有关更深入的解释,请参考这篇论文(VLDB’20)。
DDP 材料如下:
-
DDP 笔记 提供了一个入门示例以及对其设计和实现的简要描述。如果这是您第一次使用 DDP,请从这个文档开始。
-
使用分布式数据并行开始 解释了 DDP 训练中的一些常见问题,包括负载不平衡、检查点和多设备模型。请注意,DDP 可以很容易地与单机多设备模型并行结合,该模型并行在单机模型并行最佳实践教程中有描述。
-
启动和配置分布式数据并行应用程序 文档展示了如何使用 DDP 启动脚本。
-
Shard Optimizer States With ZeroRedundancyOptimizer 配方演示了如何使用ZeroRedundancyOptimizer来减少优化器的内存占用。
-
Distributed Training with Uneven Inputs Using the Join Context Manager 教程介绍了如何使用通用的连接上下文管理器进行不均匀输入的分布式训练。
torch.distributed.FullyShardedDataParallel
FullyShardedDataParallel(FSDP)是一种数据并行范例,它在每个 GPU 上维护模型参数、梯度和优化器状态的副本,将所有这些状态分片到数据并行工作器中。对 FSDP 的支持从 PyTorch v1.11 开始添加。教程Getting Started with FSDP提供了关于 FSDP 如何工作的深入解释和示例。
torch.distributed.elastic
随着应用程序复杂性和规模的增长,故障恢复变得必不可少。在使用 DDP 时,有时会不可避免地遇到诸如内存溢出(OOM)等错误,但 DDP 本身无法从这些错误中恢复,也无法使用标准的try-except结构来处理它们。这是因为 DDP 要求所有进程以密切同步的方式运行,并且在不同进程中启动的所有AllReduce通信必须匹配。如果组中的一个进程抛出异常,很可能会导致不同步(不匹配的AllReduce操作),从而导致崩溃或挂起。torch.distributed.elastic 添加了容错性和利用动态机器池(弹性)的能力。
基于 RPC 的分布式训练
许多训练范式不适合数据并行 ism,例如参数服务器范式、分布式管道并行 ism、具有多个观察者或代理的强化学习应用等。torch.distributed.rpc 旨在支持一般的分布式训练场景。
torch.distributed.rpc 有四个主要支柱:
-
RPC 支持在远程工作节点上运行给定函数。
-
RRef 帮助管理远程对象的生命周期。引用计数协议在RRef 笔记中介绍。
-
Distributed Autograd 将自动求导引擎扩展到机器边界之外。更多细节请参考Distributed Autograd Design。
-
Distributed Optimizer 自动联系所有参与的工作节点,使用分布式自动求导引擎计算的梯度来更新参数。
RPC 教程如下:
-
使用分布式 RPC 框架入门 教程首先使用一个简单的强化学习(RL)示例来演示 RPC 和 RRef。然后,它将基本的分布式模型并行应用到一个 RNN 示例中,展示如何使用分布式自动求导和分布式优化器。
-
使用分布式 RPC 框架实现参数服务器 教程借鉴了HogWild!训练的精神,并将其应用于异步参数服务器(PS)训练应用。
-
使用 RPC 实现分布式管道并行性 教程将单机管道并行示例(在单机模型并行最佳实践中介绍)扩展到分布式环境,并展示如何使用 RPC 实现它。
-
使用异步执行实现批量 RPC 处理的教程演示了如何使用@rpc.functions.async_execution装饰器实现 RPC 批处理,这可以帮助加速推理和训练。它使用了类似于上述教程 1 和 2 中的 RL 和 PS 示例。
-
将分布式数据并行与分布式 RPC 框架相结合的教程演示了如何将 DDP 与 RPC 结合起来,使用分布式数据并行性和分布式模型并行性来训练模型。
PyTorch 分布式开发者
如果您想为 PyTorch 分布式做出贡献,请参考我们的开发者指南。
PyTorch 中的分布式数据并行 - 视频教程
原文:
pytorch.org/tutorials/beginner/ddp_series_intro.html译者:飞龙
协议:CC BY-NC-SA 4.0
介绍 || 什么是 DDP || 单节点多 GPU 训练 || 容错性 || 多节点训练 || minGPT 训练
作者:Suraj Subramanian
跟随下面的视频或在youtube上观看。
www.youtube.com/embed/-K3bZYHYHEA
这一系列视频教程将带您了解通过 DDP 在 PyTorch 中进行分布式训练。
该系列从简单的非分布式训练作业开始,最终部署到集群中的多台机器上进行训练。在此过程中,您还将了解到关于torchrun用于容错分布式训练。
本教程假定您对 PyTorch 中的模型训练有基本的了解。
运行代码
您需要多个 CUDA GPU 来运行教程代码。通常可以在具有多个 GPU 的云实例上完成此操作(教程使用具有 4 个 GPU 的 Amazon EC2 P3 实例)。
教程代码托管在这个github 仓库。克隆该仓库并跟随教程!
教程部分
-
介绍(本页)
-
DDP 是什么? 温和地介绍了 DDP 在幕后的工作
-
单节点多 GPU 训练 在单台机器上使用多个 GPU 训练模型
-
容错分布式训练 使用 torchrun 使您的分布式训练工作更加稳健
-
多节点训练 使用多台机器上的多个 GPU 进行模型训练
-
使用 DDP 训练 GPT 模型 使用 DDP 训练minGPT模型的“真实世界”示例
单机模型并行最佳实践
原文:
pytorch.org/tutorials/intermediate/model_parallel_tutorial.html译者:飞龙
协议:CC BY-NC-SA 4.0
注意
点击这里下载完整示例代码
作者:Shen Li
模型并行在分布式训练技术中被广泛使用。先前的帖子已经解释了如何使用DataParallel在多个 GPU 上训练神经网络;这个功能将相同的模型复制到所有 GPU 上,每个 GPU 消耗不同的输入数据分区。虽然它可以显著加速训练过程,但对于一些模型太大无法适应单个 GPU 的情况,它无法工作。这篇文章展示了如何通过使用模型并行来解决这个问题,与DataParallel相反,它将单个模型分割到不同的 GPU 上,而不是在每个 GPU 上复制整个模型(具体来说,假设一个模型m包含 10 层:使用DataParallel时,每个 GPU 将有这 10 层的副本,而使用两个 GPU 上的模型并行时,每个 GPU 可以承载 5 层)。
模型并行的高级思想是将模型的不同子网络放置在不同的设备上,并相应地实现forward方法以在设备之间传递中间输出。由于模型的部分在任何单独的设备上运行,一组设备可以共同为一个更大的模型提供服务。在这篇文章中,我们不会尝试构建庞大的模型并将它们压缩到有限数量的 GPU 中。相反,这篇文章侧重于展示模型并行的思想。读者可以将这些思想应用到现实世界的应用中。
注意
对于跨多个服务器的分布式模型并行训练,请参考使用分布式 RPC 框架入门以获取示例和详细信息。
基本用法
让我们从一个包含两个线性层的玩具模型开始。要在两个 GPU 上运行这个模型,只需将每个线性层放在不同的 GPU 上,并将输入和中间输出移动到匹配层设备的位置。
import torch
import torch.nn as nn
import torch.optim as optimclass ToyModel(nn.Module):def __init__(self):super(ToyModel, self).__init__()self.net1 = torch.nn.Linear(10, 10).to('cuda:0')self.relu = torch.nn.ReLU()self.net2 = torch.nn.Linear(10, 5).to('cuda:1')def forward(self, x):x = self.relu(self.net1(x.to('cuda:0')))return self.net2(x.to('cuda:1'))
请注意,上面的ToyModel看起来与在单个 GPU 上实现它的方式非常相似,除了四个to(device)调用,这些调用将线性层和张量放置在适当的设备上。这是模型中唯一需要更改的地方。backward()和torch.optim将自动处理梯度,就好像模型在一个 GPU 上一样。您只需要确保在调用损失函数时标签与输出在同一设备上。
model = ToyModel()
loss_fn = nn.MSELoss()
optimizer = optim.SGD(model.parameters(), lr=0.001)optimizer.zero_grad()
outputs = model(torch.randn(20, 10))
labels = torch.randn(20, 5).to('cuda:1')
loss_fn(outputs, labels).backward()
optimizer.step()
将模型并行应用于现有模块
也可以通过只更改几行代码在多个 GPU 上运行现有的单 GPU 模块。下面的代码显示了如何将torchvision.models.resnet50()分解为两个 GPU。思路是继承现有的ResNet模块,并在构造过程中将层分割到两个 GPU 上。然后,重写forward方法,通过相应地移动中间输出来拼接两个子网络。
from torchvision.models.resnet import ResNet, Bottlenecknum_classes = 1000class ModelParallelResNet50(ResNet):def __init__(self, *args, **kwargs):super(ModelParallelResNet50, self).__init__(Bottleneck, [3, 4, 6, 3], num_classes=num_classes, *args, **kwargs)self.seq1 = nn.Sequential(self.conv1,self.bn1,self.relu,self.maxpool,self.layer1,self.layer2).to('cuda:0')self.seq2 = nn.Sequential(self.layer3,self.layer4,self.avgpool,).to('cuda:1')self.fc.to('cuda:1')def forward(self, x):x = self.seq2(self.seq1(x).to('cuda:1'))return self.fc(x.view(x.size(0), -1))
上述实现解决了模型过大无法适应单个 GPU 的情况。然而,您可能已经注意到,如果您的模型适合单个 GPU,则运行速度会比在单个 GPU 上运行要慢。这是因为,在任何时候,只有两个 GPU 中的一个在工作,而另一个则闲置。性能进一步恶化,因为需要在layer2和layer3之间将中间输出从cuda:0复制到cuda:1。
让我们进行一个实验,以更量化地了解执行时间。在这个实验中,我们通过将随机输入和标签传递给它们来训练ModelParallelResNet50和现有的torchvision.models.resnet50()。训练之后,模型将不会产生任何有用的预测,但我们可以对执行时间有一个合理的了解。
import torchvision.models as modelsnum_batches = 3
batch_size = 120
image_w = 128
image_h = 128def train(model):model.train(True)loss_fn = nn.MSELoss()optimizer = optim.SGD(model.parameters(), lr=0.001)one_hot_indices = torch.LongTensor(batch_size) \.random_(0, num_classes) \.view(batch_size, 1)for _ in range(num_batches):# generate random inputs and labelsinputs = torch.randn(batch_size, 3, image_w, image_h)labels = torch.zeros(batch_size, num_classes) \.scatter_(1, one_hot_indices, 1)# run forward passoptimizer.zero_grad()outputs = model(inputs.to('cuda:0'))# run backward passlabels = labels.to(outputs.device)loss_fn(outputs, labels).backward()optimizer.step()
上面的train(model)方法使用nn.MSELoss作为损失函数,使用optim.SGD作为优化器。它模拟对128 X 128图像进行训练,这些图像被组织成 3 个批次,每个批次包含 120 张图像。然后,我们使用timeit运行train(model)方法 10 次,并绘制带有标准偏差的执行时间。
import matplotlib.pyplot as plt
plt.switch_backend('Agg')
import numpy as np
import timeitnum_repeat = 10stmt = "train(model)"setup = "model = ModelParallelResNet50()"
mp_run_times = timeit.repeat(stmt, setup, number=1, repeat=num_repeat, globals=globals())
mp_mean, mp_std = np.mean(mp_run_times), np.std(mp_run_times)setup = "import torchvision.models as models;" + \"model = models.resnet50(num_classes=num_classes).to('cuda:0')"
rn_run_times = timeit.repeat(stmt, setup, number=1, repeat=num_repeat, globals=globals())
rn_mean, rn_std = np.mean(rn_run_times), np.std(rn_run_times)def plot(means, stds, labels, fig_name):fig, ax = plt.subplots()ax.bar(np.arange(len(means)), means, yerr=stds,align='center', alpha=0.5, ecolor='red', capsize=10, width=0.6)ax.set_ylabel('ResNet50 Execution Time (Second)')ax.set_xticks(np.arange(len(means)))ax.set_xticklabels(labels)ax.yaxis.grid(True)plt.tight_layout()plt.savefig(fig_name)plt.close(fig)plot([mp_mean, rn_mean],[mp_std, rn_std],['Model Parallel', 'Single GPU'],'mp_vs_rn.png')

结果显示,模型并行实现的执行时间比现有的单 GPU 实现长了4.02/3.75-1=7%。因此,我们可以得出结论,在跨 GPU 传输张量时大约有 7%的开销。还有改进的空间,因为我们知道两个 GPU 中的一个在整个执行过程中处于空闲状态。一种选择是将每个批次进一步分成一系列分割的管道,这样当一个分割到达第二个子网络时,接下来的分割可以被送入第一个子网络。这样,两个连续的分割可以在两个 GPU 上同时运行。
通过流水线输入加速
在以下实验中,我们将每个 120 张图像批次进一步分成 20 张图像的拆分。由于 PyTorch 异步启动 CUDA 操作,实现不需要生成多个线程来实现并发。
class PipelineParallelResNet50(ModelParallelResNet50):def __init__(self, split_size=20, *args, **kwargs):super(PipelineParallelResNet50, self).__init__(*args, **kwargs)self.split_size = split_sizedef forward(self, x):splits = iter(x.split(self.split_size, dim=0))s_next = next(splits)s_prev = self.seq1(s_next).to('cuda:1')ret = []for s_next in splits:# A. ``s_prev`` runs on ``cuda:1``s_prev = self.seq2(s_prev)ret.append(self.fc(s_prev.view(s_prev.size(0), -1)))# B. ``s_next`` runs on ``cuda:0``, which can run concurrently with As_prev = self.seq1(s_next).to('cuda:1')s_prev = self.seq2(s_prev)ret.append(self.fc(s_prev.view(s_prev.size(0), -1)))return torch.cat(ret)setup = "model = PipelineParallelResNet50()"
pp_run_times = timeit.repeat(stmt, setup, number=1, repeat=num_repeat, globals=globals())
pp_mean, pp_std = np.mean(pp_run_times), np.std(pp_run_times)plot([mp_mean, rn_mean, pp_mean],[mp_std, rn_std, pp_std],['Model Parallel', 'Single GPU', 'Pipelining Model Parallel'],'mp_vs_rn_vs_pp.png')
请注意,设备之间的张量复制操作在源设备和目标设备上的当前流上是同步的。如果您创建多个流,您必须确保复制操作得到适当的同步。在完成复制操作之前写入源张量或读取/写入目标张量可能导致未定义的行为。上述实现仅在源设备和目标设备上使用默认流,因此不需要强制执行额外的同步。

实验结果显示,将输入流水线传输到模型并行的 ResNet50 可以将训练过程加速大约3.75/2.51-1=49%。这仍然远远落后于理想的 100%加速。由于我们在管道并行实现中引入了一个新参数split_sizes,目前还不清楚这个新参数如何影响整体训练时间。直觉上,使用较小的split_size会导致许多小的 CUDA 内核启动,而使用较大的split_size会导致在第一个和最后一个分割期间相对较长的空闲时间。两者都不是最佳选择。对于这个特定实验,可能存在一个最佳的split_size配置。让我们通过运行使用几个不同split_size值的实验来尝试找到它。
means = []
stds = []
split_sizes = [1, 3, 5, 8, 10, 12, 20, 40, 60]for split_size in split_sizes:setup = "model = PipelineParallelResNet50(split_size=%d)" % split_sizepp_run_times = timeit.repeat(stmt, setup, number=1, repeat=num_repeat, globals=globals())means.append(np.mean(pp_run_times))stds.append(np.std(pp_run_times))fig, ax = plt.subplots()
ax.plot(split_sizes, means)
ax.errorbar(split_sizes, means, yerr=stds, ecolor='red', fmt='ro')
ax.set_ylabel('ResNet50 Execution Time (Second)')
ax.set_xlabel('Pipeline Split Size')
ax.set_xticks(split_sizes)
ax.yaxis.grid(True)
plt.tight_layout()
plt.savefig("split_size_tradeoff.png")
plt.close(fig)
把这个文件夹拖到另一个文件夹中。
结果显示,将split_size设置为 12 可以实现最快的训练速度,从而导致3.75/2.43-1=54%的加速。仍然有机会进一步加快训练过程。例如,所有在cuda:0上的操作都放在其默认流中。这意味着下一个分割的计算不能与prev分割的复制操作重叠。然而,由于prev和下一个分割是不同的张量,因此可以将一个的计算与另一个的复制重叠。实现需要在两个 GPU 上使用多个流,不同的子网络结构需要不同的流管理策略。由于没有通用的多流解决方案适用于所有模型并行使用情况,我们在本教程中不会讨论这个问题。
注意:
本文展示了几个性能测量。当在您自己的机器上运行相同的代码时,您可能会看到不同的数字,因为结果取决于底层硬件和软件。为了在您的环境中获得最佳性能,一个正确的方法是首先生成曲线以找出最佳的拆分大小,然后使用该拆分大小来流水线输入。
脚本的总运行时间:(5 分钟 48.653 秒)
下载 Python 源代码:model_parallel_tutorial.py
下载 Jupyter 笔记本:model_parallel_tutorial.ipynb
Sphinx-Gallery 生成的画廊
开始使用分布式数据并行
原文:
pytorch.org/tutorials/intermediate/ddp_tutorial.html译者:飞龙
协议:CC BY-NC-SA 4.0
作者:Shen Li
编辑者:Joe Zhu
注意
查看并编辑此教程在github。
先决条件:
-
PyTorch 分布式概述
-
DistributedDataParallel API 文档
-
DistributedDataParallel 笔记
DistributedDataParallel(DDP)在模块级别实现了数据并行,可以在多台机器上运行。使用 DDP 的应用程序应该生成多个进程,并为每个进程创建一个单独的 DDP 实例。DDP 使用torch.distributed包中的集体通信来同步梯度和缓冲区。更具体地说,DDP 为model.parameters()给定的每个参数注册一个自动求导钩子,当在反向传播中计算相应的梯度时,该钩子将触发。然后 DDP 使用该信号来触发跨进程的梯度同步。更多详细信息请参考DDP 设计说明。
使用 DDP 的推荐方式是为每个模型副本生成一个进程,其中一个模型副本可以跨多个设备。DDP 进程可以放置在同一台机器上或跨多台机器,但 GPU 设备不能在进程之间共享。本教程从基本的 DDP 用例开始,然后演示更高级的用例,包括模型检查点和将 DDP 与模型并行结合使用。
注意
本教程中的代码在一个 8-GPU 服务器上运行,但可以很容易地推广到其他环境。
DataParallel和DistributedDataParallel之间的比较
在我们深入讨论之前,让我们澄清一下为什么尽管增加了复杂性,你会考虑使用DistributedDataParallel而不是DataParallel:
-
首先,
DataParallel是单进程、多线程的,仅适用于单台机器,而DistributedDataParallel是多进程的,适用于单机和多机训练。由于线程之间的 GIL 冲突、每次迭代复制模型以及输入散布和输出聚集引入的额外开销,即使在单台机器上,DataParallel通常比DistributedDataParallel慢。 -
回想一下从之前的教程中得知,如果你的模型太大无法放入单个 GPU 中,你必须使用模型并行将其分割到多个 GPU 上。
DistributedDataParallel与模型并行一起工作;DataParallel目前不支持。当 DDP 与模型并行结合时,每个 DDP 进程都会使用模型并行,所有进程共同使用数据并行。 -
如果您的模型需要跨多台机器,或者您的用例不适合数据并行主义范式,请参阅RPC API以获取更通用的分布式训练支持。
基本用例
要创建一个 DDP 模块,你必须首先正确设置进程组。更多细节可以在使用 PyTorch 编写分布式应用程序中找到。
import os
import sys
import tempfile
import torch
import torch.distributed as dist
import torch.nn as nn
import torch.optim as optim
import torch.multiprocessing as mpfrom torch.nn.parallel import DistributedDataParallel as DDP# On Windows platform, the torch.distributed package only
# supports Gloo backend, FileStore and TcpStore.
# For FileStore, set init_method parameter in init_process_group
# to a local file. Example as follow:
# init_method="file:///f:/libtmp/some_file"
# dist.init_process_group(
#    "gloo",
#    rank=rank,
#    init_method=init_method,
#    world_size=world_size)
# For TcpStore, same way as on Linux.def setup(rank, world_size):os.environ['MASTER_ADDR'] = 'localhost'os.environ['MASTER_PORT'] = '12355'# initialize the process groupdist.init_process_group("gloo", rank=rank, world_size=world_size)def cleanup():dist.destroy_process_group()
现在,让我们创建一个玩具模块,用 DDP 包装它,并提供一些虚拟输入数据。请注意,由于 DDP 在构造函数中从 rank 0 进程向所有其他进程广播模型状态,您不需要担心不同的 DDP 进程从不同的初始模型参数值开始。
class ToyModel(nn.Module):def __init__(self):super(ToyModel, self).__init__()self.net1 = nn.Linear(10, 10)self.relu = nn.ReLU()self.net2 = nn.Linear(10, 5)def forward(self, x):return self.net2(self.relu(self.net1(x)))def demo_basic(rank, world_size):print(f"Running basic DDP example on rank {rank}.")setup(rank, world_size)# create model and move it to GPU with id rankmodel = ToyModel().to(rank)ddp_model = DDP(model, device_ids=[rank])loss_fn = nn.MSELoss()optimizer = optim.SGD(ddp_model.parameters(), lr=0.001)optimizer.zero_grad()outputs = ddp_model(torch.randn(20, 10))labels = torch.randn(20, 5).to(rank)loss_fn(outputs, labels).backward()optimizer.step()cleanup()def run_demo(demo_fn, world_size):mp.spawn(demo_fn,args=(world_size,),nprocs=world_size,join=True)
正如您所看到的,DDP 封装了较低级别的分布式通信细节,并提供了一个干净的 API,就像它是一个本地模型一样。梯度同步通信发生在反向传播过程中,并与反向计算重叠。当backward()返回时,param.grad已经包含了同步的梯度张量。对于基本用例,DDP 只需要几行额外的代码来设置进程组。当将 DDP 应用于更高级的用例时,一些注意事项需要谨慎处理。
处理速度不均衡
在 DDP 中,构造函数、前向传递和后向传递是分布式同步点。预期不同的进程将启动相同数量的同步,并按相同顺序到达这些同步点,并在大致相同的时间进入每个同步点。否则,快速进程可能会提前到达并在等待滞后者时超时。因此,用户负责在进程之间平衡工作负载分布。有时,由于网络延迟、资源竞争或不可预测的工作负载波动等原因,不可避免地会出现处理速度不均衡的情况。为了避免在这些情况下超时,请确保在调用init_process_group时传递一个足够大的timeout值。
保存和加载检查点
在训练过程中,通常使用torch.save和torch.load来对模块进行检查点,并从检查点中恢复。有关更多详细信息,请参阅SAVING AND LOADING MODELS。在使用 DDP 时,一种优化是在一个进程中保存模型,然后加载到所有进程中,减少写入开销。这是正确的,因为所有进程都从相同的参数开始,并且在反向传递中梯度是同步的,因此优化器应该保持将参数设置为相同的值。如果使用此优化,请确保在保存完成之前没有进程开始加载。此外,在加载模块时,您需要提供一个适当的map_location参数,以防止一个进程进入其他设备。如果缺少map_location,torch.load将首先将模块加载到 CPU,然后将每个参数复制到保存的位置,这将导致同一台机器上的所有进程使用相同的设备集。有关更高级的故障恢复和弹性支持,请参阅TorchElastic。
def demo_checkpoint(rank, world_size):print(f"Running DDP checkpoint example on rank {rank}.")setup(rank, world_size)model = ToyModel().to(rank)ddp_model = DDP(model, device_ids=[rank])CHECKPOINT_PATH = tempfile.gettempdir() + "/model.checkpoint"if rank == 0:# All processes should see same parameters as they all start from same# random parameters and gradients are synchronized in backward passes.# Therefore, saving it in one process is sufficient.torch.save(ddp_model.state_dict(), CHECKPOINT_PATH)# Use a barrier() to make sure that process 1 loads the model after process# 0 saves it.dist.barrier()# configure map_location properlymap_location = {'cuda:%d' % 0: 'cuda:%d' % rank}ddp_model.load_state_dict(torch.load(CHECKPOINT_PATH, map_location=map_location))loss_fn = nn.MSELoss()optimizer = optim.SGD(ddp_model.parameters(), lr=0.001)optimizer.zero_grad()outputs = ddp_model(torch.randn(20, 10))labels = torch.randn(20, 5).to(rank)loss_fn(outputs, labels).backward()optimizer.step()# Not necessary to use a dist.barrier() to guard the file deletion below# as the AllReduce ops in the backward pass of DDP already served as# a synchronization.if rank == 0:os.remove(CHECKPOINT_PATH)cleanup()
将 DDP 与模型并行结合起来
DDP 也适用于多 GPU 模型。在训练大型模型和大量数据时,DDP 包装多 GPU 模型尤其有帮助。
class ToyMpModel(nn.Module):def __init__(self, dev0, dev1):super(ToyMpModel, self).__init__()self.dev0 = dev0self.dev1 = dev1self.net1 = torch.nn.Linear(10, 10).to(dev0)self.relu = torch.nn.ReLU()self.net2 = torch.nn.Linear(10, 5).to(dev1)def forward(self, x):x = x.to(self.dev0)x = self.relu(self.net1(x))x = x.to(self.dev1)return self.net2(x)
当将多 GPU 模型传递给 DDP 时,device_ids和output_device必须不设置。输入和输出数据将由应用程序或模型的forward()方法放置在适当的设备上。
def demo_model_parallel(rank, world_size):print(f"Running DDP with model parallel example on rank {rank}.")setup(rank, world_size)# setup mp_model and devices for this processdev0 = rank * 2dev1 = rank * 2 + 1mp_model = ToyMpModel(dev0, dev1)ddp_mp_model = DDP(mp_model)loss_fn = nn.MSELoss()optimizer = optim.SGD(ddp_mp_model.parameters(), lr=0.001)optimizer.zero_grad()# outputs will be on dev1outputs = ddp_mp_model(torch.randn(20, 10))labels = torch.randn(20, 5).to(dev1)loss_fn(outputs, labels).backward()optimizer.step()cleanup()if __name__ == "__main__":n_gpus = torch.cuda.device_count()assert n_gpus >= 2, f"Requires at least 2 GPUs to run, but got {n_gpus}"world_size = n_gpusrun_demo(demo_basic, world_size)run_demo(demo_checkpoint, world_size)world_size = n_gpus//2run_demo(demo_model_parallel, world_size)
使用 torch.distributed.run/torchrun 初始化 DDP
我们可以利用 PyTorch Elastic 来简化 DDP 代码并更轻松地初始化作业。让我们仍然使用 Toymodel 示例并创建一个名为elastic_ddp.py的文件。
import torch
import torch.distributed as dist
import torch.nn as nn
import torch.optim as optimfrom torch.nn.parallel import DistributedDataParallel as DDPclass ToyModel(nn.Module):def __init__(self):super(ToyModel, self).__init__()self.net1 = nn.Linear(10, 10)self.relu = nn.ReLU()self.net2 = nn.Linear(10, 5)def forward(self, x):return self.net2(self.relu(self.net1(x)))def demo_basic():dist.init_process_group("nccl")rank = dist.get_rank()print(f"Start running basic DDP example on rank {rank}.")# create model and move it to GPU with id rankdevice_id = rank % torch.cuda.device_count()model = ToyModel().to(device_id)ddp_model = DDP(model, device_ids=[device_id])loss_fn = nn.MSELoss()optimizer = optim.SGD(ddp_model.parameters(), lr=0.001)optimizer.zero_grad()outputs = ddp_model(torch.randn(20, 10))labels = torch.randn(20, 5).to(device_id)loss_fn(outputs, labels).backward()optimizer.step()dist.destroy_process_group()if __name__ == "__main__":demo_basic()
然后可以在所有节点上运行 torch elastic/torchrun 命令来初始化上面创建的 DDP 作业:
torchrun --nnodes=2 --nproc_per_node=8 --rdzv_id=100 --rdzv_backend=c10d --rdzv_endpoint=$MASTER_ADDR:29400 elastic_ddp.py
我们在两台主机上运行 DDP 脚本,每台主机运行 8 个进程,也就是说我们在 16 个 GPU 上运行它。请注意,$MASTER_ADDR在所有节点上必须相同。
torchrun 将启动 8 个进程,并在启动它的节点上的每个进程上调用elastic_ddp.py,但用户还需要应用类似 slurm 的集群管理工具来实际在 2 个节点上运行此命令。
例如,在启用了 SLURM 的集群上,我们可以编写一个脚本来运行上面的命令,并将MASTER_ADDR设置为:
export MASTER_ADDR=$(scontrol show hostname ${SLURM_NODELIST} | head -n 1)
然后我们可以使用 SLURM 命令运行此脚本:srun --nodes=2 ./torchrun_script.sh。当然,这只是一个例子;您可以选择自己的集群调度工具来启动 torchrun 作业。
关于 Elastic run 的更多信息,可以查看这个快速入门文档以了解更多。
使用 PyTorch 编写分布式应用程序
原文:
pytorch.org/tutorials/intermediate/dist_tuto.html译者:飞龙
协议:CC BY-NC-SA 4.0
作者:Séb Arnold
注:
查看并编辑此教程在github。
先决条件:
- PyTorch 分布式概述
在这个简短的教程中,我们将介绍 PyTorch 的分布式包。我们将看到如何设置分布式环境,使用不同的通信策略,并了解一些包的内部情况。
设置
PyTorch 中包含的分布式包(即torch.distributed)使研究人员和实践者能够轻松地在进程和机器集群之间并行化他们的计算。为此,它利用消息传递语义,允许每个进程将数据传递给任何其他进程。与多进程(torch.multiprocessing)包相反,进程可以使用不同的通信后端,并不限于在同一台机器上执行。
为了开始,我们需要能够同时运行多个进程的能力。如果您可以访问计算集群,您应该与您的本地系统管理员核实,或者使用您喜欢的协调工具(例如,pdsh,clustershell,或其他工具)。在本教程中,我们将使用一台单机,并使用以下模板生成多个进程。
"""run.py:"""
#!/usr/bin/env python
import os
import torch
import torch.distributed as dist
import torch.multiprocessing as mpdef run(rank, size):""" Distributed function to be implemented later. """passdef init_process(rank, size, fn, backend='gloo'):""" Initialize the distributed environment. """os.environ['MASTER_ADDR'] = '127.0.0.1'os.environ['MASTER_PORT'] = '29500'dist.init_process_group(backend, rank=rank, world_size=size)fn(rank, size)if __name__ == "__main__":size = 2processes = []mp.set_start_method("spawn")for rank in range(size):p = mp.Process(target=init_process, args=(rank, size, run))p.start()processes.append(p)for p in processes:p.join()
上面的脚本生成两个进程,每个进程都将设置分布式环境,初始化进程组(dist.init_process_group),最后执行给定的run函数。
让我们来看看init_process函数。它确保每个进程都能通过一个主进程协调,使用相同的 IP 地址和端口。请注意,我们使用了gloo后端,但也有其他后端可用。(参见第 5.1 节)我们将在本教程的最后讨论dist.init_process_group中发生的魔法,但基本上它允许进程通过共享位置来相互通信。
点对点通信

发送和接收
一种进程向另一个进程传输数据的过程称为点对点通信。这些通过send和recv函数或它们的立即对应函数isend和irecv来实现。
"""Blocking point-to-point communication."""def run(rank, size):tensor = torch.zeros(1)if rank == 0:tensor += 1# Send the tensor to process 1dist.send(tensor=tensor, dst=1)else:# Receive tensor from process 0dist.recv(tensor=tensor, src=0)print('Rank ', rank, ' has data ', tensor[0])
在上面的例子中,两个进程都从零张量开始,然后进程 0 增加张量并将其发送给进程 1,以便它们最终都变为 1.0。请注意,进程 1 需要分配内存来存储将要接收的数据。
还要注意send/recv是阻塞的:两个进程都会停止,直到通信完成。另一方面,immediates 是非阻塞的;脚本会继续执行,方法会返回一个Work对象,我们可以选择wait()。
"""Non-blocking point-to-point communication."""def run(rank, size):tensor = torch.zeros(1)req = Noneif rank == 0:tensor += 1# Send the tensor to process 1req = dist.isend(tensor=tensor, dst=1)print('Rank 0 started sending')else:# Receive tensor from process 0req = dist.irecv(tensor=tensor, src=0)print('Rank 1 started receiving')req.wait()print('Rank ', rank, ' has data ', tensor[0])
在使用即时通信时,我们必须小心地处理发送和接收的张量。由于我们不知道数据何时会传输到其他进程,因此在req.wait()完成之前,我们不应修改发送的张量或访问接收的张量。换句话说,
-
在
dist.isend()之后写入tensor会导致未定义的行为。 -
在
dist.irecv()之后从tensor中读取将导致未定义的行为。
然而,在执行req.wait()之后,我们可以确保通信已经发生,并且存储在tensor[0]中的值为 1.0。
点对点通信在我们希望更精细地控制进程通信时非常有用。它们可以用来实现复杂的算法,比如在百度的 DeepSpeech或Facebook 的大规模实验中使用的算法。(参见第 4.1 节)
集体通信
| 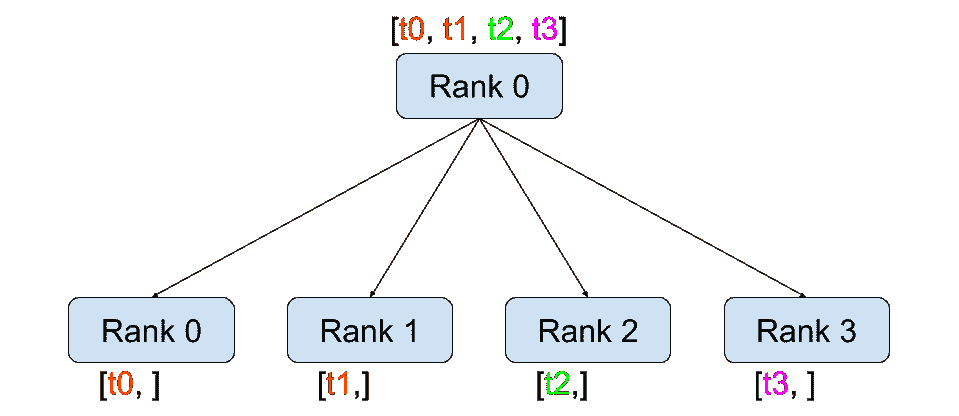
分散
| 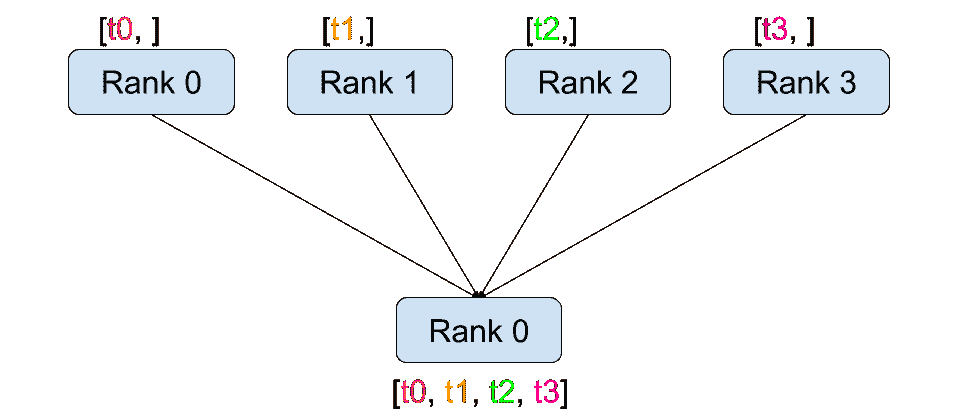
收集
|
| 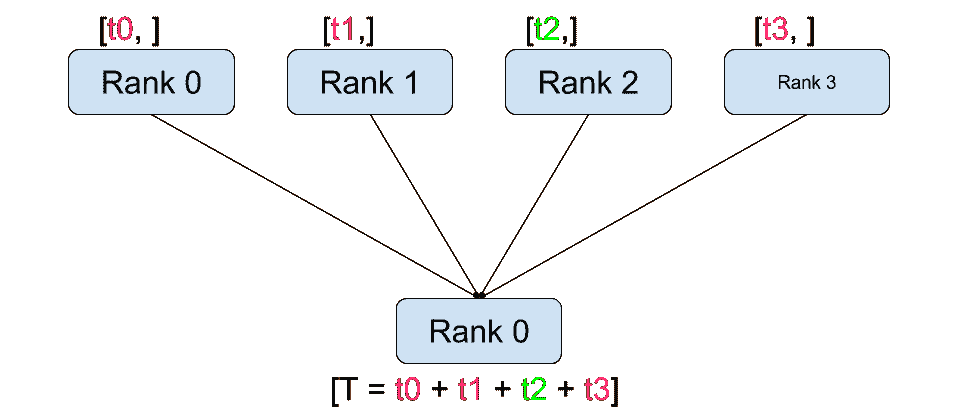
减少
| 
全局归约
|
| 
广播
| 
全收集
|
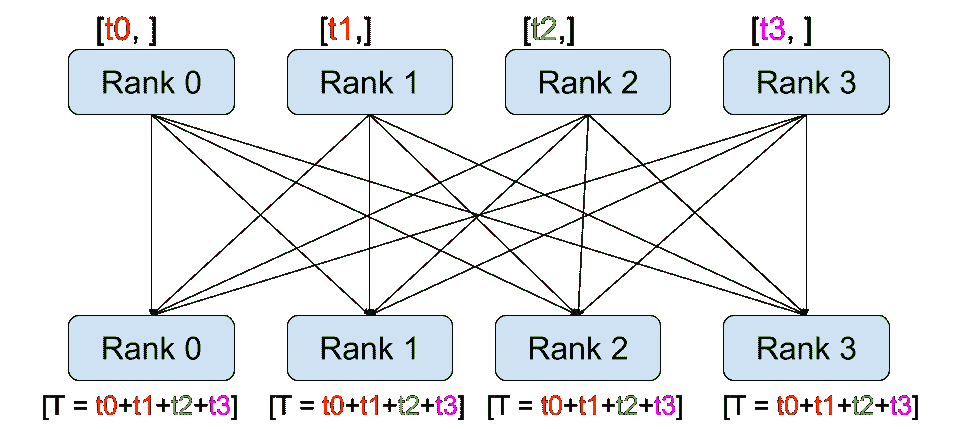
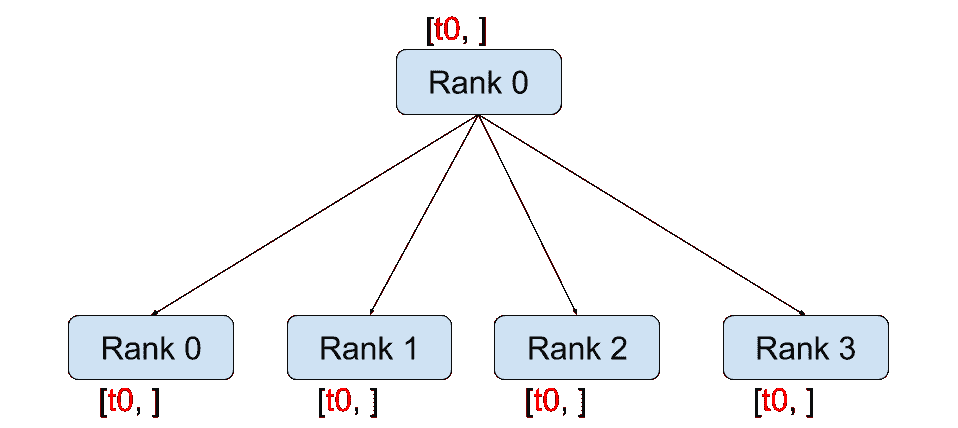
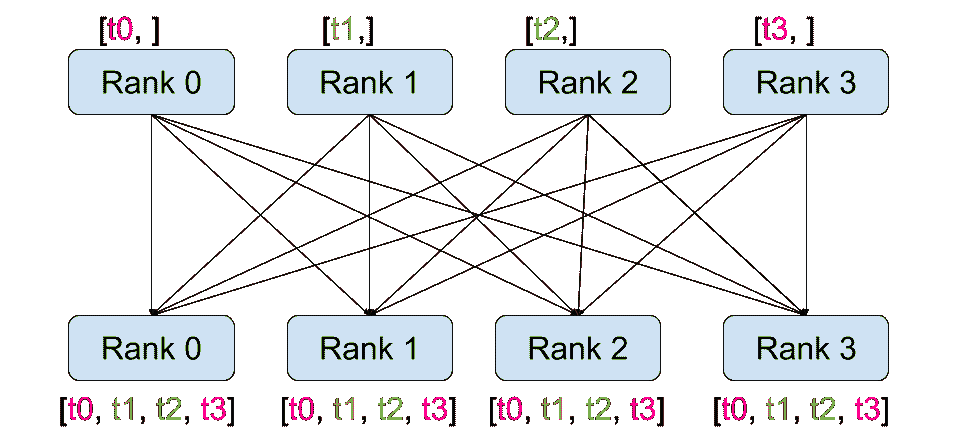
与点对点通信相反,集合允许在组中的所有进程之间进行通信模式。组是所有进程的子集。要创建一个组,我们可以将一组秩传递给dist.new_group(group)。默认情况下,集合在所有进程上执行,也称为世界。例如,为了获得所有进程上所有张量的总和,我们可以使用dist.all_reduce(tensor, op, group)集合。
""" All-Reduce example."""
def run(rank, size):""" Simple collective communication. """group = dist.new_group([0, 1])tensor = torch.ones(1)dist.all_reduce(tensor, op=dist.ReduceOp.SUM, group=group)print('Rank ', rank, ' has data ', tensor[0])
由于我们想要对组中所有张量的总和,我们使用dist.ReduceOp.SUM作为减少运算符。一般来说,任何可交换的数学运算都可以用作运算符。PyTorch 默认提供了 4 种这样的运算符,都在逐元素级别工作:
-
dist.ReduceOp.SUM, -
dist.ReduceOp.PRODUCT, -
dist.ReduceOp.MAX, -
dist.ReduceOp.MIN。
除了dist.all_reduce(tensor, op, group)之外,PyTorch 目前实现了总共 6 种集合操作。
-
dist.broadcast(tensor, src, group): 将tensor从src复制到所有其他进程。 -
dist.reduce(tensor, dst, op, group): 将op应用于每个tensor,并将结果存储在dst中。 -
dist.all_reduce(tensor, op, group): 与 reduce 相同,但结果存储在所有进程中。 -
dist.scatter(tensor, scatter_list, src, group): 将第 i i i 个张量scatter_list[i]复制到第 i i i 个进程。 -
dist.gather(tensor, gather_list, dst, group): 将tensor从所有进程复制到dst。 -
dist.all_gather(tensor_list, tensor, group): 将tensor从所有进程复制到tensor_list,在所有进程上。 -
dist.barrier(group): 阻塞组中的所有进程,直到每个进程都进入此函数。
分布式训练
注意: 您可以在此 GitHub 存储库中找到本节的示例脚本。
现在我们了解了分布式模块的工作原理,让我们用它来写一些有用的东西。我们的目标是复制DistributedDataParallel的功能。当然,这将是一个教学示例,在实际情况下,您应该使用上面链接的官方、经过充分测试和优化的版本。
我们简单地想要实现随机梯度下降的分布式版本。我们的脚本将让所有进程计算其模型在其数据批次上的梯度,然后平均它们的梯度。为了确保在改变进程数量时获得类似的收敛结果,我们首先需要对数据集进行分区。(您也可以使用tnt.dataset.SplitDataset,而不是下面的代码片段。)
""" Dataset partitioning helper """
class Partition(object):def __init__(self, data, index):self.data = dataself.index = indexdef __len__(self):return len(self.index)def __getitem__(self, index):data_idx = self.index[index]return self.data[data_idx]class DataPartitioner(object):def __init__(self, data, sizes=[0.7, 0.2, 0.1], seed=1234):self.data = dataself.partitions = []rng = Random()rng.seed(seed)data_len = len(data)indexes = [x for x in range(0, data_len)]rng.shuffle(indexes)for frac in sizes:part_len = int(frac * data_len)self.partitions.append(indexes[0:part_len])indexes = indexes[part_len:]def use(self, partition):return Partition(self.data, self.partitions[partition])
通过上面的片段,我们现在可以简单地使用以下几行代码对任何数据集进行分区:
""" Partitioning MNIST """
def partition_dataset():dataset = datasets.MNIST('./data', train=True, download=True,transform=transforms.Compose([transforms.ToTensor(),transforms.Normalize((0.1307,), (0.3081,))]))size = dist.get_world_size()bsz = 128 / float(size)partition_sizes = [1.0 / size for _ in range(size)]partition = DataPartitioner(dataset, partition_sizes)partition = partition.use(dist.get_rank())train_set = torch.utils.data.DataLoader(partition,batch_size=bsz,shuffle=True)return train_set, bsz
假设我们有 2 个副本,那么每个进程将有一个包含 30000 个样本的train_set。我们还将批量大小除以副本数量,以保持总批量大小为 128。
我们现在可以编写我们通常的前向-后向-优化训练代码,并添加一个函数调用来平均我们模型的梯度。(以下内容在很大程度上受到官方PyTorch MNIST 示例的启发。)
""" Distributed Synchronous SGD Example """
def run(rank, size):torch.manual_seed(1234)train_set, bsz = partition_dataset()model = Net()optimizer = optim.SGD(model.parameters(),lr=0.01, momentum=0.5)num_batches = ceil(len(train_set.dataset) / float(bsz))for epoch in range(10):epoch_loss = 0.0for data, target in train_set:optimizer.zero_grad()output = model(data)loss = F.nll_loss(output, target)epoch_loss += loss.item()loss.backward()average_gradients(model)optimizer.step()print('Rank ', dist.get_rank(), ', epoch ',epoch, ': ', epoch_loss / num_batches)
还需要实现average_gradients(model)函数,它简单地接受一个模型,并在整个世界范围内对其梯度进行平均。
""" Gradient averaging. """
def average_gradients(model):size = float(dist.get_world_size())for param in model.parameters():dist.all_reduce(param.grad.data, op=dist.ReduceOp.SUM)param.grad.data /= size
看这里!我们成功实现了分布式同步随机梯度下降,并且可以在大型计算机集群上训练任何模型。
**注意:**虽然最后一句话在技术上是正确的,但要实现同步 SGD 的生产级实现需要更多的技巧。再次使用已经经过测试和优化的内容。
我们自己的环形全局归约
作为一个额外的挑战,想象一下我们想要实现 DeepSpeech 的高效环形全局归约。使用点对点集合很容易实现这一目标。
""" Implementation of a ring-reduce with addition. """
def allreduce(send, recv):rank = dist.get_rank()size = dist.get_world_size()send_buff = send.clone()recv_buff = send.clone()accum = send.clone()left = ((rank - 1) + size) % sizeright = (rank + 1) % sizefor i in range(size - 1):if i % 2 == 0:# Send send_buffsend_req = dist.isend(send_buff, right)dist.recv(recv_buff, left)accum[:] += recv_buff[:]else:# Send recv_buffsend_req = dist.isend(recv_buff, right)dist.recv(send_buff, left)accum[:] += send_buff[:]send_req.wait()recv[:] = accum[:]
在上面的脚本中,allreduce(send, recv) 函数的签名与 PyTorch 中的略有不同。它接受一个 recv 张量,并将所有 send 张量的总和存储在其中。作为留给读者的练习,我们的版本与 DeepSpeech 中的版本之间仍然有一个区别:他们的实现将梯度张量分成块,以便最佳地利用通信带宽。(提示:torch.chunk)
高级主题
我们现在准备探索torch.distributed更高级的功能。由于涉及内容较多,本节分为两个小节:
-
通信后端:在这里我们学习如何使用 MPI 和 Gloo 进行 GPU-GPU 通信。
-
初始化方法:我们了解如何最好地设置
dist.init_process_group()中的初始协调阶段。
通信后端
torch.distributed 最优雅的一个方面是它能够抽象并构建在不同的后端之上。如前所述,目前在 PyTorch 中实现了三种后端:Gloo、NCCL 和 MPI。它们各自具有不同的规范和权衡,取决于所需的用例。支持的函数的比较表可以在这里找到。
Gloo 后端
到目前为止,我们已经广泛使用了Gloo 后端。作为一个开发平台,它非常方便,因为它包含在预编译的 PyTorch 二进制文件中,并且在 Linux(自 0.2 版本起)和 macOS(自 1.3 版本起)上都可以使用。它支持 CPU 上的所有点对点和集体操作,以及 GPU 上的所有集体操作。对于 CUDA 张量的集体操作的实现并不像 NCCL 后端提供的那样优化。
正如您肯定已经注意到的那样,如果您将model放在 GPU 上,我们的分布式 SGD 示例将无法工作。为了使用多个 GPU,让我们也进行以下修改:
-
使用
device = torch.device("cuda:{}".format(rank)) -
model = Net()->model = Net().to(device) -
使用
data, target = data.to(device), target.to(device)将数据和目标转移到设备上。
通过上述修改,我们的模型现在正在两个 GPU 上训练,您可以使用watch nvidia-smi来监视它们的利用率。
MPI 后端
消息传递接口(MPI)是来自高性能计算领域的标准化工具。它允许进行点对点和集体通信,并且是 torch.distributed API 的主要灵感来源。存在几种 MPI 的实现(例如 Open-MPI、MVAPICH2、Intel MPI),每种都针对不同的目的进行了优化。使用 MPI 后端的优势在于 MPI 在大型计算机集群上的广泛可用性和高度优化。一些最近的实现也能够利用 CUDA IPC 和 GPU Direct 技术,以避免通过 CPU 进行内存复制。
不幸的是,PyTorch 的二进制文件不能包含 MPI 实现,我们将不得不手动重新编译它。幸运的是,这个过程相当简单,因为在编译时,PyTorch 会自行寻找可用的 MPI 实现。以下步骤安装 MPI 后端,通过安装 PyTorch from source。
-
创建并激活您的 Anaconda 环境,按照指南安装所有先决条件,但是不要运行
python setup.py install。 -
选择并安装您喜欢的 MPI 实现。请注意,启用 CUDA-aware MPI 可能需要一些额外的步骤。在我们的情况下,我们将使用不支持 GPU 的 Open-MPI:
conda install -c conda-forge openmpi -
现在,转到您克隆的 PyTorch 存储库并执行
python setup.py install。
为了测试我们新安装的后端,需要进行一些修改。
-
将
if __name__ == '__main__':下面的内容替换为init_process(0, 0, run, backend='mpi')。 -
运行
mpirun -n 4 python myscript.py。
这些变化的原因是 MPI 需要在生成进程之前创建自己的环境。MPI 还将生成自己的进程,并执行初始化方法中描述的握手,使init_process_group的rank和size参数变得多余。实际上,这是非常强大的,因为您可以通过向mpirun传递附加参数来为每个进程定制计算资源。 (例如,每个进程的核心数,手动分配机器给特定的 rank,以及更多)这样做,您应该获得与其他通信后端相同的熟悉输出。
NCCL 后端
NCCL 后端提供了针对 CUDA 张量的集体操作的优化实现。如果您只使用 CUDA 张量进行集体操作,请考虑使用此后端以获得最佳性能。NCCL 后端已包含在带有 CUDA 支持的预构建二进制文件中。
初始化方法
为了完成本教程,让我们谈谈我们调用的第一个函数:dist.init_process_group(backend, init_method)。特别是,我们将讨论不同的初始化方法,这些方法负责每个进程之间的初始协调步骤。这些方法允许您定义协调的方式。根据您的硬件设置,其中一种方法应该比其他方法更适合。除了以下部分,您还应该查看官方文档。
环境变量
在整个教程中,我们一直在使用环境变量初始化方法。通过在所有机器上设置以下四个环境变量,所有进程将能够正确连接到主节点,获取有关其他进程的信息,并最终与它们握手。
-
MASTER_PORT:主机上将托管排名为 0 的进程的空闲端口。 -
MASTER_ADDR: 将托管排名为 0 的进程的机器的 IP 地址。 -
WORLD_SIZE:进程的总数,这样主进程就知道要等待多少个工作进程。 -
RANK:每个进程的排名,这样它们就会知道它是主进程还是工作进程。
共享文件系统
共享文件系统要求所有进程都能访问共享文件系统,并通过共享文件进行协调。这意味着每个进程将打开文件,写入其信息,并等待直到所有人都这样做。之后,所有必要的信息将立即对所有进程可用。为了避免竞争条件,文件系统必须支持通过fcntl进行锁定。
dist.init_process_group(init_method='file:///mnt/nfs/sharedfile',rank=args.rank,world_size=4)
传输控制协议(TCP)是一种面向连接的协议,它提供可靠的数据传输服务。TCP 在网络通信中起着重要作用,它确保数据在发送和接收之间的可靠传输。TCP 使用三次握手建立连接,并使用流量控制和拥塞控制来确保数据传输的稳定性。TCP 是互联网上最常用的协议之一,被广泛应用于各种网络应用中。
通过提供进程 0 的 IP 地址和可达端口号,可以通过 TCP 进行初始化。在这里,所有的工作进程都可以连接到进程 0,并交换彼此如何联系的信息。
dist.init_process_group(init_method='tcp://10.1.1.20:23456',rank=args.rank,world_size=4)
致谢
我想感谢 PyTorch 开发人员在他们的实现、文档和测试方面做得如此出色。当代码不清晰时,我总是可以依靠文档或测试找到答案。特别感谢 Soumith Chintala、Adam Paszke 和 Natalia Gimelshein 在初稿中提供深刻的评论并回答问题。
