文章目录
- 1.灌装集群节点操作系统
- 1.1 设置hosts
- 1.2 设置nameserver
- 1.3 关闭防火墙
- 1.4 关闭Selinux
- 1.5 关闭Swap分区
- 1.6 时间同步
- 1.7 调整内核参数
- 1.8 系统内核升级
- 2.安装Docker
- 2.1 卸载旧Docker
- 2.2 配置Docker软件源
- 2.3 安装Docker
- 3.部署Kubernets集群
- 3.1 设置 K8s 软件源
- 3.2 安装kubeadm,kubelet 和kubectl
- 3.3 下载镜像
- 3.4 部署Kubernetes Master
- 3.5 配置文件
- 3.6 添加其他节点
- 3.7 安装网络插件
- 3.8 检查节点是否污染
- 3.9 k8s集群常用命令
- 3.10 安装k8s可视化页面
1.灌装集群节点操作系统
系统:一台或多台机器,操作系统CentOS-7-2009(根据实际情况选择)。
硬件配置:2GB 或更多RAM,2 个CPU 或更多CPU,硬盘30GB 或更多。
网络:集群中所有机器之间网络互通,可以访问外网,需要拉取镜像。
其他:禁止swap 分区,时间同步等。目标:
(1)在所有节点上安装Docker 和 kubeadm
(2)部署 Kubernetes Master
(3)部署容器网络插件
(4)部署 Kubernetes Node,将节点加入 Kubernetes 集群中
(5)部署 Dashboard Web 页面,可视化查看 Kubernetes 资源
| HostName | IP | CPU | 内存 | 磁盘 | 数据盘 | OS | 角色 |
|---|---|---|---|---|---|---|---|
| ceph61 | 192.168.120.61 | 4 | 4G | 80G(OS) 30G 30G 30G | /dev/sdb /dev/sdc /dev/sdd | CentOS-7-x86_64-Everything-2009.iso | k8s-master |
| ceph62 | 192.168.120.62 | 4 | 4G | 50G(OS) 30G 30G 30G | /dev/sdb /dev/sdc /dev/sdd | CentOS-7-x86_64-Everything-2009.iso | k8s-node |
| ceph63 | 192.168.120.63 | 4 | 4G | 50G(OS) 30G 30G 30G | /dev/sdb /dev/sdc /dev/sdd | CentOS-7-x86_64-Everything-2009.iso | k8s-node |
1.1 设置hosts
# 集群所有节点都执行
cat >> /etc/hosts << EOF
192.168.120.61 ceph61
192.168.120.62 ceph62
192.168.120.63 ceph63
EOF
1.2 设置nameserver
# 集群所有节点都执行(如果是内网集群,此处设置为网关ip地址)
vim /etc/resolv.conf
nameserver 114.114.114.114
nameserver 8.8.8.8
1.3 关闭防火墙
# 集群所有节点都执行
systemctl stop firewalld
systemctl disable firewalld
1.4 关闭Selinux
# 集群所有节点都执行
# 永久
sed -i 's/SELINUX=enforcing/SELINUX=disabled/g' /etc/selinux/config
# 临时
setenforce 0
1.5 关闭Swap分区
# 集群所有节点都执行
# 临时
swapoff -a
# 永久
sed -ri 's/.*swap.*/#&/' /etc/fstab
1.6 时间同步
# 集群所有节点都执行
# 实验方法
yum install ntpdate -y
ntpdate time.windows.com
-------------------------------------------------------------------
# 生产环境-在线环境
yum install chrony -y
# 备份配置
cp /etc/chrony.conf  /etc/chrony.conf.orig
sed -i '/^pool/s/^/#/' /etc/chrony.conf    #注解掉pool
grep '#pool' /etc/chrony.conf
sed -i '/#pool/a\server cn.pool.ntp.org iburst' /etc/chrony.conf
sed -i '/#pool/a\server ntp.ntsc.ac.cn iburst' /etc/chrony.conf
sed -i '/#pool/a\server ntp1.aliyun.com iburst' /etc/chrony.conf
grep -A 3 '#pool' /etc/chrony.conf
-------------------------------------------------------------------
# 生产环境-离线环境
# 时间服务节点
allow 192.168.120.0/24
server 127.127.0.1 iburst
driftfile /var/lib/chrony/drift
keyfile /etc/chrony.keys
leapsectz right/UTC
local stratum 10
makestep 1.0 3
rtcsync
logdir /var/log/chrony# 时间客户端
allow 192.168.120.0/24
server 192.168.120.41 iburst
driftfile /var/lib/chrony/drift
keyfile /etc/chrony.keys
leapsectz right/UTC
local stratum 10
makestep 1.0 3
rtcsync
logdir /var/log/chrony# 重启服务
systemctl restart chronyd.service
1.7 调整内核参数
# 集群所有节点都执行
cat > /etc/sysctl.d/kubernetes.conf << EOF
net.bridge.bridge-nf-call-iptables=1
net.bridge.bridge-nf-call-ip6tables=1
EOF# 执行命令使修改生效。
modprobe br_netfilter
sysctl -p /etc/sysctl.d/kubernetes.conf
1.8 系统内核升级
# 集群所有节点都执行
# 1.获取源
yum install https://www.elrepo.org/elrepo-release-7.el7.elrepo.noarch.rpm
# 2.安装
yum --enablerepo=elrepo-kernel install -y kernel-lt
# 3.设置开机从新内核启动
grub2-set-default 'CentoS Linux (5.4.267-1.el7.elrepo.×86_64) 7 (Core)'
# 4.重启生效
reboot
# 5.查看
uname -a
# 6.安装更新
yum update -y
2.安装Docker
2.1 卸载旧Docker
# 集群所有节点都执行,卸载旧版本docker或docker-engine和相关依赖包
sudo yum remove docker docker-client docker-client-latest docker-common docker-latest docker-latest-logrotate docker-logrotate docker-engine
2.2 配置Docker软件源
# 集群所有节点都执行,安装需要的包
yum install -y yum-utils device-mapper-persistent-data lvm2
# 阿里镜像
yum-config-manager --add-repo https://mirrors.aliyun.com/docker-ce/linux/centos/docker-ce.repo
# 更新软件包索引
yum makecache fast
# 查看docker版本
yum list docker-ce --showduplicates | sort -r
2.3 安装Docker
# 集群所有节点都执行,不指定版本,默认安装最新的版本
yum install docker-ce docker-ce-cli containerd.io docker-compose-plugin
# 或者指定版本安装
# yum install docker-ce-<VERSION_STRING> docker-ce-cli-<VERSION_STRING> containerd.io
# 例如:yum install docker-ce-24.xx.x.ce docker-ce-cli-24.xx.x.ce containerd.io# 设置镜像加速器
mkdir /etc/docker
cat > /etc/docker/daemon.json << EOF
{"registry-mirrors": ["https://i8d2zxyn.mirror.aliyuncs.com"],"exec-opts": ["native.cgroupdriver=systemd"],"log-driver": "json-file","log-opts": {"max-size": "100m"},"storage-driver": "overlay2"
}
EOF
# 设置开启自启动并启动docker服务
systemctl status docker		# 查看docker服务状态
systemctl start docker		# 启动docker服务
systemctl stop docker		# 关闭docker服务
systemctl enable docker		# 设置docker服务开机启动
systemctl is-enabled docker	# 查看docker服务是否设置开机启动[root@ceph61 ~]# docker --version
Docker version 25.0.2, build 29cf629
3.部署Kubernets集群
3.1 设置 K8s 软件源
# 集群所有节点都执行
cat > /etc/yum.repos.d/kubernetes.repo << EOF
[kubernetes]
name=Kubernetes
baseurl=https://mirrors.aliyun.com/kubernetes/yum/repos/kubernetes-el7-x86_64/
enabled=1
gpgcheck=0
gpgkey=https://mirrors.aliyun.com/kubernetes/yum/doc/rpm-package-key.gpg https://mirrors.aliyun.com/kubernetes/yum/doc/yum-key.gpg
EOF# 创建本地缓存
yum makecache
3.2 安装kubeadm,kubelet 和kubectl
# 此处需要指定版本,如果不指定版本,默认安装最新的版本,有时和docker不兼容,导致k8s集群初始化报错
# 因为Docker安装了最新的版本,此处k8s版本也默认安装最新的
yum -y install kubelet kubectl kubeadm
# 例如指定版本:yum -y install kubelet-1.22.4 kubectl-1.22.4 kubeadm-1.22.4[root@ceph61 ~]# kubelet --version
Kubernetes v1.28.2
[root@ceph61 ~]# kubectl version
Client Version: v1.28.2
Kustomize Version: v5.0.4-0.20230601165947-6ce0bf390ce3
[root@ceph61 ~]# kubeadm version
kubeadm version: &version.Info{Major:"1", Minor:"28", GitVersion:"v1.28.2", GitCommit:"89a4ea3e1e4ddd7f7572286090359983e0387b2f", GitTreeState:"clean", BuildDate:"2023-09-13T09:34:32Z", GoVersion:"go1.20.8", Compiler:"gc", Platform:"linux/amd64"}# 启动kubelet服务并设置开机自启
systemctl start kubelet && systemctl enable kubelet# 此处还无法启动kubelet服务,kubeadm init xxx 命令执行过程中,会启动该服务
systemctl status kubelet.service
# 查看错误信息
journalctl -xefu kubelet
3.3 下载镜像
# 集群所有节点都执行
# 如果不手动下载镜像,当执行 kubeadm init xxx 时,从国外网站下载镜像失败
# 1.查询需要下载的镜像及版本号:kubeadm config images list
[root@ceph61 ~]# kubeadm config images list
I0205 11:20:22.892197   35269 version.go:256] remote version is much newer: v1.29.1; falling back to: stable-1.28
registry.k8s.io/kube-apiserver:v1.28.6
registry.k8s.io/kube-controller-manager:v1.28.6
registry.k8s.io/kube-scheduler:v1.28.6
registry.k8s.io/kube-proxy:v1.28.6
registry.k8s.io/pause:3.9
registry.k8s.io/etcd:3.5.9-0
registry.k8s.io/coredns/coredns:v1.10.1# 下载(可以手动下载,如果是外网,可以不下载)
docker pull registry.aliyuncs.com/google_containers/kube-apiserver:v1.28.6
docker pull registry.aliyuncs.com/google_containers/kube-controller-manager:v1.28.6
docker pull registry.aliyuncs.com/google_containers/kube-scheduler:v1.28.6
docker pull registry.aliyuncs.com/google_containers/kube-proxy:v1.28.6
docker pull registry.aliyuncs.com/google_containers/pause:3.9
docker pull registry.aliyuncs.com/google_containers/etcd:3.5.9-0
docker pull registry.aliyuncs.com/google_containers/coredns:v1.10.1
# 从新打tag
docker tag registry.aliyuncs.com/google_containers/kube-apiserver:v1.28.6 registry.k8s.io/kube-apiserver:v1.28.6
docker tag registry.aliyuncs.com/google_containers/kube-controller-manager:v1.28.6 registry.k8s.io/kube-controller-manager:v1.28.6
docker tag registry.aliyuncs.com/google_containers/kube-scheduler:v1.28.6 registry.k8s.io/kube-scheduler:v1.28.6
docker tag registry.aliyuncs.com/google_containers/kube-proxy:v1.28.6 registry.k8s.io/kube-proxy:v1.28.6
docker tag registry.aliyuncs.com/google_containers/pause:3.9 registry.k8s.io/pause:3.9
docker tag registry.aliyuncs.com/google_containers/etcd:3.5.9-0 registry.k8s.io/etcd:3.5.9-0
docker tag registry.aliyuncs.com/google_containers/coredns:v1.10.1 registry.k8s.io/coredns/coredns:v1.10.1
# 删除旧的tag信息(可以暂时保留)
docker rmi registry.aliyuncs.com/google_containers/kube-apiserver:v1.28.6
docker rmi registry.aliyuncs.com/google_containers/kube-controller-manager:v1.28.6
docker rmi registry.aliyuncs.com/google_containers/kube-scheduler:v1.28.6
docker rmi registry.aliyuncs.com/google_containers/kube-proxy:v1.28.6
docker rmi registry.aliyuncs.com/google_containers/pause:3.9
docker rmi registry.aliyuncs.com/google_containers/etcd:3.5.9-0
docker rmi registry.aliyuncs.com/google_containers/coredns:v1.10.1# 查询镜像(手动下载的情况)
[root@ceph61 ~]# docker images
REPOSITORY                                                        TAG       IMAGE ID       CREATED         SIZE
registry.aliyuncs.com/google_containers/kube-apiserver            v1.28.6   70e88c5e3a8e   2 weeks ago     126MB
registry.k8s.io/kube-apiserver                                    v1.28.6   70e88c5e3a8e   2 weeks ago     126MB
registry.aliyuncs.com/google_containers/kube-scheduler            v1.28.6   7597ecaaf120   2 weeks ago     60.1MB
registry.k8s.io/kube-scheduler                                    v1.28.6   7597ecaaf120   2 weeks ago     60.1MB
registry.aliyuncs.com/google_containers/kube-controller-manager   v1.28.6   18dbd2df3bb5   2 weeks ago     122MB
registry.k8s.io/kube-controller-manager                           v1.28.6   18dbd2df3bb5   2 weeks ago     122MB
registry.aliyuncs.com/google_containers/kube-proxy                v1.28.6   342a759d8815   2 weeks ago     77.9MB
registry.k8s.io/kube-proxy                                        v1.28.6   342a759d8815   2 weeks ago     77.9MB
registry.aliyuncs.com/google_containers/etcd                      3.5.9-0   73deb9a3f702   8 months ago    294MB
registry.k8s.io/etcd                                              3.5.9-0   73deb9a3f702   8 months ago    294MB
registry.aliyuncs.com/google_containers/coredns                   v1.10.1   ead0a4a53df8   12 months ago   53.6MB
registry.k8s.io/coredns/coredns                                   v1.10.1   ead0a4a53df8   12 months ago   53.6MB
registry.aliyuncs.com/google_containers/pause                     3.9       e6f181688397   15 months ago   744kB
registry.k8s.io/pause                                             3.9       e6f181688397   15 months ago   744kB
3.4 部署Kubernetes Master
# 问题1:如果报错,需要执行下面步骤,关闭CRI
[root@ceph61 ~]# kubeadm init   --apiserver-advertise-address=0.0.0.0   --image-repository=registry.aliyuncs.com/google_containers   --kubernetes-version=v1.28.6   --service-cidr=10.96.0.0/12   --pod-network-cidr=10.244.0.0/16
[init] Using Kubernetes version: v1.28.6
[preflight] Running pre-flight checks
error execution phase preflight: [preflight] Some fatal errors occurred:[ERROR CRI]: container runtime is not running: output: time="2024-02-05T11:28:28+08:00" level=fatal msg="validate service connection: CRI v1 runtime API is not implemented for endpoint \"unix:///var/run/containerd/containerd.sock\": rpc error: code = Unimplemented desc = unknown service runtime.v1.RuntimeService"
, error: exit status 1
[preflight] If you know what you are doing, you can make a check non-fatal with `--ignore-preflight-errors=...`
To see the stack trace of this error execute with --v=5 or higher# 步骤1:进行如下设置,kubernetes使用crictl命令管理CRI,查看其配置文件/etc/crictl.yaml。
# 初始情况下没有这个配置文件,这里建议添加这个配置,否则kubeadm init时会报其他错。
cat > /etc/crictl.yaml <<EOF
runtime-endpoint: unix:///var/run/containerd/containerd.sock
image-endpoint: unix:///var/run/containerd/containerd.sock
timeout: 0
debug: false
pull-image-on-create: false
EOF# 步骤2:关闭CRI,集群三节点都需要修改
vim /etc/containerd/config.toml
# 注释掉CRI
# disabled_plugins = ["cri"]# 步骤3:重启containerd
[root@ceph61 ~]# systemctl restart containerd# 问题2:报错pause镜像获取失败
[kubelet-start] Starting the kubelet
[wait-control-plane] Waiting for the kubelet to boot up the control plane as static Pods from directory "/etc/kubernetes/manifests". This can take up to 4m0s
[kubelet-check] Initial timeout of 40s passed.Unfortunately, an error has occurred:timed out waiting for the conditionThis error is likely caused by:- The kubelet is not running- The kubelet is unhealthy due to a misconfiguration of the node in some way (required cgroups disabled)If you are on a systemd-powered system, you can try to troubleshoot the error with the following commands:- 'systemctl status kubelet'- 'journalctl -xeu kubelet'Additionally, a control plane component may have crashed or exited when started by the container runtime.
To troubleshoot, list all containers using your preferred container runtimes CLI.
Here is one example how you may list all running Kubernetes containers by using crictl:- 'crictl --runtime-endpoint unix:///var/run/containerd/containerd.sock ps -a | grep kube | grep -v pause'Once you have found the failing container, you can inspect its logs with:- 'crictl --runtime-endpoint unix:///var/run/containerd/containerd.sock logs CONTAINERID'
error execution phase wait-control-plane: couldn't initialize a Kubernetes cluster
To see the stack trace of this error execute with --v=5 or higher# 参考:https://zhuanlan.zhihu.com/p/660905540
# 步骤1:
containerd config dump > /etc/containerd/config.toml
vim /etc/containerd/config.toml
# 将下面值:
sandbox_image = "registry.k8s.io/pause:3.6"
# 修改为:
sandbox_image = "registry.aliyuncs.com/google_containers/pause:3.9"
# 步骤2:
sudo systemctl restart containerd
# K8s集群初始化、重置...
# 当该init命令重新执行时,需要先执行:
kubeadm reset --force# 用kubeadm ini初始化kubernetes,在Master(ceph61:k8s-master)节点执行
kubeadm init \--apiserver-advertise-address=0.0.0.0 \--image-repository=registry.aliyuncs.com/google_containers \--kubernetes-version=v1.28.6 \--service-cidr=10.96.0.0/12 \--pod-network-cidr=10.244.0.0/16# 由于默认拉取镜像地址k8s.gcr.io 国内无法访问,这里指定阿里云镜像仓库地址:
--apiserver-advertise-addres : 填写 k8s-master ip,默认只填写0.0.0.0即可
--image-repository : 镜像地址,指定为阿里源即可
--kubernetes-version : 指定版本跳过网络请求,Kubernetes版本号必须一致,通过kubeadm config images list查看版本号,# 因为它的默认值是stable-1,会从https://storage.googleapis.com/kubernetes-release/release/stable-1.txt下载最新的版本号
--service-cidr=10.96.0.0/12	: # 这个参数后的IP地址直接就套用10.96.0.0/12,以后安装时也套用即可,不要更改
--pod-network-cidr=10.244.0.0/16 : # k8s内部的pod节点之间网络可以使用的IP段,不能和service-cidr写一样,如果不知道怎么配,就先用这个10.244.0.0/16[root@ceph61 ~]# kubeadm init \
>   --apiserver-advertise-address=0.0.0.0 \
>   --image-repository=registry.aliyuncs.com/google_containers \
>   --kubernetes-version=v1.28.6 \
>   --service-cidr=10.96.0.0/12 \
>   --pod-network-cidr=10.244.0.0/16
[init] Using Kubernetes version: v1.28.6
[preflight] Running pre-flight checks
[preflight] Pulling images required for setting up a Kubernetes cluster
[preflight] This might take a minute or two, depending on the speed of your internet connection
[preflight] You can also perform this action in beforehand using 'kubeadm config images pull'
[certs] Using certificateDir folder "/etc/kubernetes/pki"
[certs] Generating "ca" certificate and key
[certs] Generating "apiserver" certificate and key
[certs] apiserver serving cert is signed for DNS names [ceph61 kubernetes kubernetes.default kubernetes.default.svc kubernetes.default.svc.cluster.local] and IPs [10.96.0.1 192.168.120.61]
[certs] Generating "apiserver-kubelet-client" certificate and key
[certs] Generating "front-proxy-ca" certificate and key
[certs] Generating "front-proxy-client" certificate and key
[certs] Generating "etcd/ca" certificate and key
[certs] Generating "etcd/server" certificate and key
[certs] etcd/server serving cert is signed for DNS names [ceph61 localhost] and IPs [192.168.120.61 127.0.0.1 ::1]
[certs] Generating "etcd/peer" certificate and key
[certs] etcd/peer serving cert is signed for DNS names [ceph61 localhost] and IPs [192.168.120.61 127.0.0.1 ::1]
[certs] Generating "etcd/healthcheck-client" certificate and key
[certs] Generating "apiserver-etcd-client" certificate and key
[certs] Generating "sa" key and public key
[kubeconfig] Using kubeconfig folder "/etc/kubernetes"
[kubeconfig] Writing "admin.conf" kubeconfig file
[kubeconfig] Writing "kubelet.conf" kubeconfig file
[kubeconfig] Writing "controller-manager.conf" kubeconfig file
[kubeconfig] Writing "scheduler.conf" kubeconfig file
[etcd] Creating static Pod manifest for local etcd in "/etc/kubernetes/manifests"
[control-plane] Using manifest folder "/etc/kubernetes/manifests"
[control-plane] Creating static Pod manifest for "kube-apiserver"
[control-plane] Creating static Pod manifest for "kube-controller-manager"
[control-plane] Creating static Pod manifest for "kube-scheduler"
[kubelet-start] Writing kubelet environment file with flags to file "/var/lib/kubelet/kubeadm-flags.env"
[kubelet-start] Writing kubelet configuration to file "/var/lib/kubelet/config.yaml"
[kubelet-start] Starting the kubelet
[wait-control-plane] Waiting for the kubelet to boot up the control plane as static Pods from directory "/etc/kubernetes/manifests". This can take up to 4m0s
[apiclient] All control plane components are healthy after 6.502526 seconds
[upload-config] Storing the configuration used in ConfigMap "kubeadm-config" in the "kube-system" Namespace
[kubelet] Creating a ConfigMap "kubelet-config" in namespace kube-system with the configuration for the kubelets in the cluster
[upload-certs] Skipping phase. Please see --upload-certs
[mark-control-plane] Marking the node ceph61 as control-plane by adding the labels: [node-role.kubernetes.io/control-plane node.kubernetes.io/exclude-from-external-load-balancers]
[mark-control-plane] Marking the node ceph61 as control-plane by adding the taints [node-role.kubernetes.io/control-plane:NoSchedule]
[bootstrap-token] Using token: 6d91mq.mlm8kkyos1c2hvev
[bootstrap-token] Configuring bootstrap tokens, cluster-info ConfigMap, RBAC Roles
[bootstrap-token] Configured RBAC rules to allow Node Bootstrap tokens to get nodes
[bootstrap-token] Configured RBAC rules to allow Node Bootstrap tokens to post CSRs in order for nodes to get long term certificate credentials
[bootstrap-token] Configured RBAC rules to allow the csrapprover controller automatically approve CSRs from a Node Bootstrap Token
[bootstrap-token] Configured RBAC rules to allow certificate rotation for all node client certificates in the cluster
[bootstrap-token] Creating the "cluster-info" ConfigMap in the "kube-public" namespace
[kubelet-finalize] Updating "/etc/kubernetes/kubelet.conf" to point to a rotatable kubelet client certificate and key
[addons] Applied essential addon: CoreDNS
[addons] Applied essential addon: kube-proxyYour Kubernetes control-plane has initialized successfully!To start using your cluster, you need to run the following as a regular user:mkdir -p $HOME/.kubesudo cp -i /etc/kubernetes/admin.conf $HOME/.kube/configsudo chown $(id -u):$(id -g) $HOME/.kube/configAlternatively, if you are the root user, you can run:export KUBECONFIG=/etc/kubernetes/admin.confYou should now deploy a pod network to the cluster.
Run "kubectl apply -f [podnetwork].yaml" with one of the options listed at:https://kubernetes.io/docs/concepts/cluster-administration/addons/Then you can join any number of worker nodes by running the following on each as root:kubeadm join 192.168.120.61:6443 --token 6d91mq.mlm8kkyos1c2hvev \--discovery-token-ca-cert-hash sha256:fb4ec669becd632f799cfc2ddf48746cd7689ce58a24598c1250e353b5d3dd64
3.5 配置文件
# 在 master(ceph61) 节点
mkdir -p $HOME/.kube
sudo cp -i /etc/kubernetes/admin.conf $HOME/.kube/config
sudo chown $(id -u):$(id -g) $HOME/.kube/config# 拷贝到其余节点
scp /etc/kubernetes/admin.conf ceph62:/etc/kubernetes/
scp /etc/kubernetes/admin.conf ceph63:/etc/kubernetes/# 配置环境变量
echo "export KUBECONFIG=/etc/kubernetes/admin.conf" >> ~/.bash_profile
source ~/.bash_profile
3.6 添加其他节点
# 在其余节点(ceph62,ceph63)节点执行如下命令:
kubeadm join 192.168.120.61:6443 --token 6d91mq.mlm8kkyos1c2hvev --discovery-token-ca-cert-hash sha256:fb4ec669becd632f799cfc2ddf48746cd7689ce58a24598c1250e353b5d3dd64# 加入集群后:
[root@ceph61 ~]# kubectl get node
NAME     STATUS     ROLES           AGE     VERSION
ceph61   NotReady   control-plane   3m11s   v1.28.2
ceph62   NotReady   <none>          13s     v1.28.2
ceph63   NotReady   <none>          9s      v1.28.2
3.7 安装网络插件
# 方法1:(在ceph集群中暂时不使用)
kubectl apply -f https://raw.githubusercontent.com/coreos/flannel/master/Documentation/kube-flannel.yml
[root@ceph61 ~]# kubectl apply -f https://raw.githubusercontent.com/coreos/flannel/master/Documentation/kube-flannel.yml
namespace/kube-flannel created
clusterrole.rbac.authorization.k8s.io/flannel created
clusterrolebinding.rbac.authorization.k8s.io/flannel created
serviceaccount/flannel created
configmap/kube-flannel-cfg created
daemonset.apps/kube-flannel-ds created\# 方法2:(Ceph集群,建议使用该网络插件),只需要在ceph61节点运行即可
wget https://docs.projectcalico.org/v3.25/manifests/calico.yaml --no-check-certificate
# wget https://docs.projectcalico.org/v3.23/manifests/calico.yaml --no-check-certificate
kubectl apply -f calico.yaml
[root@ceph61 ~]# kubectl apply -f calico.yaml
poddisruptionbudget.policy/calico-kube-controllers created
serviceaccount/calico-kube-controllers created
serviceaccount/calico-node created
configmap/calico-config created
customresourcedefinition.apiextensions.k8s.io/bgpconfigurations.crd.projectcalico.org created
customresourcedefinition.apiextensions.k8s.io/bgppeers.crd.projectcalico.org created
customresourcedefinition.apiextensions.k8s.io/blockaffinities.crd.projectcalico.org created
customresourcedefinition.apiextensions.k8s.io/caliconodestatuses.crd.projectcalico.org created
customresourcedefinition.apiextensions.k8s.io/clusterinformations.crd.projectcalico.org created
customresourcedefinition.apiextensions.k8s.io/felixconfigurations.crd.projectcalico.org created
customresourcedefinition.apiextensions.k8s.io/globalnetworkpolicies.crd.projectcalico.org created
customresourcedefinition.apiextensions.k8s.io/globalnetworksets.crd.projectcalico.org created
customresourcedefinition.apiextensions.k8s.io/hostendpoints.crd.projectcalico.org created
customresourcedefinition.apiextensions.k8s.io/ipamblocks.crd.projectcalico.org created
customresourcedefinition.apiextensions.k8s.io/ipamconfigs.crd.projectcalico.org created
customresourcedefinition.apiextensions.k8s.io/ipamhandles.crd.projectcalico.org created
customresourcedefinition.apiextensions.k8s.io/ippools.crd.projectcalico.org created
customresourcedefinition.apiextensions.k8s.io/ipreservations.crd.projectcalico.org created
customresourcedefinition.apiextensions.k8s.io/kubecontrollersconfigurations.crd.projectcalico.org created
customresourcedefinition.apiextensions.k8s.io/networkpolicies.crd.projectcalico.org created
customresourcedefinition.apiextensions.k8s.io/networksets.crd.projectcalico.org created
clusterrole.rbac.authorization.k8s.io/calico-kube-controllers created
clusterrole.rbac.authorization.k8s.io/calico-node created
clusterrolebinding.rbac.authorization.k8s.io/calico-kube-controllers created
clusterrolebinding.rbac.authorization.k8s.io/calico-node created
daemonset.apps/calico-node created
deployment.apps/calico-kube-controllers created# 查看节点状态
[root@ceph61 ~]# kubectl get nodes
NAME     STATUS   ROLES           AGE   VERSION
ceph61   Ready    control-plane   40m   v1.28.2
ceph62   Ready    <none>          37m   v1.28.2
ceph63   Ready    <none>          37m   v1.28.2# 下载镜像(如果查看节点状态失败)
docker pull docker.io/calico/cni:v3.25.0
docker pull docker.io/calico/node:v3.25.0
docker pull docker.io/calico/kube-controllers:v3.25.0
3.8 检查节点是否污染
# 检查节点是否污染 - ceph61节点被污染,被污染后,无法参与调度
[root@ceph61 ~]# kubectl describe node ceph61 | grep Taints
Taints:             node-role.kubernetes.io/control-plane:NoSchedule
[root@ceph61 ~]# kubectl describe node ceph62 | grep Taints
Taints:             <none>
[root@ceph61 ~]# kubectl describe node ceph63 | grep Taints
Taints:             <none># 取消节点污染
[root@ceph41 ~]# kubectl taint nodes --all node-role.kubernetes.io/control-plane-
# 打印输出如下
node/ceph61 untainted
taint "node-role.kubernetes.io/master" not found
taint "node-role.kubernetes.io/master" not found
# 再次检查
[root@ceph61 ~]# kubectl describe node ceph61 | grep Taints
Taints:             <none>
3.9 k8s集群常用命令
# 获取集群namespace
kubectl get namespace
# 获取当前运行的所有进程
kubectl get pod -A
kubectl get pod --all-namespaces
# 获取指定namespace的pod
kubectl get pod -n <namespace>
# 获取更详细信息
kubectl get pod -o wide -A
# 查看某一个pod的详细数据
kubectl describe pod <podname> -n <namespace>
# 查看日志
kubectl logs <podname> -f
kubectl logs <podname> -f -n <namespace>
# 进入容器
kubectl exec -it <podname> -- bash
# 删除pod
kubectl delete pod <podname> -n <namespace>
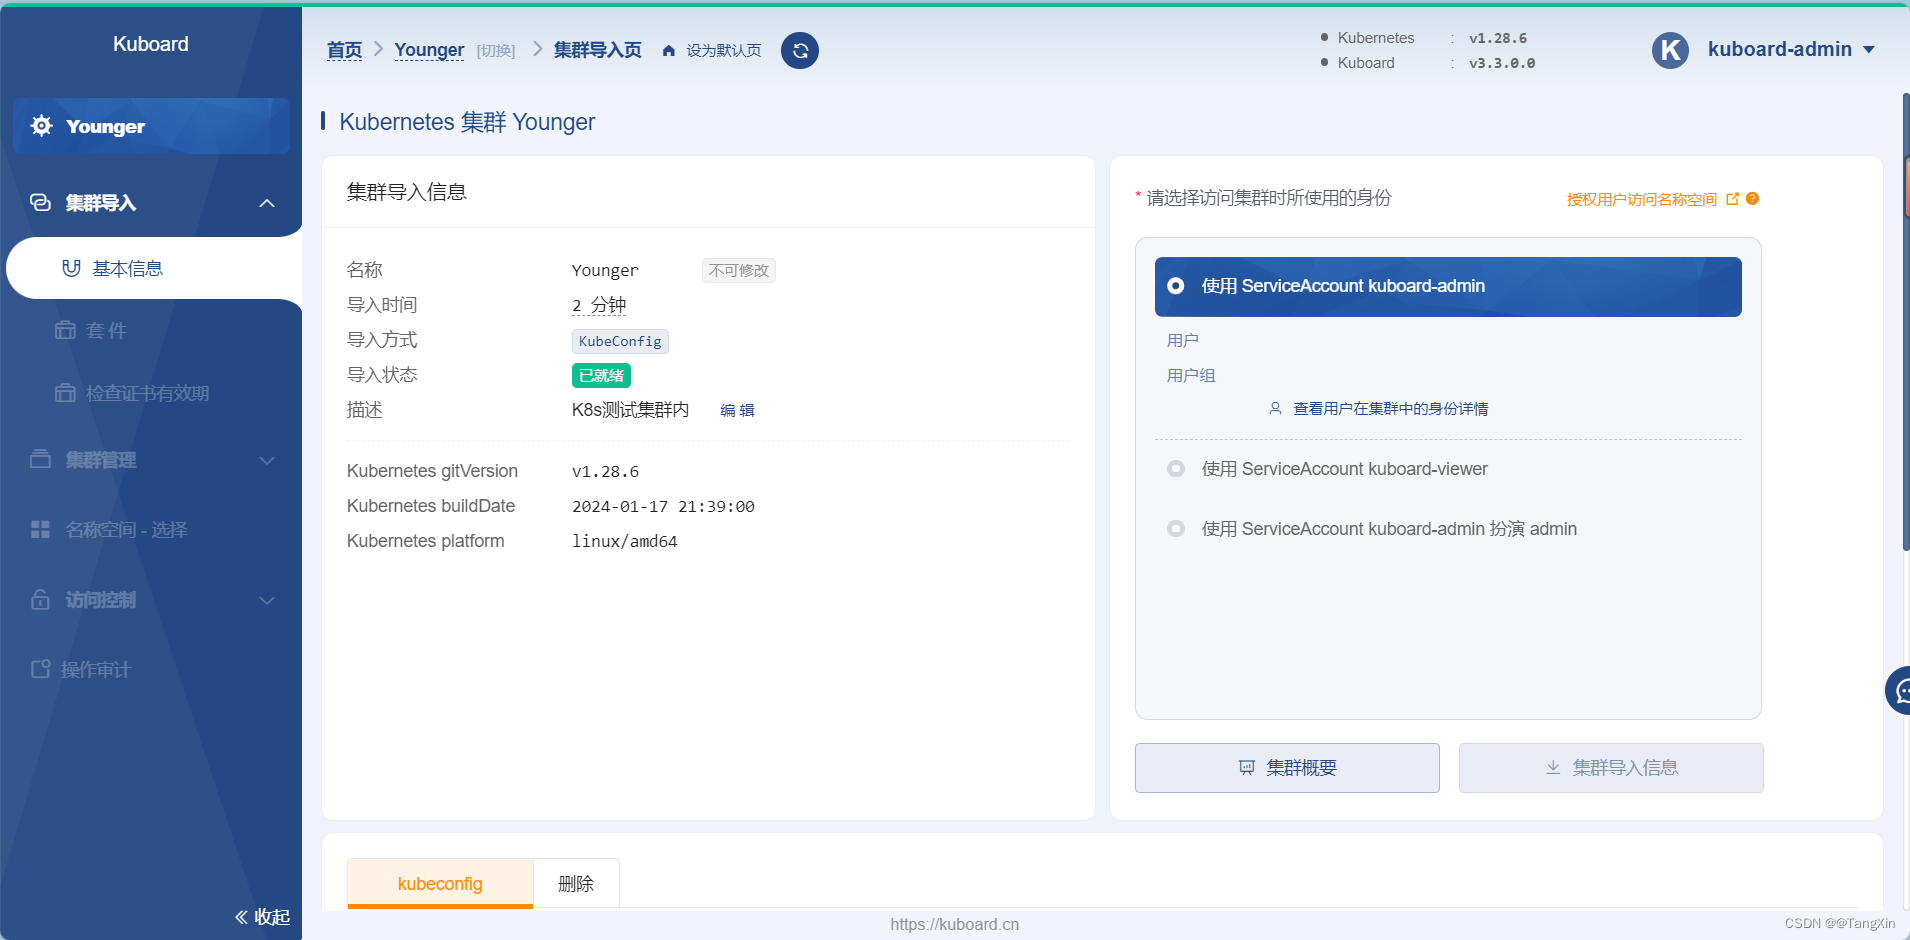
3.10 安装k8s可视化页面
# 第1步:查看k8s版本兼容性
https://github.com/kubernetes/dashboard/releases# 第2步:在 master(ceph61)节点执行如下命令:
docker run -d \--restart=unless-stopped \--name=kuboard \-p 8080:80/tcp \-p 10081:10081/tcp \-e KUBOARD_ENDPOINT="http://192.168.120.61:8080" \-e KUBOARD_AGENT_SERVER_TCP_PORT="10081" \-v /root/kuboard-data:/data \eipwork/kuboard:v3[root@ceph61 ~]# docker run -d \
>   --restart=unless-stopped \
>   --name=kuboard \
>   -p 8080:80/tcp \
>   -p 10081:10081/tcp \
>   -e KUBOARD_ENDPOINT="http://192.168.120.61:8080" \
>   -e KUBOARD_AGENT_SERVER_TCP_PORT="10081" \
>   -v /root/kuboard-data:/data \
>   eipwork/kuboard:v3
Unable to find image 'eipwork/kuboard:v3' locally
v3: Pulling from eipwork/kuboard
39cf15d1b231: Pull complete
ecd0ab02f0ae: Pull complete
225e08117bbd: Pull complete
abcb1f095da7: Pull complete
1eeda1b6f001: Pull complete
4349852fff77: Pull complete
1f029b610fdb: Pull complete
4df394d7d606: Pull complete
3c697407405f: Pull complete
ee935ad7cf4e: Pull complete
09e01f13e911: Pull complete
4e388503d89a: Pull complete
35e609fe422f: Pull complete
2e14fa3ae7d7: Pull complete
cec83c92c2a8: Pull complete
d6932e6ef2a1: Pull complete
Digest: sha256:0ea7d38afa2bb31ae178f8dc32feeccd480376097a2e3b7423750d02f123fa8c
Status: Downloaded newer image for eipwork/kuboard:v3
3b9ae57bb5506bf53df125e8ee656beeef6b5833a75cfb966b261eb2179df81d# http://192.168.120.61:8080/
# 账号密码默认是:admin/Kuboard123