前言
学数仓的时候发现 flume 落了一点,赶紧补齐。
1、Flume 事务

Source 在往 Channel 发送数据之前会开启一个 Put 事务:
- doPut:将批量数据写入临时缓冲区 putList(当 source 中的数据达到 batchsize 或者 超过特定的时间就会发送数据)
- doCommit:检查 channel 内存队列是否足够合并
- doRollback:如果 channel 内存队列空间不足没救回滚数据
同样 Sink 在从 Channel 主动拉取数据的时候也会开启一个 Take 事务:
- doTake:将数据读取到临时缓冲区 takeList,并将数据发送到 HDFS
- doCommit:如果数据全部发送成功,就会清除临时缓冲区 taskList
- dooRollback:数据发送过程如果出现异常,rollback 将临时缓冲区的数据归还给 channel 内存队列
2、Flume Agent 内部原理
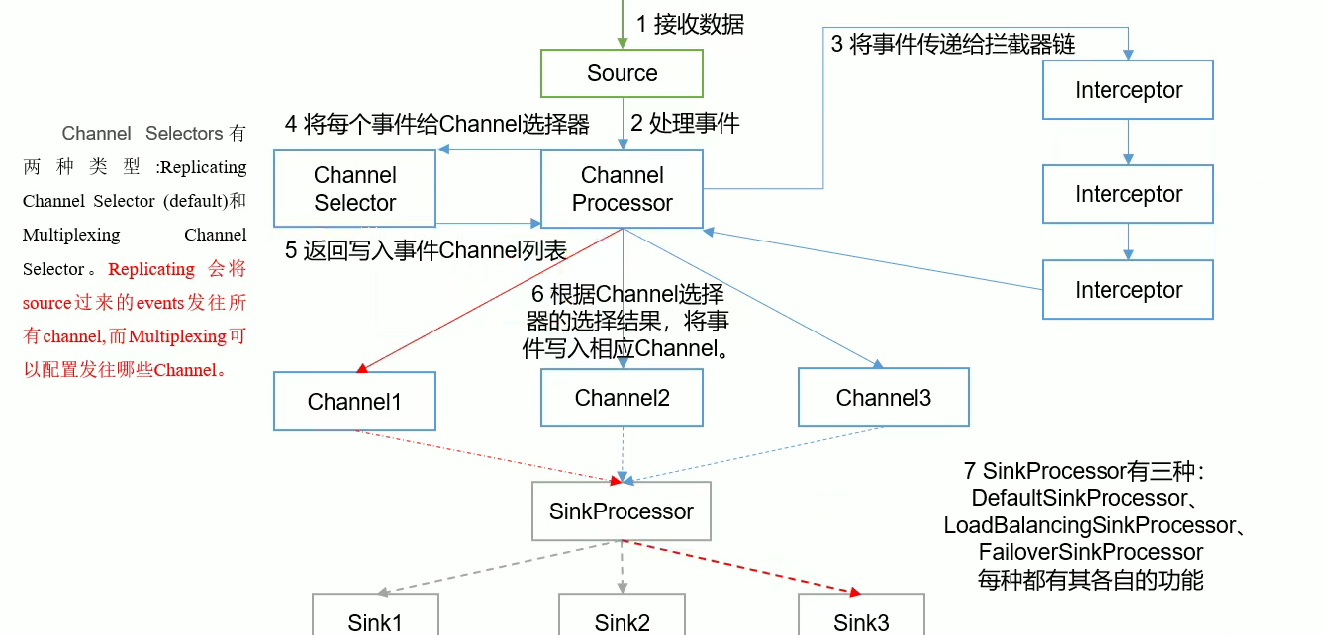
注意:只有 source 和 channel 之间可以存在拦截器,channel 和 sink 之间不可以!
- source 接收数据,把数据封装成 Event
- 传给 channel processor 也就是 channel 处理器
- 把事件传给拦截器(interceptor),在拦截器这里可以对数据进行一些处理(我们在上一节中说过,当我们的路径信息中包含时间的时候,需要从 Event Header 中读取时间信息,如果没有就需要我们指定从本地读取 timestamp,所以这里我们就可以在拦截器这里给我们的 event 添加头部信息);而且,拦截器可以设置多个
- 经过拦截器处理的事件又返回给了 channel processor ,然后 channel processor 把事件传给 channel 选择器(channel selector 有两种类型:Replicating 和 Multiplexing ,Replicating 会把source 发送来的 events 发往所有 channel,而 multiplexing 可以配置指定发往哪些 channel)
- 经过 channel 选择器处理后的事件仍然返回给 channel processor
- channel processor 会根据 channel 选择器的结果,发送给相应的 channel(也就是这个时候才会真正的开启 put 事务,之前都是对 event 进行简单的处理)
- SinkProcessor 负责协调拉取 channel 中的数据,它有三种类型:DefaultSinkProcessor、LoadBalancingSinkpProcessor(负载均衡,也就是多个 Sink 轮询的方式去读取 channel 中的数据)、FailoverSinkProcessor(故障转移,每个 sink 有自己的优先级,优先级高的去读取 channel 中的事件,只有当它挂掉的时候,才会轮到下一个优先级的 sink 去读)。其中 DefaultSinkProcessor 一个 channel 只能绑定一个 Sink,所以它也就没有 sink 组的概念。
注意:一个 sink 只可以绑定一个 channel ,但是一个 channel 可以绑定多个 sink!
3、Flume 拓扑结构
3.1、简单串联
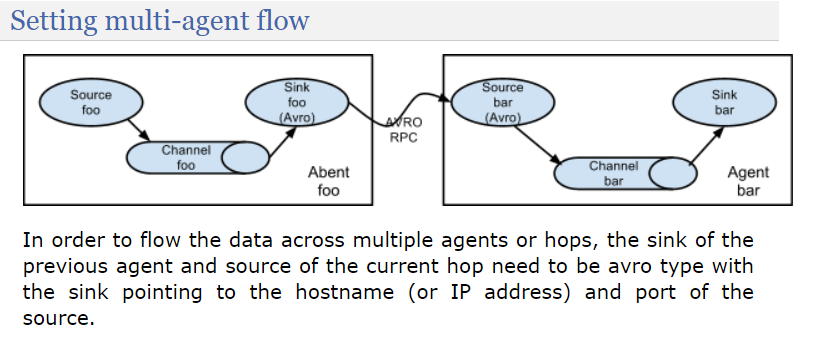
官网这段话翻译过来就是:为了将数据跨越多个代理或跃点进行传输,前一个代理的接收器(sink)和当前跃点的源(source)需要是avro类型,接收器指向源的主机名(或IP地址)和端口。
这种模式的缺点很好理解,就像串联电路,一个节点坏了会影响整个系统。
3.2、复制和多路复用
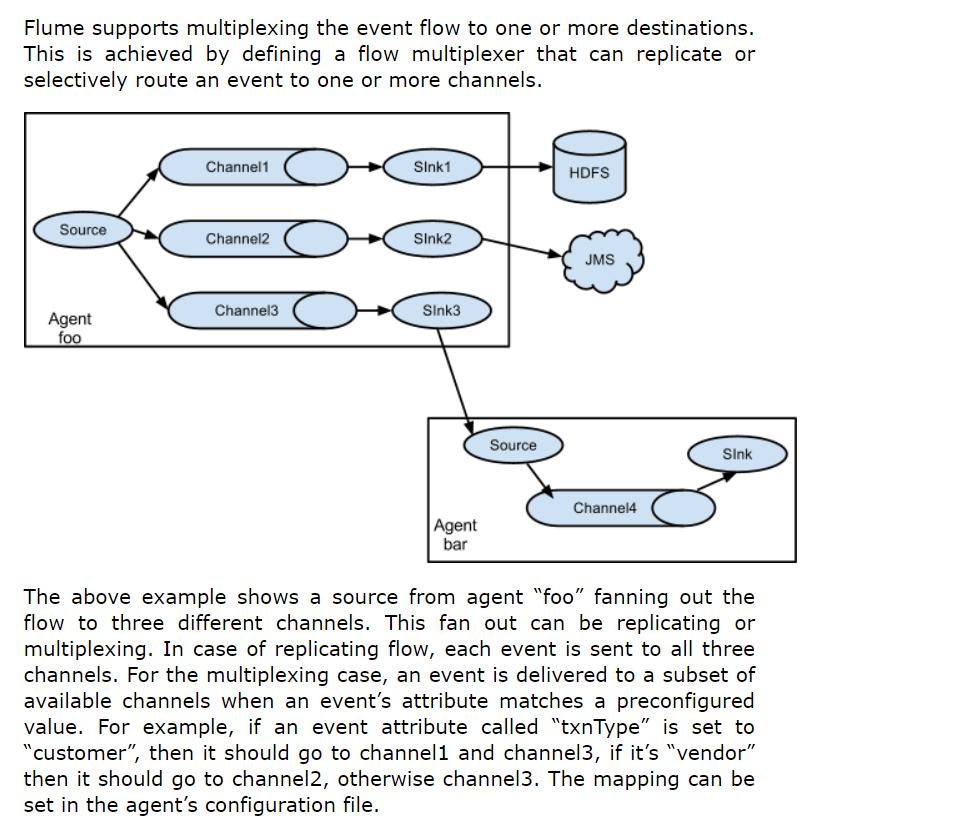
从官网翻译过来就是:上述示例显示了一个名为“foo”的代理源将流程分散到三个不同的通道。这种分散可以是复制或多路复用。在复制流程的情况下,每个事件都会发送到这三个通道。对于多路复用的情况,当事件的属性与预配置的值匹配时,事件将被发送到可用通道的子集。例如,如果事件属性名为“txnType”设置为“customer”,则应发送到channel1和channel3,如果为“vendor”,则应发送到channel2,否则发送到channel3。映射可以在代理的配置文件中设置。
这种模式相比上面的串联模式的优点无非就是可以发送过多个目的地。
3.3、负载均衡和故障转移

Flume 支持多个 Sink 逻辑上分到一个 Sink 组,sink 组配合不同的 SinkProcessor ,可以实现负载均衡和错误恢复的功能。
3.4、聚合

这种模式在实际开发中是经常会用到的,日常web应用通常分布在上百个服务器,大者甚至上千个、上万个服务器。产生的日志,处理起来也非常麻烦。用flume的这种组合方式能很好的解决这一问题,每台服务器部署一个flume采集日志,传送到一个集中收集日志的 flume,再由此flume上传到hdfs、hive、hbase等,进行日志分析。
4、Flume 企业开发实例
4.1、复制和多路复用
注意:多路复用必须配合拦截器使用,因为需要在 Event Header 中添加一些信息。
1)案例需求
2)需求分析
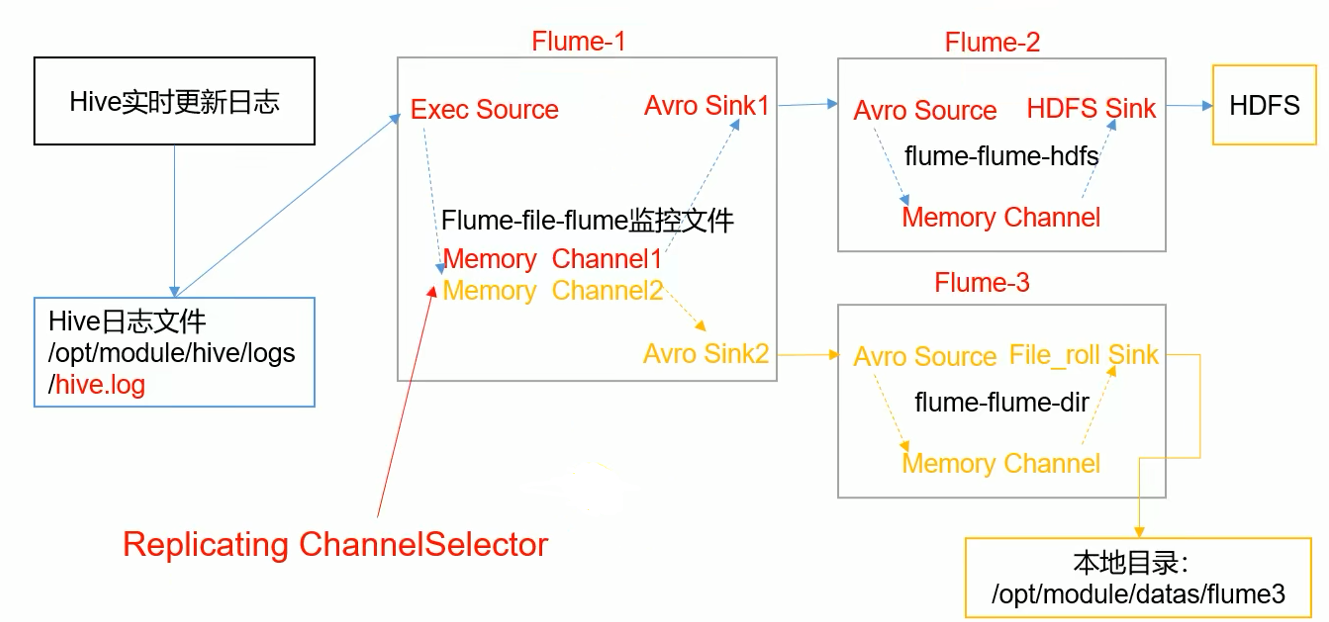
- 监控文件变动我们可以考虑使用 taildir 或者 exec 这两种 source
- flume-1 sink 需要使用 avro sink 才能传输到下一个 flume-2 和 flume-3 的 source
- flume-2 需要上传数据到 HDFS 所以 sink 为 hdfs
- flume-3 需要把数据输出到本地,所以 sink 为 file_roll sink(要保存到本地目录,这个目录就必须提前创建好,它不像 HDFS Sink 会自动帮我们创建)
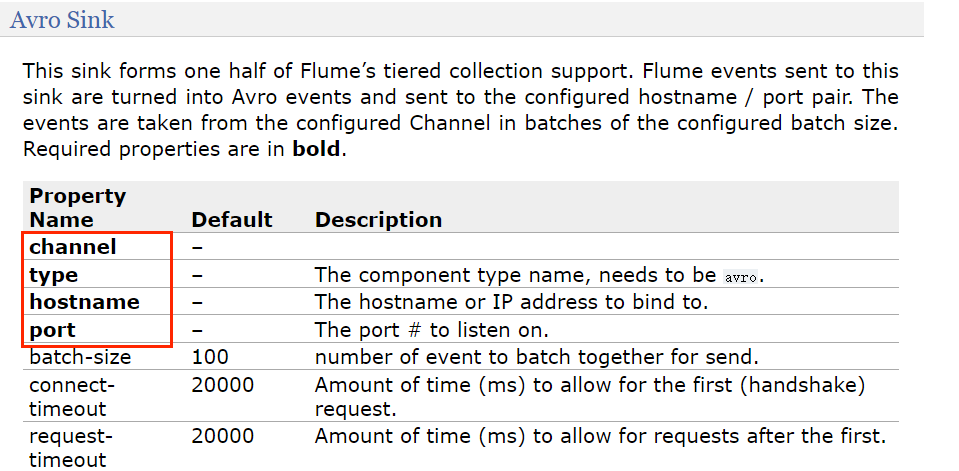
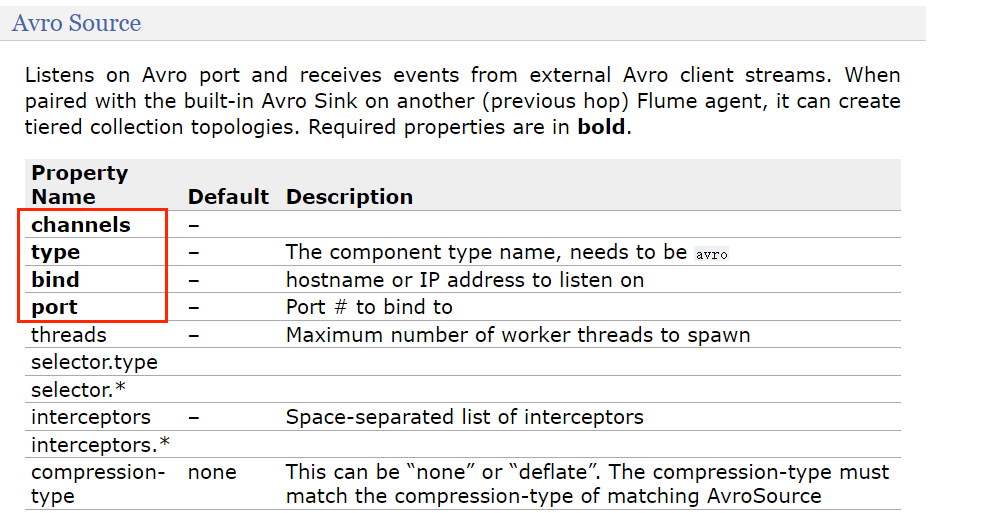

我们需要实现三个 flume 作业:
- flume-1 把监听到的新日志读取到 flume-2 和 flume-3 的 source
- flume-2 把日志上传到 hdfs
- flume-3 把日志写到本地
3)需求实现
flume-file-flume.conf
# Name the components on this agent
a1.sources = r1
a1.sinks = k1 k2
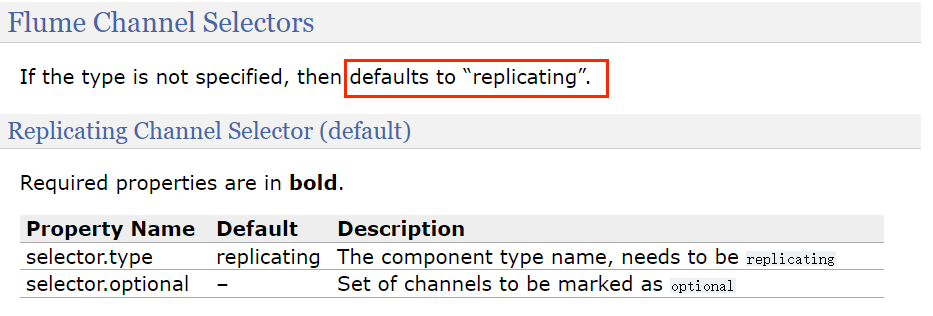
a1.channels = c1 c2# 将数据流复制给所有 channel 默认就是 replicating 所以也可以不用配置
a1.sources.r1.selector.type = replicating
# Describe/configure the source
a1.sources.r1.type = exec
a1.sources.r1.command = tail -F /opt/module/hive-3.1.2/logs/hive.log
a1.sources.r1.shell = /bin/bash -c# Describe the sink
# sink 端的 avro 是一个数据发送者
a1.sinks.k1.type = avro
a1.sinks.k1.hostname = hadoop102
a1.sinks.k1.port = 4141
a1.sinks.k2.type = avro
a1.sinks.k2.hostname = hadoop102
a1.sinks.k2.port = 4142# Describe the channel
a1.channels.c1.type = memory
a1.channels.c1.capacity = 1000
a1.channels.c1.transactionCapacity = 100
a1.channels.c2.type = memory
a1.channels.c2.capacity = 1000
a1.channels.c2.transactionCapacity = 100# Bind the source and sink to the channel
# 一个 sink 只可以指定一个 channel,但是一个 channel 可以指定多个 sink
a1.sources.r1.channels = c1 c2
a1.sinks.k1.channel = c1
a1.sinks.k2.channel = c2
flume-hdfs.conf
# Name the components on this agent
a2.sources = r1
a2.sinks = k1
a2.channels = c1# Describe/configure the source
# source 端的 avro 是一个数据接收服务
a2.sources.r1.type = avro
a2.sources.r1.bind = hadoop102
a2.sources.r1.port = 4141# Describe the sink
a2.sinks.k1.type = hdfs
a2.sinks.k1.hdfs.path = hdfs://hadoop102:9820/flume2/%Y%m%d/%H
#上传文件的前缀
a2.sinks.k1.hdfs.filePrefix = flume2-
#是否按照时间滚动文件夹
a2.sinks.k1.hdfs.round = true
#多少时间单位创建一个新的文件夹
a2.sinks.k1.hdfs.roundValue = 1
#重新定义时间单位
a2.sinks.k1.hdfs.roundUnit = hour
#是否使用本地时间戳
a2.sinks.k1.hdfs.useLocalTimeStamp = true
#积攒多少个 Event 才 flush 到 HDFS 一次
a2.sinks.k1.hdfs.batchSize = 100
#设置文件类型,可支持压缩
a2.sinks.k1.hdfs.fileType = DataStream
#多久生成一个新的文件
a2.sinks.k1.hdfs.rollInterval = 30
#设置每个文件的滚动大小大概是 128M
a2.sinks.k1.hdfs.rollSize = 134217700
#文件的滚动与 Event 数量无关
a2.sinks.k1.hdfs.rollCount = 0# Describe the channel
a2.channels.c1.type = memory
a2.channels.c1.capacity = 1000
a2.channels.c1.transactionCapacity = 100# Bind the source and sink to the channel
a2.sources.r1.channels = c1
a2.sinks.k1.channel = c1
flume-dir.conf
# Name the components on this agent
a3.sources = r1
a3.sinks = k1
a3.channels = c2# Describe/configure the source
a3.sources.r1.type = avro
a3.sources.r1.bind = hadoop102
a3.sources.r1.port = 4142# Describe the sink
a3.sinks.k1.type = file_roll
a3.sinks.k1.sink.directory = /opt/module/data/flume3# Describe the channel
a3.channels.c2.type = memory
a3.channels.c2.capacity = 1000
a3.channels.c2.transactionCapacity = 100# Bind the source and sink to the channel
a3.sources.r1.channels = c2
a3.sinks.k1.channel = c2
4)测试
bin/flume-ng agent -c conf/ -n a3 -f job/group1/flume-dir.conf
bin/flume-ng agent -n a1 -c conf/ -f job/group1/flume-file-flumc.conf
bin/flume-ng agent -n a2 -c conf/ -f job/group1/flume-hdfs.conf
查看结果:

注意:写入本地文件时,当一段时间没有新的日志时,它仍然会创建一个新的文件,而不像 hdfs sink 即使达到了设置的间隔时间但是没有新日志产生,那么它也不会创建一个新的文件。
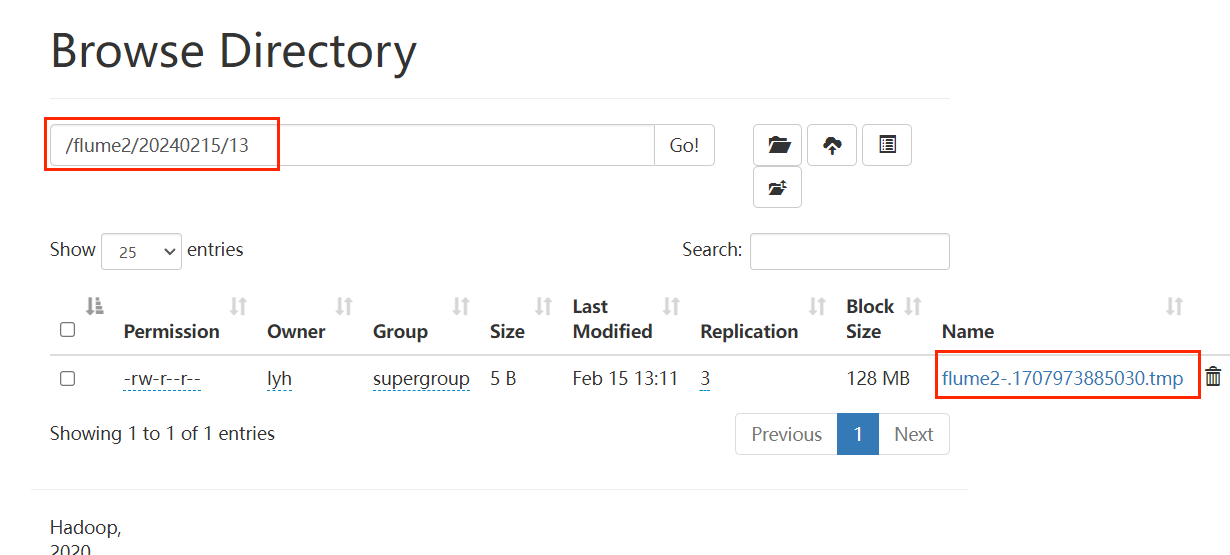
这个需要注意的就是 hdfs 的端口不要写错,比如我的就不是 9870 而是 8020.
4.2、负载均衡和故障转移
1)案例需求
2)需求分析
- 开启一个端口 88888 来发送数据
- 使用 flume-1 监听该端口,并发送到 flume-2 和 flume-3 (需要 flume-1 的 sink 为 avro sink,flume-2 和 flume-3 的 source 为 avro source),flume-2 和 flume-3 发送日志到控制台(flume-2 和 flume-3 的 sink 为 logger sink)
3)需求实现
flume-nc-flume.conf
# Name the components on this agent
a1.sources = r1
a1.channels = c1
a1.sinkgroups = g1
a1.sinks = k1 k2# Describe/configure the source
a1.sources.r1.type = netcat
a1.sources.r1.bind = localhost
a1.sources.r1.port = 44444a1.sinkgroups.g1.processor.type = failover
a1.sinkgroups.g1.processor.priority.k1 = 5
a1.sinkgroups.g1.processor.priority.k2 = 10
a1.sinkgroups.g1.processor.maxpenalty = 10000# Describe the sink
a1.sinks.k1.type = avro
a1.sinks.k1.hostname = hadoop102
a1.sinks.k1.port = 4141
a1.sinks.k2.type = avro
a1.sinks.k2.hostname = hadoop102
a1.sinks.k2.port = 4142# Describe the channel
a1.channels.c1.type = memory
a1.channels.c1.capacity = 1000
a1.channels.c1.transactionCapacity = 100# Bind the source and sink to the channel
a1.sources.r1.channels = c1
a1.sinkgroups.g1.sinks = k1 k2
a1.sinks.k1.channel = c1
a1.sinks.k2.channel = c1
flume-flume-console1.conf
# Name the components on this agent
a2.sources = r1
a2.sinks = k1
a2.channels = c1# Describe/configure the source
a2.sources.r1.type = avro
a2.sources.r1.bind = hadoop102
a2.sources.r1.port = 4141# Describe the sink
a2.sinks.k1.type = logger# Describe the channel
a2.channels.c1.type = memory
a2.channels.c1.capacity = 1000
a2.channels.c1.transactionCapacity = 100# Bind the source and sink to the channel
a2.sources.r1.channels = c1
a2.sinks.k1.channel = c1
flume-flume-console2.conf
# Name the components on this agent
a3.sources = r1
a3.sinks = k1
a3.channels = c2# Describe/configure the source
a3.sources.r1.type = avro
a3.sources.r1.bind = hadoop102
a3.sources.r1.port = 4142# Describe the sink
a3.sinks.k1.type = logger# Describe the channel
a3.channels.c2.type = memory
a3.channels.c2.capacity = 1000
a3.channels.c2.transactionCapacity = 100# Bind the source and sink to the channel
a3.sources.r1.channels = c2
a3.sinks.k1.channel = c2
4)案例测试
bin/flume-ng agent -c conf/ -n a3 -f job/group2/flume-flume-console2.conf -Dflume.root.logger=INFO,console
bin/flume-ng agent -c conf/ -n a2 -f job/group2/flume-flume-console1.conf -Dflume.root.logger=INFO,console
bin/flume-ng agent -c conf/ -n a1 -f job/group2/flume-nc-flume.conf
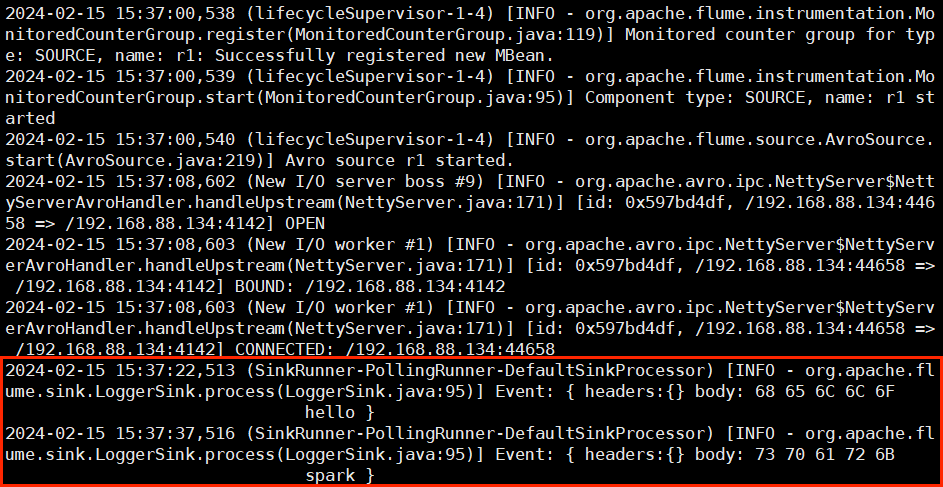
关闭 flume-flume-console1.conf 作业
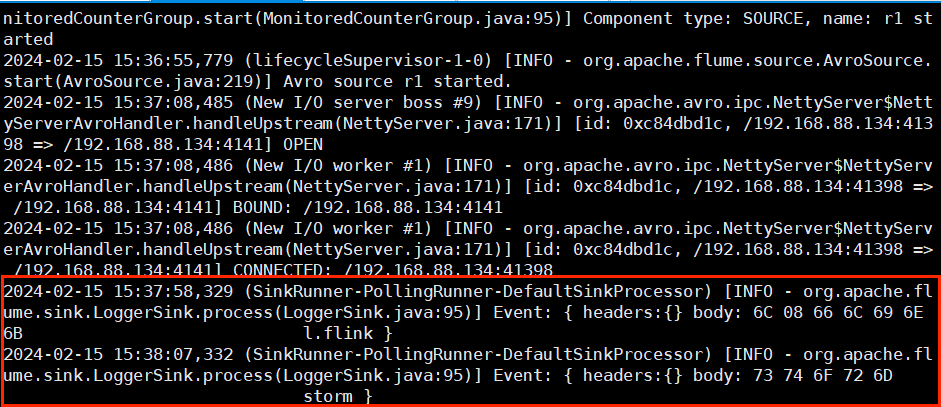 我们发现,一开始我们开启三个 flume 作业,当向 netcat 输入数据时,只有 flume-flume-console1.conf 作业的控制台有日志输出,这是因为它的优先级更高,当把作业 flume-flume-console1.conf 关闭时,再次向端口 44444 发送数据,发现 flume-flume-console2.conf 作业开始输出。
如果要使用负载均衡,只需要替换上面 flume-nc-flume.conf 中:
a1.sinkgroups.g1.processor.type = failover
a1.sinkgroups.g1.processor.priority.k1 = 5
a1.sinkgroups.g1.processor.priority.k2 = 10
a1.sinkgroups.g1.processor.maxpenalty = 10000
替换为:
a1.sinkgroups.g1.processor.type = load_balance
a1.sinkgroups.g1.processor.backoff = true
a1.sinkgroups.g1.processor.maxTimeOut = 30000
其中,backoff 代表退避,默认为 false, 如果当前 sink 没有拉到数据,那么接下来一段时间就不用这个 sink 。maxTimeOut 代表最大的退避时间,因为退避默认是指数增长的(比如一个 sink 第一次没有拉到数据,需要等 1 s,第二次还没拉到,等 2s,第三次等 4s ...),默认最大值为 30 s。
4.3、聚合
1)案例需求
- hadoop102 上的 Flume-1 监控文件/opt/module/group.log,
- hadoop103 上的 Flume-2 监控某一个端口的数据流,
- Flume-1 与 Flume-2 将数据发给 hadoop104 上的 Flume-3,Flume-3 将最终数据打印到控制台。
注意:主机只能在 hadoop104 上配,因为 avro source 在 hadoop104 上,客户端(hadoop02 和 hadoop103 的 sink)可以远程连接,但是服务端(hadoop104 的 source)只能绑定自己的端口号。
2)需求实现
flume-log-flume.conf
# Name the components on this agent
a1.sources = r1
a1.sinks = k1
a1.channels = c1# Describe/configure the source
a1.sources.r1.type = exec
a1.sources.r1.command = tail -F /opt/module/group.log
a1.sources.r1.shell = /bin/bash -c# Describe the sink
a1.sinks.k1.type = avro
a1.sinks.k1.hostname = hadoop104
a1.sinks.k1.port = 4141# Describe the channel
a1.channels.c1.type = memory
a1.channels.c1.capacity = 1000
a1.channels.c1.transactionCapacity = 100# Bind the source and sink to the channel
a1.sources.r1.channels = c1
a1.sinks.k1.channel = c1
flume-nc-flume.conf
# Name the components on this agent
a2.sources = r1
a2.sinks = k1
a2.channels = c1# Describe/configure the source
a2.sources.r1.type = netcat
a2.sources.r1.bind = hadoop103
a2.sources.r1.port = 44444# Describe the sink
a2.sinks.k1.type = avro
a2.sinks.k1.hostname = hadoop104
a2.sinks.k1.port = 4141# Use a channel which buffers events in memory
a2.channels.c1.type = memory
a2.channels.c1.capacity = 1000
a2.channels.c1.transactionCapacity = 100# Bind the source and sink to the channel
a2.sources.r1.channels = c1
a2.sinks.k1.channel = c1
flume-flume-log.conf
# Name the components on this agent
a3.sources = r1
a3.sinks = k1
a3.channels = c1# Describe/configure the source
a3.sources.r1.type = avro
a3.sources.r1.bind = hadoop104
a3.sources.r1.port = 4141# Describe the sink
a3.sinks.k1.type = logger# Describe the channel
a3.channels.c1.type = memory
a3.channels.c1.capacity = 1000
a3.channels.c1.transactionCapacity = 100# Bind the source and sink to the channel
a3.sources.r1.channels = c1
a3.sinks.k1.channel = c1
3)测试
向 group.log 文件中追加文本:

注意:hadoop103 这里不能写 nc localhost 44444 而要写 nc hadoop103 44444! 否则报错:Ncat: Connection refused.

5、自定义 Interceptor
前面我们的多路复用还没有实现,因为我们说多路复用必须配合拦截器来使用,因为我们必须知道每个 Channel 发往哪些 Sink,这需要拦截器往 Event Header 中写一些内容。
1)案例需求
2)需求分析
在实际的开发中,一台服务器产生的日志类型可能有很多种,不同类型的日志可能需要发送到不同的分析系统。此时会用到 Flume 拓扑结构中的 Multiplexing 结构,Multiplexing 的原理是,根据 event 中 Header 的某个 key 的值,将不同的 event 发送到不同的 Channel中,所以我们需要自定义一个 Interceptor,为不同类型的 event 的 Header 中的 key 赋予不同的值。
在该案例中,我们以端口数据模拟日志,以是否包含”lyh”模拟不同类型的日志,我们需要自定义 interceptor 区分数据中是否包含”lyh”,将其分别发往不同的分析系统(Channel)。
3)需求实现
自定义拦截器
引入 flume 依赖
<dependency><groupId>org.apache.flume</groupId><artifactId>flume-ng-core</artifactId><version>1.9.0</version>
</dependency>
package com.lyh.gmall.interceptor;import org.apache.flume.Context;
import org.apache.flume.Event;
import org.apache.flume.interceptor.Interceptor;import java.util.ArrayList;
import java.util.List;
import java.util.Map;public class TypeInterceptor implements Interceptor {// 存放事件集合private List<Event> addHeaderEvents;@Overridepublic void initialize() {// 初始化存放事件的集合addHeaderEvents = new ArrayList<>();}// 单个事件拦截@Overridepublic Event intercept(Event event) {// 1. 获取事件中的 header 信息Map<String, String> headers = event.getHeaders();// 2. 获取事件中的 body 信息String body = new String(event.getBody());// 3. 根据 body 中是否包含 'lyh' 来决定发往哪个 sinkif (body.contains("lyh"))headers.put("type","first");elseheaders.put("type","second");return event;}// 批量事件拦截@Overridepublic List<Event> intercept(List<Event> events) {// 1. 清空集合addHeaderEvents.clear();// 2. 遍历 eventsfor (Event event : events) {// 3. 给每个事件添加头信息addHeaderEvents.add(intercept(event));}return addHeaderEvents;}@Overridepublic void close() {}public static class Builder implements Interceptor.Builder{@Overridepublic Interceptor build() {return new TypeInterceptor();}@Overridepublic void configure(Context context) {}}
}
打包放到 flume 安装目录的 lib 目录下:
flume 作业配置
hadoop102:
# Name the components on this agent
a1.sources = r1
a1.sinks = k1 k2
a1.channels = c1 c2# Describe/configure the source
a1.sources.r1.type = netcat
a1.sources.r1.bind = localhost
a1.sources.r1.port = 44444
a1.sources.r1.interceptors = i1
a1.sources.r1.interceptors.i1.type = com.lyh.interceptor.TypeInterceptor$Builder
a1.sources.r1.selector.type = multiplexing
a1.sources.r1.selector.header = type
a1.sources.r1.selector.mapping.first = c1 # 包含 'lyh'
a1.sources.r1.selector.mapping.second = c2 # 不包含 'lyh'# Describe the sink
a1.sinks.k1.type = avro
a1.sinks.k1.hostname = hadoop103
a1.sinks.k1.port = 4141
a1.sinks.k2.type=avro
a1.sinks.k2.hostname = hadoop104
a1.sinks.k2.port = 4242# Use a channel which buffers events in memory
a1.channels.c1.type = memory
a1.channels.c1.capacity = 1000
a1.channels.c1.transactionCapacity = 100# Use a channel which buffers events in memory
a1.channels.c2.type = memory
a1.channels.c2.capacity = 1000
a1.channels.c2.transactionCapacity = 100# Bind the source and sink to the channel
a1.sources.r1.channels = c1 c2
a1.sinks.k1.channel = c1
a1.sinks.k2.channel = c2a1.sources = r1
a1.sinks = k1
a1.channels = c1a1.sources.r1.type = avro
a1.sources.r1.bind = hadoop103
a1.sources.r1.port = 4141a1.sinks.k1.type = loggera1.channels.c1.type = memory
a1.channels.c1.capacity = 1000
a1.channels.c1.transactionCapacity = 100a1.sinks.k1.channel = c1
a1.sources.r1.channels = c1a1.sources = r1
a1.sinks = k1
a1.channels = c1a1.sources.r1.type = avro
a1.sources.r1.bind = hadoop104
a1.sources.r1.port = 4242a1.sinks.k1.type = loggera1.channels.c1.type = memory
a1.channels.c1.capacity = 1000
a1.channels.c1.transactionCapacity = 100a1.sinks.k1.channel = c1
a1.sources.r1.channels = c14)需求实现
#hadoop103
bin/flume-ng agent -n a1 -c conf/ -f job/group4/flume2.conf -Dflume.root.logger=INFO,console#hadoop104
bin/flume-ng agent -n a1 -c conf/ -f job/group4/flume3.conf -Dflume.root.logger=INFO,console#hadoop102
bin/flume-ng agent -n a1 -c conf/ -f job/group4/flume1.conf
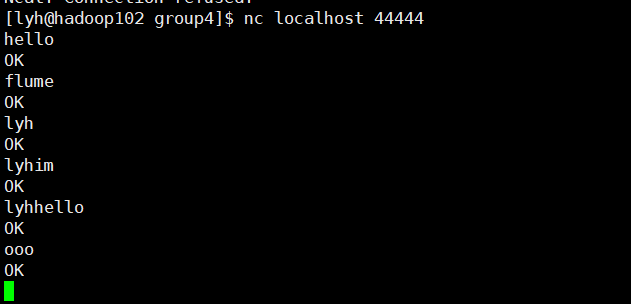
nc localhost 44444
hadoop102:
hadoop103:

hadoop104:

可以看到,从 hadoop102 发送的日志中,包含 "lyh" 的都被发往 hadoop103 的 4141 端口,其它日志则被发往 hadoop104 的 4242端口。
6、自定义 Source
自定义 source 用的还是比较少的,毕竟 flume 已经提供了很多常用的了。
1)介绍
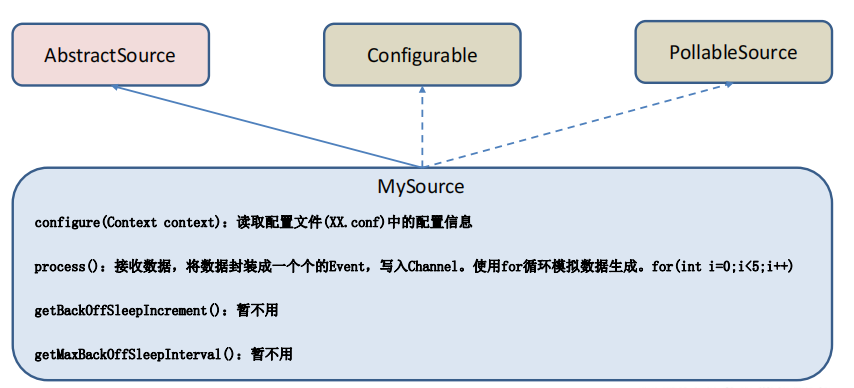
- getBackOffSleepIncrement() //backoff 步长,当从数据源拉取数据时,拉取不到数据的话它不会一直再去拉取,而是等待,之后每一次再=如果还拉取不到,就会比上一次多等待步长单位个时间。
- getMaxBackOffSleepInterval() //backoff 最长时间,如果不设置最长等待时间,它最终会无限等待,所以需要指定。
- configure(Context context) //初始化 context(读取配置文件内容)
- process() //获取数据封装成 event 并写入 channel,这个方法将被循环调用。
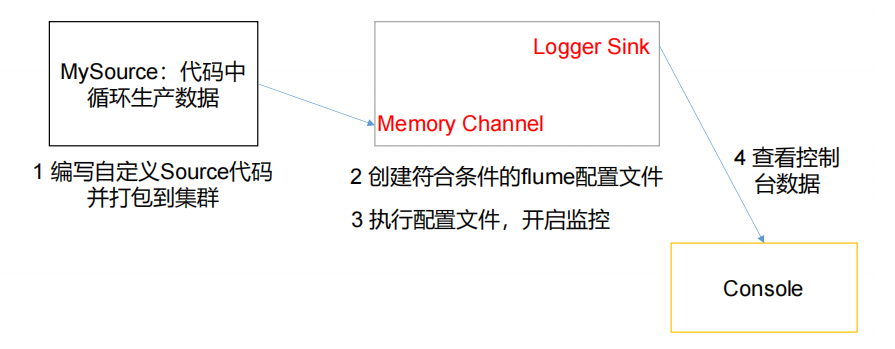
2)需求
3)分析
4)需求实现
代码
package com.lyh.source;import org.apache.flume.Context;
import org.apache.flume.EventDeliveryException;
import org.apache.flume.PollableSource;
import org.apache.flume.conf.Configurable;
import org.apache.flume.event.SimpleEvent;
import org.apache.flume.source.AbstractSource;import java.util.HashMap;
import java.util.Map;public class MySource extends AbstractSource implements Configurable, PollableSource {// 定义配置文件将来要读取的字段private Long delay;private String field;@Overridepublic Status process() throws EventDeliveryException {try {// 创建事件头信息Map<String,String> headerMap = new HashMap<>();// 创建事件SimpleEvent event = new SimpleEvent();// 循环封装事件for (int i = 0; i < 5; i++) {// 给事件设置头信息event.setHeaders(headerMap);// 给事件设置内容event.setBody((field + i).getBytes());// 将事件写入 channelgetChannelProcessor().processEvent(event);Thread.sleep(delay);}} catch (InterruptedException e) {e.printStackTrace();}return Status.READY;}// 步长@Overridepublic long getBackOffSleepIncrement() {return 0;}// 最大间隔时间@Overridepublic long getMaxBackOffSleepInterval() {return 0;}// 初始化配置信息@Overridepublic void configure(Context context) {delay = context.getLong("delay");field = context.getString("field","Hello");}
}
配置文件
# Name the components on this agent
a1.sources = r1
a1.sinks = k1
a1.channels = c1# Describe/configure the source
a1.sources.r1.type = com.lyh.source.MySource
a1.sources.r1.delay = 1000
a1.sources.r1.field = lyh# Describe the sink
a1.sinks.k1.type = logger# Use a channel which buffers events in memory
a1.channels.c1.type = memory
a1.channels.c1.capacity = 1000
a1.channels.c1.transactionCapacity = 100# Bind the source and sink to the channel
a1.sources.r1.channels = c1
a1.sinks.k1.channel = c1
bin/flume-ng agent -n a1 -c conf/ -f job/custom-source.conf -Dflume.root.logger=INFO,console运行结果:

7、自定义 Sink
1)介绍
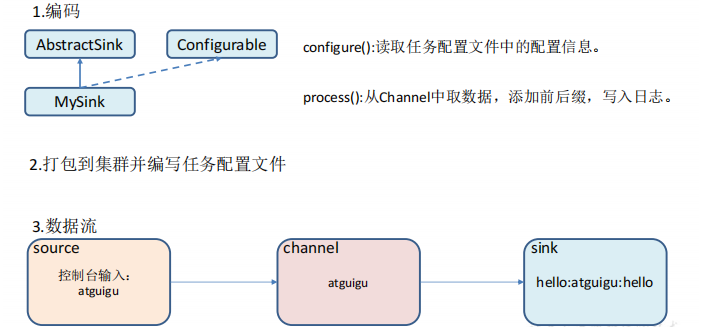
- configure(Context context)//初始化 context(读取配置文件内容)
- process()//从 Channel 读取获取数据(event),这个方法将被循环调用。
2)需求分析
3)需求实现
package com.lyh.sink;import org.apache.flume.*;
import org.apache.flume.conf.Configurable;
import org.apache.flume.sink.AbstractSink;
import org.slf4j.Logger;
import org.slf4j.LoggerFactory;public class MySink extends AbstractSink implements Configurable{private final static Logger LOG = LoggerFactory.getLogger(AbstractSink.class);private String prefix;private String suffix;@Overridepublic Status process() throws EventDeliveryException {// 声明返回值状态信息Status status;// 获取当前 sink 绑定的 channelChannel channel = getChannel();// 获取事务Transaction txn = channel.getTransaction();// 声明事件Event event;// 开启事务txn.begin();// 读取 channel 中的事件、直到读取事件结束循环while (true){event = channel.take();if (event!=null) break;}try {// 打印事件LOG.info(prefix + new String(event.getBody()) + suffix);// 事务提交txn.commit();status = Status.READY;}catch (Exception e){// 遇到异常回滚事务txn.rollback();status = Status.BACKOFF;}finally {// 关闭事务txn.close();}return null;}// 初始化配置信息@Overridepublic void configure(Context context) {// 带默认值prefix = context.getString("prefix","hello");// 不带默认值suffix = context.getString("suffix");}
}
配置文件
# Name the components on this agent
a1.sources = r1
a1.sinks = k1
a1.channels = c1# Describe/configure the source
a1.sources.r1.type = netcat
a1.sources.r1.bind = localhost
a1.sources.r1.port = 44444# Describe the sink
a1.sinks.k1.type = com.atguigu.MySink
a1.sinks.k1.prefix = lyh:
a1.sinks.k1.suffix = :lyh# Use a channel which buffers events in memory
a1.channels.c1.type = memory
a1.channels.c1.capacity = 1000
a1.channels.c1.transactionCapacity = 100# Bind the source and sink to the channel
a1.sources.r1.channels = c1
a1.sinks.k1.channel = c1
4)测试
bin/flume-ng agent -n a1 -c conf/ -f job/custom-sink.conf -Dflume.root.logger=INFO,console运行结果:

总结
自此,flume 的学习基本也完了,这一篇虽然不多但也用了大概3天时间。相比较 kafka、flink,flume 这个框架还是非常简单的,比如我们自己实现一些 source、sink,都是很简单的,没有太多复杂的理解的东西。
总之 flume 这个工具还是多看官网。
