1 axios的实例与请求流程
在阅读源码之前,先大概了解一下axios实例的属性和请求整体流程,带着这些概念,阅读源码可以轻松不少!
下图是axios实例属性的简图。

可以看到axios的实例上,其实主要就这三个东西:
- config:配置,比如url、method、params、headers等等
- interceptors :拦截器,分为请求拦截器和返回拦截器。
- request:调用xhr或者http请求的方法,参数就是config
由于调用request方法的时候可以再次传入config,但是不能传入interceptors,所以拦截器一定是要在请求之前就在axios上添加好,不能临时加。
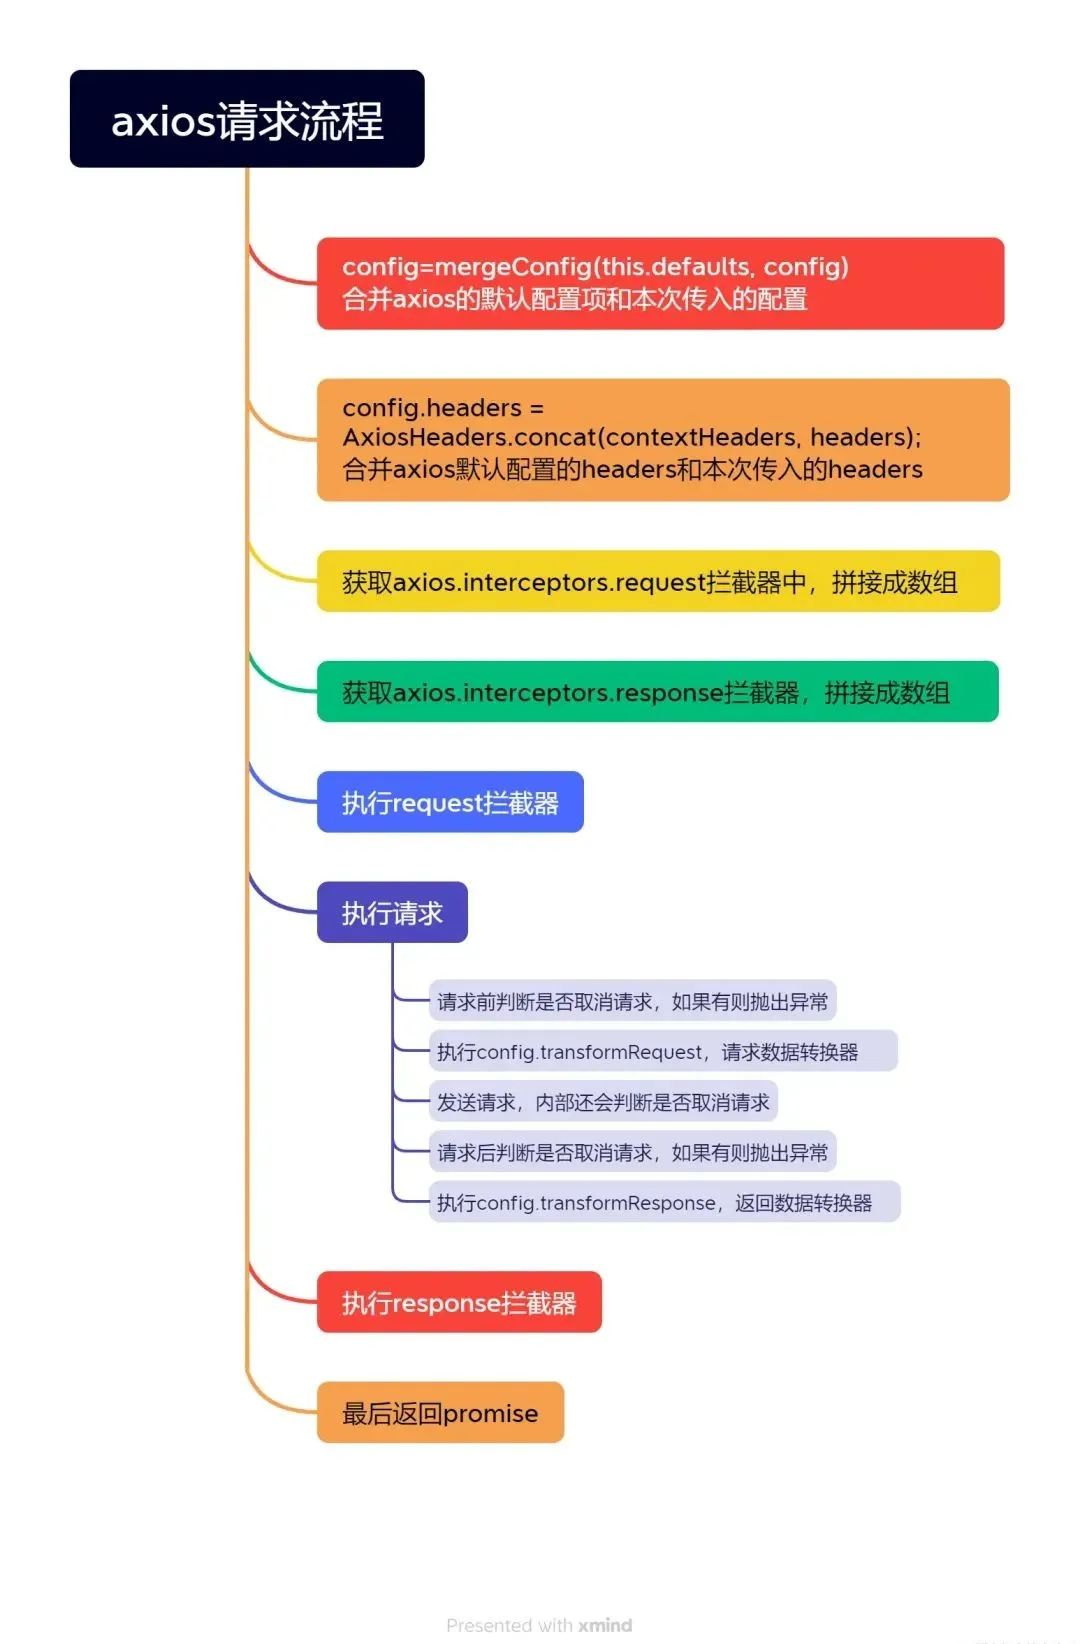
下图是axios的请求流程,其实相当简单,先了解这个流程,看源码的时候就会有方向。
2 源码文件结构解析
axios的源码都在lib文件夹下,最核心的内容在core文件夹里。
lib│ axios.js // 最终导出的文件│ utils.js // 工具类├─adapters // 适配器相关│ adapters.js //适配器类│ http.js // node请求│ xhr.js // 浏览器请求├─cancel // 取消功能相关│ CanceledError.js //取消异常类│ CancelToken.js //取消token类│ isCancel.js //判断是否取消├─core // 核心功能相关│ Axios.js // axios类│ AxiosError.js // axios异常类│ AxiosHeaders.js // 请求头│ buildFullPath.js // 构造请求地址│ dispatchRequest.js // 发送请求方法│ InterceptorManager.js // 拦截器的类│ mergeConfig.js // 合并配置方法│ settle.js // 处理请求结果方法│ transformData.js // 数据转换执行方法├─defaults // 默认配置│ index.js // 默认请求参数配置│ transitional.js // 默认transitional配置├─env // node环境没有FormData,│ │ data.js│ └─classes│ FormData.js├─helpers // 各种工具类方法,看名字就可以大概猜到作用│ AxiosTransformStream.js│ AxiosURLSearchParams.js│ bind.js│ buildURL.js│ callbackify.js│ combineURLs.js│ cookies.js│ deprecatedMethod.js│ formDataToJSON.js│ formDataToStream.js│ fromDataURI.js│ HttpStatusCode.js│ isAbsoluteURL.js│ isAxiosError.js│ isURLSameOrigin.js│ null.js│ parseHeaders.js│ parseProtocol.js│ readBlob.js│ README.md│ speedometer.js│ spread.js│ throttle.js│ toFormData.js│ toURLEncodedForm.js│ validator.js│ ZlibHeaderTransformStream.js└─platform // 为不同环境下准备的方法│ index.js├─browser│ │ index.js│ └─classes│ Blob.js│ FormData.js│ URLSearchParams.js└─node│ index.js└─classesFormData.jsURLSearchParams.js
3 源码文件阅读
3.1 入口文件 axios.js
该文件创建了一个axios实例,并且导出,所以我们import axios from 'axios'引入的就是该实例,可以直接使用,不需要再new Axios({...})这样写。
下面看一下axios实例是如何创建的吧~
// 核心方法,根据config创建axios实例
function createInstance (defaultConfig) {// 创建axios实例const context = new Axios(defaultConfig);// 给Axios原型上的request方法绑定context为它的this// 这个instance就是我们最终使用的axios// 没想到吧,最开始的instance其实是个函数,// 所以我们才可以使用这个用法axios('/api/url')// 只不过后面给它扩展了很多东西const instance = bind(Axios.prototype.request, context);// 将Axios.prototype上的属性都绑定到instance上,// 这样它就拥有了简写的请求方法,比如axios.get(),axios.post()// 如果是函数,this绑定为contextutils.extend(instance, Axios.prototype, context, { allOwnKeys: true });// 将context上的属性都绑定到instance上,// 这样它就拥有了拦截器属性,可以使用axios.interceptors.request.use()// 因为context上的函数的this本就指向context,所以第三个参数不需要再指定utils.extend(instance, context, null, { allOwnKeys: true });// 给instance增加create方法,可以通过create创建一个实例instance.create = function create (instanceConfig) {// 入参为拼接配置项,以instanceConfig为优先return createInstance(mergeConfig(defaultConfig, instanceConfig));};return instance;
}// 调用上面的方法,最终导出的是axios,
// 其实是Axios.prototype.request,并扩展了很多属性
const axios = createInstance(defaults);// 继续给axios增加属性
// 这就说明如果自己通过const myAxios=axios.create({});
// 创建出来的实例就没有下面这些属性了
// 所以下面这些属性只能通过import axios from 'axios';
// axios.all()这样的方式来使用axios.Axios = Axios;// Cancel相关
axios.CanceledError = CanceledError;
axios.CancelToken = CancelToken;
axios.isCancel = isCancel;
axios.VERSION = VERSION;
// 工具函数,将对象转为FormData
axios.toFormData = toFormData;// Axios通用异常类
axios.AxiosError = AxiosError;// Cancel异常类
axios.Cancel = axios.CanceledError;// Expose all/spread
// 工具函数
axios.all = function all (promises) {return Promise.all(promises);
};// 工具函数,利用apply将数组参数改为单个传入的参数
axios.spread = spread;// 判断异常是否是AxiosError
axios.isAxiosError = isAxiosError;// 合并config对象方法
axios.mergeConfig = mergeConfig;axios.AxiosHeaders = AxiosHeaders;// 工具方法
axios.formToJSON = thing => formDataToJSON(utils.isHTMLForm(thing) ? new FormData(thing) : thing);// 获取适配器:xhr 、http
axios.getAdapter = adapters.getAdapter;// 请求状态
axios.HttpStatusCode = HttpStatusCode;axios.default = axios;// 最终导出
export default axios
3.2 Axios类
从上面的文件可以看出,axios扩展了Axios的原型方法和Axios实例的属性,所以接下来要重点看Axios的类里有什么内容。
class Axios {// 可以看到Axios的构造函数相当简单// 仅仅是保存了我们传入的config,// 然后初始化空的拦截器对象constructor(instanceConfig) {// 所有的配置都设置再defaults上this.defaults = instanceConfig;// 初始化空的拦截器对象,包含请求拦截器request和返回拦截器responsethis.interceptors = {request: new InterceptorManager(),response: new InterceptorManager()};}// request是Axios的核心方法// 所有的核心都在request方法里,// request方法接收两种参数,【直接传config对象】或者【传url和config对象】request (configOrUrl, config) {// 允许axios('example/url'[, config]) 这样使用if (typeof configOrUrl === 'string') {config = config || {};config.url = configOrUrl;} else {config = configOrUrl || {};}// request会使用传入的配置merge默认配置// 所以即使只传了一个url,也会使用默认的Get方法config = mergeConfig(this.defaults, config);const { headers } = config;// 默认get请求config.method = (config.method || this.defaults.method || 'get').toLowerCase();// 说明header可以直接设置// 也可以在common设置通用header,也可以为每种请求设置特定的headerlet contextHeaders = headers && utils.merge(headers.common,headers[config.method]);headers && utils.forEach(['delete', 'get', 'head', 'post', 'put', 'patch', 'common'],(method) => {delete headers[method];});// 优先使用headers下配置,再使用headers.common和headers[get,post]的配置config.headers = AxiosHeaders.concat(contextHeaders, headers);// 请求拦截器链const requestInterceptorChain = [];// 记录是否使用同步的方式调用,我们配置拦截器的时候,默认是false,也就是异步let synchronousRequestInterceptors = true;this.interceptors.request.forEach(function unshiftRequestInterceptors (interceptor) {// 如果配置了runWhen函数,那么会先执行runWhen,如果为true,才会添加该拦截器if (typeof interceptor.runWhen === 'function' && interceptor.runWhen(config) === false) {return;}synchronousRequestInterceptors = synchronousRequestInterceptors && interceptor.synchronous;// unshift说明后传入的请求拦截器先执行,一次放入两个,分别是fulfilled和rejectedrequestInterceptorChain.unshift(interceptor.fulfilled, interceptor.rejected);});// 响应拦截器链const responseInterceptorChain = [];this.interceptors.response.forEach(function pushResponseInterceptors (interceptor) {// push说明先传入的响应拦截器先执行responseInterceptorChain.push(interceptor.fulfilled, interceptor.rejected);});let promise;let i = 0;let len;// 默认是异步执行,也就是一个执行完再执行下一个if (!synchronousRequestInterceptors) {//dispatchRequest是真正的发送请求const chain = [dispatchRequest.bind(this), undefined];// 前面插入请求拦截器chain.unshift.apply(chain, requestInterceptorChain);// 后面插入响应拦截器chain.push.apply(chain, responseInterceptorChain);len = chain.length;promise = Promise.resolve(config);// 依次执行while (i < len) {promise = promise.then(chain[i++], chain[i++]);}return promise;}len = requestInterceptorChain.length;let newConfig = config;i = 0;// 同步执行,请求拦截器while (i < len) {const onFulfilled = requestInterceptorChain[i++];const onRejected = requestInterceptorChain[i++];try {newConfig = onFulfilled(newConfig);} catch (error) {onRejected.call(this, error);break;}}// 发起请求try {promise = dispatchRequest.call(this, newConfig);} catch (error) {return Promise.reject(error);}i = 0;len = responseInterceptorChain.length;// 返回有异常可以继续走下去while (i < len) {promise = promise.then(responseInterceptorChain[i++], responseInterceptorChain[i++]);}return promise;}// 获取请求地址getUri (config) {config = mergeConfig(this.defaults, config);const fullPath = buildFullPath(config.baseURL, config.url);return buildURL(fullPath, config.params, config.paramsSerializer);}
}// Provide aliases for supported request methods
// 给Axios原型注入四个请求方法,请求方法本质都是调用request方法
// 这四个都是不带请求体的
utils.forEach(['delete', 'get', 'head', 'options'], function forEachMethodNoData (method) {Axios.prototype[method] = function (url, config) {return this.request(mergeConfig(config || {}, {method,url,data: (config || {}).data}));};
});// 给Axios注入post,put,patch,postForm,putForm,patchForm方法
// 这几个方法都是带请求体的
utils.forEach(['post', 'put', 'patch'], function forEachMethodWithData (method) {function generateHTTPMethod (isForm) {return function httpMethod (url, data, config) {return this.request(mergeConfig(config || {}, {method,headers: isForm ? {'Content-Type': 'multipart/form-data'} : {},url,data}));};}Axios.prototype[method] = generateHTTPMethod();Axios.prototype[method + 'Form'] = generateHTTPMethod(true);
});export default Axios;
3.3 InterceptorManager类
接下来看看拦截器是如何实现的。
先回顾一下我们平时是怎么使用拦截器的?
axios.interceptors.request.use({fulfilled:()=>{},rejected:()=>{}
})
可以看到我们给use传递的是一个对象,对象包含fulfilled函数和rejected函数。
接下来看源码:
class InterceptorManager {// 构造函数只初始化了一个空的handlers数组// 拦截器就是放在这个数组里的constructor() {this.handlers = [];}// 添加拦截器,返回索引,可以用索引来移除拦截器// 可以发现除了fulfilled和rejected,// 我们还可以设置synchronous和runWhen// runWhen函数用来动态控制是否使用该拦截器use (fulfilled, rejected, options) {this.handlers.push({fulfilled,rejected,synchronous: options ? options.synchronous : false,runWhen: options ? options.runWhen : null});return this.handlers.length - 1;}// 根据添加时返回的索引去删除拦截器eject (id) {if (this.handlers[id]) {this.handlers[id] = null;}}// 清空拦截器clear () {if (this.handlers) {this.handlers = [];}}// 提供遍历拦截器快捷操作forEach (fn) {utils.forEach(this.handlers, function forEachHandler (h) {if (h !== null) {fn(h);}});}
}export default InterceptorManager;
3.4 dispatchRequest发送请求
看完上面的代码,我们已经基本搞清楚了axios的整体流程:
组装config->组装header->调用请求拦截器->发送实际请求->调用返回拦截器。
但是我们还不知道axios具体是如何调用请求的,那么接下来就要看dispatchRequest代码咯!
// 暂且先记住,这个函数的作用就是用来判断请求是否被取消,
// 如果要的话,则直接抛出异常,
function throwIfCancellationRequested (config) {if (config.cancelToken) {config.cancelToken.throwIfRequested();}if (config.signal && config.signal.aborted) {throw new CanceledError(null, config);}
}// 发送请求核心函数
export default function dispatchRequest (config) {// 刚开始请求前判断一次是否取消throwIfCancellationRequested(config);config.headers = AxiosHeaders.from(config.headers);// 执行数据转换操作config.data = transformData.call(config,config.transformRequest);// 默认设置请求头的contentType为application/x-www-form-urlencodedif (['post', 'put', 'patch'].indexOf(config.method) !== -1) {config.headers.setContentType('application/x-www-form-urlencoded', false);}// 获取适配器,如果是浏览器环境获取xhr,// 如果是Node环境,获取http // 适配器就是最终用来发送请求的东西const adapter = adapters.getAdapter(config.adapter || defaults.adapter);// 请求是使用适配器执行configreturn adapter(config).then(function onAdapterResolution (response) {// 请求完之后判断是否要取消throwIfCancellationRequested(config);// 对返回结果进行转换response.data = transformData.call(config,config.transformResponse,response);// 设置返回头response.headers = AxiosHeaders.from(response.headers);return response;}, function onAdapterRejection (reason) {// 如果不是因为取消而报错if (!isCancel(reason)) {// 再次判断是否要取消,如果是会抛出异常throwIfCancellationRequested(config);// 处理正常错误的返回值if (reason && reason.response) {reason.response.data = transformData.call(config,config.transformResponse,reason.response);reason.response.headers = AxiosHeaders.from(reason.response.headers);}}return Promise.reject(reason);});
}
3.5 adapter 请求适配器,此处以xhr请求适配器为例
dispatchRequest的流程还是相对简单的,剩下的疑惑就是adapter干了些什么,让我们接着往下看吧!
// 用于给上传和下载进度增加监听函数
function progressEventReducer (listener, isDownloadStream) {let bytesNotified = 0;const _speedometer = speedometer(50, 250);return e => {const loaded = e.loaded;const total = e.lengthComputable ? e.total : undefined;const progressBytes = loaded - bytesNotified;const rate = _speedometer(progressBytes);const inRange = loaded <= total;bytesNotified = loaded;const data = {loaded,total,progress: total ? (loaded / total) : undefined,bytes: progressBytes,rate: rate ? rate : undefined,estimated: rate && total && inRange ? (total - loaded) / rate : undefined,event: e};data[isDownloadStream ? 'download' : 'upload'] = true;listener(data);};
}// 判断是否支持XMLHttpRequest
const isXHRAdapterSupported = typeof XMLHttpRequest !== 'undefined';// 适配器的请求参数是config
export default isXHRAdapterSupported && function (config) {// 返回Promisereturn new Promise(function dispatchXhrRequest (resolve, reject) {// 请求体let requestData = config.data;// 请求头const requestHeaders = AxiosHeaders.from(config.headers).normalize();// 返回数据类型const responseType = config.responseType;let onCanceled;// function done () {if (config.cancelToken) {config.cancelToken.unsubscribe(onCanceled);}if (config.signal) {config.signal.removeEventListener('abort', onCanceled);}}// 自动帮我们设置contentType,// 这就是为什么我们使用的时候都不需要// 特别设置contentType的原因了if (utils.isFormData(requestData)) {if (platform.isStandardBrowserEnv || platform.isStandardBrowserWebWorkerEnv) {// 浏览器环境让浏览器设置requestHeaders.setContentType(false); } else {requestHeaders.setContentType('multipart/form-data;', false); }}// 请求let request = new XMLHttpRequest();// 设置auth,帮我们转码好了if (config.auth) {const username = config.auth.username || '';const password = config.auth.password ? unescape(encodeURIComponent(config.auth.password)) : '';requestHeaders.set('Authorization', 'Basic ' + btoa(username + ':' + password));}// 拼接完整URL路径const fullPath = buildFullPath(config.baseURL, config.url);// 开启请求request.open(config.method.toUpperCase(), buildURL(fullPath, config.params, config.paramsSerializer), true);// 设置超时时间request.timeout = config.timeout;//function onloadend () {if (!request) {return;}// 预准备返回体的内容const responseHeaders = AxiosHeaders.from('getAllResponseHeaders' in request && request.getAllResponseHeaders());const responseData = !responseType || responseType === 'text' || responseType === 'json' ?request.responseText : request.response;const response = {data: responseData,status: request.status,statusText: request.statusText,headers: responseHeaders,config,request};// 请求完之后判断请求是成功还是失败// 执行resolve和reject的操作settle(function _resolve (value) {resolve(value);done();}, function _reject (err) {reject(err);done();}, response);// 清除requestrequest = null;}if ('onloadend' in request) {// 设置onloadendrequest.onloadend = onloadend;} else {// Listen for ready state to emulate onloadendrequest.onreadystatechange = function handleLoad () {if (!request || request.readyState !== 4) {return;}// The request errored out and we didn't get a response, this will be// handled by onerror instead// With one exception: request that using file: protocol, most browsers// will return status as 0 even though it's a successful requestif (request.status === 0 && !(request.responseURL && request.responseURL.indexOf('file:') === 0)) {return;}// readystate handler is calling before onerror or ontimeout handlers,// so we should call onloadend on the next 'tick'// readystate之后再执行onloadendsetTimeout(onloadend);};}// 处理浏览器请求取消事件request.onabort = function handleAbort () {if (!request) {return;}reject(new AxiosError('Request aborted', AxiosError.ECONNABORTED, config, request));request = null;};// 处理低级的网络错误request.onerror = function handleError () {reject(new AxiosError('Network Error', AxiosError.ERR_NETWORK, config, request));request = null;};// 处理超时request.ontimeout = function handleTimeout () {let timeoutErrorMessage = config.timeout ? 'timeout of ' + config.timeout + 'ms exceeded' : 'timeout exceeded';const transitional = config.transitional || transitionalDefaults;if (config.timeoutErrorMessage) {timeoutErrorMessage = config.timeoutErrorMessage;}reject(new AxiosError(timeoutErrorMessage,transitional.clarifyTimeoutError ? AxiosError.ETIMEDOUT : AxiosError.ECONNABORTED,config,request));request = null;};// 添加 xsrfif (platform.isStandardBrowserEnv) {const xsrfValue = (config.withCredentials || isURLSameOrigin(fullPath))&& config.xsrfCookieName && cookies.read(config.xsrfCookieName);if (xsrfValue) {requestHeaders.set(config.xsrfHeaderName, xsrfValue);}}// 无请求体的话就移除contentTyperequestData === undefined && requestHeaders.setContentType(null);// 添加headers if ('setRequestHeader' in request) {utils.forEach(requestHeaders.toJSON(), function setRequestHeader (val, key) {request.setRequestHeader(key, val);});}// 添加withCredentials if (!utils.isUndefined(config.withCredentials)) {request.withCredentials = !!config.withCredentials;}// 添加responseTypeif (responseType && responseType !== 'json') {request.responseType = config.responseType;}// 增加下载过程的监听函数if (typeof config.onDownloadProgress === 'function') {request.addEventListener('progress', progressEventReducer(config.onDownloadProgress, true));}// 增加上传过程的监听函数if (typeof config.onUploadProgress === 'function' && request.upload) {request.upload.addEventListener('progress', progressEventReducer(config.onUploadProgress));}// 请求过程中取消if (config.cancelToken || config.signal) {onCanceled = cancel => {if (!request) {return;}reject(!cancel || cancel.type ? new CanceledError(null, config, request) : cancel);request.abort();request = null;};config.cancelToken && config.cancelToken.subscribe(onCanceled);if (config.signal) {config.signal.aborted ? onCanceled() : config.signal.addEventListener('abort', onCanceled);}}// 获取请求协议,比如https这样的const protocol = parseProtocol(fullPath);// 判断当前环境是否支持该协议if (protocol && platform.protocols.indexOf(protocol) === -1) {reject(new AxiosError('Unsupported protocol ' + protocol + ':', AxiosError.ERR_BAD_REQUEST, config));return;}// 发送请求request.send(requestData || null);});
}