(未完成,待补充)
获取Faster RCNN源码
(开源的很多,论文里也有,在这里不多赘述)
替换自己的数据集(图片+标签文件)
(需要使用labeling生成标签文件)
打开终端,进入gpupytorch环境
运行voc_annotation.py文件生成与训练文件
E:\DeepLearningModel\Model01>activate gpupytorch(gpupytorch) E:\DeepLearningModel\Model01>python voc_annotation.py
D:\Anaconda\envs\gpupytorch\lib\site-packages\numpy\_distributor_init.py:30: UserWarning: loaded more than 1 DLL from .libs:
D:\Anaconda\envs\gpupytorch\lib\site-packages\numpy\.libs\libopenblas.PYQHXLVVQ7VESDPUVUADXEVJOBGHJPAY.gfortran-win_amd64.dll
D:\Anaconda\envs\gpupytorch\lib\site-packages\numpy\.libs\libopenblas64__v0.3.21-gcc_10_3_0.dllwarnings.warn("loaded more than 1 DLL from .libs:\n%s" %
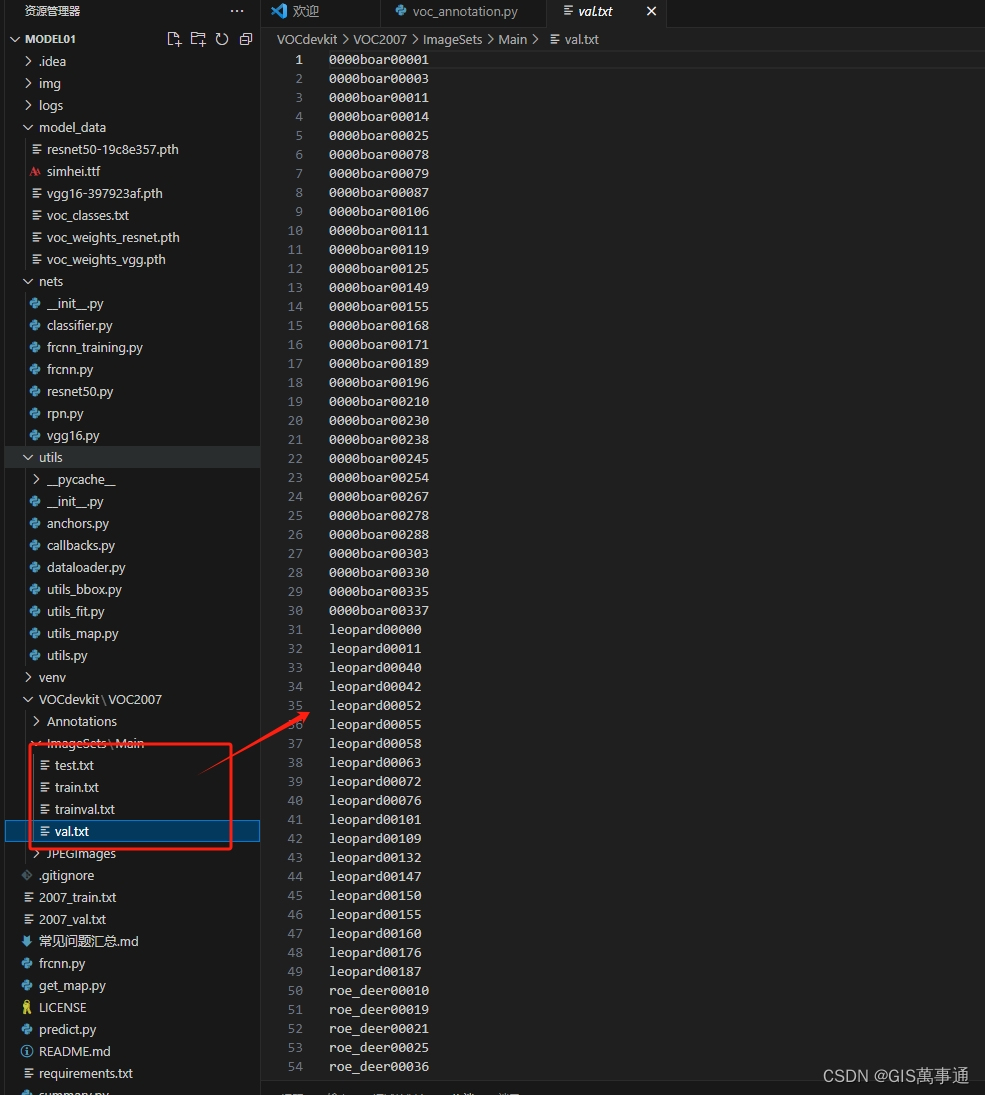
Generate txt in ImageSets.
train and val size 777
train size 699
Generate txt in ImageSets done.
Generate 2007_train.txt and 2007_val.txt for train.结果所示:
(gpupytorch) E:\DeepLearningModel\Model01>python voc_annotation.py
D:\Anaconda\envs\gpupytorch\lib\site-packages\numpy\_distributor_init.py:30: UserWarning: loaded more than 1 DLL from .libs:
D:\Anaconda\envs\gpupytorch\lib\site-packages\numpy\.libs\libopenblas.PYQHXLVVQ7VESDPUVUADXEVJOBGHJPAY.gfortran-win_amd64.dll
D:\Anaconda\envs\gpupytorch\lib\site-packages\numpy\.libs\libopenblas64__v0.3.21-gcc_10_3_0.dllwarnings.warn("loaded more than 1 DLL from .libs:\n%s" %
Generate txt in ImageSets.
train and val size 777
train size 699
Generate txt in ImageSets done.
Generate 2007_train.txt and 2007_val.txt for train.
Generate 2007_train.txt and 2007_val.txt for train done.
|  leopard | 174 |
|     boar | 491 |
| roe_deer | 352 |(gpupytorch) E:\DeepLearningModel\Model01>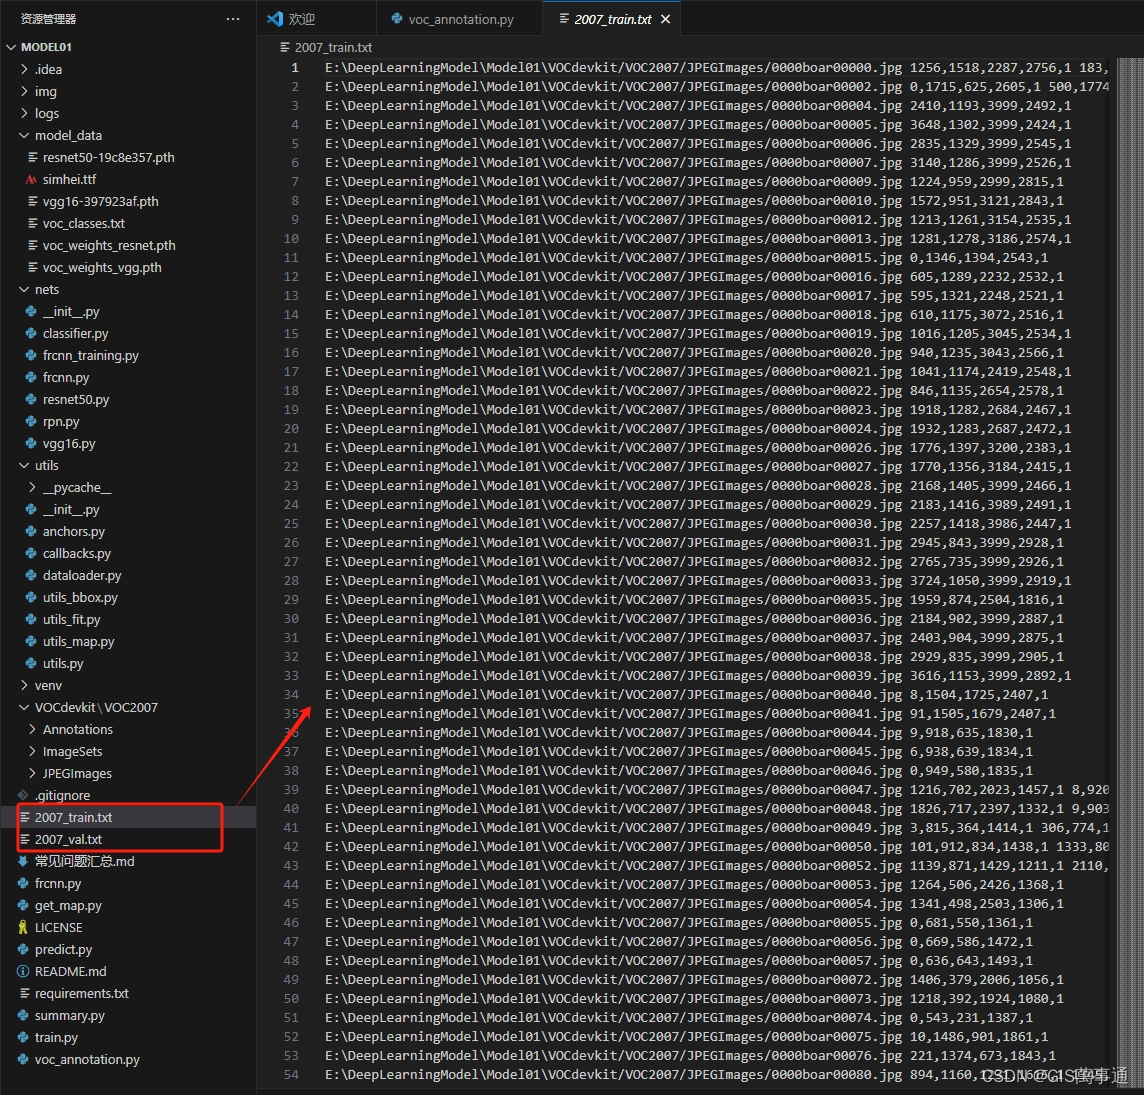
运行:train.py文件
import colorsys
import os
import timeimport numpy as np
import torch
import torch.nn as nn
from PIL import Image, ImageDraw, ImageFontfrom nets.frcnn import FasterRCNN
from utils.utils import (cvtColor, get_classes, get_new_img_size, resize_image,preprocess_input, show_config)
from utils.utils_bbox import DecodeBoxclass FRCNN(object):_defaults = {"model_path"    : 'logs/loss_2024_03_05_22_26_24.pth',"classes_path"  : 'model_data/voc_classes.txt',"backbone"      : "resnet50","confidence"    : 0.5,"nms_iou"       : 0.3,'anchors_size'  : [8, 16, 32],"cuda"          : True,}@classmethoddef get_defaults(cls, n):if n in cls._defaults:return cls._defaults[n]else:return "Unrecognized attribute name '" + n + "'"def __init__(self, **kwargs):self.__dict__.update(self._defaults)for name, value in kwargs.items():setattr(self, name, value)self._defaults[name] = value self.class_names, self.num_classes  = get_classes(self.classes_path)self.std    = torch.Tensor([0.1, 0.1, 0.2, 0.2]).repeat(self.num_classes + 1)[None]if self.cuda:self.std    = self.std.cuda()self.bbox_util  = DecodeBox(self.std, self.num_classes)#---------------------------------------------------#hsv_tuples = [(x / self.num_classes, 1., 1.) for x in range(self.num_classes)]self.colors = list(map(lambda x: colorsys.hsv_to_rgb(*x), hsv_tuples))self.colors = list(map(lambda x: (int(x[0] * 255), int(x[1] * 255), int(x[2] * 255)), self.colors))self.generate()show_config(**self._defaults)#---------------------------------------------------##   载入模型#---------------------------------------------------#def generate(self):self.net    = FasterRCNN(self.num_classes, "predict", anchor_scales = self.anchors_size, backbone = self.backbone)device      = torch.device('cuda' if torch.cuda.is_available() else 'cpu')self.net.load_state_dict(torch.load(self.model_path, map_location=device))self.net    = self.net.eval()print('{} model, anchors, and classes loaded.'.format(self.model_path))if self.cuda:self.net = nn.DataParallel(self.net)self.net = self.net.cuda()#---------------------------------------------------##   检测图片#---------------------------------------------------#def detect_image(self, image, crop = False, count = False):#---------------------------------------------------##   计算输入图片的高和宽#---------------------------------------------------#image_shape = np.array(np.shape(image)[0:2])#---------------------------------------------------##   计算resize后的图片的大小,resize后的图片短边为600#---------------------------------------------------#input_shape = get_new_img_size(image_shape[0], image_shape[1])#---------------------------------------------------------##   在这里将图像转换成RGB图像,防止灰度图在预测时报错。#   代码仅仅支持RGB图像的预测,所有其它类型的图像都会转化成RGB#---------------------------------------------------------#image       = cvtColor(image)#---------------------------------------------------------##   给原图像进行resize,resize到短边为600的大小上#---------------------------------------------------------#image_data  = resize_image(image, [input_shape[1], input_shape[0]])#---------------------------------------------------------##   添加上batch_size维度#---------------------------------------------------------#image_data  = np.expand_dims(np.transpose(preprocess_input(np.array(image_data, dtype='float32')), (2, 0, 1)), 0)with torch.no_grad():images = torch.from_numpy(image_data)if self.cuda:images = images.cuda()#-------------------------------------------------------------##   roi_cls_locs  建议框的调整参数#   roi_scores    建议框的种类得分#   rois          建议框的坐标#-------------------------------------------------------------#roi_cls_locs, roi_scores, rois, _ = self.net(images)#-------------------------------------------------------------##   利用classifier的预测结果对建议框进行解码,获得预测框#-------------------------------------------------------------#results = self.bbox_util.forward(roi_cls_locs, roi_scores, rois, image_shape, input_shape, nms_iou = self.nms_iou, confidence = self.confidence)#---------------------------------------------------------##   如果没有检测出物体,返回原图#---------------------------------------------------------#           if len(results[0]) <= 0:return imagetop_label   = np.array(results[0][:, 5], dtype = 'int32')top_conf    = results[0][:, 4]top_boxes   = results[0][:, :4]#---------------------------------------------------------##   设置字体与边框厚度#---------------------------------------------------------#font        = ImageFont.truetype(font='model_data/simhei.ttf', size=np.floor(3e-2 * image.size[1] + 0.5).astype('int32'))thickness   = int(max((image.size[0] + image.size[1]) // np.mean(input_shape), 1))#---------------------------------------------------------##   计数#---------------------------------------------------------#if count:print("top_label:", top_label)classes_nums    = np.zeros([self.num_classes])for i in range(self.num_classes):num = np.sum(top_label == i)if num > 0:print(self.class_names[i], " : ", num)classes_nums[i] = numprint("classes_nums:", classes_nums)#---------------------------------------------------------##   是否进行目标的裁剪#---------------------------------------------------------#if crop:for i, c in list(enumerate(top_label)):top, left, bottom, right = top_boxes[i]top     = max(0, np.floor(top).astype('int32'))left    = max(0, np.floor(left).astype('int32'))bottom  = min(image.size[1], np.floor(bottom).astype('int32'))right   = min(image.size[0], np.floor(right).astype('int32'))dir_save_path = "img_crop"if not os.path.exists(dir_save_path):os.makedirs(dir_save_path)crop_image = image.crop([left, top, right, bottom])crop_image.save(os.path.join(dir_save_path, "crop_" + str(i) + ".png"), quality=95, subsampling=0)print("save crop_" + str(i) + ".png to " + dir_save_path)#---------------------------------------------------------##   图像绘制#---------------------------------------------------------#for i, c in list(enumerate(top_label)):predicted_class = self.class_names[int(c)]box             = top_boxes[i]score           = top_conf[i]top, left, bottom, right = boxtop     = max(0, np.floor(top).astype('int32'))left    = max(0, np.floor(left).astype('int32'))bottom  = min(image.size[1], np.floor(bottom).astype('int32'))right   = min(image.size[0], np.floor(right).astype('int32'))label = '{} {:.2f}'.format(predicted_class, score)draw = ImageDraw.Draw(image)label_size = draw.textsize(label, font)label = label.encode('utf-8')# print(label, top, left, bottom, right)if top - label_size[1] >= 0:text_origin = np.array([left, top - label_size[1]])else:text_origin = np.array([left, top + 1])for i in range(thickness):draw.rectangle([left + i, top + i, right - i, bottom - i], outline=self.colors[c])draw.rectangle([tuple(text_origin), tuple(text_origin + label_size)], fill=self.colors[c])draw.text(text_origin, str(label,'UTF-8'), fill=(0, 0, 0), font=font)del drawreturn imagedef get_FPS(self, image, test_interval):#---------------------------------------------------##   计算输入图片的高和宽#---------------------------------------------------#image_shape = np.array(np.shape(image)[0:2])input_shape = get_new_img_size(image_shape[0], image_shape[1])#---------------------------------------------------------##   在这里将图像转换成RGB图像,防止灰度图在预测时报错。#   代码仅仅支持RGB图像的预测,所有其它类型的图像都会转化成RGB#---------------------------------------------------------#image       = cvtColor(image)#---------------------------------------------------------##   给原图像进行resize,resize到短边为600的大小上#---------------------------------------------------------#image_data  = resize_image(image, [input_shape[1], input_shape[0]])#---------------------------------------------------------##   添加上batch_size维度#---------------------------------------------------------#image_data  = np.expand_dims(np.transpose(preprocess_input(np.array(image_data, dtype='float32')), (2, 0, 1)), 0)with torch.no_grad():images = torch.from_numpy(image_data)if self.cuda:images = images.cuda()roi_cls_locs, roi_scores, rois, _ = self.net(images)#-------------------------------------------------------------##   利用classifier的预测结果对建议框进行解码,获得预测框#-------------------------------------------------------------#results = self.bbox_util.forward(roi_cls_locs, roi_scores, rois, image_shape, input_shape, nms_iou = self.nms_iou, confidence = self.confidence)t1 = time.time()for _ in range(test_interval):with torch.no_grad():roi_cls_locs, roi_scores, rois, _ = self.net(images)#-------------------------------------------------------------##   利用classifier的预测结果对建议框进行解码,获得预测框#-------------------------------------------------------------#results = self.bbox_util.forward(roi_cls_locs, roi_scores, rois, image_shape, input_shape, nms_iou = self.nms_iou, confidence = self.confidence)t2 = time.time()tact_time = (t2 - t1) / test_intervalreturn tact_time#---------------------------------------------------##   检测图片#---------------------------------------------------#def get_map_txt(self, image_id, image, class_names, map_out_path):f = open(os.path.join(map_out_path, "detection-results/"+image_id+".txt"),"w")#---------------------------------------------------##   计算输入图片的高和宽#---------------------------------------------------#image_shape = np.array(np.shape(image)[0:2])input_shape = get_new_img_size(image_shape[0], image_shape[1])#---------------------------------------------------------##   在这里将图像转换成RGB图像,防止灰度图在预测时报错。#   代码仅仅支持RGB图像的预测,所有其它类型的图像都会转化成RGB#---------------------------------------------------------#image       = cvtColor(image)#---------------------------------------------------------##   给原图像进行resize,resize到短边为600的大小上#---------------------------------------------------------#image_data  = resize_image(image, [input_shape[1], input_shape[0]])#---------------------------------------------------------##   添加上batch_size维度#---------------------------------------------------------#image_data  = np.expand_dims(np.transpose(preprocess_input(np.array(image_data, dtype='float32')), (2, 0, 1)), 0)with torch.no_grad():images = torch.from_numpy(image_data)if self.cuda:images = images.cuda()roi_cls_locs, roi_scores, rois, _ = self.net(images)#-------------------------------------------------------------##   利用classifier的预测结果对建议框进行解码,获得预测框#-------------------------------------------------------------#results = self.bbox_util.forward(roi_cls_locs, roi_scores, rois, image_shape, input_shape, nms_iou = self.nms_iou, confidence = self.confidence)#--------------------------------------##   如果没有检测到物体,则返回原图#--------------------------------------#if len(results[0]) <= 0:return top_label   = np.array(results[0][:, 5], dtype = 'int32')top_conf    = results[0][:, 4]top_boxes   = results[0][:, :4]for i, c in list(enumerate(top_label)):predicted_class = self.class_names[int(c)]box             = top_boxes[i]score           = str(top_conf[i])top, left, bottom, right = boxif predicted_class not in class_names:continuef.write("%s %s %s %s %s %s\n" % (predicted_class, score[:6], str(int(left)), str(int(top)), str(int(right)),str(int(bottom))))f.close()return
终端/编码器运行:
E:\DeepLearningModel\Model01>activate gpupytorch(gpupytorch) E:\DeepLearningModel\Model01>python train.py
D:\Anaconda\envs\gpupytorch\lib\site-packages\numpy\_distributor_init.py:30: UserWarning: loaded more than 1 DLL from .libs:
D:\Anaconda\envs\gpupytorch\lib\site-packages\numpy\.libs\libopenblas.PYQHXLVVQ7VESDPUVUADXEVJOBGHJPAY.gfortran-win_amd64.dll
D:\Anaconda\envs\gpupytorch\lib\site-packages\numpy\.libs\libopenblas64__v0.3.21-gcc_10_3_0.dllwarnings.warn("loaded more than 1 DLL from .libs:\n%s" %
Number of devices: 1
initialize network with normal type
Load weights model_data/voc_weights_resnet.pth.Successful Load Key: ['extractor.0.weight', 'extractor.1.weight', 'extractor.1.bias', 'extractor.1.running_mean', 'extractor.1.running_var', 'extractor.1.num_batches_tracked', 'extractor.4.0.conv1.weight', 'extractor.4.0.bn1.weight', 'extractor.4.0.bn1.bias', 'extractor.4.0.bn1.running_mean', 'extractor.4.0.bn1.running_var', 'extractor.4.0.bn1.num_batches_tracked', 'extractor.4.0.conv2.weight', 'extractor.4.0.bn2.weight', 'extractor.4.0.bn2.bias', 'extractor.4.0.bn2.running_mean', 'extractor.4.0.bn2.running_var', 'e ……
Successful Load Key Num: 324Fail To Load Key: ['head.cls_loc.weight', 'head.cls_loc.bias', 'head.score.weight', 'head.score.bias'] ……
Fail To Load Key num: 4温馨提示,head部分没有载入是正常现象,Backbone部分没有载入是错误的。
Configurations:
----------------------------------------------------------------------
|                     keys |                                   values|
----------------------------------------------------------------------
|             classes_path |               model_data/voc_classes.txt|
|               model_path |        model_data/voc_weights_resnet.pth|
|              input_shape |                               [600, 600]|
|               Init_Epoch |                                        0|
|             Freeze_Epoch |                                       50|
|           UnFreeze_Epoch |                                      100|
|        Freeze_batch_size |                                        4|
|      Unfreeze_batch_size |                                        2|
|             Freeze_Train |                                     True|
|                  Init_lr |                                   0.0001|
|                   Min_lr |                   1.0000000000000002e-06|
|           optimizer_type |                                     adam|
|                 momentum |                                      0.9|
|            lr_decay_type |                                      cos|
|              save_period |                                        5|
|                 save_dir |                                     logs|
|              num_workers |                                        4|
|                num_train |                                      699|
|                  num_val |                                       78|
----------------------------------------------------------------------
Start Train
Epoch 1/100:   0%|                                                               | 0/174 [00:00<?, ?it/s<class 'dict'>]D:\Anaconda\envs\gpupytorch\lib\site-packages\numpy\_distributor_init.py:30: UserWarning: loaded more than 1 DLL from .libs:
D:\Anaconda\envs\gpupytorch\lib\site-packages\numpy\.libs\libopenblas.PYQHXLVVQ7VESDPUVUADXEVJOBGHJPAY.gfortran-win_amd64.dll
查看结果:
Calculate Map.
96.35% = boar AP        ||      score_threhold=0.5 : F1=0.81 ; Recall=97.92% ; Precision=69.12%
94.74% = leopard AP     ||      score_threhold=0.5 : F1=0.90 ; Recall=94.74% ; Precision=85.71%
94.97% = roe_deer AP    ||      score_threhold=0.5 : F1=0.86 ; Recall=96.88% ; Precision=77.50%
mAP = 95.35%
Get map done.
Epoch:100/100
Total Loss: 0.505 || Val Loss: 0.621
Save best model to best_epoch_weights.pth