目录
一、 Docker的基本组成
二、 容器和镜像的关系
2.1 面向对象角度
2.2 从镜像容器角度
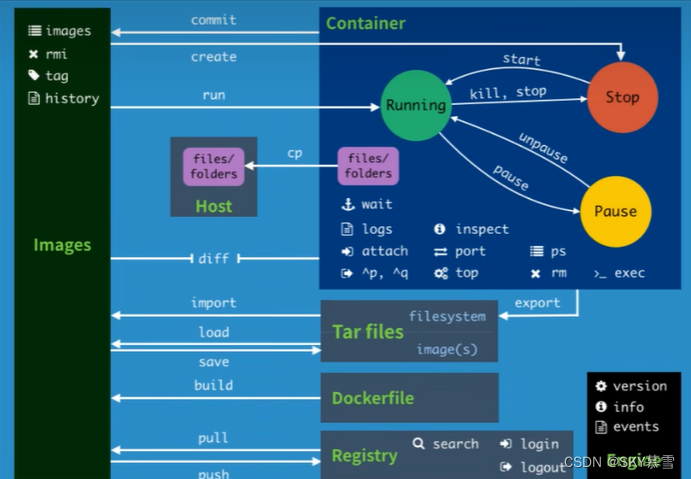
三、 容器命令
3.1 使用Ubuntu
3.1.1 下载镜像
3.1.2 新建和启动容器 run
3.1.3交互式
compose编排与部署
1. docker-compose部署
2. docker-compose.yml模板
3. 使用compose搭建WordPress
小结
一、 Docker的基本组成
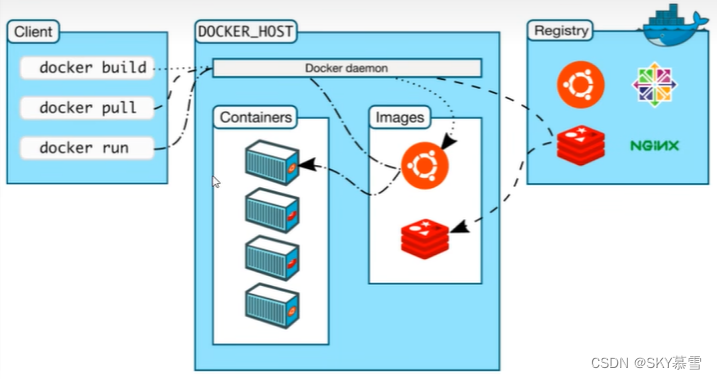
Docker 是一种轻量级的虚拟化容器解决方案,它利用容器来打包应用程序和其依赖项,提供了一种快速部署和运行应用程序的方式。下面是 Docker 的基本组成部分:
镜像(Image):
镜像是 Docker 容器的基础。它包含了应用程序运行所需的所有文件系统内容、库、环境变量和配置等信息。镜像可以用于创建容器实例。
容器(Container):容器是 Docker 镜像的运行实例。每个容器都是相互隔离的,可以在其中运行一个或多个应用程序。容器具有自己的文件系统、网络和进程空间,并且可以被快速创建、启动、停止和删除。
仓库(Repository):仓库是存储 Docker 镜像的地方,可以是本地主机上的仓库,也可以是远程仓库(如 Docker Hub)。用户可以从仓库中拉取镜像到本地使用,也可以将自己创建的镜像推送到仓库中供他人使用。
Docker 守护进程(Docker Daemon):Docker 守护进程是在主机上运行的后台服务,负责管理 Docker 对象,如镜像、容器、网络等。它接收来自 Docker 客户端的请求,并处理这些请求。
Docker 客户端(Docker Client):Docker 客户端是与 Docker 守护进程通信的命令行工具。用户可以通过 Docker 客户端执行各种操作,如构建镜像、运行容器、管理网络等。
网络(Network):Docker 提供了各种网络驱动程序,用于连接 Docker 容器,使它们可以相互通信。用户可以创建自定义网络并将容器连接到这些网络中,实现灵活的网络配置。
数据卷(Volume):数据卷是用于在容器之间共享数据的一种方法。它允许容器访问宿主机上的特定目录或文件,以持久化存储数据或共享文件。
以上是 Docker 的基本组成部分,它们共同构成了 Docker 的核心功能和架构。通过合理使用这些组件,可以更高效地管理和运行应用程序容器。
二、 容器和镜像的关系
2.1 面向对象角度
docker利用容器(container)独立运行的一个和一组应用,应用程序或服务运行在容器里面,容器类似于一个虚拟化的运行环境,容器是用镜像创建的运行实例
镜像是一个静态的定义,容器是镜像运行时的实体
容器为镜像提供了一个标准的隔离的运行环境,它可以被启动、开始、停止、删除
每个容器都是相互隔离的、保证安全的平台
2.2 从镜像容器角度
可以把容器看作是一个简易版的Linux环境(包括root用户权限,进程空间,用户空间和网络空间等)和运行在其中的应用程序
三、 容器命令
docker必须部署在Linux内核上,如果其他系统想部署docker就必须安装一个虚拟的Linux环境
因此,docker自带一个迷你的、微小版的Linux环境
实际的环境中,必须有镜像才能创建容器,这是根本前提
从上到下的层次关系
centos7镜像 =>
docker容器 =>
centos7.9 =>
VMware =>
Windows =>
台式机/笔记本电脑如果是Ubuntu镜像
Ubuntu镜像 =>
docker容器 =>
centos7.9 =>
VMware =>
Windows =>
台式机/笔记本电脑
3.1 下载镜像
[root@localhost ~]# docker pull ubuntu
Using default tag: latest
latest: Pulling from library/ubuntu
7b1a6ab2e44d: Pull complete
Digest: sha256:626ffe58f6e7566e00254b638eb7e0f3b11d4da9675088f4781a50ae288f3322
Status: Downloaded newer image for ubuntu:latest
docker.io/library/ubuntu:latest[root@localhost ~]# docker images
REPOSITORY    TAG       IMAGE ID       CREATED         SIZE
hello-world   latest    d2c94e258dcb   10 months ago   13.3kB
ubuntu        latest    ba6acccedd29   2 years ago     72.8MB
3.2 新建和启动容器 run
使用run按照镜像,生成一个个的容器实例(相当于安装的一个个的虚拟机实例),也就是鲸鱼背上的集装箱

[root@localhost ~]# docker run --helpUsage: docker run [OPTIONS] IMAGE [COMMAND] [ARG...][OPTIONS] 说明
--name 容器名字 =>为容器指定一个名称,若不指定则随机分配
-d 后台运行模式,并返回容器ID,也称启动守护式容器(后台运行)-i 以交互式模式运行容器,通常与 -t 一起使用
-t 为容器重新分配一个伪输入终端,通常与 -i 一起使用
也即 启动交互式容器(前台有伪终端,等待交互)-P 随机端口映射(系统随机分配),大写P
-p 指定端口映射,小写p
-p hostPort:containerPort =>主机端口号:容器内端口号 例 -p 80:8080
容器实例是运行在docker上,访问容器实例
以redis为例,首先要指定宿主机(docker)暴露的6379端口,在docker内部找6379端口的Redis容器,即为-p 6379s:6379;左边是访问宿主机暴露的端口,右边是docker访问Redis提供的端口
直接运行
[root@localhost ~]# docker run ubuntu
#没有任何返回值,使用docker ps 也没有正在运行的
3.3 交互式
使用镜像centos:latest以交互式启动一个容器,在容器内执行/bin/bash命令(表示在载入容器后运行bash,docker中必须保持一个进程的运行,否则整个容器就会退出,这个就表示启动容器之后启动bash)
(Bash,Unix,shell的一种,Bash是一个命令处理器,通常运行于文本窗口,并能够执行用户直接输入的命令,Bash还能从文件中读取命令,这样的文件称为脚本)
docker run -it centos /bin/bash
-i 交互式
-t 终端
centos 镜像,没加latest,默认是最新版,否则需要加TAG
/bin/bash 放在镜像后的命令,希望以一个交互式的shell,因此使用/bin/bash
需要退出终端,直接输入exit
如果镜像关闭,使用以下命令,重新进入docker容器
docekr exec -it 容器名称(或ID) bash
[root@localhost ~]# docker ps --help
Usage: docker ps [OPTIONS]
[OPTIONS]
-a 显示全部容器,正在运行的+历史运行过的
-l 显示最近创建
-n 显示最近n个创建的容器
-q 只显示容器ID,静默模式
实例
用exit退出会自动停止容器运行,使用ctrl+p+q退出并不会停止运行
[root@localhost ~]# docker pull ubuntu
Using default tag: latest
latest: Pulling from library/ubuntu
7b1a6ab2e44d: Pull complete
Digest: sha256:626ffe58f6e7566e00254b638eb7e0f3b11d4da9675088f4781a50ae288f3322
Status: Downloaded newer image for ubuntu:latest
docker.io/library/ubuntu:latest
[root@localhost ~]# docker images
REPOSITORY    TAG       IMAGE ID       CREATED         SIZE
hello-world   latest    d2c94e258dcb   10 months ago   13.3kB
ubuntu        latest    ba6acccedd29   2 years ago     72.8MB
[root@localhost ~]#
[root@localhost ~]# docker run -it -P --name wq-test ubuntu
root@da93329d147f:/#
3.4 后台运行
直接-d,容器自动停止
后台运行必须有一个前台进程(docker机制)
[root@localhost ~]# docker run -d ubuntu
c86fe1c9bd0308eae62c70cccd3cf913f607909dcb3d6fdd237deda611dc162f
[root@localhost ~]# docker ps
CONTAINER ID   IMAGE     COMMAND   CREATED   STATUS    PORTS     NAMES
[root@localhost ~]# docker ps -a
CONTAINER ID   IMAGE     COMMAND   CREATED         STATUS                     PORTS     NAMES
c86fe1c9bd03   ubuntu    "bash"    4 seconds ago   Exited (0) 4 seconds ago             vigilant_jepsen
例如,ubuntu、nginx,如果是以后台运行,就会导致前台没有运行的应用,类似这样的容器后台启动后,就会立即停止,解决方案是,将要运行的容器以前台进程的形式运行,常见的是命令行模式(-it)
不加/bin/bash或bash,默认会带shell脚本运行
[root@localhost ~]# docker run -d ubuntu
3311284af50180025cdbc6e6933b8f9f9f9b5f8bfacc69b54f606073c7100e5d
[root@localhost ~]# docker run -it ubuntu
root@b28af4f70f84:/#
3.5 部署redis实例
下载redis
[root@localhost ~]# docker pull redis:6.0.8
6.0.8: Pulling from library/redis
bb79b6b2107f: Pull complete
1ed3521a5dcb: Pull complete
5999b99cee8f: Pull complete
3f806f5245c9: Pull complete
f8a4497572b2: Pull complete
eafe3b6b8d06: Pull complete
Digest: sha256:21db12e5ab3cc343e9376d655e8eabbdbe5516801373e95a8a9e66010c5b8819
Status: Downloaded newer image for redis:6.0.8
docker.io/library/redis:6.0.8
[root@localhost ~]# docker images
REPOSITORY    TAG       IMAGE ID       CREATED         SIZE
hello-world   latest    d2c94e258dcb   10 months ago   13.3kB
ubuntu        latest    ba6acccedd29   2 years ago     72.8MB
redis         6.0.8     16ecd2772934   3 years ago     104MB
以交互式方式运行redis
[root@localhost ~]# docker run -it redis:6.0.8
1:C 13 Mar 2024 01:21:02.019 # oO0OoO0OoO0Oo Redis is starting oO0OoO0OoO0Oo
1:C 13 Mar 2024 01:21:02.019 # Redis version=6.0.8, bits=64, commit=00000000, modified=0, pid=1, just started
1:C 13 Mar 2024 01:21:02.019 # Warning: no config file specified, using the default config. In order to specify a config file use redis-server /path/to/redis.conf_._                                                  _.-``__ ''-._                                             _.-``    `.  `_.  ''-._           Redis 6.0.8 (00000000/0) 64 bit.-`` .-```.  ```\/    _.,_ ''-._                                   (    '      ,       .-`  | `,    )     Running in standalone mode|`-._`-...-` __...-.``-._|'` _.-'|     Port: 6379|    `-._   `._    /     _.-'    |     PID: 1`-._    `-._  `-./  _.-'    _.-'                                   |`-._`-._    `-.__.-'    _.-'_.-'|                                  |    `-._`-._        _.-'_.-'    |           http://redis.io        `-._    `-._`-.__.-'_.-'    _.-'                                   |`-._`-._    `-.__.-'    _.-'_.-'|                                  |    `-._`-._        _.-'_.-'    |                                  `-._    `-._`-.__.-'_.-'    _.-'                                   `-._    `-.__.-'    _.-'                                       `-._        _.-'                                           `-.__.-'                                               1:M 13 Mar 2024 01:21:02.020 # WARNING: The TCP backlog setting of 511 cannot be enforced because /proc/sys/net/core/somaxconn is set to the lower value of 128.
1:M 13 Mar 2024 01:21:02.020 # Server initialized
1:M 13 Mar 2024 01:21:02.020 # WARNING overcommit_memory is set to 0! Background save may fail under low memory condition. To fix this issue add 'vm.overcommit_memory = 1' to /etc/sysctl.conf and then reboot or run the command 'sysctl vm.overcommit_memory=1' for this to take effect.
1:M 13 Mar 2024 01:21:02.020 # WARNING you have Transparent Huge Pages (THP) support enabled in your kernel. This will create latency and memory usage issues with Redis. To fix this issue run the command 'echo madvise > /sys/kernel/mm/transparent_hugepage/enabled' as root, and add it to your /etc/rc.local in order to retain the setting after a reboot. Redis must be restarted after THP is disabled (set to 'madvise' or 'never').
1:M 13 Mar 2024 01:21:02.020 * Ready to accept connections
这种交互式的模式,是不安全的,因为这个界面需要一直挂着,使用ctrl+c这个容器就会被终止
使用后台方式运行redis,
对于redis,mysql这类服务,使用-d进行后台运行
[root@localhost ~]# docker run -d redis:6.0.8
b9e19344da5e9172b8b90cf19948164915f08c6f931d02d8096146fdf5225e55
[root@localhost ~]# docker ps
CONTAINER ID   IMAGE         COMMAND                  CREATED         STATUS        PORTS      NAMES
b9e19344da5e   redis:6.0.8   "docker-entrypoint.s…"   2 seconds ago   Up 1 second   6379/tcp   trusting_kowalevski
从这可以体会到docker的便捷,秒级启动
3.6 查看容器运行日志log
[root@localhost ~]# docker ps
CONTAINER ID   IMAGE         COMMAND                  CREATED         STATUS        PORTS      NAMES
b9e19344da5e   redis:6.0.8   "docker-entrypoint.s…"   2 seconds ago   Up 1 second   6379/tcp   trusting_kowalevski
[root@localhost ~]# docker logs b9e19344da5e
1:C 13 Mar 2024 01:25:16.939 # oO0OoO0OoO0Oo Redis is starting oO0OoO0OoO0Oo
1:C 13 Mar 2024 01:25:16.939 # Redis version=6.0.8, bits=64, commit=00000000, modified=0, pid=1, just started
1:C 13 Mar 2024 01:25:16.939 # Warning: no config file specified, using the default config. In order to specify a config file use redis-server /path/to/redis.conf
1:M 13 Mar 2024 01:25:16.940 * Running mode=standalone, port=6379.
1:M 13 Mar 2024 01:25:16.940 # WARNING: The TCP backlog setting of 511 cannot be enforced because /proc/sys/net/core/somaxconn is set to the lower value of 128.
1:M 13 Mar 2024 01:25:16.940 # Server initialized
1:M 13 Mar 2024 01:25:16.940 # WARNING overcommit_memory is set to 0! Background save may fail under low memory condition. To fix this issue add 'vm.overcommit_memory = 1' to /etc/sysctl.conf and then reboot or run the command 'sysctl vm.overcommit_memory=1' for this to take effect.
1:M 13 Mar 2024 01:25:16.940 # WARNING you have Transparent Huge Pages (THP) support enabled in your kernel. This will create latency and memory usage issues with Redis. To fix this issue run the command 'echo madvise > /sys/kernel/mm/transparent_hugepage/enabled' as root, and add it to your /etc/rc.local in order to retain the setting after a reboot. Redis must be restarted after THP is disabled (set to 'madvise' or 'never').
1:M 13 Mar 2024 01:25:16.940 * Ready to accept connections
3.7 查看容器内部top
[root@localhost ~]# docker top b9e19344da5e
UID                 PID                 PPID                C                   STIME               TTY                 TIME                CMD
polkitd             12632               12611               0                   21:25               ?                   00:00:00            redis-server *:6379
3.8 查看容器内部信息
[root@localhost ~]# docker inspect b9e19344da5e3.9 容器的启动和关闭
[root@localhost ~]# docker stop wq-test
wq-test[root@localhost ~]# docker ps
CONTAINER ID   IMAGE     COMMAND   CREATED         STATUS         PORTS     NAMES
dd321849f520   ubuntu    "bash"    2 minutes ago   Up 2 minutes             wq-test2
[root@localhost ~]# docker ps -a
CONTAINER ID   IMAGE     COMMAND   CREATED         STATUS                     PORTS     NAMES
dd321849f520   ubuntu    "bash"    2 minutes ago   Up 2 minutes                         wq-test2
9a5beffef401   ubuntu    "bash"    7 minutes ago   Exited (0) 4 seconds ago             wq-test[root@localhost ~]# docker start wq-test
wq-test[root@localhost ~]# docker ps
CONTAINER ID   IMAGE     COMMAND   CREATED         STATUS         PORTS                                   NAMES
dd321849f520   ubuntu    "bash"    3 minutes ago   Up 3 minutes                                           wq-test2
9a5beffef401   ubuntu    "bash"    8 minutes ago   Up 7 seconds   0.0.0.0:8080->80/tcp, :::8080->80/tcp   wq-test
3.10 容器删除
关闭已经停止的容器
[root@localhost ~]# docker ps -a
CONTAINER ID   IMAGE     COMMAND   CREATED          STATUS                     PORTS     NAMES
8217bc62d95c   ubuntu    "bash"    3 seconds ago    Exited (0) 2 seconds ago             w01
dd321849f520   ubuntu    "bash"    11 minutes ago   Up 11 minutes                        wq-test2
[root@localhost ~]# docker rm w01
w01
[root@localhost ~]# docker ps -a
CONTAINER ID   IMAGE     COMMAND   CREATED          STATUS          PORTS     NAMES
dd321849f520   ubuntu    "bash"    11 minutes ago   Up 11 minutes             wq-test2
关闭正在运行的容器
[root@localhost ~]# docker rm -f wq-test2
wq-test2
[root@localhost ~]# docker ps -a
CONTAINER ID   IMAGE     COMMAND   CREATED   STATUS    PORTS     NAMES
批量删除
[root@localhost ~]# docker run -d  ubuntu
cdee66294ad85365e319c43f91003d2cd47e768eaf8b383da70f7c4889a8fe0a
[root@localhost ~]# docker run -d  ubuntu
8bef244a48bc1b3b5b00b51ca1d64b33525f315c8225477916caa75f55237b5a
[root@localhost ~]# docker run -d  ubuntu
4bd4fc2af724f724286318046de0acda6d1dec727638ae167df6c9e9fe92fc90
[root@localhost ~]# docker run -d  ubuntu
d449c3a51ff0e54dd27db62ef341c0cc296df799484ed1e280001d4dae205bb6[root@localhost ~]# docker ps -aq
d449c3a51ff0
4bd4fc2af724
8bef244a48bc
cdee66294ad8[root@localhost ~]# docker ps -a
CONTAINER ID   IMAGE     COMMAND   CREATED          STATUS                      PORTS     NAMES
d449c3a51ff0   ubuntu    "bash"    15 seconds ago   Exited (0) 14 seconds ago             nostalgic_black
4bd4fc2af724   ubuntu    "bash"    15 seconds ago   Exited (0) 15 seconds ago             frosty_bardeen
8bef244a48bc   ubuntu    "bash"    16 seconds ago   Exited (0) 16 seconds ago             frosty_franklin
cdee66294ad8   ubuntu    "bash"    19 seconds ago   Exited (0) 18 seconds ago             objective_saha[root@localhost ~]# docker rm -f $(docker ps -aq)
d449c3a51ff0
4bd4fc2af724
8bef244a48bc
cdee66294ad8[root@localhost ~]# docker ps -a
CONTAINER ID   IMAGE     COMMAND   CREATED   STATUS    PORTS     NAMES
[root@localhost ~]#
compose编排与部署
Docker Compose是一个用于定义和运行多个Docker容器的工具。它使用YAML文件来配置应用程序的服务、网络和卷等方面,使得在单个主机上进行部署更加简单。通过定义一个Compose文件,你可以一次性启动、停止和管理整个应用程序的多个容器。
Compose文件包含了应用程序的各种服务的配置选项,如镜像、端口映射、环境变量、卷挂载等。你只需在Compose文件中定义所需的服务和其配置,然后使用docker-compose up命令即可启动整个应用程序。此外,你还可以使用docker-compose down命令来停止和删除所有相关的容器。
1. docker-compose部署
[root@localhost bin]#  pwd
/usr/local/bin
[root@localhost bin]# curl -L "https://github.com/docker/compose/releases/download/1.29.2/docker-compose-$(uname -s)-$(uname -m)" -o /usr/local/bin/docker-compose% Total    % Received % Xferd  Average Speed   Time    Time     Time  CurrentDload  Upload   Total   Spent    Left  Speed0     0    0     0    0     0      0      0 --:--:--  0:00:01 --:--:--     0
100 12.1M  100 12.1M    0     0   5094      0  0:41:40  0:41:40 --:--:--  5509[root@localhost bin]# ll
total 12440
-rw-r--r--. 1 root root 12737304 Mar 10 02:25 docker-compose
[root@localhost bin]# chmod 777 docker-compose[root@localhost bin]# docker-compose --version
docker-compose version 1.29.2, build 5becea4c
查看帮助
[root@localhost ~]# docker-compose --help
Define and run multi-container applications with Docker.Usage:docker-compose [-f <arg>...] [options] [COMMAND] [ARGS...]docker-compose -h|--helpOptions:-f, --file FILE             Specify an alternate compose file (default: docker-compose.yml)-p, --project-name NAME     Specify an alternate project name (default: directory name)--verbose                   Show more output--no-ansi                   Do not print ANSI control characters-v, --version               Print version and exit-H, --host HOST             Daemon socket to connect to--tls                       Use TLS; implied by --tlsverify--tlscacert CA_PATH         Trust certs signed only by this CA--tlscert CLIENT_CERT_PATH  Path to TLS certificate file--tlskey TLS_KEY_PATH       Path to TLS key file--tlsverify                 Use TLS and verify the remote--skip-hostname-check       Don't check the daemon's hostname against the name specifiedin the client certificate (for example if your docker hostis an IP address)--project-directory PATH    Specify an alternate working directory(default: the path of the Compose file)Commands:build              Build or rebuild servicesbundle             Generate a Docker bundle from the Compose fileconfig             Validate and view the Compose filecreate             Create servicesdown               Stop and remove containers, networks, images, and volumesevents             Receive real time events from containersexec               Execute a command in a running containerhelp               Get help on a commandimages             List imageskill               Kill containerslogs               View output from containerspause              Pause servicesport               Print the public port for a port bindingps                 List containerspull               Pull service imagespush               Push service imagesrestart            Restart servicesrm                 Remove stopped containersrun                Run a one-off commandscale              Set number of containers for a servicestart              Start servicesstop               Stop servicestop                Display the running processesunpause            Unpause servicesup                 Create and start containersversion            Show the Docker-Compose version information
2. docker-compose.yml模板
version: '3.8'
services:
web:
image: nginx:latest
ports:
- "8080:80"
db:
image: mysql:latest
environment:
MYSQL_ROOT_PASSWORD: example
MYSQL_DATABASE: mydatabase
MYSQL_USER: user
MYSQL_PASSWORD: password
包含了两个服务:web 和 db。web 服务使用 Nginx 镜像并将容器的 80 端口映射到宿主机的 8080 端口;db 服务使用 MySQL 镜像,并设置了一些环境变量用于配置 MySQL 实例。解析:
version: 指定了 Docker Compose 文件的版本。
services: 定义了各个服务。
web 和 db 是服务的名称,可以根据实际情况自行命名。
image: 指定了服务所使用的镜像。
ports: 定义了端口映射关系,格式为 "宿主机端口:容器端口"。
environment: 设置了该服务运行时需要的环境变量,这里设置了 MySQL 的 root 密码、数据库名、用户名和密码。
3. 使用compose搭建WordPress
[root@localhost ~]# cd /home/
[root@localhost home]# ll
total 0# 创建项目目录
[root@localhost home]# mkdir wordpress
[root@localhost home]# vi docker-compose.yml
[root@localhost home]# cat docker-compose.yml
version: "3"
services:db:image: mysql:8.0command:- --default_authentication_plugin=mysql_native_password- --character-set-server=utf8mb4- --collation-server=utf8mb4_unicode_civolumes:- db_data:/var/lib/mysqlrestart: alwaysenvironment:MYSQL_ROOT_PASSWORD: 123456MYSQL_DATABASE: wordpressMYSQL_USER: wordpressMYSQL_PASSWORD: wordpresswordpress:depends_on:- dbimage: wordpress:latestports:- "8000:80"restart: alwaysenvironment:WORDPRESS_DB_HOST: db:3306WORDPRESS_DB_USER: wordpressWORDPRESS_DB_PASSWORD: wordpress
volumes:db_data:
启动项目
[root@localhost home]# docker-compose up[root@localhost home]# docker ps
CONTAINER ID   IMAGE              COMMAND                  CREATED         STATUS         PORTS                                   NAMES
edeae04f9543   wordpress:latest   "docker-entrypoint.s…"   7 minutes ago   Up 7 minutes   0.0.0.0:8000->80/tcp, :::8000->80/tcp   home_wordpress_1
ebaa335a1d47   mysql:8.0          "docker-entrypoint.s…"   7 minutes ago   Up 7 minutes   3306/tcp, 33060/tcp                     home_db_1#必须在项目目录中才能使用这个命令
[root@localhost home]# docker-compose psName                    Command               State                  Ports
------------------------------------------------------------------------------------------------
home_db_1          docker-entrypoint.sh --def ...   Up      3306/tcp, 33060/tcp
home_wordpress_1   docker-entrypoint.sh apach ...   Up      0.0.0.0:8000->80/tcp,:::8000->80/tcp
关闭防火墙,通过浏览器进行访问
[root@localhost home]# systemctl stop firewalld
[root@localhost home]# setenforce 0

小结
![[密码学]OpenSSL实践篇](https://img-blog.csdnimg.cn/direct/43a9f6ebbab34d1aba6c4c52909f4ef9.png)