一、项目背景
一个Web网站程序,你可以观看到其他用户博客也可以登录自己的账号发布博客,通过使用Selenium定位web元素、操作测试对象等方法来对个人博客系统的进行测试,测试的核心内容有用户登录、博客列表及博客数量的展示、查看全文、写博客、删除博客、注销账号等,该个人博客系统可以实现个人用户简单的博客记录,时间、标题、内容以及发布者等都可以进行详细地查看。
二、测试主要任务
1.功能测试
1.1编写手工测试用例
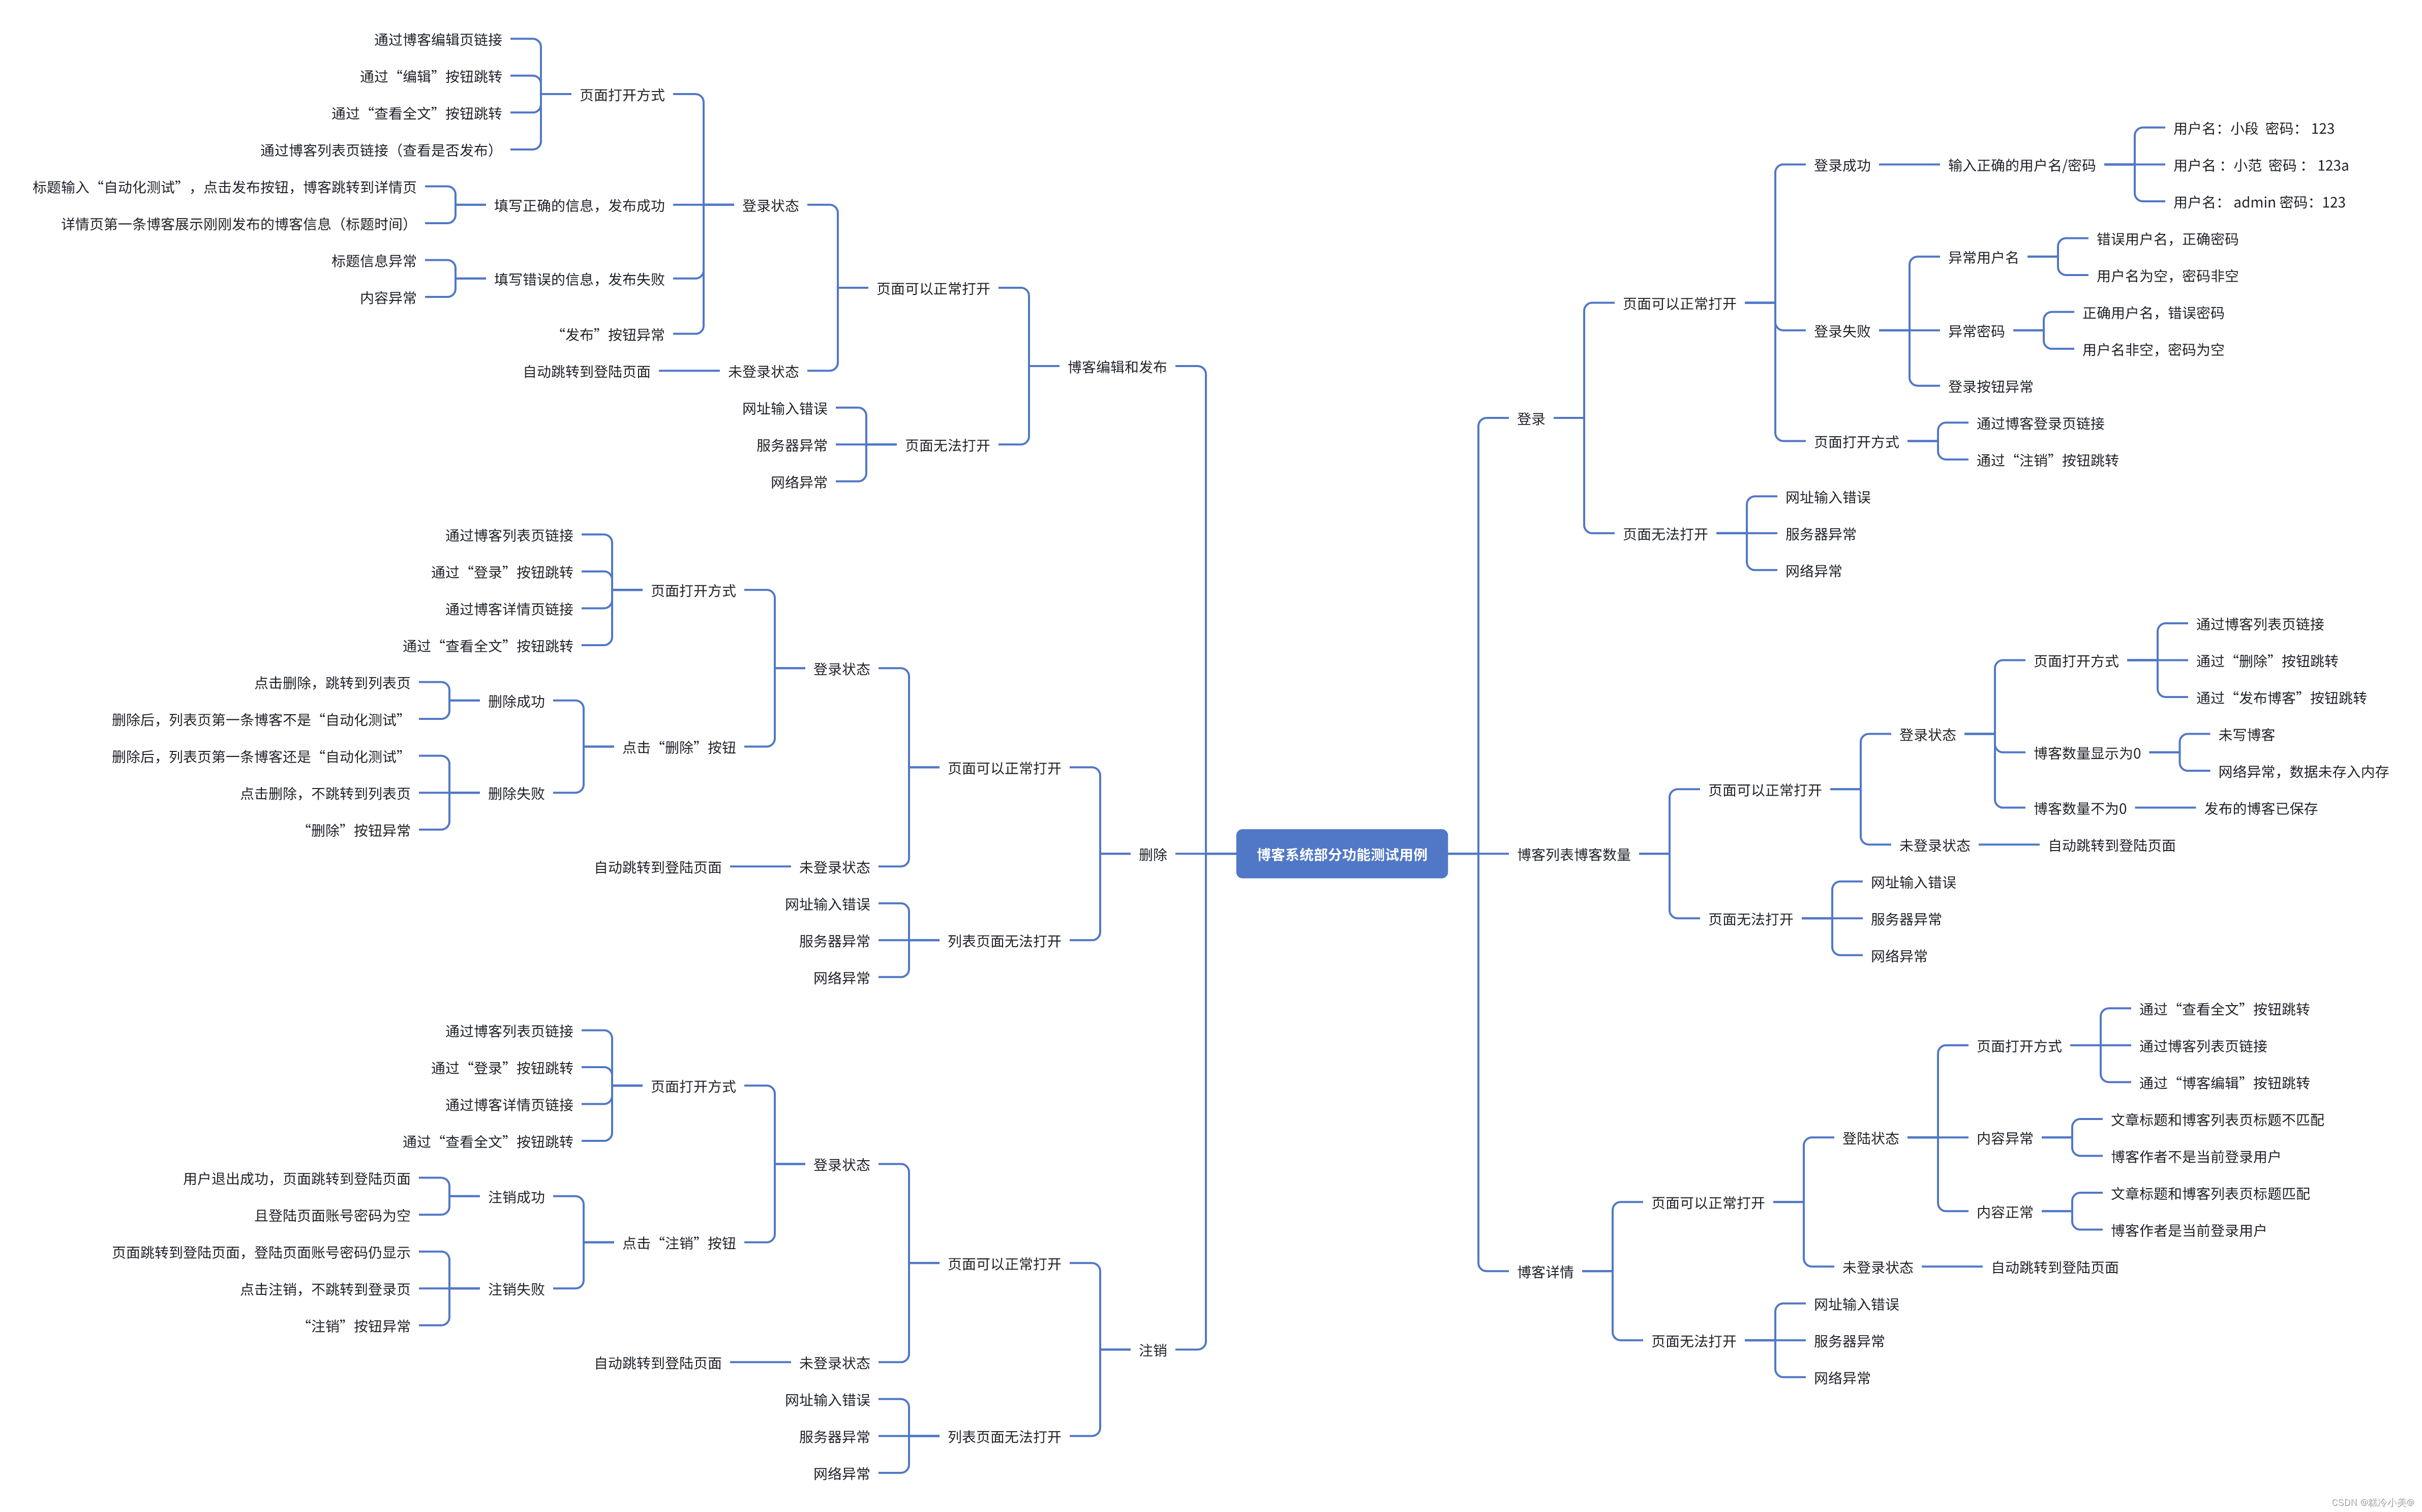
设计测试用例方法主要从 功能测试、界面测试、性能测试、兼容性测试、易用性测试、安全测试、弱网测试等七个方面进行设计,但个人博客的测试主要就是针对核心功能进行测试脑图展示如下:
1.2实际执行用例
1.2.1登录
(1)介绍
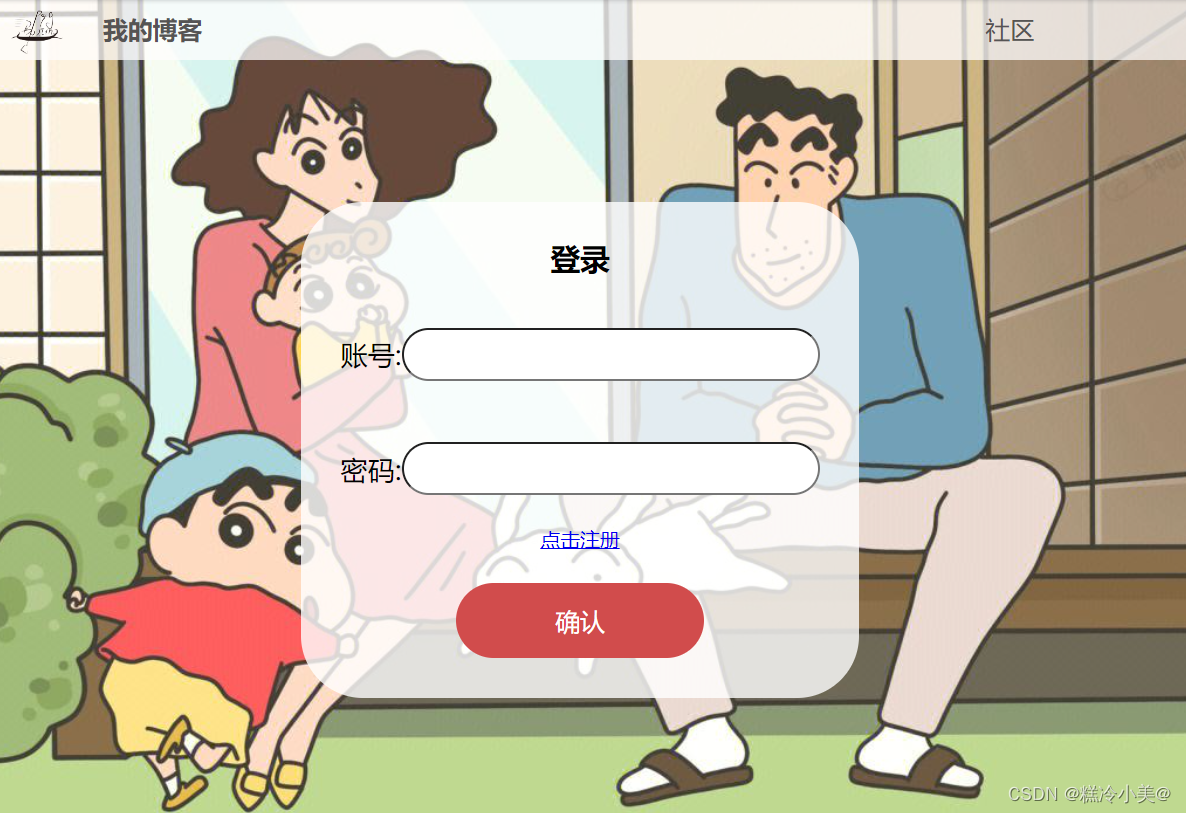
用户名以及密码已经在后端写入了数据库是已经存在的,登录成功后就会跳转到列表页面;执行用户注销操作后,也会回到登录页面。
(2)测试用例展示
a)界面
b)输入正确的账号和密码(以用户"duanxiao123"为例):
预期结果:跳转到博客列表页。
实际结果如下:

c)输入错误的账号或密码
预期结果:提示用户输入错误。
实际结果如下:

1.2.2博客列表及博客数量的展示
(1)介绍
可以在列表页(主页)查看有限数量的博客简介,其包括博客标题、发布时间以及内容概要。
(2)测试用例展示
a)列表页界面(显示博客数量不为0等)

1.2.3写博客&&发布博客
(1)介绍
在博客列表页点击“写博客”之后就会进入博客编辑页面,此时就可以进行新博客的写入。
(2)测试用例展示
a)列表页界面

b)点击“写博客按钮”,跳转到博客编辑页

c)输入标题和正文(在控制台输入js脚本)
预期结果:标题和正文都能正确写入并且没有非法字符。
实际结果:
d)发布博客
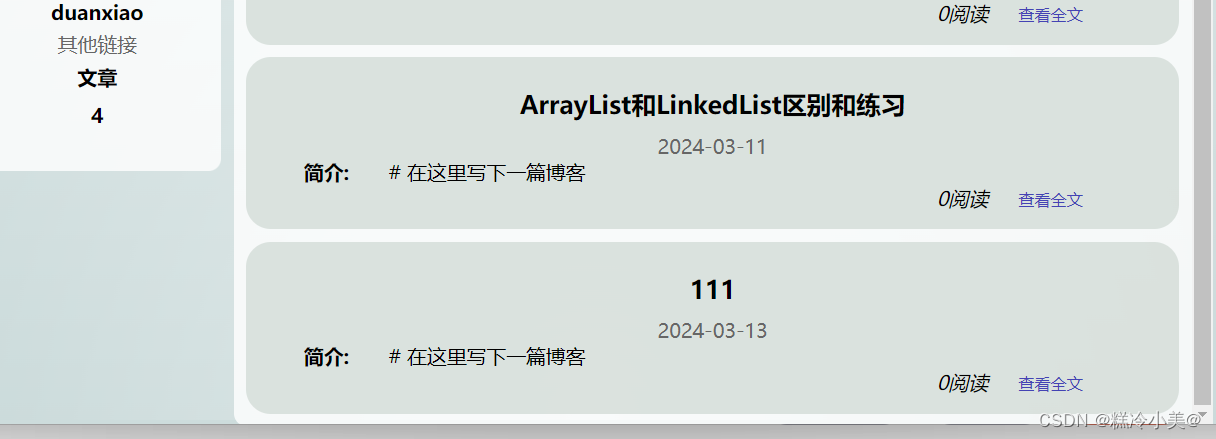
预期结果:博客发布成功并跳转到列表页在博客列表页显示文章标题和发布时间。
实际结果:
1.2.4查看全文
(1)介绍
在列表页面点击“查看全文”按钮就会跳转到详情页,此时就可以看到该篇博客的完整内容;在博客详情页也可以点击“作者主页”查看是否正常跳转。
(2)测试用例展示
a)列表页界面

b)点击第一篇博客查看全文按钮
预期结果:进入到对应的博客详情页。
实际结果:
c)点击“作者主页”按钮
预期结果:跳转到对应的博客列表页且文章数量不变。
实际结果:
1.2.5删除博客
(1)介绍
列表页界面找到一篇待删除博客点击“查看全文”按钮跳转到博客详情页,在博客详情页点击“删除按钮”跳转到对应的博客列表页且被删除文章不存在。
(2)测试用例展示
a)列表页界面

b)找到一篇待删除博客点击“查看全文”按钮
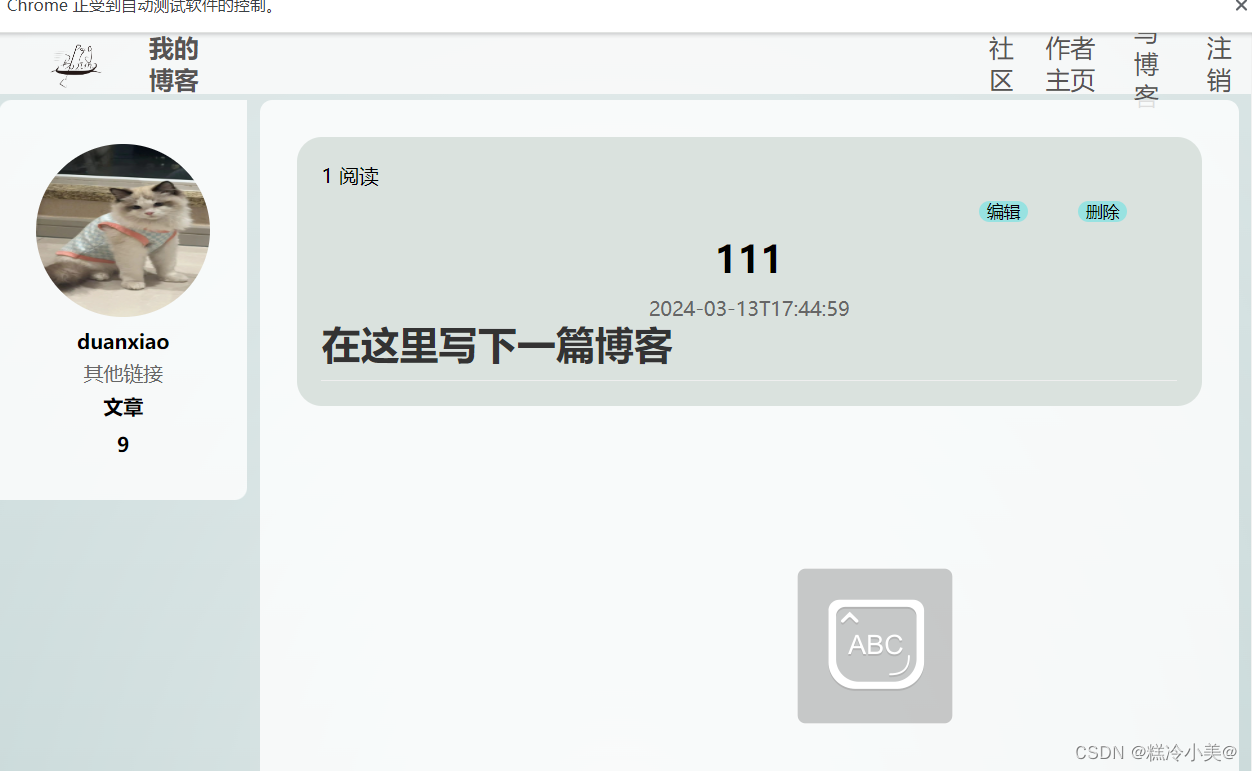
b)点击“删除”按钮
预期结果:跳转到对应的博客列表页且被删除文章不存在。
实际结果:
1.2.6注销博客
(1)介绍
在列表页面点击“注销”按钮就会跳转到博客登录页,此时用户名和密码栏数据清空,但界面可以正常使用。
(2)测试用例展示
a)列表页界面

b)点击“注销”按钮
预期结果:删除会话信息,跳转到博客登录页,且登陆页面账号密码被清空。
实际结果:
:
2.使用Selenium进行Web自动化测试
2.1引入pom.xml依赖
我们需要创建Maven项目引入如下依赖(selenium4、junit5等):
<dependencies>
<!--        添加selenium依赖--><dependency><groupId>org.seleniumhq.selenium</groupId><artifactId>selenium-java</artifactId><version>4.0.0</version></dependency><!--        添加junit5依赖--><dependency><groupId>org.junit.jupiter</groupId><artifactId>junit-jupiter</artifactId><version>5.8.2</version><scope>test</scope></dependency><dependency><groupId>org.junit.platform</groupId><artifactId>junit-platform-suite</artifactId><version>1.8.2</version><scope>test</scope></dependency></dependencies>
2.2 创建驱动和释放驱动类
创建一个驱动类(自定义名为InitAndEnd),在对博客登录页、博客列表页、博客编辑页、博客详情页,这几个页面分别进行测试时,都有一个初始化动作(创建驱动)和退出动作(退出浏览器),那么我们便可以把创建驱动和释放驱动这个操作放在一个类中,并设置驱动对象为静态的,就可以让创建和销毁驱动的步骤执行一次,其他类如果需要驱动直接继承该类。
package Blog;import org.junit.jupiter.api.AfterAll;
import org.junit.jupiter.api.BeforeAll;
import org.openqa.selenium.WebDriver;
import org.openqa.selenium.chrome.ChromeDriver;/*** Created with IntelliJ IDEA.* Description:* User: 咚咚咚咚* Date: 2024-02-27* Time: 17:31*/
public class InitAndEnd {static WebDriver webDriver;@BeforeAll//创建驱动-----初始化动作static void SetUp(){webDriver=new ChromeDriver();}
@AfterAll//退出浏览器--------退出动作static void TearDown(){webDriver.quit();
}
}
2.3创建测试套件类
创建一个测试套件类(自定义名为RunSuite),通过 @Suite 注解标识该类为测试套件类,然后使用 @SelectClasses的参数指定执行类的顺序(通过这个类来运行测试用例),通过套件一次执行所有要运行的测试用例,大大提高了效率。(本项目中对各个测试点写成了方法,放在BlogCases里;没有将测试点写成类,故没有用到测试套件,这里主要对测试套件功能做简介)
import org.junit.platform.suite.api.SelectClasses;
import org.junit.platform.suite.api.SelectPackages;
import org.junit.platform.suite.api.Suite;/*** Created with IntelliJ IDEA.* Description:* User: 咚咚咚咚* Date: 2024-02-27* Time: 16:20*/
//测试套件/*.通过class进行测试用例的运行@Suite@SelectClasses({junitTest01.class,junit5Test02.class})*///通过package进行测试用例的运行@Suite@SelectPackages(value={"Test01","Test02"})
public class RunSuite {
}
2.4博客“登录“自动化测试
①创建一个博客测试类(自定义名为BlogCases)继承AutoTestUtils类,得到驱动
②创建 LoginSuccess()方法
③在这个界面下分别对打开网页是否正常,并使用参数化注解对登录正常模块、登录异常模块分别进行测试
④使用Order注解指定测试顺序,否则可能会因为执行顺序不对导致测试失败
⑤注意清空内容后才能再次输入用户名以及密码
代码和详细注释如下:
@TestMethodOrder(MethodOrderer.OrderAnnotation.class)//指定类的执行顺序
//extends InitAndEnd让每个测试用例都有初始化和退出动作
public class BlogCases extends InitAndEnd {/**** 1.输入正确的账号密码,显示登陆成功** */@Order(1)@ParameterizedTest//参数化//例如admin和passage内容可更改,不同的用户账号密码可以进行传参来变化@CsvFileSource(resources = "LoginSuccess.csv")//@Test//表示当前是一个测试用例,有 @ParameterizedTest//参数化时不用void LoginSuccess(String username,String password,String expected_list_url,String expected_nickName) throws InterruptedException {System.out.println(username + password + expected_list_url +expected_nickName);//打开博客登录页面webDriver.get("http://122.51.27.48:8080/login.html");
//智能等待webDriver.manage().timeouts().implicitlyWait(3, TimeUnit.SECONDS);//输入用户名duanxiao123
webDriver.findElement(By.cssSelector("#userName")).sendKeys(username);webDriver.manage().timeouts().implicitlyWait(3, TimeUnit.SECONDS);
//输入passage=“123”webDriver.findElement(By.cssSelector("#password")).sendKeys(password);webDriver.manage().timeouts().implicitlyWait(3, TimeUnit.SECONDS);
//点击提交按钮webDriver.findElement(By.cssSelector("body > div.container > div > form > div:nth-child(4) > button")).click();webDriver.manage().timeouts().implicitlyWait(3, TimeUnit.SECONDS);
//跳转到列表页(断言url,断言admin)//获取到当前列表页urlsleep(5000);String currentUrl = webDriver.getCurrentUrl();webDriver.manage().timeouts().implicitlyWait(3, TimeUnit.SECONDS);System.out.println(currentUrl);//如果url=”expected_list_url“,测试通过,否则测试不通过Assertions.assertEquals(expected_list_url,currentUrl);webDriver.manage().timeouts().implicitlyWait(3, TimeUnit.SECONDS);webDriver.manage().timeouts().implicitlyWait(3, TimeUnit.SECONDS);
//获取到当前昵称名String cur_nickName=webDriver.findElement(By.cssSelector("#nickname")).getText();//获取到名称文本//如果昵称=”duanxiao“,测试通过,否则不通过Assertions.assertEquals(expected_nickName,cur_nickName);}
测试结果如下:

2.5博客”列表中博客数量“自动化测试
①在BlogCases类中添加BlogList()方法
②在这个界面下对“博客数量是否为0”进行测试
②在这个界面下对“删除博客”进行测试
②在这个方法下对“注销博客”进行测试
③使用Order注解指定测试顺序,否则可能会因为执行顺序不对导致测试失败
“博客数量是否为0”进行测试代码和详细注释如下:
/**** 博客列表页博客数量不为0** */@Order(2)@Testvoid BlogList(){//打开博客列表页webDriver.get("http://122.51.27.48:8080/list.html");String currentUrl = webDriver.getCurrentUrl();System.out.println(currentUrl);webDriver.manage().timeouts().implicitlyWait(3, TimeUnit.SECONDS);//获取列表页所有博客标题对应的元素int size = webDriver.findElements(By.cssSelector(".title")).size();//断言----如果元素数量不为0,测试通过Assertions.assertNotEquals(0,size);}“博客数量是否为0”进行测试结果如下:

2.6”写博客“&&”发布博客“自动化测试
①在BlogCases类中添加editBlog()和blod_info_checked()方法
②在这个界面下分别对打开网页是否正常、测试输入标题和正文博客是否可以正常发布、测试“写博客”按钮是否可以正常使用
③使用Order注解指定测试顺序,否则可能会因为执行顺序不对导致测试失败
代码和详细注释如下:
  @Order(3)@Testvoid editBlog() throws InterruptedException {//找到写博客按钮并点击webDriver.findElement(By.cssSelector("body > div.nav > a:nth-child(5)")).click();webDriver.manage().timeouts().implicitlyWait(3, TimeUnit.SECONDS);//找到输入框webDriver.findElement(By.cssSelector("#title"));// 输入标题(通过js将标题进行输入)webdriver需强制类型转换( (JavascriptExecutor)webDriver ).executeScript("document.getElementById(\"title\").value=\"111\"");sleep(3000);//点击发布webDriver.findElement(By.cssSelector("body > div.edit-container > div.edit-title > button")).click();
//sleep(3000);webDriver.manage().timeouts().implicitlyWait(3, TimeUnit.SECONDS);webDriver.switchTo().alert().accept();sleep(3000);webDriver.switchTo().alert().dismiss();((JavascriptExecutor) webDriver).executeScript("document.documentElement.scrollTop=1000000");//获取当前页面url进行断言String currentUrl = webDriver.getCurrentUrl();System.out.println(currentUrl);Assertions.assertEquals("http://122.51.27.48:8080/list.html",currentUrl);}/*** 校验是否发布成功(校验已发布博客的标题和时间)**/@Order(4)@Testvoid blod_info_checked() throws InterruptedException {webDriver.get("http://122.51.27.48:8080/list.html");webDriver.manage().timeouts().implicitlyWait(3, TimeUnit.SECONDS);((JavascriptExecutor) webDriver).executeScript("document.documentElement.scrollTop=1000000");webDriver.manage().timeouts().implicitlyWait(3, TimeUnit.SECONDS);
//校验已发布博客的标题String new_text = webDriver.findElement(By.cssSelector("#blogDiv > div:nth-child(5) > div.title")).getText();//校验已发布博客的时间sleep(3000);String new_time = webDriver.findElement(By.cssSelector("#blogDiv > div:nth-child(5) > div.date")).getText();Assertions.assertEquals("111",new_text);Assertions.assertEquals("2024-03-13",new_time);if(new_time.contains("2024-03-12")){System.out.println("测试通过");}else{System.out.println("测试不通过");System.out.println(new_time);}}
测试结果如下:

2.7”查看全文“自动化测试
①在BlogCases类中添加blogDetail()方法
②在这个界面下分别对打开网页是否正常、点击”查看全文“按钮是否可以正常跳转进行测试
③使用Order注解指定测试顺序,否则可能会因为执行顺序不对导致测试失败
代码和详细注释如下:
@Order(5)@ParameterizedTest
@MethodSource("Generator")void blogDetail(String expected_url,String expected_blog_titile,String expected_title) throws InterruptedException {webDriver.get("http://122.51.27.48:8080/list.html");webDriver.manage().timeouts().implicitlyWait(3, TimeUnit.SECONDS);//找到第一篇博客对应的查看全文按钮webDriver.findElement(By.cssSelector("#blogDiv > div:nth-child(1) > div.viewRow > a")).click();sleep(3000);//获取当前页面的url+校验String cur_url = webDriver.getCurrentUrl();System.out.println(cur_url);Assertions.assertEquals(expected_url,cur_url);//获取博客标题+校验sleep(3000);String cur_blog_title=webDriver.findElement(By.cssSelector("#title")).getText();System.out.println(cur_blog_title);Assertions.assertEquals(expected_blog_titile,cur_blog_title );if(cur_url.contains("cur_blog_title")){System.out.println("测试通过");}else{System.out.println("测试不通过");}//获取当前页面title(博客详情页)+校验String cur_title = webDriver.getTitle();System.out.println(cur_title);Assertions.assertEquals(expected_title,cur_title );}
测试结果如下:

2.8”删除“自动化测试
①在BlogCases类中添加blogDeleted() 方法
②在这个界面下分别对打开网页是否正常、点击”删除“按钮是否可以正常跳转进行测试
③使用Order注解指定测试顺序,否则可能会因为执行顺序不对导致测试失败
“删除按钮”进行测试代码和详细注释如下:
@Order(6)// @Testvoid blogDeleted() throws InterruptedException {//获取博客列表页面webDriver.get("http://122.51.27.48:8080/list.html");webDriver.manage().timeouts().implicitlyWait(3, TimeUnit.SECONDS);//点击第一篇博客的查看全文按钮webDriver.findElement(By.cssSelector("#blogDiv > div:nth-child(4) > div.viewRow > a")).click();webDriver.manage().timeouts().implicitlyWait(3, TimeUnit.SECONDS);//点击删除按钮webDriver.findElement(By.cssSelector("#blog > div.two > button:nth-child(2)")).click();webDriver.manage().timeouts().implicitlyWait(3, TimeUnit.SECONDS);webDriver.switchTo().alert().accept();sleep(3000);webDriver.switchTo().alert().accept();webDriver.manage().timeouts().implicitlyWait(3, TimeUnit.SECONDS);String currentUrl = webDriver.getCurrentUrl();sleep(3000);/* String text = webDriver.findElement(By.cssSelector("#blogDiv > div:nth-child(11) > div.title")).getText();//校验:返回到博客列表页面,如果第一篇博客标题不是”自动化测试“,测试通过Assertions.assertEquals("http://122.51.27.48:8080/list.html",currentUrl);Assertions.assertNotEquals("自动化测试",text);*/if(currentUrl.contains("111")){System.out.println("测试不通过");}else{System.out.println("测试通过");}
}“删除按钮”进行测试结果如下:

2.9”注销“自动化测试
①在BlogCases类中添加Logout()方法
②在这个界面下分别对打开网页是否正常、点击”删除“按钮是否可以正常跳转进行测试
③使用Order注解指定测试顺序,否则可能会因为执行顺序不对导致测试失败
“注销按钮”进行测试代码和详细注释如下:
@Order(7)@Testvoid Logout() throws InterruptedException {//获取博客列表页面webDriver.get("http://122.51.27.48:8080/list.html");webDriver.manage().timeouts().implicitlyWait(3, TimeUnit.SECONDS);//找到注销按钮webDriver.findElement(By.cssSelector("body > div.nav > a:nth-child(6)")).click();
webDriver.manage().timeouts().implicitlyWait(3,TimeUnit.SECONDS);
webDriver.switchTo().alert().accept();
//校验urlsleep(3000);String cur_url= webDriver.getCurrentUrl();Assertions.assertEquals(cur_url,"http://122.51.27.48:8080/login.html");//校验提交按钮WebElement element = webDriver.findElement(By.cssSelector("body > div.container > div > form > div:nth-child(4) > button"));Assertions.assertNotNull(element);}“注销按钮”进行测试结果如下:

3.自动化测试特点与亮点
特点:
根据个人项目来设计的测试用例,然后根据测试用例使用selenium4自动化测试工具和junit5单元测试框架结合来实现web自动化测试的(功能、步骤、技术一定要明确)
亮点:
1.只创建一次驱动,避免每个用例重复创建驱动造成时间和资源的浪费。
2.使用参数化,保持用例的整洁,提高代码的可读性。
3.使用隐式等待,提高了自动化运行效率,提高了自动化的稳定性。
4. 使用了JUnit5中提供的注解:避免生成过多的对象,造成资源和时间的浪费,提高了自动化的执行效率。
4. 测试中遇到的bug及原因
隐式等待有时会改变代码执行顺序出现报错,可加入强制等待,确保页面加载完成,提高自动化的稳定性。
