欢迎来到Cefler的博客😁
🕌博客主页:折纸花满衣
🏠个人专栏:信号量和线程池

目录
- 👉🏻日志代码
- Log.cpp
- Main.cc
- 👉🏻线程池代码
- LockGuard.hpp(自定义互斥锁,进行加锁和解锁)
- Thread.hpp
- Task.hpp(安排线程任务)
- ThreadPool.hpp
- 👉🏻读写锁和自旋锁
- c++读写锁实现伪代码
- c++自旋锁实现伪代码
👉🏻日志代码
Log.cpp
#define _CRT_SECURE_NO_WARNINGS 1
#pragma once#include <iostream>
#include <fstream>
#include <string>
#include <cstdarg>
#include <ctime>
#include <unistd.h>
#include <sys/types.h>
#include <sys/stat.h>
#include <fcntl.h>using namespace std;
enum
{Debug = 0,Info,Warning,Error,Fatal
};enum
{Screen = 10,//向显示器OneFile,ClassFile
};std::string LevelToString(int level)
{switch (level){case Debug:return "Debug";case Info:return "Info";case Warning:return "Warning";case Error:return "Error";case Fatal:return "Fatal";default:return "Unknown";}
}const int defaultstyle = Screen;
const std::string default_filename = "log.";
const std::string logdir = "log";class Log
{
public:Log() : style(defaultstyle), filename(default_filename){mkdir(logdir.c_str(), 0775);}void Enable(int sty) //{style = sty;}std::string TimeStampExLocalTime(){time_t currtime = time(nullptr);struct tm* curr = localtime(&currtime);char time_buffer[128];snprintf(time_buffer, sizeof(time_buffer), "%d-%d-%d %d:%d:%d",curr->tm_year + 1900, curr->tm_mon + 1, curr->tm_mday,curr->tm_hour, curr->tm_min, curr->tm_sec);return time_buffer;}void WriteLogToOneFile(const std::string& logname, const std::string& message){umask(0);int fd = open(logname.c_str(), O_CREAT | O_WRONLY | O_APPEND, 0666);if (fd < 0) return;write(fd, message.c_str(), message.size());close(fd);// std::ofstream out(logname);// if (!out.is_open())//     return;// out.write(message.c_str(), message.size());// out.close();}void WriteLogToClassFile(const std::string& levelstr, const std::string& message){std::string logname = logdir;logname += "/";logname += filename;logname += levelstr;WriteLogToOneFile(logname, message);}void WriteLog(const std::string& levelstr, const std::string& message){switch (style){case Screen:std::cout << message;break;case OneFile:WriteLogToClassFile("all", message);break;case ClassFile:WriteLogToClassFile(levelstr, message);break;default:break;}}void LogMessage(int level, const char* format, ...) // 类C的一个日志接口{char leftbuffer[1024];std::string levelstr = LevelToString(level);std::string currtime = TimeStampExLocalTime();std::string idstr = std::to_string(getpid());char rightbuffer[1024];va_list args; // char *, void *va_start(args, format);// args 指向了可变参数部分vsnprintf(rightbuffer, sizeof(rightbuffer), format, args);va_end(args); // args = nullptr;snprintf(leftbuffer, sizeof(leftbuffer), "[%s][%s][%s] ",levelstr.c_str(), currtime.c_str(), idstr.c_str());std::string loginfo = leftbuffer;loginfo += rightbuffer;WriteLog(levelstr, loginfo);}// void operator()(int level, const char *format, ...)// {//     LogMessage(int level, const char *format, ...)// }~Log() {}private:int style;std::string filename;
};Log lg;class Conf
{
public:Conf(){lg.Enable(Screen);}~Conf(){}
};Conf conf;
Main.cc
#include <iostream>
#include "Log.hpp"int main()
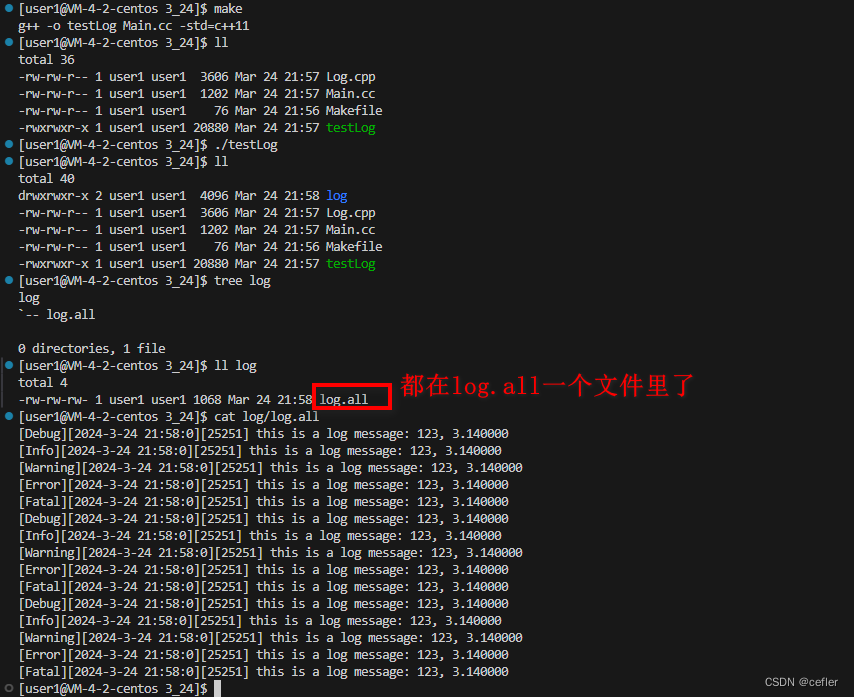
{Log lg;lg.Enable(OneFile);lg.LogMessage(Debug, "this is a log message: %d, %lf\n", 123, 3.14);lg.LogMessage(Info, "this is a log message: %d, %lf\n", 123, 3.14);lg.LogMessage(Warning, "this is a log message: %d, %lf\n", 123, 3.14);lg.LogMessage(Error, "this is a log message: %d, %lf\n", 123, 3.14);lg.LogMessage(Fatal, "this is a log message: %d, %lf\n", 123, 3.14);lg.LogMessage(Debug, "this is a log message: %d, %lf\n", 123, 3.14);lg.LogMessage(Info, "this is a log message: %d, %lf\n", 123, 3.14);lg.LogMessage(Warning, "this is a log message: %d, %lf\n", 123, 3.14);lg.LogMessage(Error, "this is a log message: %d, %lf\n", 123, 3.14);lg.LogMessage(Fatal, "this is a log message: %d, %lf\n", 123, 3.14);lg.LogMessage(Debug, "this is a log message: %d, %lf\n", 123, 3.14);lg.LogMessage(Info, "this is a log message: %d, %lf\n", 123, 3.14);lg.LogMessage(Warning, "this is a log message: %d, %lf\n", 123, 3.14);lg.LogMessage(Error, "this is a log message: %d, %lf\n", 123, 3.14);lg.LogMessage(Fatal, "this is a log message: %d, %lf\n", 123, 3.14);return 0;
}
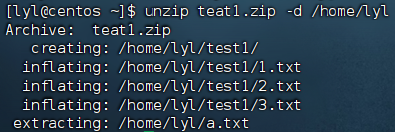
上述我们是将内容写进一个文件夹里lg.Enable(OneFile);
我们看结果:
👉🏻线程池代码
LockGuard.hpp(自定义互斥锁,进行加锁和解锁)
#pragma once#include <pthread.h>// 不定义锁,默认认为外部会给我们传入锁对象
class Mutex
{
public:Mutex(pthread_mutex_t *lock):_lock(lock){}void Lock(){pthread_mutex_lock(_lock);}void Unlock(){pthread_mutex_unlock(_lock);}~Mutex(){}private:pthread_mutex_t *_lock;
};class LockGuard
{
public:LockGuard(pthread_mutex_t *lock): _mutex(lock){_mutex.Lock();}~LockGuard(){_mutex.Unlock();}
private:Mutex _mutex;
};
Thread.hpp
#pragma once#include <iostream>
#include <string>
#include <functional>
#include <pthread.h>// 设计方的视角
//typedef std::function<void()> func_t;
template<class T>
using func_t = std::function<void(T&)>;template<class T>
class Thread
{
public:Thread(const std::string &threadname, func_t<T> func, T &data):_tid(0), _threadname(threadname), _isrunning(false), _func(func), _data(data){}static void *ThreadRoutine(void *args) // 类内方法,{// (void)args; // 仅仅是为了防止编译器有告警Thread *ts = static_cast<Thread *>(args);ts->_func(ts->_data);return nullptr;}bool Start(){int n = pthread_create(&_tid, nullptr, ThreadRoutine, this/*?*/);if(n == 0) {_isrunning = true;return true;}else return false;}bool Join(){if(!_isrunning) return true;int n = pthread_join(_tid, nullptr);if(n == 0){_isrunning = false;return true;}return false;}std::string ThreadName(){return _threadname;}bool IsRunning(){return _isrunning;}~Thread(){}
private:pthread_t _tid;std::string _threadname;bool _isrunning;func_t<T> _func;T _data;
};
Task.hpp(安排线程任务)
#pragma once
#include <iostream>
#include <string>
#include <unistd.h>const int defaultvalue = 0;enum
{ok = 0,div_zero,mod_zero,unknow
};const std::string opers = "+-*/%";class Task
{
public:Task(){}Task(int x, int y, char op): data_x(x), data_y(y), oper(op), result(defaultvalue), code(ok){}void Run(){switch (oper){case '+':result = data_x + data_y;break;case '-':result = data_x - data_y;break;case '*':result = data_x * data_y;break;case '/':{if (data_y == 0)code = div_zero;elseresult = data_x / data_y;}break;case '%':{if (data_y == 0)code = mod_zero;elseresult = data_x % data_y;}break;default:code = unknow;break;}}void operator()(){Run();}std::string PrintTask(){std::string s;s = std::to_string(data_x);s += oper;s += std::to_string(data_y);s += "=?";return s;}std::string PrintResult(){std::string s;s = std::to_string(data_x);s += oper;s += std::to_string(data_y);s += "=";s += std::to_string(result);s += " [";s += std::to_string(code);s += "]";return s;}~Task(){}private:int data_x;int data_y;char oper; // + - * / %int result;int code; // 结果码,0: 结果可信 !0: 结果不可信,1,2,3,4
};
ThreadPool.hpp
#pragma once#include <iostream>
#include <queue>
#include <vector>
#include <pthread.h>
#include <functional>
#include "Log.hpp"
#include "Thread.hpp"
#include "LockGuard.hpp"static const int defaultnum = 5;class ThreadData
{
public:ThreadData(const std::string &name) : threadname(name){}~ThreadData(){}public:std::string threadname;
};template <class T>
class ThreadPool
{
private:ThreadPool(int thread_num = defaultnum) : _thread_num(thread_num){pthread_mutex_init(&_mutex, nullptr);//互斥锁初始化pthread_cond_init(&_cond, nullptr);//条件变量初始化// 构建指定个数的线程for (int i = 0; i < _thread_num; i++){// 待优化std::string threadname = "thread-";threadname += std::to_string(i + 1);ThreadData td(threadname);// Thread<ThreadData> t(threadname,//                      std::bind(&ThreadPool<T>::ThreadRun, this, std::placeholders::_1), td);// _threads.push_back(t);_threads.emplace_back(threadname,std::bind(&ThreadPool<T>::ThreadRun, this,std::placeholders::_1),td);//emplace_back函数直接在容器的末尾就地构造一个新的元素(直接构造),而不是先创建一个临时对象lg.LogMessage(Info, "%s is created...\n", threadname.c_str());//打印日志}}ThreadPool(const ThreadPool<T> &tp) = delete;const ThreadPool<T> &operator=(const ThreadPool<T>) = delete;public:// 有线程安全问题的(单例模式-懒汉模式):在懒汉模式下,单例实例在第一次使用时才被创建//线程不安全是因为会有多个线程进行创建实例static ThreadPool<T> *GetInstance(){if (instance == nullptr){LockGuard lockguard(&sig_lock);//为了规避线程不安全情况,要进行加锁操作if (instance == nullptr){lg.LogMessage(Info, "创建单例成功...\n");instance = new ThreadPool<T>();}}return instance;}bool Start(){// 启动for (auto &thread : _threads){thread.Start();lg.LogMessage(Info, "%s is running ...\n", thread.ThreadName().c_str());}return true;}void ThreadWait(const ThreadData &td)//线程等待{lg.LogMessage(Debug, "no task, %s is sleeping...\n", td.threadname.c_str());pthread_cond_wait(&_cond, &_mutex);}void ThreadWakeup()//唤醒线程{pthread_cond_signal(&_cond);}void checkSelf(){// 1. _task_num > _task_num_high_water && _thread_num < _thread_num_high_water// 创建更多的线程,并且更新_thread_num// 2. _task_num == _task_num_low_water && _thread_num >= _thread_num_high_water// 把自己退出了,并且更新_thread_num}void ThreadRun(ThreadData &td)//线程执行{while (true){// checkSelf()checkSelf();// 取任务T t;{LockGuard lockguard(&_mutex);while (_q.empty()){ThreadWait(td);//执行队列如果为空,则让当前线程进行等待lg.LogMessage(Debug, "thread %s is wakeup\n", td.threadname.c_str());//若执行到这一步,说明线程以及被唤醒}t = _q.front();_q.pop();}// 处理任务t();lg.LogMessage(Debug, "%s handler task %s done, result is : %s\n",td.threadname, t.PrintTask().c_str(), t.PrintResult().c_str());}}void Push(T &in){lg.LogMessage(Debug, "other thread push a task, task is : %s\n", in.PrintTask().c_str());LockGuard lockguard(&_mutex);_q.push(in);ThreadWakeup();}~ThreadPool(){pthread_mutex_destroy(&_mutex);pthread_cond_destroy(&_cond);}// for debugvoid Wait(){for (auto &thread : _threads){thread.Join();}}private:std::queue<T> _q;std::vector<Thread<ThreadData>> _threads;int _thread_num;pthread_mutex_t _mutex;pthread_cond_t _cond;static ThreadPool<T> *instance;static pthread_mutex_t sig_lock;// 扩展1:// int _thread_num;// int _task_num;// int _thread_num_low_water;  // 3// int _thread_num_high_water; // 10// int _task_num_low_water;    // 0// int _task_num_high_water;   // 30// 扩展2: 多进程+多线程// int number{1};
};template <class T>
ThreadPool<T> *ThreadPool<T>::instance = nullptr;
template <class T>
pthread_mutex_t ThreadPool<T>::sig_lock = PTHREAD_MUTEX_INITIALIZER;
👉🏻读写锁和自旋锁
当多个线程尝试同时访问共享资源时,为了保证数据的一致性,需要使用锁来实现同步。读加锁和自旋锁都是常见的锁机制,用于控制对共享资源的访问。
-
读加锁(Read Lock):
- 读加锁允许多个线程同时对共享资源进行读取操作,但不允许写操作。
- 当一个线程获取了读锁后,其他线程可以继续获取读锁,但不能获取写锁,直到所有的读锁都被释放。
- 读锁之间不会互斥,可以同时存在多个读锁。
- 读锁适用于读操作频繁,写操作较少的场景,可以提高并发读取效率。
-
自旋锁(Spin Lock):
- 自旋锁是一种忙等待的锁机制,当一个线程尝试获取锁时,如果锁已经被其他线程占用,该线程会循环检测锁是否被释放,而不是进入睡眠状态。
- 自旋锁适用于对共享资源的访问时间非常短的情况,避免了线程频繁切换和上下文切换的开销。
- 自旋锁在多核处理器上效果更好,因为在等待锁的过程中可以利用处理器时间进行自旋操作,提高效率。
总的来说,读加锁适合读操作频繁的场景,而自旋锁适合对共享资源访问时间短、线程并发量不高的场景。选择合适的锁机制可以提高程序的并发性能和效率。
c++读写锁实现伪代码
读写锁(Read-Write Lock)是一种多线程同步机制,允许多个线程同时对共享资源进行读取操作,但在进行写操作时需要互斥排他。它的设计目的是在读操作频繁、写操作较少的场景下提高并发性能。
读写锁通常包括两种状态:读模式和写模式。
- 读模式:多个线程可以同时获取读锁,以便并发地读取共享资源。
- 写模式:当一个线程获取写锁时,其他线程无法同时获取读锁或写锁,确保写操作的互斥性。
与互斥锁不同,读写锁允许多个线程同时持有读锁,这样可以提高并发性能。只有当有线程持有写锁时,其他线程才不能获取读锁或写锁。
读写锁的使用场景通常是在数据的读操作远远多于写操作的情况下,通过允许并发读取来提高性能。然而,如果写操作频繁,读写锁可能会失去优势,因为写操作会阻塞所有的读操作。
在C++中,可以使用 std::shared_mutex 来实现读写锁的功能,通过 lock_shared() 获取读锁,通过 lock() 获取写锁,实现对共享资源的安全访问。
#include <iostream>
#include <thread>
#include <mutex>std::mutex mtx;
int sharedData = 0;void writer() {mtx.lock(); // 加锁sharedData++; // 写操作std::cout << "Writer updated data to: " << sharedData << std::endl;mtx.unlock(); // 解锁
}int main() {std::thread writerThread1(writer);std::thread writerThread2(writer);writerThread1.join();writerThread2.join();return 0;
}
c++自旋锁实现伪代码
C++11 提供的原子操作来实现自旋锁
#include <atomic>class SpinLock {
public:void lock() {while (locked.test_and_set(std::memory_order_acquire)) {// 自旋等待锁释放}}void unlock() {locked.clear(std::memory_order_release);}private:std::atomic_flag locked = ATOMIC_FLAG_INIT;
};如上便是本期的所有内容了,如果喜欢并觉得有帮助的话,希望可以博个点赞+收藏+关注🌹🌹🌹❤️ 🧡 💛,学海无涯苦作舟,愿与君一起共勉成长


![[BT]BUUCTF刷题第6天(3.24)](https://img-blog.csdnimg.cn/direct/a0b2b2c123d146f0bf6c1177fe622ab0.png)