我们知道Netty框架是基于NIO网络编程模型实现的,本篇文章就基于NIO的启动流程来剖析Netty启动流程的源码
NIO启动流程
首先我们先来看一下NIO的启动流程
//1 netty 中使用 NioEventLoopGroup (简称 nio boss 线程)来封装线程和 selector
Selector selector = Selector.open(); //2 创建 NioServerSocketChannel,同时会初始化它关联的 handler,以及为原生 ssc 存储 config
NioServerSocketChannel attachment = new NioServerSocketChannel();//3 创建 NioServerSocketChannel 时,创建了 java 原生的 ServerSocketChannel
ServerSocketChannel serverSocketChannel = ServerSocketChannel.open();
serverSocketChannel.configureBlocking(false);//4 启动 nio boss 线程执行接下来的操作//5 注册(仅关联 selector 和 NioServerSocketChannel),未关注事件
SelectionKey selectionKey = serverSocketChannel.register(selector, 0, attachment);//6 head -> 初始化器 -> ServerBootstrapAcceptor -> tail,初始化器是一次性的,只为添加 acceptor//7 绑定端口
serverSocketChannel.bind(new InetSocketAddress(8080));//8 触发 channel active 事件,在 head 中关注 op_accept 事件
selectionKey.interestOps(SelectionKey.OP_ACCEPT);
我们剖析Netty启动流程就是分析一下Netty中对上面的代码是如何处理的。
Netty启动流程剖析
我们以一段简单的Netty服务端代码为例
package cn.kjz.source;import io.netty.bootstrap.ServerBootstrap;
import io.netty.channel.ChannelInitializer;
import io.netty.channel.ChannelOption;
import io.netty.channel.nio.NioEventLoopGroup;
import io.netty.channel.socket.nio.NioServerSocketChannel;
import io.netty.channel.socket.nio.NioSocketChannel;
import io.netty.handler.logging.LoggingHandler;public class TestSourceServer {public static void main(String[] args) {new ServerBootstrap().group(new NioEventLoopGroup()).channel(NioServerSocketChannel.class).childHandler(new ChannelInitializer<NioSocketChannel>() {@Overrideprotected void initChannel(NioSocketChannel ch) {ch.pipeline().addLast(new LoggingHandler());}}).bind(8080);}
}
NIO中的Selector selector = Selector.open();就封装在new NioEventLoopGroup()这个类中,NioEventLoopGroup这个类本文就不展开分析了,后面会有详细的博文分析。

在此处打个断点debug运行一下。
F7进入到断点处,我在这里打了三个断点,分别对应了NIO中的几个重要步骤,下面我来详细说明一下。
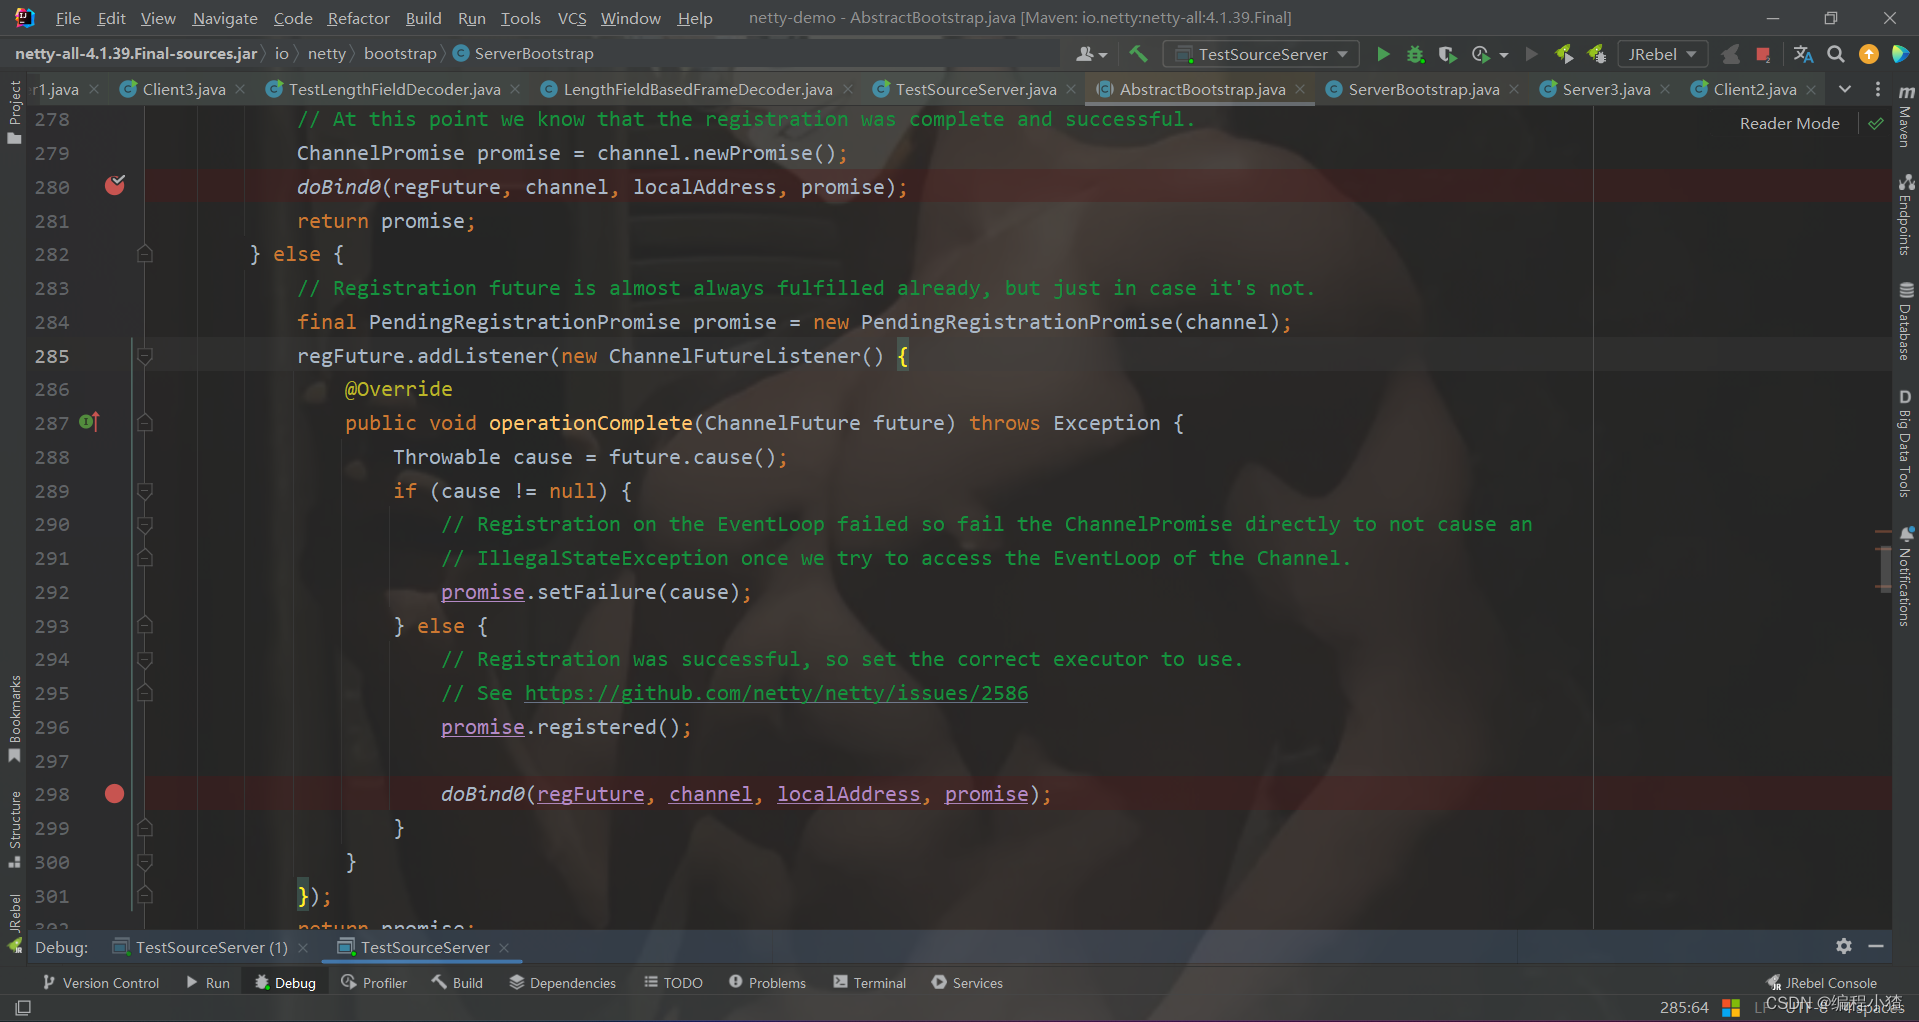
分析代码我们可以得出第一个断点处执行的代码就相当于创建 java 原生的ServerSocketChannel ServerSocketChannel serverSocketChannel = ServerSocketChannel.open();对应方法的init,把serverSocketChannel注册到selector上, SelectionKey selectionKey = serverSocketChannel.register(selector, 0, attachment);对应方法的Register。剩下的两个断点就是对应的绑定端口serverSocketChannel.bind(new InetSocketAddress(8080));我们可以看到第一个断点的方法返回的对象是ChannelFuture,这个过程是非阻塞的,如果regFuture.isDone(),就是注册完成比较快,会调用第二个断点处的方法,否则就会进入到第三个断点处。在第三个断点处是将绑定端口的任务交给了其他线程去完成,这个线程就是NIO线程。
private ChannelFuture doBind(final SocketAddress localAddress) {// 1. 执行初始化和注册 regFuture 会由 initAndRegister 设置其是否完成,从而回调 3.2 处代码final ChannelFuture regFuture = initAndRegister();final Channel channel = regFuture.channel();if (regFuture.cause() != null) {return regFuture;}// 2. 因为是 initAndRegister 异步执行,需要分两种情况来看,调试时也需要通过 suspend 断点类型加以区分// 2.1 如果已经完成if (regFuture.isDone()) {ChannelPromise promise = channel.newPromise();// 3.1 立刻调用 doBind0doBind0(regFuture, channel, localAddress, promise);return promise;} // 2.2 还没有完成else {final PendingRegistrationPromise promise = new PendingRegistrationPromise(channel);// 3.2 回调 doBind0regFuture.addListener(new ChannelFutureListener() {@Overridepublic void operationComplete(ChannelFuture future) throws Exception {Throwable cause = future.cause();if (cause != null) {// 处理异常...promise.setFailure(cause);} else {promise.registered();// 3. 由注册线程去执行 doBind0doBind0(regFuture, channel, localAddress, promise);}}});return promise;}
}接下来我们先进入到initAndRegister()方法中。
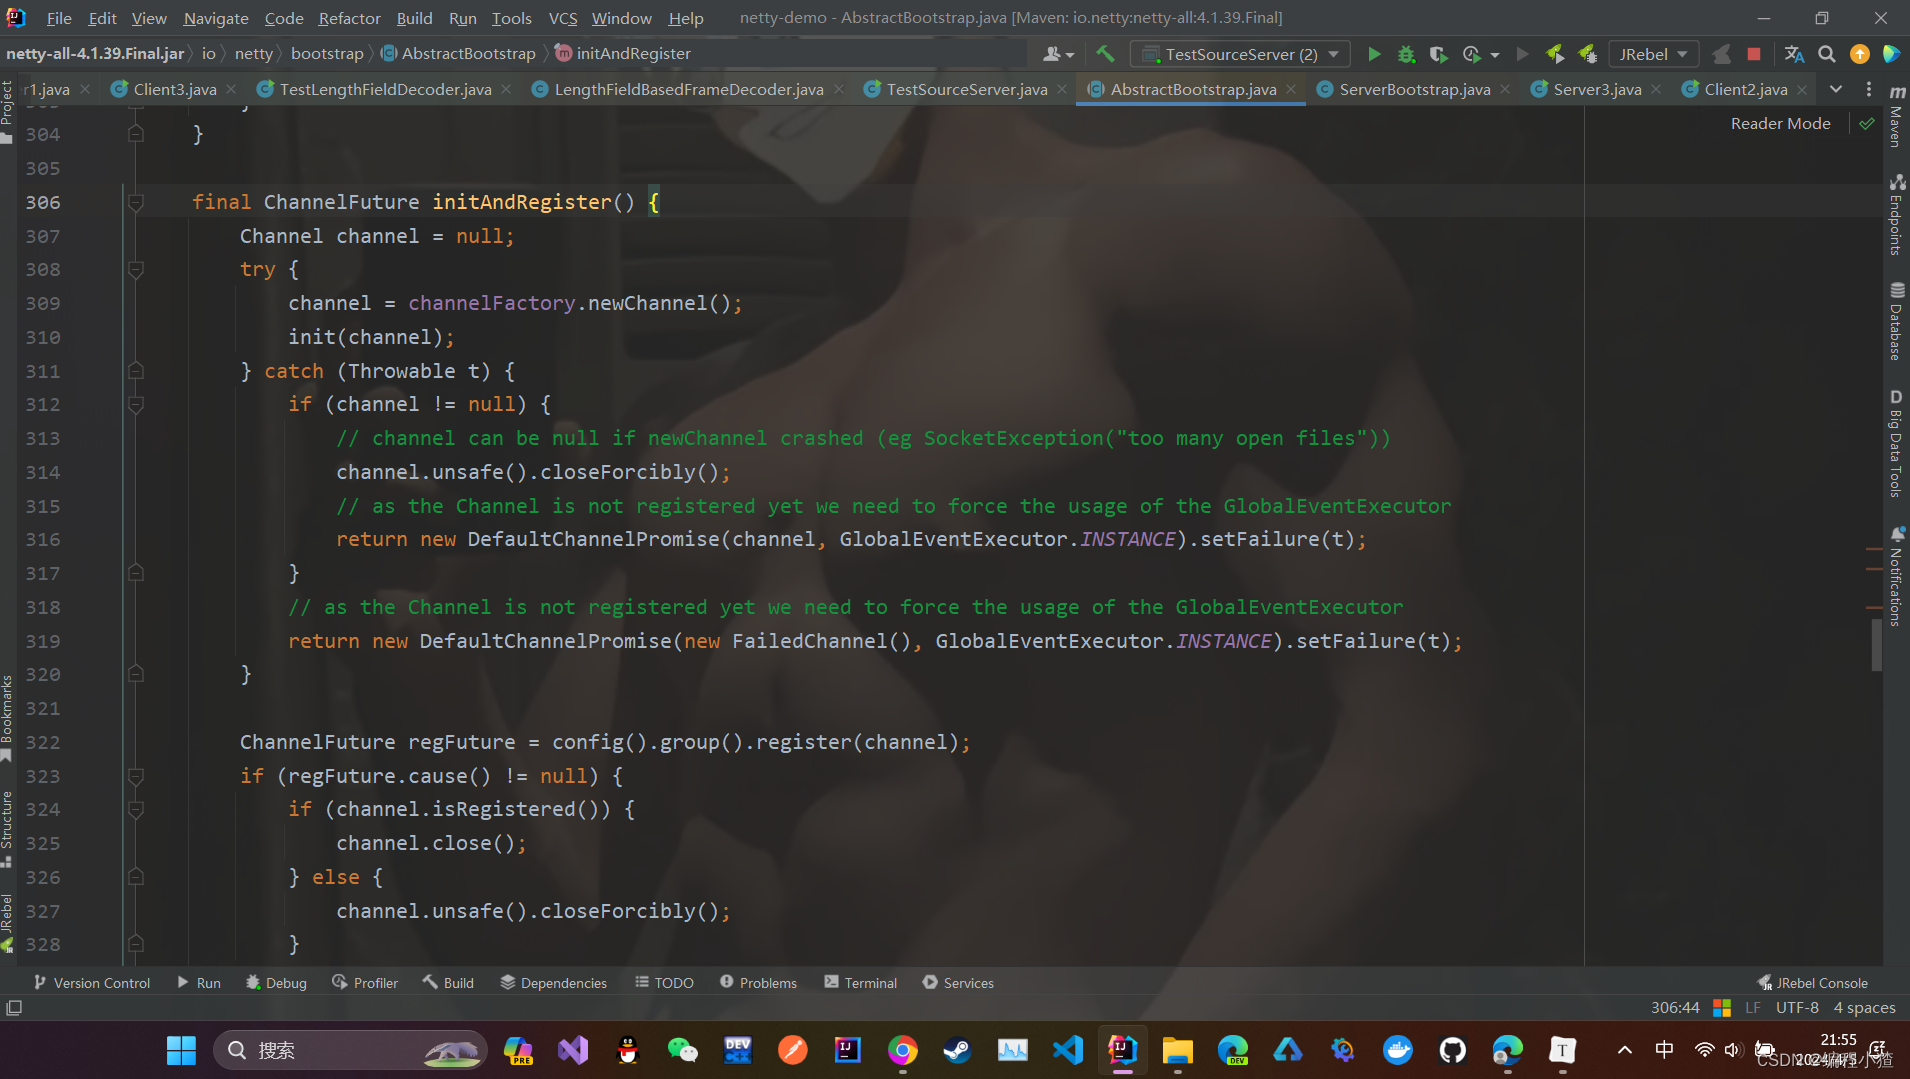
关键代码如下:
final ChannelFuture initAndRegister() {Channel channel = null;try {channel = channelFactory.newChannel();// 1.1 初始化 - 做的事就是添加一个初始化器 ChannelInitializerinit(channel);} catch (Throwable t) {// 处理异常...return new DefaultChannelPromise(new FailedChannel(), GlobalEventExecutor.INSTANCE).setFailure(t);}// 1.2 注册 - 做的事就是将原生 channel 注册到 selector 上ChannelFuture regFuture = config().group().register(channel);if (regFuture.cause() != null) {// 处理异常...}return regFuture;
}
先创建了channel,channel = channelFactory.newChannel();那么是怎么创建的channel呢?我们进入到这个方法去看一下
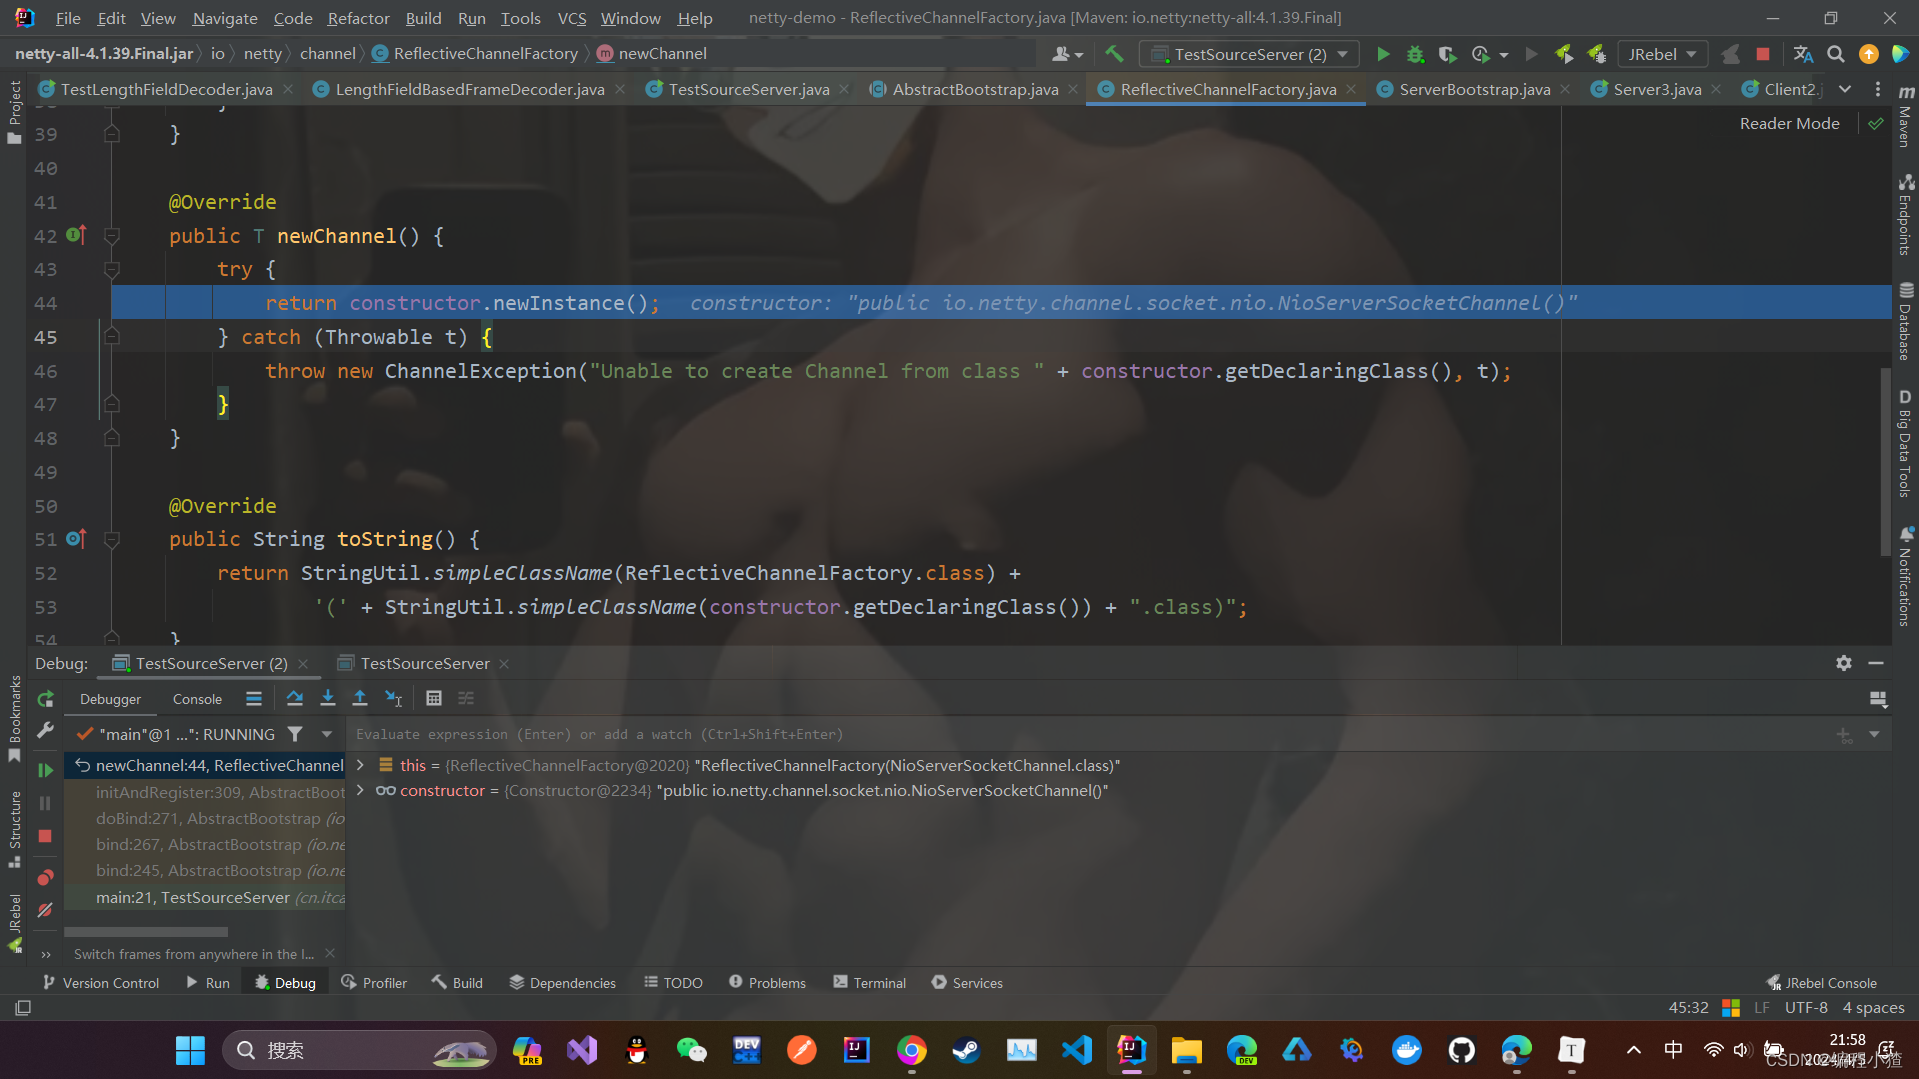
我们可以看到是通过反射机制创建的channel。
接下来我们再回去看init(channel),这个方法做的就是将创建的channel进行了初始化,给channel添加了一个初始化器ChannelInitializer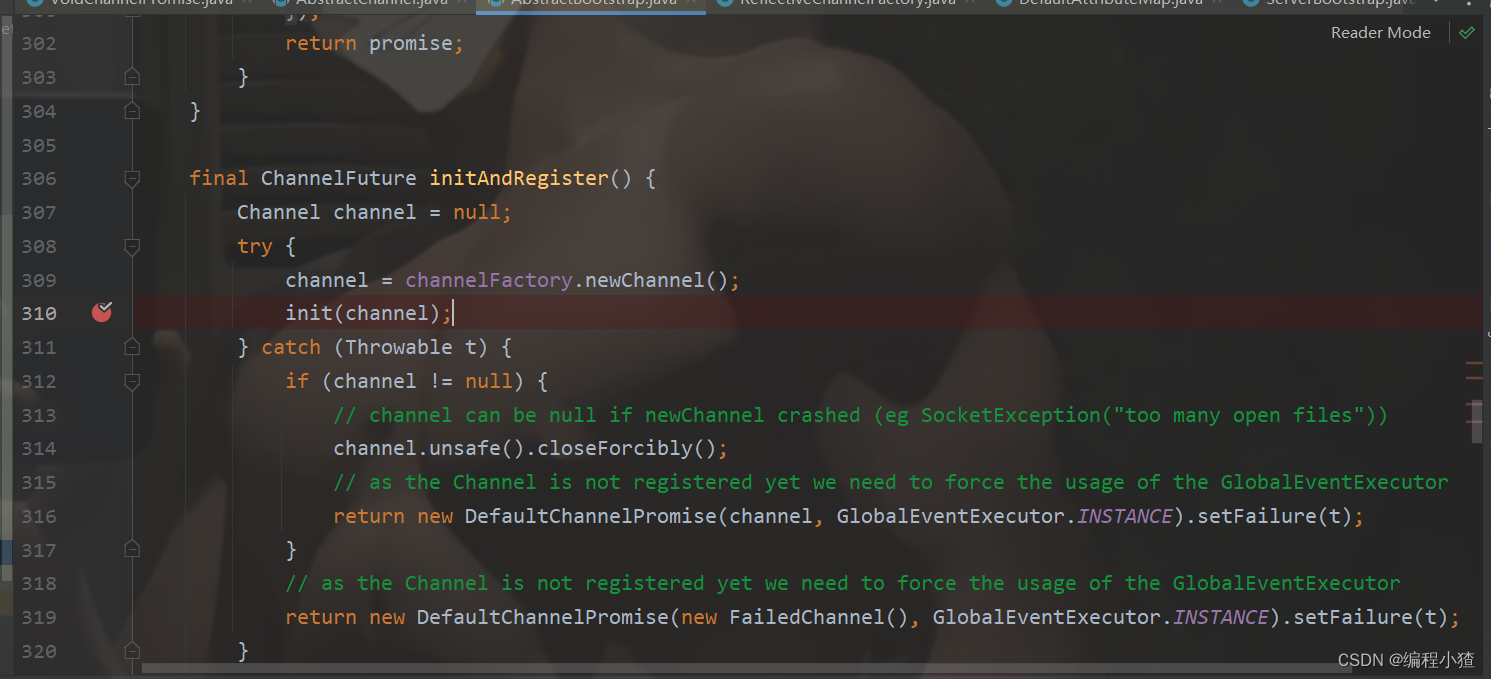
我们进入到这个方法中去看一下
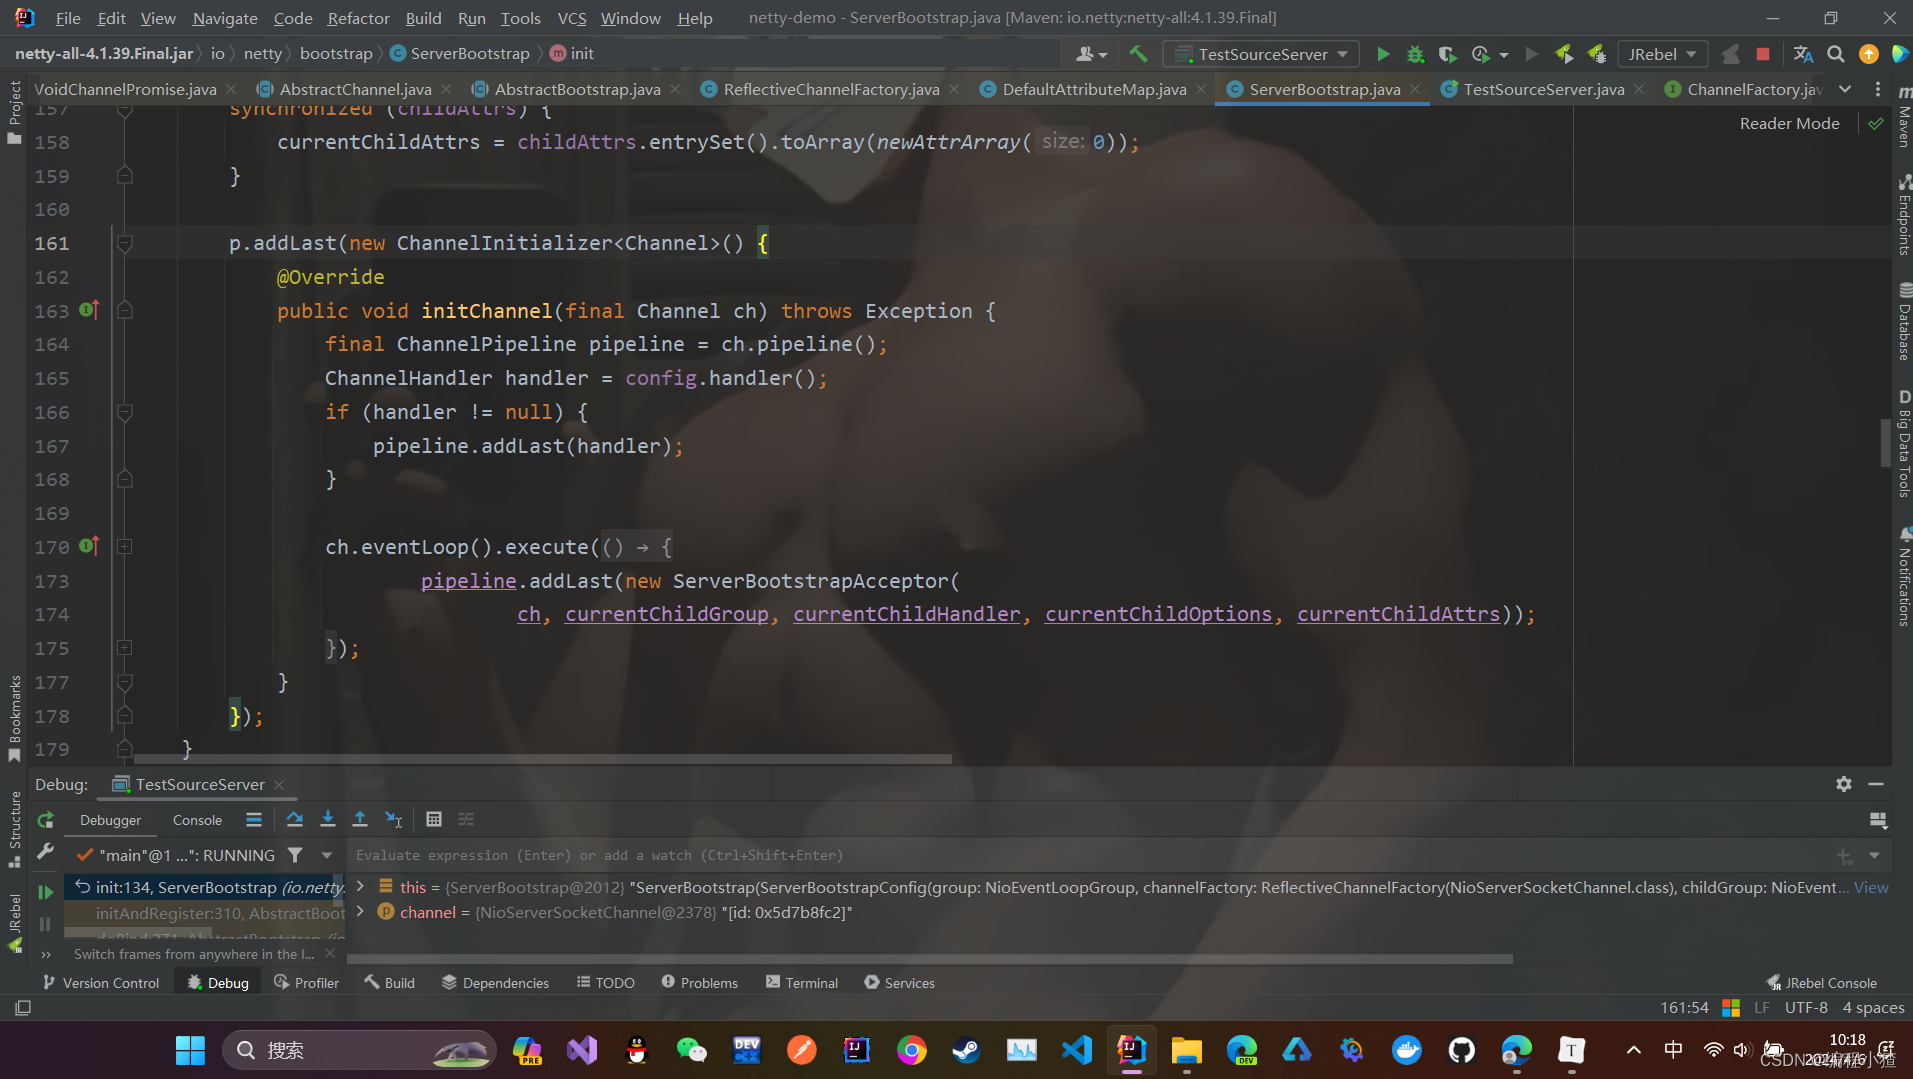
我将上面的代码注释了一下
// 这里 channel 实际上是 NioServerSocketChannel
void init(Channel channel) throws Exception {final Map<ChannelOption<?>, Object> options = options0();synchronized (options) {setChannelOptions(channel, options, logger);}final Map<AttributeKey<?>, Object> attrs = attrs0();synchronized (attrs) {for (Entry<AttributeKey<?>, Object> e: attrs.entrySet()) {@SuppressWarnings("unchecked")AttributeKey<Object> key = (AttributeKey<Object>) e.getKey();channel.attr(key).set(e.getValue());}}ChannelPipeline p = channel.pipeline();final EventLoopGroup currentChildGroup = childGroup;final ChannelHandler currentChildHandler = childHandler;final Entry<ChannelOption<?>, Object>[] currentChildOptions;final Entry<AttributeKey<?>, Object>[] currentChildAttrs;synchronized (childOptions) {currentChildOptions = childOptions.entrySet().toArray(newOptionArray(0));}synchronized (childAttrs) {currentChildAttrs = childAttrs.entrySet().toArray(newAttrArray(0));}// 为 NioServerSocketChannel 添加初始化器,第一次执行到此处时,只是添加了这个初始化器,
//还没有执行初始化器中的代码p.addLast(new ChannelInitializer<Channel>() {@Overridepublic void initChannel(final Channel ch) throws Exception {final ChannelPipeline pipeline = ch.pipeline();ChannelHandler handler = config.handler();if (handler != null) {pipeline.addLast(handler);}// 初始化器的职责是将 ServerBootstrapAcceptor 加入至 NioServerSocketChannelch.eventLoop().execute(new Runnable() {@Overridepublic void run() {pipeline.addLast(new ServerBootstrapAcceptor(ch, currentChildGroup, currentChildHandler, currentChildOptions, currentChildAttrs));}});}});
}
接下来我们来分析注册部分的源码,跟进ChannelFuture regFuture = config().group().register(channel);断点处,经过一系列的调用链,来到了本质的地方。

此处涉及了主线程和NIO线程的切换,由于当前线程不是NIO线程,因此代码会运行到else代码块中,下面验证一下:
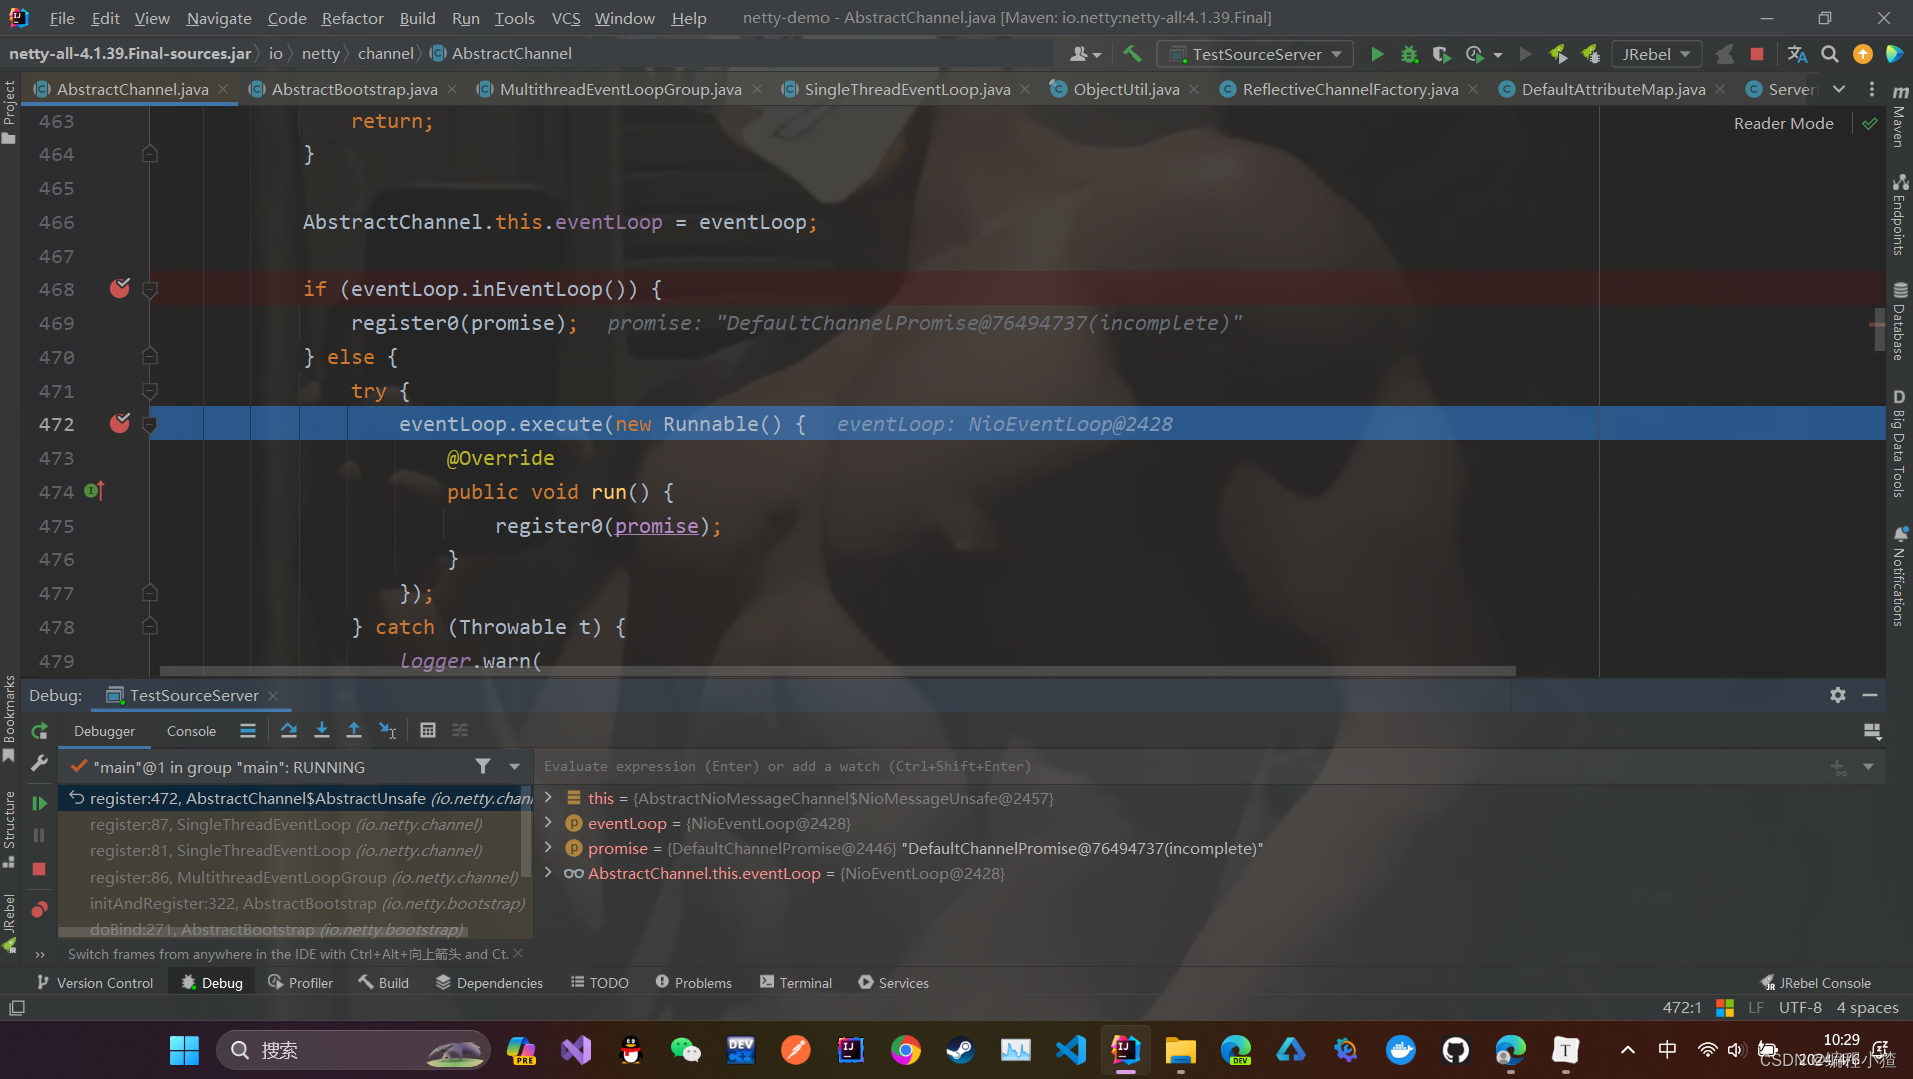
我们可以看到确实进入到了else代码块中,同时将真正用于注册的方法register0(promise);封装成了一个任务对象,交给了eventLoop去执行,我们知道eventLoop中封装的就是NIO线程,此处完成了main->nio boss线程的切换

上面的代码注释如下:
public final void register(EventLoop eventLoop, final ChannelPromise promise) {// 一些检查,略...AbstractChannel.this.eventLoop = eventLoop;if (eventLoop.inEventLoop()) {register0(promise);} else {try {// 首次执行 execute 方法时,会启动 nio 线程,之后注册等操作在 nio 线程上执行// 因为只有一个 NioServerSocketChannel 因此,也只会有一个 boss nio 线程// 这行代码完成的事实是 main -> nio boss 线程的切换eventLoop.execute(new Runnable() {@Overridepublic void run() {register0(promise);}});} catch (Throwable t) {// 日志记录...closeForcibly();closeFuture.setClosed();safeSetFailure(promise, t);}}
}
我们继续跟进register0(promise)方法
register0方法的注释如下:
private void register0(ChannelPromise promise) {try {if (!promise.setUncancellable() || !ensureOpen(promise)) {return;}boolean firstRegistration = neverRegistered;// 1.2.1 原生的 nio channel 绑定到 selector 上,注意此时没有注册 selector 关注事件,附件为 NioServerSocketChanneldoRegister();neverRegistered = false;registered = true;// 1.2.2 执行 NioServerSocketChannel 初始化器的 initChannelpipeline.invokeHandlerAddedIfNeeded();// 回调 3.2 io.netty.bootstrap.AbstractBootstrap#doBind0safeSetSuccess(promise);pipeline.fireChannelRegistered();// 对应 server socket channel 还未绑定,isActive 为 falseif (isActive()) {if (firstRegistration) {pipeline.fireChannelActive();} else if (config().isAutoRead()) {beginRead();}}} catch (Throwable t) {// Close the channel directly to avoid FD leak.closeForcibly();closeFuture.setClosed();safeSetFailure(promise, t);}
}
doRegister();将原生的 nio channel 绑定到 selector 上,pipeline.invokeHandlerAddedIfNeeded();上面说过在NioServerSocketChannel 进行初始化时,给channel添加了一个初始化器ChannelInitializer,但是没有执行初始化器中的代码,此处就要执行初始化器中的代码,下面来验证一下
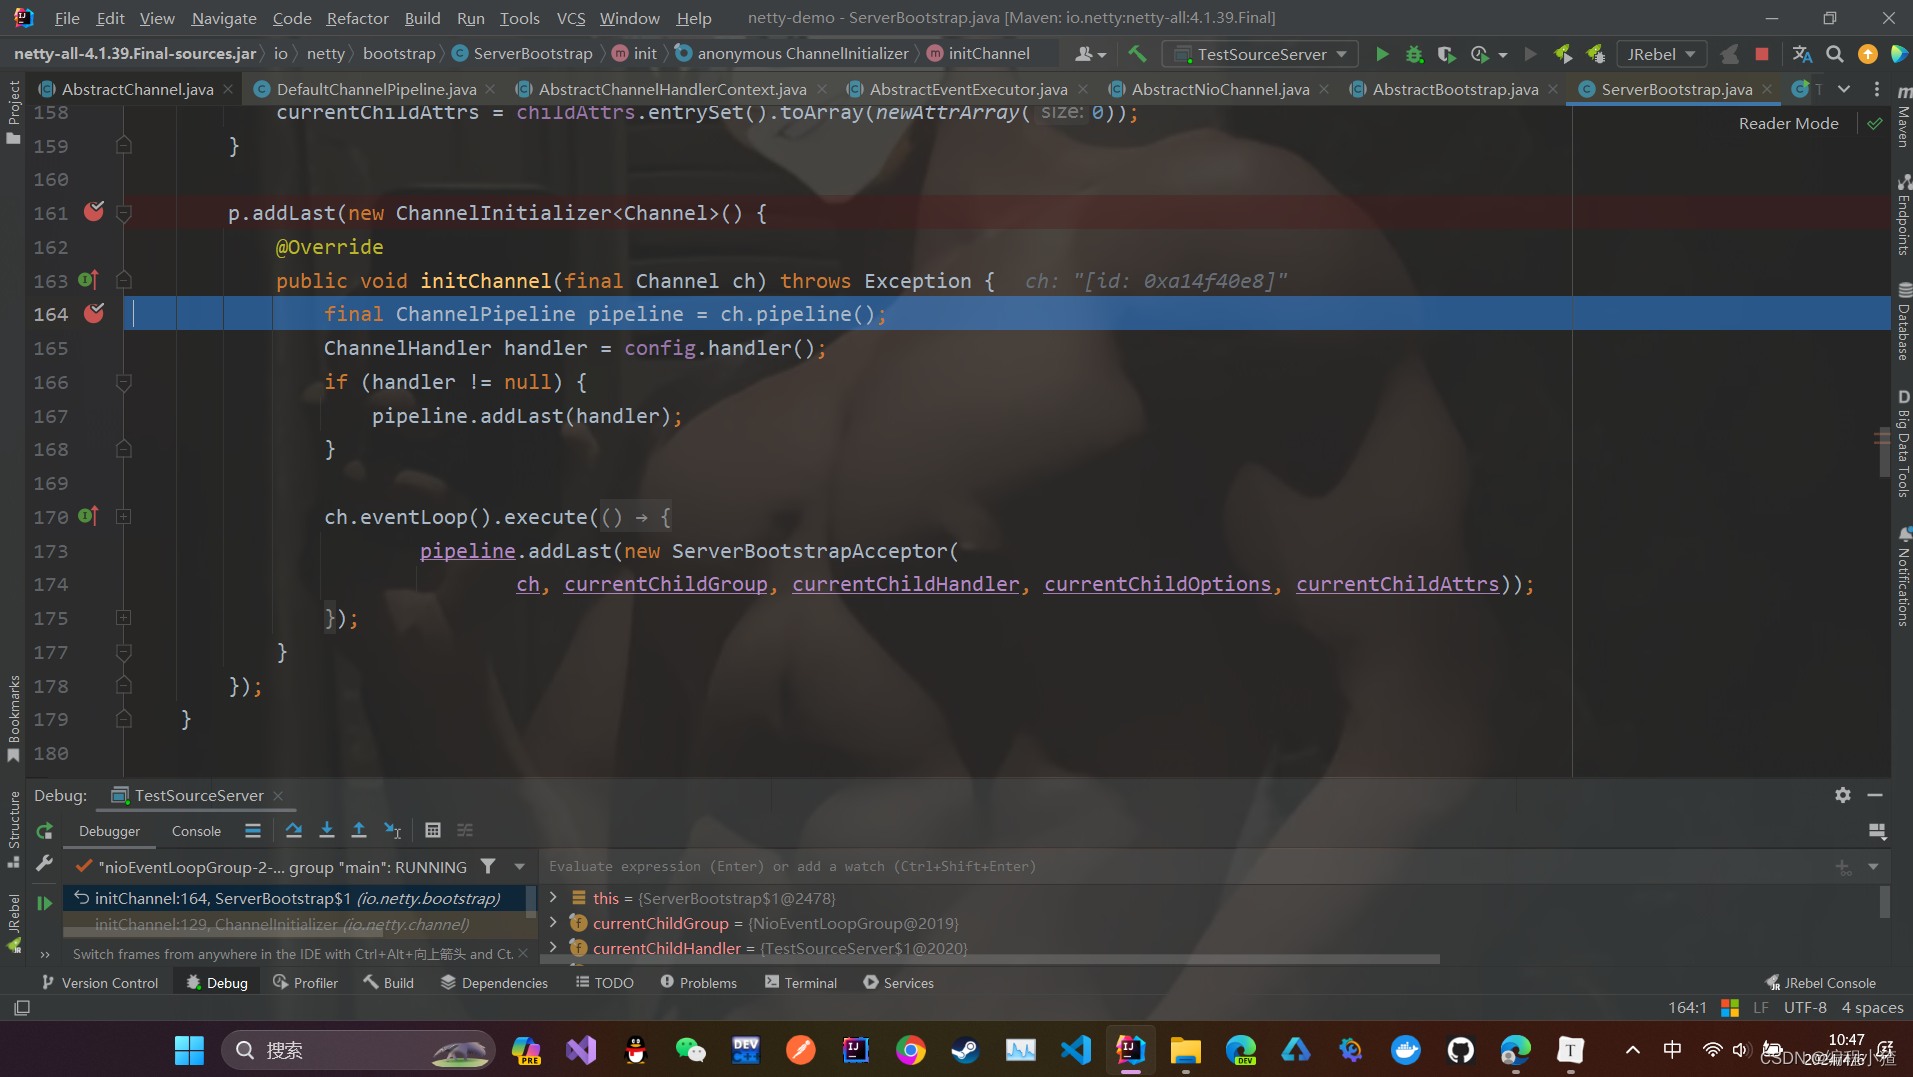
我们可以看到代码又回来执行了初始化器中的代码,initChannel方法在注册完毕后调用,用于初始化channel。
下面是initChannel方法的注释
private boolean initChannel(ChannelHandlerContext ctx) throws Exception {if (initMap.add(ctx)) { // Guard against re-entrance.try {// 1.2.2.1 执行初始化initChannel((C) ctx.channel());} catch (Throwable cause) {exceptionCaught(ctx, cause);} finally {// 1.2.2.2 移除初始化器ChannelPipeline pipeline = ctx.pipeline();if (pipeline.context(this) != null) {pipeline.remove(this);}}return true;}return false;
}
下面我们回到register0方法

上面我加断点处的这行代码就是给initAndRegister()方法设置结果的,我上面有讲到initAndRegister()方法是一个异步方法,返回的是一个promise对象,

上面的safeSetSuccess(promise)就是给promise设置方法执行的结果,下面我们需要验证一下safeSetSuccess(promise)中的promise是不是initAndRegister()方法返回的对象,我将initAndRegister()方法的返回值做一个标记
运行到safeSetSuccess(promise);我们可以发现是同一个对象。

promise设置成功后进入doBind()方法的else代码块中执行回调函数

我们继续跟进到doBind0()方法中,进过一系列的调用链,我们直接来到核心部分
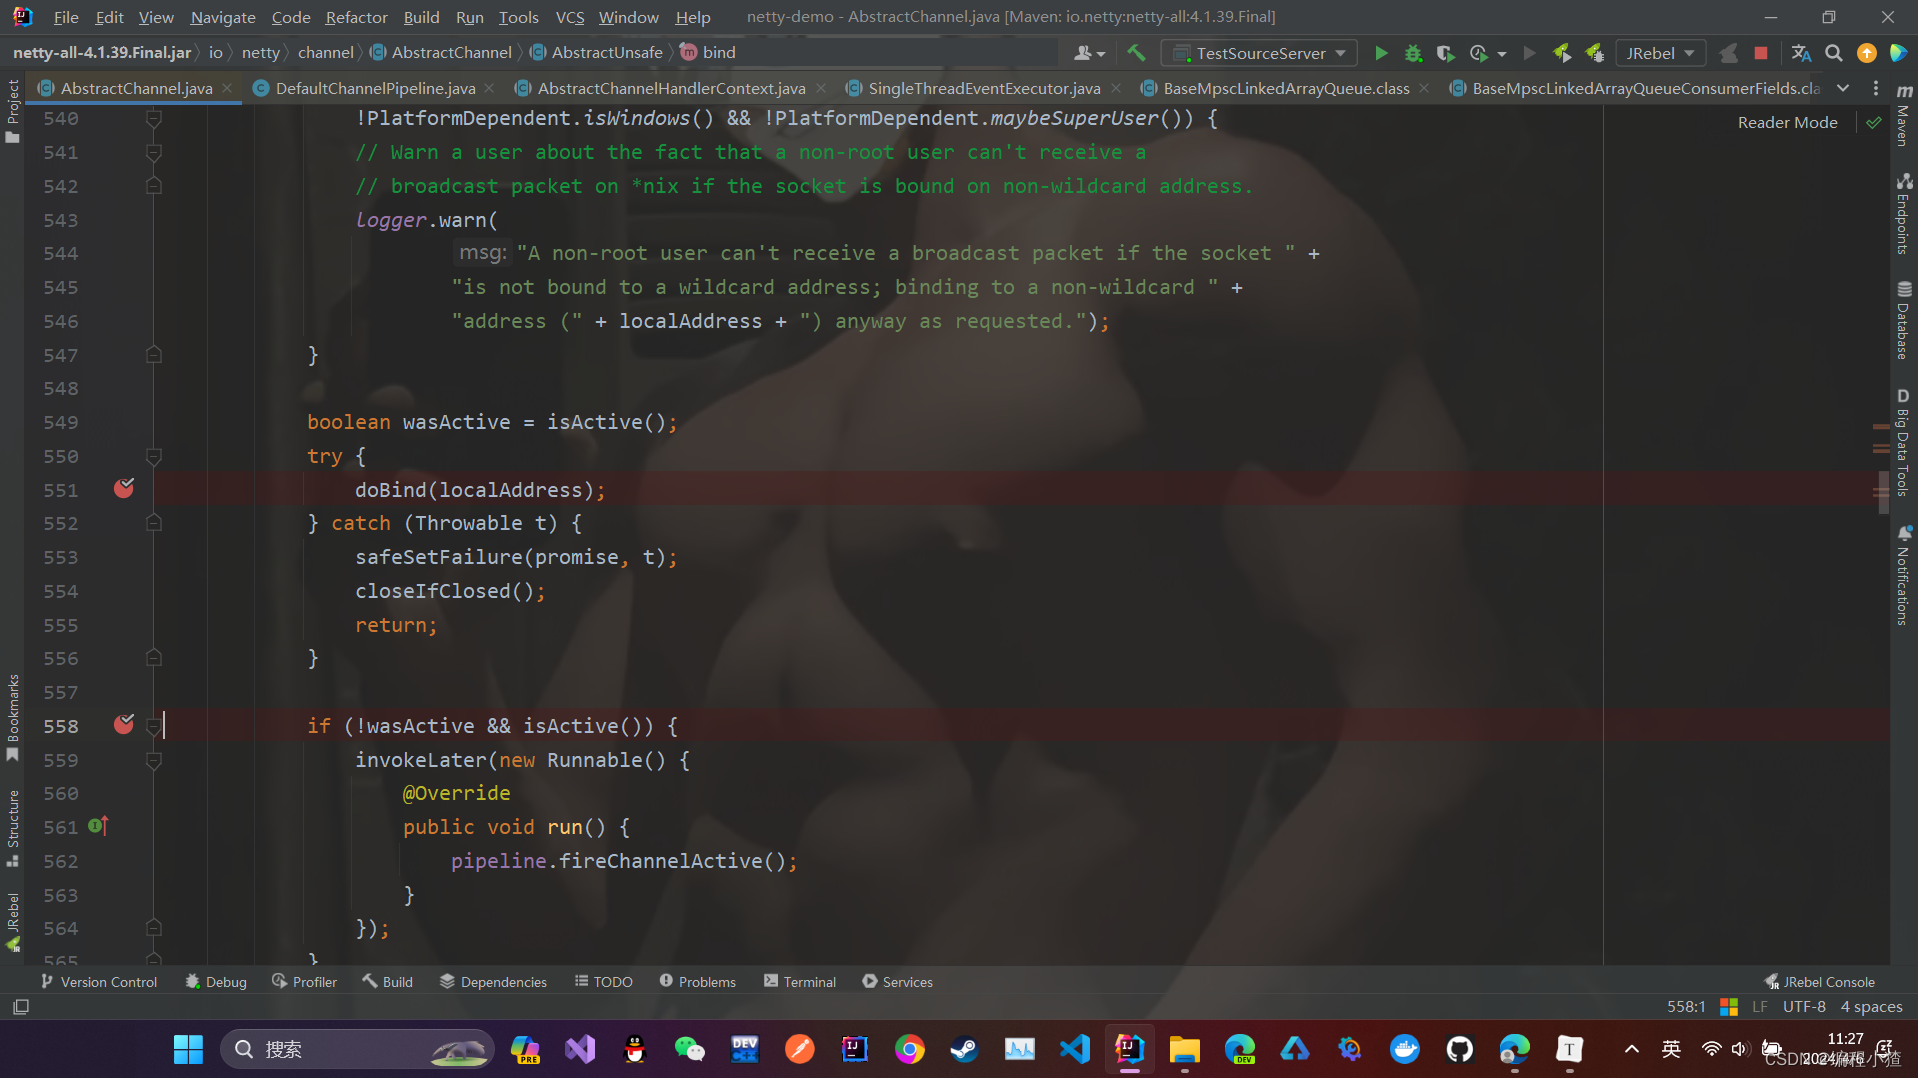
此处的doBind(localAddress);就是真正绑定端口的方法,我们跟进去看一下
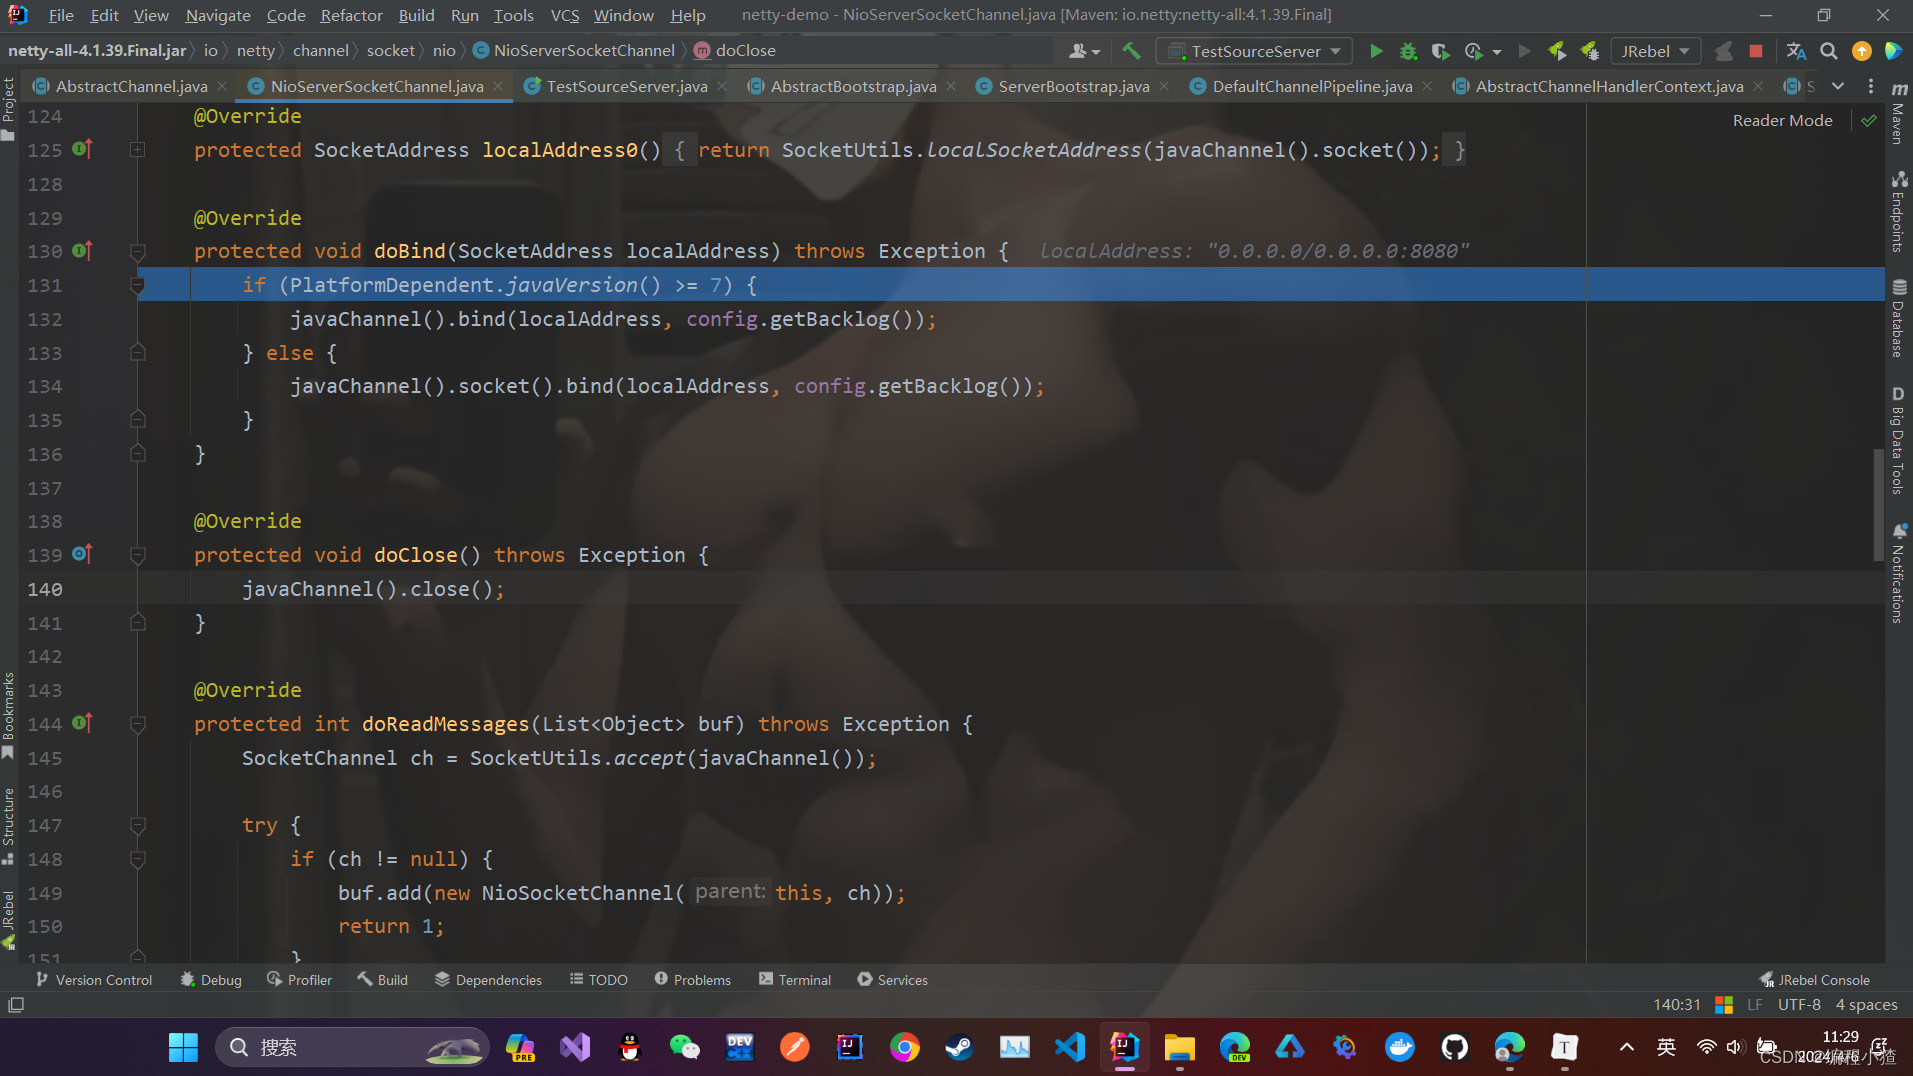
绑定好后进入到上面的第二个断点,此处代码的作用就是使channel上绑定的handler都触发channelActive方法。初始化的channel拥有三个handler,head->acceptor->tail,实际上主要的工作都是由headHandler完成的,所以我直接把断点加在headHandler的channelActive上
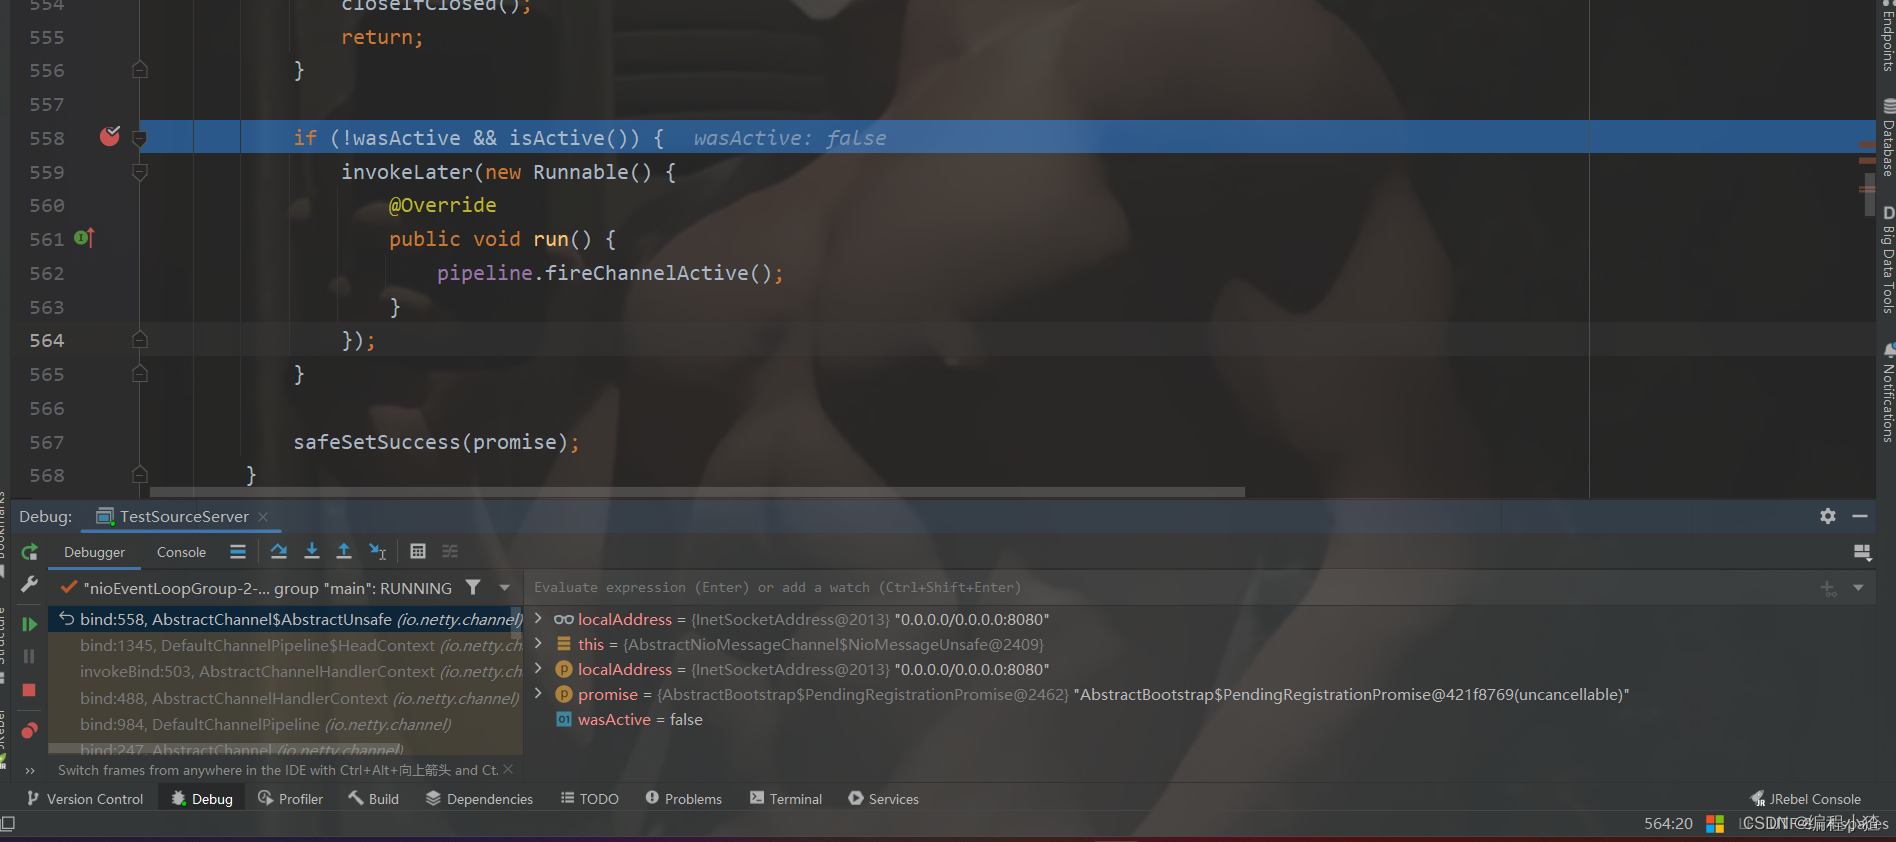
headHandler的断点

断点处readIfIsAutoRead();方法的作用就是将serverSocketChannel设置关注accept事件,我们跟进readIfIsAutoRead();方法,进过一系列的调用链来到本质部分
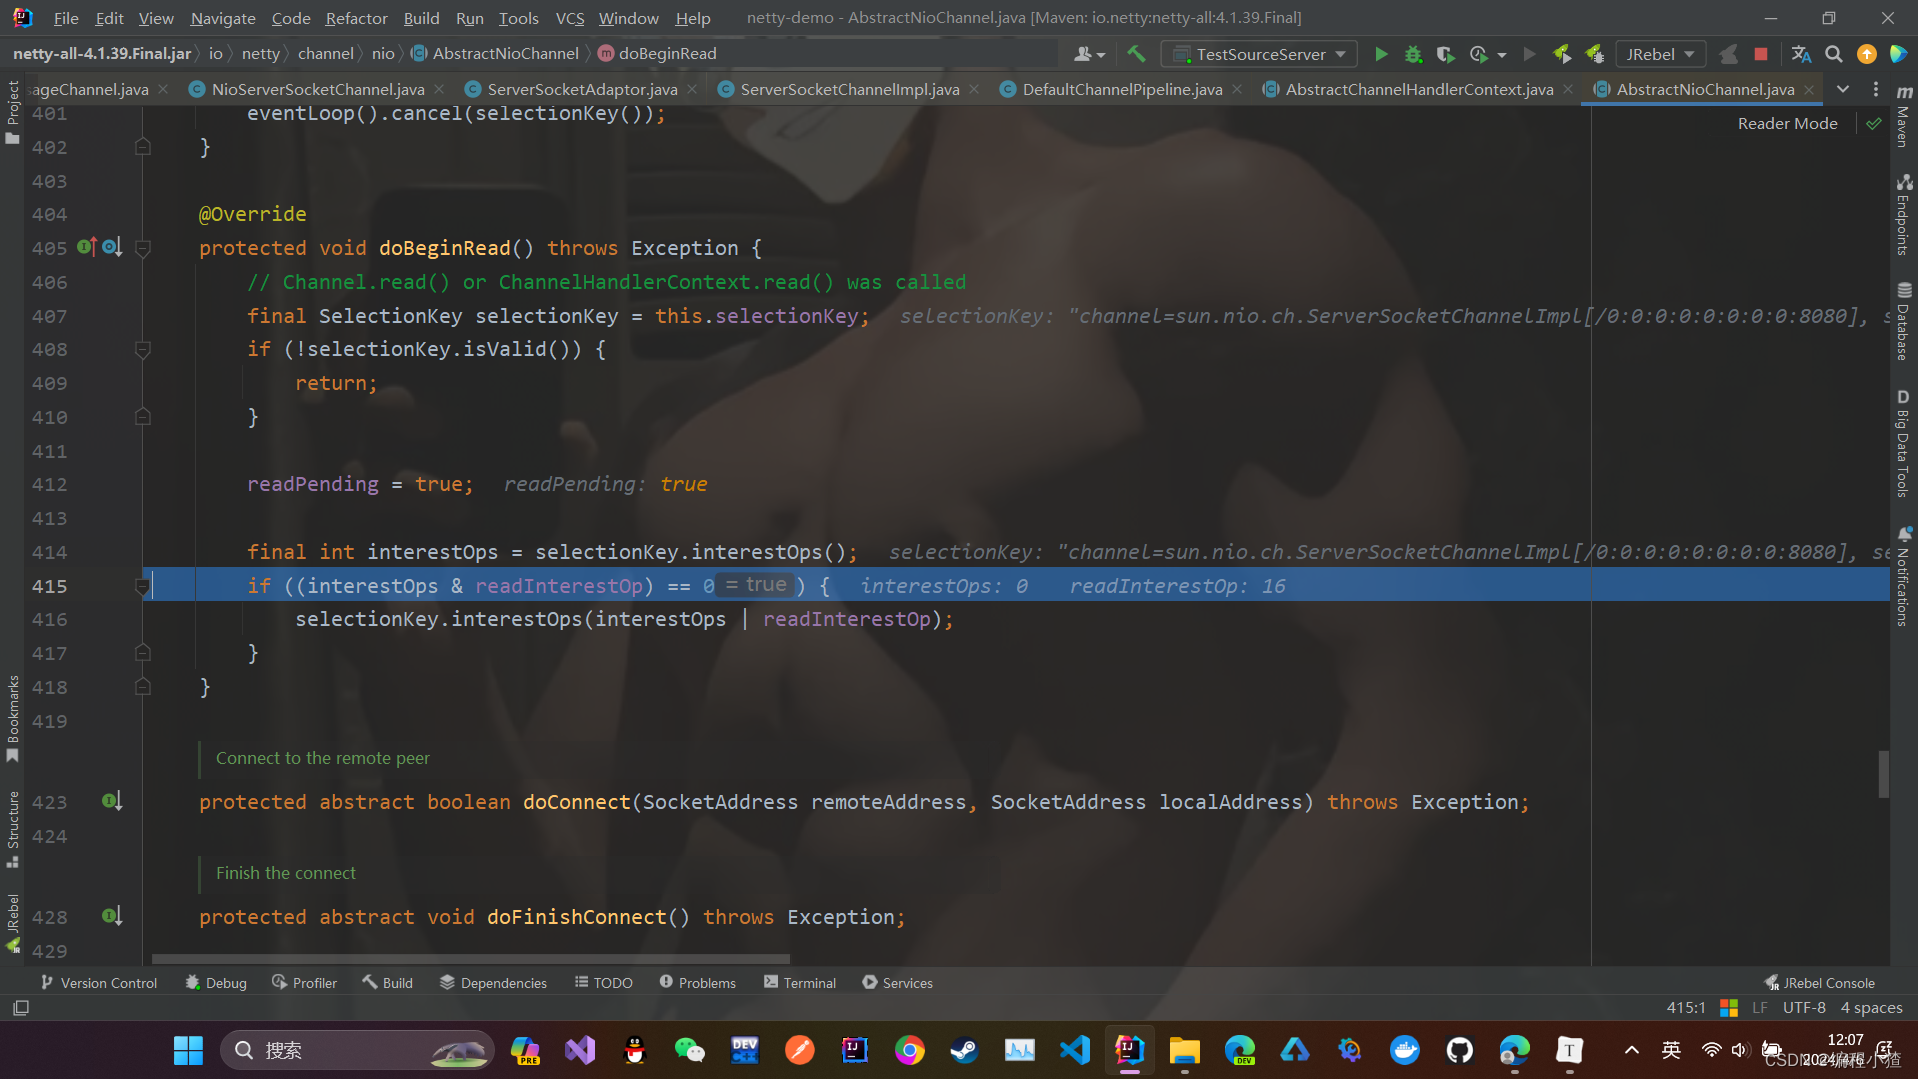
我们可以看到目前为止,并没有关注任何事件,进入到if代码块后serverSocketChannel设置关注accept事件。
到此Netty启动流程就剖析完毕了。
为了使整个流程更加清晰,下面我会对上面的流程进行总结
Netty启动流程总结
1.initAndRegister()对channel进行初始化、注册,返回regFuture(promise对象)
1.1 init main(主线程中完成)
创建NioServerSocketChannel (相当于Nio中的ServerSocketChannel serverSocketChannel = ServerSocketChannel.open(); ) mian
往NioServerSocketChannel添加初始化器handler main
初始化handler等待调用 (初始化handler使accept事件发生后建立连接)nio-thread调用
1.2 register(切换线程)
启动nio boss 线程 main
原始serverSocketChannel注册至Selector,此时还未关注事件 nio-thread
执行NioServerScokerChannel初始化handler nio-thread
2. regFuture的回调doBind() nio-thread
原生ServerSocketChannel绑定端口 nio-thread(相当于nio中的 serverSocketChannel.bind(new InetSocketAddress(8080)))nio-thread
触发NioServerSocketChannel绑定的handler的channelActive方法。nio-thread
![[C++初阶]初识C++(二)](https://img-blog.csdnimg.cn/direct/ad742a83bc8a42d080fbfb0fda3ad0a8.png)






![[从零开始学习Redis | 第九篇] 深入了解Redis数据类型](https://img-blog.csdnimg.cn/69e9169c980f43e0aad31ff9ada88a9c.png)
