mysql主从
文章目录
- mysql主从
- 1. 主从简介
- 1.1 主从作用
- 1.2 主从形式
- 2. 主从复制原理
- 3. 主从复制配置
- 3.1 mysql安装(两台主机安装一致,下面只演示一台主机操作)
- 3.2 mysql主从配置
- 3.2.1 确保从数据库与主数据库里的数据一样
- 3.2.2 在主数据库里创建一个同步账号授权给从数据库使用
- 3.2.3 配置主数据库
- 3.2.4 配置从数据库
- 3.2.5 测试验证
1. 主从简介
在现代企业中,数据显得尤为重要,而存储数据的数据库选择又五花八门,但无论是何种数据库,均存在着一种隐患。
想几个问题:
- 用一台数据库存放数据,若此数据库服务器宕机了导致数据丢失怎么办?
- 业务量大了,数据多了,访问的人多了,一台数据库无法保证服务质量了怎么办?
1.1 主从作用
- 实时灾备,用于故障切换
- 读写分离,提供查询服务
- 备份,避免影响业务
1.2 主从形式

- 一主一从
- 主主复制
- 一主多从—扩展系统读取的性能,因为读是在从库读取的
- 多主一从—5.7开始支持
- 联级复制
2. 主从复制原理
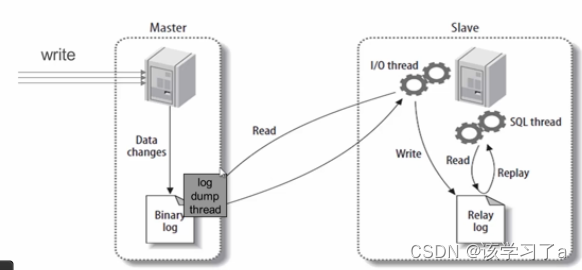
主从复制步骤:
- 主库将所有的写操作记录到binlog日志中并生成一个log dump线程,将binlog日志传给从库的I/O线程
- 从库生成两个线程,一个I/O线程,一个SQL线程
- I/O线程去请求主库的binlog,并将得到的binlog日志写到relay log(中继日志) 文件中
- SQL线程,会读取relay log文件中的日志,并解析成具体操作,来实现主从的操作一致,达到最终数据一致的目的
3. 主从复制配置
主从复制配置步骤:
- 确保从数据库与主数据库里的数据一样
- 在主数据库里创建一个同步账号授权给从数据库使用
- 配置主数据库(修改配置文件)
- 配置从数据库(修改配置文件)
需求:
搭建两台MySQL服务器,一台作为主服务器,一台作为从服务器,主服务器进行写操作,从服务器进行读操作
环境说明:
| 数据库角色 | IP | 应用与系统版本 | 有无数据 |
|---|---|---|---|
| 主数据库 | 192.168.116.140 | rockylinux9 | 无数据 |
| 从数据库 | 192.168.116.143 | rockylinux9 | 无数据 |
3.1 mysql安装(两台主机安装一致,下面只演示一台主机操作)
分别在主从两台服务器上安装mysql8.0.35版本,此处略过安装步骤,若有疑问请参考《mysql基础》与《mysql进阶》两篇文章。
1.修改主机名
[root@localhost ~]# hostnamectl set-hostname master
[root@localhost ~]# bash
[root@master ~]# [root@localhost ~]# hostnamectl set-hostname slave
[root@localhost ~]# bash
[root@slave ~]# 2.关闭防火墙
[root@master ~]# systemctl disable --now firewalld
Removed "/etc/systemd/system/multi-user.target.wants/firewalld.service".
Removed "/etc/systemd/system/dbus-org.fedoraproject.FirewallD1.service".
[root@master ~]# vi /etc/selinux/config
[root@master ~]# cat /etc/selinux/config|grep '^SELINUX'
SELINUX=disabled
SELINUXTYPE=targeted
[root@master ~]# setenforce 0
[root@master ~]# getenforce
Permissive[root@slave ~]# systemctl disable --now firewalld
Removed "/etc/systemd/system/multi-user.target.wants/firewalld.service".
Removed "/etc/systemd/system/dbus-org.fedoraproject.FirewallD1.service".
[root@slave ~]# vi /etc/selinux/config
[root@slave ~]# cat /etc/selinux/config|grep '^SELINUX'
SELINUX=disabled
SELINUXTYPE=targeted
[root@slave ~]# setenforce 0
[root@slave ~]# getenforce
Permissive3.下载软件包
[root@master ~]# ls
anaconda-ks.cfg  mysql-8.0.35-linux-glibc2.28-x86_64.tar.xz4.压缩软件包
[root@master ~]# tar xf mysql-8.0.35-linux-glibc2.28-x86_64.tar.xz  -C /usr/local
[root@master ~]# cd /usr/local
[root@master local]# ls
bin  etc  games  include  lib  lib64  libexec  mysql-8.0.35-linux-glibc2.28-x86_64  sbin  share  src
[root@master local]# mv mysql-8.0.35-linux-glibc2.28-x86_64 mysql
[root@master local]# ls
bin  etc  games  include  lib  lib64  libexec  mysql  sbin  share  src
[root@master local]# 5.配置环境变量
[root@master local]# ls
bin  etc  games  include  lib  lib64  libexec  mysql  sbin  share  src
[root@master local]# echo 'export PATH=/usr/local/mysql/bin:$PATH' > /etc/profile.d/mysql.sh
[root@master local]# source /etc/profile.d/mysql.sh 6.做软连接
[root@master local]# ls
bin  etc  games  include  lib  lib64  libexec  mysql  sbin  share  src
[root@master local]# ln -s /usr/local/mysql/include/ /usr/include/mysql7.告知lib在哪
[root@master local]# vim /etc/ld.so.conf.d/mysql.conf
[root@master local]# ldconfig -v8.添加帮助文档
[root@master local]# ls
bin  etc  games  include  lib  lib64  libexec  mysql  sbin  share  src
[root@master local]# vim /etc/man_db.conf
#
MANDATORY_MANPATH                       /usr/man
MANDATORY_MANPATH                       /usr/share/man
MANDATORY_MANPATH                       /usr/local/share/man
MANDATORY_MANPATH                       /usr/local/mysql/man
#---------------------------------------------------------9.创建用户并修改/usr/local/mysql/的所有者和所属组为mysql
[root@master ~]# useradd -r -M -s /sbin/nologin mysql
[root@master ~]# id mysql
uid=991(mysql) gid=991(mysql) groups=991(mysql)
[root@master ~]# chown -R mysql.mysql /usr/local/mysql
[root@master ~]# ll -d /usr/local/mysql
drwxr-xr-x. 9 mysql mysql 129 Dec 26 16:40 /usr/local/mysql10.创建数据库存放数据的目录并修改属组
[root@master ~]# mkdir /opt/data
[root@master ~]# chown -R mysql.mysql /opt/data
[root@master ~]# ll -d /opt/data
drwxr-xr-x. 2 mysql mysql 6 Dec 26 16:48 /opt/data11.初始化
[root@master ~]# mysqld --initialize --user mysql --datadir /opt/data
2023-12-26T08:49:43.219451Z 0 [System] [MY-013169] [Server] /usr/local/mysql/bin/mysqld (mysqld 8.0.35) initializing of server in progress as process 57766
2023-12-26T08:49:43.231426Z 1 [System] [MY-013576] [InnoDB] InnoDB initialization has started.
2023-12-26T08:49:43.579789Z 1 [System] [MY-013577] [InnoDB] InnoDB initialization has ended.
2023-12-26T08:49:45.083767Z 6 [Note] [MY-010454] [Server] A temporary password is generated for root@localhost: otVyge;=q7eY
[root@master ~]# echo 'otVyge;=q7eY' > pass
[root@master ~]# cat pass
otVyge;=q7eY12.向配置文件添加内容
[root@master ~]# vim /etc/my.cnf
[root@master ~]# cat /etc/my.cnf
[mysqld]
basedir = /usr/local/mysql
datadir = /opt/data
port = 3306
socket = /tmp/mysql.sock
pid-file = /opt/data/mysql.pid
user = mysql
skip-name-resolve13.给mysql服务指定位置
[root@master ~]# cd /usr/local/mysql
[root@master mysql]# ls
bin  docs  include  lib  LICENSE  man  README  share  support-files
[root@master mysql]# cd support-files/
[root@master support-files]# ls
mysqld_multi.server  mysql-log-rotate  mysql.server
[root@master support-files]# vim mysql.server
[root@master support-files]# cat mysql.server | grep '^datadir'
datadir=/opt/data
datadir_set=
[root@master support-files]# cat mysql.server | grep '^basedir'
basedir=/usr/local/mysql
[root@master support-files]# systemctl daemon-reload14.启动服务
[root@master support-files]# service mysqld start
Starting MySQL.Logging to '/opt/data/master.err'.SUCCESS!
[root@master support-files]# ss -antl
State              Recv-Q             Send-Q                          Local Address:Port                            Peer Address:Port             Process
LISTEN             0                  128                                   0.0.0.0:22                                   0.0.0.0:*
LISTEN             0                  70                                          *:33060                                      *:*
LISTEN             0                  151                                         *:3306                                       *:*
LISTEN             0                  128                                      [::]:22                                      [::]:*                                    15.设置开机自启
[root@master ~]# cd /usr/lib/systemd/system
[root@master system]# cp sshd.service mysql.service
[root@master system]# vim mysql.service
[root@master system]# cat mysql.service
[Unit]
Description=mysql server daemon
After=network.target sshd-keygen.target[Service]
Type=forking
ExecStart=service mysqld start
ExecStop=service mysqld stop
ExecReload=/bin/kill -HUP $MAINPID[Install]
WantedBy=multi-user.target
[root@master system]# service mysqld stop
Shutting down MySQL.ss. SUCCESS!
[root@master system]# systemctl daemon-reload
[root@master system]# systemctl status mysql
○ mysql.service - mysql server daemonLoaded: loaded (/usr/lib/systemd/system/mysql.service; disabled; preset: disabled)Active: inactive (dead)
[root@master system]# systemctl enable --now mysql
Created symlink /etc/systemd/system/multi-user.target.wants/mysql.service → /usr/lib/systemd/system/mysql.service.
[root@master system]# systemctl status mysql
● mysql.service - mysql server daemonLoaded: loaded (/usr/lib/systemd/system/mysql.service; enabled; preset: disabled)Active: active (running) since Tue 2023-12-26 17:06:55 CST; 7s agoProcess: 99845 ExecStart=service mysqld start (code=exited, status=0/SUCCESS)Main PID: 99862 (mysqld_safe)Tasks: 39 (limit: 10820)Memory: 371.5MCPU: 829msCGroup: /system.slice/mysql.service├─ 99862 /bin/sh /usr/local/mysql/bin/mysqld_safe --datadir=/opt/data --pid-file=/opt/data/mysql.pid└─100052 /usr/local/mysql/bin/mysqld --basedir=/usr/local/mysql --datadir=/opt/data --plugin-dir=/usr/local/mysql/lib/plugin --user=mysql --log-error=ma>Dec 26 17:06:53 master systemd[1]: Starting mysql server daemon...
Dec 26 17:06:55 master service[99849]: Starting MySQL. SUCCESS!
Dec 26 17:06:55 master systemd[1]: Started mysql server daemon.16.修改数据库密码
[root@master ~]# cat pass
otVyge;=q7eY
[root@master ~]# mysql -uroot -p'otVyge;=q7eY'
mysql: [Warning] Using a password on the command line interface can be insecure.
Welcome to the MySQL monitor.  Commands end with ; or \g.
Your MySQL connection id is 8
Server version: 8.0.35Copyright (c) 2000, 2023, Oracle and/or its affiliates.Oracle is a registered trademark of Oracle Corporation and/or its
affiliates. Other names may be trademarks of their respective
owners.Type 'help;' or '\h' for help. Type '\c' to clear the current input statement.mysql> alter user root@localhost identified with mysql_native_password by 'Passw0rd@_~';
Query OK, 0 rows affected (0.00 sec)
mysql> quit
Bye
[root@master ~]# mysql -uroot -p'Passw0rd@_~'
mysql: [Warning] Using a password on the command line interface can be insecure.
Welcome to the MySQL monitor.  Commands end with ; or \g.
Your MySQL connection id is 11
Server version: 8.0.35 MySQL Community Server - GPLCopyright (c) 2000, 2023, Oracle and/or its affiliates.Oracle is a registered trademark of Oracle Corporation and/or its
affiliates. Other names may be trademarks of their respective
owners.Type 'help;' or '\h' for help. Type '\c' to clear the current input statement.mysql> show databases;
+--------------------+
| Database           |
+--------------------+
| information_schema |
| mysql              |
| performance_schema |
| sys                |
+--------------------+
4 rows in set (0.01 sec)
3.2 mysql主从配置
3.2.1 确保从数据库与主数据库里的数据一样
为确保从数据库与主数据库里的数据一样,先全备主数据库并还原到从数据库中
//先查看主库有哪些库
mysql> show databases;
+--------------------+
| Database           |
+--------------------+
| information_schema |
| mysql              |
| performance_schema |
| sys                |
+--------------------+
4 rows in set (0.00 sec)//再查看从库有哪些库
mysql> show databases;
+--------------------+
| Database           |
+--------------------+
| information_schema |
| mysql              |
| performance_schema |
| sys                |
+--------------------+
4 rows in set (0.00 sec)
3.2.2 在主数据库里创建一个同步账号授权给从数据库使用
[root@master ~]# mysql -uroot -pPassw0rd@_~
mysql: [Warning] Using a password on the command line interface can be insecure.
Welcome to the MySQL monitor.  Commands end with ; or \g.
Your MySQL connection id is 12
Server version: 8.0.35 MySQL Community Server - GPLCopyright (c) 2000, 2023, Oracle and/or its affiliates.Oracle is a registered trademark of Oracle Corporation and/or its
affiliates. Other names may be trademarks of their respective
owners.Type 'help;' or '\h' for help. Type '\c' to clear the current input statement.mysql> create user repl@192.168.116.143 identified with mysql_native_password by 'Passw0rd@_~';
Query OK, 0 rows affected (0.01 sec)mysql> grant replication slave on *.* to repl@192.168.116.143-> ;
Query OK, 0 rows affected (0.00 sec)mysql> flush privileges-> ;
Query OK, 0 rows affected (0.01 sec)//到slave主机登入
[root@slave ~]# mysql -urepl -pPassw0rd@_~ -h192.168.116.140
mysql: [Warning] Using a password on the command line interface can be insecure.
Welcome to the MySQL monitor.  Commands end with ; or \g.
Your MySQL connection id is 11
Server version: 8.0.35 MySQL Community Server - GPLCopyright (c) 2000, 2023, Oracle and/or its affiliates.Oracle is a registered trademark of Oracle Corporation and/or its
affiliates. Other names may be trademarks of their respective
owners.Type 'help;' or '\h' for help. Type '\c' to clear the current input statement.mysql>
3.2.3 配置主数据库
[root@master ~]# vim /etc/my.cnf
[root@master ~]# cat /etc/my.cnf
[mysqld]
basedir = /usr/local/mysql
datadir = /opt/data
port = 3306
socket = /tmp/mysql.sock
pid-file = /opt/data/mysql.pid
user = mysql
skip-name-resolvelog-bin = mysql_bin
server-id = 10
[root@master ~]# systemctl restart mysql
[root@master ~]# ss -antl
State              Recv-Q             Send-Q                          Local Address:Port                            Peer Address:Port             Process
LISTEN             0                  128                                   0.0.0.0:22                                   0.0.0.0:*
LISTEN             0                  70                                          *:33060                                      *:*
LISTEN             0                  151                                         *:3306                                       *:*
LISTEN             0                  128                                      [::]:22                                      [::]:*               //查看主库的状态
mysql> show master status;
+------------------+----------+--------------+------------------+-------------------+
| File             | Position | Binlog_Do_DB | Binlog_Ignore_DB | Executed_Gtid_Set |
+------------------+----------+--------------+------------------+-------------------+
| mysql_bin.000001 |      157 |              |                  |                   |
+------------------+----------+--------------+------------------+-------------------+
1 row in set (0.00 sec)
3.2.4 配置从数据库
[root@slave ~]# vim /etc/my.cnf
[root@slave ~]# cat /etc/my.cnf
[mysqld]
basedir = /usr/local/mysql
datadir = /opt/data
port = 3306
socket = /tmp/mysql.sock
pid-file = /opt/data/mysql.pid
user = mysql
skip-name-resolverelay-log = mysql_relay_bin
server-id = 20
[root@slave ~]# systemctl restart mysql
[root@slave ~]# ss -antl
State              Recv-Q             Send-Q                          Local Address:Port                            Peer Address:Port             Process
LISTEN             0                  128                                   0.0.0.0:22                                   0.0.0.0:*
LISTEN             0                  128                                      [::]:22                                      [::]:*
LISTEN             0                  151                                         *:3306                                       *:*
LISTEN             0                  70                                          *:33060                                      *:*                                    //配置并启动主从复制
mysql> change master to-> master_host='192.168.116.140',-> master_user='repl',-> master_password='Passw0rd@_~',-> master_port=3306,-> master_log_file='mysql_bin.000001',-> master_log_pos=157;
Query OK, 0 rows affected, 9 warnings (0.02 sec)mysql> start slave-> ;
Query OK, 0 rows affected, 1 warning (0.01 sec)//查看从服务器状态
mysql> show slave status\G
*************************** 1. row ***************************Slave_IO_State: Waiting for source to send eventMaster_Host: 192.168.116.140Master_User: replMaster_Port: 3306Connect_Retry: 60Master_Log_File: mysql_bin.000001Read_Master_Log_Pos: 157Relay_Log_File: mysql_relay_bin.000002Relay_Log_Pos: 326Relay_Master_Log_File: mysql_bin.000001Slave_IO_Running: YesSlave_SQL_Running: YesReplicate_Do_DB: Replicate_Ignore_DB: Replicate_Do_Table: Replicate_Ignore_Table: Replicate_Wild_Do_Table: Replicate_Wild_Ignore_Table: Last_Errno: 0Last_Error: Skip_Counter: 0Exec_Master_Log_Pos: 157Relay_Log_Space: 536Until_Condition: NoneUntil_Log_File: Until_Log_Pos: 0Master_SSL_Allowed: NoMaster_SSL_CA_File: Master_SSL_CA_Path: Master_SSL_Cert: Master_SSL_Cipher: Master_SSL_Key: Seconds_Behind_Master: 0
Master_SSL_Verify_Server_Cert: NoLast_IO_Errno: 0Last_IO_Error: Last_SQL_Errno: 0Last_SQL_Error: Replicate_Ignore_Server_Ids: Master_Server_Id: 10Master_UUID: b6998aa8-a3cb-11ee-900f-000c29ed2b10Master_Info_File: mysql.slave_master_infoSQL_Delay: 0SQL_Remaining_Delay: NULLSlave_SQL_Running_State: Replica has read all relay log; waiting for more updatesMaster_Retry_Count: 86400Master_Bind: Last_IO_Error_Timestamp: Last_SQL_Error_Timestamp: Master_SSL_Crl: Master_SSL_Crlpath: Retrieved_Gtid_Set: Executed_Gtid_Set: Auto_Position: 0Replicate_Rewrite_DB: Channel_Name: Master_TLS_Version: Master_public_key_path: Get_master_public_key: 0Network_Namespace:
1 row in set, 1 warning (0.00 sec)
3.2.5 测试验证
在主服务器创建库并创建表,向表中插入数据:
mysql> show databases;
+--------------------+
| Database           |
+--------------------+
| information_schema |
| mysql              |
| performance_schema |
| sys                |
+--------------------+
4 rows in set (0.01 sec)mysql> create database student;
Query OK, 1 row affected (0.01 sec)mysql> use student;
Database changed
mysql> create table hl(id int not null,name varchar(20));
Query OK, 0 rows affected (0.02 sec)mysql> desc hl;
+-------+-------------+------+-----+---------+-------+
| Field | Type        | Null | Key | Default | Extra |
+-------+-------------+------+-----+---------+-------+
| id    | int         | NO   |     | NULL    |       |
| name  | varchar(20) | YES  |     | NULL    |       |
+-------+-------------+------+-----+---------+-------+
2 rows in set (0.01 sec)
mysql> insert hl(id,name) value(1,'tom'),(2,'jerry');
Query OK, 2 rows affected (0.00 sec)
Records: 2  Duplicates: 0  Warnings: 0mysql> select * from hl;
+----+-------+
| id | name  |
+----+-------+
|  1 | tom   |
|  2 | jerry |
+----+-------+
2 rows in set (0.00 sec)
在从数据库中查看数据是否同步:
mysql> show databases;
+--------------------+
| Database           |
+--------------------+
| information_schema |
| mysql              |
| performance_schema |
| student            |
| sys                |
+--------------------+
5 rows in set (0.01 sec)mysql> select * from student.hl;
+----+-------+
| id | name  |
+----+-------+
|  1 | tom   |
|  2 | jerry |
+----+-------+
2 rows in set (0.00 sec)
![【饿了么笔试题汇总】[全网首发]2024-04-12-饿了么春招笔试题-三语言题解(CPP/Python/Java)](https://img-blog.csdnimg.cn/direct/60dd47443c3048618c27e2778460ffae.png#pic_center)