QUERY EXECUTION task3/task4
- Task #3 - HashJoin Executor and Optimization
- 1、HashJoin
- 1.1 思路
- 1.2 代码
- 2 NestedLoopJoin优化为HashJoin
- 2.1 思路
- 2.2 代码
- Task #4 Sort + Limit Executors + Top-N Optimization+ Window Functions
- 1、Sort
- 1.1 思路
- 1.2 代码
- 2、Limit Executors
- 2.1 思路
- 2.2 代码
- 3、Top-N Optimization
- 3.1 思路
- 3.2 代码
- 3.3 优化
- 4、Window Functions
- 4.1 思路
- 4.2 代码
Task #3 - HashJoin Executor and Optimization
1、HashJoin
1.1 思路
哈希连接包括两个阶段:构建(build)阶段和探测(probe)阶段。
构建阶段:遍历右表,将每个元组的连接键哈希并存储在哈希表中。
探测阶段:遍历左表,对表中的每个元组进行哈希,并在哈希表中查找具有相同哈希值的条目。由于右表可能有好几个和左表匹配的选项,所以还需要一个迭代器
其中需要注意,如果是左连接,没找到对应哈希值要把左边对应的右边写null。如果是内连接,跳过下一个。
1.2 代码
#include "execution/executors/hash_join_executor.h"namespace bustub {HashJoinExecutor::HashJoinExecutor(ExecutorContext *exec_ctx, const HashJoinPlanNode *plan,std::unique_ptr<AbstractExecutor> &&left_child,std::unique_ptr<AbstractExecutor> &&right_child): AbstractExecutor(exec_ctx) {this->plan_ = plan;this->left_child_ = std::move(left_child);this->right_child_ = std::move(right_child);if (!(plan->GetJoinType() == JoinType::LEFT || plan->GetJoinType() == JoinType::INNER)) {// Note for 2023 Fall: You ONLY need to implement left join and inner join.throw bustub::NotImplementedException(fmt::format("join type {} not supported", plan->GetJoinType()));}
}void HashJoinExecutor::Init() {// 初始化左右plan的左右孩子this->left_child_->Init();this->right_child_->Init();// 获取左执行器符合条件的元组,left_bool_用于判断左执行器是否还有符合条件的元组left_bool_ = left_child_->Next(&left_tuple_, &left_rid_);// NEXT方法的輸出參數,用于存储查询结果Tuple right_tuple{};RID right_rid{};//构建哈希表jht_ = std::make_unique<SimpleHashJoinHashTable>();// 遍历子执行器,将右子执行器中的获取的数据插入到join哈希表中// 不能在HashJoinExecutor执行器的next中完成,因为执行器需要先从子执行器中获取所有数据,然后对这些数据进行join,最后才能产生输出结果while (right_child_->Next(&right_tuple, &right_rid)) {jht_->InsertKey(GetRightJoinKey(&right_tuple), right_tuple);}// 获取左侧元组的hash keyauto left_hash_key = GetLeftJoinKey(&left_tuple_);// 在哈希表中查找与左侧元组匹配的右侧元组right_tuple_ = jht_->GetValue(left_hash_key);//这里必须判断right_tuple_是否为空,否则指针会指向空地址报错// 不为空说明找到了哈希值一样的if (right_tuple_ != nullptr) {jht_iterator_ = right_tuple_->begin();// 标记为true,防止next函数中重复输出has_done_ = true;} else {// 标记为false,主要用于左连接没有匹配的情况has_done_ = false;}
}auto HashJoinExecutor::Next(Tuple *tuple, RID *rid) -> bool {// 用while的原因:如果是内连接,如果没有匹配的元组,则该轮不输出任何元组,不需要返回值,继续往下查找其他左元组while (true) {// 如果right_tuple_不为空,且jht_iterator_未遍历完,则遍历输出// 一个左边可能匹配多个右边if (right_tuple_ != nullptr && jht_iterator_ != right_tuple_->end()) {std::vector<Value> values;auto right_tuple = *jht_iterator_;for (uint32_t i = 0; i < this->left_child_->GetOutputSchema().GetColumnCount(); i++) {values.emplace_back(left_tuple_.GetValue(&this->left_child_->GetOutputSchema(), i));}// 连接操作右边元组的值均不为nullfor (uint32_t i = 0; i < this->right_child_->GetOutputSchema().GetColumnCount(); i++) {values.emplace_back(right_tuple.GetValue(&this->right_child_->GetOutputSchema(), i));}*tuple = Tuple{values, &GetOutputSchema()};++jht_iterator_;return true;}// 如果right_tuple_为空,或者jht_iterator_遍历完,且为左连接// 如果has_done_为false,则说明左连接没有匹配的元组,需要输出右元组为null的情况if (plan_->GetJoinType() == JoinType::LEFT && !has_done_) {std::vector<Value> values;for (uint32_t i = 0; i < this->left_child_->GetOutputSchema().GetColumnCount(); i++) {values.emplace_back(left_tuple_.GetValue(&this->left_child_->GetOutputSchema(), i));}// 连接操作右边元组的值均不为nullfor (uint32_t i = 0; i < this->right_child_->GetOutputSchema().GetColumnCount(); i++) {values.emplace_back(ValueFactory::GetNullValueByType(this->right_child_->GetOutputSchema().GetColumn(i).GetType()));}*tuple = Tuple{values, &GetOutputSchema()};has_done_ = true;return true;}// 如果不是左连接,或者为左连接,但有有效输出,则继续遍历下一个左元组进行匹配// 如果left_bool_为false,左边找完了left_bool_ = left_child_->Next(&this->left_tuple_, &this->left_rid_);if (!left_bool_) {return false;}// 重置右边匹配的元组,以及更新迭代器auto left_hash_key = GetLeftJoinKey(&left_tuple_);// 在哈希表中查找与左侧元组匹配的右侧元组right_tuple_ = jht_->GetValue(left_hash_key);if (right_tuple_ != nullptr) {jht_iterator_ = right_tuple_->begin();has_done_ = true;} else {has_done_ = false;}}
}}  // namespace bustub
#include <memory>
#include <utility>#include "aggregation_executor.h"
#include "execution/executor_context.h"
#include "execution/executors/abstract_executor.h"
#include "execution/plans/hash_join_plan.h"
#include "storage/table/tuple.h"namespace bustub {/** HashJoinKeyrepresents a key in an join operation */
struct HashJoinKey {std::vector<Value> hash_keys_;/*** Compares two hash joi keys for equality* @param other the other hash join key to be compared with* @return `true` if both hash join key have equivalent values*/auto operator==(const HashJoinKey &other) const -> bool {// 比较两个对象的hash_keys_成员中的每个Value对象是否相等for (uint32_t i = 0; i < other.hash_keys_.size(); ++i) {if (hash_keys_[i].CompareEquals(other.hash_keys_[i]) != CmpBool::CmpTrue) {return false;}}return true;}
};
}  // namespace bustubnamespace std {
/** Implements std::hash on AggregateKey */
template <>
struct hash<bustub::HashJoinKey> {auto operator()(const bustub::HashJoinKey &join_key) const -> std::size_t {size_t curr_hash = 0;for (const auto &key : join_key.hash_keys_) {if (!key.IsNull()) {// 对每一个非空的value对象,计算出它的哈希值curr_hash = bustub::HashUtil::CombineHashes(curr_hash, bustub::HashUtil::HashValue(&key));}}return curr_hash;}
};}  // namespace stdnamespace bustub {
/*** A simplified hash table that has all the necessary functionality for join.*/
class SimpleHashJoinHashTable {public:/** 插入join key和tuple构建hash表 */void InsertKey(const HashJoinKey &join_key, const Tuple &tuple) {if (ht_.count(join_key) == 0) {std::vector<Tuple> tuple_vector;tuple_vector.push_back(tuple);ht_.insert({join_key, tuple_vector});} else {ht_.at(join_key).push_back(tuple);}}/** 获取该join key对应的tuple */auto GetValue(const HashJoinKey &join_key) -> std::vector<Tuple> * {if (ht_.find(join_key) == ht_.end()) {return nullptr;}return &(ht_.find(join_key)->second);}/*** Clear the hash table*/void Clear() { ht_.clear(); }private:/** The hash table is just a map from aggregate keys to aggregate values */std::unordered_map<HashJoinKey, std::vector<Tuple>> ht_{};
};
/*** HashJoinExecutor executes a nested-loop JOIN on two tables.*/
class HashJoinExecutor : public AbstractExecutor {public:/*** Construct a new HashJoinExecutor instance.* @param exec_ctx The executor context* @param plan The HashJoin join plan to be executed* @param left_child The child executor that produces tuples for the left side of join* @param right_child The child executor that produces tuples for the right side of join*/HashJoinExecutor(ExecutorContext *exec_ctx, const HashJoinPlanNode *plan,std::unique_ptr<AbstractExecutor> &&left_child, std::unique_ptr<AbstractExecutor> &&right_child);/** Initialize the join */void Init() override;/*** Yield the next tuple from the join.* @param[out] tuple The next tuple produced by the join.* @param[out] rid The next tuple RID, not used by hash join.* @return `true` if a tuple was produced, `false` if there are no more tuples.*/auto Next(Tuple *tuple, RID *rid) -> bool override;/** @return The output schema for the join */auto GetOutputSchema() const -> const Schema & override { return plan_->OutputSchema(); };private:auto GetLeftJoinKey(const Tuple *tuple) -> HashJoinKey {std::vector<Value> values;for (const auto &expr : plan_->LeftJoinKeyExpressions()) {values.emplace_back(expr->Evaluate(tuple, left_child_->GetOutputSchema()));}return {values};}auto GetRightJoinKey(const Tuple *tuple) -> HashJoinKey {std::vector<Value> values;for (const auto &expr : plan_->RightJoinKeyExpressions()) {values.emplace_back(expr->Evaluate(tuple, right_child_->GetOutputSchema()));}return {values};}/** The HashJoin plan node to be executed. */const HashJoinPlanNode *plan_;// 遍历哈希表的迭代器std::vector<Tuple>::iterator jht_iterator_;// 哈希表std::unique_ptr<SimpleHashJoinHashTable> jht_;// 指向左表的执行器对象std::unique_ptr<AbstractExecutor> left_child_;// 指向右表的执行器对象std::unique_ptr<AbstractExecutor> right_child_;Tuple left_tuple_{};RID left_rid_{};std::vector<Tuple> *right_tuple_{nullptr};bool has_done_;// 用来判断左边还有没有符合要求的元组bool left_bool_;
};}  // namespace bustub
2 NestedLoopJoin优化为HashJoin
2.1 思路
查询计划是从下往上的树形结构,所以要现在做下面再搞上面(用递归实现)
注意:要检查每个等值条件两侧的列属于哪个表。
步骤:
1、把子节点用递归的方式添加到 optimized_children 列表中
2、用 CloneWithChildren 方法克隆原始计划,并用优化后的子节点替换原始的子节点。这样即使实际没优化成,也说明尝试优化过了
3、看优化为hashjoin的条件满不满足
4、满足则换,不满足输出原计划
2.2 代码
#include <algorithm>
#include <memory>
#include "execution/expressions/column_value_expression.h"
#include "execution/expressions/comparison_expression.h"
#include "execution/expressions/logic_expression.h"
#include "execution/plans/abstract_plan.h"
#include "execution/plans/hash_join_plan.h"
#include "execution/plans/nested_loop_join_plan.h"
#include "optimizer/optimizer.h"namespace bustub {
// 解析一个逻辑表达式,并提取出左右两侧的关键表达式
void ParseAndExpression(const AbstractExpressionRef &predicate,std::vector<AbstractExpressionRef> *left_key_expressions,std::vector<AbstractExpressionRef> *right_key_expressions) {// 尝试将谓词转换为逻辑表达式,与或非auto *logic_expression_ptr = dynamic_cast<LogicExpression *>(predicate.get());// 递归处理逻辑逻辑表达式if (logic_expression_ptr != nullptr) {// left childParseAndExpression(logic_expression_ptr->GetChildAt(0), left_key_expressions, right_key_expressions);// right childParseAndExpression(logic_expression_ptr->GetChildAt(1), left_key_expressions, right_key_expressions);}// 尝试将谓词转换为比较表达式auto *comparison_ptr = dynamic_cast<ComparisonExpression *>(predicate.get());// 如果是比较表达式if (comparison_ptr != nullptr) {auto column_value_1 = dynamic_cast<const ColumnValueExpression &>(*comparison_ptr->GetChildAt(0));// auto column_value_2 = dynamic_cast<const ColumnValueExpression &>(*comparison_ptr->GetChildAt(1));// 区分每个数据元素是从左侧表还是右侧表提取的,例如 A.id = B.id时,系统需要知道 A.id 和 B.id 分别属于哪个数据源if (column_value_1.GetTupleIdx() == 0) {left_key_expressions->emplace_back(comparison_ptr->GetChildAt(0));right_key_expressions->emplace_back(comparison_ptr->GetChildAt(1));} else {left_key_expressions->emplace_back(comparison_ptr->GetChildAt(1));right_key_expressions->emplace_back(comparison_ptr->GetChildAt(0));}}
}auto Optimizer::OptimizeNLJAsHashJoin(const AbstractPlanNodeRef &plan) -> AbstractPlanNodeRef {// TODO(student): implement NestedLoopJoin -> HashJoin optimizer rule// Note for 2023 Fall: You should support join keys of any number of conjunction of equi-condistions:// E.g. <column expr> = <column expr> AND <column expr> = <column expr> AND ...std::vector<AbstractPlanNodeRef> optimized_children;for (const auto &child : plan->GetChildren()) {// 递归调用optimized_children.emplace_back(OptimizeNLJAsHashJoin(child));}auto optimized_plan = plan->CloneWithChildren(std::move(optimized_children));if (optimized_plan->GetType() == PlanType::NestedLoopJoin) {const auto &join_plan = dynamic_cast<const NestedLoopJoinPlanNode &>(*optimized_plan);// 获取谓词auto predicate = join_plan.Predicate();std::vector<AbstractExpressionRef> left_key_expressions;std::vector<AbstractExpressionRef> right_key_expressions;// 提取左右两侧关键表达式,分别放到left_key_expressions和right_key_expressions里)ParseAndExpression(predicate, &left_key_expressions, &right_key_expressions);return std::make_shared<HashJoinPlanNode>(join_plan.output_schema_, join_plan.GetLeftPlan(),join_plan.GetRightPlan(), left_key_expressions, right_key_expressions,join_plan.GetJoinType());}return optimized_plan;
}}  // namespace bustub
这个完成后可以运行SQLLogicTests - #14 和#15.
Task #4 Sort + Limit Executors + Top-N Optimization+ Window Functions
这个感觉比前面的都简单
1、Sort
1.1 思路
要求:默认升序
Init函数把元组顺序排好。Next函数从开始位置一个个输出
1.2 代码
#include <memory>
#include <vector>#include "execution/executor_context.h"
#include "execution/executors/abstract_executor.h"
#include "execution/plans/seq_scan_plan.h"
#include "execution/plans/sort_plan.h"
#include "storage/table/tuple.h"namespace bustub {// 用于排序的比较器
class Comparator {public:Comparator() { schema_ = nullptr; }Comparator(const Schema *schema, std::vector<std::pair<OrderByType, AbstractExpressionRef>> order_bys): schema_(schema), order_bys_(std::move(order_bys)) {}auto operator()(const Tuple &t1, const Tuple &t2) -> bool {for (auto const &order_by : this->order_bys_) {const auto order_type = order_by.first;// 使用Evaluate获取值AbstractExpressionRef expr = order_by.second;Value v1 = expr->Evaluate(&t1, *schema_);Value v2 = expr->Evaluate(&t2, *schema_);if (v1.CompareEquals(v2) == CmpBool::CmpTrue) {continue;}// 如果是升序(ASC 或 DEFAULT),比较 v1 是否小于 v2(CompareLessThan)if (order_type == OrderByType::ASC || order_type == OrderByType::DEFAULT) {return v1.CompareLessThan(v2) == CmpBool::CmpTrue;}// 如果是降序(DESC),比较 v1 是否大于 v2(CompareGreaterThan)return v1.CompareGreaterThan(v2) == CmpBool::CmpTrue;}// 两个元组所有键都相等return false;}private:const Schema *schema_;// 两个参数:升序还是降序,用那个键的值std::vector<std::pair<OrderByType, AbstractExpressionRef>> order_bys_;
};/*** The SortExecutor executor executes a sort.*/
class SortExecutor : public AbstractExecutor {public:/*** Construct a new SortExecutor instance.* @param exec_ctx The executor context* @param plan The sort plan to be executed*/SortExecutor(ExecutorContext *exec_ctx, const SortPlanNode *plan, std::unique_ptr<AbstractExecutor> &&child_executor);/** Initialize the sort */void Init() override;/*** Yield the next tuple from the sort.* @param[out] tuple The next tuple produced by the sort* @param[out] rid The next tuple RID produced by the sort* @return `true` if a tuple was produced, `false` if there are no more tuples*/auto Next(Tuple *tuple, RID *rid) -> bool override;/** @return The output schema for the sort */auto GetOutputSchema() const -> const Schema & override { return plan_->OutputSchema(); }private:/** The sort plan node to be executed */const SortPlanNode *plan_;// 生成要排序的数据std::unique_ptr<AbstractExecutor> child_executor_;std::vector<Tuple> tuples_;std::vector<Tuple>::iterator iter_;
};
} // namespace bustubSortExecutor::SortExecutor(ExecutorContext *exec_ctx, const SortPlanNode *plan,std::unique_ptr<AbstractExecutor> &&child_executor): AbstractExecutor(exec_ctx) {this->plan_ = plan;this->child_executor_ = std::move(child_executor);
}void SortExecutor::Init() {child_executor_->Init();Tuple tuple{};RID rid{};while (child_executor_->Next(&tuple, &rid)) {tuples_.emplace_back(tuple);}// 获取排序字段auto order_by = plan_->GetOrderBy();// 排序std::sort(tuples_.begin(), tuples_.end(), Comparator(&this->GetOutputSchema(), order_by));iter_ = tuples_.begin();
}auto SortExecutor::Next(Tuple *tuple, RID *rid) -> bool {// 调用的时候返回,从头到尾一个个返回if (iter_ != tuples_.end()) {*tuple = *iter_;++iter_;return true;}return false;
}
2、Limit Executors
2.1 思路
要求: 限制元组(记录或行)的数量。没什么说的。
2.2 代码
LimitExecutor::LimitExecutor(ExecutorContext *exec_ctx, const LimitPlanNode *plan,std::unique_ptr<AbstractExecutor> &&child_executor): AbstractExecutor(exec_ctx) {this->plan_ = plan;this->child_executor_ = std::move(child_executor);
}void LimitExecutor::Init() {child_executor_->Init();std::size_t count = 0;auto limit = plan_->GetLimit();Tuple tuple{};RID rid{};// 获取符合条件数量的元组while (count < limit && child_executor_->Next(&tuple, &rid)) {count++;tuples_.emplace_back(tuple);}if (!tuples_.empty()) {iter_ = tuples_.begin();}
}auto LimitExecutor::Next(Tuple *tuple, RID *rid) -> bool {if (!tuples_.empty() && iter_ != tuples_.end()) {*tuple = *iter_;iter_++;return true;}return false;
}private:/** The limit plan node to be executed */const LimitPlanNode *plan_;/** The child executor from which tuples are obtained */std::unique_ptr<AbstractExecutor> child_executor_;std::vector<Tuple> tuples_;std::vector<Tuple>::iterator iter_;
3、Top-N Optimization
3.1 思路
比较器的实现和sort里的Comparator是一样的。
Init函数里用
std::priority_queue<Tuple, std::vector<Tuple>, HeapComparator> heap(HeapComparator(&this->GetOutputSchema(), plan_->GetOrderBy()));
定义一个可以排序的(HeapComparator实现)、存储top-n元组的堆
3.2 代码
TopNExecutor::TopNExecutor(ExecutorContext *exec_ctx, const TopNPlanNode *plan,std::unique_ptr<AbstractExecutor> &&child_executor): AbstractExecutor(exec_ctx) {this->plan_ = plan;this->child_executor_ = std::move(child_executor);
}void TopNExecutor::Init() {child_executor_->Init();//使用优先队列存储topN,升序用大顶堆,降序用小顶堆std::priority_queue<Tuple, std::vector<Tuple>, HeapComparator> heap(HeapComparator(&this->GetOutputSchema(), plan_->GetOrderBy()));Tuple tuple{};RID rid{};//遍历子执行器,将子执行器返回的元组加入优先队列while (child_executor_->Next(&tuple, &rid)) {heap.push(tuple);heap_size_++;//因為只需要topN个元组,所以当优先队列大小大于topN时,弹出堆顶元组(如果是升序,堆顶是最大的元组,如果是降序,堆顶是最小的元组)if (heap.size() > plan_->GetN()) {heap.pop();heap_size_--;}}while (!heap.empty()) {this->top_entries_.push(heap.top());heap.pop();}
}auto TopNExecutor::Next(Tuple *tuple, RID *rid) -> bool {if (top_entries_.empty()) {return false;}*tuple = top_entries_.top();top_entries_.pop();return true;
}private:/** The TopN plan node to be executed */const TopNPlanNode *plan_;/** The child executor from which tuples are obtained */std::unique_ptr<AbstractExecutor> child_executor_;// 按順序存储优先队列中的tuple/** The stack to store sorted top-n tuple*/std::stack<Tuple> top_entries_;size_t heap_size_{0};
3.3 优化
要求: 将带有 ORDER BY + LIMIT 子句的查询转换为使用 TopNExecutor
优化的实现和前面优化成hashjoin的有点像
步骤:
1、把子节点用递归的方式添加到 optimized_children 列表中
2、用 CloneWithChildren 方法克隆原始计划,并用优化后的子节点替换原始的子节点。这样即使实际没优化成,也说明尝试优化过了
3、看优化为Top-N的条件满不满足,即有没有limit+orderby
4、满足就换,不满足输出原计划
#include "execution/plans/limit_plan.h"
#include "execution/plans/sort_plan.h"
#include "execution/plans/topn_plan.h"
#include "optimizer/optimizer.h"namespace bustub {auto Optimizer::OptimizeSortLimitAsTopN(const AbstractPlanNodeRef &plan) -> AbstractPlanNodeRef {// TODO(student): implement sort + limit -> top N optimizer rule// 对所有子节点递归应用这一优化std::vector<bustub::AbstractPlanNodeRef> optimized_children;for (const auto &child : plan->GetChildren()) {optimized_children.emplace_back(OptimizeSortLimitAsTopN(child));}auto optimized_plan = plan->CloneWithChildren(std::move(optimized_children));if (optimized_plan->GetType() == PlanType::Limit) {const auto &limit_plan = dynamic_cast<const LimitPlanNode &>(*optimized_plan);auto child = optimized_plan->children_[0];if (child->GetType() == PlanType::Sort) {const auto &sort_plan = dynamic_cast<const SortPlanNode &>(*child);return std::make_shared<TopNPlanNode>(optimized_plan->output_schema_, optimized_plan->children_[0],sort_plan.GetOrderBy(), limit_plan.limit_);}}return optimized_plan;
}
}  // namespace bustub
4、Window Functions
4.1 思路
看下官方介绍:https://15445.courses.cs.cmu.edu/fall2023/project3/#optimizer-guide,很详细了
不想写了,我要出去玩。要是有人看,帮我写了我粘上去吧
4.2 代码
#include "execution/executors/window_function_executor.h"
#include "execution/executors/aggregation_executor.h"
#include "execution/executors/sort_executor.h"
#include "execution/plans/window_plan.h"
#include "storage/table/tuple.h"namespace bustub {WindowFunctionExecutor::WindowFunctionExecutor(ExecutorContext *exec_ctx, const WindowFunctionPlanNode *plan,std::unique_ptr<AbstractExecutor> &&child_executor): AbstractExecutor(exec_ctx), plan_(plan), child_executor_(std::move(child_executor)) {}void WindowFunctionExecutor::Init() {child_executor_->Init();// 获取窗口函数的信息auto window_functions = plan_->window_functions_;// 获取列数auto cloumn_size = plan_->columns_.size();//创建各类vection用于存储窗口函数的具体信息// 是否需要排序std::vector<bool> is_order_by(plan_->columns_.size());// 窗口函数表达式std::vector<AbstractExpressionRef> window_exprs(cloumn_size);// 窗口函数类型std::vector<WindowFunctionType> window_function_types(cloumn_size);// 分组条件std::vector<std::vector<AbstractExpressionRef>> partition_by(cloumn_size);// 排序条件std::vector<std::vector<std::pair<OrderByType, AbstractExpressionRef>>> order_bys(cloumn_size);// 是否是函数表达式std::vector<bool> is_function_expr(cloumn_size);// 获取窗口函数中的值,并且将相应的值存入vector中for (uint32_t i = 0; i < cloumn_size; i++) {// 如果没有窗口函数,则直接将列存入vector中,说明只是单纯的数值列if (window_functions.find(i) == window_functions.end()) {// 直接将列存入vector中window_exprs[i] = plan_->columns_[i];// 说明只是单纯的数值列is_function_expr[i] = false;// 没有排序is_order_by[i] = false;// 将空的窗口函数类型也存入SimpleWindowHashTable的vector中,方便後續遍歷使用whts_.emplace_back(window_function_types[i]);continue;}// 说明是函数表达式is_function_expr[i] = true;// 获取窗口函数const auto &window_function = window_functions.find(i)->second;// 将窗口函数存入vector中window_exprs[i] = window_function.function_;// 获取窗口函数类型window_function_types[i] = window_function.type_;// 获取分组条件partition_by[i] = window_function.partition_by_;// 获取排序条件order_bys[i] = window_function.order_by_;// 判断是否需要排序,因為即使有窗口函數,但是也有可能不需要排序is_order_by[i] = !window_function.order_by_.empty();// 创建SimpleWindowHashTablewhts_.emplace_back(window_function_types[i]);}Tuple tuple{};RID rid{};std::vector<Tuple> tuples;// 获取符合条件的所有元组while (child_executor_->Next(&tuple, &rid)) {tuples.emplace_back(tuple);}// 获取order_by_,这里因为文档中说了,所有的窗口函数都只支持一个order_by,所以直接取第一个即可const auto &order_by(window_functions.begin()->second.order_by_);if (!order_by.empty()) {// 如果order_by不为空,则对元组进行排序std::sort(tuples.begin(), tuples.end(), Comparator(&child_executor_->GetOutputSchema(), order_by));}// 用于存储窗口函数的keystd::vector<std::vector<AggregateKey>> tuple_keys;// 获取窗口函数中的聚合函数或者rank函数for (const auto &this_tuple : tuples) {std::vector<Value> values{};std::vector<AggregateKey> keys;// 遍历元组列,判断符合条件的列for (uint32_t i = 0; i < cloumn_size; ++i) {// 如果是函数表达式,则需要处理if (is_function_expr[i]) {// 获取窗口函数的keyauto agg_key = MakeWinKey(&this_tuple, partition_by[i]);// 如果是rank函数,则需要特殊处理if (window_function_types[i] == WindowFunctionType::Rank) {// 获取该列的最新值auto new_value = order_by[0].second->Evaluate(&this_tuple, this->GetOutputSchema());// 这里是rank函数,需要判断该值是否与之前的值相同,如果相同则,rank等级一样values.emplace_back(whts_[i].InsertCombine(agg_key, new_value));keys.emplace_back(agg_key);continue;}// 聚合函数的情况下,与前面聚合函数的处理一样auto agg_val = MakeWinValue(&this_tuple, window_exprs[i]);values.emplace_back(whts_[i].InsertCombine(agg_key, agg_val));keys.emplace_back(agg_key);continue;}// 对于没有窗口函数的列,直接将列存入vector中values.emplace_back(window_exprs[i]->Evaluate(&this_tuple, this->GetOutputSchema()));keys.emplace_back();}// 将更新后的列值存入tuple的vector中tuples_.emplace_back(std::move(values));// 将更新后的key存入tuple_keys的vector中tuple_keys.emplace_back(std::move(keys));}// 这次用于处理没有order_by的情况下,不需要对每个元组单独进行窗口函数处理,每一个元组的列值都是相同的,且是最新值for (uint32_t tuple_idx = 0; tuple_idx < tuples_.size(); ++tuple_idx) {auto &tuplenew = tuples_[tuple_idx];for (uint32_t i = 0; i < tuplenew.size(); ++i) {if (is_function_expr[i] && !is_order_by[i]) {// 将每个元组窗口函数的列值更新为最新值tuplenew[i] = whts_[i].Find(tuple_keys[tuple_idx][i]);}}}
}auto WindowFunctionExecutor::Next(Tuple *tuple, RID *rid) -> bool {if (tuples_.empty()) {return false;}// 获取元组*tuple = Tuple(tuples_.front(), &this->GetOutputSchema());*rid = tuple->GetRid();// 删除已经处理过的元组tuples_.pop_front();return true;
}
}  // namespace bustub
/*** A simplified hash table that has all the necessary functionality for window functions*/
class SimpleWindowHashTable {public:/*** Construct a new SimpleWindowHashTable instance.* @param window_agg_exprs the window aggregation expressions* @param window_agg_types the types of window aggregations*/explicit SimpleWindowHashTable(const WindowFunctionType &window_function_type): window_function_type_(window_function_type) {}/** @return The initial window aggregate value for this window executor*/auto GenerateInitialWindowAggregateValue() -> Value {Value value;switch (window_function_type_) {case WindowFunctionType::CountStarAggregate:return ValueFactory::GetIntegerValue(0);case WindowFunctionType::Rank:case WindowFunctionType::CountAggregate:case WindowFunctionType::SumAggregate:case WindowFunctionType::MinAggregate:case WindowFunctionType::MaxAggregate:return ValueFactory::GetNullValueByType(TypeId::INTEGER);}return {};}/*** Combines the input into the aggregation result.* @param[out] result The output rows of aggregate value corresponding to one key* @param input The input value*/auto CombineAggregateValues(Value *result, const Value &input) -> Value {Value &old_val = *result;const Value &new_val = input;switch (window_function_type_) {case WindowFunctionType::CountStarAggregate:old_val = old_val.Add(Value(TypeId::INTEGER, 1));break;case WindowFunctionType::CountAggregate:if (!new_val.IsNull()) {if (old_val.IsNull()) {old_val = ValueFactory::GetIntegerValue(0);}old_val = old_val.Add(Value(TypeId::INTEGER, 1));}break;case WindowFunctionType::SumAggregate:if (!new_val.IsNull()) {if (old_val.IsNull()) {old_val = new_val;} else {old_val = old_val.Add(new_val);}}break;case WindowFunctionType::MinAggregate:if (!new_val.IsNull()) {if (old_val.IsNull()) {old_val = new_val;} else {old_val = new_val.CompareLessThan(old_val) == CmpBool::CmpTrue ? new_val.Copy() : old_val;}}break;case WindowFunctionType::MaxAggregate:if (!new_val.IsNull()) {if (old_val.IsNull()) {old_val = new_val;} else {old_val = new_val.CompareGreaterThan(old_val) == CmpBool::CmpTrue ? new_val.Copy() : old_val;}}break;case WindowFunctionType::Rank:++rank_count_;if (old_val.CompareEquals(new_val) != CmpBool::CmpTrue) {old_val = new_val;last_rank_count_ = rank_count_;}return ValueFactory::GetIntegerValue(last_rank_count_);}return old_val;}/*** Inserts a value into the hash table and then combines it with the current aggregation* @param win_key the key to be inserted* @param win_val the value to be inserted*/auto InsertCombine(const AggregateKey &win_key, const Value &win_value) -> Value {if (ht_.count(win_key) == 0) {ht_.insert({win_key, GenerateInitialWindowAggregateValue()});}return CombineAggregateValues(&ht_[win_key], win_value);}/*** Find a value with give key* @param win_key the key to be used to find its corresponding value*/auto Find(const AggregateKey &win_key) -> Value { return ht_.find(win_key)->second; }/*** Clear the hash table*/void Clear() { ht_.clear(); }private:const WindowFunctionType window_function_type_;std::unordered_map<AggregateKey, Value> ht_;uint32_t rank_count_ = 0;uint32_t last_rank_count_ = 0;
};private:/** The window aggregation plan node to be executed */const WindowFunctionPlanNode *plan_;/** The child executor from which tuples are obtained */std::unique_ptr<AbstractExecutor> child_executor_;/** The SimpleWindowHashTable*/std::vector<SimpleWindowHashTable> whts_;/** The output tuples */std::deque<std::vector<Value>> tuples_;
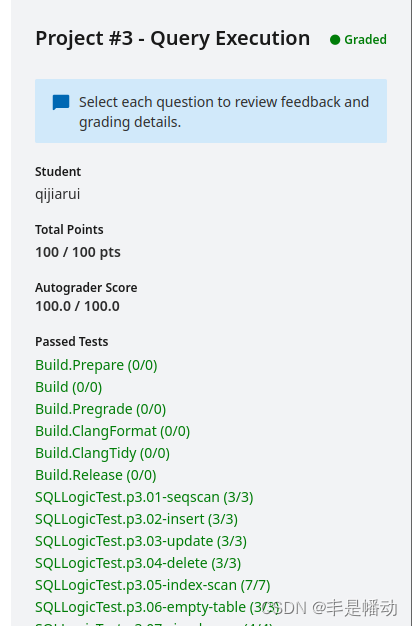
最后放个满分截图。有的地方明后天有空再完善下,没空算了。
参考文章:
[1]https://zhuanlan.zhihu.com/p/570917775(BusTub 养成记:从课程项目到 SQL 数据库)
[2]https://zhuanlan.zhihu.com/p/587566135(做个数据库:2022 CMU15-445 Project3 Query Execution)
[3]https://blog.csdn.net/laiyuhua120/article/details/130494964(CMU 15445 P3 Query Execution)
[4] https://blog.csdn.net/qq_43686863/article/details/132711982?spm=1001.2014.3001.5506(CMU 15-445 Project #3 - Query Execution(Task #1、Task #2))
[5]https://zhuanlan.zhihu.com/p/690608079?(cmu15445fall2022笔记(完结撒花))
[6] https://blog.csdn.net/Tianweidadada/article/details/125340858?spm=1001.2014.3001.5506(记录一下 CMU 15445 项目)
[7] 文心一言
[8]https://15445.courses.cs.cmu.edu/fall2023/project3/#optimizer-guide(CMU15445)