环境准备
 准备数据库表
use mybatis;-- 部门管理
create table dept(id int unsigned primary key auto_increment comment '主键ID',name varchar(10) not null unique comment '部门名称',create_time datetime not null comment '创建时间',update_time datetime not null comment '修改时间'
) comment '部门表';insert into dept (id, name, create_time, update_time) values(1,'学工部',now(),now()),(2,'教研部',now(),now()),(3,'咨询部',now(),now()), (4,'就业部',now(),now()),(5,'人事部',now(),now());-- 员工管理
create table emp (id int unsigned primary key auto_increment comment 'ID',username varchar(20) not null unique comment '用户名',password varchar(32) default '123456' comment '密码',name varchar(10) not null comment '姓名',gender tinyint unsigned not null comment '性别, 说明: 1 男, 2 女',image varchar(300) comment '图像',job tinyint unsigned comment '职位, 说明: 1 班主任,2 讲师, 3 学工主管, 4 教研主管, 5 咨询师',entrydate date comment '入职时间',dept_id int unsigned comment '部门ID',create_time datetime not null comment '创建时间',update_time datetime not null comment '修改时间'
) comment '员工表';INSERT INTO emp
(id, username, password, name, gender, image, job, entrydate,dept_id, create_time, update_time) VALUES(1,'jinyong','123456','金庸',1,'1.jpg',4,'2000-01-01',2,now(),now()),(2,'zhangwuji','123456','张无忌',1,'2.jpg',2,'2015-01-01',2,now(),now()),(3,'yangxiao','123456','杨逍',1,'3.jpg',2,'2008-05-01',2,now(),now()),(4,'weiyixiao','123456','韦一笑',1,'4.jpg',2,'2007-01-01',2,now(),now()),(5,'changyuchun','123456','常遇春',1,'5.jpg',2,'2012-12-05',2,now(),now()),(6,'xiaozhao','123456','小昭',2,'6.jpg',3,'2013-09-05',1,now(),now()),(7,'jixiaofu','123456','纪晓芙',2,'7.jpg',1,'2005-08-01',1,now(),now()),(8,'zhouzhiruo','123456','周芷若',2,'8.jpg',1,'2014-11-09',1,now(),now()),(9,'dingminjun','123456','丁敏君',2,'9.jpg',1,'2011-03-11',1,now(),now()),(10,'zhaomin','123456','赵敏',2,'10.jpg',1,'2013-09-05',1,now(),now()),(11,'luzhangke','123456','鹿杖客',1,'11.jpg',5,'2007-02-01',3,now(),now()),(12,'hebiweng','123456','鹤笔翁',1,'12.jpg',5,'2008-08-18',3,now(),now()),(13,'fangdongbai','123456','方东白',1,'13.jpg',5,'2012-11-01',3,now(),now()),(14,'zhangsanfeng','123456','张三丰',1,'14.jpg',2,'2002-08-01',2,now(),now()),(15,'yulianzhou','123456','俞莲舟',1,'15.jpg',2,'2011-05-01',2,now(),now()),(16,'songyuanqiao','123456','宋远桥',1,'16.jpg',2,'2010-01-01',2,now(),now()),(17,'chenyouliang','123456','陈友谅',1,'17.jpg',NULL,'2015-03-21',NULL,now(),now());
创建Springboot工程 引入对应的依赖
<?xml version="1.0" encoding="UTF-8"?>
<project xmlns="http://maven.apache.org/POM/4.0.0" xmlns:xsi="http://www.w3.org/2001/XMLSchema-instance"xsi:schemaLocation="http://maven.apache.org/POM/4.0.0 https://maven.apache.org/xsd/maven-4.0.0.xsd"><modelVersion>4.0.0</modelVersion><!--所有项目的父工程 指定了springboot工程的版本--><parent><groupId>org.springframework.boot</groupId><artifactId>spring-boot-starter-parent</artifactId><version>3.2.5</version><relativePath/> <!-- lookup parent from repository --></parent><!-- Generated by https://start.springboot.io --><!-- 优质的 spring/boot/data/security/cloud 框架中文文档尽在 => https://springdoc.cn --><groupId>com.bigdate</groupId><artifactId>Mybatis</artifactId><version>0.0.1-SNAPSHOT</version><name>Mybatis</name><description>Mybatis</description><properties><java.version>17</java.version></properties><dependencies><dependency><groupId>org.springframework.boot</groupId><artifactId>spring-boot-starter-web</artifactId></dependency><!--mybatis起步依赖--><dependency><groupId>org.mybatis.spring.boot</groupId><artifactId>mybatis-spring-boot-starter</artifactId><version>3.0.3</version></dependency><!--MySQL驱动包--><dependency><groupId>com.mysql</groupId><artifactId>mysql-connector-j</artifactId><scope>runtime</scope></dependency><!--Springboot单元测试所需要的依赖--><dependency><groupId>org.springframework.boot</groupId><artifactId>spring-boot-starter-test</artifactId><scope>test</scope></dependency><dependency><groupId>org.mybatis.spring.boot</groupId><artifactId>mybatis-spring-boot-starter-test</artifactId><version>3.0.3</version><scope>test</scope></dependency><!-- druid连接池 --><dependency><groupId>com.alibaba</groupId><artifactId>druid-spring-boot-starter</artifactId><version>1.2.8</version></dependency><!-- lombok --><dependency><groupId>org.projectlombok</groupId><artifactId>lombok</artifactId></dependency></dependencies><build><plugins><plugin><groupId>org.springframework.boot</groupId><artifactId>spring-boot-maven-plugin</artifactId></plugin></plugins></build></project>
引入数据库的连接信息
spring.application.name=Mybatisspring.datasource.driver-class-name=com.mysql.cj.jdbc.Driverspring.datasource.url=jdbc:mysql://localhost:3306/mybatisspring.datasource.username=rootspring.datasource.password=123456spring.datasource.type=com.alibaba.druid.pool.DruidDataSource创建实体类并用lombok工具 通过注释简化书写

package com.bigdate.mybatis.pojo;import lombok.*;import java.time.LocalDate;
import java.time.LocalDateTime;//@Getter
//@Setter
//@ToString
//@EqualsAndHashCode@Data
@NoArgsConstructor  //无参构造
@AllArgsConstructor //带参构造public class User {//IDprivate Integer id;//用户名private String username;//密码private String password;//姓名private String name;//性别private Short gender;//图像private String image;//职位private Short job;//入职时间private LocalDate entrydate;//部门IDprivate Integer deptID;//创建时间private LocalDateTime creatTime;//修改时间private LocalDateTime updateTime;}
准备好Mapper接口 将数据库中拿到的实体类对象交给ioc容器
package com.bigdate.mybatis.mapper;import com.bigdate.mybatis.pojo.User;
import org.apache.ibatis.annotations.Mapper;
import org.apache.ibatis.annotations.Select;import java.util.List;@Mapper//表示当前是Mybatis的一个接口 此时程序运行时框架会自动生成实现类对象(代理对象) 并交给spring的ioc容器
public interface UserMapper {}
基础工程

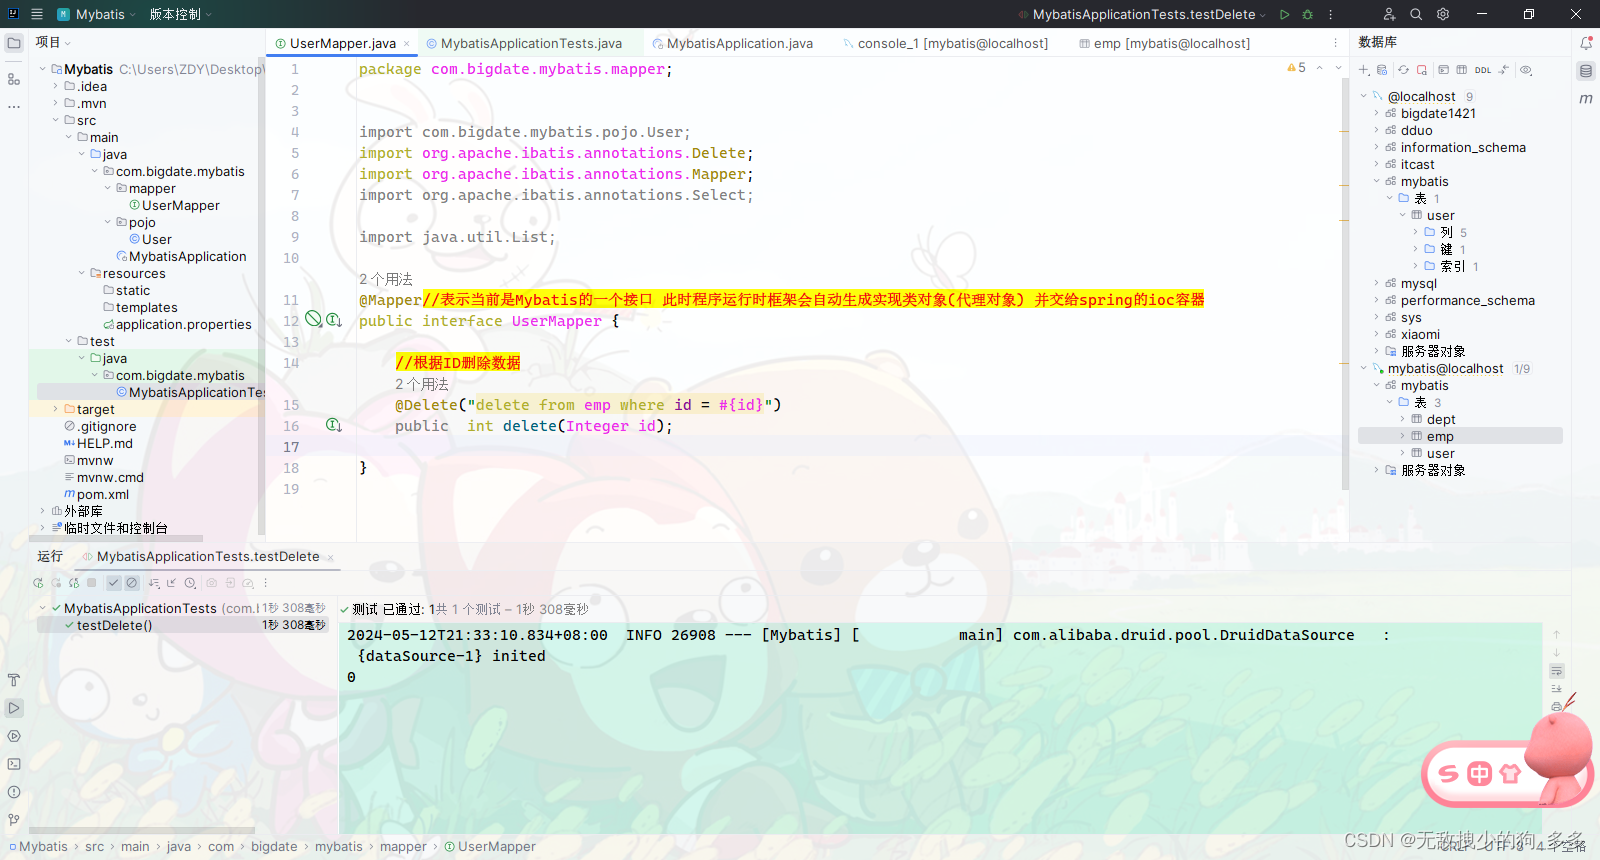
删除操作


删除数据库表中的数据

package org.example.mybatis.mapper;import org.apache.ibatis.annotations.Delete;
import org.apache.ibatis.annotations.Mapper;@Mapper//表示当前是Mybatis的一个接口 此时程序运行时框架会自动生成实现类对象(代理对象) 并交给spring的ioc容器
public interface UserMapper {//根据ID删除数据@Delete("delete from emp where id = #{id}")//返回值代表的是操作影响的数据数public  int delete(Integer id);}
package org.example.mybatis;import org.example.mybatis.mapper.UserMapper;
import org.junit.jupiter.api.Test;
import org.springframework.beans.factory.annotation.Autowired;
import org.springframework.boot.test.context.SpringBootTest;import java.sql.*;
import java.util.ArrayList;
import java.util.List;@SpringBootTest //springboot整合单元测试的注解
class MybatisApplicationTests {@Autowired//声明接口类型的对象 将此对象注入进来private UserMapper userMapper;@Testpublic void testDelete(){int ans=userMapper.delete(14);//拿到返回值 并且输出到控制台System.out.println(userMapper.delete(ans));}}
一般来说返回值是不需要的
返回值类型都设置为void
预编译SQL
我们不知道Java底层执行了什么样子的SQL语句
所以我们要打开日志
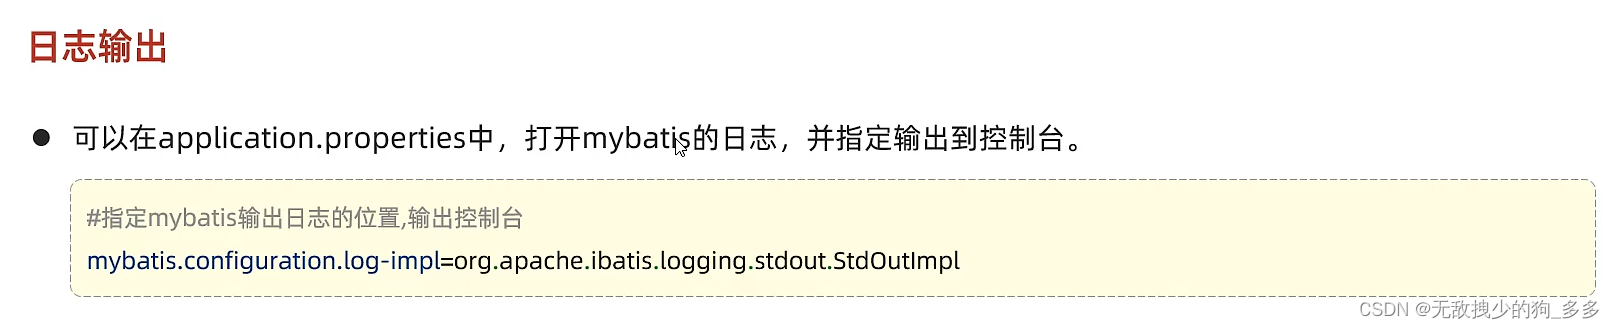
在配置文件中配置
指定输出到控制台
spring.application.name=Mybatis#驱动类名称
spring.datasource.driver-class-name=com.mysql.cj.jdbc.Driver#数据库连接url
spring.datasource.url=jdbc:mysql://localhost:3306/mybatis#连接数据库的用户名
spring.datasource.username=root#连接数据库的密码
spring.datasource.password=123456#换数据库连接池
spring.datasource.type=com.alibaba.druid.pool.DruidDataSource#配置mybatis的日志 指定输出到控制台
mybatis.configuration.log-impl=org.apache.ibatis.logging.stdout.StdOutImpl
这样就能输出执行的SQL语句
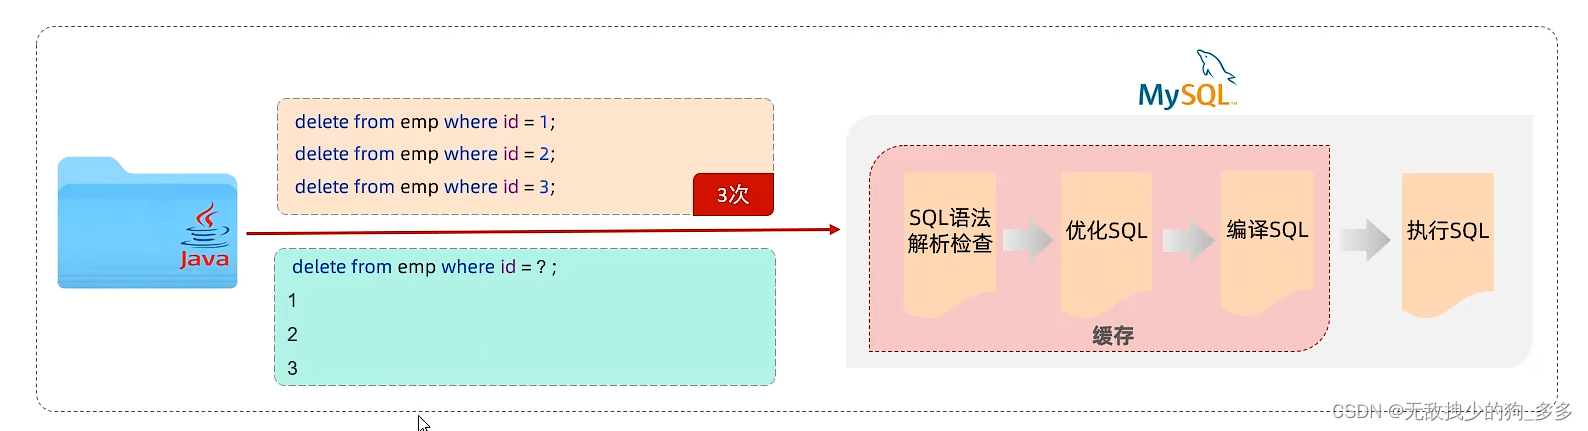
这个语句叫预编译SQL语句
?是预编译过程中的数据占位符
采用这种预编译的方式 性能更高 而且更安全

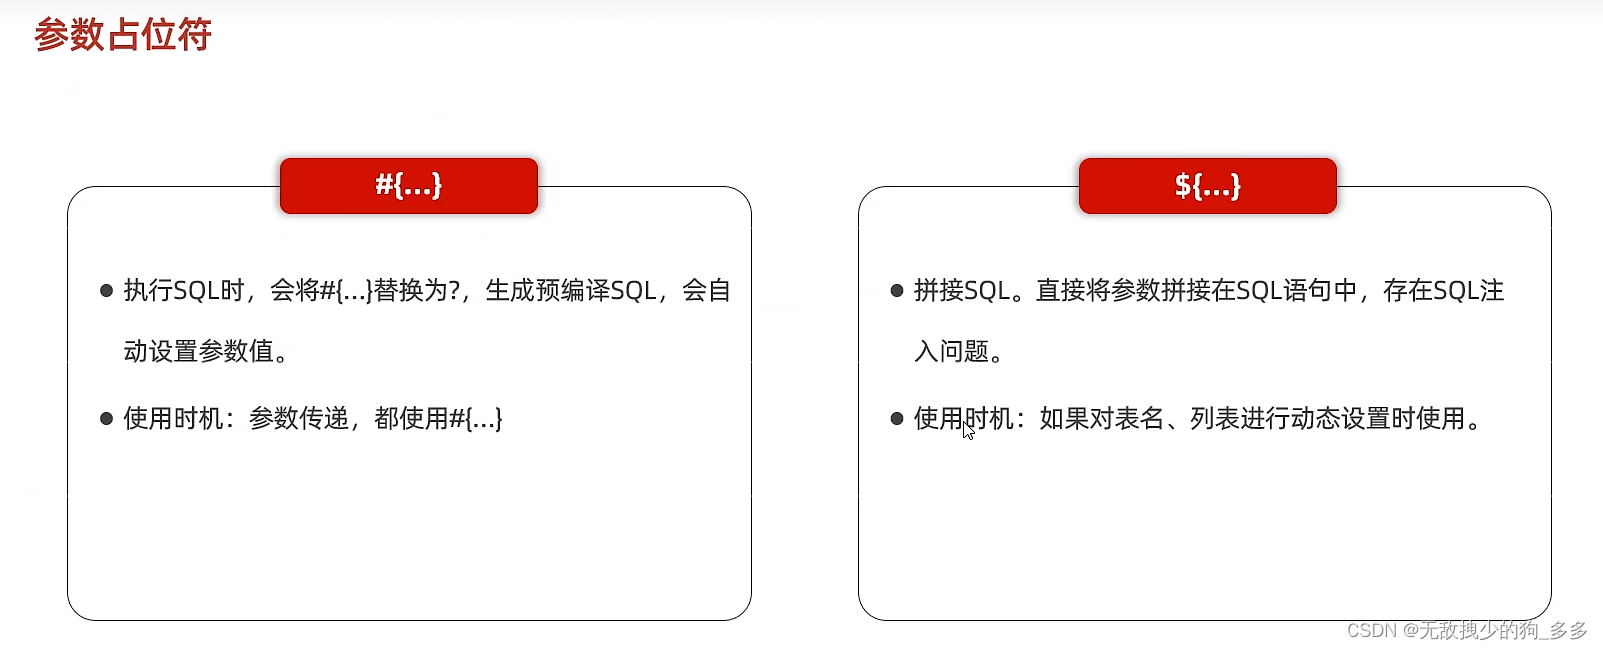
#和 {} 最后会被 ?替换


SQL具有缓存机制
小结

新增操作

往员工表中插入数据
实际前端页面是一个表单提交数据
基本信息录入完毕后
就能将数据提交到服务端
然后服务端将数据写入数据库

用实体类封装参数


注意字段要一一对应
如果字段名对应不上就难以通过测试
这边改了半个小时

先定义接口方法
再获取接口 写测试类
package org.example.mybatis.mapper;import org.apache.ibatis.annotations.Delete;
import org.apache.ibatis.annotations.Insert;
import org.apache.ibatis.annotations.Mapper;
import org.example.mybatis.pojo.User;@Mapper//表示当前是Mybatis的一个接口 此时程序运行时框架会自动生成实现类对象(代理对象) 并交给spring的ioc容器
public interface UserMapper {//根据ID删除数据@Delete("delete from emp where id = #{id}")//返回值代表的是操作影响的数据数public  int delete(Integer id);//新增数据@Insert("insert into emp (id, username, password, name, gender, image, job, entrydate, dept_id, create_time, update_time)" +"values (#{id},#{username},#{password},#{name},#{gender},#{image},#{job},#{entryDate},#{deptID},#{creatTime},#{updateTime})")public void insert(User user);}
package org.example.mybatis;import org.example.mybatis.mapper.UserMapper;
import org.example.mybatis.pojo.User;
import org.junit.jupiter.api.Test;
import org.springframework.beans.factory.annotation.Autowired;
import org.springframework.boot.test.context.SpringBootTest;import java.sql.*;
import java.time.LocalDate;
import java.time.LocalDateTime;
import java.util.ArrayList;
import java.util.List;@SpringBootTest //springboot整合单元测试的注解
class MybatisApplicationTests {@Autowired//声明接口类型的对象 将此对象注入进来private UserMapper userMapper;@Testpublic void testDelete(){int ans=userMapper.delete(14);//拿到返回值System.out.println(userMapper.delete(ans));}@Testpublic void testInsert(){User user=new User();//-- 插入数据//insert into emp(id, username, password, name, gender, image, job, entrydate, dept_id, create_time, update_time)//values (133,'Dduo',1234,'多多','1','100.jpg','1',now(),1,now(),now());user.setId(1332);user.setUsername("Dduo");user.setPassword("1234");user.setName("多多");user.setGender((short) 1);user.setImage("1.jpg");user.setJob((short)1);user.setEntryDate(LocalDate.of(2000,1,1));user.setDeptID(1);user.setCreatTime(LocalDateTime.now());user.setUpdateTime(LocalDateTime.now());//执行新增员工信息的操作userMapper.insert(user);}}写在Mapper接口里的方法

写在测试类里面的启动测试案例

主键返回
在数据添加成功后
需要获取插入数据库数据的主键
例如在添加套餐数据时 还需要维护套餐菜品关系表的数据

我们需要怎么去做呢

代码演示

package org.example.mybatis.mapper;import org.apache.ibatis.annotations.Delete;
import org.apache.ibatis.annotations.Insert;
import org.apache.ibatis.annotations.Mapper;
import org.apache.ibatis.annotations.Options;
import org.example.mybatis.pojo.User;@Mapper//表示当前是Mybatis的一个接口 此时程序运行时框架会自动生成实现类对象(代理对象) 并交给spring的ioc容器
public interface UserMapper {//根据ID删除数据@Delete("delete from emp where id = #{id}")//返回值代表的是操作影响的数据数public  int delete(Integer id);//新增数据@Options(useGeneratedKeys = true , keyProperty = "id")@Insert("insert into emp (id, username, password, name, gender, image, job, entrydate, dept_id, create_time, update_time)" +"values (#{id},#{username},#{password},#{name},#{gender},#{image},#{job},#{entryDate},#{deptID},#{creatTime},#{updateTime})")public void insert(User user);}
更新修改操作
点击操作的编辑按钮时
就会根据当前数据的主键ID
来查找这条数据并将数据回填
我们直接修改
然后提交表单到服务端去完成数据库表结构中数据的修改
写在Mapper接口里的

写在测试类里面

package org.example.mybatis.mapper;import org.apache.ibatis.annotations.*;
import org.example.mybatis.pojo.User;@Mapper//表示当前是Mybatis的一个接口 此时程序运行时框架会自动生成实现类对象(代理对象) 并交给spring的ioc容器
public interface UserMapper {//根据ID删除数据@Delete("delete from emp where id = #{id}")//返回值代表的是操作影响的数据数public  int delete(Integer id);//新增数据@Options(useGeneratedKeys = true , keyProperty = "id")@Insert("insert into emp (id, username, password, name, gender, image, job, entrydate, dept_id, create_time, update_time)" +"values (#{id},#{username},#{password},#{name},#{gender},#{image},#{job},#{entryDate},#{deptID},#{creatTime},#{updateTime})")public void insert(User user);//更新数据@Update("update emp set username=#{username},password=#{password},name=#{gender}," +"gender=#{gender},image=#{image},job=#{job}," +"entrydate=#{entryDate},dept_id=#{deptID},create_time=#{creatTime} ,update_time=#{updateTime} " +"where id=#{id}")public void update(User user);}
package org.example.mybatis;import org.example.mybatis.mapper.UserMapper;
import org.example.mybatis.pojo.User;
import org.junit.jupiter.api.Test;
import org.springframework.beans.factory.annotation.Autowired;
import org.springframework.boot.test.context.SpringBootTest;import java.sql.*;
import java.time.LocalDate;
import java.time.LocalDateTime;
import java.util.ArrayList;
import java.util.List;@SpringBootTest //springboot整合单元测试的注解
class MybatisApplicationTests {@Autowired//声明接口类型的对象 将此对象注入进来private UserMapper userMapper;@Testpublic void testDelete(){int ans=userMapper.delete(14);//拿到返回值System.out.println(userMapper.delete(ans));}@Testpublic void testInsert(){User user=new User();//-- 插入数据//insert into emp(id, username, password, name, gender, image, job, entrydate, dept_id, create_time, update_time)//values (133,'Dduo',1234,'多多','1','100.jpg','1',now(),1,now(),now());user.setId(14);user.setUsername("Dduo1");user.setPassword("1234");user.setName("多多");user.setGender((short) 1);user.setImage("1.jpg");user.setJob((short)1);user.setEntryDate(LocalDate.of(2000,1,1));user.setDeptID(1);user.setCreatTime(LocalDateTime.now());user.setUpdateTime(LocalDateTime.now());//执行新增员工信息的操作userMapper.insert(user);}@Testpublic void testUpdata(){User user=new User();user.setId(14);user.setUsername("Dduo1");user.setPassword("1234");user.setName("多多");user.setGender((short) 1);user.setImage("1.jpg");user.setJob((short)1);user.setEntryDate(LocalDate.of(2000,1,1));user.setDeptID(1);user.setCreatTime(LocalDateTime.now());user.setUpdateTime(LocalDateTime.now());//执行新增员工信息的操作userMapper.update(user);}}查看日志 更新的数据为一条

根据ID查询

写在Mapper接口里

写在测试类里面
package org.example.mybatis;import org.example.mybatis.mapper.UserMapper;
import org.example.mybatis.pojo.User;
import org.junit.jupiter.api.Test;
import org.springframework.beans.factory.annotation.Autowired;
import org.springframework.boot.test.context.SpringBootTest;import java.sql.*;
import java.time.LocalDate;
import java.time.LocalDateTime;
import java.util.ArrayList;
import java.util.List;@SpringBootTest //springboot整合单元测试的注解
class MybatisApplicationTests {@Autowired//声明接口类型的对象 将此对象注入进来private UserMapper userMapper;@Testpublic void testDelete(){int ans=userMapper.delete(14);//拿到返回值System.out.println(userMapper.delete(ans));}@Testpublic void testInsert(){User user=new User();//-- 插入数据//insert into emp(id, username, password, name, gender, image, job, entrydate, dept_id, create_time, update_time)//values (133,'Dduo',1234,'多多','1','100.jpg','1',now(),1,now(),now());user.setId(14);user.setUsername("Dduo1");user.setPassword("1234");user.setName("多多");user.setGender((short) 1);user.setImage("1.jpg");user.setJob((short)1);user.setEntryDate(LocalDate.of(2000,1,1));user.setDeptID(1);user.setCreatTime(LocalDateTime.now());user.setUpdateTime(LocalDateTime.now());//执行新增员工信息的操作userMapper.insert(user);}@Testpublic void testUpdata(){User user=new User();user.setId(14);user.setUsername("Dduo1");user.setPassword("1234");user.setName("多多");user.setGender((short) 1);user.setImage("1.jpg");user.setJob((short)1);user.setEntryDate(LocalDate.of(2000,1,1));user.setDeptID(1);user.setCreatTime(LocalDateTime.now());user.setUpdateTime(LocalDateTime.now());//执行新增员工信息的操作userMapper.update(user);}@Testpublic void testGetById(){User user=userMapper.getById(2);System.out.println(user);}}
控制台进行反馈

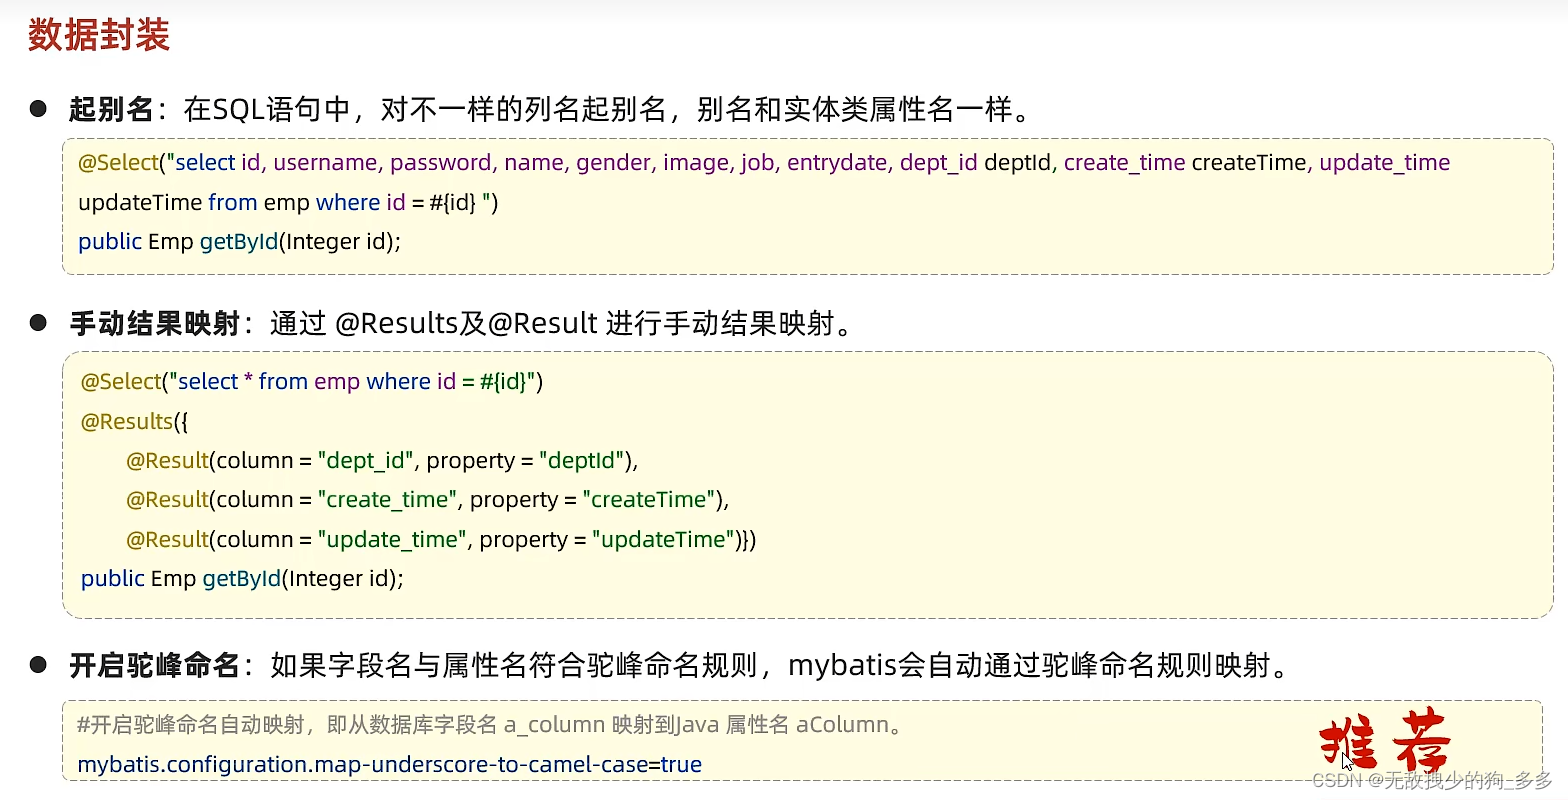
但是在控制台中 字段值没有全部封装
而日期类的数据没有封装
在我们进行单元测试的时候我们会发现有些字段没有封装到实体类对象里面

处理方案


但是这种方案比较繁琐 不使用
我们应该打开Mybatis 自动映射开关
驼峰命名自动映射的开关
mybatis.configuration.map-underscore-to-camel-case=true
这样在Mapper接口中既不用手动封装也不用去取别名了
直接把原代码放开
package org.example.mybatis.mapper;import org.apache.ibatis.annotations.*;
import org.example.mybatis.pojo.User;@Mapper//表示当前是Mybatis的一个接口 此时程序运行时框架会自动生成实现类对象(代理对象) 并交给spring的ioc容器
public interface UserMapper {//根据ID删除数据@Delete("delete from emp where id = #{id}")//返回值代表的是操作影响的数据数public  int delete(Integer id);//新增数据@Options(useGeneratedKeys = true , keyProperty = "id")@Insert("insert into emp (id, username, password, name, gender, image, job, entrydate, dept_id, create_time, update_time)" +"values (#{id},#{username},#{password},#{name},#{gender},#{image},#{job},#{entryDate},#{deptID},#{creatTime},#{updateTime})")public void insert(User user);//更新数据@Update("update emp set username=#{username},password=#{password},name=#{gender}," +"gender=#{gender},image=#{image},job=#{job}," +"entrydate=#{entryDate},dept_id=#{deptID},create_time=#{creatTime} ,update_time=#{updateTime} " +"where id=#{id}")public void update(User user);//查询数据@Select("select * from emp where id=#{id}")public User getById(Integer id);//方案1 给字段起别名 让别名与实体类的属性一致
//    @Select("select id, username, password, name, gender, image, job, " +
//            "entrydate entryDate, dept_id  deptID, create_time creatTime, update_time updateTime" +
//            " from emp where id=#{id}")
//    public User getById1(Integer id);//方案2 通过@Results @Result注解手动映射封装
//    @Results({
//            @Result(column = "entrydate",property = "entryDate"),
//            @Result(column = "dept_id",property = "deptID"),
//            @Result(column = "create_time",property = "creatTime"),
//            @Result(column = "update_time",property = "updateTime")
//    })
//    @Select("select * from emp where id=#{id}")
//    public User getById2(Integer id);}
小结