前言
接下来将实现一个远程继电器,实时远程控制和查询的开关状态。用 5v 直流电控制 220v 交流电。
硬件上: 使用 nodemcu D1 和 JQC-3FF-S-Z 继电器。
软件上: 使用 nodejs 作为服务端,和 html 作为客户端。
在开始之前在电脑中建立一个文件夹 /project
效果
远程继电器模块
材料准备
硬件
| 名称 | 数量 |
|---|---|
| nodemcu D1 | 1 |
| JQC-3FF-S-Z 继电器 | 1 |
| 杜邦线 | 若干 |
| led(3.3v) | 1 |
| 面包板 | 1 |
服务端依赖
/project/package.json
{"name": "server","version": "1.0.0","description": "","main": "index.js","scripts": {"test": "echo \"Error: no test specified\" && exit 1"},"author": "","license": "ISC","dependencies": {"body-parser": "^1.20.2","express": "^4.18.2","socket.io": "^4.7.1"}
}
IDE
Arduino
vsCode
服务端实现
/project/index.js
const bodyParser = require("body-parser");
const express = require("express");
const path = require("path");
const app = express();
const http = require("http");
const { Server } = require("socket.io");
const server = http.createServer(app);const port = 3005;/*** 所有开关的状态记录
*/
const switchs = {// 台灯开关desklamp: "0",
};app.use(bodyParser.json({ limit: "50mb" }));
// for parsing application/x-www-form-urlencoded
app.use(bodyParser.urlencoded({ extended: true }));
// 前端静态服务,包括文件和页面
app.use(express.static(path.join(__dirname,"./client")))app.all("*",function (req,res,next) {res.set({"Content-Type": "text/plain","Access-Control-Allow-Credentials": "true","Access-Control-Allow-Headers": "X-Requested-With,Content-Type,token,authorization","Access-Control-Allow-Origin": "*","Access-Control-Allow-Origin": req.headers.origin,"Access-Control-Allow-Methods": "POST,GET","Content-Type": "application/json",});next();
});const io = new Server(server,{allowEIO3: true,credentials: true,cors: {},
});
io.on("connection",(socket) => {try {console.log("一个新的 scoket 连接"); /*** 用户连接即推送信息*/ io.to(socket.id).emit("switchs",switchs);/*** 查询请求,返回所有开关状态*/socket.on("query",function (data) {console.log(`[query]`, data ? data : "");io.to(socket.id).emit("switchs",switchs);});/*** 设置开关状态* { id: "desklamp", data: "0" | "1" }*/socket.on("set",function (body) {const id = body.id;const status = body.data;if(!id) {console.log('没有传入id,更新失败!')return};switchs[id] = status;console.log(`[set]`, id, body.data); // 更新完后广播io.emit("switchs",switchs);});// 发生错误时触发socket.on("error",function (err) {console.log("socket 错误:",err);});} catch (err) {console.log("socket 错误:",err);io.to(socket.id).emit("error",`系统异常:${err}`);}
});server.listen(port,() => {console.log(`服务正在运行: http://localhost:${port}`);
});
代码分析
- 首先是使用
3005端口启动了一个服务器. - 将
./client设置为静态文件夹,该文件夹中将会放置客户端页面 - 使用 socket.io 插件实现一个 ws 服务。
- 监听
query消息,用于返回当前开关状态 - 监听
set消息,用于改变开关状态
代码中 switchs 写为对象形式是为了方便后期继续扩展别的继电器。
客户端实现
/project/client/index.html
<!DOCTYPE html>
<html lang="en"><head><meta charset="UTF-8"><meta http-equiv="X-UA-Compatible" content="IE=edge"><meta name="viewport" content="width=device-width, initial-scale=1.0"><title>Document</title>
</head><body><div id="info" style="margin-bottom: 16px; width: 100%;height: 300px;border: 1px solid red;"> </div><button id="btn">手动查询</button><button id="open">开灯</button><button id="close">关灯</button>
</body></html>
<script type="module">import { io } from "https://cdn.socket.io/4.4.1/socket.io.esm.min.js";const server = "ws://" + location.host;const socket = io(server, {reconnectionDelayMax: 10000,auth: {},query: { }});function onSwitchs(data) {console.log("[switchs]接收:", data);document.querySelector("#info").innerHTML = JSON.stringify(data, null, 4)}socket.on("switchs", onSwitchs);const btn = document.querySelector("#btn");const obtn = document.querySelector("#open");const cbtn = document.querySelector("#close");btn.addEventListener("click", function () {// 发送输入框数据socket.emit("query")})obtn.addEventListener("click", function () {// 发送输入框数据socket.emit("set", { id: "desklamp", data: "1" })})cbtn.addEventListener("click", function () {// 发送输入框数据socket.emit("set", { id: "desklamp", data: "0" })})
</script>
页面如下:
浏览器访问:127.0.0.1:3005
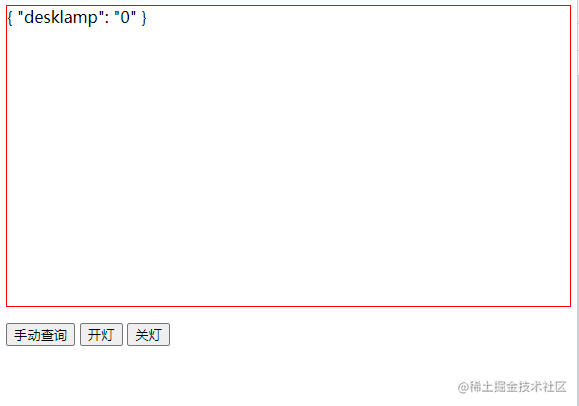
代码分析
代码比较简单,只是实现了控制开关和查询的按钮。
硬件代码
/project/main/main.ino
#include <ESP8266WiFi.h>
#include <Arduino.h>
#include <ArduinoJson.h>
#include <WebSocketsClient.h>
#include <SocketIOclient.h>
#include <Hash.h>#ifndef STASSID
#define STASSID "oldwang"
#define STAPSK "wifi密码"
#endif// 继电器引脚 高电平断开,低电平接通
int jdqPot = 12;// 开关状态   "0"关闭, "1" 开启
String switchStatus = "0";const char* ssid = STASSID;
const char* password = STAPSK;const char* websockets_server_host = "192.168.xx.xx"; //"www.xxx.top";  // 服务器名
const uint16_t websockets_server_port = 3005;         // 端口SocketIOclient socketIO; StaticJsonDocument<1024> iomsg;void socketIOEvent(socketIOmessageType_t type, uint8_t* payload, size_t length) {switch (type) {case sIOtype_DISCONNECT:Serial.printf("[IOc] Disconnected!\n");break;case sIOtype_CONNECT:Serial.printf("[IOc] Connected to url: %s\n", payload);// join default namespace (no auto join in Socket.IO V3)socketIO.send(sIOtype_CONNECT, "/");break;case sIOtype_EVENT:// 获取到服务的消息后打印出来Serial.printf("[IOc] get event: %s\n", payload);deserializeJson(iomsg, &(*payload));if (iomsg[0] == "switchs") { if (iomsg[1]["desklamp"] == "1") {// 开灯switchStatus = "1";}else{// 关灯 switchStatus = "0";}} break;case sIOtype_ACK:Serial.printf("[IOc] get ack: %u\n", length);hexdump(payload, length);break;case sIOtype_ERROR:Serial.printf("[IOc] get error: %u\n", length);hexdump(payload, length);break;case sIOtype_BINARY_EVENT:Serial.printf("[IOc] get binary: %u\n", length);hexdump(payload, length);break;case sIOtype_BINARY_ACK:Serial.printf("[IOc] get binary ack: %u\n", length);hexdump(payload, length);break;}
}void setup() {// Serial.begin(115200);Serial.begin(9600);Serial.setDebugOutput(true);pinMode(jdqPot, OUTPUT);Serial.println();Serial.println();Serial.print("wifi 连接中 ");Serial.println(ssid);WiFi.mode(WIFI_STA);WiFi.begin(ssid, password);while (WiFi.status() != WL_CONNECTED) {delay(500);Serial.print(".");}Serial.println("");Serial.println("WiFi connected");Serial.println("IP address: ");Serial.println(WiFi.localIP());Serial.println("socketIO begin: ");// server address, port and URLsocketIO.begin(websockets_server_host, websockets_server_port, "/socket.io/?EIO=4");// event handlersocketIO.onEvent(socketIOEvent);
}unsigned long messageTimestamp = 0;
void loop() {socketIO.loop();uint64_t now = millis();//  1分钟向服务器发送一次心跳消息if (now - messageTimestamp > 60000) {// if (now - messageTimestamp > 20000) {messageTimestamp = now;sendMsg("heartbeatMonitoring", "hi");// 测试打开开关// sendMsg("set", "1");// digitalWrite(jdqPot, LOW);}// 根据状态控制继电器状态if (switchStatus == "0") {// 关闭digitalWrite(jdqPot, LOW);} else {// 接通digitalWrite(jdqPot, HIGH);}
}// 发送信息的方法
// @msgName 服务端监听的事件名
// @msg     会当到 data 中进行发送
void sendMsg(char msgName[100], char msg[100]) {// 创建一个 scoket.io json 消息DynamicJsonDocument doc(1024);JsonArray array = doc.to<JsonArray>();// 消息名称// ps: socket.on('event_name', ....array.add(msgName);// 添加消息内容JsonObject param = array.createNestedObject();param["data"] = msg;param["id"] = "desklamp";// JSON to String (serializion)String output;serializeJson(doc, output);// Send eventsocketIO.sendEVENT(output);Serial.print("send:");Serial.println(output);
}
注意
arduinoWebSockets 这个依赖必须去 github 下载,不能在 Arduino IDE 中直接搜索安装,因为不是一个作者写的,不一样。下载地址:https://github.com/Links2004/arduinoWebSockets 。
下载后的依赖放到IDE首选项中设置的地址中即可,还不懂就百度一下安装 arduino 依赖库。
ArduinoJson 依赖直接在 Arduino IDE 中搜索安装即可
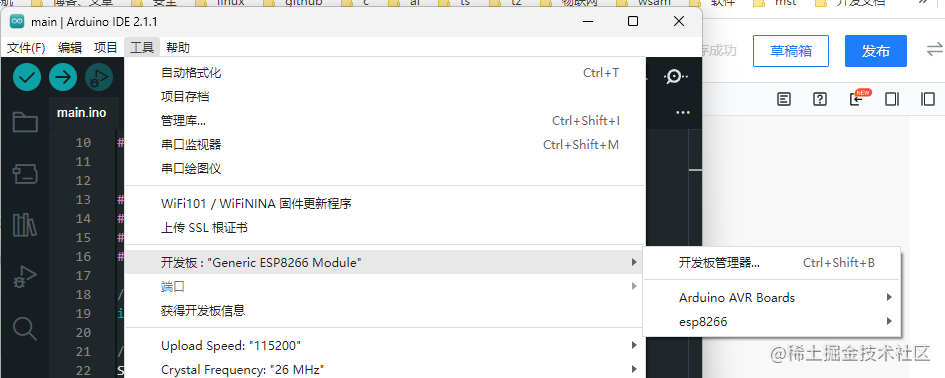
IDE 中开发版选择和 nodemcu 一样:
引脚接线
| D1 | 继电器 | led |
|---|---|---|
| 5V | DC+ | |
| 3.3V | NO | |
| GND | DC- | 负极 |
| D6 | IN | |
| COM | 正极 |
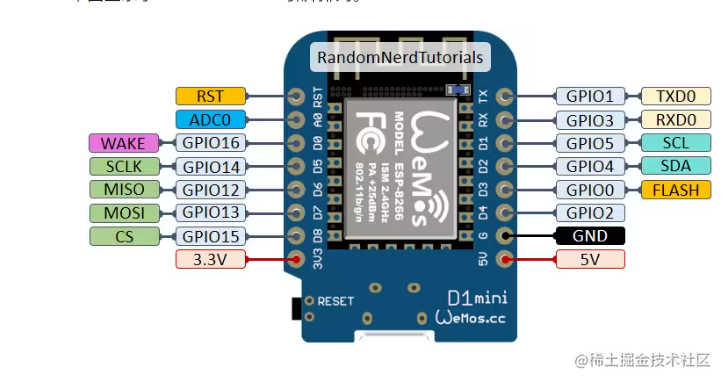
附上一张 nodemcu d1 引脚和 arduino 引脚的对应图
