Angular封装高德地图组件实现输入框搜索,地图点击选地点(Angular17版本)
话不多说直接上代码
创建一个独立组件
html代码:
<div style="position: relative;"><input #searchInput nz-input placeholder="请输入地址"/><div #mapContainer style="width: 100%;height: 350px;"></div>
</div>
样式less
@import "src/styles/themes/mixin";.themeMixin({:host {position: relative;.toolbar {z-index: 9999;top: 8px;right: 8px;width: 200px;}}
});
ts代码:
import {AfterViewInit,Component,ElementRef,EventEmitter,Input,OnInit,Output, SimpleChanges,ViewChild
} from '@angular/core';
import {Observable, Observer, Subject} from "rxjs";
import {getPointsCenter} from "../../../util/gis";
import {NzInputDirective} from "ng-zorro-antd/input";
@Component({selector: 'app-site-pick',standalone: true,imports: [NzInputDirective],templateUrl: './site-pick.component.html',styleUrl: './site-pick.component.less'
})
export class SitePickComponent implements OnInit, AfterViewInit{@ViewChild('mapContainer', {static: false}) mapContainer: ElementRef@ViewChild('searchInput', {static: false}) searchInput: ElementRef@Output("inputChange") inputChange = new EventEmitter<{ lonlat: any, siteName: any, adCode: any }>();@Input() lonlat: string;@Input() locationName: string;@Input("boundary") boundary: stringmap: any;overlays: any[] = [];searchAdCode = '010'defaultCenter = [116.397755, 39.903179]currentMarker: any; // 用于存储当前标记的引用drawMapEvent = new Subject()mapLoaded = false; // 标志位,判断地图是否已加载private mapLoadSubject = new Subject<void>(); // 用于触发地图加载完成事件ngOnInit(): void {this.drawMapEvent.subscribe(next => {this.currentPosition().subscribe(center => {this.addSearchPlugin();});});}addSearchPlugin(): void {const placeSearch = new window['AMap'].PlaceSearch({map: this.map,city: this.searchAdCode});const auto = new window['AMap'].Autocomplete({input: this.searchInput.nativeElement,city: this.searchAdCode});window['AMap'].Event.addListener(auto, "select", (e) => {placeSearch.search(e.poi.name, (status, result) => {if (status === 'complete' && result.info === 'OK' && result.poiList.pois.length > 0) {const poi = result.poiList.pois[0];placeSearch.getDetails(poi.id, (detailStatus, detailResult) => {if (detailStatus === 'complete' && detailResult.poiList.pois.length > 0) {const detailedPoi = detailResult.poiList.pois[0];const adCode = [detailedPoi.pname,detailedPoi.cityname,detailedPoi.adname].filter(ac => ac);if (adCode.length === 2) {adCode.splice(1, 0, adCode[0]);}const adCodeStr = adCode.join(',');const location = detailedPoi.location;const siteName = detailedPoi.name;const lonlat = location.lng + ',' + location.lat;this.inputChange.emit({ lonlat: lonlat, siteName: siteName, adCode: adCodeStr });}});}});});}currentPosition(): Observable<any> {return new Observable<any>((observer: Observer<any>) => {new window['AMap'].Geolocation({enableHighAccuracy: false,timeout: 5000,offset: [10, 20],zoomToAccuracy: true,position: 'RB'}).getCityInfo((status, result) => {if (status == 'complete') {if (this.boundary && typeof this.boundary === 'string') {try {const center = getPointsCenter(this.boundary.split(';'));observer.next(center);} catch (e) {observer.next(this.defaultCenter);}} else {observer.next(result.position);this.searchAdCode = result.adcode;this.addSearchPlugin();}} else {console.error(result, 'Geolocation');observer.next(this.defaultCenter);}});});}ngAfterViewInit(): void {setTimeout(() => {this.map = new window['AMap'].Map(this.mapContainer.nativeElement, {resizeEnable: true,zoom: 14});this.map.on('click', (e) => {const lonlat = e.lnglat.getLng() + ',' + e.lnglat.getLat();this.resolveLocation(lonlat);});this.map.on('complete', () => {this.mapLoaded = true; // 地图加载完成this.mapLoadSubject.next(); // 触发地图加载完成事件this.initMarker();});this.drawMapEvent.next(null);}, 0);}initMarker(): void {if (!this.map) {console.error('地图尚未加载完成');return;}if (this.currentMarker) {this.map.remove(this.currentMarker);}if (this.lonlat) {const [lon, lat] = this.lonlat.split(',').map(Number);const position = new window['AMap'].LngLat(lon, lat);this.currentMarker = new window['AMap'].Marker({map: this.map,position: position});}}resolveLocation(lonlat: string): void {const [lng, lat] = lonlat.split(',').map(Number);const position = new window['AMap'].LngLat(lng, lat);const geocoder = new window['AMap'].Geocoder();geocoder.getAddress(position, (status, result) => {if (status === 'complete' && result.regeocode) {const address = result.regeocode.formattedAddress;const addressComponent = result.regeocode.addressComponent;const adCode = [addressComponent.province, addressComponent.city, addressComponent.district].map(ac => ac && typeof ac === 'object' ? ac.adcode : ac).filter(ac => ac);if (adCode.length === 2) {adCode.splice(1, 0, adCode[0]);}const adCodeStr = adCode.join(',');this.searchInput.nativeElement.value = address;this.inputChange.emit({ lonlat: lonlat, siteName: address, adCode: adCodeStr });} else {console.error('根据经纬度获取地址失败:', result);}});this.initMarker();}updateMapLocation(): Promise<void> {return new Promise((resolve, reject) => {if (!this.map) {console.error('地图尚未加载完成');return reject('地图尚未加载完成');}const [lon, lat] = this.lonlat.split(',').map(Number);const position = new window['AMap'].LngLat(lon, lat);if (this.currentMarker) {this.currentMarker.setPosition(position);} else {this.currentMarker = new window['AMap'].Marker({map: this.map,position: position});}this.map.setCenter([lon, lat]);resolve();});}getAddressFromLonLat(): void {const [lng, lat] = this.lonlat.split(',').map(Number);const geocoder = new window['AMap'].Geocoder();const position = new window['AMap'].LngLat(lng, lat);geocoder.getAddress(position, (status, result) => {if (status === 'complete' && result.regeocode) {const address = result.regeocode.formattedAddress;const addressComponent = result.regeocode.addressComponent;const adCode = [addressComponent.province, addressComponent.city, addressComponent.district].map(ac => ac && typeof ac === 'object' ? ac.adcode : ac).filter(ac => ac);if (adCode.length === 2) {adCode.splice(1, 0, adCode[0]);}const adCodeStr = adCode.join(',');this.searchInput.nativeElement.value = address;this.inputChange.emit({ lonlat: this.lonlat, siteName: address, adCode: adCodeStr });} else {console.error('根据经纬度获取地址失败:', result);}});}ngOnChanges(changes: SimpleChanges): void {if (changes['lonlat'] && this.lonlat) {if (this.mapLoaded) {this.updateMapLocation().then(() => {this.getAddressFromLonLat(); //根据 lonlat 获取地名});} else {this.mapLoadSubject.subscribe(() => { // 订阅地图加载完成事件this.updateMapLocation().then(() => {this.getAddressFromLonLat(); //根据 lonlat 获取地名});});}}}
}
如果 this.drawMapEvent.next(null); 报错改成 this.drawMapEvent.next();即可 因为我引入的 rxjs@7.5.7,
我这里对数据进行了处理:传出外部的数据类型:{ lonlat: any, siteName: any, adCode: any }
lonlat是经纬度,用",“逗号分隔
siteName是地点名
adCode是行政区code 用”,"分隔
使用
由于我做了表单的传值 可以直接在Form表单使用
<nz-form-item><nz-form-label [nzSpan]="4" nzFor="lonlat">场地地址</nz-form-label><nz-form-control [nzSpan]="16" nzHasFeedback nzErrorTip="lonlat"><app-site-pick[lonlat]="form.get('lonlat').value"(inputChange)="inputChange($event)"></app-site-pick></nz-form-control></nz-form-item>
/*** 地图input框选中返回lonlat+name* @param $event*/inputChange($event: any) {this.form.get('lonlat').setValue($event.lonlat);this.form.get('address').setValue($event.siteName)}这里我只需要传入lonlat即可回显地点
inputChange()方法可以监听改变的数据,然后数据格式就自己处理吧
当然也可以通过[(ngModel)]进行绑定
还有最关键的高德地图的key,securityJsCode(自己去官网上注册)
在全局上配置写上:app.config.ts
export const appConfig: ApplicationConfig = {providers: [importProvidersFrom(HttpClientModule, NzMessageModule, NzDrawerModule, NzModalModule, NzNotificationModule,NzSwitchModule),provideAnimations(),provideRouter(appRoutes,withPreloading(PreloadSelective),withComponentInputBinding() // 开启路由参数绑定到组件的输入属性,ng16新增特性),// 初始化配置{provide: APP_INITIALIZER,useFactory: (bootstrap: BootstrapService) => () => {return bootstrap.init();},deps: [BootstrapService],multi: true,},// 国际化{provide: NZ_I18N,useFactory: (localId: string) => {switch (localId) {case 'en':return en_US;default:return zh_CN;}},deps: [LOCALE_ID]},{provide: HTTP_INTERCEPTORS, useClass: GlobalInterceptor, multi: true},{provide: AMAP_CONFIG, useValue: {securityJsCode: '9a2396b90169c48885aXXXXX6',key: 'de07643eaabaXXXXXX29284'}}]
};
{provide: AMAP_CONFIG, useValue: {securityJsCode: '9a2396b9XXX2c0c3eaf6fdb6',key: 'de07643XXXX5a5629284'}
}
这个就是
然后在你的BootstrapService 中添加启动 loadAMap
import {Inject, Injectable} from '@angular/core';
import {registerLocaleData} from "@angular/common";
import zh from "@angular/common/locales/zh";
import {NzIconService} from "ng-zorro-antd/icon";
import {load} from "@amap/amap-jsapi-loader";
import {AMAP_CONFIG, AMAPConfig} from "../config";
import {SkinService} from "./skin.service";@Injectable({providedIn: 'root'})
export class BootstrapService {constructor(private nzIconService: NzIconService,private skinService: SkinService,@Inject(AMAP_CONFIG) private amapConfig: AMAPConfig) {}init(): void {// 注册本地化语言包registerLocaleData(zh);// 注册icon// this.nzIconService.addIconLiteral('outline:clear', '')// 初始化设置主题this.skinService.loadTheme(this.skinService.localTheme()).then();// 加载地图this.loadAMap()}loadAMap(): void {window['_AMapSecurityConfig'] = {securityJsCode: this.amapConfig.securityJsCode, // 安全密钥};load({"key": this.amapConfig.key,"version": "2.0", // 指定要加载的 JSAPI 的版本,缺省时默认为 1.4.15"plugins": ['AMap.Geolocation','AMap.PolygonEditor','AMap.PlaceSearch','AMap.AutoComplete','AMap.Polyline','AMap.Geocoder'], // 需要使用的的插件列表,如比例尺'AMap.Scale'等"AMapUI": {// 是否加载 AMapUI,缺省不加载"version": '1.1',// AMapUI 缺省 1.1"plugins": ['overlay/SimpleMarker'],},"Loca": { // 是否加载 Loca, 缺省不加载"version": '2.0' // Loca 版本,缺省 1.3.2},}).then((AMap) => {window['AMap'] = AMap}).catch(e => {console.log(e);})}
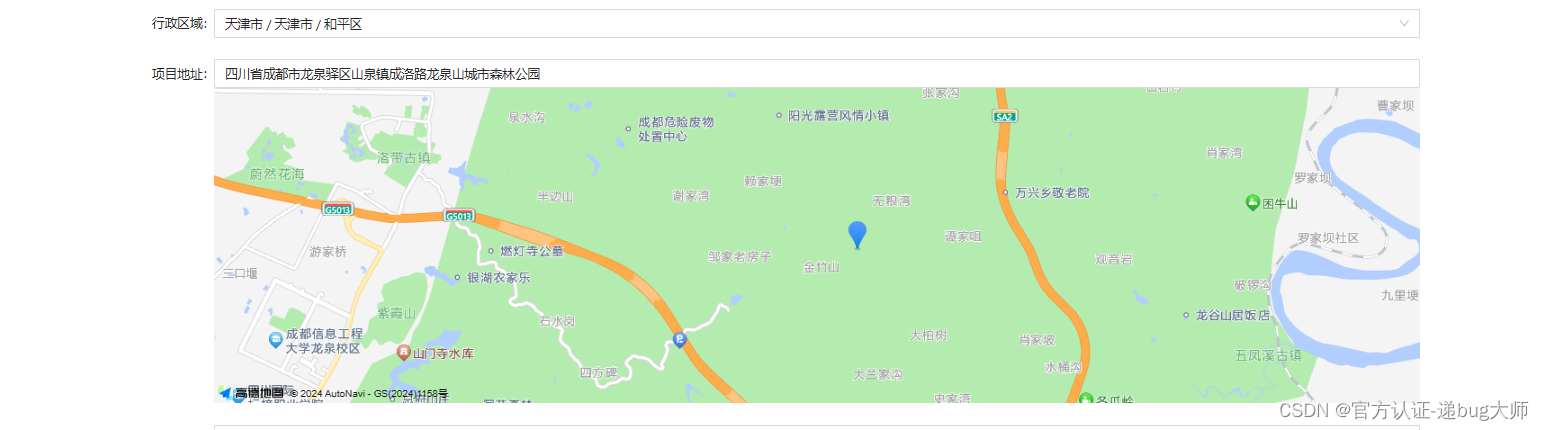
}成品展示: