1 spring介绍
1)为什么学习spring
1. Spring技术是JavaEE开发必备技能,企业开发技术选型命中率>90%
2. 简化开发,降低企业级开发的复杂性
3. 框架整合,高效整合其他技术,提高企业级应用开发与运行效率
作为一个java程序员, spring必学., 是必经之路!
2)spring框架学什么?
1. IOC
2. AOP
3. 整合
3)spring中的设计模式
学习spring的, 先了解下spring中主要的设计模式:
1. 工厂模式
1.简单工厂
简单工厂模式是一种创建型设计模式,用于根据给定的类型实例化不同的类
例如: 不同的动物类型创建对应的动物实例。
public interface Animal {void speak();
}
public class Dog implements Animal {@Overridepublic void speak() {System.out.println("Woof!");}
}public class Cat implements Animal {@Overridepublic void speak() {System.out.println("Meow");}
}
然后,创建一个名为AnimalFactory的简单工厂类,它负责根据给定的类型实例化相应的动物实例:
public class AnimalFactory {public enum AnimalType {DOG,CAT}public static Animal createAnimal(AnimalType type) {switch (type) {case DOG:return new Dog();case CAT:return new Cat();default:throw new IllegalArgumentException("Invalid animal type: " + type);}}
}
最后,我们可以在主方法中使用这个简单工厂类来创建不同类型的动物实例:
public class Main {public static void main(String[] args) {Animal dog = AnimalFactory.createAnimal(AnimalFactory.AnimalType.DOG);dog.speak();Animal cat = AnimalFactory.createAnimal(AnimalFactory.AnimalType.CAT);cat.speak();}
}
2.抽象工厂
抽象工厂模式是一种创建型设计模式,它允许您根据不同的族系或者平台来实例化一组相关的对象;
首先,我们定义两个接口,Animal和Plant
public interface Animal {void speak();
}public interface Plant {void grow();
}
接下来,为不同族系创建具体的Animal和Plant实现:
// 陆地生物
public class LandAnimal implements Animal {@Overridepublic void speak() {System.out.println("I am a land animal.");}
}public class LandPlant implements Plant {@Overridepublic void grow() {System.out.println("I am a land plant.");}
}// 水生生物
public class AquaticAnimal implements Animal {@Overridepublic void speak() {System.out.println("I am an aquatic animal.");}
}public class AquaticPlant implements Plant {@Overridepublic void grow() {System.out.println("I am an aquatic plant.");}
}
然后,创建一个名为NatureFactory的抽象工厂接口:
public interface NatureFactory {Animal createAnimal();Plant createPlant();
}
接着,为不同族系创建具体的工厂实现:
public class LandFactory implements NatureFactory {@Overridepublic Animal createAnimal() {return new LandAnimal();}@Overridepublic Plant createPlant() {return new LandPlant();}
}public class AquaticFactory implements NatureFactory {@Overridepublic Animal createAnimal() {return new AquaticAnimal();}@Overridepublic Plant createPlant() {return new AquaticPlant();}
}
最后,在主方法中,我们可以使用这些抽象工厂类来创建不同族系的Animal和Plant实例:
public class Main {public static void main(String[] args) {NatureFactory landFactory = new LandFactory();Animal landAnimal = landFactory.createAnimal();Plant landPlant = landFactory.createPlant();landAnimal.speak();landPlant.grow();NatureFactory aquaticFactory = new AquaticFactory();Animal aquaticAnimal = aquaticFactory.createAnimal();Plant aquaticPlant = aquaticFactory.createPlant();aquaticAnimal.speak();aquaticPlant.grow();}
}
通过使用抽象工厂模式,您可以轻松地在不同的族系之间切换,同时保持代码的可扩展性和封装
2.单例模式
1.饿汉式(可用)
饿汉式单例模式是一种创建型设计模式,它在类加载时就创建了对象实例,并确保只有一个实例存在.
public class Singleton {// 在类加载时创建唯一的实例private static final Singleton INSTANCE = new Singleton();// 将构造方法设为私有,防止外部创建新实例private Singleton() {}// 提供获取唯一实例的公共方法public static Singleton getInstance() {return INSTANCE;}
}
public class Main {public static void main(String[] args) {Singleton singletonInstance = Singleton.getInstance();}
}
饿汉式单例模式在类加载时就创建了实例,这意味着即使您从未使用过该实例,它也会占用内存。这可能导致资源浪费,特别是在实例创建成本较高的情况下.
2.懒汉式(不可用,线程不安全)
懒汉式单例模式是一种创建型设计模式,它在第一次请求实例时才创建唯一的实例,并确保整个应用程序中仅存在一个实例.
public class Singleton {// 初始化唯一实例为空private static Singleton instance = null;// 将构造方法设为私有,防止外部创建新实例private Singleton() {}// 提供获取唯一实例的公共方法public static synchronized Singleton getInstance() {if (instance == null) {instance = new Singleton();}return instance;}
}
3.懒汉式(锁方法, 不推荐使用)
同上, 在创建对象的静态方法上加上同步锁synchronized .
4.双重检查(推荐使用)
双重检查锁定(Double-Checked Locking,DCL)是一种用于确保在多线程环境下懒汉式单例模式的线程安全性的方法.
public class Singleton {// 使用volatile关键字确保内存可见性private static volatile Singleton instance = null;// 将构造方法设为私有,防止外部创建新实例private Singleton() {}// 提供获取唯一实例的公共方法,并使用双重检查锁定public static Singleton getInstance() {if (instance == null) {synchronized (Singleton.class) {if (instance == null) {instance = new Singleton();}}}return instance;}
}
首先,我们进行第一次检查:如果instance为空,说明实例尚未创建,此时需要获取Singleton.class的锁。当线程成功获得锁后,进行第二次检查:确保在其他线程获得锁之前实例仍未被创建。如果instance仍然为空,则创建新的实例;否则,直接返回已创建的实例。
此实现在多线程环境中是线程安全的,并且相对于每次都获取锁的懒汉式单例模式具有更好的性能
5.静态内部类(推荐使用)
public class Singleton {// 将构造方法设为私有,防止外部创建新实例private Singleton() {}// 静态内部类负责创建唯一实例private static class SingletonHolder {private static final Singleton INSTANCE = new Singleton();}// 提供获取唯一实例的公共方法public static Singleton getInstance() {return SingletonHolder.INSTANCE;}
}
当Singleton类加载时, 由于静态内部类在外部内加载时并不会加载, 而时在静态内部内调用时才加载, 所以该方法并不会像饿汉式那样浪费资源, 同时Java规范保证了静态初始化是线程安全的,因此在类加载时会创建唯一的实例, 所以次方法比较推荐;
6.枚举(推荐使用)
public enum Singleton {INSTANCE;// 可以添加其他方法和属性public void doSomething() {System.out.println("Singleton enum is doing something");}
}
public class Main {public static void main(String[] args) {Singleton singletonInstance = Singleton.INSTANCE;singletonInstance.doSomething();}
}
使用枚举实现单例模式是一种简洁且安全的方法。在Java中,枚举类型可以确保线程安全和实例唯一性;
3.代理模式
代理模式是一种结构型设计模式,其目的是通过代理来控制对实际对象的访问。代理通常与实际对象具有相同的接口,并将请求转发给实际对象,可能会在转发之前或之后执行其他操作;
public interface Subject {void operation();
}
public class RealSubject implements Subject {@Overridepublic void operation() {System.out.println("RealSubject is performing the operation");}
}
public class ProxySubject implements Subject {private final RealSubject realSubject;public ProxySubject(RealSubject realSubject) {this.realSubject = realSubject;}@Overridepublic void operation() {preOperation();realSubject.operation();postOperation();}private void preOperation() {System.out.println("Executing pre-operation tasks in proxy");}private void postOperation() {System.out.println("Executing post-operation tasks in proxy");}
}
public class Main {public static void main(String[] args) {RealSubject realSubject = new RealSubject();ProxySubject proxySubject = new ProxySubject(realSubject);// 使用代理执行操作,它将执行预/后操作并调用RealSubject的operation()proxySubject.operation();}
}
在实际应用中,代理模式可以被用于实现许多功能,例如安全性检查、日志记录、缓存和远程访问等.
4)了解Spring大家族
Spring发展到今天已经形成了一种开发的生态圈,Spring提供了若干个项目,每个项目用于完成特定的功能;官网: Spring | Home
1.spring framework
也就是我们经常说的spring框架,主要分为IOC和AOP两大块;
2.spring boot
它的目标是简化Spring应用和服务的创建、开发与部署,简化了配置文件,使用嵌入式web服务器,含有诸多开箱即用的微服务功能,可以和spring cloud联合部署。
Spring Boot的核心思想是约定大于配置,应用只需要很少的配置即可,简化了应用开发模式。
3.Spring Data
是一个数据访问及操作的工具集,封装了多种数据源的操作能力,包括:jdbc、Redis、MongoDB等
4.Spring Cloud
是一套完整的微服务解决方案,是一系列不同功能的微服务框架的集合
5. Spring Security
主要用于快速构建安全的应用程序和服务, 负责进行应用程序的认证, 授权;
5)spring framework组成
spring框架分为两大块, IOC和AOP;
spring框架包含一下几大模块:

1、 Core Container(核心容器)
Beans模块:提供了BeanFactory,是工厂模式的经典实现,Spring将管理对象称为Bean。
Core核心模块:提供了Spring框架的基本组成部分,包括IoC和DI功能。
Context上下文模块:建立在Core和Beans模块的基础之上,它是访问定义和配置的任何对象的媒介。
SpEL模块:它提供了Spring Expression Language支持,是运行时查询和操作对象图的强大的表达式语言
2、Data Access/Integration(数据访问/集成)
JDBC模块:提供了一个JDBC的抽象层,大幅度地减少了在开发过程中对数据库操作的编码。
ORM模块:对流行的对象关系映射API,包括JPA、JDO和Hibernate提供了集成层支持。
OXM模块:提供了一个支持对象/ XML映射的抽象层实现,如JAXB、Castor、XMLBeans、JiBX和XStream。
JMS 模块:指 Java 消息传递服务,包含使用和产生信息的特性,自 4.1 版本后支持与Spring-message模块的集成。
Transactions事务模块:支持对实现特殊接口以及所有POJO类的编程和声明式的事务管理。
3、 Web
WebSocket模块:Spring 4.0以后新增的模块,它提供了WebSocket 和SockJS的实现,以及对STOMP的支持。
Servlet模块:也称为Spring-webmvc模块,包含了Spring的模型—视图—控制器(MVC)和REST Web Services实现的Web应用程序。
Web模块:提供了基本的Web开发集成特性,例如:多文件上传功能、使用Servlet监听器来初始化IoC容器以及Web应用上下文。
Portlet模块:提供了在Portlet环境中使用MVC实现,类似Servlet模块的功能。
4、 其他模块
AOP 模块:提供了面向切面编程实现,允许定义方法拦截器和切入点,将代码按照功能进行分离,以降低耦合性。
Aspects 模块:提供了与AspectJ的集成功能,AspectJ是一个功能强大且成熟的面向切面编程(AOP)框架。
Instrumentation 模块:提供了类工具的支持和类加载器的实现,可以在特定的应用服务器中使用。
Messaging模块:Spring 4.0以后新增的模块,它提供了对消息传递体系结构和协议的支持。
Test模块:提供了对单元测试和集成测试的支持
2 IoC和DI
1)IoC介绍和使用
IoC(Inversion of Control)控制反转, 它将对象之间的依赖关系与对象本身的创建和管理分离开来。这有助于降低程序中各个组件之间的耦合度,并提高代码可维护性、可测试性以及扩展性。
在Spring IoC容器中,对象的生命周期由容器进行管理,而不是由对象自己管理。IoC容器负责实例化、配置和装配Bean,然后将这些Bean注入到需要的组件中。使用IoC可以使您专注于业务逻辑的实现,而不必关心底层的对象创建和依赖解析工作。
Spring IoC容器主要包括两种类型:
1.BeanFactory:BeanFactory是一个简单的容器,它负责实例化、定位、配置应用程序中的对象,并解决它们之间的依赖关系。XmlBeanFactory是最常用的BeanFactory实现。
2.ApplicationContext:ApplicationContext是BeanFactory的子接口,它为应用程序提供了更多的企业级特性,如消息资源处理、事件发布、声明式事务处理等。通常,我们会使用ApplicationContext作为Spring IoC容器,常见的实现有ClassPathXmlApplicationContext、FileSystemXmlApplicationContext等
IOC简单示例
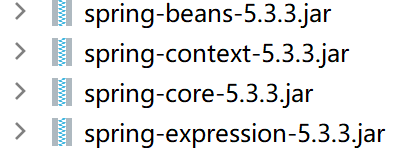
导入jar;
public interface GreetingService {void sayHello();
}
public class Student {public void sayHello() {System.out.println("Hello, Spring IoC!");}
}
<?xml version="1.0" encoding="UTF-8"?>
<beans xmlns="http://www.springframework.org/schema/beans"xmlns:xsi="http://www.w3.org/2001/XMLSchema-instance"xsi:schemaLocation="http://www.springframework.org/schema/beanshttp://www.springframework.org/schema/beans/spring-beans.xsd"><bean id="student" class="com.qs.spring.Student"></bean></beans>
public static void main(String[] args) {// 加载Spring配置文件ApplicationContext context = new ClassPathXmlApplicationContext("applicationContext.xml");// 获取Bean并使用sayHello()方法Student student = (Student) context.getBean("student");student.sayHello();
}
bean的作用范围
<bean class="com.qs.spring.entity.Student" scope="prototype"><property name="sid" value="1001"></property><property name="sname" value="张三"></property><property name="gender" value="男"></property>
</bean>
当scope为prototype, 是多例;为singleton或者默认都是单例;
bean的生命周期
- 实例化:Spring根据配置文件或注解定义创建Bean实例。
- 属性填充:Spring通过依赖注入将指定的属性值和引用设置到Bean的属性中,这可以是基于构造方法、setter方法或字段的注入。
- 容器回调(Aware接口):如果Bean实现了某些特定的
Aware接口(如BeanNameAware、BeanFactoryAware等),Spring会自动调用相应的回调方法,将容器相关的信息传递给Bean。 - BeanPostProcessor前置处理:Spring会调用已注册的所有
BeanPostProcessor接口实现类的postProcessBeforeInitialization方法,允许您进行自定义处理,例如修改Bean属性或改变Bean引用。 - 初始化:当Bean的所有属性都设置好后,Spring会检查Bean是否实现了
InitializingBean接口,如果实现了该接口,Spring会调用afterPropertiesSet()方法。此外,如果Bean定义中包含init-method属性(XML配置)或@PostConstruct注解(注解配置),也会执行对应的初始化方法。 - BeanPostProcessor后置处理:Spring会调用已注册的所有
BeanPostProcessor接口实现类的postProcessAfterInitialization方法,同样允许您进行自定义处理。 - Bean准备就绪:至此,Bean已经准备好了,可以被应用程序使用。
- 销毁:当容器关闭时,Spring会检查Bean是否实现了
DisposableBean接口,如果实现了该接口,Spring会调用destroy()方法。此外,如果Bean定义中包含destroy-method属性(XML配置)或@PreDestroy注解(注解配置),也会执行对应的销毁方法。
注意:在整个生命周期中,BeanPostProcessor前置/后置处理和Aware接口回调等特性可以通过编程方式自定义,以满足具体需求。
2)DI的介绍和使用
依赖注入(Dependency Injection,DI)是Spring框架的核心概念之一。它是一种将组件之间的依赖关系从组件内部移除的设计模式,使得组件之间的耦合度降低,代码更加灵活和可维护.
在Spring框架中,DI通过控制反转(Inversion of Control,IoC)容器实现。IoC容器负责管理应用程序中的对象(称为Bean)以及它们之间的依赖关系。简单来说,DI允许我们将对象的创建和配置委托给IoC容器,并在需要时将这些对象注入其它对象.
Spring提供了以下几种主要的依赖注入方式:
- 基于构造函数的注入:通过构造函数将依赖项传递给需要它们的类。在XML配置中,使用
<constructor-arg>元素实现;而在基于注解的配置中,可以在构造函数上添加@Autowired注解。 - 基于Setter方法的注入:通过调用setter方法将依赖项传递给需要它们的类。在XML配置中,使用
<property>元素实现;而在基于注解的配置中,可以在setter方法上添加@Autowired注解。 - 基于字段的注入:直接向类的字段注入依赖项,而无需使用构造函数或setter方法。在基于注解的配置中,可以在字段上添加
@Autowired注解。
基于构造函数的注入:
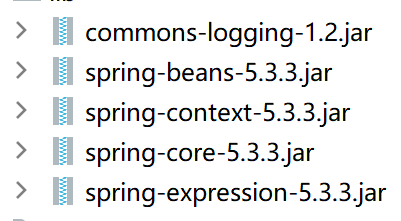
导入jar;
需要进行注入的实体类;
public class Student {private  Integer sid;private  String sname;private  String gender;public Student(Integer sid, String sname, String gender) {this.sid = sid;this.sname = sname;this.gender = gender;}
}
xml文件中构造注入:
<bean class="com.qs.spring.entity.Student" id="student"><constructor-arg name="gender" value="男"></constructor-arg><constructor-arg name="sid" value="1001"></constructor-arg><constructor-arg name="sname" value="张三"></constructor-arg>
</bean>
基于Setter方法的注入:
public class Student {private Integer sid;private String sname;private String gender;public Integer getSid() {return sid;}public void setSid(Integer sid) {this.sid = sid;}public String getSname() {return sname;}public void setSname(String sname) {this.sname = sname;}public String getGender() {return gender;}public void setGender(String gender) {this.gender = gender;}
<bean class="com.qs.spring.entity.Student"><property name="sid" value="1001"></property><property name="sname" value="张三"></property><property name="gender" value="男"></property>
</bean>
属性值为对象的注入:
public class Student {......private Clazz clazz;public Clazz getClazz() {return clazz;}public void setClazz(Clazz clazz) {this.clazz = clazz;}......
}
<bean class="com.qs.spring.entity.Student"><property name="sid" value="1001"></property><property name="sname" value="张三"></property><property name="gender" value="男"></property><property name="clazz" ref="clazz"></property></bean><bean class="com.qs.spring.entity.Clazz" id="clazz"><property name="cid" value="1001"></property><property name="cname" value="DT117"></property></bean>
自动注入: 当需要注入的值是对象并且IOC容器中也存在该对象时, 可以选择自动注入: autowire;
byType: 根据类型自动注入;
byName: 根据id的值和属性名称自动注入;
<bean class="com.qs.spring.entity.Student" autowire="byType"><property name="sid" value="1001"></property><property name="sname" value="张三"></property><property name="gender" value="男"></property>
</bean>
<bean class="com.qs.spring.entity.Clazz" id="clazz"><property name="cid" value="1001"></property><property name="cname" value="DT117"></property>
</bean>
属性值为数组, 集合等注入:
public class Student {......private List<Integer> list;private Set<Integer> set;private Map<String,String> map;public List<Integer> getList() {return list;}public void setList(List<Integer> list) {this.list = list;}public Set<Integer> getSet() {return set;}public void setSet(Set<Integer> set) {this.set = set;}public Map<String, String> getMap() {return map;}public void setMap(Map<String, String> map) {this.map = map;}......
}
<bean class="com.qs.spring.entity.Student" autowire="byName"><property name="sid" value="1001"></property><property name="sname" value="张三"></property><property name="gender" value="男"></property><property name="list"><list><value>111</value><value>222</value><value>333</value></list></property><property name="set"><set><value>444</value><value>555</value><value>666</value></set></property><property name="map"><map><entry key="aaa" value="123"></entry><entry key="bbb" value="111"></entry><entry key="ccc" value="321"></entry></map></property></bean>
基于字段的注入
直接在需要注入的属性上添加注解实现;
@Autowired
private Clazz clazz;
@Autowired: 在IoC容器中根据类型查找, 然后注入到指定的属性中;
@Resource: 该注解并非Spring注解, 而是java中的注解,作用和 @Autowired类似, 是在根据名称进行注入;
3 Aop
Spring AOP(Aspect-Oriented Programming,面向切面编程)是Spring框架的一个重要特性,它允许将与业务逻辑无关的横切关注点(如日志记录、安全检查、事务管理等)从应用程序代码中分离出来。这有助于提高代码的模块化程度,使得应用程序更加易于维护和扩展。
在Spring AOP中,主要涉及以下几个核心概念:
- 切面(Aspect):封装了横切关注点的模块化代码,通常包含一个或多个通知(Advice)以及切入点(Pointcut)的定义。
- 通知(Advice):切面在特定连接点执行的操作。根据执行时机不同,通知可以分为前置通知(Before)、后置通知(After)、返回通知(After-returning)、异常通知(After-throwing)和环绕通知(Around)。
- 切入点(Pointcut):描述了通知应该织入的一系列连接点。切入点通过类和方法签名的模式匹配定义,例如匹配特定包下所有类的所有方法。
- 连接点(Join point):程序执行过程中可以插入切面操作的点,例如方法调用、构造函数调用、字段赋值等。Spring AOP仅支持方法执行连接点。
- 引入(Introduction):允许为现有类添加新方法或属性的一种方式。
- 织入(Weaving):将切面与目标对象组合在一起,创建代理对象的过程。织入可以在编译时、类加载时或运行时完成。Spring AOP默认使用运行时织入。
1)使用配置文件实现:
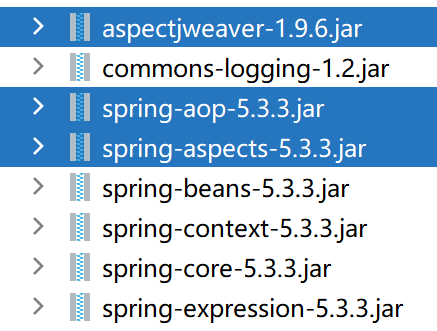
导入jar;
创建业务类接口:
public interface GoodsService {void sayHello(String name);
}
实现接口:
public class GoodsServiceImpl implements GoodsService {@Overridepublic void sayHello(String name) {System.out.println("Hello, " + name);}
}
创建增强处理的类和方法:
public class myLogger {//JoinPoint  可以获取到业务方法的相关的信息//前置通知public void beforeLogging(JoinPoint point){System.out.println("------------------------------进入前置通知---------------------");System.out.println("---------------------进入了类:"+point.getTarget().getClass().getName());System.out.println("---------------------进入了方法:"+point.getSignature().getName());System.out.println("---------------------传入了参数:"+point.getArgs()[0]);System.out.println(".------------------------------离开前置通知---------------------");}//后置通知public void afterLogging(JoinPoint point,Object result){System.out.println("------------------------------进入后置通知---------------------");System.out.println("---------------------进入了类:"+point.getTarget().getClass().getName());System.out.println("---------------------进入了方法:"+point.getSignature().getName());System.out.println("---------------------传入了参数:"+point.getArgs()[0]);System.out.println("---------------------返回值:"+result);System.out.println(".------------------------------离开后置通知---------------------");}//环绕通知public Object aroundLogging(ProceedingJoinPoint point) throws Throwable {System.out.println("------------------------------进入环绕通知---------------------");System.out.println("---------------------进入了类:"+point.getTarget().getClass().getName());System.out.println("---------------------进入了方法:"+point.getSignature().getName());System.out.println("---------------------传入了参数:"+point.getArgs()[0]);//手动执行业务方法  并且接收返回值Object result = point.proceed();System.out.println("---------------------返回值:"+result);System.out.println(".------------------------------离开环绕通知---------------------");return result;}   //异常通知public void execptionLogging(JoinPoint point,Exception e){System.out.println("------------------------------进入异常通知---------------------");System.out.println("---------------------进入了类:"+point.getTarget().getClass().getName());System.out.println("---------------------进入了方法:"+point.getSignature().getName());System.out.println("---------------------传入了参数:"+point.getArgs()[0]);System.out.println("---------------------发生了异常:"+e.getMessage());System.out.println(".------------------------------离开异常通知---------------------");}//最终通知public void finallyLogging(JoinPoint point){System.out.println("------------------------------进入最终通知---------------------");System.out.println("---------------------进入了类:"+point.getTarget().getClass().getName());System.out.println("---------------------进入了方法:"+point.getSignature().getName());System.out.println("---------------------传入了参数:"+point.getArgs()[0]);System.out.println(".------------------------------离开最终通知---------------------");}
}
<bean class="com.qs.spring.service.GoodsService"></bean> <bean class="com.qs.spring.aop.MyLogger" id="myLogger"></bean><aop:config><aop:pointcut id="pt" expression="execution(* com.qs.spring.service.*.*(..))"/><aop:aspect ref="myLogger"><aop:before method="beforeLogging" pointcut-ref="pt"></aop:before><aop:after-returning method="afterLogging" pointcut-ref="pt" returning="result"></aop:after-returning><aop:around method="aroundLogging" pointcut-ref="pt"></aop:around><aop:after-throwing method="execptionLogging" pointcut-ref="pt" throwing="e"></aop:after-throwing><aop:after method="finallyLogging" pointcut-ref="pt"></aop:after></aop:aspect></aop:config>
2)使用注解实现:
1) 给创建增强处理的类和方法加上指定的注解:
@Aspect: 用在增加处理类上,声明该类为aop的一个切面类;
@Pointcut(“execution(* cn.guotu.service..(…))”), 用在方法上, 指定一个切入点
@Before(), 用在方法上, 代表该方法是一个前置增强方法
@Around(), 用在方法上, 代表该方法是一个环绕增强方法
@AfterReturning(), 用在方法上, 代表该方法是一个后置增强方法
@AfterThrowing(), 用在方法上, 代表该方法是一个异常增强方法
@After(), 用在方法上, 代表该方法是一个异常增强方法
@Aspect
public class MyLoggerAspacj {//切入点@Pointcut("execution(* cn.guotu.service.*.*(..))")public void pt(){}@Before("pt()")public void beforeLogging(JoinPoint point){System.out.println("------------------------------进入前置增强---------------------");System.out.println("---------------------进入了类:"+point.getTarget().getClass().getName());System.out.println("---------------------进入了方法:"+point.getSignature().getName());System.out.println("---------------------传入了参数:"+point.getArgs()[0]);System.out.println(".------------------------------离开前置增强---------------------");}//环绕增强@Around("pt()")public Object aroundLogging(ProceedingJoinPoint point) throws Throwable {System.out.println("------------------------------进入环绕增强---------------------");System.out.println("---------------------进入了类:"+point.getTarget().getClass().getName());System.out.println("---------------------进入了方法:"+point.getSignature().getName());System.out.println("---------------------传入了参数:"+point.getArgs()[0]);//手动执行业务方法  并且接收返回值Object result = point.proceed();System.out.println("---------------------返回值:"+result);System.out.println(".------------------------------离开环绕增强---------------------");return result;}@AfterReturning(pointcut = "pt()",returning="result")public void afterLogging(JoinPoint point,Object result){System.out.println("------------------------------进入后置增强---------------------");System.out.println("---------------------进入了类:"+point.getTarget().getClass().getName());System.out.println("---------------------进入了方法:"+point.getSignature().getName());System.out.println("---------------------传入了参数:"+point.getArgs()[0]);System.out.println("---------------------返回值:"+result);System.out.println(".------------------------------离开后置增强---------------------");}//异常增强@AfterThrowing(pointcut = "pt()",throwing = "e")public void execptionLogging(JoinPoint point,Exception e){System.out.println("------------------------------进入异常增强---------------------");System.out.println("---------------------进入了类:"+point.getTarget().getClass().getName());System.out.println("---------------------进入了方法:"+point.getSignature().getName());System.out.println("---------------------传入了参数:"+point.getArgs()[0]);System.out.println("---------------------发生了异常:"+e.getMessage());System.out.println(".------------------------------离开异常增强---------------------");}@After("pt()")public void finallyLogging(JoinPoint point){System.out.println("------------------------------进入最终增强---------------------");System.out.println("---------------------进入了类:"+point.getTarget().getClass().getName());System.out.println("---------------------进入了方法:"+point.getSignature().getName());System.out.println("---------------------传入了参数:"+point.getArgs()[0]);System.out.println(".------------------------------离开最终增强---------------------");}
}
<bean class="com.qs.spring.service.GoodsService"></bean>
<bean class="com.qs.spring.aop.MyLogger" id="myLogger"></bean><!--打开aop的注解扫描-->
<aop:aspectj-autoproxy></aop:aspectj-autoproxy>
3 spring整合mybatis
1)添加jar
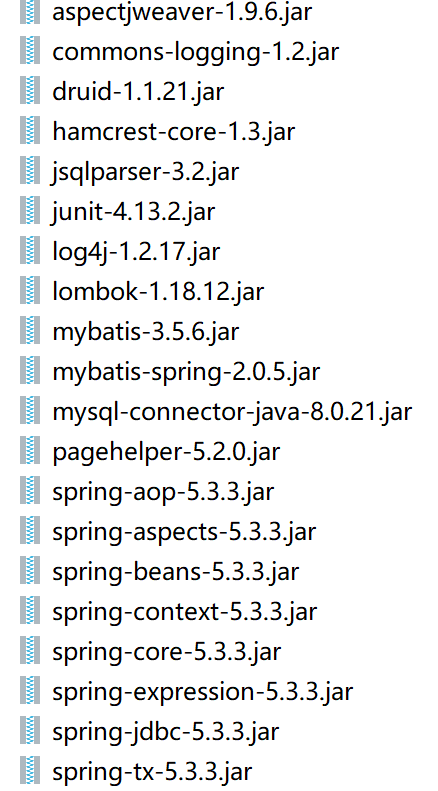
2) 创建配置文件:
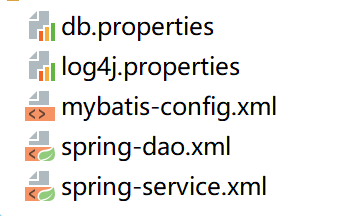
datasources.propertiesurl=jdbc:mysql://127.0.0.1:3306/goods?serverTimezone=Asia/Shanghai
driver=com.mysql.cj.jdbc.Driver
user=root
password=root
mybatis-config.xml<?xml version="1.0" encoding="utf-8"?>
<!DOCTYPE configuration PUBLIC "-//mybatis.org//DTD Config 3.0//EN""http://mybatis.org/dtd/mybatis-3-config.dtd">
<configuration><plugins><plugin interceptor="com.github.pagehelper.PageInterceptor"></plugin></plugins>
</configuration>
spring-dao.xml<?xml version="1.0" encoding="UTF-8"?>
<beans xmlns="http://www.springframework.org/schema/beans"xmlns:xsi="http://www.w3.org/2001/XMLSchema-instance"xmlns:context="http://www.springframework.org/schema/context"xmlns:aop="http://www.springframework.org/schema/aop"xsi:schemaLocation="http://www.springframework.org/schema/aophttp://www.springframework.org/schema/aop/spring-aop-4.3.xsdhttp://www.springframework.org/schema/beanshttp://www.springframework.org/schema/beans/spring-beans-4.3.xsdhttp://www.springframework.org/schema/contexthttp://www.springframework.org/schema/context/spring-context-4.3.xsd"><!--加载db.properties--><context:property-placeholder location="db.properties"/><!--配置连接环境--><bean id="dataSource" class="com.alibaba.druid.pool.DruidDataSource"><property name="password" value="${password}"></property><property name="username" value="${user}"></property><property name="url" value="${url}"></property><property name="driverClassName" value="${driver}"></property></bean><!--  sqlsessionfactory  --><bean id="sqlSessionFactory" class="org.mybatis.spring.SqlSessionFactoryBean"><property name="dataSource" ref="dataSource"></property><property name="configLocation" value="mybatis-config.xml"></property></bean><!--配置mapper扫描的包--><bean class="org.mybatis.spring.mapper.MapperScannerConfigurer"><property name="basePackage" value="cn.guotu.mapper"></property></bean>
</beans>
spting-service.xml<?xml version="1.0" encoding="UTF-8"?>
<beans xmlns="http://www.springframework.org/schema/beans"xmlns:xsi="http://www.w3.org/2001/XMLSchema-instance"xmlns:context="http://www.springframework.org/schema/context"xmlns:aop="http://www.springframework.org/schema/aop"xmlns:tx="http://www.springframework.org/schema/tx"xsi:schemaLocation="http://www.springframework.org/schema/aophttp://www.springframework.org/schema/aop/spring-aop-4.3.xsdhttp://www.springframework.org/schema/beanshttp://www.springframework.org/schema/beans/spring-beans-4.3.xsdhttp://www.springframework.org/schema/contexthttp://www.springframework.org/schema/context/spring-context-4.3.xsdhttp://www.springframework.org/schema/tx http://www.springframework.org/schema/tx/spring-tx-4.3.xsd"><!--开启service包的扫描--><context:component-scan base-package="cn.guotu.service"></context:component-scan>
</beans>
实体类: Goods.java(略)
Mapper接口: GoodsMapper.java(略)
服务层: GoodsService.java(略)
4 spring事务管理
1)基于配置文件的事务
当在service的业务方法中, 对数据库有1个以上的操作时, 如果方法内任何一个地方出现异常, 那么对数据的所有操作都需要回滚, 要么全部都执行成功, 要么都执行后失败!
spring-dao.xml<?xml version="1.0" encoding="UTF-8"?>
<beans xmlns="http://www.springframework.org/schema/beans"xmlns:xsi="http://www.w3.org/2001/XMLSchema-instance"xmlns:context="http://www.springframework.org/schema/context"xmlns:aop="http://www.springframework.org/schema/aop"xmlns:tx="http://www.springframework.org/schema/tx"xsi:schemaLocation="http://www.springframework.org/schema/aophttp://www.springframework.org/schema/aop/spring-aop-4.3.xsdhttp://www.springframework.org/schema/beanshttp://www.springframework.org/schema/beans/spring-beans-4.3.xsdhttp://www.springframework.org/schema/contexthttp://www.springframework.org/schema/context/spring-context-4.3.xsdhttp://www.springframework.org/schema/tx http://www.springframework.org/schema/tx/spring-tx-4.3.xsd"><!--开启service包的扫描--><context:component-scan base-package="cn.guotu.service"></context:component-scan><!-- 配置事务管理器 (增强处理类) --><bean id="transactionManager" class="org.springframework.jdbc.datasource.DataSourceTransactionManager"><property name="dataSource" ref="dataSource"></property></bean><!-- 配置哪些方法需要进行事务管理  (切入点)--><tx:advice id="advice" transaction-manager="transactionManager"><tx:attributes><tx:method name="insert*" propagation="REQUIRED"/><tx:method name="save*" propagation="REQUIRED"/><tx:method name="add*" propagation="REQUIRED"/><tx:method name="update*" propagation="REQUIRED"/><tx:method name="change*" propagation="REQUIRED"/><tx:method name="delete*" propagation="REQUIRED"/></tx:attributes></tx:advice><aop:config><aop:pointcut id="pt" expression="execution(* cn.guotu.service.*.*(..))"/><aop:advisor pointcut-ref="pt" advice-ref="advice"></aop:advisor></aop:config>
</beans>
GoodsService.javapublic void insert(){Goods goods = new Goods();goods.setGname("国土1");goods.setGcount(100);goods.setGprice(5.6);goods.setCreateTime(new Date());goods.setTid(1);int i = goodsMapper.insert(goods);int a = 10/0;Goods goods1 = new Goods();goods1.setGname("国土2");goods1.setGcount(100);goods1.setGprice(5.6);goods1.setCreateTime(new Date());goods1.setTid(1);int i1 = goodsMapper.insert(goods1);System.out.println(i1);}
2)基于注解实现事务
spring-dao.xml<?xml version="1.0" encoding="UTF-8"?>
<beans xmlns="http://www.springframework.org/schema/beans"xmlns:xsi="http://www.w3.org/2001/XMLSchema-instance"xmlns:context="http://www.springframework.org/schema/context"xmlns:aop="http://www.springframework.org/schema/aop"xmlns:tx="http://www.springframework.org/schema/tx"xsi:schemaLocation="http://www.springframework.org/schema/aophttp://www.springframework.org/schema/aop/spring-aop-4.3.xsdhttp://www.springframework.org/schema/beanshttp://www.springframework.org/schema/beans/spring-beans-4.3.xsdhttp://www.springframework.org/schema/contexthttp://www.springframework.org/schema/context/spring-context-4.3.xsdhttp://www.springframework.org/schema/tx http://www.springframework.org/schema/tx/spring-tx-4.3.xsd"><!--开启service包的扫描--><context:component-scan base-package="cn.guotu.service"></context:component-scan><!-- 配置事务管理器 (增强处理类) --><bean id="transactionManager" class="org.springframework.jdbc.datasource.DataSourceTransactionManager"><property name="dataSource" ref="dataSource"></property></bean><!-- 开始事务的注解扫描 --><tx:annotation-driven transaction-manager="transactionManager"></tx:annotation-driven></beans>
GoodsService.java@Transactional(propagation = Propagation.REQUIRED,isolation = Isolation.SERIALIZABLE)
public void insert(){Goods goods = new Goods();goods.setGname("国土1");goods.setGcount(100);goods.setGprice(5.6);goods.setCreateTime(new Date());goods.setTid(1);int i =  goodsMapper.insert(goods);int a = 10/0;Goods goods1 = new Goods();goods1.setGname("国土2");goods1.setGcount(100);goods1.setGprice(5.6);goods1.setCreateTime(new Date());goods1.setTid(1);int i1 =  goodsMapper.insert(goods1);System.out.println(i1);
}
3)事务的传播机制
Propagation:
1.REQUIRED
如果当前没有事务,就创建一个新事务,如果当前存在事务,就加入该事务,该设置是最常用的默认设置。
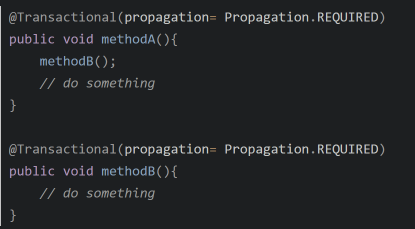
调用methdoA,如果methodB发生异常,触发事务回滚,也会methodA中的也会回滚
2.SUPPORTS
支持当前事务,如果当前存在事务,就加入该事务,如果当前不存在事务,就以非事务执行。
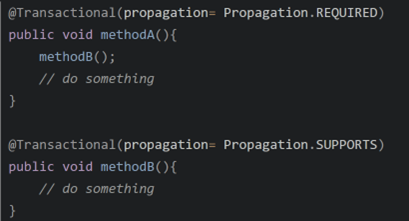
如果调用methodA,再调用methodB,MehtodB会加入到MethodA的开启的当前事务中。 如果直接调用methodB,当前没有事务,就以非事务执行。
3.MNDATORY
支持当前事务,如果当前存在事务,就加入该事务,如果当前不存在事务,就抛出异常。
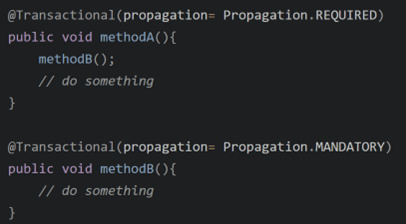
如果调用methodA,再调用methodB,MehtodB会加入到MethodA的开启的当前事务中。 如果直接调用methodB,当前没有事务,就会抛出异常。
4.REQUIRES_NEW
创建新事务,无论当前存不存在事务,都创建新事务。
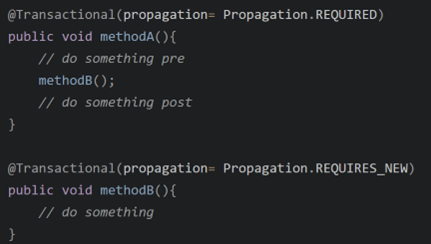
调用methodA,会先开启事务1,执行A的something pre的代码。再调用methodB,methdoB会开启一个事务2,再执行自身的代码。最后在执行methodA的something post。如果method发生异常回滚,只是methodB中的代码回滚,不影响methodA中的代码。如果methodA发生异常回滚,只回滚methodA中的代码,不影响methodB中的代码。
5.NOT_SUPPORTED
以非事务方式执行操作,如果当前存在事务,就把当前事务挂起。
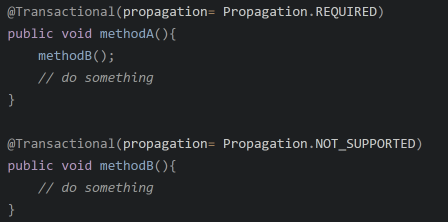
调用methodA,再调用methodB,methodA开启的事务会被挂起,即在methodB中不齐作用,相当于没有事务,methodB内部抛出异常不会回滚。methodA内的代码发生异常会回滚。 直接调用methodB,不会开启事务。
6.NEVER
以非事务方式执行操作,如果当前存在事务,则抛出异常。
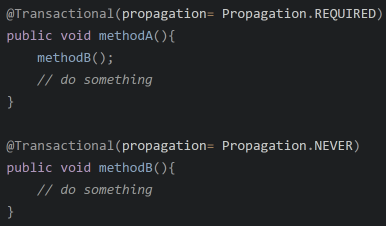
7.NESTED
如果当前存在事务,则在嵌套事务内执行。如果当前没有事务,则按REQUIRED属性执行。
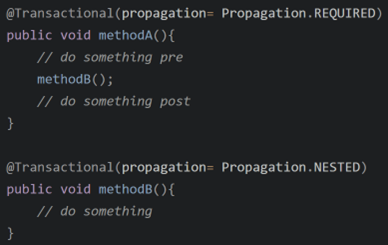
调用methodA,开启一个事务,执行something pre的代码,设置回滚点savepoint,再调用methodB的代码,如果methodB里抛出异常,此时回滚到之前的saveponint。再然后执行methodA里的something post的代码,最后提交或者回滚事务。 嵌套事务,外层的事务如果回滚,会导致内层的事务也回滚;但是内层的事务如果回滚,仅仅是回滚自己的代码,不影响外层的事务的代码。
4)事务的隔离级别
1) 读未提交(脏读) (不加任何锁)
当一个事务开启后, 修改了数据, 但是未提交事务之前, 另外一个事务来读取数据, 可以读到未提交的数据;
由于读的数据是未提交的, 那么万一事务回滚, 数据就读到的是错的; 会产生脏数据;
2)读提交(不可重复读) (写锁(部分行))
如果是一个读事务(线程),则允许其他事务读写,如果是写事务将会禁止其他事务访问该行数据,该隔离级别避免了脏读,但是可能出现不可重复读。事务A事先读取了数据,事务B紧接着更新了数据,并提交了事务,而事务A再次读取该数据时,数据已经发生了改变
3)可重复读(读写锁(部分行))
可重复读取是指在一个事务内,多次读同一个数据,在这个事务还没结束时,其他事务不能访问该数据(包括了读写),这样就可以在同一个事务内两次读到的数据是一样的,因此称为是可重复读隔离级别;
读取数据的事务将会禁止写事务,写事务则禁止任何其他事务(包括了读写),这样避免了不可重复读和脏读,但是有时可能会出现幻读。
4)串行话(读写锁(表))
这是最高的隔离级别,它通过强制事务排序,使之不可能相互冲突,从而解决幻读问题。简言之,它是在每个读的数据行上加上锁。在这个级别,可能导致大量的超时现象和锁竞争;
| 事务隔离级别 | 脏读 | 不可重复读 | 幻读 |
|---|---|---|---|
| 读未提交 (read-uncommitted) | 是 | 是 | 是 |
| 读提交(read-committed) | 否 | 是 | 是 |
| 可重复读(repeatable-read) | 否 | 否 | 是 |
| 串行化(serializable) | 否 | 否 | 否 |
5 其余常用注解
- @Component:将类标记为Spring管理的Bean。@Service、@Repository和@Controller都是特定类型的@Component注解,分别表示服务层、数据访问层和控制层组件。
- @Autowired:用于自动装配Bean之间的依赖关系。可以用于构造函数、setter方法或字段上。从Spring 4.3开始,如果只有一个构造函数,可以省略@Autowired。
- @Qualifier:当有多个相同类型的Bean时,使用@Qualifier指定特定的Bean进行注入。通常与@Autowired一起使用。
- @Value:用于向Bean的属性注入基本类型或String类型的值,支持SpEL表达式。
- @Scope:定义Bean的作用域,如singleton(默认)、prototype、request、session和global session。
- @PostConstruct:标记一个方法作为初始化方法,该方法会在Bean实例化并设置完所有属性后调用。
- @PreDestroy:标记一个方法作为销毁方法,在容器关闭前调用。
- @Configuration:将类标记为Spring Java配置类,用于定义和注册Bean。
- @Bean:用于@Configuration类中的方法上,声明一个Bean。方法返回的对象将由Spring容器管理。
- @ComponentScan:用于Java配置类上,声明启用组件扫描。可以指定扫描的基础包和过滤条件。


