引言
Activiti 7是一款遵循BPMN 2.0标准的开源工作流引擎,旨在为企业提供灵活、可扩展的流程管理功能。它支持图形化的流程设计、丰富的API接口、强大的执行引擎和完善的监控报表,帮助企业实现业务流程的自动化、规范化和智能化。本文将为您详细介绍 Activiti 7的安装及使用。
一、安装运行环境:
- Activiti7:7.1.0.M2
- SpringBoot:2.7.17
- JDK的版本是:1.8
二、添加pom 依赖
pom 依赖如下:
<dependencies><dependency><groupId>org.springframework.boot</groupId><artifactId>spring-boot-starter-web</artifactId></dependency><dependency><groupId>org.springframework.boot</groupId><artifactId>spring-boot-starter-test</artifactId><scope>test</scope></dependency><!-- activiti 依赖--><dependency><groupId>org.activiti</groupId><artifactId>activiti-spring-boot-starter</artifactId><version>7.1.0.M2</version></dependency><!-- mysql --><dependency><groupId>mysql</groupId><artifactId>mysql-connector-java</artifactId><version>8.0.23</version></dependency><!-- jdbc --><dependency><groupId>org.springframework.boot</groupId><artifactId>spring-boot-starter-jdbc</artifactId></dependency>
</dependencies>
三、配置文件 application.yml
server:port: 8081
spring:application:name: activitidemo# 配置Spring的数据源datasource:driverClassName: com.mysql.cj.jdbc.Driverurl: jdbc:mysql://localhost:3306/activitidemo?useSSL=false&characterEncoding=utf-8&serverTimezone=UTCusername: rootpassword: xxxxx# activiti的配置activiti:#1.flase:默认值。activiti在启动时,对比数据库表中保存的版本,如果没有表或者版本不匹配,将抛出异常#2.true: activiti会对数据库中所有表进行更新操作。如果表不存在,则自动创建#3.create_drop: 在activiti启动时创建表,在关闭时删除表(必须手动关闭引擎,才能删除表)#4.drop-create: 在activiti启动时删除原来的旧表,然后在创建新表(不需要手动关闭引擎)database-schema-update: true# 检测历史表是否存在, Activiti7中默认是没有开启数据库历史记录的,启动数据库历史记录db-history-used: true#记录历史等级 可配置的历史级别有none, activity, audit, full#none:不保存任何的历史数据,因此,在流程执行过程中,这是最高效的。#activity:级别高于none,保存流程实例与流程行为,其他数据不保存。#audit:除activity级别会保存的数据外,还会保存全部的流程任务及其属性。audit为history的默认值。#full:保存历史数据的最高级别,除了会保存audit级别的数据外,还会保存其他全部流程相关的细节数据,包括一些流程参数等。history-level: full# 校验流程文件,默认校验resouces下的 process 文件夹里的流程文件check-process-definitions: false# 关闭自动部署deployment-mode: never-fail# 解决频繁查询SQL问题async-executor-activate: false
四、运行启动类
项目启动,将自动生成activiti 表结构
//为方便测试,禁用 默认的 Spring Security 认证
@SpringBootApplication(exclude = {SecurityAutoConfiguration.class, ManagementWebSecurityAutoConfiguration.class})
public class ActivitidemoApplication {public static void main(String[] args) {SpringApplication.run(ActivitidemoApplication.class, args);}
}
五、创建流程
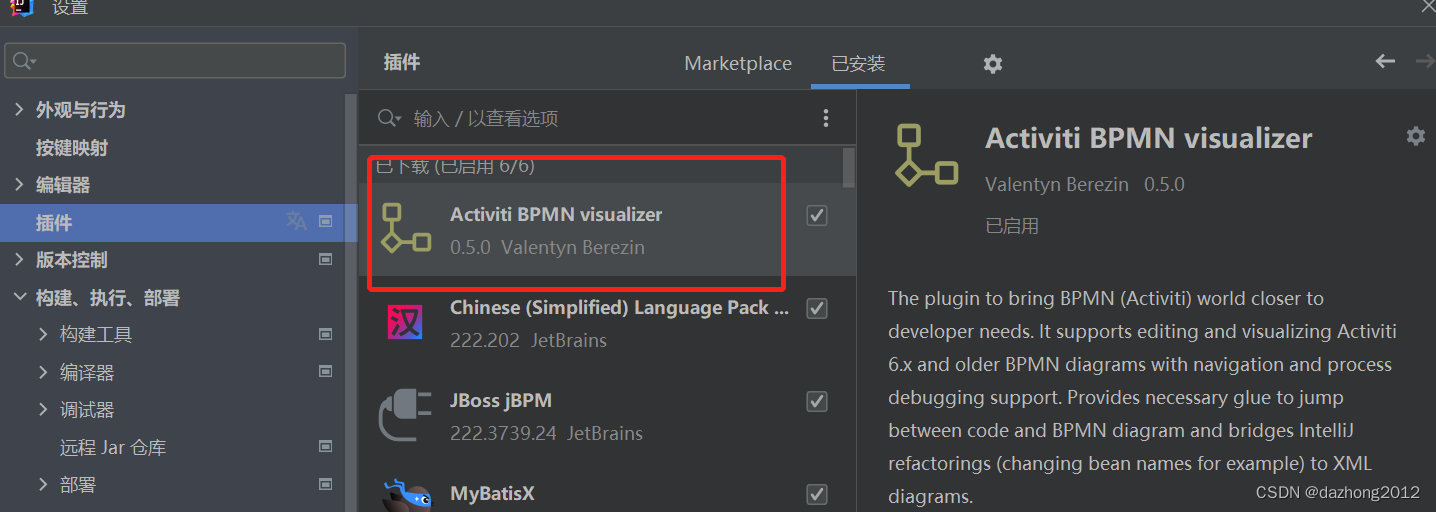
- idea 安装 BPMN 可视化插件
- 创建BPMN文件 leave
resource 目录下新建 文件夹 processes,右键-》新建-》 New Activiti 6.0x BPMN 2.0 file -》名称 leave

- 编写具体流程
在创建好的文件中任意位置右键,选择 View BPMN Diagram,打开可视化界面(流程定义的界面)

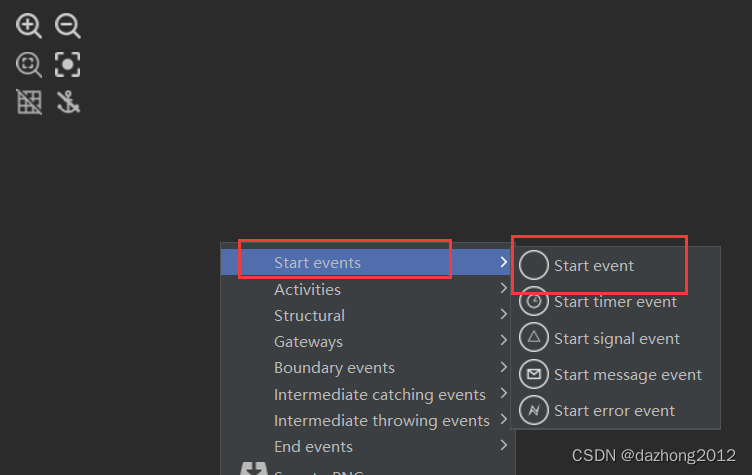
- 打开可视化编辑器,右键start events –>start event画一个开始事件。
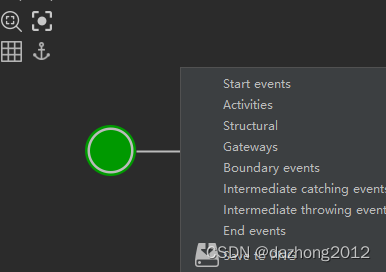
- 生成.png图片文件,在流程图中点击右键生成,并选择 BPMN所在文件目录保存

六、新建测试类进行流程测试
@SpringBootTest(classes = ActivitidemoApplication.class)
public class ActivitidemoApplicationTest {@Autowiredprivate ProcessEngine processEngine;@Autowiredprivate RepositoryService repositoryService;@Testpublic void test1(){TaskService taskService = processEngine.getTaskService();List<Task> list = taskService.createTaskQuery().list();for (Task task : list) {System.out.println(task);}}/*** 手动部署流程*/@Testpublic void deployment(){DeploymentBuilder deployment = repositoryService.createDeployment();Deployment 请假流程 = deployment.name("请假流程").addClasspathResource("processes/leave.bpmn20.xml").addClasspathResource("processes/leave.png").deploy();System.out.println("部署ID:"+请假流程.getId());System.out.println("部署名称:"+请假流程.getName());}/*** 查询流程部署列表*/@Testpublic void listDeployments() {List<Deployment> deployments = this.repositoryService.createDeploymentQuery().list();if (!deployments.isEmpty()) {deployments.forEach(deployment -> {System.out.println("Id:" + deployment.getId());System.out.println("Name:" + deployment.getName());System.out.println("DeploymentTime:" + deployment.getDeploymentTime());System.out.println("Key:" + deployment.getKey());});}}/*** 删除流程部署*/@Testpublic void deleteDeplyoment(){//第二个参数为级联删除,默认为false(有该流程的实例则不能删除),设置true则为级联删除repositoryService.deleteDeployment("8441e980-a5bc-11ed-a133-00e04c362f39",false);}
}
相关博客:
- 开源流程引擎三巨头:activiti、flowable、camunda 简介
参考文档:
https://www.cnblogs.com/ccx-lly/p/17094482.html
Activiti工作流介绍及使用 https://blog.csdn.net/anyisure/article/details/131289554







![[CUDA 学习笔记] 稀疏矩阵向量乘法(SpMV) CUDA 实现与优化](https://img-blog.csdnimg.cn/direct/49e9c610c3d04ee8b27608db0a68f680.png)
