第一章 SpringBoot开发入门
1.Springboot的优点。
① 可快速构建独立的Spring应用。
② 直接嵌入Tomcat、Jetty和Undertow服务器(无须部署WAR文件)
③ 通过依赖启动器简化构建配置
④ 自动化配置Spring和第三方库
⑤ 提供生产就绪功能
⑥ 极少的代码生成和XML配置
2.Lombok开发工具的常用注解,要求会在项目中使用Lombok
@Data:这个注解是@Getter、@Setter、@ToString、@EqualsAndHashCode等注解的集合。它会自动生成getter和setter方法、toString()方法、equals()方法和hashCode()方法。
@NoArgsConstructor、@AllArgsConstructor和@RequiredArgsConstructor:这三个注解分别用于生成无参构造器、包含所有参数的构造器和包含特定参数的构造器。这有助于在Java类中提供灵活的构造器选项
3.SpringBoot项目的常用注解
① @SpringBootApplication 是 Spring Boot 的核心注解,用于标记该类为主程序启动类
② @RestController 是一个组合注解,等同于@Controller和@ResponseBody两个注解结合使用的结果。
③ @Controller 注解用于标识一个 Java 类是一个控制器。控制器负责接收请求、处理请求,并返回响应,如ThymeLeaf中的html页面模版
④ @GetMapping 主要作用是设置方法的访问路径并限定其访问方式为Get。如在hello方法上添加@GetMapping(“/hello”)注解,则该方法的请求处理路径为”/hello”
4.SpringBoot项目的常用项目构建工具
① Maven,其核心配置文件是pom.xml
② Gradle ,其核心配置文件是 build.gradle
5.利用SpringBoot进行单元测试的步骤?
- 在pom文件添加Spring-boot-starter-test测试启动器
- 编写单元测试类
- 编写单元测试方法
第二章 SpringBoot核心配置与注解
1.全局配置文件
application.properties配置文件
IDEA使用Springboot Initializer方式构建Spring Boot项目时,会自动在resource目录下生成application.properties空配置文件,在项目启动时会加载该配置文件。
案例:通过配置文件给实体类赋值
1、创建两个Bean类,Pet类和Person类
//Person类
public class Person {private int id;private String firstName;private List hobby;private Map map;private String email;
}//Pet类
public class Pet {private int id;private String name;
}
2、application.properties配置文件设置对象值
person.id = 1
person.name = 张三
person.hobby = [唱,跳,rap]
person.map.k1 = v12
person.map.k2 = v2
person.pet.id=1
person.pet.name = zs
3、将Person交给IOC容器管理
@Data注解为添加getter/setter方法
@Component注解为Bean并交给IOC管理
@ConfigurationProperties(prefix = "person")将配置文件中person前缀的属性注入到该类
@Data
@Component
@ConfigurationProperties(prefix = "person")
public class Person {
...
}
4、测试类中注入Person测试
@RunWith(SpringRunner.class) //测试运行器,并加载Spring Boot测试注解
@SpringBootTest //标记单元测试类
class Unit2ApplicationTests {@Autowired //依赖注入private Person person;@Test //注解为测试方法void contextLoads() {System.out.println(person.toString());}
}
application.yaml配置文件
yaml/yml配置文件和传统的properties配置文件原理一样,只不过yaml格式支持的一直JSON超集文件格式,看起来更简洁一些
优先级:properties>yml>yaml
yaml配置格式
person:id: 2firstname: 李四hobby: [chang, tiao, rap]map: {k3:v3, k4:v4}email: 11skdjafk@qq.compet: {id: 1, name: lisi}1、vlaue为普通数据类型,注意冒号后面有空格
server: port: 80812、value值为数组和单列集合。缩紧式写法有两种
第一种 -(空格)
hobby: - play- raad- sleep第二种逗号分隔
hobby: play,raad,sleep
行内写法,[]可以省略
hobby: [play,raad,sleep]3.value值为Map集合,使用{}
map: {k3:v3, k4:v4}缩进法
person:map: k1:v1k2:v2配置文件属性值的注入
@ConfigurationProperties(prefix = "xxx")
@ConfigurationProperties(prefix = "person")
public class Person {
...
}
@Value("${xxx.xx}")注入配置文件属性值
@Value("${person.id}")
private int id;
@Value("#{5*2}") 使用SpEL表达式直接给属性注入值
@Value("#{5*2}")
private int id;
两种注解对比分析
| 对比点 | @ConfigurationProperties | @Value |
| 底层框架 | SpringBoot | Spring |
| 功能 | 批量注入配置文件中的属性 | 单个注入 |
| setter方法 | 需要 | 不需要 |
| 复杂类型属性注入 | 支持 | 不支持 |
| 松散绑定 | 支持 | 不支持 |
| JSR303数据校验 | 支持 | 不支持 |
| SpEL表达式 | 不支持 | 支持 |
松散绑定
例如Bean有一个属性firstName,properties中可以有以下几种写法
person.firstName = james //标准写法,对应Person类属性名
person.first-Name = james //使用-分隔单词
person.first_Name = james //使用下划线分隔单词
PERSON.FIRST_NAME = james //使用大小写格式,推荐常量属性配置
JSR303数据校验
对注入的值做是否符合相关值的规则,如是否符合email格式
在pom中添加依赖
<dependency><groupId>org.springframework.boot</groupId><artifactId>spring-boot-starter-validation</artifactId></dependency> @Component
@ConfigurationProperties(prefix = "person")
@Validated //引入Spring框架支持的数据校验规则
public class Person {@Email //对属性进行规则匹配private String email;}
自定义配置文件
使用@PropertySource加载配置文件
案例:
1.在resource目录创建一个自定义配置文件test.properties
test.id=10
test.name=zhangsan
2.自定义配置类MyProperties
@Data
@Configuration  //声明为自定义配置类
@PropertySource("classpath:test.properties")  //指定配置文件位置
@EnableConfigurationProperties(MyProperties.class)  //开启对应配置类的属性注入功能
@ConfigurationProperties(prefix = "test")  //指定配置文件注入属性前缀
public class MyProperties {private int id;private String name;
}2.Profile文件多环境配置
使用Profile文件进行多环境配置
文件命名格式:application-{profile}.properties
注:profile对应具体的环境标识
在resource目录下创建多个以application-{profile}.properties格式命名的配置文件
如
application-{dev}.properties //开发环境
application-{test}.properties //测试环境
application-{prod}.properties //生产环境
激活指定环境的方式
1、通过命令
- 将项目打包为jar包
- 输入命令
java -jar xxx.jar --spring.profiles.active=dev //只需要填写环境标识就行,这里切换开发环境
2、全局配置文件设置spring.profiles.active属性激活
在配置文件中设置spring.profiles.active=dev 即可切换到开发环境
@Profile注解多环境配置
@Profile:作用与类,通过value值指定环境配置
同样需要全局配置文件设置spring.profiles.active属性激活
案例:
1、resource目录下创建两个配置文件
application-{dev}.properties
配置监听端口为8081
application-{test}.properties
配置监听端口为8081
1、创建一个环境配置接口
public interface DBConnector {public void configure();
}
2.创建不同环境类实现接口
开发环境
@Configuration  //声明为配置类
@Profile(value = "dev")  //设置为dev环境
public class DevDBConnector implements DBConnector{@Overridepublic void configure() {System.out.println("DEV开发环境");}
}
测试环境
@Configuration
@Profile(value = "test")
public class TestDBConnector implements DBConnector{@Overridepublic void configure() {System.out.println("TEST测试环境");}
}
3.全局配置文件中设置spring.profiles.active
spring.profiles.active=dev
测试代码
@Autowiredprivate DBConnector dbConnector;@Testpublic void dbtest(){dbConnector.configure();}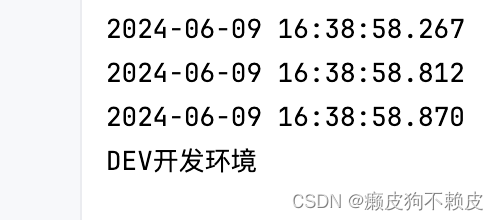
配置文件随机值设置
语法${random.xx}
如:
my.string = ${random.value} //随机字符串
my.number=${random.int} //随机int类型
my.bignumber=${random.long} //配置随机long类型
my.uuid=${random.uuid} //配置随机uuid类型数
my.number.less.than.ten=${random.int(10)} //配置10以内
my.number.in.rang=${random.int[1024,65535]} //配置范围之间
参数间引用
app.name = MyApp
app.description=${app.name} is a Spring Boot application
第三章 SpringBoot数据访问
SpringBoot整合Spring Data Jpa
1、编写ORM实体类:实体类与数据表进行映射,并配置好映射关系
2、编写Repository接口:针对不同的表数据操作编写各自对应的Repository接口,根据需要编写对应的数据操作方法
案例:
mysql数据库
/*Navicat Premium Data TransferSource Server         : bookSource Server Type    : MySQLSource Server Version : 80027Source Host           : localhost:3307Source Schema         : springbootdataTarget Server Type    : MySQLTarget Server Version : 80027File Encoding         : 65001Date: 09/06/2024 17:13:35
*/SET NAMES utf8mb4;
SET FOREIGN_KEY_CHECKS = 0;-- ----------------------------
-- Table structure for t_article
-- ----------------------------
DROP TABLE IF EXISTS `t_article`;
CREATE TABLE `t_article`  (`id` int NOT NULL AUTO_INCREMENT COMMENT '文章id',`title` varchar(200) CHARACTER SET utf8 COLLATE utf8_general_ci NULL DEFAULT NULL COMMENT '文章标题',`content` longtext CHARACTER SET utf8 COLLATE utf8_general_ci NULL COMMENT '文章内容',PRIMARY KEY (`id`) USING BTREE
) ENGINE = InnoDB AUTO_INCREMENT = 3 CHARACTER SET = utf8 COLLATE = utf8_general_ci ROW_FORMAT = Dynamic;-- ----------------------------
-- Records of t_article
-- ----------------------------
INSERT INTO `t_article` VALUES (1, 'Spring Boot基础入门', '从入门到精通讲解...');
INSERT INTO `t_article` VALUES (2, 'Spring Cloud基础入门', '从入门到精通讲解...');-- ----------------------------
-- Table structure for t_comment
-- ----------------------------
DROP TABLE IF EXISTS `t_comment`;
CREATE TABLE `t_comment`  (`id` int NOT NULL AUTO_INCREMENT COMMENT '评论id',`content` longtext CHARACTER SET utf8 COLLATE utf8_general_ci NULL COMMENT '评论内容',`author` varchar(200) CHARACTER SET utf8 COLLATE utf8_general_ci NULL DEFAULT NULL COMMENT '评论作者',`a_id` int NULL DEFAULT NULL COMMENT '关联的文章id',PRIMARY KEY (`id`) USING BTREE
) ENGINE = InnoDB AUTO_INCREMENT = 6 CHARACTER SET = utf8 COLLATE = utf8_general_ci ROW_FORMAT = Dynamic;-- ----------------------------
-- Records of t_comment
-- ----------------------------
INSERT INTO `t_comment` VALUES (1, '很全、很详细', '狂奔的蜗牛', 1);
INSERT INTO `t_comment` VALUES (2, '赞一个', 'tom', 1);
INSERT INTO `t_comment` VALUES (3, '很详细', 'kitty', 1);
INSERT INTO `t_comment` VALUES (4, '很好,非常详细', '张三', 1);
INSERT INTO `t_comment` VALUES (5, '很不错', '张杨', 2);SET FOREIGN_KEY_CHECKS = 1;
1、配置maven导入坐标
<!--JPA相关库--><dependency><groupId>org.springframework.boot</groupId><artifactId>spring-boot-starter-data-jpa</artifactId></dependency><!--mysql插件--><dependency><groupId>com.mysql</groupId><artifactId>mysql-connector-j</artifactId></dependency><2、properties配置数据库连接
spring.datasource.url=mysql://localhost:3306/springbootdata?serverTimezone=UTC
spring.datasource.username=root
spring.datasource.password=12345678
3、创建ORM实体类
package com.gzist.domain;import lombok.Data;
import org.springframework.stereotype.Component;import javax.persistence.*;
@Data
@Entity(name = "t_comment")  //建立了实体类和数据表的关系   name指向表名
public class Discuss {//标识这是主键字段@Id//指定主键生成策略,GenerationType.IDENTITY就是对应到mysql中的数据自增策略@GeneratedValue(strategy = GenerationType.IDENTITY)private Integer id;//使用@Column映射类的属性和数据表的字段关系  name指定表中的字段名//当类的属性名和数据表的字段名一致时,此注解可以省略private String content;private String author;@Column(name = "a_id")private Integer aId;
}
4.编写Repository接口,根据方法命名规则查询
package com.gzist.repository;import com.gzist.domain.Discuss;
import org.springframework.data.jpa.repository.JpaRepository;import java.util.List;//JpaRepository<Discuss,Integer>两个参数,一个是ORM实体类,一个是主键数据类型
public interface DiscussRepository extends JpaRepository<Discuss,Integer> {/**方法命名规则查询* 1.查询方法以findBy开头* 2.涉及条件查询时,条件的属性用条件关键字连接* 3.条件属性首字母需大写* */public List<Discuss> findByAuthorNotNull();//根据作者查询public List<Discuss> findByAuthor(String author);//根据内容模糊查询public List<Discuss> findByContentLike(String content);//根据内容和作者查询public List<Discuss> findByContentAndAuthor(String content,String author);//根据范围查询List<Discuss> findByIdIsLessThan(Integer id);List<Discuss> findByIdBetween(Integer startId, Integer endId);List<Discuss> findByIdIn(List<Integer> Ids);}
测试
package com.gzist;import com.gzist.domain.Discuss;
import com.gzist.repository.DiscussRepository;
import org.junit.jupiter.api.Test;
import org.springframework.beans.factory.annotation.Autowired;
import org.springframework.boot.test.context.SpringBootTest;import java.util.ArrayList;
import java.util.List;@SpringBootTest
class JpaNamingRuleTest {@Autowiredprivate DiscussRepository repository;@Testvoid testAuthorNotNull(){List<Discuss> byAuthorNotNull = repository.findByAuthorNotNull();for (Discuss discuss : byAuthorNotNull) {System.out.println(byAuthorNotNull);}}@Testvoid testAuthor(){List<Discuss> byAuthor = repository.findByAuthor("张杨");for (Discuss discuss : byAuthor) {System.out.println(discuss);}}@Testvoid testContentLike(){List<Discuss> byContentLike = repository.findByContentLike("%很%");for (Discuss discuss : byContentLike) {System.out.println(discuss);}}@Testvoid testAuthorAndContent(){List<Discuss> byContentAndAuthor = repository.findByContentAndAuthor("很不错", "张杨");for (Discuss discuss : byContentAndAuthor) {System.out.println(discuss);}}@Testvoid testIdIsLessThan(){List<Discuss> byIdIsLessThan = repository.findByIdIsLessThan(3);for (Discuss discuss : byIdIsLessThan) {System.out.println(discuss);}}@Testvoid testIdBetween(){List<Discuss> byAIdBetween = repository.findByIdBetween(2, 5);for (Discuss discuss : byAIdBetween) {System.out.println(discuss);}}@Testvoid testIdis(){ArrayList<Integer> list1 = new ArrayList<>();list1.add(2);list1.add(4);List<Discuss> byIdIs = repository.findByIdIn(list1);for (Discuss byIdI : byIdIs) {System.out.println(byIdI);}}}
@Query查询
编写Repository接口
package com.gzist.repository;import com.gzist.domain.Discuss;
import org.springframework.data.domain.Pageable;
import org.springframework.data.jpa.repository.JpaRepository;
import org.springframework.data.jpa.repository.Modifying;
import org.springframework.data.jpa.repository.Query;
import org.springframework.transaction.annotation.Transactional;import java.util.List;public interface JPQLRepository extends JpaRepository<Discuss,Integer>{//占位符从1开始//根据文章id分叶查询@Query("SELECT d FROM  t_comment d where d.aId= ?1")public List<Discuss> getDiscussPaged(Integer aid,Pageable pageable);//nativeQuery=ture使用原生SQL@Query(value = "SELECT * FROM  t_comment d where d.a_id= ?1",nativeQuery = true)public List<Discuss> getDiscussPaged1(Integer aid,Pageable pageable);@Transactional@Modifying@Query("UPDATE t_comment c SET c.author = ?1 where c.id = ?2")public int updateDiscuss(String author,Integer id);@Transactional@Modifying@Query("DELETE t_comment c where c.id = ?1")public int deleteDiscussById(Integer id);}
测试
package com.gzist;import com.gzist.domain.Discuss;
import com.gzist.repository.JPQLRepository;
import org.junit.jupiter.api.Test;
import org.springframework.beans.factory.annotation.Autowired;
import org.springframework.boot.test.context.SpringBootTest;
import org.springframework.data.domain.PageRequest;
import org.springframework.data.domain.Pageable;import java.util.List;@SpringBootTest
public class JPQLRepositoryTests {@Autowiredprivate JPQLRepository jpqlRepository;@Testvoid testpages(){Pageable pageable = PageRequest.of(0,3);List<Discuss> discussPaged = jpqlRepository.getDiscussPaged(1,pageable);System.out.println(discussPaged);}@Testvoid testpages1(){Pageable pageable = PageRequest.of(0,3);List<Discuss> discussPaged = jpqlRepository.getDiscussPaged1(1,pageable);System.out.println(discussPaged);}@Testvoid testUpdataById(){int updateDiscuss = jpqlRepository.updateDiscuss("杨杨", 5);System.out.println("成功更新"+updateDiscuss+"条");}@Testvoid testDeleteById(){int delDiscuss = jpqlRepository.deleteDiscussById(6);System.out.println("成功删除"+delDiscuss+"条");}}
SpringBoot整合Redis
步骤:
1、pom文件中添加Spring Data Redis依赖
2、编写实体类
3、编写Repository接口
4、在全局配置文件application.properties中添加Redis数据库连接配置
5、编写单元测试进行接口方法测试以及整合测试
案例:
1、添加依赖
<dependency><groupId>org.springframework.boot</groupId><artifactId>spring-boot-starter-data-redis</artifactId>
</dependency>
2、编写实体类
Persion.java
package com.gzist.domain;import lombok.Data;
import org.springframework.data.annotation.Id;
import org.springframework.data.redis.core.RedisHash;
import org.springframework.data.redis.core.index.Indexed;import java.util.List;@Data
@RedisHash("person")  //指定操作实体类对象在Redis数据库中的存储空间
public class Person {@Id  //标识实体类主键private String id;@Indexedprivate String firstName;@Indexedprivate String lastName;private Address adreess;private List<Family> familyList;
}
Address.java
package com.gzist.domain;import lombok.Data;
import org.springframework.data.redis.core.index.Indexed;@Data
public class Address {@Indexedprivate String city;@Indexedprivate String country;
}
Family.java
package com.gzist.domain;import lombok.Data;
import org.springframework.data.redis.core.index.Indexed;@Data
public class Family {@Indexedprivate String type;@Indexedprivate String name;
}
3、编写Repository接口 ,需要注意的是操作Redis数据库时编写Repository接口需要继承Crud Repository,而不是JpaRepository,如果想继承JpaRepository需要同时添加Spring data JPA和spring Data Redis依赖
package com.gzist.repository;import com.gzist.domain.Person;
import org.springframework.data.domain.Page;
import org.springframework.data.domain.Pageable;
import org.springframework.data.repository.CrudRepository;import java.util.List;//<Person,String>,Person为操作的实体类,String为实体类id的数据类型
public interface RedisRepository extends CrudRepository<Person,String> {List<Person> findByLastName(String lastname);Page findPersonByLastName(String lastname, Pageable pageable);List<Person> findByFirstNameAndLastName(String f,String l);List<Person> findByAdreess_City(String add_city);List<Person> findByFamilyList_Username(String username}
application.properties配置
spring.redis.host=127.0.0.1
spring.redis.port=6379
spring.redis.password=
编写单元测试
Version:1.0 StartHTML:0000000128 EndHTML:0000010693 StartFragment:0000000128 EndFragment:0000010693 SourceURL:about:blank
package com.gzist;import com.gzist.domain.Address;
import com.gzist.domain.Family;
import com.gzist.domain.Person;
import com.gzist.repository.RedisRepository;
import org.junit.jupiter.api.Test;
import org.springframework.beans.factory.annotation.Autowired;
import org.springframework.boot.test.context.SpringBootTest;import java.util.ArrayList;
import java.util.List;@SpringBootTest
class SpringRedisApplicationTests {@Autowiredprivate RedisRepository redisRepository;@Testpublic void savePerson(){Person person = new Person("张","有才");Person person1 = new Person("Harden","James");Address address = new Address("北京","China");person.setAdreess(address);ArrayList<Family> families = new ArrayList<>();Family dad = new Family("父亲","张良");Family mom = new Family("母亲","李香");families.add(dad);families.add(mom);person.setFamilyList(families);//向Redis数据库添加数据Person save = redisRepository.save(person);Person save1 = redisRepository.save(person1);System.out.println(save);System.out.println(save1);}@Testpublic void selectPerson() {List<Person> personList = redisRepository.findByAdreess_City("北京");System.out.println(personList);}@Testpublic void updataPerson(){Person person = redisRepository.findByFirstNameAndLastName("张","有才").get(0);person.setLastName("小明");Person updata = redisRepository.save(person);System.out.println(updata);}@Testpublic void delPerson(){Person person = redisRepository.findByFirstNameAndLastName("张", "小明").get(0);redisRepository.delete(person);}@Testpublic void selectFamilyList(){List<Person> byFamilyListUsername = redisRepository.findByFamilyList_Username("张良");System.out.println(byFamilyListUsername);}}
第四章 SpringBoot视图技术
Thymeleaf介绍
- Spring官方中对并不支持jsp的渲染模板,推荐使用Thymeleaf、FreeMarker等模板引擎
- Thymeleaf可以独立运行,不依赖服务器(Tomcat、NGINX等)
Thymeleaf入门
1、导入依赖
<dependency><groupId>org.springframework.boot</groupId><artifactId>spring-boot-starter-thymeleaf</artifactId>
</dependency>
2、模板页面
- 页面默认情况定义在resource/templates文件夹中
- templates文件夹默认不能直接访问Controller转发访问
3、全局配置常用参数
#启用模板缓存,默认为true,一般上线时使用,开发过程通常会关闭,保证调试过程数据能够及时响应
spring.thymeleaf.cache = flase
#模板编码
spring.thymeleaf.encoding = UTF-8
#应用于模板的模式
spring.thymeleaf.mode = HTML5
#指定模板路径,默认classpath:/templates/
spring.thymeleaf.prefix = classpath:/resources/templates/
#指定模板名称后缀,默认.html
spring.thymeleaf.suffix = .html
编写Controller,访问Controller跳转模板
获取简单类型
导入org.springframework.ui.Model包,使用model.addAttribute传键-值到view渲染
//Controller代码
package com.gzist.controller;import org.springframework.stereotype.Controller;
import org.springframework.ui.Model;
import org.springframework.web.bind.annotation.RequestMapping;@Controller
public class ThymeleafController {@RequestMapping("index")public String IndexPage(Model model){//简单类型,使用变量表达式 ${}获取对象属性model.addAttribute("name","张三");  //设置键值model.addAttribute("age","30");model.addAttribute("money","22.22");return "index"; //跳转到index}
}
变量表达式 ${...}获取
注意:
在html标签中添加xmlns:th="http://www.thymeleaf.org"才能识别语法,如下:
<html leng="en" xmlns:th="http://www.thymeleaf.org">
th:text
用于指定标签显示文本内容
//html代码
<!DOCTYPE html>
<html leng="en" xmlns:th="http://www.thymeleaf.org">
<head><meta charset="UTF-8"><title>Title</title>
</head><body>
<h3>Thymeleaf页面</h3>
<h3>简单类型数据获取</h3>
<span th:text="${name}"></span>
<span th:text="${age}"></span>
<span th:text="${money}"></span>
</body>
</html>
获取对象类型
package com.gzist.controller;import com.gzist.pojo.User;
import org.springframework.stereotype.Controller;
import org.springframework.ui.Model;
import org.springframework.web.bind.annotation.RequestMapping;@Controller
public class ThymeleafController {@RequestMapping("index")public String IndexPage(Model model){//对象类型User user = new User(2,"csl","rap",0);model.addAttribute("user",user);return "index"; //跳转到index}
}
变量表达式 ${...}获取
<!DOCTYPE html>
<html leng="en" xmlns:th="http://www.thymeleaf.org">
<head><meta charset="UTF-8"><title>Title</title>
</head><body>
<h3>Thymeleaf页面</h3><h3>对象类型数据获取</h3>
<!--使用对象.属性的方式获取-->
<span th:text="${user.id}"></span><br>
<span th:text="${user.name}"></span><br>
<span th:text="${user.hobby}"></span><br>
<span th:text="${user.sex}"></span><br></body>
</html>
选择表达式*{...}获取
th:object
th:object用于获取对象
使用方法:首先通过th:object 获取对象,然后使用th:xx = "*{}"获取对象属性。
<!DOCTYPE html>
<html leng="en" xmlns:th="http://www.thymeleaf.org">
<head><meta charset="UTF-8"><title>Title</title>
</head><body>
<h3>Thymeleaf页面</h3>
<!--<h3>对象类型数据获取</h3>-->
<div th:object="${user}"><span th:text="*{id}"></span><br><span th:text="*{name}"></span><br><span th:text="*{hobby}"></span><br><span th:text="*{sex}"></span><br>
</div></body>
</html>
获取集合类型
package com.gzist.controller;import com.gzist.pojo.User;
import org.springframework.stereotype.Controller;
import org.springframework.ui.Model;
import org.springframework.web.bind.annotation.RequestMapping;import java.util.ArrayList;
import java.util.List;@Controller
public class ThymeleafController {@RequestMapping("index")public String IndexPage(Model model){//集合类型List<User> userList = new ArrayList<>();for (int i = 0; i < 5; i++) {userList.add(new User(2+i,"cxk"+i,"rap"+i,0));}model.addAttribute("userList",userList);return "index"; //跳转到index}
}
th:each元素变量
在这个例子中,
user是每次迭代时的当前元素,${users}中的users是你传递给模板的变量名,stat是一个状态对象,它包含有关当前迭代的信息。stat.index是当前迭代的索引,stat.count是当前迭代的计数(从1开始),stat.size是集合的大小,stat.current是当前元素(与user相同),stat.even和stat.odd是布尔值,分别表示当前迭代是否是偶数或奇数。
<tr th:each="user, stat : ${users}">  <td th:text="${stat.index}"></td> <!-- 当前索引,从0开始 -->  <td th:text="${user.name}"></td>  <td th:text="${user.age}"></td>  <!-- 其他字段 -->
</tr>
<!DOCTYPE html>
<html leng="en" xmlns:th="http://www.thymeleaf.org">
<head><meta charset="UTF-8"><title>Title</title>
</head><body>
<h3>Thymeleaf页面</h3><!--<h3>集合类型数据获取</h3>-->
<table align="center" width="50%" cellspacing="0px" cellpadding="10px" border="1px"><tr><th>编号</th><th>id</th><th>name</th><th>hobby</th><th>sex</th></tr><tr th:each="u,stat:${userList}"><td th:text="${stat.index+1}"></td><td th:text="${u.id}"></td><td th:text="${u.name}"></td><td th:text="${u.hobby}"></td><td th:text="${u.sex}"></td></tr></table></body>
</html>连接URL表达式@{...}
th:href
th:src
- 上下文相关:
@{}语法创建的 URL 是相对于当前应用的上下文路径的。这意味着,如果你的应用部署在/myapp路径下,那么@{/path/to/resource}将被解析为/myapp/path/to/resource。- 参数化:你可以在
@{}语法中添加参数,如@{/path/to/resource(param1='value1',param2='value2')}。这将在 URL 的查询字符串中添加参数。- 与
th:href或th:src一起使用:@{}语法通常与th:href(用于创建链接)或th:src(用于指定图像、脚本等的源)等属性一起使用。
<a th:href="@{/home}">Home</a>
<a th:href="@{'字符串'+${model}}">字符串+url拼接</a>
<img th:src="@{/images/logo.png}" alt="Logo" />
<a th:href="@{/search(query=${searchTerm},page=${currentPage-1})}">Previous Page</a>
条件判断标签
th:if和th:unless
th:if:条件成立显示内容
th:unless:条件不成立显示内容
<span th:if="${age > 18}">已成年</span>
<!--unless标签相当于if标签取反,条件未flase才输出-->
<span th:unless="${age > 18}">该处不会输出</span>
th:switch
与switch...case..类似
//Controller数据List<User> userList = new ArrayList<>();userList.add(new User(1,"cxk1","rap1",0));userList.add(new User(2,"cxk2","rap2",1));userList.add(new User(3,"cxk3","rap3",0));userList.add(new User(4,"cxk4","rap4",3));userList.add(new User(5,"cxk5","rap5",0));model.addAttribute("userList",userList); <tr th:each="u,stat:${userList}"><td th:text="${stat.index+1}"></td><td th:text="${u.id}"></td><td th:text="${u.name}"></td><td th:text="${u.hobby}"></td><td th:switch="${u.sex}"><span th:case="0">女</span><span th:case="1">男</span><span th:case="*">未知</span></td></tr>获取日期类型格式化
 //Controller数据,日期类型model.addAttribute("date",new Date());//获取当前年份
model.addAttribute("currentYear1", Calendar.getInstance().get(Calendar.YEAR));
<!--#dates 是一个内置的工具对象,它提供了一组用于格式化、解析和操作日期和时间的方法。-->
<span th:text="${#dates.format(date,'yyyy-MM-dd HH:mm:ss')}"></span>
<span th:text="${currentYear}">2018</span>内联标签与行内标签
上面写的都是内联标签,会覆盖html标签包含的内容
如<span th:text="${name}">姓名为:</span>获取到的${name}会覆盖“姓名为:”
而不想被覆盖,而是拼接,需要属于行内标签th:inline
th:inline
th:inline="text|css|javascript"固定写法双括号[[ 表达式 ]]
<span th:inline="text">姓名为:[[${name}]]</span>碎片标签与片段表达式~{...}
th:fragment声明片段
th:include插入内容但不替换当前标签
th:replace替换当前标签及其内容。
th:insert替换当前标签的内容,但保留一个空的当前标签,并将内容作为兄弟节点插入。
- ~{ viewName } 表示引入完整页面
- ~{ viewName ::selector} 表示在指定页面寻找片段 其中selector可为片段名、jquery选择器等
- ~{ ::selector} 表示在当前页寻找
声明片段
<!DOCTYPE html>
<html lang="en" xmlns:th="http://www.thymeleaf.org">
<head><meta charset="UTF-8"><title>Title</title>
</head>
<body>
<div>其他标签也被包含了</div>
<div th:fragment="header" style="height: 200px;background-color: #889988">
<h1>标题</h1>
</div>
</body>
</html>
<!DOCTYPE html>
<html lang="en">
<head><meta charset="UTF-8"><title>Title</title>
</head>
<body>
<div th:fragment="footer" style="height: 200px;background-color: #ff5654"></div>
</body>
</html>th:include
th:include="header"等同th:include="~{ header}" 会引入完整页面
<!DOCTYPE html>
<html lang="en" xmlns:th="http://www.thymeleaf.org">
<head><meta charset="UTF-8"><title>Title</title>
</head>
<body>
<div th:include="header"></div>
<div>自定义内容</div>
<div th:include="footer"></div></body>
</html>
则上述代码会生成
th:include="header :: header "等同th:include="~{ header :: header}"它会将指定模板的内容插入到当前标签的 <body> 或 <div> 等标签内,但不会替换当前标签本身。及仅插入子标签
<div th:include="header :: header"></div>则上述代码会生成
<div> <h1>标题</h1>
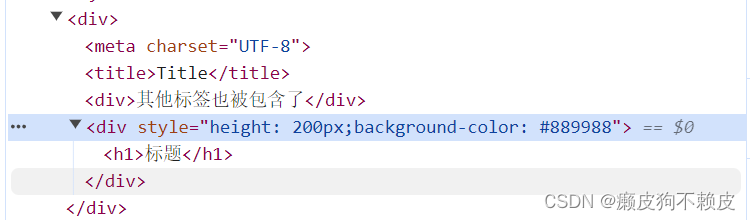
</div>th:replace
th:replace 用于替换当前标签及其内容。它会找到指定的模板片段,并用该片段替换整个当前标签。
<div th:replace="header :: header"></div>则上述代码会生成:
<div th:fragment="header" style="height: 200px;background-color: #889988"><h1>标题</h1>
</div>
注意,<div> 标签被完全替换了。
th:insert
th:insert 会插入指定的模板片段内容到当前标签的内部,作为当前标签的子节点。如果当前标签已经有内容,那么新插入的内容会追加到已有内容的后面。
<div th:insert="header :: header"></div>则上述代码会生成:
<div><div style="height: 200px;background-color: #889988"><h1>标题</h1></div>
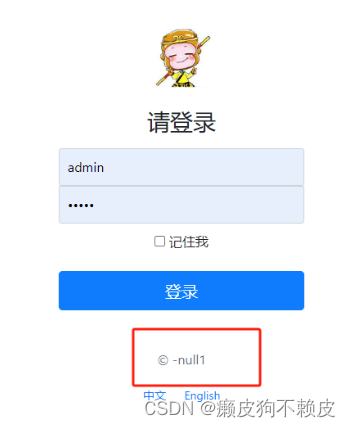
</div>国际化与消息表达式#{...}
在 Thymeleaf 中,
#{...}语法被用作消息表达式,通常与国际化(i18n)一起使用。这些表达式用于从消息源(通常是.properties文件)中检索本地化消息。
1、编写多语言国际化文件及配置文件
命名规则:基础名_语言代码_国家代码
login.properties(默认)
login.tip=请登录
login.username=用户名
login.password=密码
login.rememberme=记住我
login.button=登录
login_zh_CN.properties
login.tip=请登录
login.username=用户名
login.password=密码
login.rememberme=记住我
login.button=登录
login_en_US.properties
login.tip=Please sign in
login.username=Username
login.password=Password
login.rememberme=Remember me
login.button=Login
Springboot自动配置好了管理国际化资源文件的组件
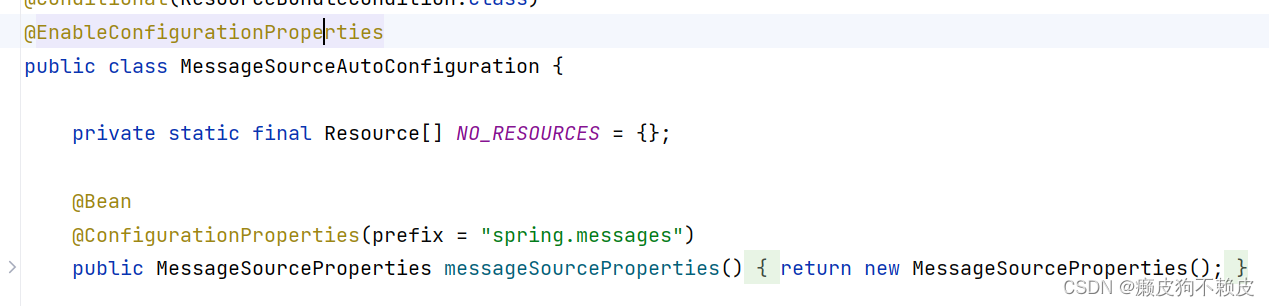
//我们配置的文件可以直接放在类路径下叫messages.properties

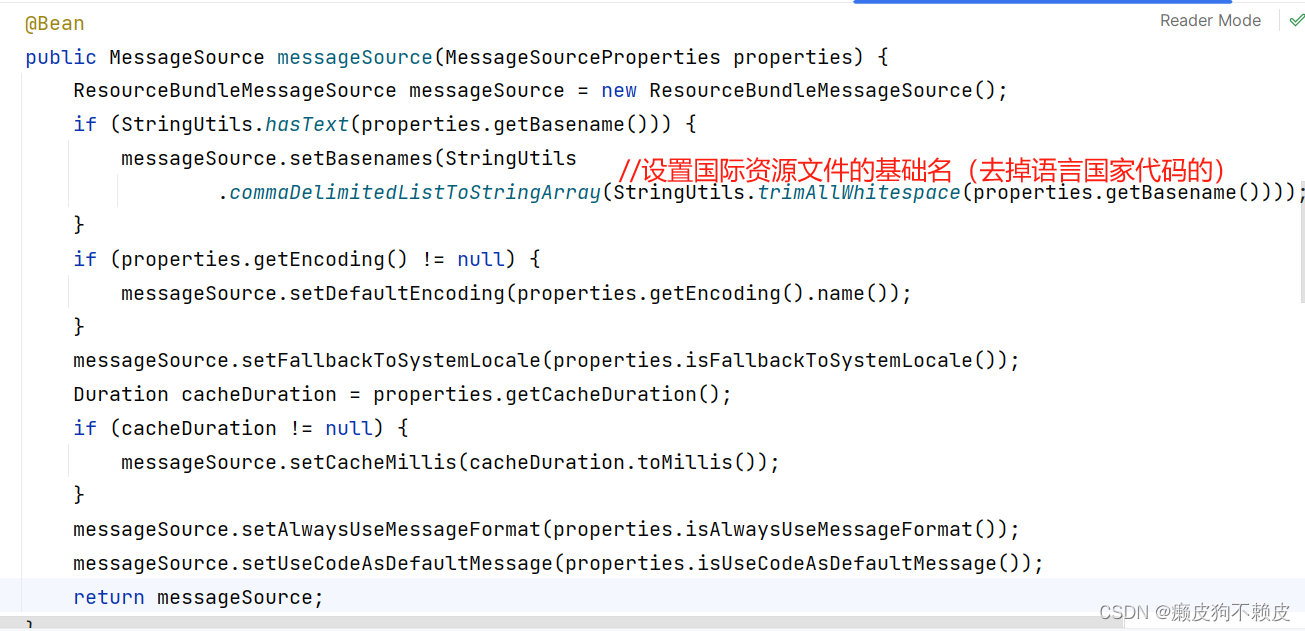
我们这里配置在i18n的文件下,所以需要在全局properties配置spring.message.basename
spring.messages.basename=i18n.login3、使用#{...}在页面获取国际化的值
<!DOCTYPE html>
<html lang="en" xmlns:th="http://www.thymeleaf.org">
<head><meta http-equiv="Content-Type" content="text/html; charset=UTF-8"><meta name="viewport" content="width=device-width, initial-scale=1,shrink-to-fit=no"><title>用户登录界面</title><link th:href="@{/login/css/bootstrap.min.css}" rel="stylesheet"><link th:href="@{/login/css/signin.css}" rel="stylesheet">
</head>
<body class="text-center">
<!--  用户登录form表单 -->
<form class="form-signin"><img class="mb-4" th:src="@{/login/img/login.jpg}" width="72" height="72"><h1 class="h3 mb-3 font-weight-normal" th:text="#{login.tip}">请登录</h1><input type="text" class="form-control"th:placeholder="#{login.username}" required="" autofocus=""><input type="password" class="form-control"th:placeholder="#{login.password}" required=""><div class="checkbox mb-3"><label><input type="checkbox" value="remember-me"> [[#{login.rememberme}]]</label></div><button class="btn btn-lg btn-primary btn-block" type="submit" th:text="#{login.button}">登录</button><p class="mt-5 mb-3 text-muted">© <span th:text="${currentYear}">2018</span>-<span th:text="${currentYear}+1">2019</span></p><a class="btn btn-sm" th:href="@{/toLoginPage(l='zh_CN')}">中文</a><a class="btn btn-sm" th:href="@{/toLoginPage(l='en_US')}">English</a>
</form>
</body>
</html>
编写Controller访问就可以根据改变浏览器语言切换中英文了
package com.gzist.controller;import org.springframework.stereotype.Controller;
import org.springframework.ui.Model;
import org.springframework.web.bind.annotation.GetMapping;@Controller
public class I18nController {@GetMapping("/toLoginPage")public String loginPage(Model model){return "login";}}
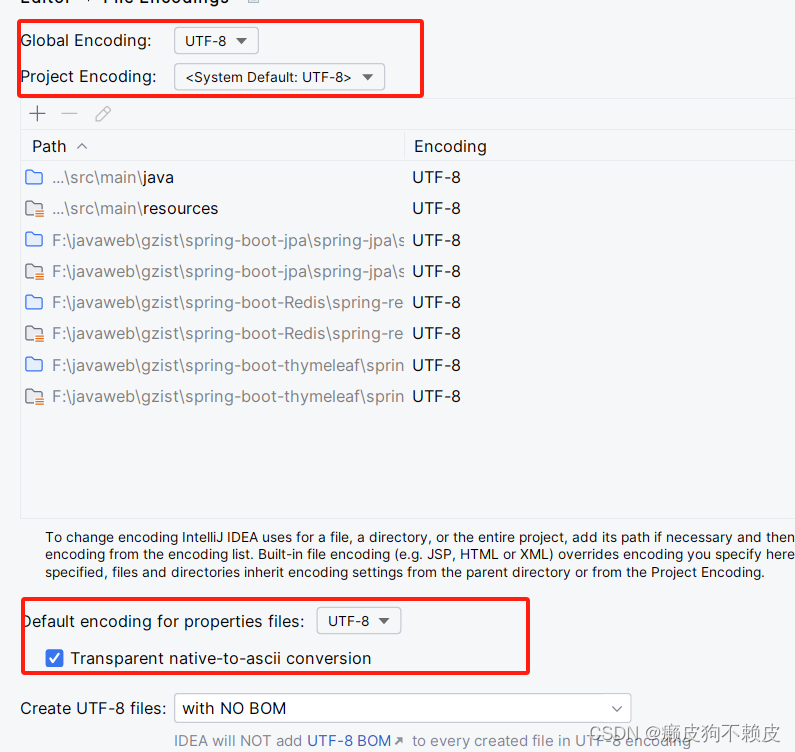
如果乱码,settings搜索file encodings
原理:
国际化有一个重要的对象Locale(区域信息对象),和一个组件LocaleResolver(获取区域信息对象)
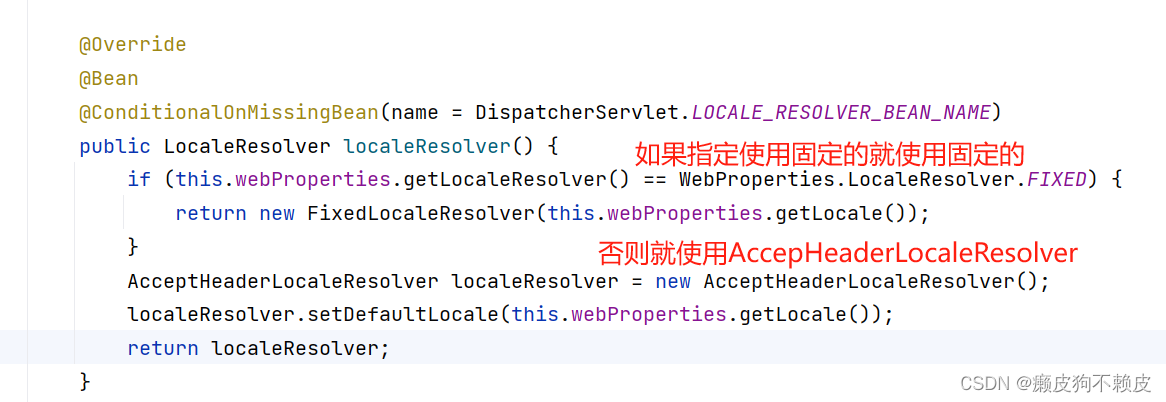
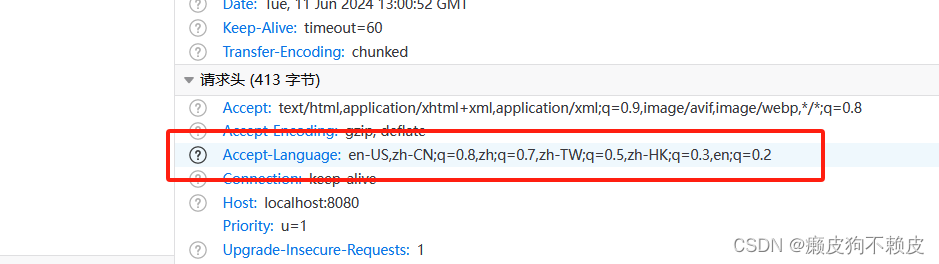
在AcceptHeaderLocaleResolver有一个方法用于从请求头中解析区域信息
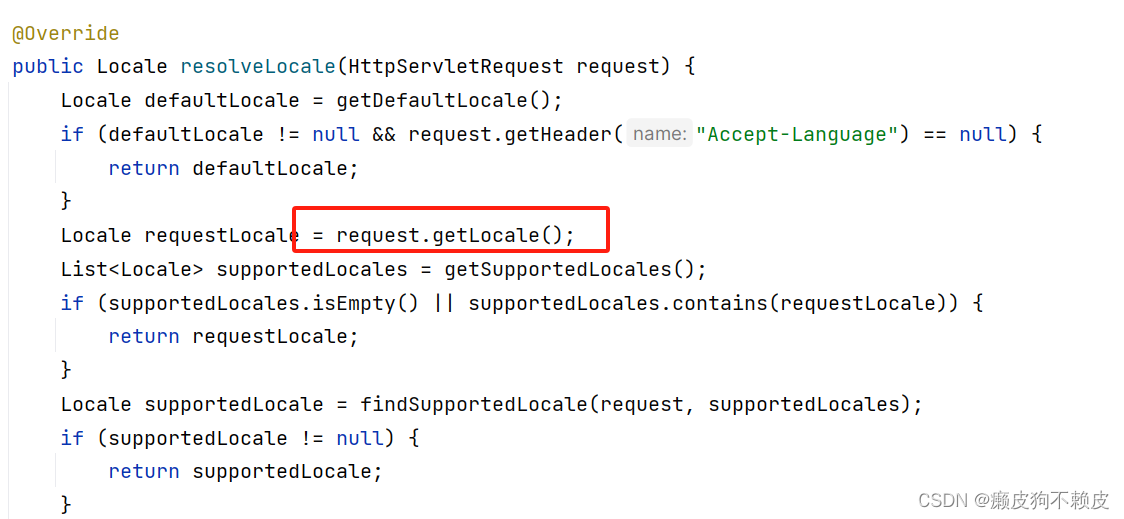
默认的就是根据请求头带来的区域信息获取Locale进行国际化
如果我们想通过链接跳转需要自己定义重写一个LocaleResolver,请求时携带区域信息

package com.gzist.config;import org.springframework.context.annotation.Bean;
import org.springframework.context.annotation.Configuration;
import org.springframework.util.StringUtils;
import org.springframework.web.servlet.LocaleResolver;import javax.servlet.http.HttpServletRequest;
import javax.servlet.http.HttpServletResponse;
import java.util.Locale;@Configuration
//实现LocaleResolver
public class MyLocaleResolver implements LocaleResolver {@Overridepublic Locale resolveLocale(HttpServletRequest request) {//获取参数带来的值String lang = request.getParameter("l");//如没带区域信息就使用默认的Locale locale = Locale.getDefault();//判断lang是否为空,request是否带来了区域信息if(!StringUtils.isEmpty(lang)){//切割带来的区域信息String[] split = lang.split("_");//new一个区域信息,split[0]语言代码,split[1]国家代码locale = new Locale(split[0],split[1]);}return locale;}@Overridepublic void setLocale(HttpServletRequest request, HttpServletResponse response, Locale locale) {}//将自定义的MyLocaleResolver类重新注册为一个类型LocaleResolver的Bean主键@Beanpublic LocaleResolver localeResolver(){return new MyLocaleResolver();}
}
第五章 SpringBoot实现Web的常用功能
整合spring MVC
SpringBoot项目中,一旦引入了Web依赖启动器 spring-boot-starter-web,那么 SpringBoot 整合 Spring MVC 框架默认实现的一些 xxxAutoConfiguration 自动配置类就会自动生效,几乎可以在无任何额外配置的情况下进行Web 开发。Spring Boot 为整合 Spring MVC 框架实现web 开发,主要提供了以下自动化配置的功能特性。
(1 )内置了两个视图解析器:ContentNegotiatingViewResolver 和 BeanNameViewResolver。
(2)支持静态资源以及 WebJars。
(3)自动注册了转换器和格式化器。
(4)支持 Http 消息转换器。
(5)自动注册了消息代码解析器。
(6) 支持静态项目首页 index.html。
(7) 支持定制应用图标 favicon.ico。
(8)自动初始化 Web 数据绑定器 ConfigurableWebBindingInitializer。
Spring Boot 整合Spring MVC 进行Web 开发时提供了很多默认配置,而且大多数时候使用默认配置即可满足开发需求。例如,Spring Boot整合 Spring MVC进行Web 开发时,不需要额外配置视图解析器
接下来整合SpringMVC实现简单页面跳转,这里将使用springboot提供的WebMvcConfigurer接口编写自定义配置,并适当扩展
1.注册视图管理器
创建一个MyMVCconfig实现WebMvcConfigurer接口,重写addViewControllers方法
package com.gzist.config;import org.springframework.beans.factory.annotation.Autowired;
import org.springframework.context.annotation.Configuration;
import org.springframework.web.servlet.config.annotation.InterceptorRegistry;
import org.springframework.web.servlet.config.annotation.ViewControllerRegistry;
import org.springframework.web.servlet.config.annotation.WebMvcConfigurer;@Configuration
public class MyMVCconfig implements WebMvcConfigurer {//注册视图管理器@Overridepublic void addViewControllers(ViewControllerRegistry registry) {//访问/toLoginPage跳转login.htmlregistry.addViewController("/toLoginPage").setViewName("login");//访问/login.html跳转login.htmlregistry.addViewController("/login.html").setViewName("login");}}
这时已经实现访问/toLoginPage和/login.html都跳转到模板/login.html,但是年份获取不到了
addViewControllers方法只适合简单的无参数视图Get方式的请求跳转,对于有参数或业务的跳转需求最好还是采用传统的处理请求
2.注册拦截器
创建一个拦截器MyInterceptor实现HandlerInterceptor
package com.gzist.config;import org.springframework.stereotype.Component;
import org.springframework.web.servlet.HandlerInterceptor;
import org.springframework.web.servlet.ModelAndView;import java.util.Calendar;@Component
public class MyInterceptor implements HandlerInterceptor {@Overridepublic boolean preHandle(javax.servlet.http.HttpServletRequest request, javax.servlet.http.HttpServletResponse response, Object handler) throws Exception {String uri = request.getRequestURI();Object loginUser = request.getSession().getAttribute("loginUser");if (loginUser == null && uri.startsWith("/admin")) {response.sendRedirect("/toLoginPage");return false;}return true;}@Overridepublic void postHandle(javax.servlet.http.HttpServletRequest request, javax.servlet.http.HttpServletResponse response, Object handler, ModelAndView modelAndView) throws Exception {//向request域中存放年份用于页面动态展示request.setAttribute("currentYear", Calendar.getInstance().get(Calendar.YEAR));}}
在MyMVCconfig注册拦截器
package com.gzist.config;import org.springframework.beans.factory.annotation.Autowired;
import org.springframework.context.annotation.Configuration;
import org.springframework.web.servlet.config.annotation.InterceptorRegistry;
import org.springframework.web.servlet.config.annotation.ViewControllerRegistry;
import org.springframework.web.servlet.config.annotation.WebMvcConfigurer;@Configuration
public class MyMVCconfig implements WebMvcConfigurer {@Autowiredprivate MyInterceptor myInterceptor;//注册拦截器@Overridepublic void addInterceptors(InterceptorRegistry registry) {registry.addInterceptor(myInterceptor).addPathPatterns("/**").excludePathPatterns("/login.html");}//注册视图管理器@Overridepublic void addViewControllers(ViewControllerRegistry registry) {registry.addViewController("/toLoginPage").setViewName("login");registry.addViewController("/login.html").setViewName("login");}}
我们在MyMVCconfig中添加了一个拦截器的拦截规则addPathPatterns,拦截规则是/**, 也就是所有的请求都会执行拦截器里的操作。
我们设置拦截器里的操作是,
请求前的操作 preHandle: 如果没有登录,就跳转到登录页面
请求后的操作postHandle:把年份数据显示到页面上
所以访问/admin 可以看到年份数据。但是如果加上这个排除规则,就是访问这两个请求,不会执行请求后的操作postHandle,所以这两个请求不能看到年份数据
.excludePathPatterns("/login.html")
.excludePathPatterns("/toLoginPage");
组件注册整合Servlet三大组件
在springboot中,使用组件注册方式整合内嵌Servlet容器Servlet、Filter、Listener三大组件时,只需要将自定义组件通过ServletRegisterationBean,FilterRegisterationBean,ListenerRegisterationBean类注册到容器中即可
1.组件整合Servlet
创建一个包servletComponent
自定义一个MyServlet类继承HttpServlet
package com.gzist.servletComponent;import org.springframework.stereotype.Component;import javax.servlet.http.HttpServlet;@Component
public class MyServlet extends HttpServlet {@Overridepublic void doGet(javax.servlet.http.HttpServletRequest request, javax.servlet.http.HttpServletResponse response) throws javax.servlet.ServletException, java.io.IOException {this.doPost(request, response);}@Overridepublic void doPost(javax.servlet.http.HttpServletRequest request, javax.servlet.http.HttpServletResponse response) throws javax.servlet.ServletException, java.io.IOException {response.getWriter().write("hello servlet");}
}
自定义一个MyFilter类实现Filter
package com.gzist.servletComponent;import org.springframework.stereotype.Component;import javax.servlet.*;
import java.io.IOException;@Component  // 注册到Spring容器
public class MyFilter implements Filter {@Overridepublic void init(FilterConfig filterConfig) throws ServletException {Filter.super.init(filterConfig);}@Overridepublic void doFilter(ServletRequest request, ServletResponse response, FilterChain chain) throws IOException, ServletException {System.out.println("执行了Filer");chain.doFilter(request,response);}@Overridepublic void destroy() {Filter.super.destroy();}
}
自定义一个MyListener类实现ServletContextListener
package com.gzist.servletComponent;import org.springframework.stereotype.Component;import javax.servlet.ServletContextEvent;
import javax.servlet.ServletContextListener;@Component  // 注册到Spring容器
public class MyListener implements ServletContextListener{@Overridepublic void contextInitialized(ServletContextEvent sce) {System.out.println("MyListener监听到项目启动");}@Overridepublic void contextDestroyed(ServletContextEvent sce) {System.out.println("MyListener监听到项目关闭");}
}
2.在config包下创建servletConfig配置类注册Servlet三大组件
package com.gzist.config;import com.gzist.servletComponent.MyFilter;
import com.gzist.servletComponent.MyListener;
import com.gzist.servletComponent.MyServlet;
import org.springframework.boot.web.servlet.FilterRegistrationBean;
import org.springframework.boot.web.servlet.ServletListenerRegistrationBean;
import org.springframework.boot.web.servlet.ServletRegistrationBean;
import org.springframework.context.annotation.Bean;
import org.springframework.context.annotation.Configuration;import java.util.Arrays;@Configuration
public class servletConfig {//注册servlet组件@Beanpublic ServletRegistrationBean getServlet(MyServlet myServlet){//创建servlet组件ServletRegistrationBean servletRegistrationBean = new ServletRegistrationBean(myServlet,"/myServlet");return servletRegistrationBean;}@Beanpublic FilterRegistrationBean getFilter(MyFilter myFilter){FilterRegistrationBean filterRegistrationBean = new FilterRegistrationBean(myFilter);filterRegistrationBean.setUrlPatterns(Arrays.asList("/toLoginPage"));return filterRegistrationBean;}@Beanpublic ServletListenerRegistrationBean getListener(MyListener myListener){ServletListenerRegistrationBean servletListenerRegistrationBean = new ServletListenerRegistrationBean(myListener);return servletListenerRegistrationBean;}
}
路径扫描方式整合Servlet三大组件
把组件整合的方式修改一下,@Component注解分别改为@WebServlet,@WebFilter,@WebListen,然后在主程序启动类上添加@ServletComponentScan
MyServlet
@WebServlet("/myservlet")  // 注册到Spring容器
public class MyServlet extends HttpServlet {
...
}
MyFilter
@WebFilter("/toLoginPage")  // 注册到Spring容器
public class MyFilter implements Filter {
...
}
MyListener
@WebListener  // 注册到Spring容器
public class MyListener implements ServletContextListener{
...
}
主程序启动类
package com.gzist;import org.springframework.boot.SpringApplication;
import org.springframework.boot.autoconfigure.SpringBootApplication;
import org.springframework.boot.web.servlet.ServletComponentScan;@SpringBootApplication
@ServletComponentScan
public class SpringMvcApplication {public static void main(String[] args) {SpringApplication.run(SpringMvcApplication.class, args);}}
文件上传、下载
pom.xml添加依赖
<!-- 进行文件下载的工具依赖 --><dependency><groupId>commons-io</groupId><artifactId>commons-io</artifactId><version>2.6</version></dependency>上传模板
<!DOCTYPE html>
<html lang="en" xmlns:th="http://www.thymeleaf.org">
<head><meta charset="UTF-8"><meta http-equiv="Content-Type" content="text/html; charset=UTF-8"><title>动态添加文件上传列表</title><link th:href="@{/login/css/bootstrap.min.css}" rel="stylesheet"><script th:src="@{/login/js/jquery.min.js}"></script>
</head>
<body>
<div th:if="${uploadStatus}" style="color: red" th:text="${uploadStatus}">上传成功</div>
<form th:action="@{/uploadFile}" method="post" enctype="multipart/form-data">上传文件: <input type="button" value="添加文件" onclick="add()"/><div id="file" style="margin-top: 10px;" th:value="文件上传区域"> </div><input id="submit" type="submit" value="上传"style="display: none;margin-top: 10px;"/>
</form>
<script type="text/javascript">// 动态添加上传按钮function add(){var innerdiv = "<div>";innerdiv += "<input type='file' name='fileUpload' required='required'>" +"<input type='button' value='删除' onclick='remove(this)'>";innerdiv +="</div>";$("#file").append(innerdiv);// 打开上传按钮$("#submit").css("display","block");}// 删除当前行<div>function remove(obj) {$(obj).parent().remove();if($("#file div").length ==0){$("#submit").css("display","none");}}
</script>
</body>
</html>
下载模板
<!DOCTYPE html>
<html lang="en" xmlns:th="http://www.thymeleaf.org">
<head><meta charset="UTF-8"><title>文件下载</title>
</head>
<body>
<div style="margin-bottom: 10px">文件下载列表:</div>
<table><tr><td>bloglogo.jpg</td><td><a th:href="@{/download(filename='bloglogo.jpg')}">下载文件</a></td></tr><tr><td>Spring Boot应用级开发教程.pdf</td><td><a th:href="@{/download(filename='Spring Boot应用级开发教程.pdf')}">下载文件</a></td></tr>
</table>
</body>
</html>
上传下载Controller
package com.itheima.controller;import org.apache.commons.io.FileUtils;
import org.springframework.http.HttpHeaders;
import org.springframework.http.HttpStatus;
import org.springframework.http.MediaType;
import org.springframework.http.ResponseEntity;
import org.springframework.stereotype.Controller;
import org.springframework.ui.Model;
import org.springframework.web.bind.annotation.*;
import org.springframework.web.multipart.MultipartFile;import javax.servlet.http.HttpServletRequest;
import java.io.File;
import java.net.URLEncoder;
import java.util.UUID;
/*** 文件管理控制类*/
@Controller
public class FileController {// 向文件上传页面跳转@GetMapping("/toUpload")public String toUpload(){return "upload";}// 文件上传管理@PostMapping("/uploadFile")public String uploadFile(MultipartFile[] fileUpload, Model model) {// 默认文件上传成功,并返回状态信息model.addAttribute("uploadStatus", "上传成功!");for (MultipartFile file : fileUpload) {// 获取文件名以及后缀名String fileName = file.getOriginalFilename();// 重新生成文件名(根据具体情况生成对应文件名)fileName = UUID.randomUUID()+"_"+fileName;// 指定上传文件本地存储目录,不存在需要提前创建String dirPath = "F:/file/";File filePath = new File(dirPath);if(!filePath.exists()){filePath.mkdirs();}try {file.transferTo(new File(dirPath+fileName));} catch (Exception e) {e.printStackTrace();// 上传失败,返回失败信息model.addAttribute("uploadStatus","上传失败: "+e.getMessage());}}// 携带上传状态信息回调到文件上传页面return "upload";}// 向文件下载页面跳转@GetMapping("/toDownload")public String toDownload(){return "download";}
//    // 文件下载管理
//    @GetMapping("/download")
//    public ResponseEntity<byte[]> fileDownload(String filename){
//        // 指定要下载的文件根路径
//        String dirPath = "F:/file/";
//        // 创建该文件对象
//        File file = new File(dirPath + File.separator + filename);
//        // 设置响应头
//        HttpHeaders headers = new HttpHeaders();
//        // 通知浏览器以下载方式打开
//        headers.setContentDispositionFormData("attachment",filename);
//        // 定义以流的形式下载返回文件数据
//        headers.setContentType(MediaType.APPLICATION_OCTET_STREAM);
//        try {
//            return new ResponseEntity<>(FileUtils.readFileToByteArray(file), headers, HttpStatus.OK);
//        } catch (Exception e) {
//            e.printStackTrace();
//            return new ResponseEntity<byte[]>(e.getMessage().getBytes(),HttpStatus.EXPECTATION_FAILED);
//        }
//    }// 所有类型文件下载管理@GetMapping("/download")public ResponseEntity<byte[]> fileDownload(HttpServletRequest request,String filename) throws Exception{// 指定要下载的文件根路径String dirPath = "F:/file/";// 创建该文件对象File file = new File(dirPath + File.separator + filename);// 设置响应头HttpHeaders headers = new HttpHeaders();// 通知浏览器以下载方式打开(下载前对文件名进行转码)filename=getFilename(request,filename);headers.setContentDispositionFormData("attachment",filename);// 定义以流的形式下载返回文件数据headers.setContentType(MediaType.APPLICATION_OCTET_STREAM);try {return new ResponseEntity<>(FileUtils.readFileToByteArray(file), headers, HttpStatus.OK);} catch (Exception e) {e.printStackTrace();return new ResponseEntity<byte[]>(e.getMessage().getBytes(),HttpStatus.EXPECTATION_FAILED);}}// 根据浏览器的不同进行编码设置,返回编码后的文件名private String getFilename(HttpServletRequest request, String filename)throws Exception {// IE不同版本User-Agent中出现的关键词String[] IEBrowserKeyWords = {"MSIE", "Trident", "Edge"};// 获取请求头代理信息String userAgent = request.getHeader("User-Agent");for (String keyWord : IEBrowserKeyWords) {if (userAgent.contains(keyWord)) {//IE内核浏览器,统一为UTF-8编码显示,并对转换的+进行更正return URLEncoder.encode(filename, "UTF-8").replace("+"," ");}}//火狐等其它浏览器统一为ISO-8859-1编码显示return new String(filename.getBytes("UTF-8"), "ISO-8859-1");}}
JAR包方式打包部署
pom.xml依赖,一般在初始化的时候默认的
<build><plugins><plugin><groupId>org.apache.maven.plugins</groupId><artifactId>maven-compiler-plugin</artifactId><version>3.8.1</version></plugin></plugins></build>右边栏选择Maven中的package就会进行打包
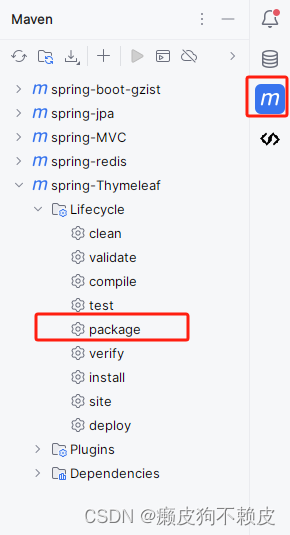
使用命令java -jar 包名部署
WAR包方式打包部署
1.在pom.xml中声明war打包方式
    <!-- 1、将项目打包方式声明为war  -->
<description>Demo project for Spring Boot</description><packaging>war</packaging>
2.在pom.xml中声明使用外部Tomcat
<!-- 2、声明使用外部提供的Tomcat --><dependency><groupId>org.springframework.boot</groupId><artifactId>spring-boot-starter-tomcat</artifactId><scope>provided</scope></dependency>3.提供 Spring Boot 启动的 Servlet 初始化器。将 Spring Boot 项目生成可部署War 包的最后一步也是最車要的一步就是提供 SpringBootServletlnitializer 子类并覆盖其:contigure()万法,这样做是利用了 Spring 框架的 Servlet 3.0支持,允许应用程序在 Servlet 容器启动时可以进行配置。打开 项目的主程序启动类 ,让其继承SpringBootServletlnitializer 并实现 configure()方法
package com.itheima;import org.springframework.boot.SpringApplication;
import org.springframework.boot.autoconfigure.SpringBootApplication;
import org.springframework.boot.builder.SpringApplicationBuilder;
import org.springframework.boot.web.servlet.ServletComponentScan;
import org.springframework.boot.web.servlet.support.SpringBootServletInitializer;@ServletComponentScan  // 开启基于注解方式的Servlet组件扫描支持
@SpringBootApplication
public class Chapter05Application extends SpringBootServletInitializer {// 3、程序主类继承SpringBootServletInitializer,并重写configure()方法@Overrideprotected SpringApplicationBuilder configure(SpringApplicationBuilder builder) {return builder.sources(Chapter05Application.class);}public static void main(String[] args) {SpringApplication.run(Chapter05Application.class, args);}}
右边栏选择Maven中的package就会以war方式进行打包
打包好的War 包复制到Tomcat 安装目录下的webapps 目录中,执行 Tomcat 安装目录下bin目录中的startup.bat 命令启动War 包项目


![【2024最新华为OD-C/D卷试题汇总】[支持在线评测] 密码解密(100分) - 三语言AC题解(Python/Java/Cpp)](https://img-blog.csdnimg.cn/direct/c069d33c72154fd4be885e19944459c1.png)
![[leetcode hot 150]第十五题,三数之和](https://img-blog.csdnimg.cn/direct/cb45550577ee47baa1b796fc6063d0d9.png)

