我对使用 PyTorch 可以轻松构建动态神经网络的想法很感兴趣,因此我决定尝试一下。
我脑海中的应用程序具有可变数量的相同类型的输入。对于可变数量的输入,已经使用了循环或递归神经网络。但是,这些结构在给定行的输入之间施加了一些顺序或层次结构。但是,当没有这样的关系时,这些方法可能不是最佳的。

NSDT工具推荐: Three.js AI纹理开发包 - YOLO合成数据生成器 - GLTF/GLB在线编辑 - 3D模型格式在线转换 - 可编程3D场景编辑器 - REVIT导出3D模型插件 - 3D模型语义搜索引擎 - Three.js虚拟轴心开发包 - 3D模型在线减面 - STL模型在线切割
以下是一个例子:给定一组从高斯分布中抽取的点,估计它们的均值和方差。请注意,对于样本的每一行,点的数量可能不同。
DeepMind 的研究人员最近发表了“关系网络”的想法,它将可变数量对象的特征作为输入并以顺序不变的方式处理它们,而无需对原始数据集的置换重复进行训练。
特别是,他们对查看对象对很感兴趣。他们提出的网络结构之一首先将 n 个对象对中的每个对象对的特征传递到网络 g,然后通过求和的方式聚合网络 g 的这 n 个副本的输出并将其输入到第二个网络 f:
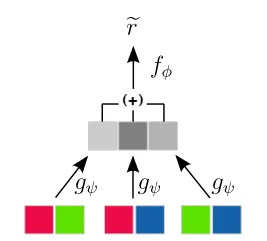
对对象对进行排序不变网络结构(来自 arxiv:1702.05068)
重要的是,求和实际上强加了对的顺序不变性。
还要注意,g 网络的输出通常是向量(即多个值)。
受此启发,我尝试在 PyTorch 中实现一个网络,它可以学习估计高斯分布的方差,给定从中抽取的可变数量的点。
我们使用简单的一维输入值,而不是使用对象对。让我们首先定义我们想要生成多少行以及每行有多少个点等:
# range of variances to generate
varianceRange = [0.5, 1.5]# total number of points to generate
numRows = 10000# minimum and maximum number of points to draw from each distribution
# (both inclusive)
numPointsRange = [10, 20]
然后我们绘制用于高斯的方差:
# generate true variances of Gaussians
# convert to float32 to avoid incompatible data types during training
trueVariances = np.random.uniform(varianceRange[0], varianceRange[1], numRows).astype('float32')
trueSigmas = np.sqrt(trup(trueVariances))
然后我们生成实际的点:我们首先需要抽取随机值来确定样本的每一行应该包含多少个点。然后我们生成点本身(为简单起见,我们将所有高斯分布的中心设为零):
# determine how many points should be drawn from each Gaussian
numPoints = np.random.randint(0, numPointsRange[0], numPointsRange[1], size=numRows)# draw a set of points from the Gaussian
xvalues = []for row in range(numRows):thisNumPoints = numPoints[row]# draw points from this Gaussianxvalues.append(np.random.normal(loc=0, scale=truesigmas[row], size=thisNumPoints))# convert to float32 to avoid problems with incompatible data types during trainingxvalues.append(xfloat32)# calculate ML estimators for each point
mLestimators = np.array([np.mean(xvar, ddof=0) for xv in xvalues], dtype='float32')# calculate unbiased estimators for each point
ubEstimators = np.array([np.mean(xvar, ddof=1) for xv in xvalues], dtype='float32')
我们可以直观地看到一个示例行:
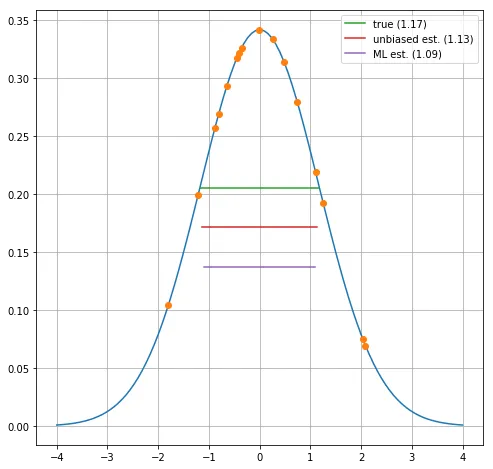
蓝色曲线表示实际的高斯分布,橙色点表示从此实例中得出的值。绿线表示方差的真实平方根(两倍),红线和紫线分别对应无偏和最大似然 (ML) 估计值。
现在让我们定义网络结构。构造函数采用几个参数来定义网络在“输入”(f) 和“输出”(g) 侧应该有多少层以及这些层应该有多宽:
class Net(nn.Module):def __init__(self, num_inputs=5, width_inputSide=50, num_outputs=50):super().__init__()self.input_side_layers = nn.ModuleList([nn.Linear(num_inputs, width_inputSide) for _ in range(num_inputs)])self.output_side_layers = nn.ModuleList([nn.Linear(width_inputSide, num_outputs) for _ in range(num_inputs)])def forward(self, x):input_side_outputs = [layer(x) for layer in self.input_side_layers]self.add_module("input_side&", input_side_outputs)num_inputs = 1self.input_side_layers = []for i in range(num_inputs):layer = nn.Linear(num_inputs, width_inputSide)self.input_side_layers.append(layer)self.add_module(f"layer_{i}", layer)num_inputs = width_inputSidefor i in range(num_inputs):self.output_side_layers[i] = nn.Linear(width_inputSide, num_outputs)if i == numLayersOutputSide - 1:# we want to learn the variancenum_outputs = 1else:num_outputs = width_inputSideself.output_side_layers.append(layer)self.add_module("output&", layer)num_inputs = num_outputs代码的核心在于网络的转发方法:
def forward(self, points):# points is a list of 2D lists if 2D points, the second index is the index# of the point within the row# overall output for the entire minibatchoutputs = []# loop over minibatch entriesfor this_points in points:# outputs of each point of this minibatch entrythis_outputs = []# stack all input points into a 2D tensorh = torch.stack(this_points)# variance (Var.from_numpy(h))h = Variable(torch.from_numpy(h))# forward all input points through the input side networkfor layer in self.input_side_layers:h = layer(h)h = F.relu(h)# average the input side network outputs: sum along first dimension (point index)avg_h = h.sum(0) / len(this_points)# feed through the output side networkout = self.output_layer(avg_h)# layer_index, in enumerate(self.outputSideLayers):h = layer# note: since we want to do regression, we do NOT apply a nonlinearty after the last layerif layer_index == len(self.outputSideLayers) - 1:h = F.relu(h)outputs.append(h)# end of loop over minibatch entriesreturn torch.cat(outputs, 0)你会注意到这一行:
output = h.sum(0) / len(thisPoints)它在输入端聚合网络的输出张量。
为了简单起见,我们不使用任何正则化,例如 dropout 层等。此外,网络的大小是手动输入的,而不是来自一些更严格的程序,例如 k 倍交叉验证等。
准备训练的代码如下:
# instantiate the model
model = Net()allIndices = np.arange(len(targetTrain))# define the loss function
lossFunc = nn.MSELoss()minibatchSize = 32# number of training epochs
num_epochs = 40optimizer = optim.Adam(model.parameters(), lr = 0.0001)trainLosses = [] ; testLosses = []# variable for target values of test set
testTargetVar = Variable(torch.from_numpy(stack(targetTest)))
主要训练循环是:
# print "starting training"
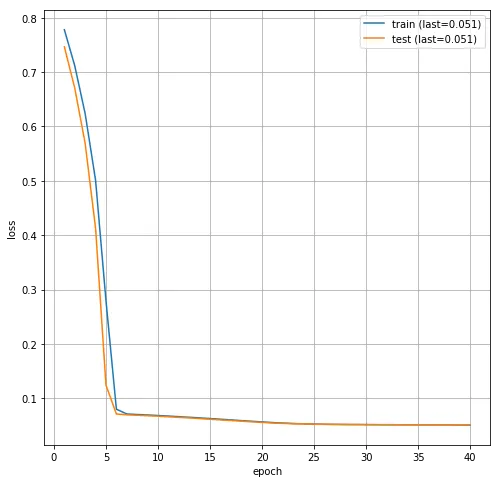
for epoch in range(num_epochs):np.random.shuffle(all_indices)# # put model in training modemodel.train()train_loss = 0train_steps = 0for indices in np.array_split(all_indices, minibatchSize):optimizer.zero_grad()# forward through the networkoutput = model.forward(input_train[indices] for index in indices)# build a PyTorch variable with the target valuetarget = Variable(thisTarget, requires_grad=False)# so that we can propagate backwards afterwordstrain_loss += lossFunc.forward(output, thisTarget)# accumulatetrain_loss += loss.data[0]# backpropagateloss.backward()# update learning rateoptimizer.step()# update learning rateoptimizer.step()train_steps += 1train_loss /= train_stepstrain_losses.append(train_loss)# evaluate model on test setmodel.eval()test_loss = lossFunc.forward(output, testTarget).data[0]test_losses.append(test_loss)print("epoch", epoch, "train_loss", train_loss, "test_loss", testLoss)在我的计算机上训练需要一段时间。损失与训练周期的演变如下:
然后我们可以在测试集上评估我们训练的模型:
model.eval()
predictions = model.forward(inputTest).data.numpy()[:,0]
让我们用以下代码来看一下用于生成高斯分布的真实方差和预测方差之间的差异:
def absDiff(prediction, trueValues):absDiff = prediction - trueValuesreturn np.mean(absDiff**2)import pandas as pddf = pd.DataFrame(dict(estimator=["network prediction","ML estimator","unbiased estimator"
]))rmse = [absDiffFunc(predictions, targetTest),absDiffFunc(np.sqrt(np.var(x, ddof=0)), 1 for x in inputTest), absDiffFunc(np.sqrt(np.var(x, ddof=1)), 1 for x in inputTest)
])
同时,我们将方差的最大似然估计和无偏估计与真实方差进行比较。下表总结了此示例运行的结果:
| estimator | rmse | |
|---|---|---|
| 0 | network prediction | 0.225890 |
| 1 | ML estimator | 0.246142 |
| 2 | unbiased estimator | 0.241594 |
均方误差的根与最大似然估计和无偏估计相当(如果不是略好的话——但请记住,这仅适用于此样本,而不适用于一般情况)。
上述网络结构可用于学习可变数量输入的函数。本文的笔记本可在此处找到。
原文链接:


