前言
在上一章【课程总结】Day17(下):初始Seq2Seq模型中,我们初步了解了Seq2Seq模型的基本情况及代码运行效果,本章内容将深入了解Seq2Seq模型的代码,梳理代码的框架图、各部分组成部分以及运行流程。
框架图
工程目录结构
查看项目目录结构如下:
seq2seq_demo/
├── data.txt                     # 原始数据文件,包含训练或测试数据
├── dataloader.py                # 数据加载器,负责读取和预处理数据
├── decoder.py                   # 解码器实现,用于生成输出序列
├── encoder.py                   # 编码器实现,将输入序列编码为上下文向量
├── main.py                      # 主程序入口,执行模型训练和推理
├── seq2seq.py                   # seq2seq 模型的实现,整合编码器和解码器
└── tokenizer.py                 # 分词器实现,将文本转换为模型可处理的格式
查看各个py文件整理关系图结构如下:
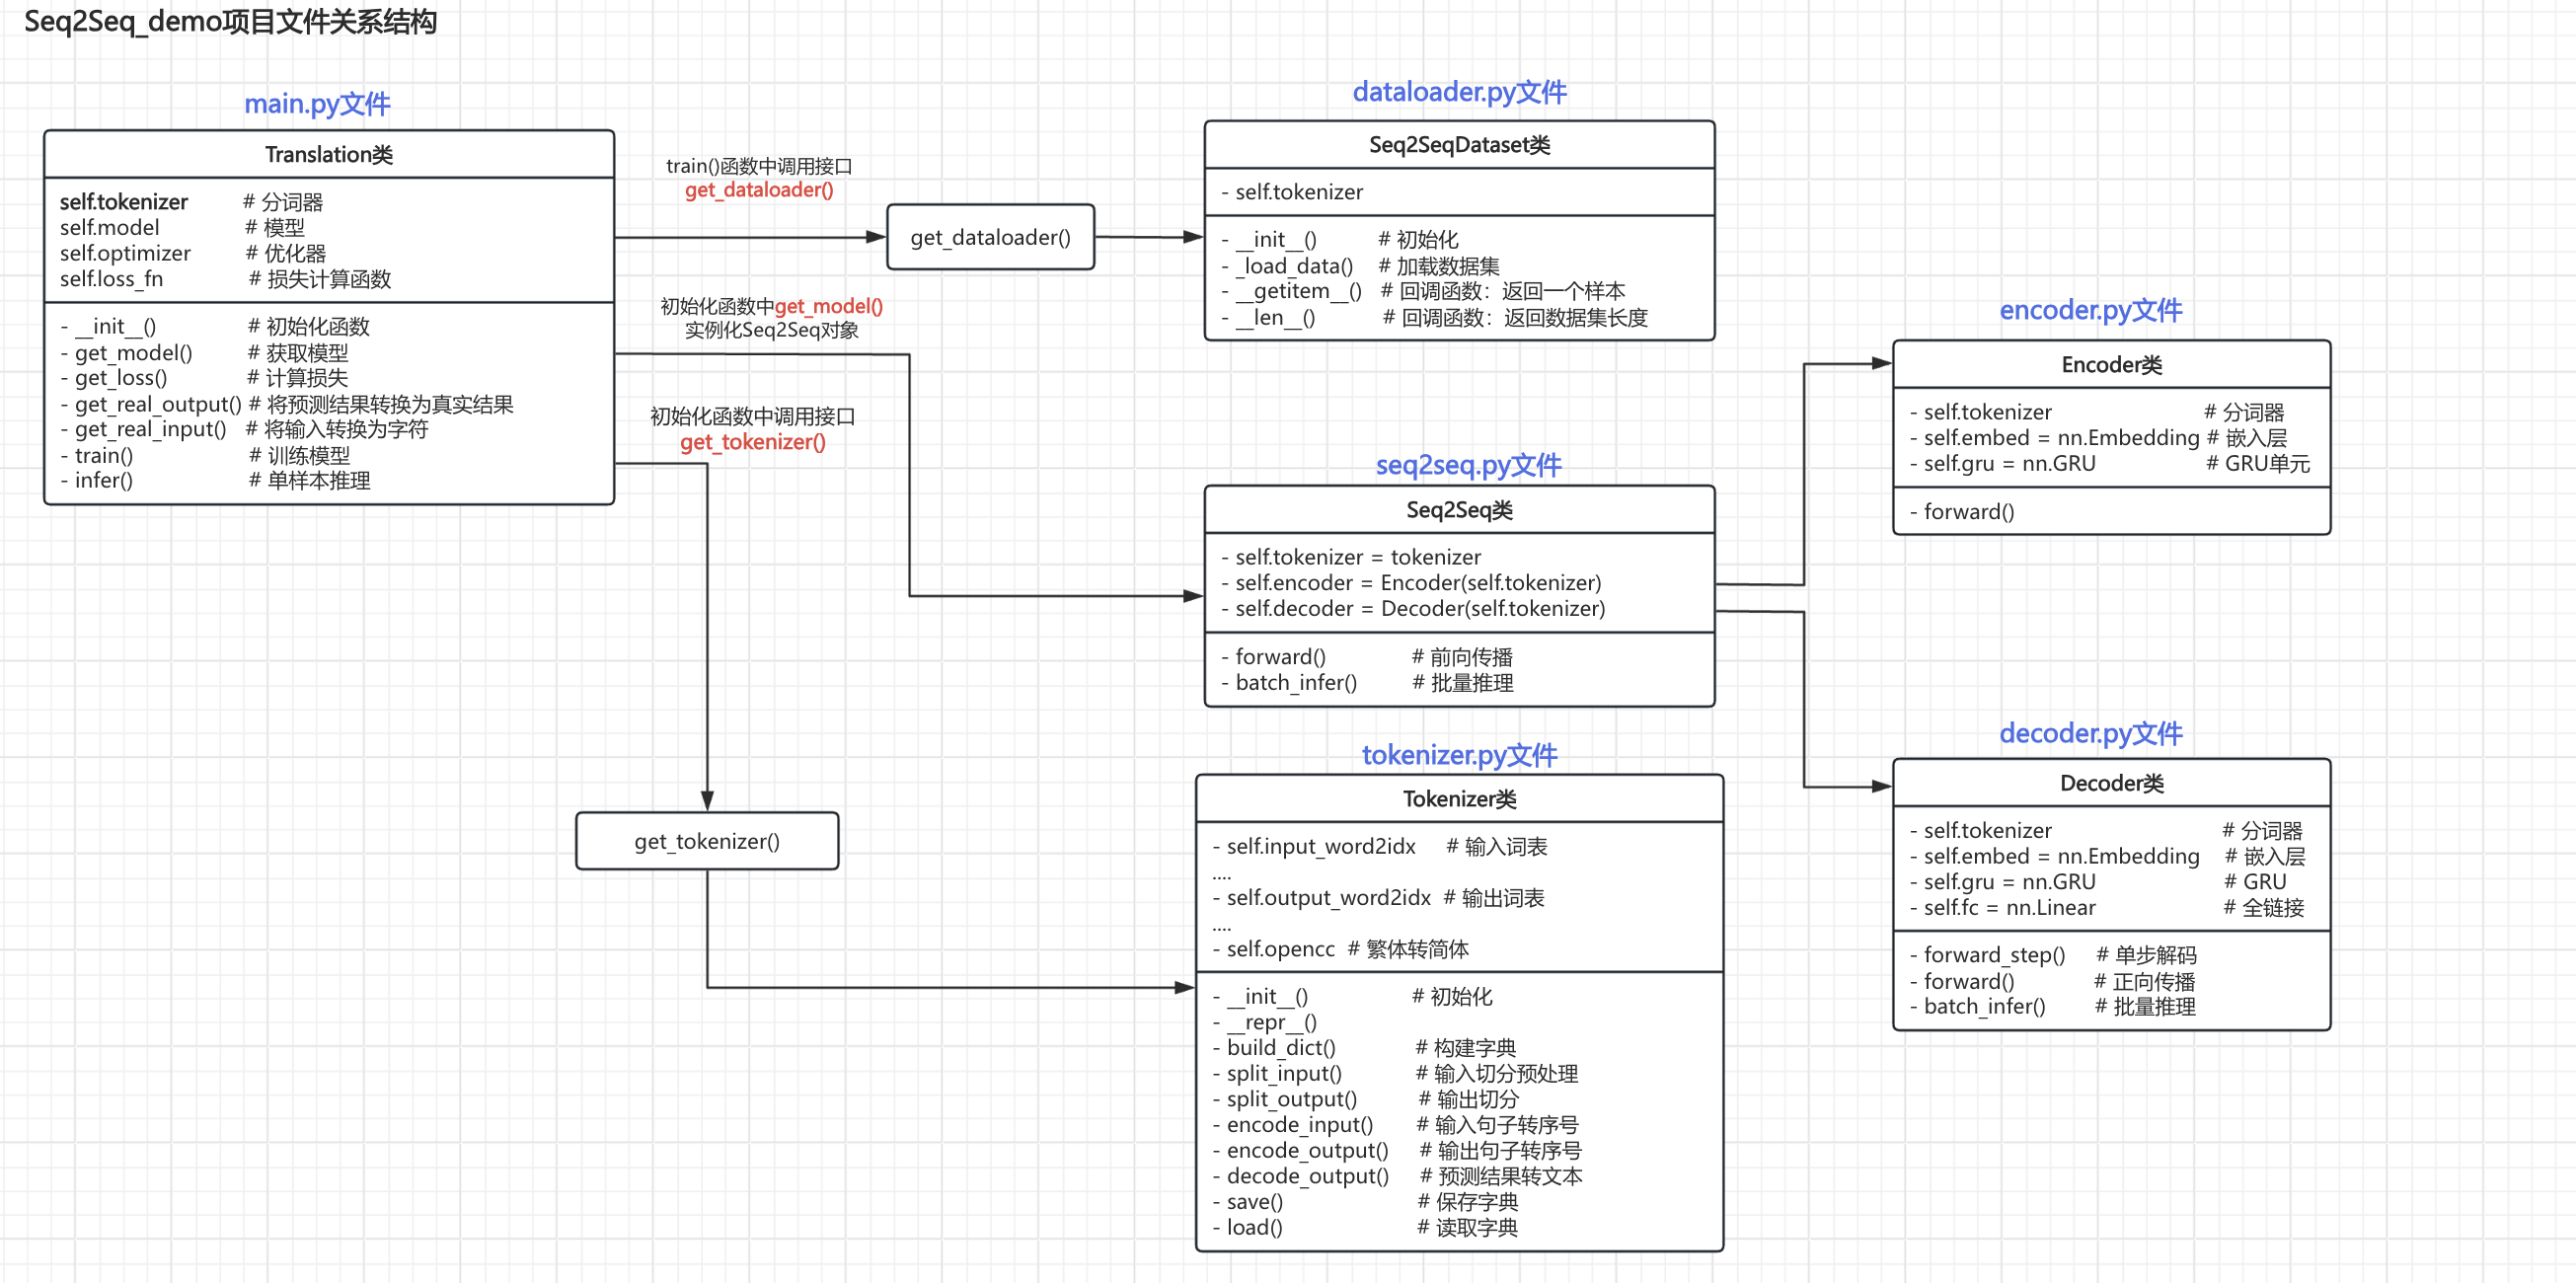
main.py文件是主程序入口,同时其中也定义了Translation类,用于训练和推理。Translation类在__init__()方法中调用get_tokenizer()方法实例化tokenizer对象。Translation类在__init__()方法中调用get_model()实例化seq2seq类对象,进而实例化Encoder和Decoder对象。Translation类在train()方法中调用get_dataloader()方法实例化dataloader对象。
核心逻辑
初始化过程
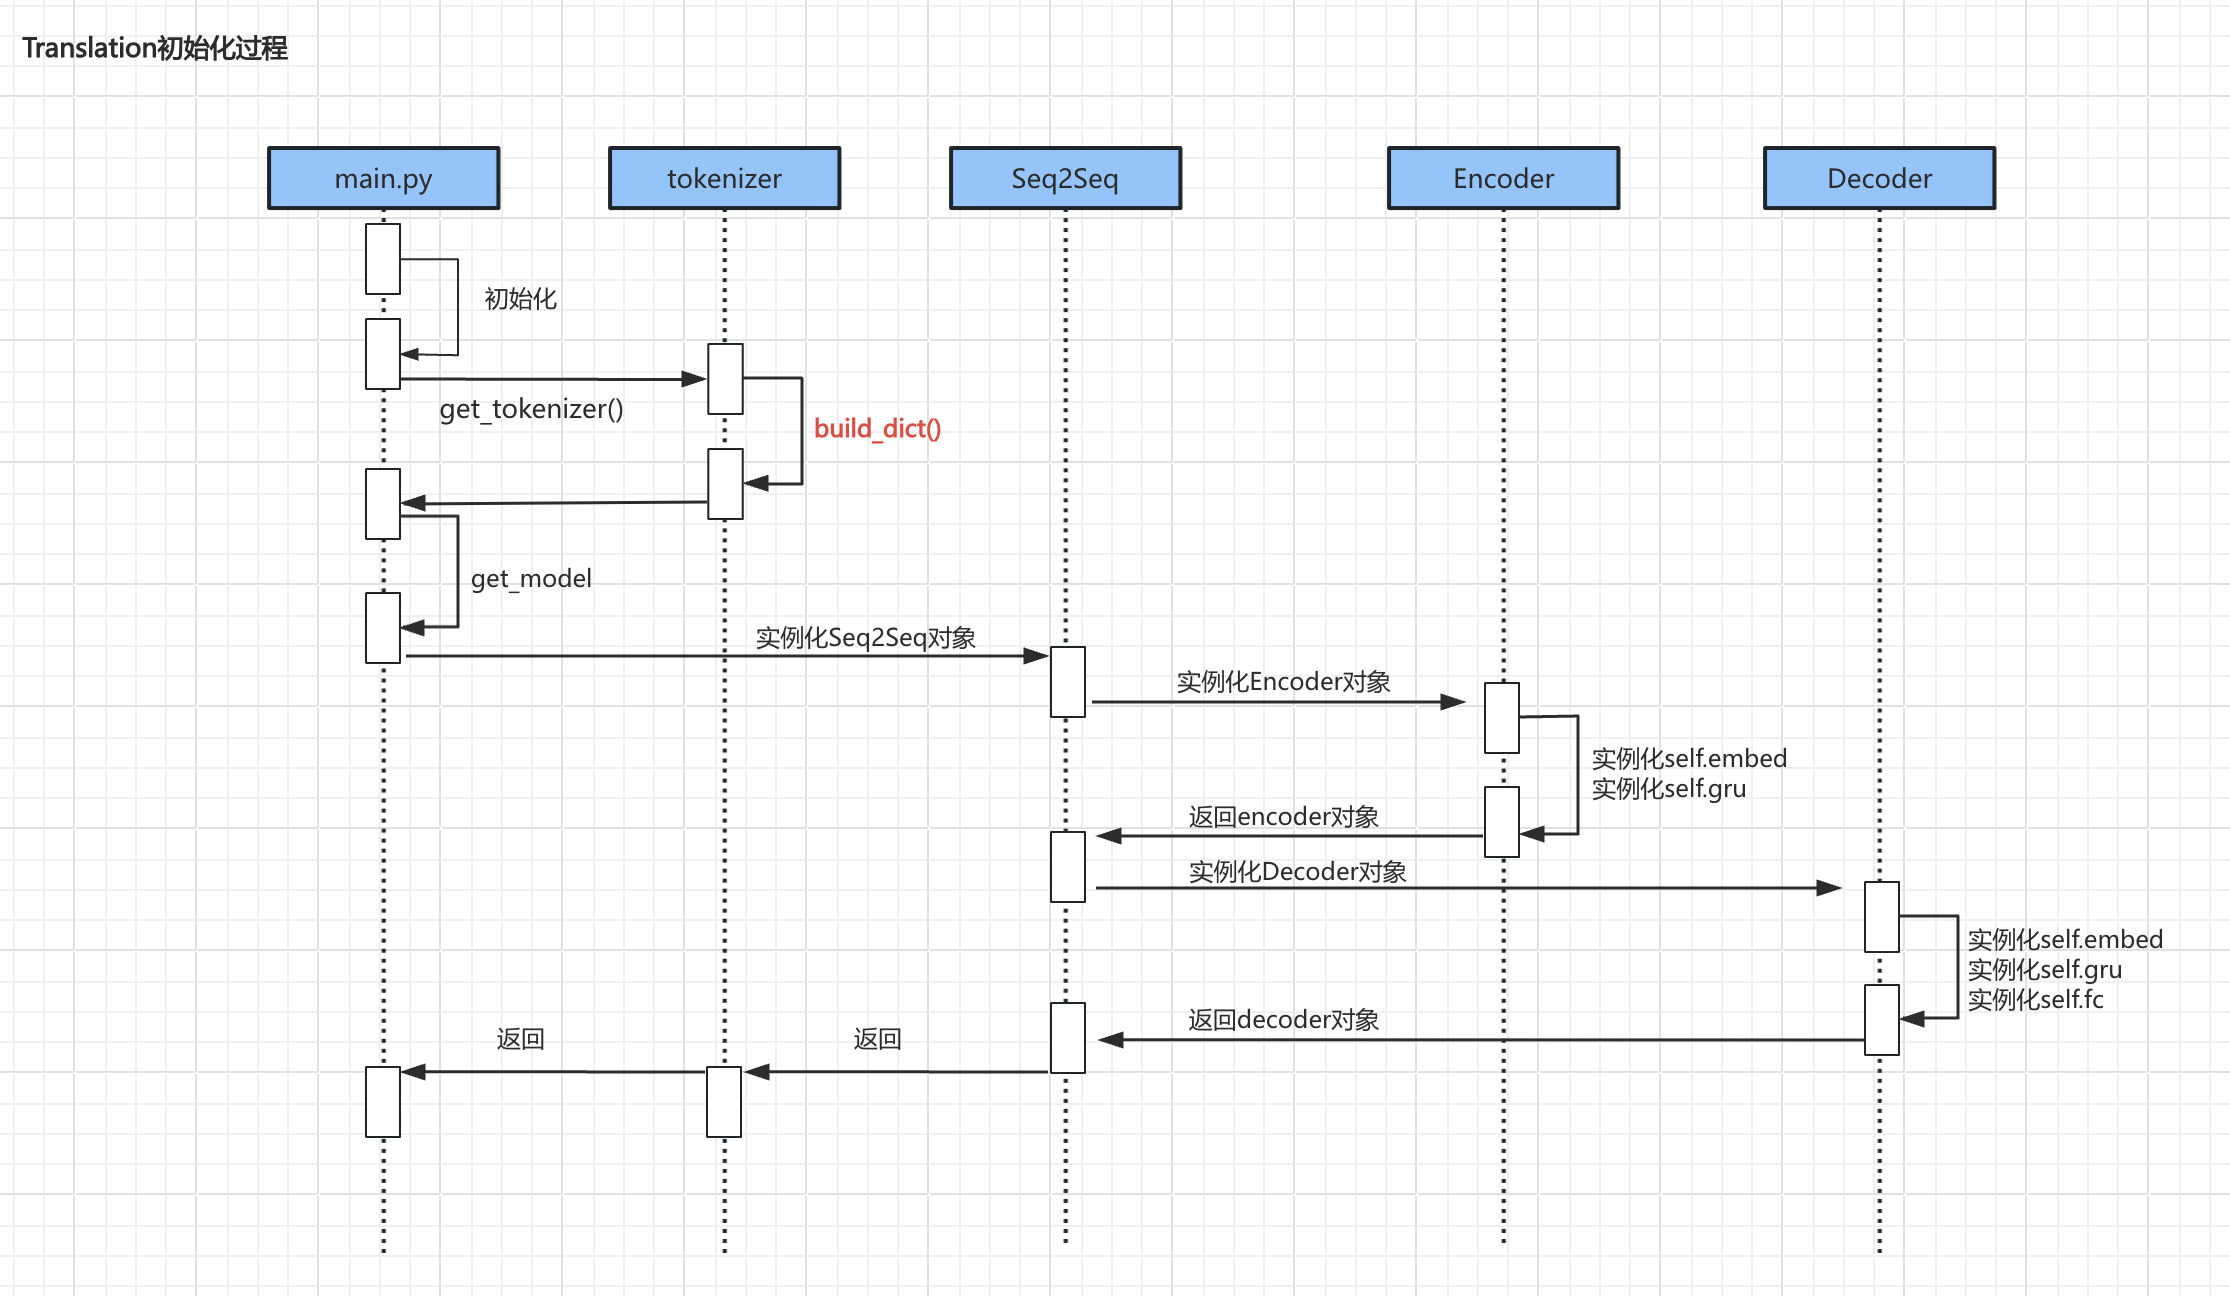
- 上述流程中较为重要的代码主要是
build_dict()、encoder实例化、decoder实例化初始化过程:
Build_dict()
def build_dict(self):"""构建字典"""if os.path.exists(self.saved_dict):self.load()print("加载本地字典成功")returninput_words = {"<UNK>", "<PAD>"}output_words = {"<UNK>", "<PAD>", "<SOS>", "<EOS>"}with open(file=self.data_file, mode="r", encoding="utf8") as f:for line in tqdm(f.readlines()):if line:input_sentence, output_sentence = line.strip().split("\t")input_sentence_words = self.split_input(input_sentence)output_sentence_words = self.split_output(output_sentence)input_words = input_words.union(set(input_sentence_words))output_words = output_words.union(set(output_sentence_words))# 输入字典self.input_word2idx = {word: idx for idx, word in enumerate(input_words)}self.input_idx2word = {idx: word for word, idx in self.input_word2idx.items()}self.input_dict_len = len(self.input_word2idx)# 输出字典self.output_word2idx = {word: idx for idx, word in enumerate(output_words)}self.output_idx2word = {idx: word for word, idx in self.output_word2idx.items()}self.output_dict_len = len(self.output_word2idx)# 保存self.save()print("保存字典成功")
代码解析:
- 首先,判断本地是否有字典,有的话直接加载;
- 其次,在
input_words和output_words集合中添加特殊符号(special tokens):<UNK>:表示未知单词,用于表示输入序列中未在字典中找到的单词;<PAD>:表示填充符号,用于填充输入序列和输出序列,使它们具有相同的长度;<SOS>:表示序列的开始,用于表示输出序列的起始位置;<EOS>:表示序列的结束,用于表示输出序列的结束位置。
- 然后,读取data.txt文件,以\t切分数据并切分单词:
- 输入的英文调用
split_input进行预处理,例如:I’m a student.→[‘i’, ‘m’, ‘a’, ‘student’, ‘.’] - 输出的中文调用
split_output进行切分,例如:我爱北京天安门→[‘我’, ‘爱’, ‘北京’, ‘天安门’]
- 输入的英文调用
- 最后,调用
self.save()方法将字典保存到本地文件self.saved_dict中。
encoder
import torch
from torch import nnclass Encoder(nn.Module):"""定义一个 编码器"""def __init__(self, tokenizer):super(Encoder, self).__init__()self.tokenizer = tokenizer# 嵌入层self.embed = nn.Embedding(num_embeddings=self.tokenizer.input_dict_len,embedding_dim=self.tokenizer.input_embed_dim,padding_idx=self.tokenizer.input_word2idx.get("<PAD>"))# GRU单元self.gru = nn.GRU(input_size=self.tokenizer.input_embed_dim,hidden_size=self.tokenizer.input_hidden_size,batch_first=False)def forward(self, x, x_len):# [seq_len, batch_size] --> [seq_len, batch_size, embed_dim]x = self.embed(x)# 压紧被填充的序列x = nn.utils.rnn.pack_padded_sequence(input=x,lengths=x_len,batch_first=False)out, hn = self.gru(x)# 填充被压紧的序列out, out_len = nn.utils.rnn.pad_packed_sequence(sequence=out,batch_first=False,padding_value=self.tokenizer.input_word2idx.get("<PAD>"))# out: [seq_len, batch_size, hidden_size]# hn: [1, batch_size, hidden_size]return out, hn
代码解析:
- encoder是一个典型的RNN结构,其定义了embedding层用于词嵌入,以及GRU单元进行序列处理。
- 在
forward方法中,首先将输入序列进行词嵌入,然后使用pack_padded_sequence将被填充的序列压紧,以便于GRU单元处理。
decoder
import torch
from torch import nn
import randomdevice = torch.device("cuda" if torch.cuda.is_available() else "cpu")class Decoder(nn.Module):def __init__(self, tokenizer):super(Decoder, self).__init__()self.tokenizer = tokenizer# 嵌入self.embed = nn.Embedding(num_embeddings=self.tokenizer.output_dict_len,embedding_dim=self.tokenizer.output_embed_dim,padding_idx=self.tokenizer.output_word2idx.get("<PAD>"),)# 抽取特征self.gru = nn.GRU(input_size=self.tokenizer.output_embed_dim,hidden_size=self.tokenizer.output_hidden_size,batch_first=False,)# 转换维度,做概率输出self.fc = nn.Linear(in_features=self.tokenizer.output_hidden_size,out_features=self.tokenizer.output_dict_len,)def forward_step(self, decoder_input, decoder_hidden):"""单步解码:decoder_input: [1, batch_size]decoder_hidden: [1, batch_size, hidden_size]"""# [1, batch_size] --> [1, batch_size, embedding_dim]decoder_input = self.embed(decoder_input)# 输入:[1, batch_size, embedding_dim] [1, batch_size, hidden_size]# 输出:[1, batch_size, hidden_size] [1, batch_size, hidden_size]# 因为只有1步,所以 out 跟 decoder_hidden是一样的out, decoder_hidden = self.gru(decoder_input, decoder_hidden)# [batch_size, hidden_size]out = out.squeeze(dim=0)# [batch_size, dict_len]out = self.fc(out)# out: [batch_size, dict_len]# decoder_hidden: [1, batch_size, hidden_size]return out, decoder_hiddendef forward(self, encoder_hidden, y, y_len):"""训练时的正向传播- encoder_hidden: [1, batch_size, hidden_size]- y: [seq_len, batch_size]- y_len: [batch_size]"""# 计算输出的最大长度(本批数据的最大长度)output_max_len = max(y_len.tolist()) + 1# 本批数据的批量大小batch_size = encoder_hidden.size(1)# 输入信号 SOS  读取第0步,启动信号# decoder_input: [1, batch_size]# 输入信号 SOS [1, batch_size]decoder_input = torch.LongTensor([[self.tokenizer.output_word2idx.get("<SOS>")] * batch_size]).to(device=device)# 收集所有的预测结果# decoder_outputs: [seq_len, batch_size, dict_len]decoder_outputs = torch.zeros(output_max_len, batch_size, self.tokenizer.output_dict_len)# 隐藏状态 [1, batch_size, hidden_size]decoder_hidden = encoder_hidden# 手动循环for t in range(output_max_len):# 输入:decoder_input: [batch_size, dict_len], decoder_hidden: [1, batch_size, hidden_size]# 返回值:decoder_output_t: [batch_size, dict_len], decoder_hidden: [1, batch_size, hidden_size]decoder_output_t, decoder_hidden = self.forward_step(decoder_input, decoder_hidden)# 填充结果张量 [seq_len, batch_size, dict_len]decoder_outputs[t, :, :] = decoder_output_t# teacher forcing 教师强迫机制use_teacher_forcing = random.random() > 0.5# 0.5 概率 实行教师强迫if use_teacher_forcing:# [1, batch_size] 取标签中的下一个词decoder_input = y[t, :].unsqueeze(0)else:# 取出上一步的推理结果 [1, batch_size]decoder_input = decoder_output_t.argmax(dim=-1).unsqueeze(0)# decoder_outputs: [seq_len, batch_size, dict_len]return decoder_outputs# ...(其他函数暂略)
代码解析:
- decoder定义了三个层:embed(词嵌入)、gru和fc(全链接层)。
- 全链接层用于输出的是字典长度,即每个位置代表着每个字的概率。
- decoder的forward_step方法,用于一步一步地执行,属于手动循环;forward方法,把所有步都执行完进行推理,属于自动循环。
- 在
forward方法中:- 首先,计算本批数据的最大长度(用于标签对齐)
- 其次,使用
encoder_hidden.size(1)获取批量大小 - 然后,增加启动信号,即
<SOS> - 然后,准备全0的张量
decoder_outputs - 然后,开始循环
- 在循环每一步中,将输入和隐藏状态传给forward_step进行处理,得到输出概率
decoder_output_t - 将结果概率放在
decoder_outputs中 - 启用教师强迫机制(teacher forcing):
- 即有50%概率,使用标准答案作为下一步的输入;
- 否则,使用上一步的推理结果中概率最大的词作为下一步的输入。
- 在循环每一步中,将输入和隐藏状态传给forward_step进行处理,得到输出概率
- 最后,返回结果概率张量
decoder_outputs
训练过程
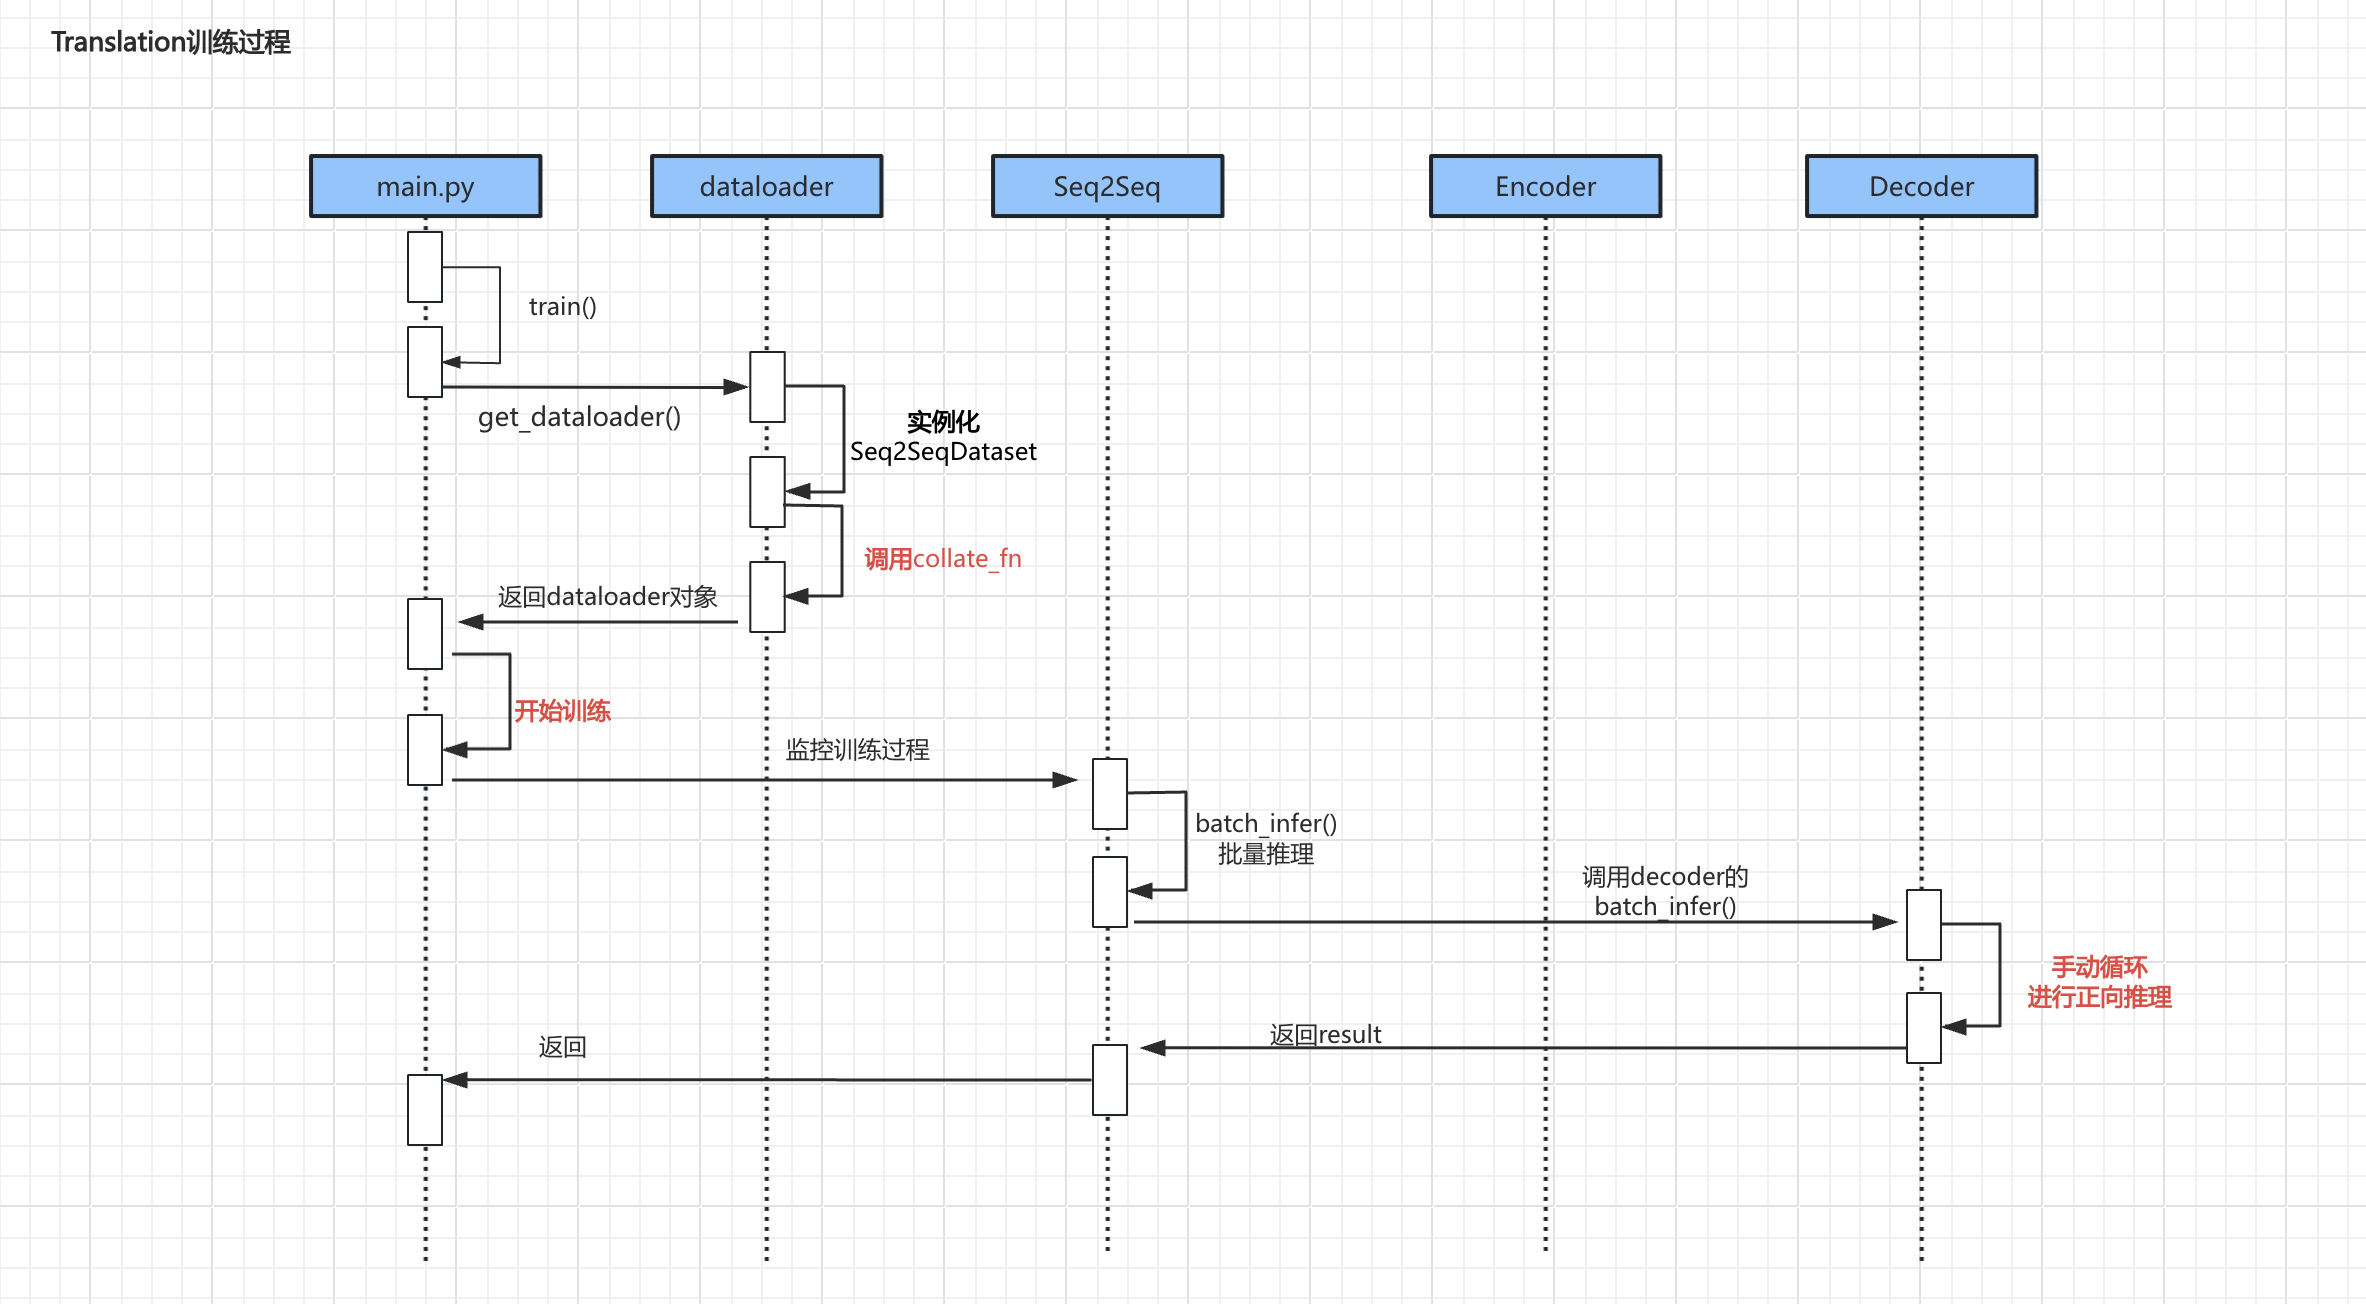
- 上述流程中较为重要的代码主要是
调用collate_fn、具体训练过程、手动循环进行正向推理
调用collate_fn
def collate_fn(batch, tokenizer):# 根据 x 的长度来 倒序排列batch = sorted(batch, key=lambda ele: ele[1], reverse=True)# 合并整个批量的每一部分input_sentences, input_sentence_lens, output_sentences, output_sentence_lens = zip(*batch)# 转索引【按本批量最大长度来填充】input_sentence_len = input_sentence_lens[0]input_idxes = []for input_sentence in input_sentences:input_idxes.append(tokenizer.encode_input(input_sentence, input_sentence_len))# 转索引【按本批量最大长度来填充】output_sentence_len = max(output_sentence_lens)output_idxes = []for output_sentence in output_sentences:output_idxes.append(tokenizer.encode_output(output_sentence, output_sentence_len))# 转张量 [seq_len, batch_size]input_idxes = torch.LongTensor(input_idxes).t()output_idxes = torch.LongTensor(output_idxes).t()input_sentence_lens = torch.LongTensor(input_sentence_lens)output_sentence_lens = torch.LongTensor(output_sentence_lens)return input_idxes, input_sentence_lens, output_idxes, output_sentence_lens
代码解析:
- 当文字长度不一样齐的时候,需要进行补充<PAD>,以保持所有序列长度一致
例如:
I’m a student.
I’m OK.
Here is your change.
- 但是补充<PAD>本身对训练过程会造成干扰,所以我们需要采用一种机制:既保证对齐数据批量化训练,又能消除填充对训练过程的影响。
- 这种机制原理:在训练时知道实际的数据长度,这样在训练时就可以略过<PAD>。
- torch提供了相应的API,其大致过程是:
- 首先,根据 x(上句) 的长度倒序排序
- 其次,获取本批量最大的长度
- 然后,将数据填充到本批量最大长度
- 最后,在返回数据时,不知返回数据,还会带着真实长度
具体训练过程
# (其他部分代码略)# 训练过程is_complete = Falsefor epoch in range(self.epochs):self.model.train()for batch_idx, (x, x_len, y, y_len) in enumerate(train_dataloader):x = x.to(device=self.device)y = y.to(device=self.device)results = self.model(x, x_len, y, y_len)loss = self.get_loss(decoder_outputs=results, y=y)# 简单判定一下,如果损失小于0.5,则训练提前完成if loss.item() < 0.3:is_complete = Trueprint(f"训练提前完成, 本批次损失为:{loss.item()}")breakloss.backward()self.optimizer.step()self.optimizer.zero_grad()# 过程监控with torch.no_grad():if batch_idx % 100 == 0:print(f"第 {epoch + 1} 轮 {batch_idx + 1} 批, 当前批次损失: {loss.item()}")x_true = self.get_real_input(x)y_pred = self.model.batch_infer(x, x_len)y_true = self.get_real_output(y)samples = random.sample(population=range(x.size(1)), k=2)for idx in samples:print("\t真实输入:", x_true[idx])print("\t真实结果:", y_true[idx])print("\t预测结果:", y_pred[idx])print("\t----------------------------------------------------------")# 外层提前退出if is_complete:# print("训练提前完成")break# 保存模型torch.save(obj=self.model.state_dict(), f="./model.pt")
手动循环进行正向推理
#(其他部分略)def batch_infer(self, encoder_hidden):"""推理时的正向传播- encoder_hidden: [1, batch_size, hidden_size]"""# 推理时,设定一个最大的固定长度output_max_len = self.tokenizer.output_max_len# 获取批量大小batch_size = encoder_hidden.size(1)# 输入信号 SOS [1, batch_size]decoder_input = torch.LongTensor([[self.tokenizer.output_word2idx.get("<SOS>")] * batch_size]).to(device=device)# print(decoder_input)results = []# 隐藏状态# encoder_hidden: [1, batch_size, hidden_size]decoder_hidden = encoder_hiddenwith torch.no_grad():# 手动循环for t in range(output_max_len):# decoder_input: [1, batch_size]# decoder_hidden: [1, batch_size, hidden_size]decoder_output_t, decoder_hidden = self.forward_step(decoder_input, decoder_hidden)# 取出结果 [1, batch_size]decoder_input = decoder_output_t.argmax(dim=-1).unsqueeze(0)results.append(decoder_input)# [seq_len, batch_size]results = torch.cat(tensors=results, dim=0)return results
代码解析:
- 相比训练的时候,推理的时候函数入参没有
y标准答案。 - 推理的过程:
- (与训练类似)获取最大长度、获取批量大小、构建启动信号。
- (与训练不同)在无梯度环境里,调用
forward_step函数,进行循环推理。 - (与训练不同)因为推理时不需要teacher forcing机制,所以直接使用贪心思想获得概率最大的词。
- 循环结束后,将结果拼接起来,返回。
补充知识
tqdm
定义
tqdm 是一个用于在 Python 中显示进度条的库,非常适合在长时间运行的循环中使用。
安装方法
pip install tqdm
使用方法
from tqdm import tqdm
import time# 示例:在一个简单的循环中使用 tqdm
for i in tqdm(range(10)):time.sleep(1)  # 模拟某个耗时操作
运行结果:

OpenCC
定义
OpenCC(Open Chinese Convert)是一个用于简体中文和繁体中文之间转换的工具
安装方法
pip install OpenCC
使用方法
import opencc# 创建转换器,使用简体到繁体的配置
converter = opencc.OpenCC('s2t')  # s2t: 简体到繁体# 输入简体中文
simplified_text = "我爱编程"# 进行转换
traditional_text = converter.convert(simplified_text)print(traditional_text)
# 输出结果:我愛編程
内容小结
- Seq2Seq项目整体组成由tokenizer(分词器)、dataloader(数据加载)、encoder(编码器)、decoder(解码器)、seq2seq和main六个部分组成
- 在分词器中重点工作是构建自定义字典,并添加特殊符号(special tokens)
<UNK>:表示未知单词,用于表示输入序列中未在字典中找到的单词;<PAD>:表示填充符号,用于填充输入序列和输出序列,使它们具有相同的长度;<SOS>:表示序列的开始,用于表示输出序列的起始位置;上文不会增加。<EOS>:表示序列的结束,用于表示输出序列的结束位置,上文不会增加。
- 在decoder的
forward函数中,增加了一个teacher_forcing_ratio参数,用于控制是否使用教师强迫机制。- 有50%概率,使用标准答案作为下一步的输入;
- 有50%概率,使用上一步的推理结果中概率最大的词作为下一步的输入。
- 该机制用于提升训练速度。
- 在训练过程中会使用
collate_fn用于数据对齐时消除PAD的影响。
参考资料
(暂无)

