文章目录
- 简易CAD软件的开发:技术解析与实现
- 引言
- 项目概述
- 程序入口
- 主窗口的实现
- 主窗口类定义(mainwindow.h)
- 主窗口类实现(mainwindow.cpp)
- 自定义绘图视图
- 自定义绘图视图类定义(myqgraphicsview.h)
- 自定义绘图视图类实现(myqgraphicsview.cpp)
- 用户界面
- 资源管理
- 实现细节
- 1. 处理用户绘图操作
- 2. 管理绘图项
- 3. 动态内存管理
- 4. 使用事件处理机制实现交互
- 5. 使用资源文件管理资源
- 6. 使用Qt Designer设计用户界面
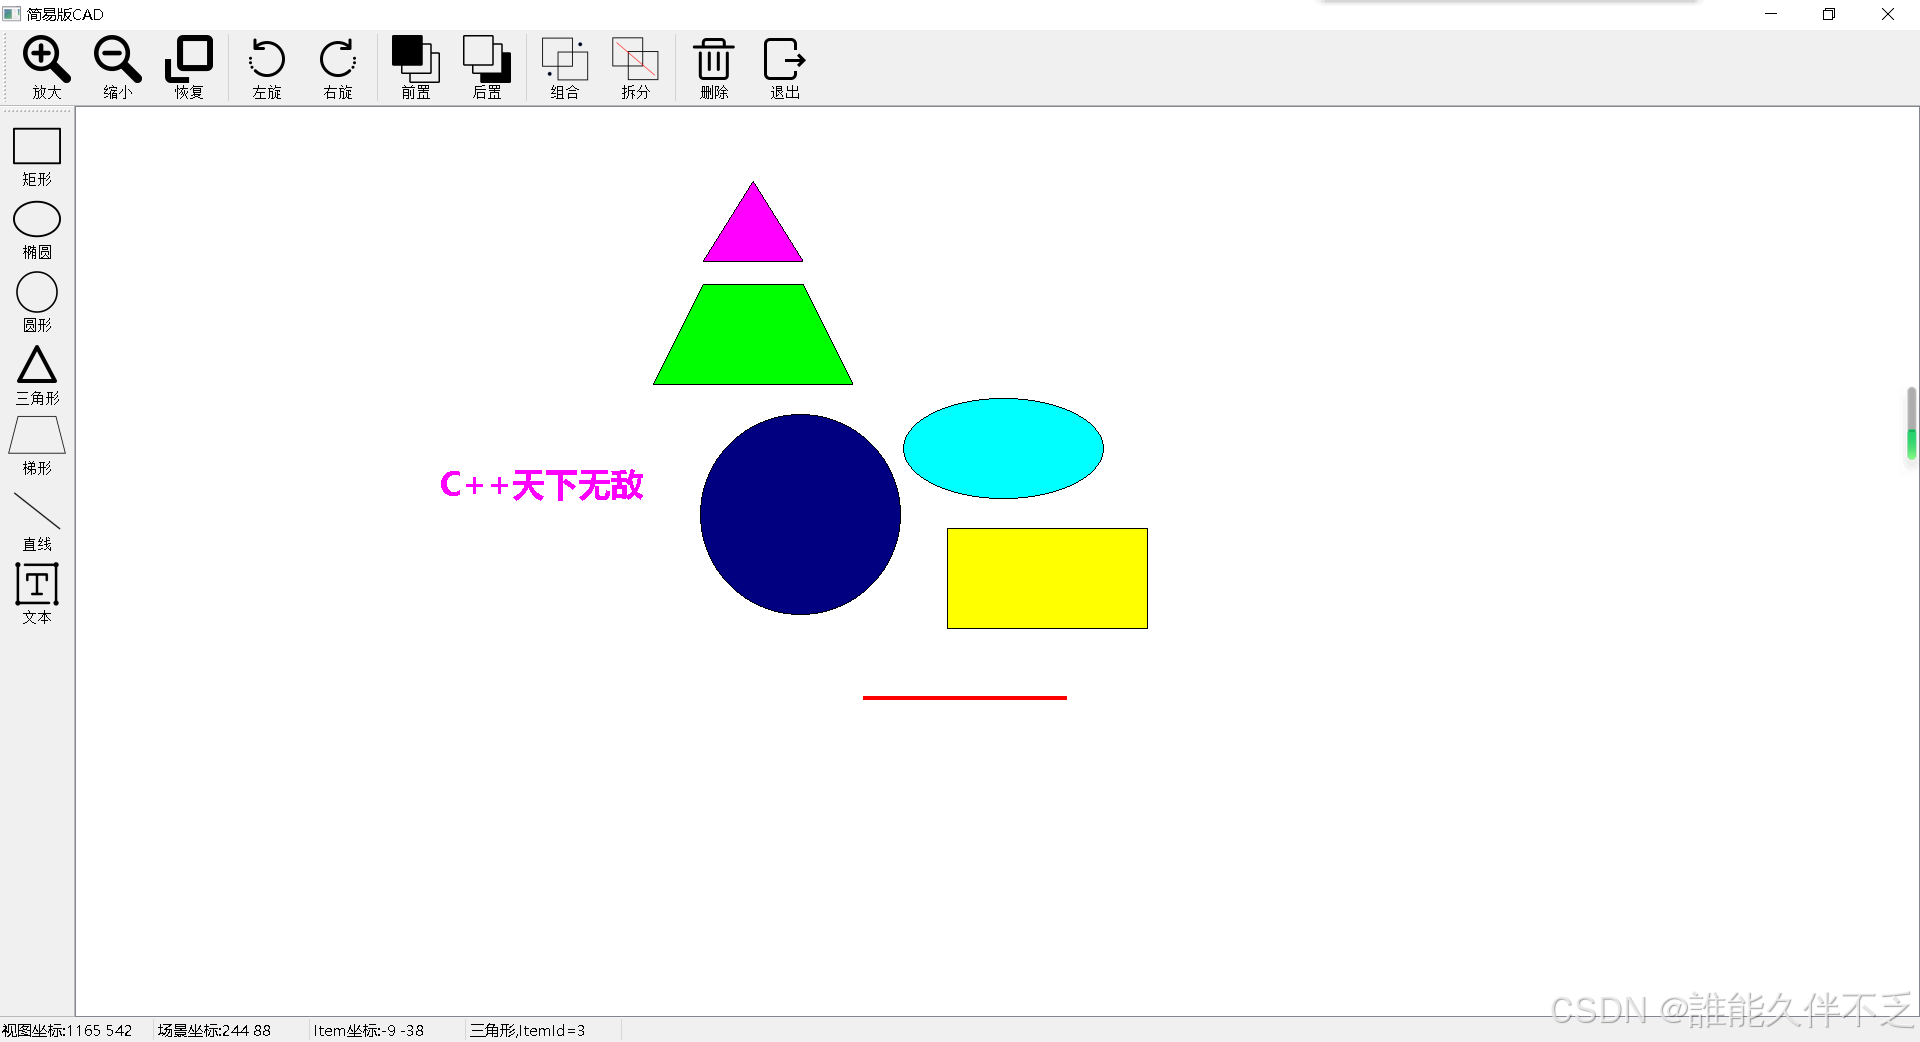
- 效果截图
- 完整代码
- mainwindow.h
- mainwindow.cpp
- myqgraphicsview.h
- myqgraphicsview.cpp
- main.cpp
- 结论
简易CAD软件的开发:技术解析与实现
引言
计算机辅助设计(CAD)软件是现代工程和设计领域中不可或缺的工具。它们用于创建、修改、分析和优化设计。尽管市场上有许多功能强大的CAD软件,但了解其基本原理和实现方法对开发人员和技术爱好者来说仍然非常重要。本篇博客将通过解析一个简易版本的CAD软件,详细讲解其开发过程和技术细节。
项目概述
该简易CAD软件项目使用了Qt框架,这是一个跨平台的C++图形用户界面库。项目包含以下主要文件:
- main.cpp:程序入口。
- mainwindow.cpp和mainwindow.h:主窗口的实现和定义。
- mainwindow.ui:UI布局文件。
- myqgraphicsview.cpp和myqgraphicsview.h:自定义绘图视图的实现和定义。
- res.qrc:资源文件。
程序入口
程序的入口位于main.cpp文件中,它的主要职责是初始化应用程序并显示主窗口。以下是核心代码:
#include <QApplication>
#include "mainwindow.h"int main(int argc, char *argv[]) {QApplication app(argc, argv);MainWindow mainWindow;mainWindow.show();return app.exec();
}
这个简单的入口程序创建了一个QApplication对象,该对象是Qt应用程序的基础。接着,它实例化了MainWindow对象并调用show方法显示主窗口。app.exec()进入Qt事件循环,开始处理用户事件。
主窗口的实现
主窗口类MainWindow继承自QMainWindow。这个类负责创建和管理程序的主界面,包括菜单栏、工具栏和绘图区域。mainwindow.h文件定义了该类的接口,而mainwindow.cpp文件则实现了这些接口。
主窗口类定义(mainwindow.h)
#ifndef MAINWINDOW_H
#define MAINWINDOW_H#include <QMainWindow>namespace Ui {
class MainWindow;
}class MainWindow : public QMainWindow {Q_OBJECTpublic:explicit MainWindow(QWidget *parent = nullptr);~MainWindow();private:Ui::MainWindow *ui;
};#endif // MAINWINDOW_H
主窗口类实现(mainwindow.cpp)
#include "mainwindow.h"
#include "ui_mainwindow.h"MainWindow::MainWindow(QWidget *parent) :QMainWindow(parent),ui(new Ui::MainWindow) {ui->setupUi(this);
}MainWindow::~MainWindow() {delete ui;
}
在构造函数中,setupUi方法加载由Qt Designer生成的UI文件,并初始化各种控件和布局。析构函数负责释放所有动态分配的资源,避免内存泄漏。
自定义绘图视图
自定义绘图视图类MyQGraphicsView继承自QGraphicsView,负责处理用户的绘图操作,如鼠标点击、移动和释放等事件。以下是该类的定义和实现。
自定义绘图视图类定义(myqgraphicsview.h)
#ifndef MYQGRAPHICSVIEW_H
#define MYQGRAPHICSVIEW_H#include <QGraphicsView>class MyQGraphicsView : public QGraphicsView {Q_OBJECTpublic:MyQGraphicsView(QWidget *parent = nullptr);protected:void mousePressEvent(QMouseEvent *event) override;void mouseMoveEvent(QMouseEvent *event) override;void mouseReleaseEvent(QMouseEvent *event) override;
};#endif // MYQGRAPHICSVIEW_H
自定义绘图视图类实现(myqgraphicsview.cpp)
#include "myqgraphicsview.h"
#include <QMouseEvent>
#include <QGraphicsScene>
#include <QGraphicsLineItem>MyQGraphicsView::MyQGraphicsView(QWidget *parent) : QGraphicsView(parent) {setScene(new QGraphicsScene(this));
}void MyQGraphicsView::mousePressEvent(QMouseEvent *event) {if (event->button() == Qt::LeftButton) {startPos = event->pos();lineItem = new QGraphicsLineItem(QLineF(startPos, startPos));scene()->addItem(lineItem);}
}void MyQGraphicsView::mouseMoveEvent(QMouseEvent *event) {if (lineItem) {lineItem->setLine(QLineF(startPos, event->pos()));}
}void MyQGraphicsView::mouseReleaseEvent(QMouseEvent *event) {if (event->button() == Qt::LeftButton && lineItem) {lineItem->setLine(QLineF(startPos, event->pos()));lineItem = nullptr;}
}
用户界面
用户界面的布局和控件配置在mainwindow.ui文件中定义。这个文件是使用Qt Designer生成的,可以直观地编辑和管理界面布局。以下是一些主要的布局和控件配置:
- 菜单栏:提供文件操作、编辑操作等菜单项。
- 工具栏:提供绘图工具,如画线、画矩形等。
- 绘图区域:一个
QGraphicsView控件,用于显示和管理绘图内容。
通过UI文件,开发者可以方便地调整界面布局、添加新控件和修改现有控件的属性。加载UI文件时,Qt会根据文件中的描述生成相应的界面组件。
资源管理
res.qrc文件用于管理应用程序所需的资源,如图标、图片和样式表。资源文件的路径在编译时固定,确保资源在运行时能够正确加载和使用。以下是一个示例res.qrc文件的内容:
<!DOCTYPE RCC>
<RCC version="1.0">
<qresource><file>icons/icon.png</file>
</qresource>
</RCC>
通过这个资源文件,程序可以在需要时加载图标并在界面中显示。例如,应用程序的图标通常存储在资源文件中,并在程序启动时加载。
实现细节
1. 处理用户绘图操作
在自定义绘图视图类中,通过重载mousePressEvent、mouseMoveEvent和mouseReleaseEvent等事件处理函数,可以实现对用户绘图操作的响应。例如,用户点击鼠标时,可以开始绘制一条线;移动鼠标时,可以更新线的终点;释放鼠标时,结束线的绘制并将其固定在视图中。
void MyQGraphicsView::mousePressEvent(QMouseEvent *event) {if (event->button() == Qt::LeftButton) {startPos = event->pos();lineItem = new QGraphicsLineItem(QLineF(startPos, startPos));scene()->addItem(lineItem);}
}void MyQGraphicsView::mouseMoveEvent(QMouseEvent *event) {if (lineItem) {lineItem->setLine(QLineF(startPos, event->pos()));}
}void MyQGraphicsView::mouseReleaseEvent(QMouseEvent *event) {if (event->button() == Qt::LeftButton && lineItem) {lineItem->setLine(QLineF(startPos, event->pos()));lineItem = nullptr;}
}
2. 管理绘图项
在绘图过程中,可以使用QGraphicsScene来管理所有绘图项。每当用户进行绘图操作时,可以在场景中添加新的绘图项,并根据需要更新其位置和大小。例如,绘制一条线时,可以创建一个QGraphicsLineItem并添加到场景中:
void MyQGraphicsView::mousePressEvent(QMouseEvent *event) {if (event->button() == Qt::LeftButton) {startPos = event->pos();lineItem = new QGraphicsLineItem(QLineF(startPos, startPos));scene()->addItem(lineItem);}
}void MyQGraphicsView::mouseMoveEvent(QMouseEvent *event) {if (lineItem) {lineItem->setLine(QLineF(startPos, event->pos()));}
}void MyQGraphicsView::mouseReleaseEvent(QMouseEvent *event) {if (event->button() == Qt::LeftButton && lineItem) {lineItem->setLine(QLineF(startPos, event->pos()));lineItem = nullptr;}
}
3. 动态内存管理
在C++中,动态内存管理是一个重要的方面。为了确保程序在运行过程中不会出现内存泄漏,需要在合适的时机释放动态分配的内存。例如,在主窗口类的析构函数中释放由setupUi分配的内存:
MainWindow::~MainWindow() {delete ui;
}
类似地,在自定义绘图视图中,如果动态分配了内存,也需要在适当的时候进行释放,以避免内存泄漏。
4. 使用事件处理机制实现交互
事件处理是Qt框架中的一个重要概念。Qt使用事件驱动机制来处理用户的输入,如鼠
标点击、键盘按键等。通过重载事件处理函数,可以自定义对各种用户输入的响应行为。
在自定义绘图视图类中,我们重载了鼠标事件处理函数。例如,当用户按下鼠标按钮时,mousePressEvent函数被调用,我们在其中记录起始点,并创建一个新的绘图项。当用户移动鼠标时,mouseMoveEvent函数被调用,我们在其中更新绘图项的位置。当用户释放鼠标按钮时,mouseReleaseEvent函数被调用,我们在其中固定绘图项的位置。
通过这种方式,我们可以实现实时的交互式绘图体验。
5. 使用资源文件管理资源
在大型应用程序中,资源(如图标、图片、样式表等)的管理是一个重要问题。Qt提供了一种方便的资源管理机制,通过qrc文件可以将资源嵌入到应用程序中。
在这个简易CAD项目中,我们通过res.qrc文件管理应用程序所需的资源。这样做的好处是,所有资源在编译时被嵌入到应用程序中,运行时不需要依赖外部文件,从而提高了应用程序的可移植性和稳定性。
<!DOCTYPE RCC>
<RCC version="1.0">
<qresource><file>icons/icon.png</file>
</qresource>
</RCC>
通过这个资源文件,程序可以在需要时加载图标并在界面中显示。例如,应用程序的图标通常存储在资源文件中,并在程序启动时加载。
6. 使用Qt Designer设计用户界面
Qt Designer是Qt提供的一个图形化界面设计工具。通过Qt Designer,开发者可以直观地设计和管理应用程序的界面布局,而无需手动编写代码。
在这个项目中,我们使用Qt Designer设计了主窗口的界面布局,并生成了mainwindow.ui文件。这个文件描述了主窗口的布局和控件配置,如菜单栏、工具栏和绘图区域。
使用Qt Designer的好处是,界面设计和逻辑代码分离,开发者可以专注于界面设计,而不需要关心具体的实现细节。同时,Qt Designer生成的UI文件可以方便地加载到程序中,并在运行时生成相应的界面组件。
效果截图
完整代码
mainwindow.h
#ifndef MAINWINDOW_H
#define MAINWINDOW_H#include <QMainWindow>
#include <QGraphicsScene>
#include <QLabel>QT_BEGIN_NAMESPACE
namespace Ui { class MainWindow; }
QT_END_NAMESPACEclass MainWindow : public QMainWindow
{Q_OBJECTpublic:MainWindow(QWidget *parent = nullptr);~MainWindow();private slots:void on_graphicsView_KeyPress(QKeyEvent *event);void on_graphicsView_mouseDoubleClick(QPoint point);void on_graphicsView_mousePress(QPoint point);void on_graphicsView_mouseMove(QPoint point);void on_actionRectangle_triggered();void on_actionEllipse_triggered();void on_actionRound_triggered();void on_actionTriangle_triggered();void on_actionRrapezoid_triggered();void on_actionLine_triggered();void on_actionText_triggered();void on_actionMax_triggered();void on_actionMin_triggered();void on_actionRecover_triggered();void on_actionLeft_triggered();void on_actionRight_triggered();void on_actionFront_triggered();void on_actionBack_triggered();void on_actionGroup_triggered();void on_actionSpilt_triggered();void on_actionDelete_triggered();void on_actionExit_triggered();private:Ui::MainWindow *ui;QGraphicsScene *Scene;int itemZvalue=0;int itemid=0;static const int ITEM_ID = 1; //图形项自定义数据的键值,表示图形项的 IDstatic const int ITEM_DESCRIPTION = 2; //图形项自定义数据的键值,表示图形项的描述QLabel *labViewCord;QLabel *labSceneCord;QLabel *labItemCord;QLabel *labItemInfo;
};
#endif // MAINWINDOW_H
mainwindow.cpp
#include "mainwindow.h"
#include "ui_mainwindow.h"
#include <QGraphicsView>
#include <QGraphicsItem>
#include <QGraphicsItemGroup>
#include <QInputDialog>
#include <QFontDialog>
#include <QKeyEvent>
#include <QColorDialog>
#include <QTime>/** 开发日志*  1.设计UI界面*      两个 toolBar, 一个 GraphicsView(作为中心部件)*  2.处理鼠标与按键事件*      2.1自建一个QGraphicsView类,重写鼠标与按键事件*      2.2创建信号*      2.3.关联信号与槽*  3.实现各种图形的绘制*  4.实现各种功能*  5.实现鼠标与按键的槽函数*  6.设计状态栏
*/MainWindow::MainWindow(QWidget *parent): QMainWindow(parent), ui(new Ui::MainWindow)
{ui->setupUi(this);setCentralWidget(ui->graphicsView);setWindowTitle("简易版CAD");showMaximized();ui->graphicsView->setCursor(Qt::CrossCursor);//如果禁用了鼠标跟踪(默认值),鼠标在移动的过程中只有同时按下了鼠标按键,//才接收鼠标移动事件//如果启用了鼠标跟踪,鼠标在移动过程中,即使没有按下鼠标按键,//小部件也会接收鼠标移动事件。ui->graphicsView->setMouseTracking(true);//QGraphicsview::setDragMode(设置视图的拖拽模式),三种拖拽模式://1、NoDrag(没有任何反应,鼠标事件将被忽略)//2、ScrollHandDrag(光标变为指向手,然后拖动鼠标将滚动滚动条,此//模式在交互和非交互模式下均有效)//3、RubberBandDrag(将出现矩形块,拖动鼠标将设置矩形的大小,并选//中矩形覆盖的所有项目,非交互视图禁用此模式)ui->graphicsView->setDragMode(QGraphicsView::RubberBandDrag);Scene=new QGraphicsScene(-300,-100,600,200);ui->graphicsView->setScene(Scene);qsrand(QTime::currentTime().msec());labViewCord =new QLabel("视图坐标:");labViewCord->setMinimumWidth(150);ui->statusbar->addWidget(labViewCord);labSceneCord =new QLabel("场景坐标:");labSceneCord->setMinimumWidth(150);ui->statusbar->addWidget(labSceneCord);labItemCord =new QLabel("图形坐标:");labItemCord->setMinimumWidth(150);ui->statusbar->addWidget(labItemCord);labItemInfo =new QLabel("图形项信息:");labItemInfo->setMinimumWidth(150);ui->statusbar->addWidget(labItemInfo);
}MainWindow::~MainWindow()
{delete ui;
}template <class T>
void setItemBrushColor(T *item){QColor color=item->brush().color();color=QColorDialog::getColor(color,NULL,"选择填充颜色");if(color.isValid()){item->setBrush(color);}
}template <class T>
void setItemPenColor(T*item){QPen pen=item->pen();QColor color =pen.color();color=QColorDialog::getColor(color,NULL,"选择填充颜色");if(color.isValid()){pen.setColor(color);item->setPen(pen);}
}void MainWindow::on_graphicsView_KeyPress(QKeyEvent *event)
{if(Scene->selectedItems().count() != 1){return;}QGraphicsItem *item=Scene->selectedItems().at(0);if(event->key()==Qt::Key_Delete){Scene->removeItem(item);}else if(event->key()==Qt::Key_Space){item->setRotation(item->rotation()+10);}else if(event->key()==Qt::Key_PageUp){item->setScale(item->scale()+0.1);}else if(event->key()==Qt::Key_PageDown){item->setScale(item->scale()-0.1);}else if(event->key()==Qt::Key_Left){item->setX(item->x()-1);}else if(event->key()==Qt::Key_Right){item->setX(item->x()+1);}else if(event->key()==Qt::Key_Up){item->setY(item->y()-1);}else if(event->key()==Qt::Key_Down){item->setY(item->y()+1);}
}void MainWindow::on_graphicsView_mouseDoubleClick(QPoint point)
{QPointF pointScene=ui->graphicsView->mapToScene(point);QGraphicsItem *item=Scene->itemAt(pointScene,ui->graphicsView->transform());if(!item){return;}switch (item->type()) {case QGraphicsRectItem::Type:{QGraphicsRectItem *item2=qgraphicsitem_cast<QGraphicsRectItem*>(item);setItemBrushColor(item2);}case QGraphicsEllipseItem::Type:{QGraphicsEllipseItem *item2=qgraphicsitem_cast<QGraphicsEllipseItem *>(item);setItemBrushColor(item2);}case QGraphicsPolygonItem::Type:{QGraphicsPolygonItem *item2=qgraphicsitem_cast<QGraphicsPolygonItem *>(item);setItemBrushColor(item2);}case QGraphicsLineItem::Type:{QGraphicsLineItem *item2=qgraphicsitem_cast<QGraphicsLineItem *>(item);setItemPenColor(item2);}case QGraphicsTextItem::Type:{QGraphicsTextItem *item2=qgraphicsitem_cast<QGraphicsTextItem *>(item);bool ojbk=false;QFont font=item2->font();font=QFontDialog::getFont(&ojbk,font,this,"设置字体");if(ojbk){QColor color =QColorDialog::getColor(color,NULL,"请选择字体的颜色");if(color.isValid()){item2->setDefaultTextColor(color);item2->setFont(font);}}}}}void MainWindow::on_graphicsView_mousePress(QPoint point)
{QPointF pointScene=ui->graphicsView->mapToScene(point);QGraphicsItem *item=Scene->itemAt(pointScene,ui->graphicsView->transform());if(!item){return;}QPointF pointItem=item->mapFromScene(pointScene);labItemCord->setText(QString::asprintf("Item坐标:%.0f %.0f",pointItem.x(),pointItem.y()));labItemInfo->setText(item->data(ITEM_DESCRIPTION).toString()+",ItemId="+item->data(ITEM_ID).toString());
}void MainWindow::on_graphicsView_mouseMove(QPoint point)
{labViewCord->setText(QString::asprintf("视图坐标:%d %d",point.x(),point.y()));QPointF pointScene=ui->graphicsView->mapToScene(point);labSceneCord->setText(QString::asprintf("场景坐标:%.0f %.0f",pointScene.x(),pointScene.y()));
}void MainWindow::on_actionRectangle_triggered()
{QGraphicsRectItem *Recitem=new QGraphicsRectItem(-100,-50,200,100);Recitem->setFlags(QGraphicsItem::ItemIsMovable |QGraphicsItem::ItemIsSelectable |QGraphicsItem::ItemIsFocusable);Recitem->setBrush(QBrush(Qt::yellow));Recitem->setZValue(itemZvalue++);Recitem->setData(ITEM_ID,itemid++);Recitem->setData(ITEM_DESCRIPTION,"矩形");Recitem->setPos(qrand()%100-50,qrand()%100-50); //-50 至 49Scene->addItem(Recitem);Scene->clearSelection();Recitem->setSelected(true);
}void MainWindow::on_actionEllipse_triggered()
{QGraphicsEllipseItem *Ellitem=new QGraphicsEllipseItem(-100,-50,200,100);Ellitem->setFlags(QGraphicsItem::ItemIsMovable |QGraphicsItem::ItemIsSelectable |QGraphicsItem::ItemIsFocusable);Ellitem->setBrush(QBrush(Qt::cyan));Ellitem->setZValue(itemZvalue++);Ellitem->setData(ITEM_ID,itemid++);Ellitem->setData(ITEM_DESCRIPTION,"椭圆");Ellitem->setPos(qrand()%100-50,qrand()%100-50); //-50 至 49Scene->addItem(Ellitem);Scene->clearSelection();Ellitem->setSelected(true);
}void MainWindow::on_actionRound_triggered()
{QGraphicsEllipseItem *Rounditem=new QGraphicsEllipseItem(-100,-50,200,200);Rounditem->setFlags(QGraphicsItem::ItemIsMovable |QGraphicsItem::ItemIsSelectable |QGraphicsItem::ItemIsFocusable);Rounditem->setBrush(QBrush(Qt::darkBlue));Rounditem->setZValue(itemZvalue++);Rounditem->setData(ITEM_ID,itemid++);Rounditem->setData(ITEM_DESCRIPTION,"圆");Rounditem->setPos(qrand()%100-50,qrand()%100-50); //-50 至 49Scene->addItem(Rounditem);Scene->clearSelection();Rounditem->setSelected(true);
}void MainWindow::on_actionTriangle_triggered()
{QGraphicsPolygonItem *item=new QGraphicsPolygonItem;QPolygonF points;points.append(QPointF(0,-80));points.append(QPointF(50,0));points.append(QPointF(-50,-0));item->setPolygon(points);item->setFlags(QGraphicsItem::ItemIsMovable |QGraphicsItem::ItemIsSelectable |QGraphicsItem::ItemIsFocusable);item->setBrush(QBrush(Qt::magenta));item->setZValue(itemZvalue++);item->setData(ITEM_ID,itemid++);item->setData(ITEM_DESCRIPTION,"三角形");item->setPos(qrand()%100-50,qrand()%100-50); //-50 至 49Scene->addItem(item);Scene->clearSelection();item->setSelected(true);
}void MainWindow::on_actionRrapezoid_triggered()
{QGraphicsPolygonItem *item=new QGraphicsPolygonItem;QPolygonF points;points.append(QPointF(-50,-50));points.append(QPointF(-100,50));points.append(QPointF(100,50));points.append(QPointF(50,-50));item->setPolygon(points);item->setFlags(QGraphicsItem::ItemIsMovable |QGraphicsItem::ItemIsSelectable |QGraphicsItem::ItemIsFocusable);item->setBrush(QBrush(Qt::green));item->setZValue(itemZvalue++);item->setData(ITEM_ID,itemid++);item->setData(ITEM_DESCRIPTION,"梯形");item->setPos(qrand()%100-50,qrand()%100-50); //-50 至 49Scene->addItem(item);Scene->clearSelection();item->setSelected(true);
}void MainWindow::on_actionLine_triggered()
{QGraphicsLineItem *item=new QGraphicsLineItem(-100,100,100,100);item->setFlags(QGraphicsItem::ItemIsMovable |QGraphicsItem::ItemIsSelectable |QGraphicsItem::ItemIsFocusable);QPen pen(Qt::red);pen.setWidth(4);item->setPen(pen);item->setZValue(itemZvalue++);item->setData(ITEM_ID,itemid++);item->setData(ITEM_DESCRIPTION,"直线");item->setPos(qrand()%100-50,qrand()%100-50); //-50 至 49Scene->addItem(item);Scene->clearSelection();item->setSelected(true);
}void MainWindow::on_actionText_triggered()
{QString str=QInputDialog::getText(this,"输入文字","请输入文字");if(str.isEmpty()){return;}QGraphicsTextItem *item=new QGraphicsTextItem(str);QFont font;font.setFamily("微软雅黑");font.setPointSize(20);font.setBold(true);item->setFont(font);item->setDefaultTextColor(Qt::magenta);item->setFlags(QGraphicsItem::ItemIsMovable |QGraphicsItem::ItemIsSelectable |QGraphicsItem::ItemIsFocusable);item->setZValue(itemZvalue++);item->setData(ITEM_ID,itemid++);item->setData(ITEM_DESCRIPTION,"文本");item->setPos(qrand()%100-50,qrand()%100-50); //-50 至 49Scene->addItem(item);Scene->clearSelection();item->setSelected(true);
}void MainWindow::on_actionMax_triggered()
{if(Scene->selectedItems().count()==1){QGraphicsItem *item=Scene->selectedItems().at(0);item->setScale(item->scale()+0.1);}else{ui->graphicsView->scale(1.1,1.1);}
}void MainWindow::on_actionMin_triggered()
{if(Scene->selectedItems().count()==1){QGraphicsItem *item=Scene->selectedItems().at(0);item->setScale(item->scale()-0.1);}else{ui->graphicsView->scale(0.9,0.9);}
}void MainWindow::on_actionRecover_triggered()
{if(Scene->selectedItems().count()==1){QGraphicsItem *item=Scene->selectedItems().at(0);item->setScale(1.0);     // 重置缩放item->setRotation(0);    // 重置旋转}else{ui->graphicsView->resetTransform(); // 重置视图变换矩阵}
}void MainWindow::on_actionLeft_triggered()
{if(Scene->selectedItems().count()==1){QGraphicsItem *item=Scene->selectedItems().at(0);item->setRotation(item->rotation()-30);}else if(Scene->selectedItems().count()>1){int count =Scene->selectedItems().count();QGraphicsItem *item;for(int i=0;i<count;i++){item=Scene->selectedItems().at(i);item->setRotation(item->rotation()-30);}}else{ui->graphicsView->rotate(-30);}
}void MainWindow::on_actionRight_triggered()
{if(Scene->selectedItems().count()==1){QGraphicsItem *item=Scene->selectedItems().at(0);item->setRotation(item->rotation()+30);}else if(Scene->selectedItems().count()>1){int count =Scene->selectedItems().count();QGraphicsItem *item;for(int i=0;i<count;i++){item=Scene->selectedItems().at(i);item->setRotation(item->rotation()+30);}}else{ui->graphicsView->rotate(30);}
}void MainWindow::on_actionFront_triggered()
{if(Scene->selectedItems().count()==1){QGraphicsItem *item=Scene->selectedItems().at(0);item->setZValue(itemZvalue++);}
}void MainWindow::on_actionBack_triggered()
{if(Scene->selectedItems().count()==1){QGraphicsItem *item=Scene->selectedItems().at(0);item->setZValue(itemZvalue--);}
}void MainWindow::on_actionGroup_triggered()
{int count=Scene->selectedItems().count();QGraphicsItemGroup *group=new  QGraphicsItemGroup;QGraphicsItem *item;if(count>1){Scene->addItem(group);for(int i=0;i<count;i++){item=Scene->selectedItems().at(0);item->setSelected(false);item->clearFocus();group->addToGroup(item);}}group->setFlags(QGraphicsItem::ItemIsMovable |QGraphicsItem::ItemIsSelectable |QGraphicsItem::ItemIsFocusable);group->setZValue(itemZvalue++);Scene->clearSelection();group->setSelected(true);
}void MainWindow::on_actionSpilt_triggered()
{int count=Scene->selectedItems().count();if(count==1){QGraphicsItemGroup *group=dynamic_cast<QGraphicsItemGroup*>(Scene->selectedItems().at(0));Scene->destroyItemGroup(group);}
}void MainWindow::on_actionDelete_triggered()
{int count=Scene->selectedItems().count();if(count>=1){QGraphicsItem *item;for(int i=0;i<count;i++){item=Scene->selectedItems().at(0);Scene->removeItem(item);delete item;}}
}void MainWindow::on_actionExit_triggered()
{this->close();
}
myqgraphicsview.h
#ifndef MYQGRAPHICSVIEW_H
#define MYQGRAPHICSVIEW_H#include <QObject>
#include <QGraphicsView>class MyQGraphicsView : public QGraphicsView
{Q_OBJECT
public:explicit MyQGraphicsView(QWidget *parent = nullptr);private:void keyPressEvent(QKeyEvent *event) override;  //键盘void mouseDoubleClickEvent(QMouseEvent *event) override;    //鼠标双击void mousePressEvent(QMouseEvent *event) override;  //鼠标单击void mouseMoveEvent(QMouseEvent *event) override;   //鼠标移动
signals:void KeyPress(QKeyEvent *event);void mouseDoubleClick(QPoint point);void mousePress(QPoint point) ;void mouseMove(QPoint point) ;
};#endif // MYQGRAPHICSVIEW_H
myqgraphicsview.cpp
#include "myqgraphicsview.h"
#include <QMouseEvent>MyQGraphicsView::MyQGraphicsView(QWidget *parent) : QGraphicsView(parent)
{}void MyQGraphicsView::keyPressEvent(QKeyEvent *event)
{emit KeyPress(event);QGraphicsView::keyPressEvent(event);
}void MyQGraphicsView::mouseDoubleClickEvent(QMouseEvent *event)
{if(event->button()==Qt::LeftButton){QPoint point=event->pos();emit mouseDoubleClick(point);}QGraphicsView::mouseDoubleClickEvent(event);
}void MyQGraphicsView::mousePressEvent(QMouseEvent *event)
{if(event->button()==Qt::LeftButton){QPoint point=event->pos();emit mousePress(point);}QGraphicsView::mousePressEvent(event);
}void MyQGraphicsView::mouseMoveEvent(QMouseEvent *event)
{QPoint point=event->pos();emit mouseMove(point);QGraphicsView::mouseMoveEvent(event);
}
main.cpp
#include "mainwindow.h"#include <QApplication>int main(int argc, char *argv[])
{QApplication a(argc, argv);MainWindow w;w.show();return a.exec();
}
结论
通过本文的详细解析,我们了解了一个简易CAD软件的开发过程和实现细节。项目中使用了Qt框架,通过自定义视图类处理用户的绘图操作,并利用资源文件管理应用程序所需的资源。该项目展示了基本的CAD软件的实现方法,为初学者提供了一个良好的学习范例,同时也为进一步开发和扩展提供了坚实的基础。
开发这样一个简易CAD软件,虽然功能相对简单,但涉及到许多重要的编程概念和技巧,如Qt框架的使用、事件处理、动态内存管理等。这些知识不仅对开发CAD软件有帮助,也可以应用到其他类型的应用程序开发中。希望通过本文的介绍,读者能够对CAD软件的开发有一个全面的了解,并能在实际项目中灵活运用这些技术。