1. 简介:
IMGUI是代码驱动gui系统,由 OnGUI 函数驱动:
void OnGUI() {if (GUILayout.Button("Press Me")){ Debug.Log("Hello!");}
}
IMGUI常用于:
创建 in-game debugging displays and tools;
为组件创建自定义inspector;
创建editor windows and tools;
2. IMGUI基础:
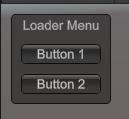
OnGUI()函数在脚本激活时每帧调用;
using UnityEngine;[ExecuteAlways]
public class TestGUI : MonoBehaviour
{private void OnGUI(){GUI.Box(new Rect(10, 10, 100, 90), "Loader Menu");if(GUI.Button(new Rect(20, 40, 80, 20), "Button 1")){Debug.Log("Button 1");}if (GUI.Button(new Rect(20, 70, 80, 20), "Button 2")){Debug.Log("Button 2");}}
}
3. 调用函数来绘制控件:
(GUI/GUILayout).Type (Rect, Content);
定义 Rect 时,坐标系基于屏幕左上角,可使用 Screen.width 和 Screen.height ;
Content类型:
string;
Texture2D;
GUIContent;
GUI.Box(new Rect(10, 10, 100, 50), icon);
GUI.Box(new Rect(10, 60, 100, 50), new GUIContent("text", icon));
GUI.Box(new Rect(10, 110, 100, 50), new GUIContent("text", icon, "This is the tooltip"));GUI.Button(new Rect(10, 160, 100, 20), new GUIContent("Click me", "This is the tooltip"));
GUI.Label(new Rect(10, 180, 100, 20), GUI.tooltip); //显示当前的tooltip内容 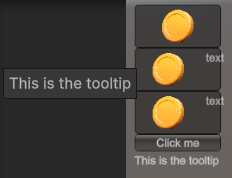
3. IMGUI控件:
Label:
GUI.Label(new Rect(100, 100, 100, 30), "show text");Button:
if(GUI.Button(new Rect(100, 100, 100, 30), "button"))
{Debug.Log("Click button");
}
RepeatButton:
类似 Button,只是点击时一直返回 true;
TextField:
str = GUI.TextField(new Rect(100, 100, 100, 30), str);单行文本输入;
TextArea:
str = GUI.TextArea(new Rect(100, 100, 100, 100), str);多行文本输入;
Toggle:
toggleVal = GUI.Toggle(new Rect(100, 100, 100, 30), toggleVal, "Toggle");Toolbar:
一行单选按钮,toolbarInt 用来记录选择的按钮索引;
private int toolbarInt = 0;
private string[] toolbarStrings = { "Toolbar1", "Toolbar2", "Toolbar3" };void OnGUI()
{toolbarInt = GUI.Toolbar(new Rect(100, 100, 300, 30), toolbarInt, toolbarStrings);
}
SelectionGrid:
多行Toolbar;
private int selectionIndex = 0;
private string[] selectionStrings = { "Toolbar1", "Toolbar2", "Toolbar3", "Toolbar4" };void OnGUI()
{selectionIndex = GUI.SelectionGrid(new Rect(100, 100, 300, 60), selectionIndex, selectionStrings, 2);
}
HorizontalSlider:
水平滑动条
private float sliderValue = 0.0f;void OnGUI()
{sliderValue = GUI.HorizontalSlider(new Rect(100, 100, 100, 30), sliderValue, 0.0f, 10.0f);
}
VerticalSlider:
垂直滑动条;
private float sliderValue = 0.0f;void OnGUI()
{sliderValue = GUI.VerticalSlider(new Rect(100, 100, 100, 30), sliderValue, 0.0f, 10.0f);
}
HorizontalScrollbar:
类似 Slider,用于导航 ScrollView 控件,有一个额外参数控制旋钮宽度;
private float scrollValue = 0.0f;void OnGUI()
{scrollValue = GUI.HorizontalScrollbar(new Rect(100, 100, 100, 30), scrollValue, 1, 0.0f, 10.0f);
}
VerticalScrollbar:
类似 HorizontalScrollbar;
ScrollView:
private Vector2 scrollPosition = Vector2.zero;void OnGUI()
{//第一个参数指定可视区域,第三个参数指定在滚动列表内的大小scrollPosition = GUI.BeginScrollView(new Rect(100, 100, 100, 100), scrollPosition, new Rect(0, 0, 400, 400));GUI.Label(new Rect(0, 0, 400, 400), "text");GUI.EndScrollView();
}
Window:
可拖动的容器;
private Rect windowRect = new Rect(100, 100, 100, 100);void OnGUI()
{windowRect = GUI.Window(0, windowRect, WindowFunction, "My Window");}void WindowFunction(int id)
{GUI.Label(new Rect(10, 20, 100, 30), "text");GUI.DragWindow();   //让window可拖动
}
GUI.changed:
检测用户是否有操作;
selectIndex = GUI.Toolbar(new Rect(100, 100, 200, 30), selectIndex, options);
if(GUI.changed)
{Debug.Log("selectIndex = " + selectIndex);
}
4. 使用GUIStyles样式化控件:
GUIStyles 控制控件的外观显示;
GUISkins 包含一系列 GUIStyles;
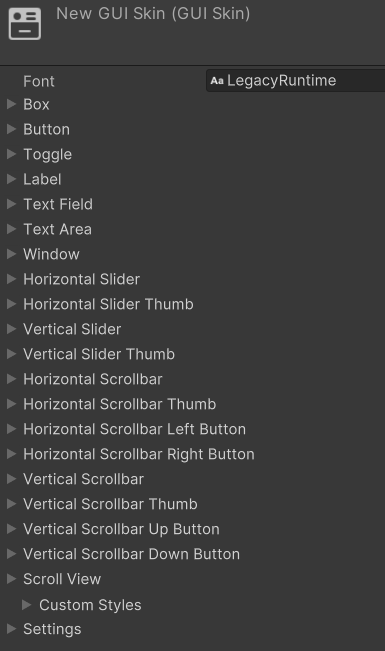
所有控件可设置一个可选的 GUIStyle;
//指定 GUIStyle 的名字 button
GUI.Label(new Rect(100, 100, 100, 30), "text", "button"); 
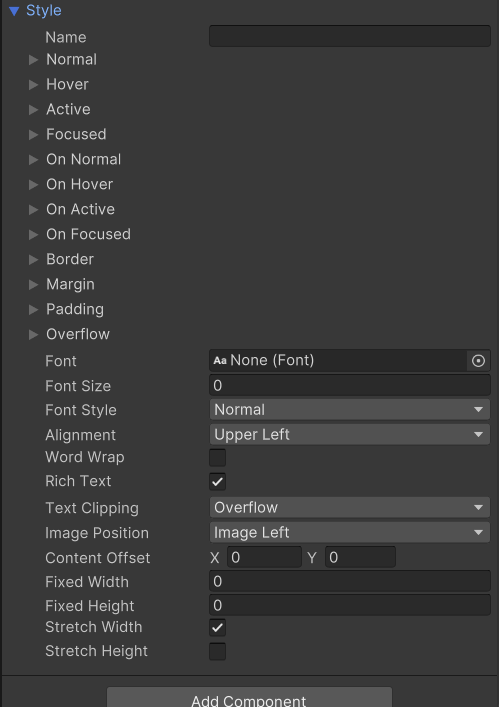
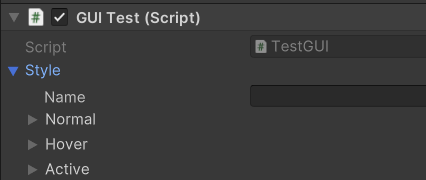
在脚本中声明一个序列化的GUIStyle ,查看属性:
public GUIStyle style;void OnGUI()
{//指定 GUIStyle 的名字 buttonGUI.Label(new Rect(100, 100, 100, 30), "text", style);
} 
设置GUISkin:
public GUISkin skin;void OnGUI()
{GUI.skin = skin;//绘制//...//恢复默认skinGUI.skin = null;    //
}
改变GUIStyle:
GUIStyle style = GUI.skin.GetStyle("label");style.fontSize = 30;
GUI.Label(new Rect(100, 100, 400, 100), "text1");style.fontSize = 50;
GUI.Label(new Rect(100, 150, 400, 100), "text2");
5. IMGUI Layout 模式:
固定布局和自动布局:
要使用自动布局,使用 GUILayout 代替GUI;
可以在 OnGUI() 函数中同时使用两种布局方式,但是两种布局相互独立;
GUILayout 不需要指定 Rect;
// Fixed Layout
GUI.Button(new Rect(25, 25, 100, 30), "I am a Fixed Layout Button");// Automatic Layout
GUILayout.Button("I am an Automatic Layout Button");
固定布局 Group:
Group内的控件将基于组的左上角定位;
GUI.BeginGroup(new Rect(Screen.width / 2 - 50, Screen.height / 2 - 50, 100, 100));GUI.Box(new Rect(0, 0, 100, 100), "Group is here");
GUI.Button(new Rect(10, 40, 80, 30), "Click me");GUI.EndGroup();
可以嵌套使用Group,可获取裁剪效果:
// background image that is 256 x 32
public Texture2D bgImage;// foreground image that is 256 x 32
public Texture2D fgImage;// a float between 0.0 and 1.0
public float playerEnergy = 1.0f;//使用默认style绘制box
public GUIStyle style = new GUIStyle();void OnGUI()
{if(bgImage == null || fgImage == null){return;}GUI.BeginGroup(new Rect(300, 300, 256, 32));// 绘制背景GUI.Box(new Rect(0, 0, 256, 32), bgImage, style);// 通过 playerEnergy 控制显示大小,达到裁剪效果GUI.BeginGroup(new Rect(0, 0, playerEnergy * 256, 32));GUI.Box(new Rect(0, 0, 256, 32), fgImage, style);GUI.EndGroup();GUI.EndGroup();
} 
自动布局 Area:
类似固定布局 Group;
定义屏幕的一块区域来包含 GUILayout 控件,控件基于 Area 的左上角定位;
GUILayout.Button("I am not inside an Area");
GUILayout.BeginArea(new Rect(Screen.width / 2, Screen.height / 2, 300, 300));
GUILayout.Button("I am completely inside an Area");
GUILayout.EndArea();
注意Area里控件的宽度将被拉伸到与Area一样;
自动布局 Horizontal and Vertical Group:
使用自动布局时,控件默认从上往下一个接一个;
为了修改这一行为,提供了Horizontal 和 Vertical Group;
Horizontal Group 里的控件被水平摆放;
GUILayout.BeginHorizontal(), GUILayout.EndHorizontal()
Vertical Group 里的控件被垂直摆放;
GUILayout.BeginVertical(), and GUILayout.EndVertical()
GUILayout.BeginArea(new Rect(400, 400, 200, 100));GUILayout.BeginHorizontal();GUILayout.Button("Button\nfirst");GUILayout.BeginVertical();
GUILayout.Button("Button2");
GUILayout.Label("Label");
GUILayout.EndVertical();GUILayout.EndHorizontal();GUILayout.EndArea(); 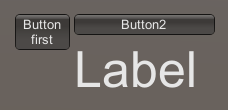
GUILayoutOptions :
使用 GUILayoutOptions 覆盖一些自动布局参数;
GUILayout.BeginArea(new Rect(100, 50, Screen.width - 200, Screen.height - 100));
GUILayout.Button("I am a regular Automatic Layout Button");
GUILayout.Button("My width has been overridden", GUILayout.Width(95));
GUILayout.EndArea(); 
6. 使用 IMGUI 扩展编辑器:
1. 创建自定义 Editor Window:
1. 创建脚本继承 EditorWindow:
using UnityEditor;
using UnityEngine;public class MyWindow : EditorWindow
{private void OnGUI(){}
}
2. 显示window:
using UnityEditor;
using UnityEngine;public class MyWindow : EditorWindow
{[MenuItem("Window/My Window")]public static void ShowWindow(){EditorWindow.GetWindow(typeof(MyWindow));}private void OnGUI(){}
}
3. 实现 gui:
EditorGUI 和 EditorGUILayout 提供了额外的控件;
using UnityEditor;
using UnityEngine;public class MyWindow : EditorWindow
{string myString = "Hello World";bool groupEnabled;bool myBool = true;float myFloat = 1.23f;[MenuItem("Window/My Window")]public static void ShowWindow(){EditorWindow.GetWindow(typeof(MyWindow));}private void OnGUI(){GUILayout.Label("Base Settings", EditorStyles.boldLabel);myString = EditorGUILayout.TextField("Text Field", myString);groupEnabled = EditorGUILayout.BeginToggleGroup("Optional Settings", groupEnabled);myBool = EditorGUILayout.Toggle("Toggle", myBool);myFloat = EditorGUILayout.Slider("Slider", myFloat, -3, 3);EditorGUILayout.EndToggleGroup();}
}
2. 自定义 Inspector:
1. 自定义 GUI of Serializable class:
using System;
using UnityEngine;public enum PersonLevel { A, B, C}[Serializable]
public class Person
{public string name;public int age;public PersonLevel personLevel;
}public class PersonInfo : MonoBehaviour
{public Person person;public Person[] persons;
} 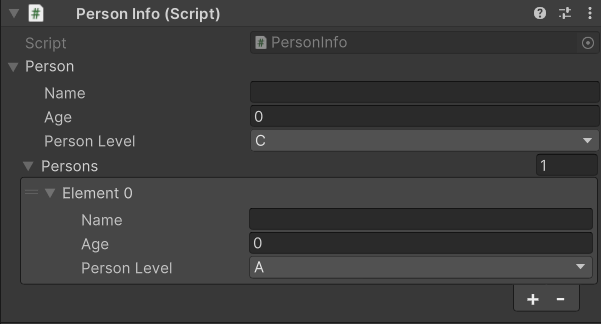
(默认显示)
使用 Property Drawer 来控制其在 Inspector 上的显示:
using UnityEditor;
using UnityEngine;[CustomPropertyDrawer(typeof(Person))]
public class PersonDrawer : PropertyDrawer
{public override void OnGUI(Rect position, SerializedProperty property, GUIContent label){// Using BeginProperty / EndProperty on the parent property means that// prefab override logic works on the entire property.EditorGUI.BeginProperty(position, label, property);// Draw labelposition = EditorGUI.PrefixLabel(position, GUIUtility.GetControlID(FocusType.Passive), label);// Don't make child fields be indentedvar indent = EditorGUI.indentLevel;EditorGUI.indentLevel = 0;// Calculate rectsvar nameRect = new Rect(position.x, position.y, 30, position.height);var ageRect = new Rect(position.x + 35, position.y, 50, position.height);var personLevelRect = new Rect(position.x + 90, position.y, position.width - 90, position.height);// Draw fields - pass GUIContent.none to each so they are drawn without labelsEditorGUI.PropertyField(nameRect, property.FindPropertyRelative("name"), GUIContent.none);EditorGUI.PropertyField(ageRect, property.FindPropertyRelative("age"), GUIContent.none);EditorGUI.PropertyField(personLevelRect, property.FindPropertyRelative("personLevel"), GUIContent.none);// Set indent back to what it wasEditorGUI.indentLevel = indent;EditorGUI.EndProperty();}
}
2. 使用 Property Attribute 自定义脚本成员 GUI:
创建 Attribute:
using UnityEngine;public class MyRangeAttribute : PropertyAttribute
{public float min;public float max;public MyRangeAttribute(float min, float max){this.min = min;this.max = max;}
}
对 Attribute 进行自定义绘制:
using UnityEditor;
using UnityEngine;//对MyRangeAttribute
[CustomPropertyDrawer(typeof(MyRangeAttribute))]
public class RangeDrawer : PropertyDrawer
{public override void OnGUI(Rect position, SerializedProperty property, GUIContent label){// First get the attribute since it contains the range for the sliderMyRangeAttribute range = (MyRangeAttribute)attribute;// Now draw the property as a Slider or an IntSlider based on whether it's a float or integer.if (property.propertyType == SerializedPropertyType.Float)EditorGUI.Slider(position, property, range.min, range.max, label);else if (property.propertyType == SerializedPropertyType.Integer)EditorGUI.IntSlider(position, property, (int)range.min, (int)range.max, label);elseEditorGUI.LabelField(position, label.text, "Use MyRange with float or int.");}
}
(注意,为了性能考虑,EditorGUILayout 不可在 PropertyDrawer 中使用)
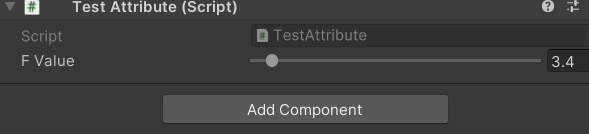
使用 Attribute:
using UnityEngine;public class TestAttribute : MonoBehaviour
{[MyRange(1.5f, 35f)]public float fValue;
} 
3. Component 自定义编辑器:
创建 component:
using UnityEngine;[ExecuteInEditMode]
public class LookAtPoint : MonoBehaviour
{public Vector3 lookAtPoint = Vector3.zero;void Update(){transform.LookAt(lookAtPoint);}
}
创建组件自定义编辑器:
using UnityEditor;[CustomEditor(typeof(LookAtPoint))]
[CanEditMultipleObjects]
public class LookAtPointEditor : Editor
{LookAtPoint targetComp;SerializedProperty lookAtPoint;void OnEnable(){lookAtPoint = serializedObject.FindProperty("lookAtPoint");}public override void OnInspectorGUI(){targetComp = target as LookAtPoint;serializedObject.Update();EditorGUILayout.PropertyField(lookAtPoint);serializedObject.ApplyModifiedProperties();}
}
通过 OnSceneGUI 往 Scene View 中添加 编辑器代码:
using UnityEngine;
using UnityEditor;[CustomEditor(typeof(LookAtPoint))]
[CanEditMultipleObjects]
public class LookAtPointEditor : Editor
{private void OnSceneGUI(){LookAtPoint t = (LookAtPoint)target;//使用 Handles 类来实现3D场景编辑控制EditorGUI.BeginChangeCheck();//给定位置,在场景中画中控制轴,拖动的话,返回变化的posVector3 pos = Handles.PositionHandle(t.lookAtPoint, Quaternion.identity);if (EditorGUI.EndChangeCheck()){Undo.RecordObject(target, "Move point");t.lookAtPoint = pos;t.Update();}}
}
如果要在场景中添加 GUI,使用 Handles.BeginGUI() and Handles.EndGUI();
4. TreeView :
是一个 IMGUI 控件,用于显示分层数据,可展开和折叠;
使用 TreeView 创建高度自定义的列表视图和多列表格;
按行渲染,每行代表一个 TreeViewItem, 包含父节点和子节点的信息;
TreeView 有一个隐藏的根 TreeViewItem,是所有其他 item的根;
重要的类和方法:
类 TreeViewState:
包含交互的状态信息,可序列化,以便在编辑器编译和进入Play模式时保存数据;
类 TreeViewItem:
包含每个 TreeView item 的数据,在 TreeView 中需要一个唯一 id;
depth 属性用来视觉缩进;
抽象方法 BuildRoot:
TreeView 类的抽象方法,每次调用 TreeView 的 Reload 方法就会触发;
用于创建 root item;
对于简单树,可创建所有的 TreeViewItem;
对于复杂树,通过覆写 BuildRows 来创建当前需要的行;
虚方法 BuildRows:
默认实现创建整个树;
可覆写只创建展开的行;
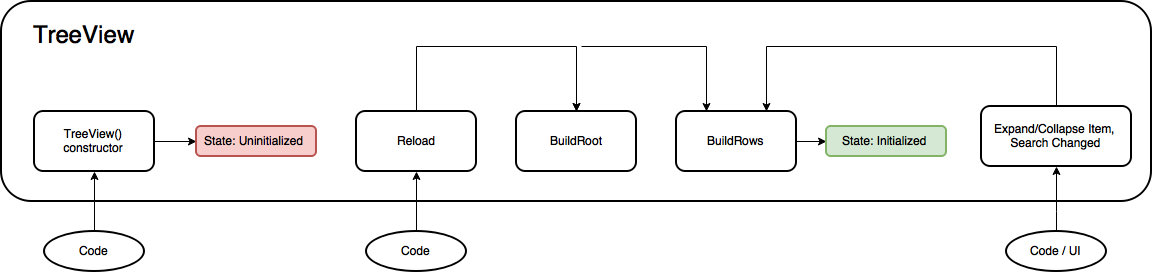
初始化 TreeView:
调用 Reload 方法来初始化;
两种方式设置 TreeView:
1. 在 BuildRoot 中创建整个树;
2. 在 BuildRoot 中只创建根,然后在 BuildRows 中只创建展开的 items;
Example 1: A simple TreeView:
using System.Collections.Generic;
using UnityEditor.IMGUI.Controls;public class SimpleTreeView : TreeView
{public SimpleTreeView(TreeViewState state) : base(state){Reload();}protected override TreeViewItem BuildRoot(){// BuildRoot is called every time Reload is called to ensure that TreeViewItems // are created from data. Here we create a fixed set of items. In a real world example,// a data model should be passed into the TreeView and the items created from the model.// This section illustrates that IDs should be unique. The root item is required to // have a depth of -1, and the rest of the items increment from that.var root = new TreeViewItem { id = 0, depth = -1, displayName = "Root" };var allItems = new List<TreeViewItem>{new TreeViewItem {id = 1, depth = 0, displayName = "Animals"},new TreeViewItem {id = 2, depth = 1, displayName = "Mammals"},new TreeViewItem {id = 3, depth = 2, displayName = "Tiger"},new TreeViewItem {id = 4, depth = 2, displayName = "Elephant"},new TreeViewItem {id = 5, depth = 2, displayName = "Okapi"},new TreeViewItem {id = 6, depth = 2, displayName = "Armadillo"},new TreeViewItem {id = 7, depth = 1, displayName = "Reptiles"},new TreeViewItem {id = 8, depth = 2, displayName = "Crocodile"},new TreeViewItem {id = 9, depth = 2, displayName = "Lizard"},};// Utility method that initializes the TreeViewItem.children and .parent for all items.SetupParentsAndChildrenFromDepths(root, allItems);// Return root of the treereturn root;}
}
另一种方式添加 Item:
protected override TreeViewItem BuildRoot()
{// BuildRoot is called every time Reload is called to ensure that TreeViewItems // are created from data. Here we create a fixed set of items. In a real world example,// a data model should be passed into the TreeView and the items created from the model.// This section illustrates that IDs should be unique. The root item is required to // have a depth of -1, and the rest of the items increment from that.var root = new TreeViewItem { id = 0, depth = -1, displayName = "Root" };//不指定depth,通过 TreeViewItem.AddChild 来添加节点var animals = new TreeViewItem { id = 1, displayName = "Animals" };root.AddChild(animals);var mammals = new TreeViewItem { id = 2, displayName = "Mammals" };animals.AddChild(mammals);mammals.AddChild(new TreeViewItem { id = 3, displayName = "Tiger" });mammals.AddChild(new TreeViewItem { id = 4, displayName = "Elephant" });mammals.AddChild(new TreeViewItem { id = 5, displayName = "Okapi" });mammals.AddChild(new TreeViewItem { id = 6, displayName = "Armadillo" });var reptiles = new TreeViewItem { id = 7, displayName = "Reptiles" };animals.AddChild(reptiles);reptiles.AddChild(new TreeViewItem { id = 8, displayName = "Crocodile" });reptiles.AddChild(new TreeViewItem { id = 9, displayName = "Lizard" });SetupDepthsFromParentsAndChildren(root);// Return root of the treereturn root;
}
使用 EditorWindow 显示 TreeView:
using UnityEditor;
using UnityEditor.IMGUI.Controls;
using UnityEngine;public class SimpleTreeViewWindow : EditorWindow
{// SerializeField is used to ensure the view state is written to the window // layout file. This means that the state survives restarting Unity as long as the window// is not closed. If the attribute is omitted then the state is still serialized/deserialized.[SerializeField]TreeViewState m_TreeViewState;//The TreeView is not serializable, so it should be reconstructed from the tree data.SimpleTreeView m_SimpleTreeView;void OnEnable(){// Check whether there is already a serialized view state (state // that survived assembly reloading)if (m_TreeViewState == null)m_TreeViewState = new TreeViewState();//创建 TreeViewm_SimpleTreeView = new SimpleTreeView(m_TreeViewState);}void OnGUI(){//绘制 TreeViewm_SimpleTreeView.OnGUI(new Rect(0, 0, position.width, position.height));}// Add menu named "My Window" to the Window menu[MenuItem("TreeView Examples/Simple Tree Window")]static void ShowWindow(){// Get existing open window or if none, make a new one:var window = GetWindow<SimpleTreeViewWindow>();window.titleContent = new GUIContent("SimpleTreeView Window");window.Show();}
}
Example 2: A multi-column TreeView:
最终效果:

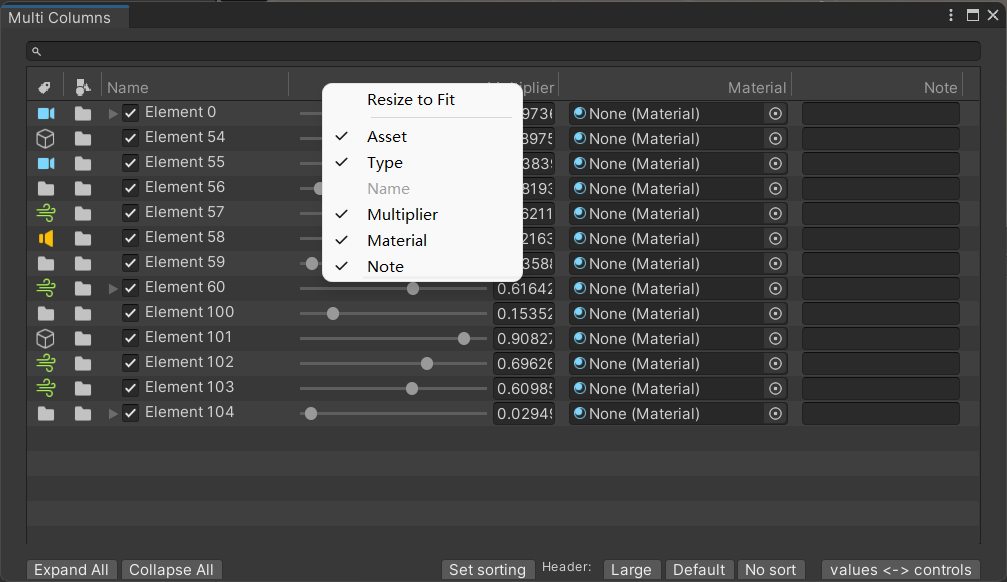
(列Header鼠标右键菜单)
EditorWindow:
using System;
using System.Collections.Generic;
using UnityEditor.Callbacks;
using UnityEditor.IMGUI.Controls;
using UnityEngine;namespace UnityEditor.TreeViewExamples
{class MultiColumnWindow : EditorWindow{[NonSerialized] bool m_Initialized;// Serialized in the window layout file so it survives assembly reloading[SerializeField] TreeViewState m_TreeViewState;[SerializeField] MultiColumnHeaderState m_MultiColumnHeaderState;SearchField m_SearchField;MultiColumnTreeView m_TreeView;MyTreeAsset m_MyTreeAsset;[MenuItem("TreeView Examples/Multi Columns")]public static MultiColumnWindow GetWindow (){var window = GetWindow<MultiColumnWindow>();window.titleContent = new GUIContent("Multi Columns");window.Focus();window.Repaint();return window;}//双击资源时触发[OnOpenAsset]public static bool OnOpenAsset (int instanceID, int line){var myTreeAsset = EditorUtility.InstanceIDToObject (instanceID) as MyTreeAsset;if (myTreeAsset != null){var window = GetWindow ();window.SetTreeAsset(myTreeAsset);return true;}return false; // we did not handle the open}void SetTreeAsset (MyTreeAsset myTreeAsset){m_MyTreeAsset = myTreeAsset;m_Initialized = false;}// TreeView 显示区域Rect multiColumnTreeViewRect{get { return new Rect(20, 30, position.width-40, position.height-60); }}// 搜索显示区域Rect toolbarRect{get { return new Rect (20f, 10f, position.width-40f, 20f); }}//底部工具栏区域Rect bottomToolbarRect{get { return new Rect(20f, position.height - 18f, position.width - 40f, 16f); }}public MultiColumnTreeView treeView{get { return m_TreeView; }}void InitIfNeeded (){if (!m_Initialized){// Check if it already exists (deserialized from window layout file or scriptable object)if (m_TreeViewState == null)m_TreeViewState = new TreeViewState();//创建 HeaderState,包含各列头部ui相关显示bool firstInit = m_MultiColumnHeaderState == null;var headerState = MultiColumnTreeView.CreateDefaultMultiColumnHeaderState(multiColumnTreeViewRect.width);//应用本地数据if (MultiColumnHeaderState.CanOverwriteSerializedFields(m_MultiColumnHeaderState, headerState))MultiColumnHeaderState.OverwriteSerializedFields(m_MultiColumnHeaderState, headerState);m_MultiColumnHeaderState = headerState;//根据 HeaderState 创建 MultiColumnHeadervar multiColumnHeader = new MyMultiColumnHeader(headerState);if (firstInit)multiColumnHeader.ResizeToFit ();var treeModel = new TreeModel<MyTreeElement>(GetData());//根据 TreeViewState,MultiColumnHeader, TreeModel 创建 TreeViewm_TreeView = new MultiColumnTreeView(m_TreeViewState, multiColumnHeader, treeModel);//搜索输入框m_SearchField = new SearchField();m_SearchField.downOrUpArrowKeyPressed += m_TreeView.SetFocusAndEnsureSelectedItem;m_Initialized = true;}}// 获取列表数据IList<MyTreeElement> GetData (){if (m_MyTreeAsset != null && m_MyTreeAsset.treeElements != null && m_MyTreeAsset.treeElements.Count > 0)return m_MyTreeAsset.treeElements;// generate some test datareturn MyTreeElementGenerator.GenerateRandomTree(130); }// 选择某个资源时触发void OnSelectionChange (){if (!m_Initialized)return;var myTreeAsset = Selection.activeObject as MyTreeAsset;if (myTreeAsset != null && myTreeAsset != m_MyTreeAsset){m_MyTreeAsset = myTreeAsset;m_TreeView.treeModel.SetData (GetData ());m_TreeView.Reload ();}}void OnGUI (){//初始化InitIfNeeded();SearchBar (toolbarRect);DoTreeView (multiColumnTreeViewRect);BottomToolBar (bottomToolbarRect);}void SearchBar (Rect rect){//绘制搜索输入框treeView.searchString = m_SearchField.OnGUI (rect, treeView.searchString);}void DoTreeView (Rect rect){//绘制 TreeViewm_TreeView.OnGUI(rect);}//底部工具栏void BottomToolBar (Rect rect){GUILayout.BeginArea (rect);using (new EditorGUILayout.HorizontalScope ()){var style = "miniButton";if (GUILayout.Button("Expand All", style)){treeView.ExpandAll ();}if (GUILayout.Button("Collapse All", style)){treeView.CollapseAll ();}GUILayout.FlexibleSpace();GUILayout.Label (m_MyTreeAsset != null ? AssetDatabase.GetAssetPath (m_MyTreeAsset) : string.Empty);GUILayout.FlexibleSpace ();if (GUILayout.Button("Set sorting", style)){var myColumnHeader = (MyMultiColumnHeader)treeView.multiColumnHeader;myColumnHeader.SetSortingColumns (new int[] {4, 3, 2}, new[] {true, false, true});myColumnHeader.mode = MyMultiColumnHeader.Mode.LargeHeader;}GUILayout.Label ("Header: ", "minilabel");if (GUILayout.Button("Large", style)){var myColumnHeader = (MyMultiColumnHeader) treeView.multiColumnHeader;myColumnHeader.mode = MyMultiColumnHeader.Mode.LargeHeader;}if (GUILayout.Button("Default", style)){var myColumnHeader = (MyMultiColumnHeader)treeView.multiColumnHeader;myColumnHeader.mode = MyMultiColumnHeader.Mode.DefaultHeader;}if (GUILayout.Button("No sort", style)){var myColumnHeader = (MyMultiColumnHeader)treeView.multiColumnHeader;myColumnHeader.mode = MyMultiColumnHeader.Mode.MinimumHeaderWithoutSorting;}GUILayout.Space (10);if (GUILayout.Button("values <-> controls", style)){treeView.showControls = !treeView.showControls;}}GUILayout.EndArea();}}internal class MyMultiColumnHeader : MultiColumnHeader{Mode m_Mode;public enum Mode{LargeHeader,DefaultHeader,MinimumHeaderWithoutSorting}public MyMultiColumnHeader(MultiColumnHeaderState state): base(state){mode = Mode.DefaultHeader;}public Mode mode{get{return m_Mode;}set{m_Mode = value;switch (m_Mode){case Mode.LargeHeader:canSort = true;height = 37f;break;case Mode.DefaultHeader:canSort = true;height = DefaultGUI.defaultHeight;break;case Mode.MinimumHeaderWithoutSorting:canSort = false;height = DefaultGUI.minimumHeight;break;}}}// 自定义 Head GUI 显示protected override void ColumnHeaderGUI (MultiColumnHeaderState.Column column, Rect headerRect, int columnIndex){// Default column header guibase.ColumnHeaderGUI(column, headerRect, columnIndex);// Add additional info for large headerif (mode == Mode.LargeHeader){// Show example overlay stuff on some of the columnsif (columnIndex > 2){headerRect.xMax -= 3f;var oldAlignment = EditorStyles.largeLabel.alignment;EditorStyles.largeLabel.alignment = TextAnchor.UpperRight;GUI.Label(headerRect, 36 + columnIndex + "%", EditorStyles.largeLabel);EditorStyles.largeLabel.alignment = oldAlignment;}}}}}
MultiColumnTreeView:
using System;
using System.Collections.Generic;
using System.Linq;
using UnityEditor.IMGUI.Controls;
using UnityEngine;
using UnityEngine.Assertions;namespace UnityEditor.TreeViewExamples
{internal class MultiColumnTreeView : TreeViewWithTreeModel<MyTreeElement>{const float kRowHeights = 20f;const float kToggleWidth = 18f;public bool showControls = true;//编辑器图标资源static GUIContent[] s_TestIcons ={EditorGUIUtility.IconContent ("Folder Icon"),EditorGUIUtility.IconContent ("AudioSource Icon"),EditorGUIUtility.IconContent ("Camera Icon"),EditorGUIUtility.IconContent ("Windzone Icon"),EditorGUIUtility.IconContent ("GameObject Icon")};// All columnsenum MyColumns{Icon1,Icon2,Name,Value1,Value2,Value3,}public enum SortOption{Name,Value1,Value2,Value3,}// Sort options per columnSortOption[] m_SortOptions = {SortOption.Value1, SortOption.Value3, SortOption.Name, SortOption.Value1, SortOption.Value2,SortOption.Value3};//展开Tree,扁平处理,不包含Rootpublic static void TreeToList (TreeViewItem root, IList<TreeViewItem> result){if (root == null)throw new NullReferenceException("root");if (result == null)throw new NullReferenceException("result");result.Clear();if (root.children == null)return;//通过一个堆来展开Stack<TreeViewItem> stack = new Stack<TreeViewItem>();//后面的元素先入栈,后弹出for (int i = root.children.Count - 1; i >= 0; i--)stack.Push(root.children[i]);while (stack.Count > 0){TreeViewItem current = stack.Pop();result.Add(current);if (current.hasChildren && current.children[0] != null){for (int i = current.children.Count - 1; i >= 0; i--){stack.Push(current.children[i]);}}}}public MultiColumnTreeView (TreeViewState state, MultiColumnHeader multicolumnHeader, TreeModel<MyTreeElement> model) : base (state, multicolumnHeader, model){Assert.AreEqual(m_SortOptions.Length , Enum.GetValues(typeof(MyColumns)).Length, "Ensure number of sort options are in sync with number of MyColumns enum values");// Custom setuprowHeight = kRowHeights;				//行高columnIndexForTreeFoldouts = 2;			//折叠图标在哪列显示showAlternatingRowBackgrounds = true;	//背景交替变化showBorder = true;						//显示边框customFoldoutYOffset = (kRowHeights - EditorGUIUtility.singleLineHeight) * 0.5f; // center foldout in the row since we also center content. See RowGUIextraSpaceBeforeIconAndLabel = kToggleWidth;multicolumnHeader.sortingChanged += OnSortingChanged;	//排序发生变化Reload();}//构建显示的行 TreeViewItem 数据// Note we We only build the visible rows, only the backend has the full tree information. // The treeview only creates info for the row list.protected override IList<TreeViewItem> BuildRows(TreeViewItem root){var rows = base.BuildRows (root);SortIfNeeded (root, rows);return rows;}void OnSortingChanged (MultiColumnHeader multiColumnHeader){SortIfNeeded (rootItem, GetRows());}void SortIfNeeded (TreeViewItem root, IList<TreeViewItem> rows){if (rows.Count <= 1)return;if (multiColumnHeader.sortedColumnIndex == -1){return; // No column to sort for (just use the order the data are in)}// Sort the roots of the existing tree itemsSortByMultipleColumns ();TreeToList(root, rows);Repaint();}void SortByMultipleColumns (){//设置排序的列var sortedColumns = multiColumnHeader.state.sortedColumns;if (sortedColumns.Length == 0)return;//只排序根节点直属的子节点var myTypes = rootItem.children.Cast<TreeViewItem<MyTreeElement> >();//首选列优先排序var orderedQuery = InitialOrder (myTypes, sortedColumns);//其他列排序for (int i=1; i<sortedColumns.Length; i++){SortOption sortOption = m_SortOptions[sortedColumns[i]];bool ascending = multiColumnHeader.IsSortedAscending(sortedColumns[i]);switch (sortOption){case SortOption.Name:// ThenBy 在现有排序的基础上,对于相等的元素,再深入排序orderedQuery = orderedQuery.ThenBy(l => l.data.name, ascending);break;case SortOption.Value1:orderedQuery = orderedQuery.ThenBy(l => l.data.floatValue1, ascending);break;case SortOption.Value2:orderedQuery = orderedQuery.ThenBy(l => l.data.floatValue2, ascending);break;case SortOption.Value3:orderedQuery = orderedQuery.ThenBy(l => l.data.floatValue3, ascending);break;}}rootItem.children = orderedQuery.Cast<TreeViewItem> ().ToList ();}IOrderedEnumerable<TreeViewItem<MyTreeElement>> InitialOrder(IEnumerable<TreeViewItem<MyTreeElement>> myTypes, int[] history){SortOption sortOption = m_SortOptions[history[0]];//是否升序bool ascending = multiColumnHeader.IsSortedAscending(history[0]);switch (sortOption){case SortOption.Name:return myTypes.Order(l => l.data.name, ascending);case SortOption.Value1:return myTypes.Order(l => l.data.floatValue1, ascending);case SortOption.Value2:return myTypes.Order(l => l.data.floatValue2, ascending);case SortOption.Value3:return myTypes.Order(l => l.data.floatValue3, ascending);default:Assert.IsTrue(false, "Unhandled enum");break;}// defaultreturn myTypes.Order(l => l.data.name, ascending);}int GetIcon1Index(TreeViewItem<MyTreeElement> item){return (int)(Mathf.Min(0.99f, item.data.floatValue1) * s_TestIcons.Length);}int GetIcon2Index (TreeViewItem<MyTreeElement> item){return Mathf.Min(item.data.text.Length, s_TestIcons.Length-1);}//绘制一行的 GUIprotected override void RowGUI (RowGUIArgs args){var item = (TreeViewItem<MyTreeElement>) args.item;//列可通过Header菜单隐藏,故需要 args.GetNumVisibleColumnsfor (int i = 0; i < args.GetNumVisibleColumns (); ++i){//绘制每列CellGUI(args.GetCellRect(i), item, (MyColumns)args.GetColumn(i), ref args);}}void CellGUI (Rect cellRect, TreeViewItem<MyTreeElement> item, MyColumns column, ref RowGUIArgs args){// Center cell rect vertically (makes it easier to place controls, icons etc in the cells)CenterRectUsingSingleLineHeight(ref cellRect);//根据类型绘制 GUIswitch (column){case MyColumns.Icon1:{GUI.DrawTexture(cellRect, s_TestIcons[GetIcon1Index(item)].image, ScaleMode.ScaleToFit);}break;case MyColumns.Icon2:{GUI.DrawTexture(cellRect, s_TestIcons[GetIcon2Index(item)].image, ScaleMode.ScaleToFit);}break;case MyColumns.Name:{// Do toggleRect toggleRect = cellRect;toggleRect.x += GetContentIndent(item);toggleRect.width = kToggleWidth;if (toggleRect.xMax < cellRect.xMax)item.data.enabled = EditorGUI.Toggle(toggleRect, item.data.enabled); // hide when outside cell rect// Default icon and labelargs.rowRect = cellRect;base.RowGUI(args);}break;case MyColumns.Value1:case MyColumns.Value2:case MyColumns.Value3:{if (showControls){cellRect.xMin += 5f; // When showing controls make some extra spacingif (column == MyColumns.Value1)item.data.floatValue1 = EditorGUI.Slider(cellRect, GUIContent.none, item.data.floatValue1, 0f, 1f);if (column == MyColumns.Value2)item.data.material = (Material)EditorGUI.ObjectField(cellRect, GUIContent.none, item.data.material, typeof(Material), false);if (column == MyColumns.Value3)item.data.text = GUI.TextField(cellRect, item.data.text);}else{string value = "Missing";if (column == MyColumns.Value1)value = item.data.floatValue1.ToString("f5");if (column == MyColumns.Value2)value = item.data.floatValue2.ToString("f5");if (column == MyColumns.Value3)value = item.data.floatValue3.ToString("f5");DefaultGUI.LabelRightAligned(cellRect, value, args.selected, args.focused);}}break;}}// Rename//--------protected override bool CanRename(TreeViewItem item){// Only allow rename if we can show the rename overlay with a certain width (label might be clipped by other columns)Rect renameRect = GetRenameRect (treeViewRect, 0, item);return renameRect.width > 30;}protected override void RenameEnded(RenameEndedArgs args){// Set the backend name and reload the tree to reflect the new modelif (args.acceptedRename){var element = treeModel.Find(args.itemID);element.name = args.newName;Reload();}}protected override Rect GetRenameRect (Rect rowRect, int row, TreeViewItem item){Rect cellRect = GetCellRectForTreeFoldouts (rowRect);CenterRectUsingSingleLineHeight(ref cellRect);return base.GetRenameRect (cellRect, row, item);}// Misc//--------protected override bool CanMultiSelect (TreeViewItem item){return true;}//创建 HeaderStatepublic static MultiColumnHeaderState CreateDefaultMultiColumnHeaderState(float treeViewWidth){var columns = new[] {new MultiColumnHeaderState.Column {headerContent = new GUIContent(EditorGUIUtility.FindTexture("FilterByLabel"), "Lorem ipsum dolor sit amet, consectetur adipiscing elit. "),contextMenuText = "Asset",		//右键点击出现的菜单,可配合 allowToggleVisibility 来控制该列是否显示headerTextAlignment = TextAlignment.Center,sortedAscending = true,sortingArrowAlignment = TextAlignment.Right,width = 30, minWidth = 30,maxWidth = 60,autoResize = false,allowToggleVisibility = true},new MultiColumnHeaderState.Column {headerContent = new GUIContent(EditorGUIUtility.FindTexture("FilterByType"), "Sed hendrerit mi enim, eu iaculis leo tincidunt at."),contextMenuText = "Type",headerTextAlignment = TextAlignment.Center,sortedAscending = true,sortingArrowAlignment = TextAlignment.Right,width = 30, minWidth = 30,maxWidth = 60,autoResize = false,allowToggleVisibility = true},new MultiColumnHeaderState.Column {headerContent = new GUIContent("Name"),headerTextAlignment = TextAlignment.Left,sortedAscending = true,sortingArrowAlignment = TextAlignment.Center,width = 150, minWidth = 60,autoResize = false,allowToggleVisibility = false},new MultiColumnHeaderState.Column {headerContent = new GUIContent("Multiplier", "In sed porta ante. Nunc et nulla mi."),headerTextAlignment = TextAlignment.Right,sortedAscending = true,sortingArrowAlignment = TextAlignment.Left,width = 110,minWidth = 60,autoResize = true},new MultiColumnHeaderState.Column {headerContent = new GUIContent("Material", "Maecenas congue non tortor eget vulputate."),headerTextAlignment = TextAlignment.Right,sortedAscending = true,sortingArrowAlignment = TextAlignment.Left,width = 95,minWidth = 60,autoResize = true,allowToggleVisibility = true},new MultiColumnHeaderState.Column {headerContent = new GUIContent("Note", "Nam at tellus ultricies ligula vehicula ornare sit amet quis metus."),headerTextAlignment = TextAlignment.Right,sortedAscending = true,sortingArrowAlignment = TextAlignment.Left,width = 70,minWidth = 60,autoResize = true}};Assert.AreEqual(columns.Length, Enum.GetValues(typeof(MyColumns)).Length, "Number of columns should match number of enum values: You probably forgot to update one of them.");var state =  new MultiColumnHeaderState(columns);return state;}}static class MyExtensionMethods{public static IOrderedEnumerable<T> Order<T, TKey>(this IEnumerable<T> source, Func<T, TKey> selector, bool ascending){if (ascending){return source.OrderBy(selector);}else{return source.OrderByDescending(selector);}}public static IOrderedEnumerable<T> ThenBy<T, TKey>(this IOrderedEnumerable<T> source, Func<T, TKey> selector, bool ascending){if (ascending){return source.ThenBy(selector);}else{return source.ThenByDescending(selector);}}}
}
基类 TreeViewWithTreeModel:
using System;
using System.Collections.Generic;
using System.Linq;
using UnityEditor.IMGUI.Controls;
using UnityEngine;namespace UnityEditor.TreeViewExamples
{internal class TreeViewItem<T> : TreeViewItem where T : TreeElement{public T data { get; set; }public TreeViewItem (int id, int depth, string displayName, T data) : base (id, depth, displayName){this.data = data;}}internal class TreeViewWithTreeModel<T> : TreeView where T : TreeElement{TreeModel<T> m_TreeModel;readonly List<TreeViewItem> m_Rows = new List<TreeViewItem>(100);public event Action treeChanged;public TreeModel<T> treeModel { get { return m_TreeModel; } }public event Action<IList<TreeViewItem>>  beforeDroppingDraggedItems;public TreeViewWithTreeModel (TreeViewState state, TreeModel<T> model) : base (state){Init (model);}public TreeViewWithTreeModel (TreeViewState state, MultiColumnHeader multiColumnHeader, TreeModel<T> model): base(state, multiColumnHeader){Init (model);}void Init (TreeModel<T> model){m_TreeModel = model;m_TreeModel.modelChanged += ModelChanged;}void ModelChanged (){if (treeChanged != null)treeChanged ();Reload ();}//构建根节点protected override TreeViewItem BuildRoot(){int depthForHiddenRoot = -1;return new TreeViewItem<T>(m_TreeModel.root.id, depthForHiddenRoot, m_TreeModel.root.name, m_TreeModel.root);}//构建显示的行 TreeViewItemprotected override IList<TreeViewItem> BuildRows (TreeViewItem root){if (m_TreeModel.root == null){Debug.LogError ("tree model root is null. did you call SetData()?");}m_Rows.Clear ();if (!string.IsNullOrEmpty(searchString)){Search (m_TreeModel.root, searchString, m_Rows);}else{if (m_TreeModel.root.hasChildren)AddChildrenRecursive(m_TreeModel.root, 0, m_Rows);}// We still need to setup the child parent information for the rows since this // information is used by the TreeView internal logic (navigation, dragging etc)SetupParentsAndChildrenFromDepths (root, m_Rows);return m_Rows;}void AddChildrenRecursive (T parent, int depth, IList<TreeViewItem> newRows){foreach (T child in parent.children){var item = new TreeViewItem<T>(child.id, depth, child.name, child);newRows.Add(item);if (child.hasChildren){if (IsExpanded(child.id))	//展开显示的行{AddChildrenRecursive (child, depth + 1, newRows);}else{item.children = CreateChildListForCollapsedParent();}}}}void Search(T searchFromThis, string search, List<TreeViewItem> result){if (string.IsNullOrEmpty(search))throw new ArgumentException("Invalid search: cannot be null or empty", "search");const int kItemDepth = 0; // tree is flattened when searchingStack<T> stack = new Stack<T>();foreach (var element in searchFromThis.children)stack.Push((T)element);while (stack.Count > 0){T current = stack.Pop();// 名字匹配的行if (current.name.IndexOf(search, StringComparison.OrdinalIgnoreCase) >= 0){result.Add(new TreeViewItem<T>(current.id, kItemDepth, current.name, current));}if (current.children != null && current.children.Count > 0){foreach (var element in current.children){stack.Push((T)element);}}}SortSearchResult(result);}protected virtual void SortSearchResult (List<TreeViewItem> rows){rows.Sort ((x,y) => EditorUtility.NaturalCompare (x.displayName, y.displayName)); // sort by displayName by default, can be overriden for multicolumn solutions}protected override IList<int> GetAncestors (int id){return m_TreeModel.GetAncestors(id);}protected override IList<int> GetDescendantsThatHaveChildren (int id){return m_TreeModel.GetDescendantsThatHaveChildren(id);}// Dragging//-----------const string k_GenericDragID = "GenericDragColumnDragging";protected override bool CanStartDrag (CanStartDragArgs args){return true;}protected override void SetupDragAndDrop(SetupDragAndDropArgs args){if (hasSearch)return;DragAndDrop.PrepareStartDrag();var draggedRows = GetRows().Where(item => args.draggedItemIDs.Contains(item.id)).ToList();DragAndDrop.SetGenericData(k_GenericDragID, draggedRows);DragAndDrop.objectReferences = new UnityEngine.Object[] { }; // this IS required for dragging to workstring title = draggedRows.Count == 1 ? draggedRows[0].displayName : "< Multiple >";DragAndDrop.StartDrag (title);}protected override DragAndDropVisualMode HandleDragAndDrop (DragAndDropArgs args){// Check if we can handle the current drag data (could be dragged in from other areas/windows in the editor)var draggedRows = DragAndDrop.GetGenericData(k_GenericDragID) as List<TreeViewItem>;if (draggedRows == null)return DragAndDropVisualMode.None;// Parent item is null when dragging outside any tree view items.switch (args.dragAndDropPosition){case DragAndDropPosition.UponItem:case DragAndDropPosition.BetweenItems:{bool validDrag = ValidDrag(args.parentItem, draggedRows);if (args.performDrop && validDrag){T parentData = ((TreeViewItem<T>)args.parentItem).data;OnDropDraggedElementsAtIndex(draggedRows, parentData, args.insertAtIndex == -1 ? 0 : args.insertAtIndex);}return validDrag ? DragAndDropVisualMode.Move : DragAndDropVisualMode.None;}case DragAndDropPosition.OutsideItems:{if (args.performDrop)OnDropDraggedElementsAtIndex(draggedRows, m_TreeModel.root, m_TreeModel.root.children.Count);return DragAndDropVisualMode.Move;}default:Debug.LogError("Unhandled enum " + args.dragAndDropPosition);return DragAndDropVisualMode.None;}}public virtual void OnDropDraggedElementsAtIndex (List<TreeViewItem> draggedRows, T parent, int insertIndex){if (beforeDroppingDraggedItems != null)beforeDroppingDraggedItems (draggedRows);var draggedElements = new List<TreeElement> ();foreach (var x in draggedRows)draggedElements.Add (((TreeViewItem<T>) x).data);var selectedIDs = draggedElements.Select (x => x.id).ToArray();m_TreeModel.MoveElements (parent, insertIndex, draggedElements);SetSelection(selectedIDs, TreeViewSelectionOptions.RevealAndFrame);}bool ValidDrag(TreeViewItem parent, List<TreeViewItem> draggedItems){TreeViewItem currentParent = parent;while (currentParent != null){if (draggedItems.Contains(currentParent))return false;currentParent = currentParent.parent;}return true;}}}