linear 功能探索
最终我们是需要使用 API 的方式,调用后端服务拉取数据填充筛选器组件,不过在探索阶段,直接用 API 方式,就需要构造 mock 数据,比较麻烦,因此先使用 Function 方式来进行功能验证。
组件初始化
新建一个页面,复制官方示例,如下:
<script setup>
import { ref } from 'vue'
import { EverrightFilter } from 'everright-filter'
import 'everright-filter/dist/style.css'
const ERfilterRef = ref(null)
const lang = ref('zh-cn')
const handleListener = ({ type, data }) => {console.log(type, data)
}
const getOptions = async () => {return new Promise((resolve, reject) => {resolve({data: {options: [],operators: {}}})})
}
const getConditions = async (params) => {return new Promise((resolve, reject) => {resolve({data: {options: [],operators: {}}})})
}
const getProps = async () => {return new Promise((resolve, reject) => {resolve({data: {}})})
}
const getPropValues = async (params) => {return new Promise((resolve, reject) => {resolve({data: {}})})
}
</script><template><div><EverrightFilter:lang="lang"@listener="handleListener":getOptions="getOptions":getConditions="getConditions":getProps="getProps":getPropValues="getPropValues"ref="ERfilterRef"/></div></template>
页面初始化效果如下:

下拉列表是空的,添加条件点击后,组件显示发生了变化,如下:

大概的界面展示效果出来了,接下来我们摸索下如何添加一个最常用的文本类筛选条件。
文本类筛选条件
经过摸索,筛选条件对应着组件的 option,因此调整 getOptions 方法,模拟一个姓名的筛选条件,如下:
const getOptions = async () => {return new Promise((resolve, reject) => {resolve({data: {options: [{label: '姓名',en_label: 'name',renderType: 'TEXT',operatorKey: 'Text',value: 'name'        }],operators: {Text: [{label: '等于',en_label: 'Equal',style: 'noop'},{label: '等于其中之一',en_label: 'Equal to one of',value: 'one_of',style: 'tags'},{label: '不等于',en_label: 'Not equal',value: 'not_equal',style: 'noop'},{label: '包含',en_label: 'Contains',value: 'contains',style: 'noop'},{label: '不包含',en_label: 'Not contain',value: 'not_contain',style: 'noop'},{label: '为空',en_label: 'Empty',value: 'empty',style: 'none'},{label: '不为空',en_label: 'Not empty',value: 'not_empty',style: 'none'}]}}})})
}
效果如下:

每个筛选条件是一个对象,用{}包裹,对象属性含义如下:
label: 中文语种下的标签名称
en_label:英文语种下的标签名称
value: 筛选条件的英文编码
renderType: 筛选条件值的输入或选择控件,可选值:CASCADER,SELECT,REGION,TEXT,NUMBER,TIME,DATE,NONE
operatorKey: 操作符的键,需要在下面的 operators 中定义,一个键对应一个操作符集合。
还有includeOperator 和 excludeOperator两个属性,可以对操作符集合进行正向或反向选取。
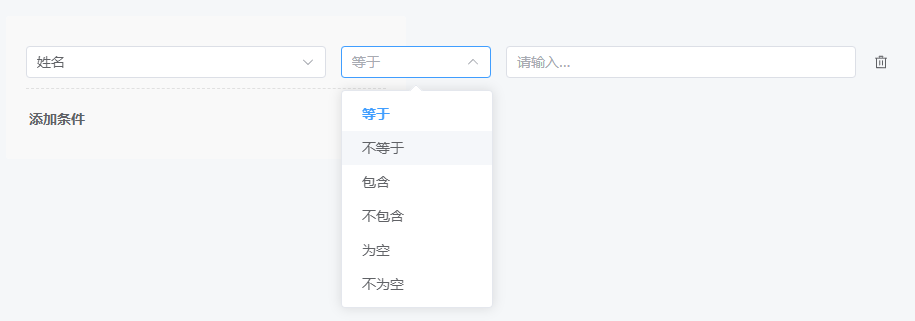
例如,上面姓名例子中,若不希望操作符出现“等于其中之一”,需按如下写法配置:
options: [{label: '姓名',en_label: 'name',renderType: 'TEXT',operatorKey: 'Text',value: 'name',excludeOperator: {operator: ['one_of']}}
]
注意 excludeOperator 后不是直接指定数组,而是加了一层 operator 节点,其中的值 one_of 对应着操作符对象属性中的 value。
调整后就从操作符列表中去除了“等于其中之一”这一项,如下:
数值类筛选条件
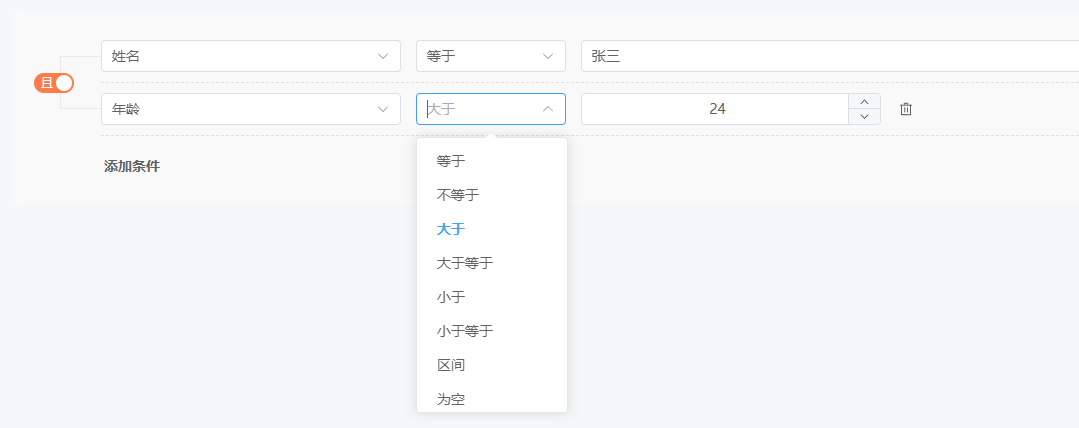
参照上述文本类的配置模式,我们添加一个数值类筛选条件:年龄,如下:
const getOptions = async () => {return new Promise((resolve, reject) => {resolve({data: {options: [{label: '姓名',en_label: 'name',renderType: 'TEXT',operatorKey: 'Text',value: 'name',excludeOperator: {operator: ['one_of']}},{label: '年龄',en_label: 'age',renderType: 'NUMBER',operatorKey: 'Number',value: 'age'}],operators: {Text: [{label: '等于',en_label: 'Equal',style: 'noop'},{label: '等于其中之一',en_label: 'Equal to one of',value: 'one_of',style: 'tags'},{label: '不等于',en_label: 'Not equal',value: 'not_equal',style: 'noop'},{label: '包含',en_label: 'Contains',value: 'contains',style: 'noop'},{label: '不包含',en_label: 'Not contain',value: 'not_contain',style: 'noop'},{label: '为空',en_label: 'Empty',value: 'empty',style: 'none'},{label: '不为空',en_label: 'Not empty',value: 'not_empty',style: 'none'}],Number: [{label: '等于',en_label: 'Equal',value: 'equal',style: 'noop'},{label: '不等于',en_label: 'Not equal',value: 'not_equal',style: 'noop'},{label: '大于',en_label: 'Greater than',value: 'greater_than',style: 'noop'},{label: '大于等于',en_label: 'Greater than or equal to',value: 'greater_than_equal',style: 'noop'},{label: '小于',en_label: 'Less than',value: 'less_than',style: 'noop'},{label: '小于等于',en_label: 'Less than or equal to',value: 'less_than_equal',style: 'noop'},{label: '区间',en_label: 'Between',value: 'between',style: 'range'},{label: '为空',en_label: 'Empty',value: 'empty',style: 'none'},{label: '不为空',en_label: 'Not empty',value: 'not_empty',style: 'none'}]}}})})
}
效果如下:
其他数据类型,如日期、时间等也大同小异,先不管细节,优先看看整体,继续说一下操作符。
操作符
在上面的探索过程中,实际已经涉及到了操作符,再具体说明下。
示例
[{label: '等于',en_label: 'Equal',value: 'equal',style: 'noop' // 无意义},{label: '等于其中之一',en_label: 'Equal to one of',value: 'one_of',style: 'tags' // 由操作符控制value为多选类型,适用于renderType CASCADER、SELECT、REGION、TEXT},{label: '为空',en_label: 'Empty',value: 'empty',style: 'none' // 不显示 value},{label: '区间',en_label: 'Between',value: 'between',style: 'range' // 由操作符控制value为区间类型,适用于renderType NUMBER、TIME、DATE}]
属性说明
label: ‘为空’,
en_label: ‘Empty’,
value: 操作符的编码,自定义
style: 样式,内置了四种
- none:不显示值控件,用于不需要值的地方,如为空、不为空等
- noop:单个值,如等于、不等于
- tags:由操作符控制 value 为多选类型,适用于 renderType 为CASCADER、SELECT、REGION、TEXT类型之一时
- range:由操作符控制 value 为区间类型,适用于 renderType 为 NUMBER、TIME、DATE 类型之一时
组件方法
我们使用数据筛选器进行灵活的自定义条件组合,最终还是需要将筛选器的结果拿到后,作为参数传给后端服务的。
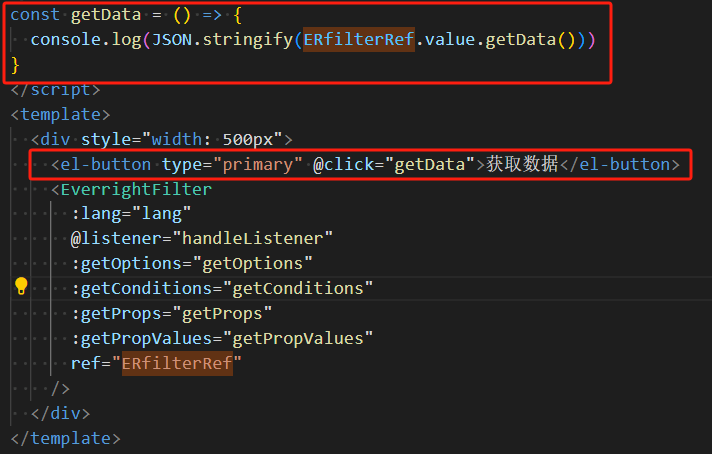
这时候就需要使用组件提供的 getData 方法了。
在页面中新加一个按钮,调用组件的获取数据方法,将数据 json 格式化后输出到控制台,如下:
我们输入两个查询条件,界面如下:

点击按钮,输出数据如下:
{"filters": [{"conditions": [{"property": "name","value": "张三"},{"operator": "greater_than","property": "age","value": 24}],"logicalOperator": "and"}],"logicalOperator": "and"
}
注意该 json 的数据结构以及最终数据和 option 和 operater 的对应关系,筛选条件 option 的 value 对应着 conditions 中的 property,操作符 operation 的 value 对应着 conditions 中的 operator,筛选条件输入的值,最终对应着 conditions 中的 vaule,然后就是组内和组件的关系设定,是 and 还是 or。
后端拿到该 json 语句后,进行解析和处理,转换成最终的 sql 语句来执行。
matrix 功能探索
有了上面 linear 的基础,matrix 就简单多了。
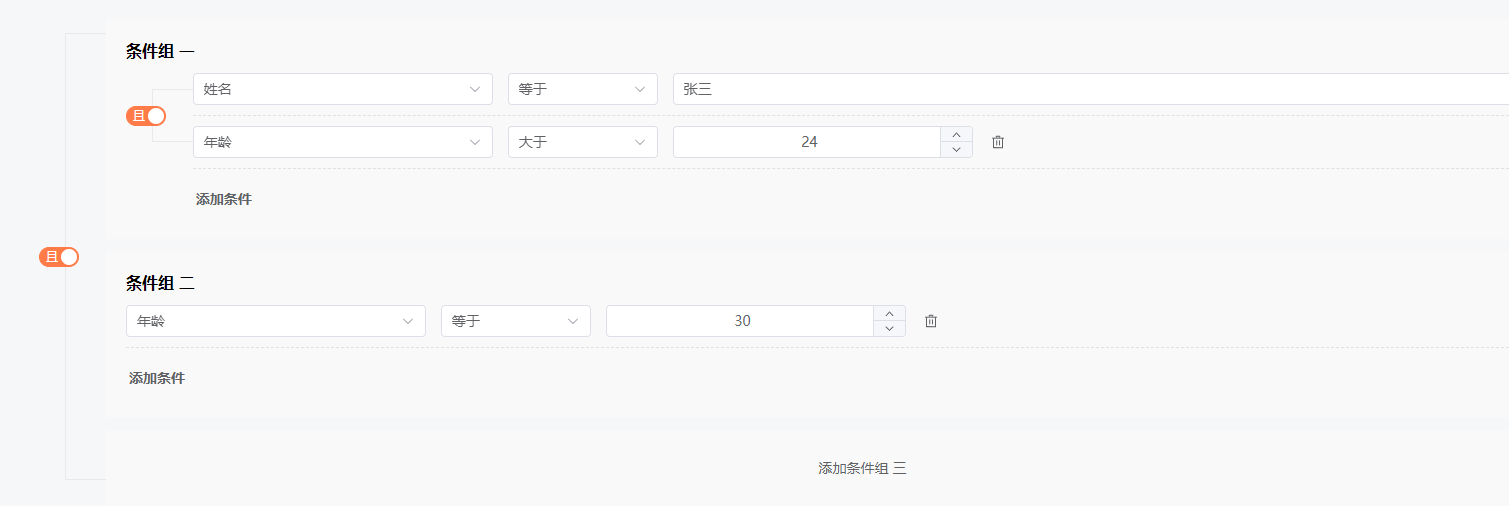
逻辑组的数量,类型为 linear 时默认只有 1 个,类型matrix则调整为了可以动态添加多个。
在原 demo 代码基础上,为筛选器组件新增一个属性 type="matrix"(默认是 linear)即可,刷新页面,效果如下:
获取到 data 结构如下:
{"filters": [{"conditions": [{"property": "name","value": "张三"},{"operator": "greater_than","property": "age","value": 24}],"logicalOperator": "and"},{"conditions": [{"operator": "equal","property": "age","value": 30}],"logicalOperator": "and"}],"logicalOperator": "and"
}
可以看到,数据结构并没有变化,只是多个逻辑分组的情况下,数据看上去更复杂了一些而已。
开源平台资料
平台名称:一二三开发平台
简介: 企业级通用开发平台
设计资料:[csdn专栏]
开源地址:[Gitee]
开源协议:MIT
如果您在阅读本文时获得了帮助或受到了启发,希望您能够喜欢并收藏这篇文章,为它点赞~
请在评论区与我分享您的想法和心得,一起交流学习,不断进步,遇见更加优秀的自己!


