使用YOLOv8(You Only Look Once)和OpenCV实现车道线和车辆检测,目标是创建一个可以检测道路上的车道并识别车辆的系统,并估计它们与摄像头的距离。该项目结合了计算机视觉技术和深度学习物体检测。
1、系统主要功能
- 车道检测:使用边缘检测和霍夫线变换检测道路车道。
- 汽车检测:使用 YOLOv8 模型识别汽车并在汽车周围绘制边界框。
- 距离估计:使用边界框大小计算检测到的汽车与摄像头的距离。
2、环境要求
- OpenCV:用于图像处理和车道检测。
- Ultralytics YOLOv8:用于车辆检测。
- NumPy:用于数组操作。
pip install opencv-python-headless numpy ultralytics
opencv-python 和 opencv-python-headless 区别是 OpenCV 的 Python 包,主要区别在于是否包含 GUI 相关的功能。
opencv-python
- 包含 GUI 功能:支持窗口显示、鼠标事件等图形界面操作。
- 依赖:需要 GUI 库(如 GTK、Qt)支持。
- 适用场景:适用于需要显示图像或与用户交互的环境,如桌面应用。
opencv-python-headless
- 不包含 GUI 功能:去除了窗口显示和用户交互功能。
- 依赖:无需 GUI 库,适合无图形界面的环境。
- 适用场景:适用于服务器或无图形界面的环境,如远程服务器、Docker 容器。
选择建议
- 如果需要显示图像或与用户交互,选择
opencv-python。 - 如果仅需图像处理且无图形界面需求,选择
opencv-python-headless。
3、代码
import cv2
import numpy as np
import math
import time
from ultralytics import YOLO  # YOLOv8 module# Function to mask out the region of interest
def region_of_interest(img, vertices):mask = np.zeros_like(img)match_mask_color = 255cv2.fillPoly(mask, vertices, match_mask_color)masked_image = cv2.bitwise_and(img, mask)return masked_image# Function to draw the filled polygon between the lane lines
def draw_lane_lines(img, left_line, right_line, color=[0, 255, 0], thickness=10):line_img = np.zeros_like(img)poly_pts = np.array([[(left_line[0], left_line[1]),(left_line[2], left_line[3]),(right_line[2], right_line[3]),(right_line[0], right_line[1])]], dtype=np.int32)# Fill the polygon between the linescv2.fillPoly(line_img, poly_pts, color)# Overlay the polygon onto the original imageimg = cv2.addWeighted(img, 0.8, line_img, 0.5, 0.0)return img# The lane detection pipeline
def pipeline(image):height = image.shape[0]width = image.shape[1]region_of_interest_vertices = [(0, height),(width / 2, height / 2),(width, height),]# Convert to grayscale and apply Canny edge detectiongray_image = cv2.cvtColor(image, cv2.COLOR_RGB2GRAY)cannyed_image = cv2.Canny(gray_image, 100, 200)# Mask out the region of interestcropped_image = region_of_interest(cannyed_image,np.array([region_of_interest_vertices], np.int32))# Perform Hough Line Transformation to detect lineslines = cv2.HoughLinesP(cropped_image,rho=6,theta=np.pi / 60,threshold=160,lines=np.array([]),minLineLength=40,maxLineGap=25)# Separating left and right lines based on slopeleft_line_x = []left_line_y = []right_line_x = []right_line_y = []if lines is None:return imagefor line in lines:for x1, y1, x2, y2 in line:slope = (y2 - y1) / (x2 - x1) if (x2 - x1) != 0 else 0if math.fabs(slope) < 0.5:  # Ignore nearly horizontal linescontinueif slope <= 0:  # Left laneleft_line_x.extend([x1, x2])left_line_y.extend([y1, y2])else:  # Right laneright_line_x.extend([x1, x2])right_line_y.extend([y1, y2])# Fit a linear polynomial to the left and right linesmin_y = int(image.shape[0] * (3 / 5))  # Slightly below the middle of the imagemax_y = image.shape[0]  # Bottom of the imageif left_line_x and left_line_y:poly_left = np.poly1d(np.polyfit(left_line_y, left_line_x, deg=1))left_x_start = int(poly_left(max_y))left_x_end = int(poly_left(min_y))else:left_x_start, left_x_end = 0, 0  # Defaults if no lines detectedif right_line_x and right_line_y:poly_right = np.poly1d(np.polyfit(right_line_y, right_line_x, deg=1))right_x_start = int(poly_right(max_y))right_x_end = int(poly_right(min_y))else:right_x_start, right_x_end = 0, 0  # Defaults if no lines detected# Create the filled polygon between the left and right lane lineslane_image = draw_lane_lines(image,[left_x_start, max_y, left_x_end, min_y],[right_x_start, max_y, right_x_end, min_y])return lane_image# Function to estimate distance based on bounding box size
def estimate_distance(bbox_width, bbox_height):# For simplicity, assume the distance is inversely proportional to the box size# This is a basic estimation, you may use camera calibration for more accuracyfocal_length = 1000  # Example focal length, modify based on camera setupknown_width = 2.0  # Approximate width of the car (in meters)distance = (known_width * focal_length) / bbox_width  # Basic distance estimationreturn distance# Main function to read and process video with YOLOv8
def process_video():# Load the YOLOv8 modelmodel = YOLO('weights/yolov8n.pt')# 或者加载官方模型# model = YOLO("yolov8n.pt")  # load an official model# Open the video filecap = cv2.VideoCapture('video/video.mp4')# Check if video opened successfullyif not cap.isOpened():print("Error: Unable to open video file.")return# Set the desired frame ratetarget_fps = 30frame_time = 1.0 / target_fps  # Time per frame to maintain 30fps# Resize to 720p (1280x720)cap.set(cv2.CAP_PROP_FRAME_WIDTH, 1280)cap.set(cv2.CAP_PROP_FRAME_HEIGHT, 720)# Loop through each framewhile cap.isOpened():ret, frame = cap.read()if not ret:break# Resize frame to 720presized_frame = cv2.resize(frame, (1280, 720))# Run the lane detection pipelinelane_frame = pipeline(resized_frame)# Run YOLOv8 to detect cars in the current frameresults = model(resized_frame)# Process the detections from YOLOv8for result in results:boxes = result.boxesfor box in boxes:x1, y1, x2, y2 = map(int, box.xyxy[0])  # Bounding box coordinatesconf = box.conf[0]  # Confidence scorecls = int(box.cls[0])  # Class ID# Only draw bounding boxes for cars with confidence >= 0.5if model.names[cls] == 'car' and conf >= 0.5:label = f'{model.names[cls]} {conf:.2f}'# Draw the bounding boxcv2.rectangle(lane_frame, (x1, y1), (x2, y2), (0, 255, 255), 2)cv2.putText(lane_frame, label, (x1, y1 - 10),cv2.FONT_HERSHEY_SIMPLEX, 0.5, (0, 255, 255), 2)# Estimate the distance of the carbbox_width = x2 - x1bbox_height = y2 - y1distance = estimate_distance(bbox_width, bbox_height)# Display the estimated distancedistance_label = f'Distance: {distance:.2f}m'cv2.putText(lane_frame, distance_label, (x1, y2 + 20),cv2.FONT_HERSHEY_SIMPLEX, 0.5, (255, 0, 0), 2)# Display the resulting frame with both lane detection and car detectioncv2.imshow('Lane and Car Detection', lane_frame)# Limit the frame rate to 30fpstime.sleep(frame_time)# Break the loop when 'q' is pressedif cv2.waitKey(1) & 0xFF == ord('q'):break# Release video capture and close windowscap.release()cv2.destroyAllWindows()# Run the video processing function
process_video()
4、工作原理
4.1 车道线检测 Pipeline
车道线检测包括一下几个步骤:
Step 1: 屏蔽感兴趣区域(ROI)
只处理图像的下半部分(车道线通常是可见的)。
def region_of_interest(img, vertices):mask = np.zeros_like(img)match_mask_color = 255cv2.fillPoly(mask, vertices, match_mask_color)masked_image = cv2.bitwise_and(img, mask)return masked_image
Step 2: 使用Canny进行边缘检测
将图像转换为灰度,并应用Canny边缘检测来突出显示边缘。
gray_image = cv2.cvtColor(image, cv2.COLOR_RGB2GRAY)
cannyed_image = cv2.Canny(gray_image, 100, 200)
Step 3: 霍夫线变换
霍夫线变换用于检测当前车道的线段。
lines = cv2.HoughLinesP(cropped_image,rho=6,theta=np.pi / 60,threshold=160,lines=np.array([]),minLineLength=40,maxLineGap=25
)
4.2 使用YOLOv8进行车辆检测
Step 1: 加载YOLOv8模型
我们使用预训练的YOLOv8模型来检测每一帧中的汽车(或者使用官方提供的模型)。
from ultralytics import YOLO
model = YOLO('weights/yolov8n.pt')
# model = YOLO('yolov8n.pt') #官方提供的模型
Step 2: 绘制边界框
对于每一辆检测到的汽车,绘制边界框,并显示类名(汽车)和置信度分数。
for box in boxes:x1, y1, x2, y2 = map(int, box.xyxy[0])conf = box.conf[0]if model.names[cls] == 'car' and conf >= 0.5:label = f'{model.names[cls]} {conf:.2f}'cv2.rectangle(lane_frame, (x1, y1), (x2, y2), (0, 255, 255), 2)cv2.putText(lane_frame, label, (x1, y1 - 10), cv2.FONT_HERSHEY_SIMPLEX, 0.5, (0, 255, 255), 2)
Step 3:. 距离估计
根据边界框的大小估计到每辆检测到的汽车的距离。
def estimate_distance(bbox_width, bbox_height):focal_length = 1000 # Example focal lengthknown_width = 2.0 # Approximate width of a car (in meters)distance = (known_width * focal_length) / bbox_widthreturn distance
Step 4:. 视频处理 Pipeline
将车道检测、车辆检测和距离估计结合到一个实时视频处理pipeline中。
while cap.isOpened():ret, frame = cap.read()if not ret:breaklane_frame = pipeline(resized_frame)results = model(resized_frame)for result in results:# Draw bounding boxes and estimate distancecv2.imshow('Lane and Car Detection', lane_frame)if cv2.waitKey(1) & 0xFF == ord('q'):break
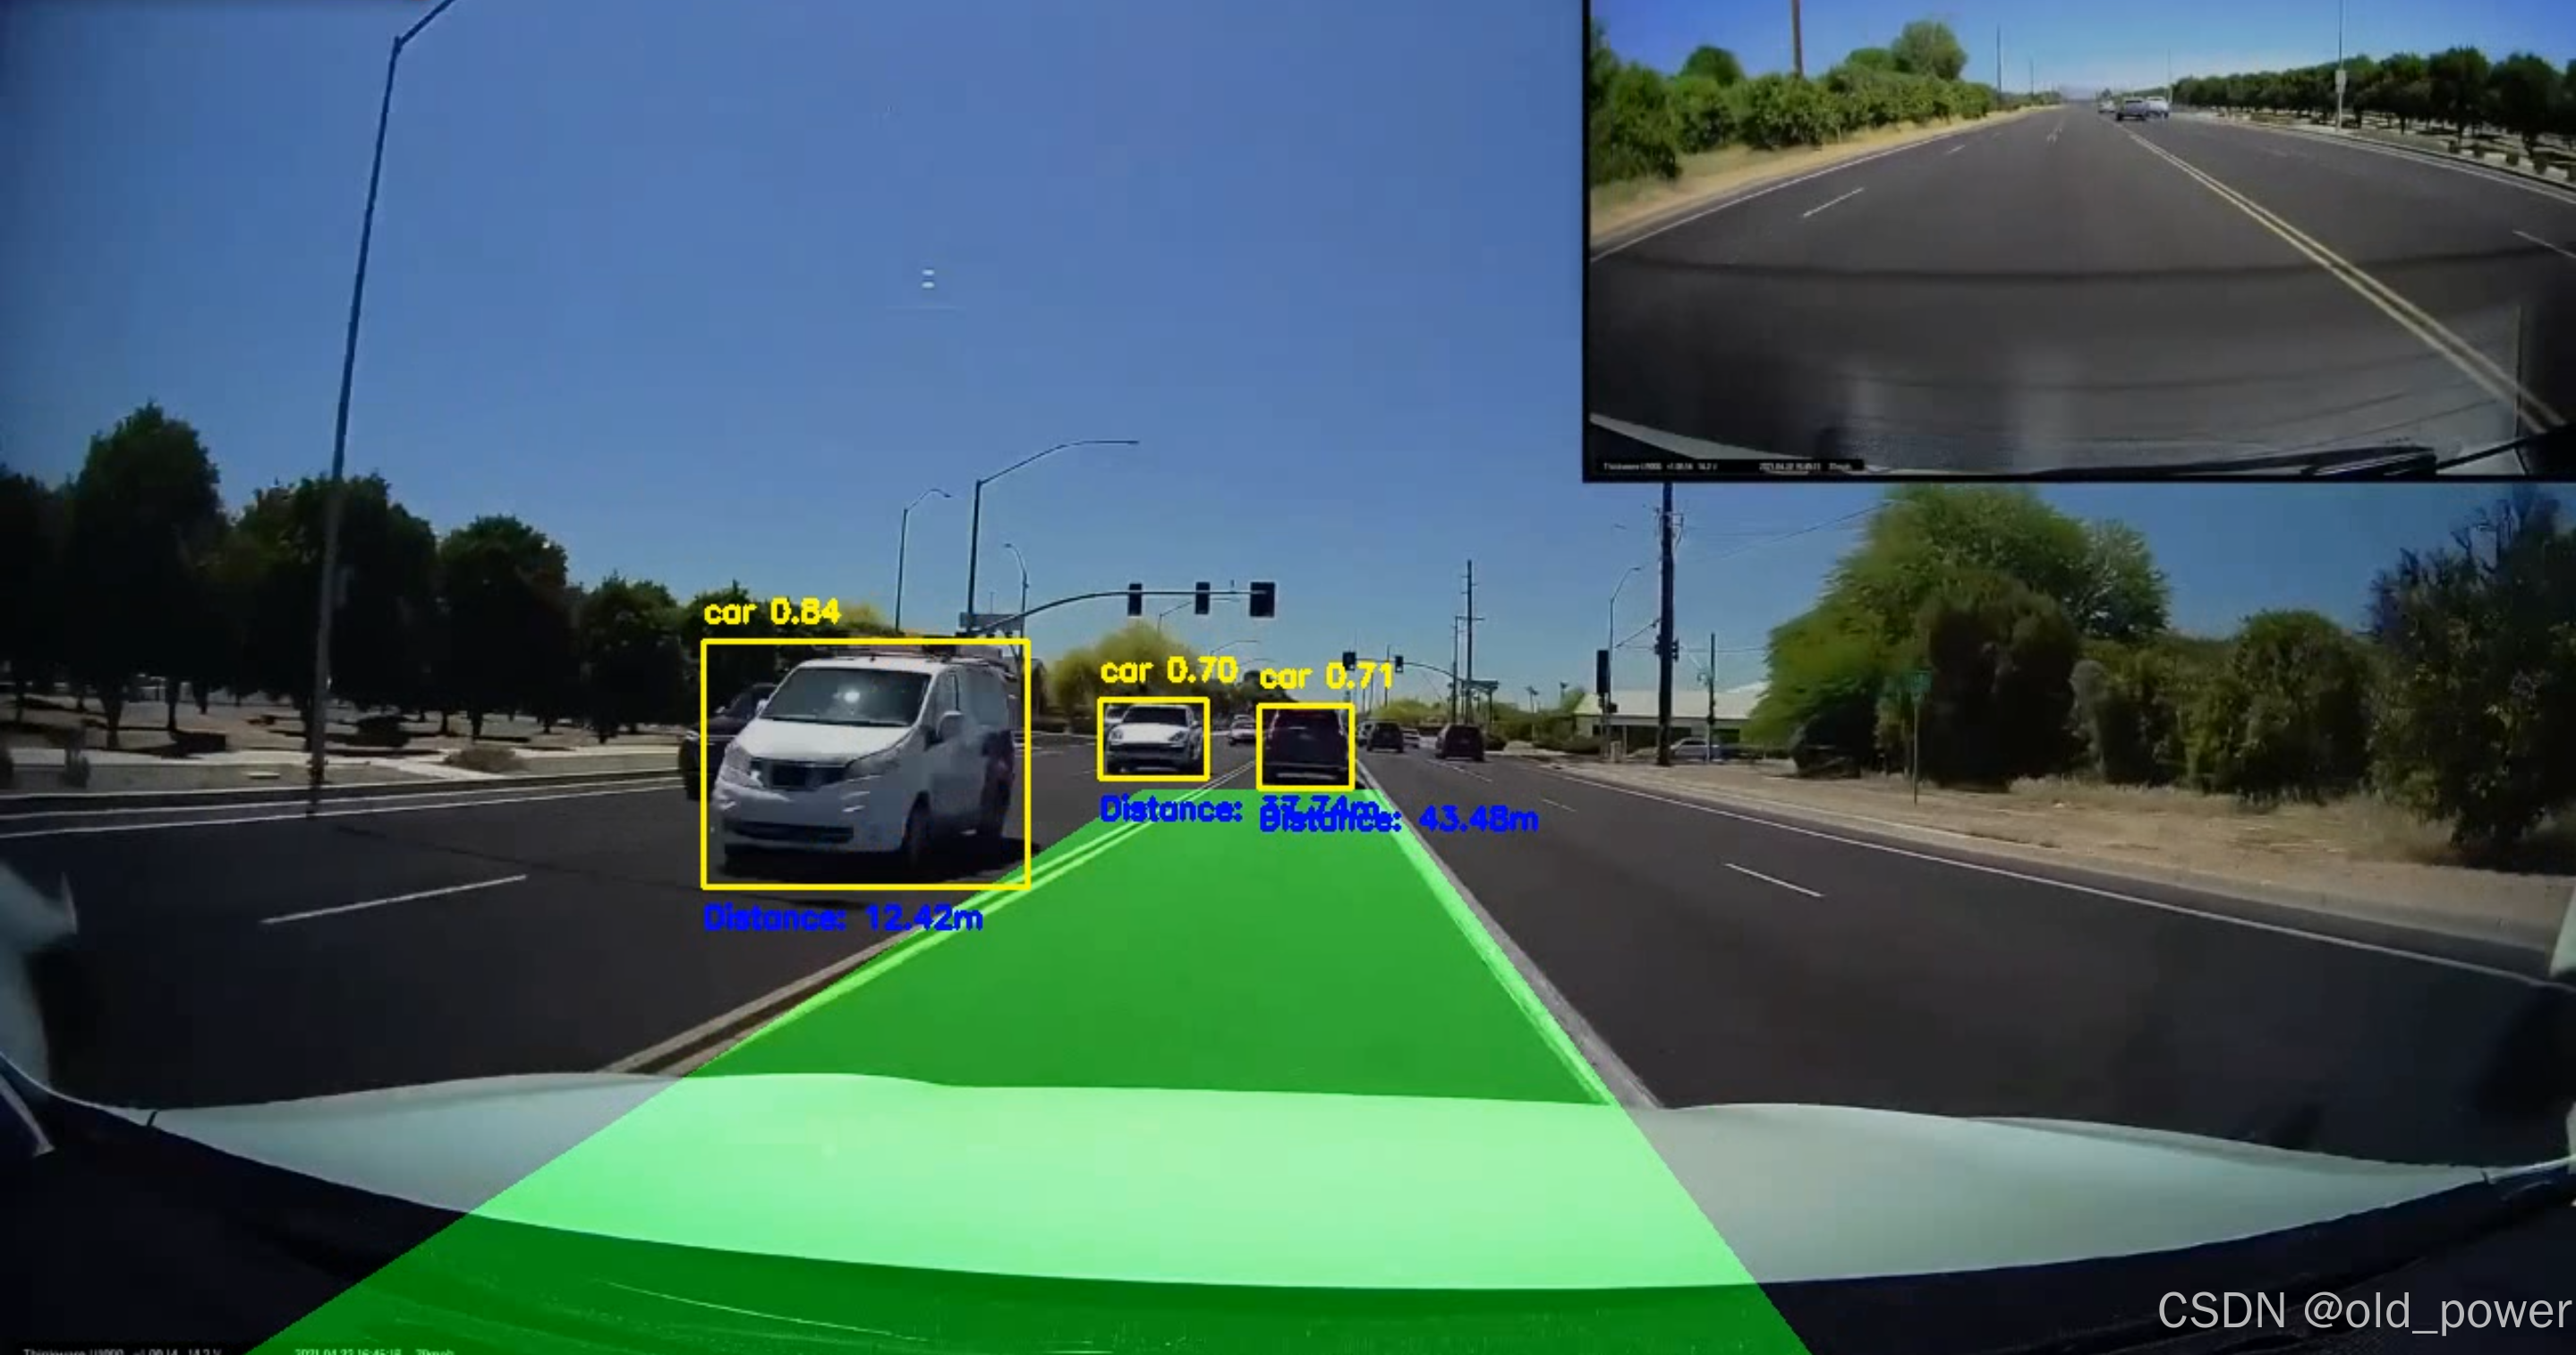
5、结果
- 项目源码地址:
https://github.com/CityIsBetter/Lane_Detection


