读完这篇文章后,你会取得什么成就?你将能够自己构建和训练大型语言模型 (LLM),同时与我一起编写代码。虽然我们正在构建一个将任何给定文本从英语翻译成马来语的 LLM,但你可以轻松地修改此 LLM 架构以用于其他语言翻译任务。
LLM 是 ChatGPT、Gemini、MetaAI、Mistral AI 等最流行的 AI 聊天机器人的核心基础。每个 LLM 的核心都有一个名为Transformer 的架构。因此,我们将首先根据著名论文“Attention is all you need”构建 Transformer 架构。
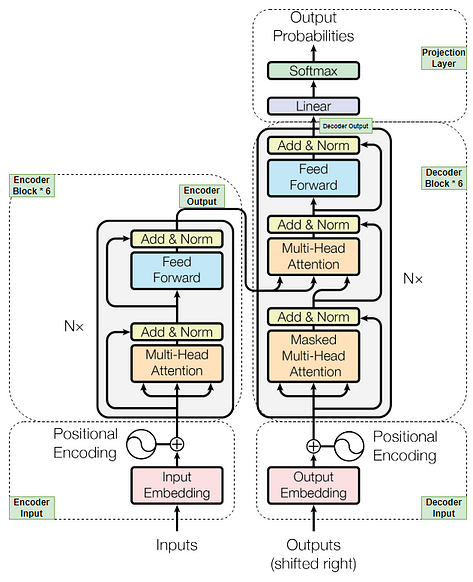
论文《Attention is all you need》中的 Transformer 架构
首先,我们将逐块构建 Transformer 模型的所有组件。然后,我们将组装所有块以构建我们的模型。之后,我们将使用从 Hugging Face 数据集中获取的数据集来训练和验证我们的模型。最后,我们将通过对新的翻译文本数据执行翻译来测试我们的模型。
重要提示:我将逐步编写 Transformer 架构中的所有组件,并提供关于什么、为什么和如何的概念的必要解释。我还会对我认为需要解释的逐行代码提供注释。这样,我相信您可以在自己编码时与整体工作流程联系起来。

让我们一起编码吧!
步骤 1:加载数据集
为了使 LLM 模型能够完成从英语翻译成汉语的任务,我们需要使用包含源语言(英语)和目标语言(汉语)对的数据集。因此,我们将使用 Huggingface 的数据集“ Helsinki-NLP/opus-100 ”。它有 100 万对英语-汉语训练数据集,足以获得良好的准确性,并且在验证和测试数据集中各有 1000 个数据。它已经预先分割,所以我们不必再次进行数据集分割。
opus-100-en-ch下载地址![]() https://download.csdn.net/download/sikh_0529/89971506
https://download.csdn.net/download/sikh_0529/89971506
#步骤1:加载数据并将其分为训练、验证和测试数据
import os
import math
import torch
import torch.nn as nn
from torch.utils.data import Dataset, DataLoader, random_split
from pathlib import Path
from datasets import load_dataset
from tqdm import tqdmif not os.path.exists("./chinesegpt"):os.mkdir("./chinesegpt")
if not os.path.exists("./tokenizer_en"):   os.mkdir("./tokenizer_en")
if not os.path.exists("./tokenizer_zh"):os.mkdir("./tokenizer_zh")device = torch.device("cuda" if torch.cuda.is_available() else "cpu")dataset = load_dataset("parquet", data_files={'train': './data/train-00000-of-00001.parquet', 'validation': './data/validation-00000-of-00001.parquet'})
train_dataset = dataset['train']
validation_dataset = dataset['validation']
raw_train_dataset, rt_to_skip = random_split(train_dataset, [4800,len(train_dataset)-4800])
raw_validation_dataset, vt_to_skip = random_split(validation_dataset, [100,len(validation_dataset)-100])
步骤 2:创建 Tokenizer
Transformer 模型不处理原始文本,它只处理数字。因此,我们必须做一些事情来将原始文本转换为数字。为此,我们将使用一种流行的标记器,称为 BPE 标记器,这是一种子词标记器,正在 GPT3 等模型中使用。我们将首先在我们在步骤 1 中准备的语料库数据(在我们的例子中是训练数据集)上训练 BPE 标记器。流程如下图所示。
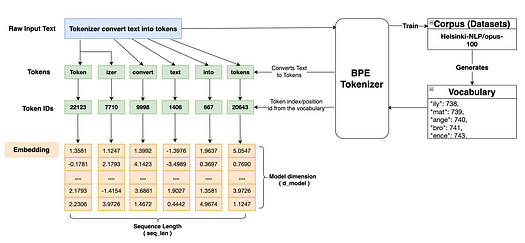
标记器流程
训练完成后,分词器会为英语和汉语生成词汇表。词汇表是来自语料库数据的唯一标记的集合。由于我们正在执行翻译任务,因此我们需要两种语言的分词器。BPE 分词器获取原始文本,将其与词汇表中的标记进行映射,并为输入原始文本中的每个单词返回一个标记。标记可以是单个单词或子词。这是子词分词器相对于其他分词器的优势之一,因为它可以克服 OOV(词汇表之外)问题。然后,分词器返回词汇表中标记的唯一索引或位置 ID,该索引或位置 ID 将进一步用于创建嵌入,如上图所示。
#步骤2:创建分词器
from tokenizers import Tokenizer
from tokenizers.models import BPE
from tokenizers.trainers import BpeTrainer
from tokenizers.pre_tokenizers import Whitespacedef get_ds_iterator(raw_train_dataset, lang):for data in raw_train_dataset:yield data['translation'][lang]# 创建源分词器 - 英文
tokenizer_en = Tokenizer(BPE(unk_token="[UNK]"))
trainer_en = BpeTrainer(min_frequency=2, special_tokens=["[PAD]","[UNK]","[CLS]", "[SEP]", "[MASK]"])
# 我们还需要添加预分词器将输入拆分成单词,因为如果没有预分词器,我们可能会得到与几个单词重叠的分词:例如,我们可以得到“there is”因为这两个词经常出现在一起,所以将它们合并为一个词。
# 使用预标记器将确保没有标记大于预标记器返回的单词。
tokenizer_en.pre_tokenizer = Whitespace()
tokenizer_en.train_from_iterator(get_ds_iterator(raw_train_dataset, "en"), trainer=trainer_en)
tokenizer_en.save("./tokenizer_en/tokenizer_en.json")# 创建目标标记器 - 汉语
tokenizer_zh = Tokenizer(BPE(unk_token="[UNK]"))
trainer_zh = BpeTrainer(min_frequency=2, special_tokens=["[PAD]","[UNK]","[CLS]", "[SEP]", "[MASK]"])
tokenizer_zh.pre_tokenizer = Whitespace()
tokenizer_zh.train_from_iterator(get_ds_iterator(raw_train_dataset, "zh"), trainer=trainer_zh)
tokenizer_zh.save("./tokenizer_zh/tokenizer_zh.json")tokenizer_en = Tokenizer.from_file("./tokenizer_en/tokenizer_en.json")
tokenizer_zh = Tokenizer.from_file("./tokenizer_zh/tokenizer_zh.json")source_vocab_size = tokenizer_en.get_vocab_size()
target_vocab_size = tokenizer_zh.get_vocab_size()# 计算源数据集和目标数据集的整个训练数据集中的最大序列长度
max_seq_len_source = 0
max_seq_len_target = 0for data in raw_train_dataset:enc_ids = tokenizer_en.encode(data['translation']['en']).idsdec_ids = tokenizer_zh.encode(data['translation']['zh']).idsmax_seq_len_source = max(max_seq_len_source, len(enc_ids))max_seq_len_target = max(max_seq_len_target, len(dec_ids))print(f'max_seqlen_source: {max_seq_len_source}')   # 根据您的情况可能有所不同
print(f'max_seqlen_target: {max_seq_len_target}')   # 根据您的情况可能有所不同# 为了使其成为我们训练的标准,我们只需采用 max_seq_len_source 并添加 20-50 即可覆盖其他标记,例如 PAD、 CLS,SEP
max_seq_len = 480
步骤 3:准备数据集和DataLoader
在此步骤中,我们将为源语言和目标语言准备一个数据集,稍后将使用该数据集来训练和验证我们将要构建的模型。我们将创建一个接收原始数据集的类,并定义一个使用源 (tokenizer_en) 和目标 (tokenizer_zh) 标记器分别对源文本和目标文本进行编码的函数。最后,我们将为训练和验证数据集创建一个 DataLoader,该 DataLoader 会分批迭代数据集(在我们的示例中,批大小将设置为 10)。批大小可以根据数据大小和可用的处理能力进行更改。
# 步骤 3:准备数据集和数据加载器# 将原始数据集转换为可由模型
class EncodeDataset(Dataset):def __init__(self, raw_dataset, max_seq_len):super().__init__()self.raw_dataset = raw_datasetself.max_seq_len = max_seq_lendef __len__(self):return len(self.raw_dataset)def __getitem__(self, index):# 获取给定索引值的包含英语和汉语的单个数据raw_text。raw_text = self.raw_dataset[index]# 按源语言和目标语言分隔文本,稍后将用于编码。source_text = raw_text['translation']['en']target_text = raw_text['translation']['zh']# 使用英语标记器对源文本进行编码,使用汉语标记器对目标文本进行编码source_text_encoded = tokenizer_en.encode(source_text).idstarget_text_encoded = tokenizer_zh.encode(target_text).ids# 使用标记器将 CLS、SEP 和 PAD 标记转换为词汇表中相应的索引 id [该 id 与任一标记器相同]CLS_ID = torch.tensor([tokenizer_zh.token_to_id("[CLS]")], dtype=torch.int64)SEP_ID = torch.tensor([tokenizer_zh.token_to_id("[SEP]")], dtype=torch.int64)PAD_ID = torch.tensor([tokenizer_zh.token_to_id("[PAD]")], dtype=torch.int64)# 为了训练模型,每个输入的序列长度应等于最大序列长度。因此,如果长度不等于最大序列长度,则会向输入序列添加额外的填充数。num_source_padding = self.max_seq_len - len(source_text_encoded) - 2num_target_padding = self.max_seq_len - len(target_text_encoded) - 1encoder_padding = torch.tensor([PAD_ID] * num_source_padding, dtype = torch.int64)decoder_padding = torch.tensor([PAD_ID] * num_target_padding, dtype = torch.int64)#encoder_input的第一个标记是句子的开头-CLS_ID,接着是源编码,然后是句末标记-SEP。#为了达到所需的max_seq_len,将在末尾添加额外的PAD令牌。encoder_input = torch.cat([CLS_ID, torch.tensor(source_text_encoded, dtype=torch.int64), SEP_ID, encoder_padding], dim=0)#decoder_input的第一个标记是句子的开头-CLS_ID,后面是目标编码。#为了达到所需的max_seq_len,将在末尾添加额外的PAD令牌。解码器输入中没有句末标记-SEP。decoder_input = torch.cat([CLS_ID, torch.tensor(target_text_encoded, dtype=torch.int64), decoder_padding ], dim=0)# 训练期间需要 target_label 进行损失计算,以比较预测标签和目标标签。# target_label 具有第一个标记作为目标编码,后跟实际目标编码。目标标签中没有句子开头标记 - CLS。# 为了达到所需的 max_seq_len,将在末尾添加额外的 PAD 标记。target_label = torch.cat([torch.tensor(target_text_encoded, dtype=torch.int64),SEP_ID,decoder_padding], dim=0)# 由于我们在输入编码中添加了额外的填充标记,因此我们不希望模型训练此标记。# 因此,我们将使用编码器掩码在编码器块中产生自注意的输出之前使填充值无效encoder_mask = (encoder_input != PAD_ID).unsqueeze(0).unsqueeze(0).int()# 我们不希望任何标记在解码阶段影响未来的标记。 因此,在掩蔽多头注意期间实施因果掩码来处理这个问题。decoder_mask = (decoder_input != PAD_ID).unsqueeze(0).unsqueeze(0).int() & causal_mask(decoder_input.size(0))return {'encoder_input': encoder_input,'decoder_input': decoder_input,'target_label': target_label,'encoder_mask': encoder_mask,'decoder_mask': decoder_mask,'source_text': source_text,'target_text': target_text}# 因果掩码将确保当前标记之后的任何标记都将被掩码,这意味着该值将被负无穷替换,并在 softmax 操作后转换为零或接近零。因此,模型将忽略这些值或无法学习任何东西。
def causal_mask(size):# 创建一个尺寸为“size x size”的方阵,并用 1 填充mask = torch.triu(torch.ones(1, size, size), diagonal = 1).type(torch.int)return mask == 0# 创建一个数据加载器用于模型训练和验证
train_ds = EncodeDataset(raw_train_dataset, max_seq_len)
val_ds = EncodeDataset(raw_validation_dataset, max_seq_len)train_dataloader = DataLoader(train_ds, batch_size = 12, shuffle = True)
val_dataloader = DataLoader(val_ds, batch_size = 1, shuffle = True)
步骤 4:输入嵌入和位置编码
输入嵌入:步骤 2 中从标记器生成的标记 ID 序列将被输入到嵌入层。嵌入层将标记 ID 映射到词汇表,并为每个标记生成一个维度为 512 的嵌入向量。[维度 512 取自注意力论文]。嵌入向量可以根据训练标记的训练数据集捕获标记的语义含义。嵌入向量内的每个维度值代表与标记相关的某种特征。例如,如果标记是狗,则某个维度值将代表眼睛、嘴巴、腿、身高等。如果我们在 n 维空间中绘制一个向量,看起来相似的物体(如狗和猫)将彼此靠近,而看起来不相似的物体(如学校和家庭)的嵌入向量将位于更远的地方。
位置编码: Transformer 架构的优点之一是它可以并行处理任意数量的输入序列,从而减少大量训练时间,并使预测速度更快。然而,一个缺点是,在并行处理许多 token 序列时,句子中 token 的位置将不按顺序排列。这可能会导致句子的含义或上下文不同,具体取决于 token 的位置。因此,为了解决这个问题,注意力论文实现了位置编码方法。本文建议在每个 token 的 512 维的索引级别上应用两个数学函数(一个是正弦,一个是余弦)。下面是简单的正弦和余弦数学函数。
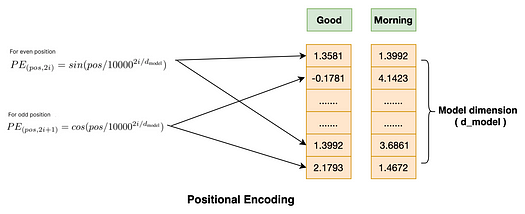
sin函数应用于每个偶数维值,而Cosine函数应用于嵌入向量的奇数维值。最后,将生成的位置编码器向量添加到嵌入向量中。现在,我们有了可以捕获标记的语义含义以及标记的位置的嵌入向量。请注意,位置编码的值在每个序列中保持不变。
import torch
import torch.nn as nn
import math# 步骤 4:输入嵌入和位置编码
class EmbeddingLayer(nn.Module):def __init__(self, d_model: int, vocab_size: int):super().__init__()self.d_model = d_model# 使用 pytorch 模型嵌入层将 token id 映射到具有 (vocab_size, d_model) 形状的嵌入向量# vocab_size 是步骤 2 中由 tokenizer 创建的训练数据的词汇量The vocab_size is the vocabulary size of the training data created by tokenizer in step 2self.embedding = nn.Embedding(vocab_size, d_model)def forward(self, input):# 除了为嵌入提供输入之外,额外乘以 d_model 的平方根是为了规范化嵌入层输出embedding_output = self.embedding(input) * math.sqrt(self.d_model)return embedding_outputclass PositionalEncoding(nn.Module):def __init__(self, d_model: int, max_seq_len: int, dropout_rate: float):super().__init__()self.dropout = nn.Dropout(dropout_rate)pe = torch.zeros(max_seq_len, d_model)pos = torch.arange(0, max_seq_len, dtype=torch.float).unsqueeze(1)div_term = torch.exp(torch.arange(0, d_model, 2).float() * (-math.log(10000.0) / d_model))pe[:, 0::2] = torch.sin(pos * div_term)pe[:, 1::2] = torch.cos(pos * div_term)# 因为我们希望分批输入句子,所以需要在 0 位置添加额外的维度来满足批号pe = pe.unsqueeze(0)self.register_buffer('pe', pe)def forward(self, input_embdding):input_embdding = input_embdding + (self.pe[:, :input_embdding.shape[1], :]).requires_grad_(False)   # to prevent from calculating gradientreturn self.dropout(input_embdding)
步骤 5:多头注意力模块
正如 Transformer 是 LLM 的核心一样,自注意力机制是 Transformer 架构的核心。
那么为什么需要自我注意力呢?让我们用下面的一个简单的例子来回答这个问题。

在句子 1和句子2,单词“银行”显然有两个不同的含义。然而,“银行”在两个句子中是相同的。这不是正确的事物。我们希望嵌入值能够根据句子的上下文而改变。因此,我们需要一种机制,其中嵌入值可以动态改变,以根据句子的整体含义给出上下文含义. 自注意力机制可以根据句子动态地更新表示上下文含义的 embedding 值。
如果自注意力机制已经如此出色,为什么我们还需要多头自注意力机制?让我们看下面的另一个例子来找出答案。

在这个例子中,如果我们使用自注意力,它可能只关注句子的一个方面,可能只是一个“什么”方面,因为它只能捕获“约翰做了什么?”。然而,其他方面,如“何时”或“何地”,对于模型更好的表现也同样重要。所以,我们需要找到一种方法让自注意力机制一次学习一个句子中的多种关系。因此,这就是多头自注意力(多头注意力可以互换使用)的用武之地。在多头注意力中,单头嵌入将被分成多个头,以便每个头将研究句子的不同方面并相应地学习。这正是我们想要的。
现在,我们知道了为什么需要多头注意力。让我们看看如何实现。多头注意力实际上是如何工作的?让我们深入研究一下。
如果你熟悉矩阵乘法,那么理解该机制对你来说是一件非常容易的事情。让我们先看一下整个流程图,我将在下面逐点描述中解释多头注意力从输入到输出的流程。
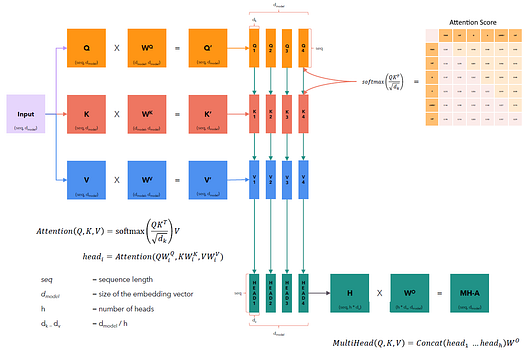
图片来源:https://github.com/hkproj/transformer 从头笔记开始
1. 首先,让我们制作 3 个编码器输入副本(输入嵌入和位置编码的组合,我们在步骤 4 中已经完成了)。让我们给它们每个起一个名字 Q、K 和 V。它们每个都只是编码器输入的一个副本。编码器输入形状:(seq_len,d_model),seq_len:最大序列长度,d_model:嵌入向量维度在本例中为 512。
2. 接下来,我们将对 Q 和权重 W_q、K 和权重 W_k 以及 V 和权重 W_v 进行矩阵乘法。每个权重矩阵的形状为 (d_model, d_model)。生成的新查询、键和值嵌入向量的形状为 (seq_len, d_model)。权重参数将由模型随机初始化,稍后将在模型开始训练时更新。为什么我们首先需要权重矩阵乘法?因为这些是查询、键和值嵌入向量需要的可学习参数,以提供更好的表示。
3. 根据注意力论文,头部数量为 8。每个新的查询、键和值嵌入向量将被划分为 8 个较小的查询、键和值嵌入向量单元。嵌入向量的新形状为 (seq_len, d_model/num_heads) 或 (seq_len, d_k)。[ d_k = d_model/num_heads ]。
4. 每个查询嵌入向量将对其自身的关键嵌入向量的转置以及序列中所有其他嵌入向量执行点积运算。此点积给出注意力分数。注意力分数显示给定标记与给定输入序列中所有其他标记的相似程度。分数越高,相似度越高。
- 然后,注意力得分将除以 d_k 的平方根,这是对矩阵中的分数值进行归一化所必需的。但为什么必须除以 d_k 才能归一化,它可以是任何其他数字。主要原因是,随着嵌入向量维数的增加,注意力矩阵中的总方差会成比例增加。这就是为什么除以 d_k 会平衡方差的增加。如果我们不除以 d_k,对于任何给定的较高注意力得分,softmax 函数将给出一个非常高的概率值,同样,对于任何低注意力得分值,softmax 函数将给出一个非常低的概率值。这最终会使模型只关注学习具有这些概率值的特征而忽略具有较低概率值的特征,这将导致梯度消失。因此,对注意力得分矩阵进行归一化是非常必要的。
- 在执行 softmax 函数之前,如果编码器掩码不为 None,则注意力得分将与编码器掩码进行矩阵乘法。如果掩码是因果掩码,则输入序列中位于其后的嵌入标记的注意力得分值将被 -ve 无穷大替换。softmax 函数将 -ve 无穷大值转换为接近零的值。因此,模型将不会学习当前标记之后的那些特征。这就是我们可以防止未来标记影响我们的模型学习的方法。
5. 然后将 softmax 函数应用于注意力分数矩阵并输出形状为 (seq_len, seq_len) 的权重矩阵。
6. 然后,这些权重矩阵将与相应的值嵌入向量进行矩阵乘法。这将产生 8 个具有形状 (seq_len, d_v) 的注意力头。[ d_v = d_model/num_heads ]。
7. 最后,所有 head 将被连接成一个具有新形状 (seq_len, d_model) 的单个 Head。这个新的单个 head 将与输出权重矩阵 W_o (d_model, d_model) 进行矩阵乘法。多头注意力的最终输出代表单词的上下文含义以及学习输入句子的多个方面的能力。
有了它,让我们开始编写更简单、更简短的多头注意力块。
# Step 5: Multihead Attention
class MultiHeadAttention(nn.Module):def __init__(self, d_model: int, num_heads: int, dropout_rate: float):super().__init__()# Defining dropout to prevent overfittingself.dropout = nn.Dropout(dropout_rate)self.num_heads = num_headsassert d_model % num_heads == 0, "d_model must be divisible by number of heads"# d_k is the new dimension of each self attention headsself.d_k = d_model // num_heads# Weight matrix are defined which are all learnable parametersself.W_q = nn.Linear(d_model, d_model, bias=False)self.W_k = nn.Linear(d_model, d_model, bias=False)self.W_v = nn.Linear(d_model, d_model, bias=False)self.W_o = nn.Linear(d_model, d_model, bias=False)def forward(self, q, k, v, encoder_mask):# Please note that we'll be training our model with not just a single sequence but rather batches of sequence, hence we'll include batch_size in the shape# query, Key and value are calculated by matrix multiplication of corresponding weights with the input embeddings# Change of shape: q(batch_size, seq_len, d_model) @ W_q(d_model, d_model) => query(batch_size, seq_len, d_model) [same goes to key and value]query = self.W_q(q)key = self.W_k(k)value = self.W_v(v)# Dividing query, key and value into number of heads, hence new dimenstion will be d_k.# Change of shape: query(batch_size, seq_len, d_model) => query(batch_size, seq_len, num_heads, d_k) -> query(batch_size,num_heads, seq_len,d_k) [same goes to key and value]query = query.view(query.shape[0], query.shape[1], self.num_heads ,self.d_k).transpose(1,2)key = key.view(key.shape[0], key.shape[1], self.num_heads ,self.d_k).transpose(1,2)value = value.view(value.shape[0], value.shape[1], self.num_heads ,self.d_k).transpose(1,2)# :: SELF ATTENTION BLOCK STARTS ::# Attention score is calculated to find the similarity or relation of query with key of itself and all other embedding in the sequence#  Change of shape: query(batch_size,num_heads, seq_len,d_k) @ key(batch_size,num_heads, seq_len,d_k) => attention_score(batch_size,num_heads, seq_len,seq_len)attention_score = (query @ key.transpose(-2,-1))/math.sqrt(self.d_k)# If mask is provided the attention score needs to modify as per the mask value. Refer to the details in point no 4.if encoder_mask is not None:attention_score.masked_fill_(encoder_mask==0, -1e9)# Softmax operation calculates the probability distribution among all the attention scores. This will determine which embedding is more similar to the given query embedding and assign the attention weight accordingly.# Change of shape: same as attention_scoreattention_score = attention_score.softmax(dim=-1)if self.dropout is not None:attention_score = self.dropout(attention_score)# Final step of Self attention block is to matrix multiplication of attention_weight with value embedding.# Change of shape: attention_score(batch_size,num_heads, seq_len,seq_len) @  value(batch_size,num_heads, seq_len,d_k) => attention_output(batch_size,num_heads, seq_len,d_k)attention_output = attention_score @ value# :: SELF ATTENTION BLOCK ENDS ::# Now, all the heads will be concated back to for a single head# Change of shape:attention_output(batch_size,num_heads, seq_len,d_k) => attention_output(batch_size,seq_len,num_heads,d_k) => attention_output(batch_size,seq_len,d_model)attention_output = attention_output.transpose(1,2).contiguous().view(attention_output.shape[0], -1, self.num_heads * self.d_k)# Finally attention_output is matrix multiplied with output weight matrix to give the final Multi-Head attention output.# The shape of the multihead_output is same as the embedding input# Change of shape: attention_output(batch_size,seq_len,d_model) @ W_o(d_model, d_model) => multihead_output(batch_size, seq_len, d_model)multihead_output = self.W_o(attention_output)return multihead_output
步骤 6:前馈网络、层归一化和 AddAndNorm
前馈网络:前馈网络使用深度神经网络来学习两个线性层(第一层有 d_model 节点,第二层有 d_ff 节点,根据注意力论文分配值)中嵌入向量的所有特征,并且将 ReLU 激活函数应用于第一线性层的输出,为嵌入值提供非线性,并应用 dropout 以进一步避免过度拟合。
层归一化:我们对嵌入值应用层规范化,以确保网络中嵌入向量的值分布保持一致。这确保了学习的顺利进行。我们将使用称为 gamma 和 beta 的额外学习参数根据网络需要缩放和移动嵌入值。
AddAndNorm:这由一个跳跃连接和一个分层归一化(前面已解释)组成。在前向传播过程中,跳跃连接确保前一层的特征在后续阶段仍能被记住,从而在计算输出时做出必要的贡献。同样,在反向传播过程中,跳跃连接通过在每个阶段少执行一次反向传播来确保防止梯度消失。AddAndNorm 在编码器(2 次)和解码器块(3 次)中均有使用。它从前一层获取输入并首先对其进行归一化,然后将其添加到前一层的输出中。
# Step 6: Feedfoward Network, Layer Normalization and AddAndNormclass FeedForward(nn.Module):def __init__(self, d_model: int, d_ff: int, dropout_rate: float):super().__init__()self.dropout = nn.Dropout(dropout_rate)self.layer_1 = nn.Linear(d_model, d_ff)self.layer_2 = nn.Linear(d_ff, d_model)def forward(self, input):return self.layer_2(self.dropout(torch.relu(self.layer_1(input))))class LayerNorm(nn.Module):# def __init__(self, features:int=512, eps: float = 1e-5):def __init__(self, eps: float = 1e-5):super().__init__()# epsilon is a very small value and is plays an important role to avoid division by zero problemself.eps = eps#Extra learning parameters gamma and beta are introduced to scale and shift the embedding value as the network needed.self.gamma = nn.Parameter(torch.ones(512)) # 512 = advisable to initialize with same number as d_modelself.beta = nn.Parameter(torch.zeros(512))def forward(self, input):mean = input.mean(dim = -1, keepdim=True)std = input.std(dim = -1, keepdim=True)return self.gamma * (input - mean)/(std + self.eps) + self.betaclass AddAndNorm(nn.Module):def __init__(self, dropout_rate: float):super().__init__()self.dropout = nn.Dropout(dropout_rate)self.layer_norm = LayerNorm()def forward(self, input, sub_layer):return input + self.dropout(sub_layer(self.layer_norm(input)))步骤 7:编码器块和编码器
编码器块:编码器块内部有两个主要组件:多头注意力和前馈。还有 2 个 Add 和 Norm 单元。我们将首先按照 Attention 论文中的流程在 EncoderBlock 类中组装所有这些组件。根据论文,此编码器块已重复 6 次。
编码器:然后我们将创建一个名为 Encoder 的附加类,它将获取 EncoderBlock 堆栈列表并给出最终的编码器输出。
#Step 7: Encoder block and Encoderclass EncoderBlock(nn.Module):# def __init__(self, features: int, self_attention_block: MultiHeadAttention, feed_forward_block: FeedForward, dropout_rate: float) -> None:def __init__(self, multihead_attention: MultiHeadAttention, feed_forward: FeedForward, dropout_rate: float) -> None:super().__init__()self.multihead_attention = multihead_attentionself.feed_forward = feed_forwardself.addnorm_1 = AddAndNorm(dropout_rate)self.addnorm_2 = AddAndNorm(dropout_rate)def forward(self, encoder_input, encoder_mask):# First AddAndNorm unit taking encoder input from skip connection and adding it with the output of MultiHead attention blockencoder_input = self.addnorm_1(encoder_input, lambda encoder_input: self.multihead_attention(encoder_input, encoder_input, encoder_input, encoder_mask))# Second AddAndNorm unit taking output of MultiHead attention block from skip connection and adding it with the output of Feedforward layerencoder_input = self.addnorm_2(encoder_input, self.feed_forward)return encoder_inputclass Encoder(nn.Module):def __init__(self, encoderblocklist: nn.ModuleList) -> None:super().__init__()# Encoder class initialized by taking encoderblock listself.encoderblocklist = encoderblocklistself.layer_norm = LayerNorm()def forward(self, encoder_input, encoder_mask):# Looping through all the encoder block - 6 timesfor encoderblock in self.encoderblocklist:encoder_input = encoderblock(encoder_input, encoder_mask)# Normalize the final encoder block output and return. This encoder output will be used later on as key and value for the cross attention in decoder blockencoder_output = self.layer_norm(encoder_input)return encoder_output步骤 8:解码器块、解码器和投影层
解码器块:解码器块中有三个主要组件:Masked Multi-Head Attention、Multi-Head Attention 和 Feedforward。解码器块还有 3 个 Add 和 Norm 单元。我们将按照 Attention 论文中的流程在 DecoderBlock 类中组装所有这些组件。根据论文,这个解码器块已经重复了 6 次。
解码器:我们将创建一个名为 Decoder 的附加类,它将获取 DecoderBlock 列表、将其堆叠,并给出最终的解码器输出。
解码器块中有两种类型的多头注意力。第一种是屏蔽多头注意力。它将解码器输入作为查询、键和值以及解码器掩码(也称为因果掩码)。因果掩码可防止模型查看序列顺序中领先的嵌入。其工作原理的详细说明请参见步骤 3 和步骤 5。
投影层:最终的解码器输出将被传递到投影层。在此层中,解码器输出将首先输入到线性层,其中嵌入的形状将按照下面的代码部分提供的方式发生变化。随后,softmax 函数将解码器输出转换为词汇表上的概率分布,并选择概率最高的标记作为预测输出。
#Step 8: Decoder block and decoder and the projectionclass DecoderBlock(nn.Module):# def __init__(self, features: int, self_attention_block: MultiHeadAttention, cross_attention_block: MultiHeadAttention, feed_forward_block: FeedForward, dropout_rate: float) -> None:def __init__(self, masked_multihead_attention: MultiHeadAttention, cross_multihead_attention: MultiHeadAttention, feed_forward: FeedForward, dropout_rate: float) -> None:super().__init__()self.masked_multihead_attention = masked_multihead_attentionself.cross_multihead_attention = cross_multihead_attentionself.feed_forward = feed_forwardself.addnorm_1 = AddAndNorm(dropout_rate)self.addnorm_2 = AddAndNorm(dropout_rate)self.addnorm_3 = AddAndNorm(dropout_rate)def forward(self, decoder_input, encoder_output, encoder_mask, decoder_mask):# First AddAndNorm unit taking decoder input from skip connection and adding it with the output of Masked Multi-Head attention blockdecoder_input = self.addnorm_1(decoder_input, lambda decoder_input: self.masked_multihead_attention(decoder_input, decoder_input, decoder_input, decoder_mask))# Second AddAndNorm unit taking output of Masked Multi-Head attention block from skip connection and adding it with the output of MultiHead attention blockdecoder_input = self.addnorm_2(decoder_input, lambda decoder_input: self.cross_multihead_attention(decoder_input, encoder_output, encoder_output, encoder_mask))# Third AddAndNorm unit taking output of MultiHead attention block from skip connection and adding it with the output of Feedforward layerdecoder_input = self.addnorm_3(decoder_input, self.feed_forward)return decoder_inputclass Decoder(nn.Module):# def __init__(self, features: int, layers: nn.ModuleList) -> None:def __init__(self, decoderblocklist: nn.ModuleList) -> None:super().__init__()self.decoderblocklist = decoderblocklistself.layer_norm = LayerNorm()def forward(self, decoder_input, encoder_output, encoder_mask, decoder_mask):for decoderblock in self.decoderblocklist:decoder_input = decoderblock(decoder_input, encoder_output, encoder_mask, decoder_mask)decoder_output = self.layer_norm(decoder_input)return decoder_outputclass ProjectionLayer(nn.Module):def __init__(self, d_model, vocab_size) -> None:super().__init__()self.projection_layer = nn.Linear(d_model, vocab_size)def forward(self, decoder_output) -> None:# Projection layer first take in decoder output and feed into the linear layer of shape (d_model, vocab_size)#Change in shape: decoder_output(batch_size, seq_len, d_model) @ linear_layer(d_model, vocab_size) => output(batch_size, seq_len, vocab_size)output = self.projection_layer(decoder_output)return output步骤 9:创建并构建 Transformer
最后,我们完成了 Transformer 架构中所有组件块的构建。唯一未完成的任务是将它们组装在一起。
首先,我们创建一个Transformer 类,它将初始化所有组件类的实例。在 Transformer 类中,我们首先定义编码函数,该函数执行 Transformer 编码器部分的所有任务并生成编码器输出。
其次,我们定义一个解码函数,它完成 Transformer 的解码器部分的所有任务并生成解码器输出。
第三,我们定义一个投影函数,它接收解码器输出并将输出映射到词汇表进行预测。
现在,Transformer 架构已准备就绪。我们现在可以构建翻译 LLM 模型,方法是定义一个函数,该函数接受以下代码中给出的所有必要参数。
#Step 9: Create and build Transfomerclass Transformer(nn.Module):def __init__(self, encoder: Encoder, decoder: Decoder, source_embed: EmbeddingLayer, target_embed: EmbeddingLayer, source_pos: PositionalEncoding, target_pos: PositionalEncoding, projection_layer: ProjectionLayer) -> None:super().__init__()self.source_embed = source_embedself.source_pos = source_posself.encoder = encoderself.target_embed = target_embedself.target_pos = target_posself.decoder = decoderself.projection_layer = projection_layerdef encode(self, encoder_input, encoder_mask):encoder_input = self.source_embed(encoder_input)encoder_input = self.source_pos(encoder_input)encoder_output = self.encoder(encoder_input, encoder_mask)return encoder_outputdef decode(self, encoder_output, encoder_mask, decoder_input, decoder_mask):decoder_input = self.target_embed(decoder_input)decoder_input = self.target_pos(decoder_input)decoder_output = self.decoder(decoder_input, encoder_output, encoder_mask, decoder_mask)return decoder_outputdef project(self, decoder_output):return self.projection_layer(decoder_output)def build_model(source_vocab_size: int, target_vocab_size: int, source_seq_len: int, target_seq_len: int, d_model: int=512, num_blocks: int=6, num_heads: int=8, dropout_rate: float=0.1, d_ff: int=2048) -> Transformer:# Create the embedding layerssource_embed = EmbeddingLayer(d_model, source_vocab_size)target_embed = EmbeddingLayer(d_model, target_vocab_size)# Create the positional encoding layerssource_pos = PositionalEncoding(d_model, source_seq_len, dropout_rate)target_pos = PositionalEncoding(d_model, target_seq_len, dropout_rate)# Create the encoder-block-listencoderblocklist = []for _ in range(num_blocks):multihead_attention = MultiHeadAttention(d_model, num_heads, dropout_rate)feed_forward = FeedForward(d_model, d_ff, dropout_rate)encoder_block = EncoderBlock(multihead_attention, feed_forward, dropout_rate)encoderblocklist.append(encoder_block)# Create the encoderencoder = Encoder(nn.ModuleList(encoderblocklist))# Create the decoder-block-listdecoderblocklist = []for _ in range(num_blocks):masked_multihead_attention = MultiHeadAttention(d_model,num_heads, dropout_rate)cross_multihead_attention = MultiHeadAttention(d_model, num_heads, dropout_rate)feed_forward = FeedForward(d_model, d_ff, dropout_rate)decoder_block = DecoderBlock(masked_multihead_attention, cross_multihead_attention, feed_forward, dropout_rate)decoderblocklist.append(decoder_block)# Create the decoderdecoder = Decoder(nn.ModuleList(decoderblocklist))# Create the projection layerprojection_layer = ProjectionLayer(d_model, target_vocab_size)# Now that we've initialized all the required blocks of transformer, we can now inititiate a modelmodel = Transformer(encoder, decoder, source_embed, target_embed, source_pos, target_pos, projection_layer)# For the first time, we'll initialize the model parameters using xavier uniform method. Once training begings the parameters will be updated by the networkfor p in model.parameters():if p.dim() > 1:nn.init.xavier_uniform_(p)return model# Let's build the the final model.
model = build_model(tokenizer_en.get_vocab_size(), tokenizer_zh.get_vocab_size(),max_seq_len, max_seq_len, d_model=512).to(device)# Let's look at the architecture that we've just build ourself
print(model)Transformer((source_embed): EmbeddingLayer((embedding): Embedding(9326, 512))(source_pos): PositionalEncoding((dropout): Dropout(p=0.1, inplace=False))(encoder): Encoder((encoderblocklist): ModuleList((0-5): 6 x EncoderBlock((multihead_attention): MultiHeadAttention((dropout): Dropout(p=0.1, inplace=False)(W_q): Linear(in_features=512, out_features=512, bias=False)(W_k): Linear(in_features=512, out_features=512, bias=False)(W_v): Linear(in_features=512, out_features=512, bias=False)(W_o): Linear(in_features=512, out_features=512, bias=False))(feed_forward): FeedForward((dropout): Dropout(p=0.1, inplace=False)(layer_1): Linear(in_features=512, out_features=2048, bias=True)(layer_2): Linear(in_features=2048, out_features=512, bias=True))(addnorm_1): AddAndNorm((dropout): Dropout(p=0.1, inplace=False)(layer_norm): LayerNorm())(addnorm_2): AddAndNorm((dropout): Dropout(p=0.1, inplace=False)(layer_norm): LayerNorm())))(layer_norm): LayerNorm())(target_embed): EmbeddingLayer((embedding): Embedding(13004, 512))(target_pos): PositionalEncoding((dropout): Dropout(p=0.1, inplace=False))(decoder): Decoder((decoderblocklist): ModuleList((0-5): 6 x DecoderBlock((masked_multihead_attention): MultiHeadAttention((dropout): Dropout(p=0.1, inplace=False)(W_q): Linear(in_features=512, out_features=512, bias=False)(W_k): Linear(in_features=512, out_features=512, bias=False)(W_v): Linear(in_features=512, out_features=512, bias=False)(W_o): Linear(in_features=512, out_features=512, bias=False))(cross_multihead_attention): MultiHeadAttention((dropout): Dropout(p=0.1, inplace=False)(W_q): Linear(in_features=512, out_features=512, bias=False)(W_k): Linear(in_features=512, out_features=512, bias=False)(W_v): Linear(in_features=512, out_features=512, bias=False)(W_o): Linear(in_features=512, out_features=512, bias=False))(feed_forward): FeedForward((dropout): Dropout(p=0.1, inplace=False)(layer_1): Linear(in_features=512, out_features=2048, bias=True)(layer_2): Linear(in_features=2048, out_features=512, bias=True))(addnorm_1): AddAndNorm((dropout): Dropout(p=0.1, inplace=False)(layer_norm): LayerNorm())(addnorm_2): AddAndNorm((dropout): Dropout(p=0.1, inplace=False)(layer_norm): LayerNorm())(addnorm_3): AddAndNorm((dropout): Dropout(p=0.1, inplace=False)(layer_norm): LayerNorm())))(layer_norm): LayerNorm())(projection_layer): ProjectionLayer((projection_layer): Linear(in_features=512, out_features=13004, bias=True)) )
步骤 10:训练和验证我们构建的 LLM 模型
现在是时候训练我们的模型了。训练过程非常简单。我们将使用在步骤 3 中创建的训练 DataLoader。由于总训练数据集数量为 100 万,我强烈建议在 GPU 设备上训练我们的模型。我花了大约 5 小时完成 20 个 epoch。每个 epoch 之后,我们将保存模型权重以及优化器状态,这样就可以更容易地从停止之前的点恢复训练,而不是从头开始恢复。
每次迭代后,我们都会使用验证 DataLoader 启动一次验证。验证数据集的大小为 2000,这非常合理。在验证过程中,我们只需要计算一次编码器输出,直到解码器输出获得句末标记 [SEP],这是因为在解码器获得 [SEP] 标记之前,我们必须一次又一次地发送相同的编码器输出,这毫无意义
解码器输入将首先从句子标记 [CLS] 的开头开始。每次预测后,解码器输入将附加下一个生成的标记,直到到达句子标记 [SEP] 的结尾。最后,投影层将输出映射到相应的文本表示。
#Step 10: Training and Validation of chineseGPTdef run_validation(model, validation_ds, tokenizer_en, tokenizer_zh, max_seq_len, device, print_msg, global_step):model.eval()count = 0with torch.no_grad():for batch in validation_ds:count += 1encoder_input = batch["encoder_input"].to(device)encoder_mask = batch["encoder_mask"].to(device)cls_id = tokenizer_zh.token_to_id('[CLS]')sep_id = tokenizer_zh.token_to_id('[SEP]')# Computing the output of the encoder for the source sequenceencoder_output = model.encode(encoder_input, encoder_mask)# for prediction task, the first token that goes in decoder input is the [CLS] tokendecoder_input = torch.empty(1, 1).fill_(cls_id).type_as(encoder_input).to(device)# since we need to keep adding the output back to the input until the [SEP] - end token is received.while True:# check if the max length is receivedif decoder_input.size(1) == max_seq_len:break# recreate mask each time the new output is added the decoder input for next token predictiondecoder_mask = causal_mask(decoder_input.size(1)).type_as(encoder_mask).to(device)# apply projection only to the next tokenout = model.decode(encoder_output, encoder_mask, decoder_input, decoder_mask)# apply projection only to the next tokenprob = model.project(out[:, -1])# select the token with highest probablity which is a greedy search implementation_, next_word = torch.max(prob, dim=1)decoder_input = torch.cat([decoder_input, torch.empty(1, 1).type_as(encoder_input).fill_(next_word.item()).to(device)], dim=1)# check if the new token is the end of tokenif next_word == sep_id:break# final output is the concatinated decoder input till the end token is reachedmodel_out = decoder_input.squeeze(0)source_text = batch["source_text"][0]target_text = batch["target_text"][0]model_out_text = tokenizer_zh.decode(model_out.detach().cpu().numpy())# Print the source, target and model outputprint_msg('-'*55)# print_msg(f"{f'SOURCE: ':>12}{source_text}")# print_msg(f"{f'TARGET: ':>12}{target_text}")# print_msg(f"{f'PREDICTED: ':>12}{model_out_text}")print_msg(f'Source Text: {source_text}')print_msg(f'Target Text: {target_text}')print_msg(f'Predicted by ChineseGPT: {model_out_text}')if count == 2:breakdef train_model(preload_epoch=None):# The entire training, validation cycle will run for 20 cycles or epochs.EPOCHS = 10initial_epoch = 0global_step = 0# Adam is one of the most commonly used optimization algorithms that hold the current state and will update the parameters based on the computed gradients.optimizer = torch.optim.AdamW(model.parameters(), lr=2e-4, eps=1e-9)# If the preload_epoch is not none, that means the training will start with the weights, optimizer that has been last saved and start with preload epoch + 1if preload_epoch is not None:model_filename = f"./malaygpt/model_{preload_epoch}.pt"state = torch.load(model_filename)model.load_state_dict(state['model_state_dict'])initial_epoch = state['epoch'] + 1optimizer.load_state_dict(state['optimizer_state_dict'])global_step = state['global_step']# The CrossEntropyLoss loss function computes the difference between the projection output and target label.loss_fn = nn.CrossEntropyLoss(ignore_index=tokenizer_en.token_to_id('[PAD]'), label_smoothing=0.1).to(device)for epoch in range(initial_epoch, EPOCHS):# torch.cuda.empty_cache()model.train()batch_iterator = tqdm(train_dataloader, desc=f"Processing Epoch {epoch:02d}")for batch in batch_iterator:encoder_input = batch['encoder_input'].to(device) # (b, seq_len)decoder_input = batch['decoder_input'].to(device) # (B, seq_len)encoder_mask = batch['encoder_mask'].to(device) # (B, 1, 1, seq_len)decoder_mask = batch['decoder_mask'].to(device) # (B, 1, seq_len, seq_len)target_label = batch['target_label'].to(device) # (B, seq_len)# Run the tensors through the encoder, decoder and the projection layerencoder_output = model.encode(encoder_input, encoder_mask) # (B, seq_len, d_model)decoder_output = model.decode(encoder_output, encoder_mask, decoder_input, decoder_mask) # (B, seq_len, d_model)projection_output = model.project(decoder_output) # (B, seq_len, vocab_size)# Compute the loss using a simple cross entropyloss = loss_fn(projection_output.view(-1, tokenizer_zh.get_vocab_size()), target_label.view(-1))batch_iterator.set_postfix({"loss": f"{loss.item():6.3f}"})# Backpropagate the lossloss.backward()# Update the weightsoptimizer.step()optimizer.zero_grad(set_to_none=True)global_step += 1# VALIDATION BLOCK STARTS HERE [Runs every epoch after the training block is complete]run_validation(model, val_dataloader, tokenizer_en, tokenizer_zh, max_seq_len, device, lambda msg: batch_iterator.write(msg), global_step)# Save the model at the end of every epochmodel_filename = f"./chinesegpt/model_{epoch}.pt"torch.save({'epoch': epoch,'model_state_dict': model.state_dict(),'optimizer_state_dict': optimizer.state_dict(),'global_step': global_step}, model_filename)# Train our model
train_model(preload_epoch=None)
步骤 11:创建一个函数来使用我们建立的模型测试新的翻译任务
我们将为我们的翻译函数赋予一个新的通用名称,称为 chinesegpt。该函数接收用户输入的英语原始文本,并输出汉语翻译文本。让我们运行该函数并尝试一下。
#Step 11: Finally testing our chineseGPT model to translated new sentences. Let's give it a try.def chinesegpt(user_input_text):# validation using input textuser_input_text = str(user_input_text).strip()# Let's get the model Define the device, tokenizers, and modeldevice = torch.device("cuda" if torch.cuda.is_available() else "cpu")tokenizer_en = Tokenizer.from_file("./tokenizer_en/tokenizer_en.json")tokenizer_zh = Tokenizer.from_file("./tokenizer_zh/tokenizer_zh.json")# Build our model# model = build_model(tokenizer_en.get_vocab_size(), tokenizer_my.get_vocab_size(), max_seq_len, max_seq_len, d_model=512).to(device)# model = get_model(tokenizer_en.get_vocab_size(), tokenizer_my.get_vocab_size()).to(device)model = build_model(tokenizer_en.get_vocab_size(), tokenizer_zh.get_vocab_size(),max_seq_len, max_seq_len, d_model=512).to(device)# Load the specific checkpoint of the model that you've saved during training.checkpoint_number = 9 # for this test, I am taking checkpoint number 10model_filename = f"./chinesegpt/model_{checkpoint_number}.pt"state = torch.load(model_filename)model.load_state_dict(state['model_state_dict'])# Lets beging the inferencingmodel.eval()with torch.no_grad():# Precompute the encoder output and reuse it for every generation stepsource_text_encoding = tokenizer_en.encode(user_input_text)source_text_encoding = torch.cat([torch.tensor([tokenizer_en.token_to_id('[CLS]')], dtype=torch.int64),torch.tensor(source_text_encoding.ids, dtype=torch.int64),torch.tensor([tokenizer_en.token_to_id('[SEP]')], dtype=torch.int64),torch.tensor([tokenizer_en.token_to_id('[PAD]')] * (max_seq_len - len(source_text_encoding.ids) - 2), dtype=torch.int64)], dim=0).to(device)source_mask = (source_text_encoding != tokenizer_en.token_to_id('[PAD]')).unsqueeze(0).unsqueeze(0).int().to(device)encoder_output = model.encode(source_text_encoding, source_mask)# Initialize the decoder input with the sos tokendecoder_input = torch.empty(1, 1).fill_(tokenizer_zh.token_to_id('[CLS]')).type_as(source_text_encoding).to(device)# Generate the translation word by wordwhile decoder_input.size(1) < max_seq_len:# build mask for target and calculate outputdecoder_mask = torch.triu(torch.ones((1, decoder_input.size(1), decoder_input.size(1))), diagonal=1).type(torch.int).type_as(source_mask).to(device)out = model.decode(encoder_output, source_mask, decoder_input, decoder_mask)# project next tokenprob = model.project(out[:, -1])_, next_word = torch.max(prob, dim=1)decoder_input = torch.cat([decoder_input, torch.empty(1, 1).type_as(source_text_encoding).fill_(next_word.item()).to(device)], dim=1)# print the translated word# print(f"{tokenizer_zh.decode([next_word.item()])}", end=' ')# break if we predict the end of sentence tokenif next_word == tokenizer_zh.token_to_id('[SEP]'):break# convert ids to tokensreturn tokenizer_zh.decode(decoder_input[0].tolist())测试时间到了!让我们进行一些翻译测试。
# Test 1: Translation using chineseGPT
user_input = "This term may extend to seven years and with fine in case of subsequent violations."
transalated_text = chinesegpt(user_input)print(f"User input (in English): {user_input}")
print(f"Translation (in Chinese): {transalated_text}")![]()
# Test 2: Translation using chineseGPT
user_input = "Delegations welcomed the progress made by CEB in ensuring a coordinated approach by the system on this issue."
transalated_text = chinesegpt(user_input)print(f"User input (in English): {user_input}")
print(f"Translation (in Chinese): {transalated_text}")![]()
“ 翻译效果似乎还不错。”
就是这样!我非常有信心,您现在能够使用 PyTorch 从头开始构建自己的大型语言模型。您也可以在其他语言数据集上训练此模型,并以该语言执行翻译任务。现在,您已经学会了如何从头开始构建原始转换器,我可以向您保证,您现在能够在目前市场上大多数可用的 LLM 上学习和实现自己的应用程序。


