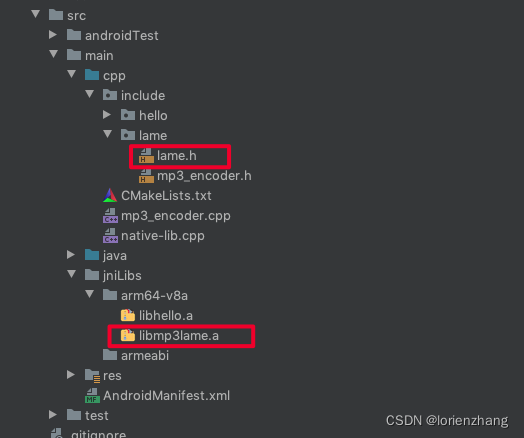
刚完成了一个pcm转成mp3的小工作,记录下自己解决这个问题的过程,以便以后可以参考。pcm转换mp3首选的就是lame这个开源框架,下载地址lame,下载完成后需要ndk编译lame。安卓ndk环境配置可以百度。下面记录下ndk编译lame的过程
首先创建一个目录mp3lame(目录名字随意),然后在目录下创建jni文件夹,将lame源码下的libmp3lame文件拷贝到jni目录下,在jni目录下创建Android.mk
LOCAL_PATH := $(call my-dir)include $(CLEAR_VARS)LOCAL_MODULE        := libmp3lame
LOCAL_CFLAGS := -DSTDC_HEADERS
LOCAL_SRC_FILES     := \
./libmp3lame/bitstream.c \
./libmp3lame/encoder.c \
./libmp3lame/fft.c \
./libmp3lame/gain_analysis.c \
./libmp3lame/id3tag.c \
./libmp3lame/lame.c \
./libmp3lame/mpglib_interface.c \
./libmp3lame/newmdct.c \
./libmp3lame/presets.c \
./libmp3lame/psymodel.c \
./libmp3lame/quantize.c \
./libmp3lame/quantize_pvt.c \
./libmp3lame/reservoir.c \
./libmp3lame/set_get.c \
./libmp3lame/tables.c \
./libmp3lame/takehiro.c \
./libmp3lame/util.c \
./libmp3lame/vbrquantize.c \
./libmp3lame/VbrTag.c \
./libmp3lame/version.c \
./wrapper.cLOCAL_LDLIBS := -lloginclude $(BUILD_SHARED_LIBRARY)
在创建Application.mk
APP_PLATFORM := android-19这是指定app编译的sdk的版本,不设置会在编译过程报错,还有其他的一些配置参数,可以百度下。
把这两个文件放到jni目录下面,在mp3lame目录下执行ndk-build命令,文件开始编译

编写wrapper.c文件,这个是jni文件,需要自己编写方法去调用lame的方法
#include <stdio.h>
#include <stdlib.h>
#include <jni.h>
#include <android/log.h>
#include "libmp3lame/lame.h"#define LOG_TAG "LAME ENCODER"
#define LOGD(format, args...)  __android_log_print(ANDROID_LOG_DEBUG, LOG_TAG, format, ##args);
#define BUFFER_SIZE 8192
#define be_short(s) ((short) ((unsigned short) (s) << 8) | ((unsigned short) (s) >> 8))lame_t lame;int read_samples(FILE *input_file, short *input) {int nb_read;nb_read = fread(input, 1, sizeof(short), input_file) / sizeof(short);int i = 0;while (i < nb_read) {input[i] = be_short(input[i]);i++;}return nb_read;
}void Java_com_demo_iflytek_mscdemo_Lame_initEncoder(JNIEnv *env,jobject jobj, jint in_num_channels, jint in_samplerate, jint in_brate,jint in_mode, jint in_quality) {lame = lame_init();LOGD("Encoding Init parameters:");lame_set_num_channels(lame, in_num_channels);LOGD("Encoding Number of channels: %d", in_num_channels);lame_set_in_samplerate(lame, in_samplerate);LOGD("Encoding Sample rate: %d", in_samplerate);lame_set_brate(lame, in_brate);LOGD("Encoding Bitrate: %d", in_brate);lame_set_mode(lame, in_mode);LOGD("Encoding Mode: %d", in_mode);lame_set_quality(lame, in_quality);LOGD("Encoding Quality: %d", in_quality);int res = lame_init_params(lame);LOGD("Encoding Init returned: %d", res);
}void Java_com_demo_iflytek_mscdemo_Lame_destroyEncoder(JNIEnv *env, jobject jobj) {int res = lame_close(lame);LOGD("Encoding Deinit returned: %d", res);
}void Java_com_demo_iflytek_mscdemo_Lame_encodeFile(JNIEnv *env,jobject jobj, jstring in_source_path, jstring in_target_path) {const char *source_path, *target_path;source_path = (*env)->GetStringUTFChars(env, in_source_path, NULL);target_path = (*env)->GetStringUTFChars(env, in_target_path, NULL);FILE *input_file, *output_file;input_file = fopen(source_path, "rb");output_file = fopen(target_path, "wb");short input[BUFFER_SIZE];char output[BUFFER_SIZE];int nb_read = 0;int nb_write = 0;int nb_total = 0;LOGD("Encoding started");while (nb_read = read_samples(input_file, input)) {nb_write = lame_encode_buffer(lame, input, input, nb_read, output,BUFFER_SIZE);fwrite(output, nb_write, 1, output_file);nb_total += nb_write;}LOGD("Encoded %d bytes", nb_total);nb_write = lame_encode_flush(lame, output, BUFFER_SIZE);fwrite(output, nb_write, 1, output_file);LOGD("Encoded Flushed %d bytes", nb_write);fclose(input_file);fclose(output_file);
}
将文件放到jni同级目录下,重新编译一遍。
编写java类
public class Lame {static {System.loadLibrary("mp3lame");}/**** @param numChannels 声道数* @param sampleRate 采样率* @param bitRate 比特率* @param mode 模式* @param quality*/public native void initEncoder(int numChannels, int sampleRate, int bitRate, int mode, int quality);public native void destroyEncoder();public native int encodeFile(String sourcePath, String targetPath);
}
这样就可以调用方法了。
注意:直接转mp3会出现噪音。。因为安卓字节是小端排序,lame是大端排序,所以需要转换,转换代码如下:
/*** 大小端字节转换* @param fileName* @return* @throws IOException*/public static String bigtolittle( String fileName) throws IOException {File file = new File(fileName); //filename为pcm文件,请自行设置InputStream in = null;byte[] bytes = null;in = new FileInputStream(file);bytes = new byte[in.available()];//in.available()是得到文件的字节数int length = bytes.length;while (length != 1) {long i = in.read(bytes, 0, bytes.length);if (i == -1) {break;}length -= i;}int dataLength = bytes.length;int shortlength = dataLength / 2;ByteBuffer byteBuffer = ByteBuffer.wrap(bytes, 0, dataLength);ShortBuffer shortBuffer = byteBuffer.order(ByteOrder.LITTLE_ENDIAN).asShortBuffer();//此处设置大小端short[] shorts = new short[shortlength];shortBuffer.get(shorts, 0, shortlength);File file1 = File.createTempFile("pcm", null);//输出为临时文件String pcmtem = file1.getPath();FileOutputStream fos1 = new FileOutputStream(file1);BufferedOutputStream bos1 = new BufferedOutputStream(fos1);DataOutputStream dos1 = new DataOutputStream(bos1);for (int i = 0; i < shorts.length; i++) {dos1.writeShort(shorts[i]);}dos1.close();Log.d("gg", "bigtolittle: " + "=" + shorts.length);return pcmtem;}ok这样就可以愉快的转换了,其他需求可以通过修改jni实现。放上几个资料的参考地址
https://blog.csdn.net/tcsupreme/article/details/80385670
https://www.jianshu.com/p/534741f5151c

![[opcv图像处理] C/C|++将图片转换为马赛克效果](https://static.hdslb.com/mobile/img/512.png)

