2022年圣诞节到来啦,很高兴这次我们又能一起度过~
CSDN诚邀各位技术er分享关于圣诞节的各种技术创意,展现你与众不同的精彩!参与本次投稿即可获得【话题达人】勋章+【圣诞快乐】定制勋章(1年1次,错过要等下一年喔)!
你可以从以下几个方面着手(不强制),或者根据自己对话题主题的理解创作,参考如下:
提醒:在发布作品前请把不用的内容删掉
本可以蓝桥ROS云课复现,后续补充。
一组cocube绘制圣诞树
之前,有绘制各类优美曲线的博客,但是一个机器人绘制效率肯定是有限的,那么一组机器人效果一定就是倍数关系啦。
优美的曲线(含蝴蝶线)-CoCube
如何将数学曲线变为机器人轨迹-花式show爱心代码-turtlesim篇
一、前言
提示:可简单介绍此次创意背景。
Turtlesim修改为CoCube,使用sketch工具包绘制出圣诞树。

需要用到的功能包:
- turtlesim
- sketch
二、创意名
提示:可介绍本篇文章要实现的圣诞节相关技术创意。
绘制各类圣诞树随心所欲哦。

这个功能包有个啥子小问题呢。
就是绘制过程中,各个小机器人分配任务不均衡。
经常出现一人绘制,万人围观的场面呢。
只剩一个绘制了。

绘制完成后。

三、效果展示
提示:可展示本篇文章要实现的圣诞节相关技术创意最终效果。
需要绘制的圣诞树越复杂需要的机器人数量越多。
一号圣诞树:

二号圣诞树:

换个颜色:

完成后:

四、实现步骤
提示:可详细介绍实现相关创意的操作步骤。
需要ROS+Turtlesim+Sketch。
配置好Project: Turtle-Sketch。
在终端输入:
roslaunch sketch sketcher.launch
ros@ros:~/RobCode/sketch$ roslaunch sketch sketcher.launch
... logging to /home/ros/.ros/log/0c537ad0-890a-11ed-a964-4789d50e4dcc/roslaunch-ros-278770.log
Checking log directory for disk usage. This may take a while.
Press Ctrl-C to interrupt
Done checking log file disk usage. Usage is <1GB.started roslaunch server http://ros:34897/SUMMARY
========PARAMETERS* /rosdistro: noetic* /rosversion: 1.15.15NODES/CannyThresholding (image_thresholding/server.py)ImagePath (image_thresholding/import_server.py)Sketch (sketch/sketcher.py)rqt_reconfigure (rqt_reconfigure/rqt_reconfigure)sim (turtlesim/turtlesim_node)auto-starting new master
process[master]: started with pid [278778]
ROS_MASTER_URI=http://localhost:11311setting /run_id to 0c537ad0-890a-11ed-a964-4789d50e4dcc
process[rosout-1]: started with pid [278788]
started core service [/rosout]
process[rqt_reconfigure-2]: started with pid [278791]
process[CannyThresholding-3]: started with pid [278792]
process[ImagePath-4]: started with pid [278797]
process[sim-5]: started with pid [278798]
process[Sketch-6]: started with pid [278799]
Max =  120 	Min =  50
[INFO] [1672491199.756063]: Address selected
[INFO] [1672491199.760637]: Image Loaded
[INFO] [1672491199.761917]: Select minimum and maximum threshold
Max =  120 	Min =  50
[INFO] [1672491203.376289]: Spawning an army of turtles to sketch your image
[INFO] [1672491205.530128]: Sketching ....
[INFO] [1672491292.705367]: Press Ctrl+C to terminate the program
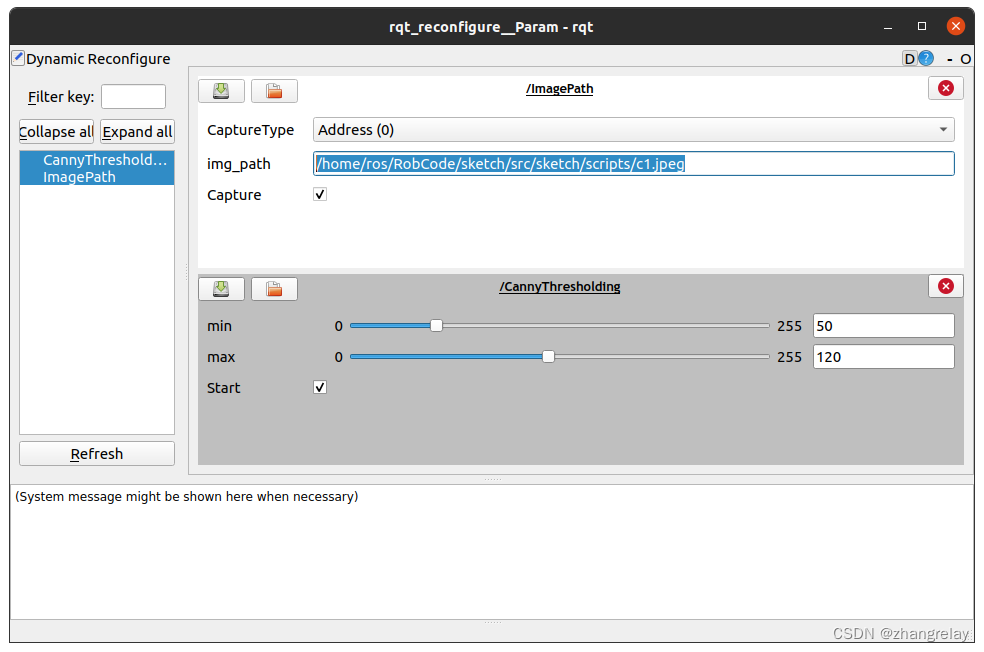
导入具体圣诞树图片:
/home/ros/RobCode/sketch/src/sketch/scripts/c1.jpeg
等待绘制完成即可。
五、编码实现
提示:可详细展示实现相关创意的代码。
绘制核心代码Python版本。
具体可参考:
Program to sketch the contours in a turtle-sim
Author: Shilpaj Bhalerao
Date: Aug 30, 2020
#!/usr/bin/env python3.8
"""
Program to sketch the contours in a turtle-sim
Author: Shilpaj Bhalerao
Date: Aug 30, 2020
"""import rospy
import numpy as np
import math
import sys
import time
import multiprocessing
import cv2
import matplotlib.pyplot as plt
from geometry_msgs.msg import Twist
from turtlesim.msg import Pose
from turtlesim.srv import *
from std_srvs.srv import Empty
from Turtle import *
# from sketch.msg import points, groups, segments
# from sketch.srv import test
import itertoolsINTERNAL = Falseclass Robot:def __init__(self, parallel=1):self.count = 1self.list = []self.processes = []self.PARALLEL = parallelself.start = Falseself.image = Noneself.activate = Trueself.draw_contour = False# Variables to access contours dataself.collection_points = []self.collection_segments = []self.collection_groups = []# Initialize sketcher noderospy.init_node('sketcher', anonymous=False)# Publisherself.pub = rospy.Publisher('/turtle1/cmd_vel', Twist, queue_size=10)# Subscriber# rospy.Subscriber('contours', segments, self.callback)# Rate to control frequency of operation of nodeself.rate = rospy.Rate(1)  # 10hz# Reset the turtle-sim simulatorreset_sim()time.sleep(2)  # Delay to make sure dynamic reconfigure is readywhile not rospy.is_shutdown():if INTERNAL:  # Test the code without the data exchange from outside nodecenter = [5.54, 5.54]origin = [4.0, 4.0]l_top = [4.0, 9.0]r_top = [9.0, 9.0]l_bottom = [4.0, 4.0]r_bottom = [9.0, 4.0]self.start = Trueself.contours = [[(1, 1), (4, 2), (3, 3,), (4, 9), origin],[(9, 1), (1, 2), (1, 3,), (9, 9), (9, 4), origin],[center, l_top, r_top, r_bottom, l_bottom, center]]self.numbers = len(self.contours)elif not INTERNAL:  # Test the code with other nodes data# Wait for user to select image from a path or capture an image using cameraif self.activate and not self.draw_contour:self.load_img()# After selecting image, start drawing contours and adjust the thresholdif self.activate and rospy.get_param('ImagePath/Capture'):self.find_contours()# After finalizing contours, spawn an army of turtles and start sketchingif self.start:# Spawn turtle at the first point of the contoursself.spawn_source()if self.PARALLEL == 0:  # If sequential implementation mode is selectedself.trace()elif self.PARALLEL == 1:  # If parallel implementation mode is selectedrospy.loginfo("Sketching ....")# Code for Multi-processingfor i in range(self.numbers):p = multiprocessing.Process(target=self.trace_parallel, args=[i])p.start()self.processes.append(p)for process in self.processes:process.join()# Remove the turtles after sketching is doneself.kill_destination()rospy.loginfo("Press Ctrl+C to terminate the program")rospy.spin()else:pass# ------------------------------- Functions related to image processing ----------------------------def load_img(self):"""Load image using either:- Path of an image- Using a camera"""while self.image is None:types = rospy.get_param('ImagePath/CaptureType')  # Check either camera or path is selected# If image path is selectedif types == 0:image_path = rospy.get_param('ImagePath/img_path')  # Read the pathself.image = cv2.imread(image_path)  # Load an image from the path# If image is loaded properly, start finding edgesif self.image is not None:rospy.loginfo("Address selected")self.draw_contour = Truebreak# If camera is selectedelif types == 1:cap = cv2.VideoCapture(0)while True:# Check if frame is selectedcondition = rospy.get_param('ImagePath/Capture')# Capture frame-by-frameret, frame = cap.read()# Display the resulting framecv2.imshow('Capture Image to Sketch', frame)cv2.waitKey(1)# If frame is selected properly, start finding edgesif condition:self.image = framecv2.destroyWindow('Capture Image to Sketch')self.draw_contour = Truebreak# Resize image since turtle-sim dimensions are 500 x 500self.image = cv2.resize(self.image, (500, 500))rospy.loginfo("Image Loaded")rospy.loginfo("Select minimum and maximum threshold")def find_contours(self):"""Find edges and contours in an image"""# Grayscalegray = cv2.cvtColor(self.image, cv2.COLOR_BGR2GRAY)# Find Canny edges using threshold inputsgains = rospy.get_param('/Thresholds')min_val = gains[0]max_val = gains[1]edged = cv2.Canny(gray, min_val, max_val)cv2.imshow("Select Threshold Values", edged)cv2.waitKey(1)# If edges are selected, start drawing sketchstart = rospy.get_param('/Activate')if start:# Find contourscontours, hierarchy = cv2.findContours(edged, cv2.RETR_EXTERNAL, cv2.CHAIN_APPROX_NONE)# Convert contours to accessible data formatself.contour_to_accessible_format(contours)# Draw all contours on a blank imageblank = np.zeros(shape=[500, 500, 3], dtype=np.uint8)cv2.drawContours(blank, contours, -1, (255, 255, 255), 1)def contour_to_accessible_format(self, contours):"""Function to convert the opencv contours to accessible data format- Collection of x,y coordinates is a point- Collection of points is a segment- Collection of segments is a group- Collection of groups is a contour:param contours: Extracted contours from the image:type contours: opencv contours"""for i in range(len(contours)):  # For all the contoursif len(contours[i]) > 10:  # If they have more than 10 pointsfor j in range(len(contours[i])):  # Find the x,y coordinates of all the pointsx_cord = (contours[i][j][0][0] * 11) / 500  # Convert points within (11, 11) i.e. size of turtle-simy_cord = (contours[i][j][0][1] * 11) / 500# Save these coordinates in a list named collection_points and subtract y from 11 to make upright# imageself.collection_points.append((x_cord, 11.0 - y_cord))# Collect all line segments in collection_segments listself.collection_segments.append(self.collection_points)self.collection_points = []# Collect all groups in collection_groups listself.collection_groups.append(self.collection_segments)# Collection of all contours in contoursself.contours = self.collection_segments# Total number of contoursself.numbers = len(self.contours)# Reset and code flowself.collection_segments = []self.activate = Falseself.start = True# ------------------------------- Functions related to sketching turtle path ----------------------------def trace_parallel(self, j):"""Function to trace the contours using multi-processing:param j: Number of multi-processes:type j: Int"""# Take x,y coord. of next point in contour and teleport turtle to that point(for all contours simultaneously)for k in range(len(self.contours[j])):self.list[j].teleport(self.contours[j][k][0], self.contours[j][k][1], 0.0)def trace(self):"""Function to trace the contours using sequential programming"""# Take x,y coord. of next point in contour and teleport turtle to that point(for one contour at a time)for j in range(self.numbers):for k in range(len(self.contours[j])):self.list[j].teleport(self.contours[j][k][0], self.contours[j][k][1], 0.0)# ------------------------------- Functions related to turtle actions ----------------------------def spawn_source(self):"""Spawn multiple turtles on the first point of each contour"""rospy.loginfo("Spawning an army of turtles to sketch your image")for i in range(self.numbers):self.list.append(Turtle(i + 1))if i == 0:self.list[0].set_pen(0)self.list[0].teleport(self.contours[i][0][0], self.contours[i][0][1], 0.0)self.list[0].set_pen(1)else:self.list[i].spawn(self.contours[i][0][0], self.contours[i][0][1], 0.0)def kill_destination(self):"""Remove the turtles from simulation at the end of sketching"""for i in range(self.numbers):self.list[i].kill_turtle()def reset_sim():"""Function to reset the simulator"""try:reset_serv = rospy.ServiceProxy('/reset', Empty)reset_serv()except rospy.ServiceException as e:rospy.loginfo("Service execution failed: %s" + str(e))if __name__ == '__main__':try:turtle = Robot(int(sys.argv[1]))except KeyboardInterrupt:exit()
原作品机器翻译如下:
#项目:海龟素描
##概述
-在这个项目中,左边的图像作为输入,右边的图像作为输出,使用turtlesim
-左侧的图像可以使用其路径选择,也可以直接从相机拍摄
-以下视频显示了该项目的实际情况
---
##使用的概念
以下是本项目使用的概念:
-**动态重新配置**
-使用路径导入图像
-使用相机导入图像
-设置Canny边缘检测的阈值
-**ROS参数**
-设置阈值参数的值
-获取阈值参数的值
-**ROS服务**
-产卵海龟
-传送海龟
-将笔的状态设置为-ON/OFF
-完成草图后移除海龟
-**OpenCV**
-导入图像的步骤
-使用Canny边缘检测查找边缘
-查找轮廓的步骤
-**多处理**
-为了画草图而生下一群海龟
---
##目录结构
-该目录包含3个包:
-“草图`
-`动态重新配置`
-`image_thresholding`
-草图目录结构
```
├── CMakeLists.txt
├── docs # Supported files for documentation
│ ├── Contours.png
│ ├── done.png
│ ├── dynamic reconfigure.png
│ ├── edges.png
│ ├── Output.png
│ ├── rosgraph.png
│ ├── test.png
│ └── turtles.png
├── include
│ └── sketch
├── launch # Launch Files
│ └── sketcher.launch
├── package.xml
├── README.md
├── nodes # ROS Nodes
│ ├── ironman.jpeg
│ ├── sketcher.py
│ └── Turtle.py
└── TODO.md # TO DO for next version
```
-Image_thresholding目录结构
```
.
├── cfg # Configuration file for GUI
│ ├── import.cfg # GUI params related to image import
│ └── thresholds.cfg # GUI params related to image thresholding
├── CMakeLists.txt
├── include
│ └── dynamic_parameters
├── launch # Launch files
│ └── canny_thresholding.launch # Launch - GUI for Canny edge detection
├── nodes # ROS Nodes
│ ├── get_values.py
│ ├── import_server.py # Import Image import parameters in python node
│ └── server.py # Import thresholding parameters in python node
└── package.xml
```
---
##编码风格指南-PEP8
---
##依赖关系
-“动态重新配置”包
-`OpenCV`
---
##安装和运行
要在本地系统上运行项目,请执行以下步骤:
-下载软件包“sketch”、“image_thresholding”和“dynamic-reconfigure noetic-devel”`
-将这些包复制到ROS工作区,即`~/ROS_ws/src/`
-构建工作区
-`$cd~/ROS_ws/`
-`$catkin_make`
-打开新终端并获取ROS工作区的源代码-`source~/ROS_ws/devel/setup.bash`
-运行命令-`$roslaunch sketcher.raunch`
-此命令将打开此项目的turtlesim和GUI


-您可以为`CaptureType选择图像**地址(0)**或**照相机(1)**选项`
-如果选择*Address(0)*,请在“img_path”部分中插入系统上图像的路径
-然后单击`Capture前面的复选框`
-如果您选择*照相机(0)*,照相机窗口将弹出,您可以在获得所需帧后单击“捕获”前面的复选框
-这将打开一个窗口,其中包含选定帧中的边

-现在,使用GUI设置最小和最大阈值以获得所需的轮廓
-单击“开始”前面的复选框,产生一支海龟大军,它将为您绘制这些轮廓

-草图完成后,海龟会消失

**注:**
-如果要将方法从并行更改为顺序,请执行以下步骤:
1.在此目录中打开启动文件`~/ROS_ws/sketch/launch/`
2.sketcher节点的“arg”标记的值为1
3.将此值更改为`0`
-这里,0=顺序执行,1=并行执行
可扩展部分:
#要执行的操作:
参考-turtle_actionlib
##项目1:绘制等高线
##下一版本的任务
-[]为等高线数据传输创建自定义消息
-[]在主题上传输等高线数据
-[]通过服务传输等高线数据
-[]使用ROS参数传输等高线数据
-[]添加加权原始图像,为GitHub配置文件创建一个漂亮的.gif文件
-[]使用GUI窗口上的按钮
-[]创建插件
-[]SRS文件
-[]编码结构图
-[x]导入图像
-[x]查找轮廓
-[x]在代码中添加自定义阈值
-[x]使用套头衫绘制芋头
-[x]将乌龟从一点移动到另一点
-[x]繁殖多只海龟
-[x]将繁殖的海龟传送到轮廓的第一个点
-[x]顺序轮廓绘制
-[x]同时绘制多个轮廓的多重处理
-[x]用于捕获图像或加载图像并显示输出的GUI
-[x]使用ROS1 Noetic
-[]用于生产的ROS2端口
-[]遵循编码样式
-[]创建文档
-[]优化代码
-[]使用PyCUDA在GPU上运行代码
-[x]文档
-依赖关系
-环境文件
-[]包装和出版
-[]日志记录模块
-[x]README文件
-[]包括使用的概念和与概念的良好资源链接
---
##项目2:如果可以,请抓住我
-[]动议
-[]动态配置
-[]PID的自定义消息
-[x]用于精确控制的PID控制器类代码
-[]实现PID调节的动态重新配置
---
##项目3:
-[]TF合作伙伴
-[]在turtlesim中创建另一个坐标系
-[]将海龟移到某个位置,并显示相对于另一个原点的坐标
提醒:在发布作品前请把不用的内容删掉