# Java EnvironmentexportJAVA_HOME=/Library/Java/JavaVirtualMachines/jdk-22.jdk/Contents/Home
# Gradle environmentexportGRADLE_HOME=/Library/Java/env/gradle-8.5# CLASSPATH: adding JAVA_HOME/lib/tools.jar and JAVA_HOME/lib/dt.jar if they existif[-d"$JAVA_HOME/lib"];thenexportCLASSPATH=$JAVA_HOME/lib/tools.jar:$JAVA_HOME/lib/dt.jar:.
fi# PATH: add all necessary paths in one lineexportPATH=$JAVA_HOME/bin:$GRADLE_HOME/bin:$PATH:.
保存变量配置:
source ~/.bash_profile
验证安装结果:
yang@MacdeMac-mini ~ % gradle -v Welcome to Gradle 8.5!Here are the highlights of this release:- Support for running on Java 21- Faster first use with Kotlin DSL- Improved error and warning messagesFor more details see https://docs.gradle.org/8.5/release-notes.html------------------------------------------------------------
Gradle 8.5
------------------------------------------------------------Build time: 2023-11-29 14:08:57 UTC
Revision: 28aca86a7180baa17117e0e5ba01d8ea9feca598Kotlin: 1.9.20
Groovy: 3.0.17
Ant: Apache Ant(TM) version 1.10.13 compiled on January 42023
JVM: 22.0.1 (Oracle Corporation 22.0.1+8-16)
OS: Mac OS X 14.7.1 x86_64
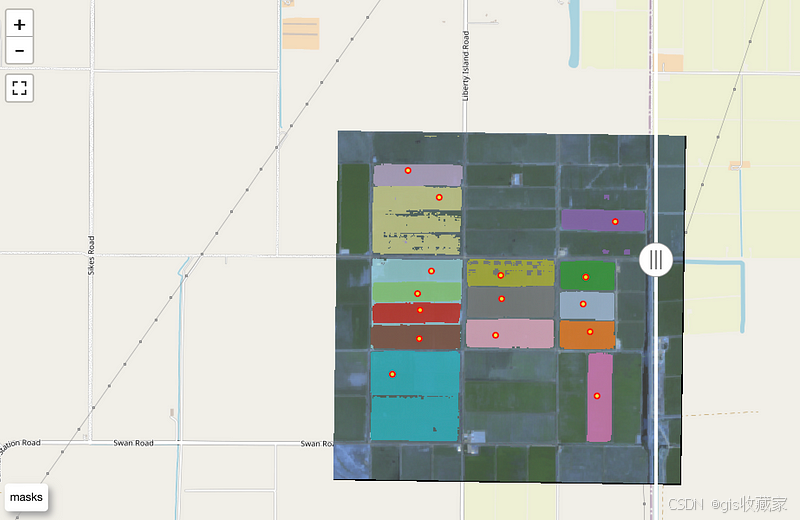
将 Segment Anything Model Version 2 应用于卫星图像以检测和导出农业地区田地边界的分步教程
🌟 简介
手动绘制田地边界是最耗时的任务之一,其准确性取决于绘制者的表现。然而,精确的边界检测在很多领域都有应用。例如,假设您…