目录
安装docker-ce
阿里云镜像加速器
文件
启动
安装docker-ce
[root@localhost ~]# wget -O /etc/yum.repos.d/CentOS-Base.repo http://mirrors.aliyun.com/repo/Centos-7.repo
--2023-08-03 18:34:32-- http://mirrors.aliyun.com/repo/Centos-7.repo
正在解析主机 mirrors.aliyun.com (mirrors.aliyun.com)... 140.249.32.202, 140.249.32.203, 140.249.32.204, ...
正在连接 mirrors.aliyun.com (mirrors.aliyun.com)|140.249.32.202|:80... 已连接。
已发出 HTTP 请求,正在等待回应... 200 OK
长度:2523 (2.5K) [application/octet-stream]
正在保存至: “/etc/yum.repos.d/CentOS-Base.repo”
100%[============================================================>] 2,523 --.-K/s 用时 0s
2023-08-03 18:34:37 (356 MB/s) - 已保存 “/etc/yum.repos.d/CentOS-Base.repo” [2523/2523])
[root@localhost ~]# yum -y install yum-utils device-mapper-persistent-data lvm2
已加载插件:fastestmirror, product-id, search-disabled-repos, subscription-manager
可能报错 把原来的删掉从新安装
Transaction check error:
package device-mapper-persistent-data-0.8.5-3.el7_9.2.x86_64 is already installed
错误概要
-------------
[root@localhost ~]# yum -y install yum-utils device-mapper-persistent-data lvm2
[root@localhost ~]# yum -y install yum-utils device-mapper-persistent-data lvm2
[root@localhost ~]# yum-config-manager --add-repo http://mirrors.aliyun.com/docker-ce/linux/centos/docker-ce.repo
已加载插件:fastestmirror, product-id, subscription-manager
This system is not registered with an entitlement server. You can use subscription-manager to register.
adding repo from: http://mirrors.aliyun.com/docker-ce/linux/centos/docker-ce.repo
grabbing file http://mirrors.aliyun.com/docker-ce/linux/centos/docker-ce.repo to /etc/yum.repos.d/docker-ce.repo
repo saved to /etc/yum.repos.d/docker-ce.repo
阿里云镜像加速器
[root@localhost ~]# yum -y install docker-ce
[root@localhost ~]# systemctl start docker
[root@localhost ~]# systemctl enable docker
Created symlink from /etc/systemd/system/multi-user.target.wants/docker.service to /usr/lib/systemd/system/docker.service.
[root@localhost ~]# vim /etc/docker/daemon.json
[root@localhost ~]# cat /etc/docker/daemon.json
{
"registry-mirrors":[ "https://nyakyfun.mirror.aliyuncs.com" ]
}
[root@localhost ~]# systemctl daemon-reload
[root@localhost ~]# systemctl restart docker
[root@localhost ~]# docker version
Client: Docker Engine - Community
Version: 24.0.5
API version: 1.43
Go version: go1.20.6
Git commit: ced0996
Built: Fri Jul 21 20:39:02 2023
OS/Arch: linux/amd64
Context: default
Server: Docker Engine - Community
Engine:
Version: 24.0.5
API version: 1.43 (minimum version 1.12)
Go version: go1.20.6
Git commit: a61e2b4
Built: Fri Jul 21 20:38:05 2023
OS/Arch: linux/amd64
Experimental: false
containerd:
Version: 1.6.22
GitCommit: 8165feabfdfe38c65b599c4993d227328c231fca
runc:
Version: 1.1.8
GitCommit: v1.1.8-0-g82f18fe
docker-init:
Version: 0.19.0
GitCommit: de40ad0
配置基础镜像
[root@localhost ~]# cat centos-7-x86_64.tar.gz | docker import - centos:7
sha256:2069099083a89e56bd326f5352b6d0e7d3ad02ba20d00b5b0305b810501db76c
之前可能有冲突所以删除
[root@localhost ~]# docker rm -f $(docker ps -aq)
c0e35fc73253
文件
编写compose文件
[root@compose compose_lnmp]# cat docker-compose.yml
version: '3'
services:nginx:hostname: nginxbuild:context: ./nginxdockerfile: Dockerfileports:- 80:80networks:- lnmpvolumes:- ./wwwroot:/usr/local/nginx/htmlphp:hostname: phpbuild:context: ./phpdockerfile: Dockerfileports:- 9000:9000networks:- lnmpvolumes:- ./wwwroot:/usr/local/nginx/htmlmysql:hostname: mysqlimage: mysql:5.6ports:- 3306:3306networks:- lnmpvolumes:- ./mysql/conf:/etc/mysql/conf.d- ./mysql/data:/var/lib/mysqlcommand: --character-set-server=utf8environment:MYSQL_ROOT_PASSWORD: 123456MYSQL_DATABASE: wordpressMYSQL_USER: userMYSQL_PASSWORD: user123networks:lnmp:可以看到一份标准配置文件应该包含 version、services、networks 三大部分,共有三级标签,每一级都是缩进两个空格。下面来详细说明一下里面的内容:
version: '3'  这是定义compose的版本号为version 3,可以参考官方文档详细了解具体有哪些版本 https://docs.docker.com/compose/compose-file/
services:
nginx:这是services下面的二级标签,名字用户自己定义,它将是服务运行后的名称;
hostname: nginx 这是定义容器的主机名,将写入到/etc/hostname中;
build:context: ./nginx 指定nginx服务的上下文路径;dockerfile:Dockerfile 指定通过上面指定路径中的Dockerilfe来构建;
ports:- 80:80 端口映射没什么好说的;
networks:-lnmp 指定的网络环境
volumes:把宿主机的/wwwroot目录绑定到容器中的/usr/local/nginx/html目录;php:这个二级标签服务和下面的内容跟nginx差不多;
mysql:这个二级标签服务也和nginx、php差不多,唯一不同的是多了个images标签、还有定义了些环境变量。
image: mysql:5.6 它是通过mysql:5.6镜像来构建mysql服务器,前面nginx、php都指定了上下文通过Dockerfile来构建的。environment:MYSQL_ROOT_PASSWORD:定义root用户密码变量为123456;MYSQL_DATABASE:定义了数据变量为wordpress;MYSQL_USER:定义了普通用户变量为user;MYSQL_PASSWORD:定义了普通用户密码变量为user123;
3、networks:lnmp: 相当于执行docker network create lnmp命令了;
[root@localhost compose_lnmp]# ll
总用量 4
-rw-r--r--. 1 root root 807 6月 3 2019 docker-compose.yml
drwxr-xr-x. 4 root root 30 6月 22 2019 mysql
drwxr-xr-x. 2 root root 83 8月 3 20:57 nginx
drwxr-xr-x. 2 root root 64 8月 3 20:56 php
drwxr-xr-x. 2 root root 41 6月 22 2019 wwwroot
[root@localhost compose_lnmp]# ls mysql
conf data
[root@localhost compose_lnmp]# vim mysql/conf/my.cnf[mysqld]
datadir=/var/lib/mysql
socket=/tmp/mysql.sock
symbolic-links=0[mysqld_safe]
log-error=/var/log/mysql/mysql.log
pid-file=/tmp/mysql.pid[root@localhost compose_lnmp]# vim nginx/nginx.conf user nginx nginx;
worker_processes 1;
worker_rlimit_nofile 102400;events {use epoll;worker_connections 4096;
}events {use epoll;worker_connections 4096;
}http {include mime.types;default_type application/octet-stream;log_format main '$remote_addr - $remote_user [$time_local] "$request" ''$status $body_bytes_sent "$http_referer" ''"$http_user_agent" "$http_x_forwarded_for"';access_log logs/access.log main;sendfile on;keepalive_timeout 65;server {listen 80;server_name localhost;charset utf-8;location / {root html;index index.php index.html index.htm;}location ~ \.php$ {root html;fastcgi_index index.php;fastcgi_pass 192.168.50.59:9000;fastcgi_param SCRIPT_FILENAME $document_root$fastcgi_script_name;include fastcgi_params;}}
}daemon off;[root@localhost compose_lnmp]# vim mysql/data/
auto.cnf ib_logfile0 mysql/ wordpress/
ibdata1 ib_logfile1 performance_schema/
[root@localhost compose_lnmp]# vim nginx/nginx.conf
[root@localhost compose_lnmp]# vim php/ 源文件照搬的
Dockerfile php-5.6.39.tar.gz php.ini
[root@localhost compose_lnmp]# vim php/php.ini [PHP];;;;;;;;;;;;;;;;;;;
; About php.ini ;
;;;;;;;;;;;;;;;;;;;
[root@localhost compose_lnmp]# vim wwwroot/index.
index.html  index.php
[root@localhost compose_lnmp]# vim wwwroot/index.html
[root@localhost compose_lnmp]# vim wwwroot/index.php <?php
phpinfo();
?>
~     [root@localhost compose_lnmp]# vim wwwroot/index.html www.crushlinux.com
~
[root@localhost ~]# /root/docker-compose -f docker-compose.yml up -d
-bash: /root/docker-compose: 权限不够
[root@localhost ~]# chmod 777 /root/docker-compose
[root@localhost ~]# cd compose_lnmp
启动
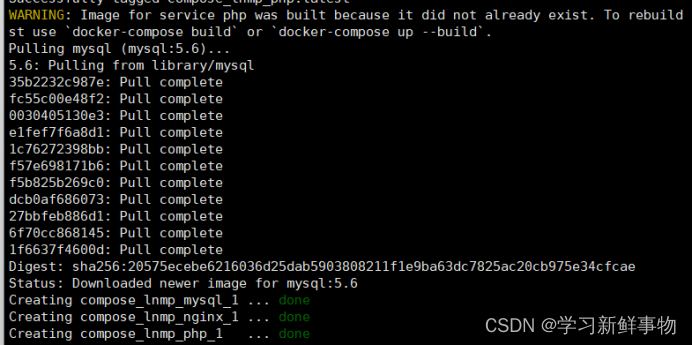
[root@localhost compose_lnmp]# /root/docker-compose -f docker-compose.yml up -d
成功
查看
[root@localhost compose_lnmp]# /root/docker-compose ps
Name Command State Ports
-------------------------------------------------------------------------------------------------------
compose_lnmp_mysql_1 docker-entrypoint.sh --cha ... Up 0.0.0.0:3306->3306/tcp,:::3306->3306/tc
p
compose_lnmp_nginx_1 /run.sh Up 0.0.0.0:80->80/tcp,:::80->80/tcp
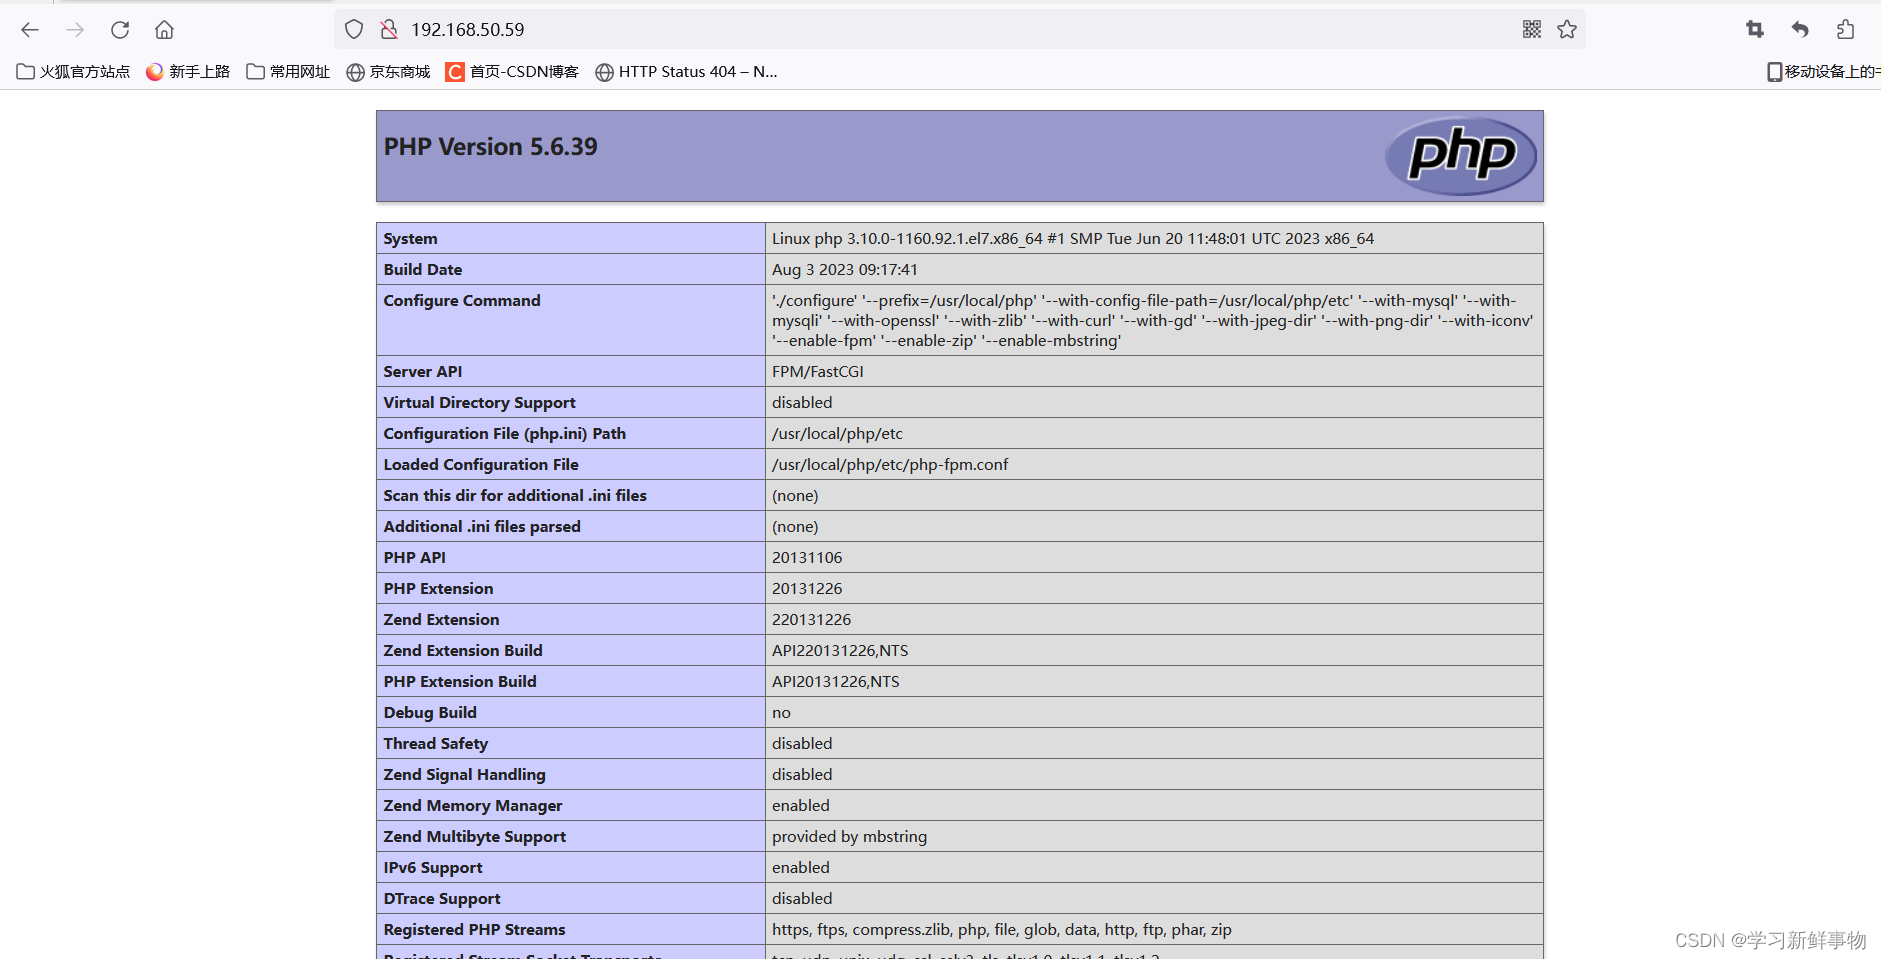
compose_lnmp_php_1 ./sbin/php-fpm -c /usr/loc ... Up 0.0.0.0:9000->9000/tcp,:::9000->9000/tc
成功

拜拜了
