1.类文件结构
一个简单的HelloWorld.Java
package cn.itcast.jvm.t5;
// HelloWorld 示例
public class HelloWorld {
public static void main(String[] args) {
System.out.println("hello world");
}
}
编译为 HelloWorld.class 后的样子如下所示:
[root@localhost ~]# od -t xC HelloWorld.class
0000000 ca fe ba be 00 00 00 34 00 23 0a 00 06 00 15 09
0000020 00 16 00 17 08 00 18 0a 00 19 00 1a 07 00 1b 07
0000040 00 1c 01 00 06 3c 69 6e 69 74 3e 01 00 03 28 29
0000060 56 01 00 04 43 6f 64 65 01 00 0f 4c 69 6e 65 4e
0000100 75 6d 62 65 72 54 61 62 6c 65 01 00 12 4c 6f 63
0000120 61 6c 56 61 72 69 61 62 6c 65 54 61 62 6c 65 01
0000140 00 04 74 68 69 73 01 00 1d 4c 63 6e 2f 69 74 63
0000160 61 73 74 2f 6a 76 6d 2f 74 35 2f 48 65 6c 6c 6f
0000200 57 6f 72 6c 64 3b 01 00 04 6d 61 69 6e 01 00 16
0000220 28 5b 4c 6a 61 76 61 2f 6c 61 6e 67 2f 53 74 72
0000240 69 6e 67 3b 29 56 01 00 04 61 72 67 73 01 00 13
0000260 5b 4c 6a 61 76 61 2f 6c 61 6e 67 2f 53 74 72 69
0000300 6e 67 3b 01 00 10 4d 65 74 68 6f 64 50 61 72 61
0000320 6d 65 74 65 72 73 01 00 0a 53 6f 75 72 63 65 46
0000340 69 6c 65 01 00 0f 48 65 6c 6c 6f 57 6f 72 6c 64
0000360 2e 6a 61 76 61 0c 00 07 00 08 07 00 1d 0c 00 1e
0000400 00 1f 01 00 0b 68 65 6c 6c 6f 20 77 6f 72 6c 64
0000420 07 00 20 0c 00 21 00 22 01 00 1b 63 6e 2f 69 74
0000440 63 61 73 74 2f 6a 76 6d 2f 74 35 2f 48 65 6c 6c
0000460 6f 57 6f 72 6c 64 01 00 10 6a 61 76 61 2f 6c 61
0000500 6e 67 2f 4f 62 6a 65 63 74 01 00 10 6a 61 76 61
0000520 2f 6c 61 6e 67 2f 53 79 73 74 65 6d 01 00 03 6f
0000540 75 74 01 00 15 4c 6a 61 76 61 2f 69 6f 2f 50 72
0000560 69 6e 74 53 74 72 65 61 6d 3b 01 00 13 6a 61 76
0000600 61 2f 69 6f 2f 50 72 69 6e 74 53 74 72 65 61 6d
0000620 01 00 07 70 72 69 6e 74 6c 6e 01 00 15 28 4c 6a
0000640 61 76 61 2f 6c 61 6e 67 2f 53 74 72 69 6e 67 3b
0000660 29 56 00 21 00 05 00 06 00 00 00 00 00 02 00 01
0000700 00 07 00 08 00 01 00 09 00 00 00 2f 00 01 00 01
0000720 00 00 00 05 2a b7 00 01 b1 00 00 00 02 00 0a 00
0000740 00 00 06 00 01 00 00 00 04 00 0b 00 00 00 0c 00
0000760 01 00 00 00 05 00 0c 00 0d 00 00 00 09 00 0e 00
0001000 0f 00 02 00 09 00 00 00 37 00 02 00 01 00 00 00
0001020 09 b2 00 02 12 03 b6 00 04 b1 00 00 00 02 00 0a
0001040 00 00 00 0a 00 02 00 00 00 06 00 08 00 07 00 0b
0001060 00 00 00 0c 00 01 00 00 00 09 00 10 00 11 00 00
0001100 00 12 00 00 00 05 01 00 10 00 00 00 01 00 13 00
0001120 00 00 02 00 14
而在这个class文件中包含的信息有魔数、版本、常量池、访问标识与继承信息、Field信息、Method信息、附加属性。其中:
魔数:表示当前文件是否是class类型的文件。
版本:表示类的版本,也就是JDK的版本。
附加属性:是一些额外的元数据,用于提供对类、方法、字段或注解的更详细描述和信息。这些附加属性以属性表的形式存储在字节码文件中。
2.字节码指令
2.1 入门
构造方法的字节码指令如下所示
2a b7 00 01 b1
- 2a => aload_0 加载 slot 0 的局部变量,即 this,做为下面的 invokespecial 构造方法调用的参数
- b7 => invokespecial 预备调用构造方法,哪个方法呢?
- 00 01 引用常量池中 #1 项,即【 Method java/lang/Object."":()V 】
- b1 表示返回
主方法的字节码指令如下所示
b2 00 02 12 03 b6 00 04 b1
- b2 => getstatic 用来加载静态变量,哪个静态变量呢?
- 00 02 引用常量池中 #2 项,即【Field java/lang/System.out:Ljava/io/PrintStream;】
- 12 => ldc 加载参数,哪个参数呢?
- 03 引用常量池中 #3 项,即 【String hello world】
- b6 => invokevirtual 预备调用成员方法,哪个方法呢?
- 00 04 引用常量池中 #4 项,即【Method java/io/PrintStream.println:(Ljava/lang/String;)V】
- b1 表示返回
上述这些指令都是Java虚拟机真正解释执行的,而aload_0、invokespecial等是一些助记符,是为了便于人类理解的。
2.2 Javap工具
自己分析类文件结构太麻烦了,Oracle 提供了 javap 工具来反编译 class 文件
将HelloWorld.class文件利用Javap工具反编译后的类文件结构如下所示:
[root@localhost ~]# javap -v HelloWorld.class
Classfile /root/HelloWorld.classLast modified Jul 7, 2019; size 597 bytesMD5 checksum 361dca1c3f4ae38644a9cd5060ac6dbcCompiled from "HelloWorld.java"
public class cn.itcast.jvm.t5.HelloWorldminor version: 0major version: 52flags: ACC_PUBLIC, ACC_SUPER
Constant pool:#1 = Methodref #6.#21 // java/lang/Object."<init>":()V#2 = Fieldref #22.#23 //
java/lang/System.out:Ljava/io/PrintStream;#3 = String #24 // hello world#4 = Methodref #25.#26 // java/io/PrintStream.println:
(Ljava/lang/String;)V#5 = Class #27 // cn/itcast/jvm/t5/HelloWorld#6 = Class #28 // java/lang/Object#7 = Utf8 <init>#8 = Utf8 ()V#9 = Utf8 Code#10 = Utf8 LineNumberTable#11 = Utf8 LocalVariableTable#12 = Utf8 this#13 = Utf8 Lcn/itcast/jvm/t5/HelloWorld;#14 = Utf8 main#15 = Utf8 ([Ljava/lang/String;)V#16 = Utf8 args#17 = Utf8 [Ljava/lang/String;#18 = Utf8 MethodParameters#19 = Utf8 SourceFile#20 = Utf8 HelloWorld.java#21 = NameAndType #7:#8 // "<init>":()V#22 = Class #29 // java/lang/System#23 = NameAndType #30:#31 // out:Ljava/io/PrintStream;#24 = Utf8 hello world#25 = Class #32 // java/io/PrintStream#26 = NameAndType #33:#34 // println:(Ljava/lang/String;)V#27 = Utf8 cn/itcast/jvm/t5/HelloWorld#28 = Utf8 java/lang/Object#29 = Utf8 java/lang/System#30 = Utf8 out#31 = Utf8 Ljava/io/PrintStream;#32 = Utf8 java/io/PrintStream#33 = Utf8 println#34 = Utf8 (Ljava/lang/String;)V
{public cn.itcast.jvm.t5.HelloWorld();descriptor: ()Vflags: ACC_PUBLICCode:stack=1, locals=1, args_size=10: aload_01: invokespecial #1 // Method java/lang/Object."
<init>":()V4: returnLineNumberTable:line 4: 0LocalVariableTable:Start Length Slot Name Signature0      5      0   this Lcn/itcast/jvm/t5/HelloWorld;public static void main(java.lang.String[]);descriptor: ([Ljava/lang/String;)Vflags: ACC_PUBLIC, ACC_STATICCode:stack=2, locals=1, args_size=10: getstatic #2 // Field
java/lang/System.out:Ljava/io/PrintStream;3: ldc #3 // String hello world5: invokevirtual #4 // Method
java/io/PrintStream.println:(Ljava/lang/String;)V8: returnLineNumberTable:line 6: 0line 7: 8LocalVariableTable:Start Length Slot Name Signature0     9     0   args [Ljava/lang/String;MethodParameters:Name Flagsargs
}
2.3 图解方法执行流程
1.原始 java 代码
package cn.itcast.jvm.t3.bytecode;
/**
* 演示 字节码指令 和 操作数栈、常量池的关系
*/
public class Demo3_1 {
public static void main(String[] args) {
int a = 10;
int b = Short.MAX_VALUE + 1;
int c = a + b;
System.out.println(c);
}
}
2.编译后的字节码文件
[root@localhost ~]# javap -v Demo3_1.class
Classfile /root/Demo3_1.classLast modified Jul 7, 2019; size 665 bytesMD5 checksum a2c29a22421e218d4924d31e6990cfc5Compiled from "Demo3_1.java"
public class cn.itcast.jvm.t3.bytecode.Demo3_1minor version: 0major version: 52flags: ACC_PUBLIC, ACC_SUPER
Constant pool:#1 = Methodref     #7.#26     // java/lang/Object."<init>":()V#2 = Class         #27        // java/lang/Short#3 = Integer       32768#4 = Fieldref      #28.#29    //
java/lang/System.out:Ljava/io/PrintStream;#5 = Methodref     #30.#31    // java/io/PrintStream.println:(I)V#6 = Class         #32        // cn/itcast/jvm/t3/bytecode/Demo3_1#7 = Class         #33        // java/lang/Object#8 = Utf8          <init>#9 = Utf8          ()V#10 = Utf8         Code#11 = Utf8         LineNumberTable#12 = Utf8         LocalVariableTable#13 = Utf8         this#14 = Utf8         Lcn/itcast/jvm/t3/bytecode/Demo3_1;#15 = Utf8         main#16 = Utf8         ([Ljava/lang/String;)V#17 = Utf8         args#18 = Utf8         [Ljava/lang/String;#19 = Utf8         a#20 = Utf8         I#21 = Utf8         b#22 = Utf8         c#23 = Utf8         MethodParameters#24 = Utf8         SourceFile#25 = Utf8         Demo3_1.java#26 = NameAndType  #8:#9      // "<init>":()V#27 = Utf8         java/lang/Short#28 = Class        #34        // java/lang/System#29 = NameAndType  #35:#36    // out:Ljava/io/PrintStream;#30 = Class        #37        // java/io/PrintStream#31 = NameAndType  #38:#39    // println:(I)V#32 = Utf8         cn/itcast/jvm/t3/bytecode/Demo3_1#33 = Utf8         java/lang/Object#34 = Utf8         java/lang/System#35 = Utf8         out#36 = Utf8         Ljava/io/PrintStream;#37 = Utf8         java/io/PrintStream#38 = Utf8         println#39 = Utf8         (I)V
{public cn.itcast.jvm.t3.bytecode.Demo3_1();descriptor: ()Vflags: ACC_PUBLICCode:stack=1, locals=1, args_size=10: aload_01: invokespecial #1         // Method java/lang/Object."
<init>":()V4: returnLineNumberTable:line 6: 0LocalVariableTable:Start Length Slot Name Signature0     5     0   this Lcn/itcast/jvm/t3/bytecode/Demo3_1;public static void main(java.lang.String[]);descriptor: ([Ljava/lang/String;)Vflags: ACC_PUBLIC, ACC_STATICCode:stack=2, locals=4, args_size=10: bipush 102: istore_13: ldc #3                        // int 327685: istore_26: iload_17: iload_28: iadd9: istore_310: getstatic #4                 // Field
java/lang/System.out:Ljava/io/PrintStream;13: iload_314: invokevirtual #5             // Method
java/io/PrintStream.println:(I)V17: returnLineNumberTable:line 8: 0line 9: 3line 10: 6line 11: 10line 12: 17LocalVariableTable:Start Length Slot Name Signature0    18     0   args [Ljava/lang/String;3    15     1    a   I6    12     2    b   I10   8      3    c   IMethodParameters:Name                         Flagsargs
}
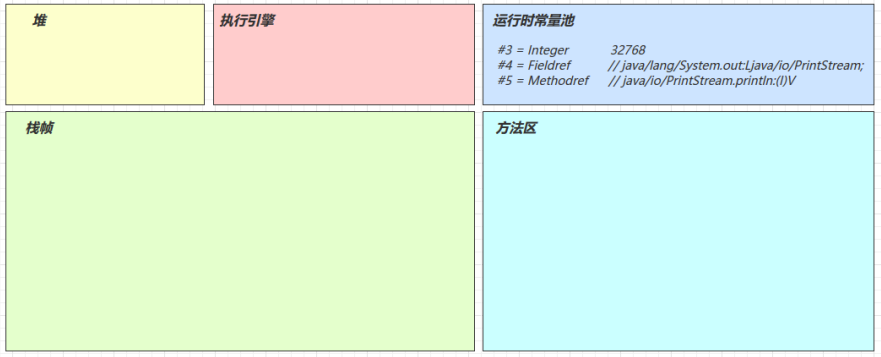
3.常量池载入运行时常量池
字节码中常量池的数据会被放入到运行时常量池
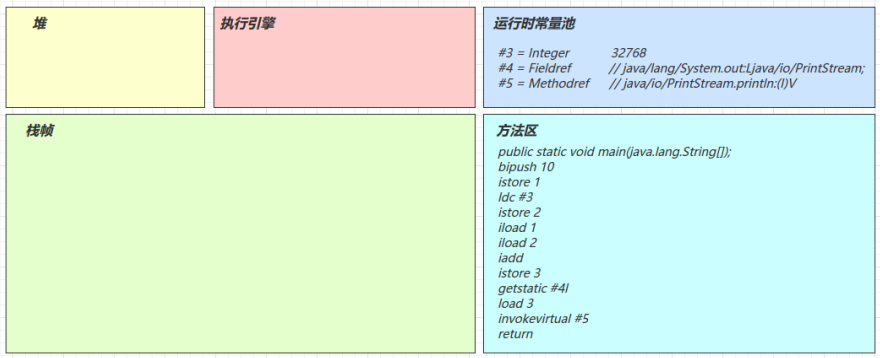
4.方法字节码载入方法区
方法的字节码会被放入到方法区中
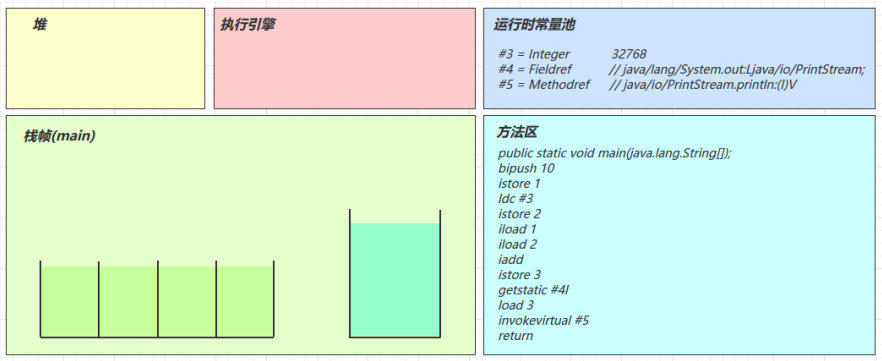
5.main 线程开始运行,分配栈帧内存
stack=2,locals=4
- locals=4决定了局部变量表的槽位是4
- stack=2决定了操作数栈的深度为2
6.执行引擎开始执行字节码
bipush 10:将一个 byte 压入操作数栈,其长度会补齐 4 个字节。类似的指令还有:
- sipush 将一个 short 压入操作数栈(其长度会补齐 4 个字节)
- ldc 将一个 int 压入操作数栈
- ldc2_w 将一个 long 压入操作数栈(分两次压入,因为 long 是 8 个字节)
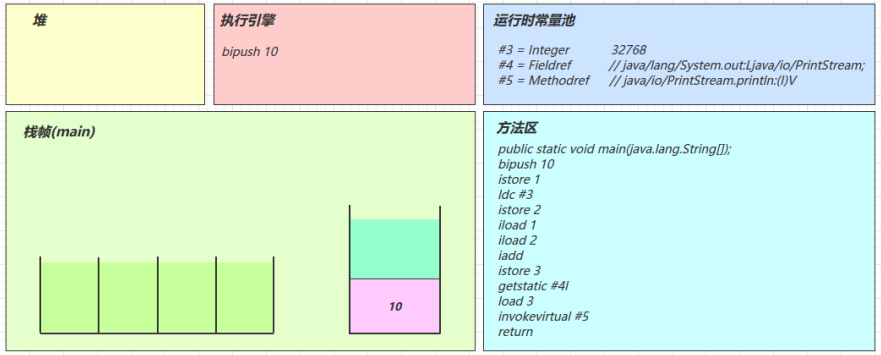
这里是short 范围以内的小的数字都是和字节码指令存在一起,超过 short 范围的数字存入了常量池
istore_1:将操作数栈顶数据弹出,存入局部变量表的 slot 1
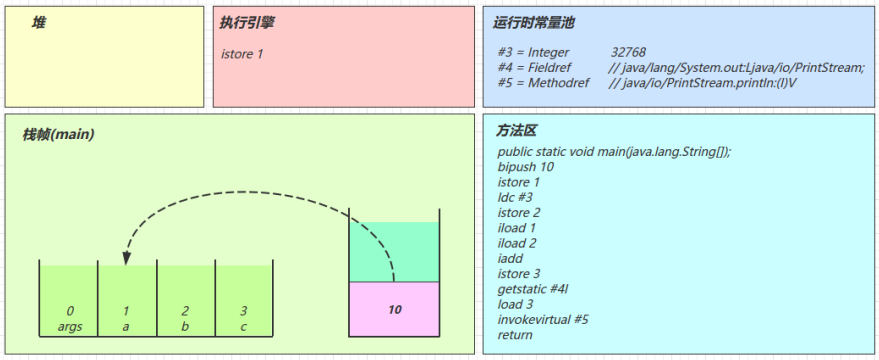
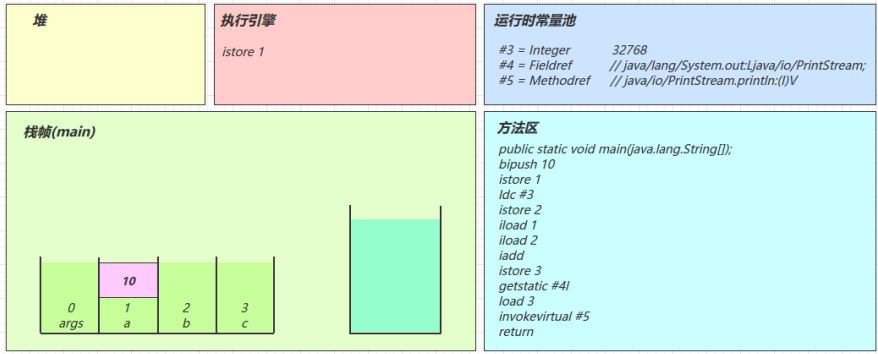
ldc #3:从运行时常量池加载 #3 数据到操作数栈
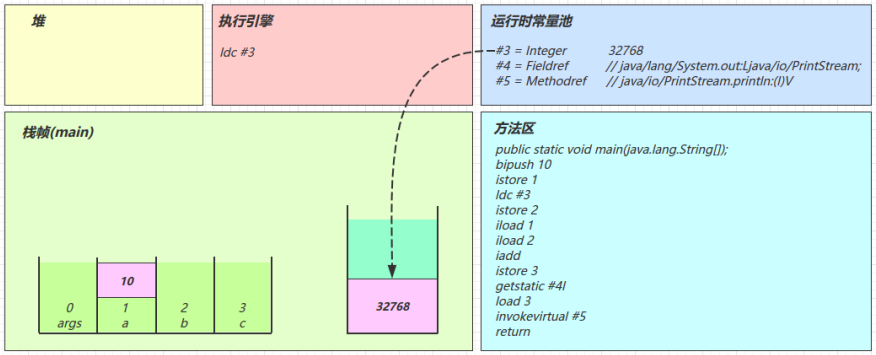
注意:Short.MAX_VALUE 是 32767,所以 32768 = Short.MAX_VALUE + 1 实际是在编译期间计算好的
istore_2:将操作数栈的栈顶元素弹出,存入到局部变量表中slot为2的位置
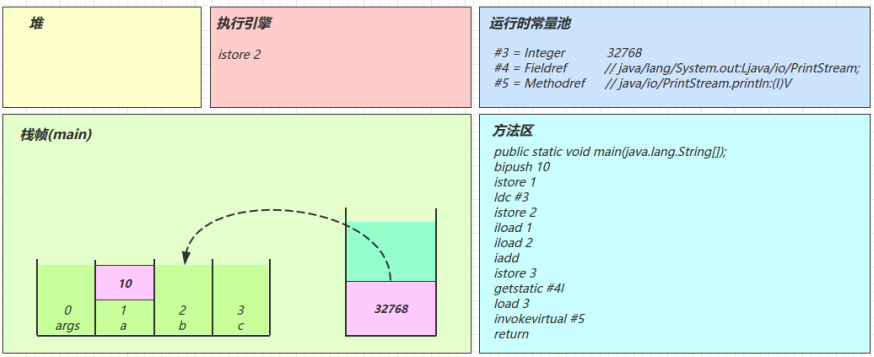
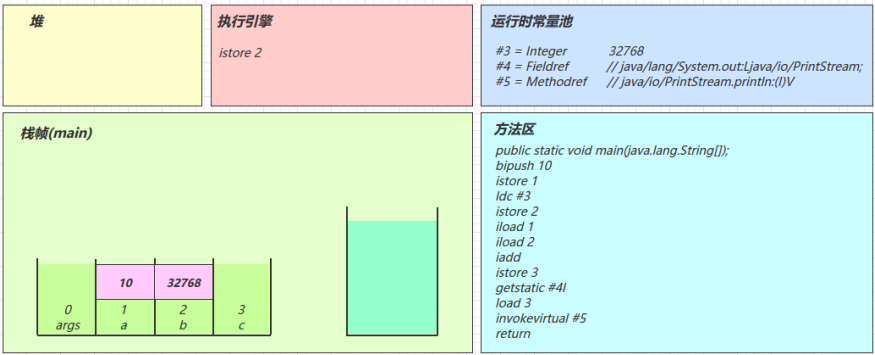
iload_1:将局部变量表中slot为1的变量值复制一份到操作数栈中
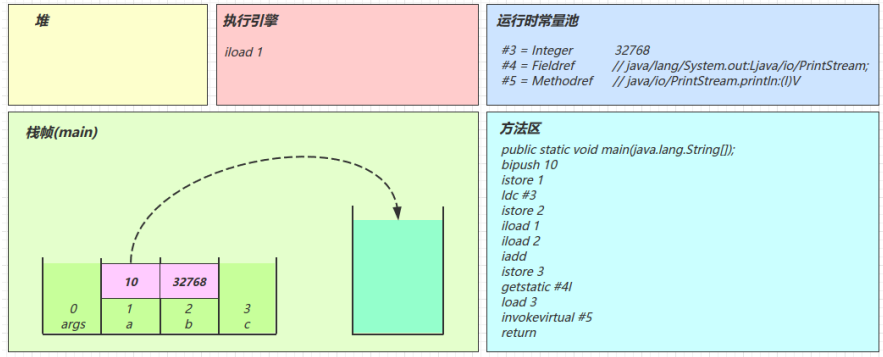
iload_2:将局部变量表中slot为2的变量值复制一份到操作数栈中

iadd:将操作数栈中的二个元素弹出相加后,重新存入操作数栈
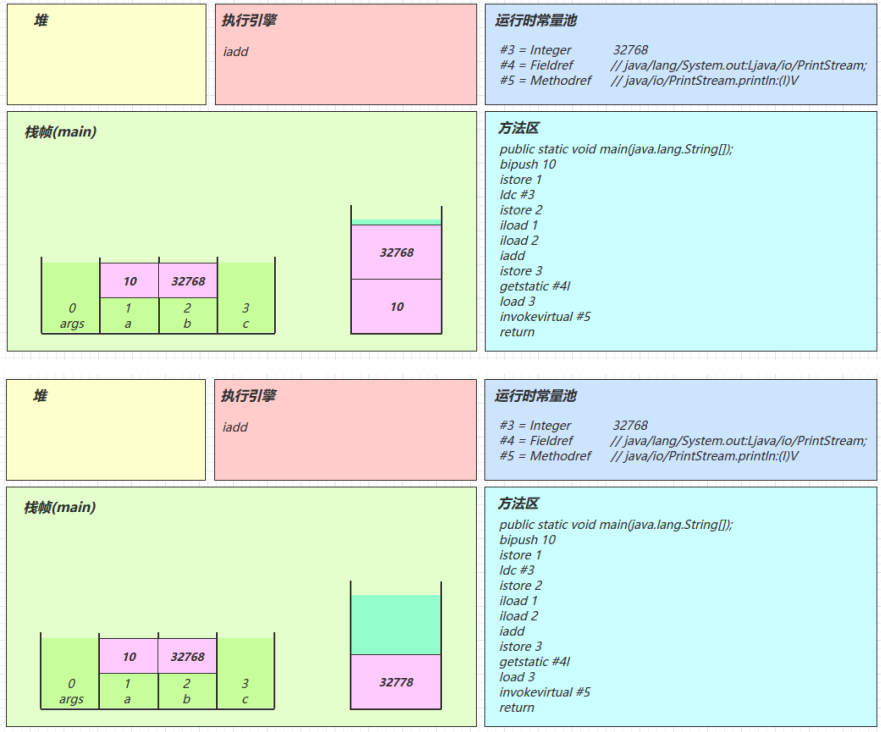
istore_3:将操作数栈中的栈顶元素弹出,存入到局部变量表中slot为3的位置

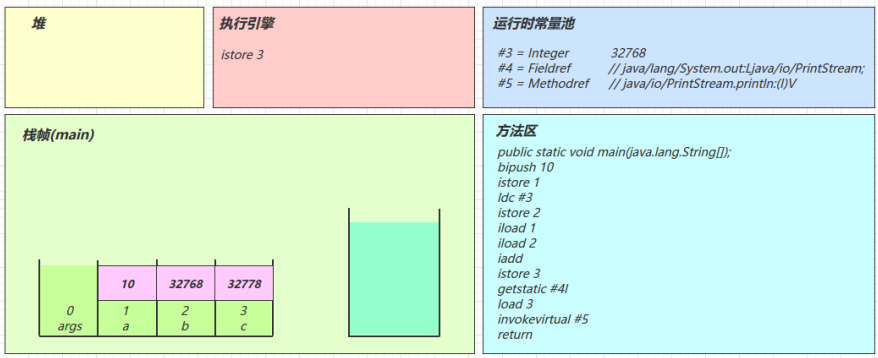
getstatic #4:根据运行时常量池取得 #4 在堆中的对象,并将对象引用存入到操作数栈中

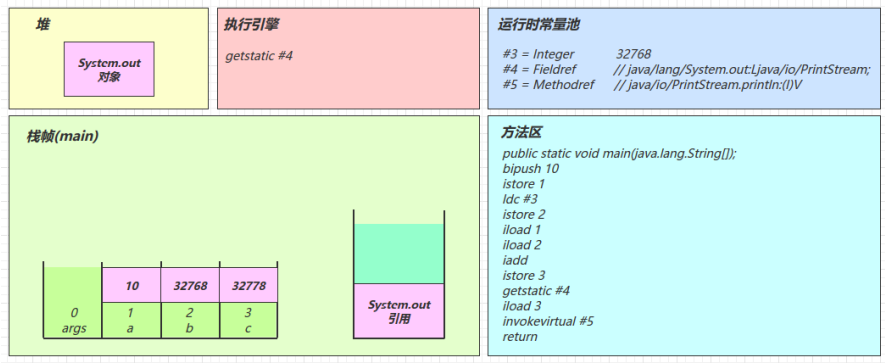
iload_3
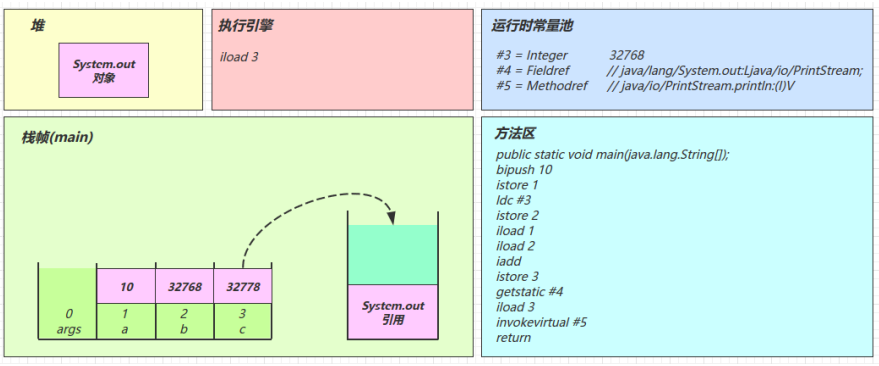
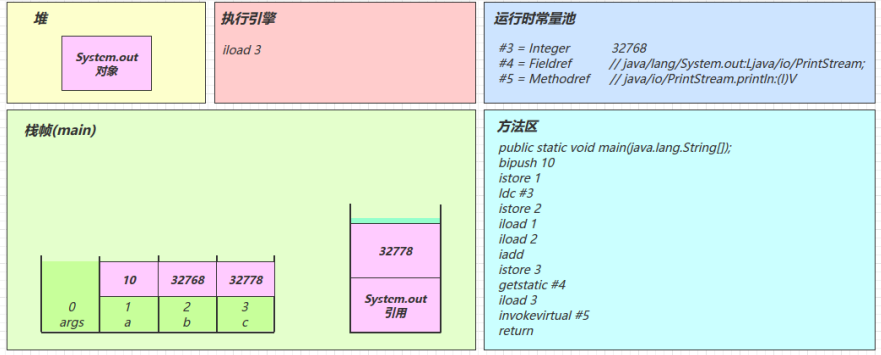
invokevirtual #5
- 找到常量池 #5 项
- 定位到方法区 java/io/PrintStream.println:(I)V 方法
- 生成新的栈帧(分配 locals、stack等)
- 传递参数,执行新栈帧中的字节码
- 执行完毕后,弹出此方法对应的栈帧
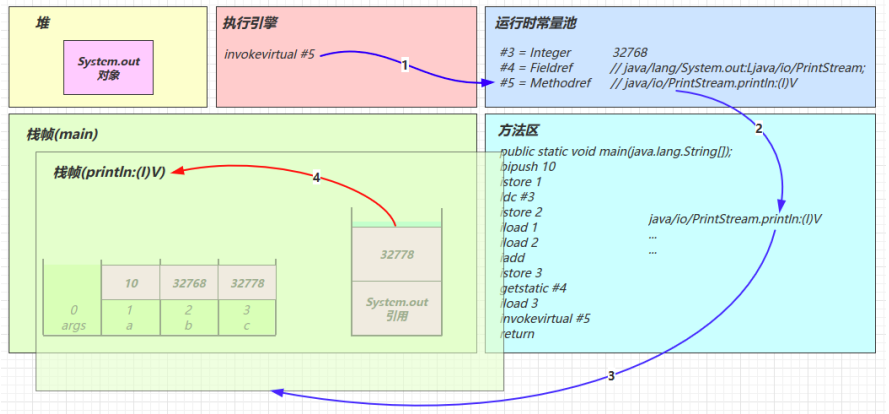
清除 main 操作数栈内容
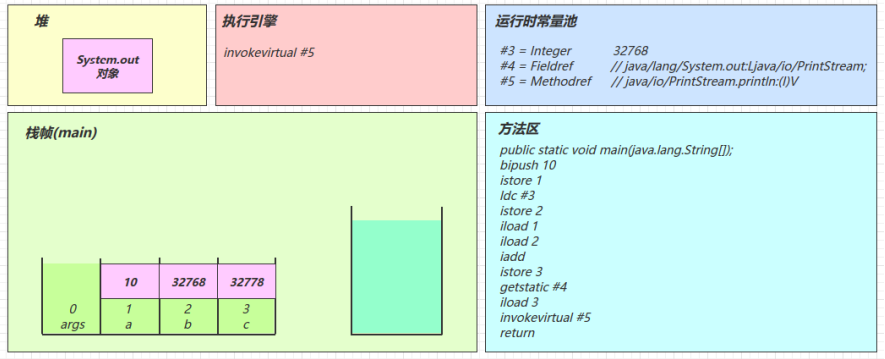
return
- 完成 main 方法调用,弹出 main 栈帧
- 程序结束
2.4 图解 i++ 执行流程
目的:从字节码角度分析 i++ 相关题目
Java代码
package cn.itcast.jvm.t3.bytecode;
/**
* 从字节码角度分析 a++ 相关题目
*/
public class Demo3_2 {public static void main(String[] args) {int a = 10;int b = a++ + ++a + a--;System.out.println(a);System.out.println(b);}
}
字节码:
public static void main(java.lang.String[]);descriptor: ([Ljava/lang/String;)Vflags: (0x0009) ACC_PUBLIC, ACC_STATICCode:stack=2, locals=3, args_size=10: bipush 102: istore_13: iload_14: iinc 1, 17: iinc 1, 110: iload_111: iadd12: iload_113: iinc 1, -116: iadd17: istore_218: getstatic #2 // Field
java/lang/System.out:Ljava/io/PrintStream;21: iload_122: invokevirtual #3 // Method
java/io/PrintStream.println:(I)V25: getstatic #2 // Field
java/lang/System.out:Ljava/io/PrintStream;28: iload_229: invokevirtual #3 // Method
java/io/PrintStream.println:(I)V32: returnLineNumberTable:line 8: 0line 9: 3line 10: 18line 11: 25line 12: 32LocalVariableTable:Start Length Slot Name Signature0     33    0   args [Ljava/lang/String;3     30    1    a    I18    15    2    b    I
分析:
- 注意 iinc 指令是直接在局部变量 slot 上进行运算
- a++ 和 ++a 的区别是先执行 iload 还是 先执行 iinc
图解main方法执行流程
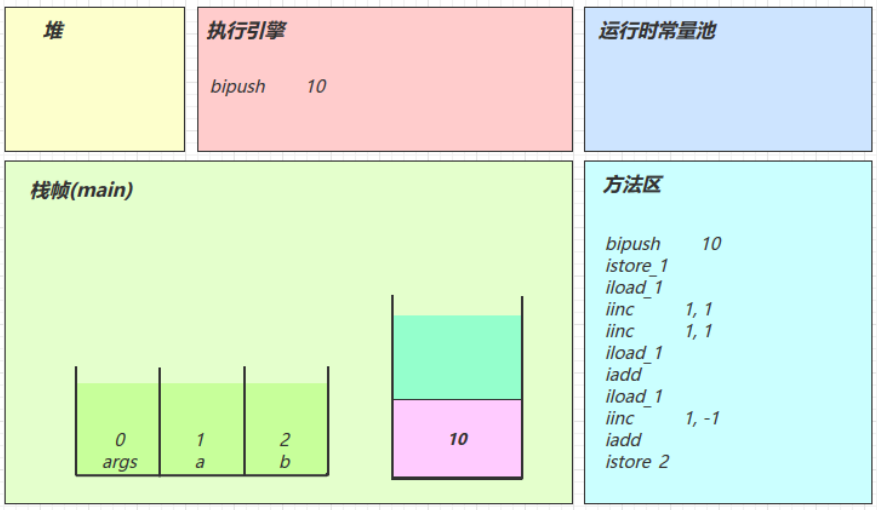
bipush 10:将方法区中的字面量10加入到操作数栈中
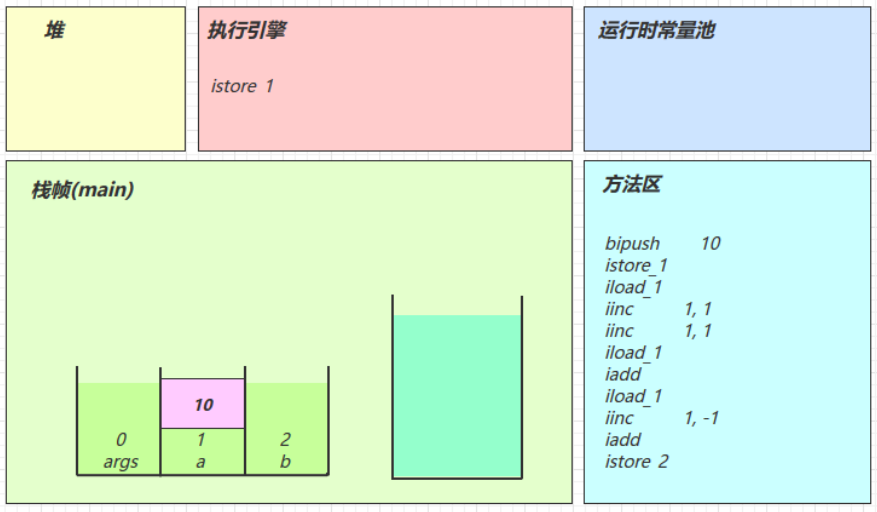
istore 1:将操作数栈的栈顶元素弹出,加入到局部变量表中slot=1的位置
iload 1:将局部变量表中 slot=1 处的变量值 10 复制一份到操作数栈中

linc 1,1:直接将方法区中的1与局部变量表中slot=1处的变量值相加
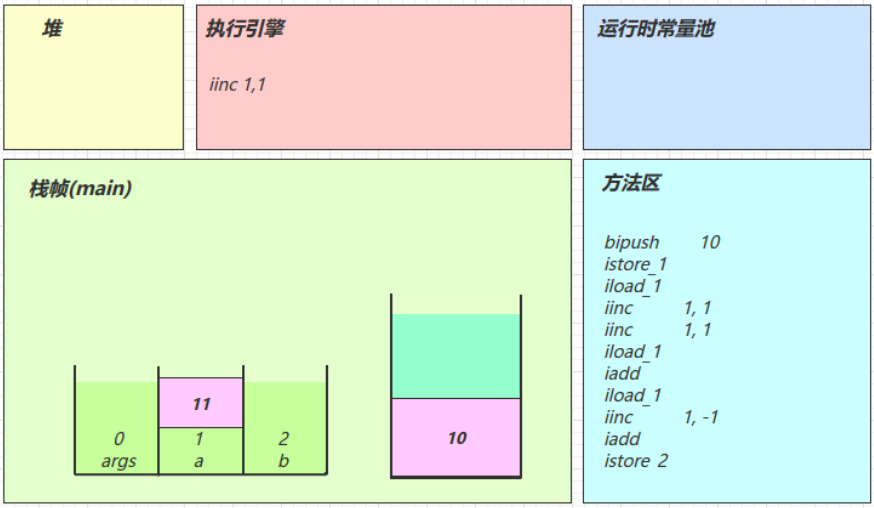
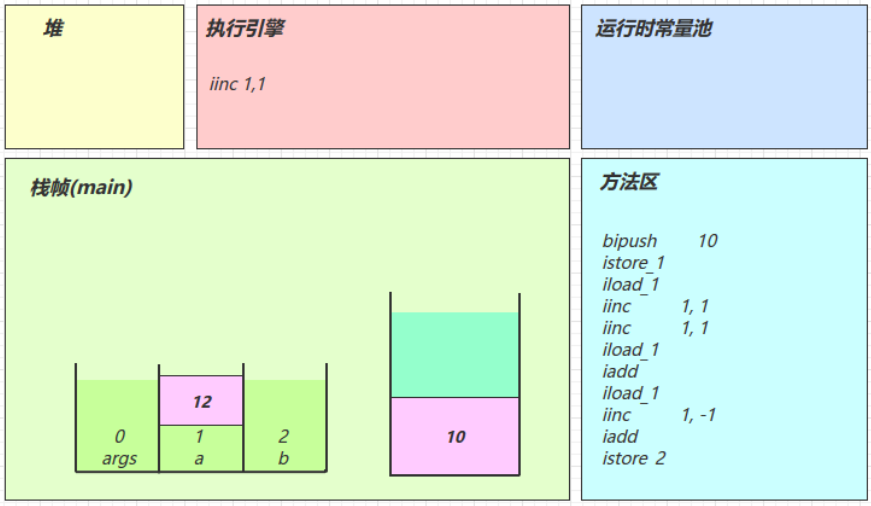
iload 1:将局部变量表中slot=1处的变量值12复制一份到操作数栈中
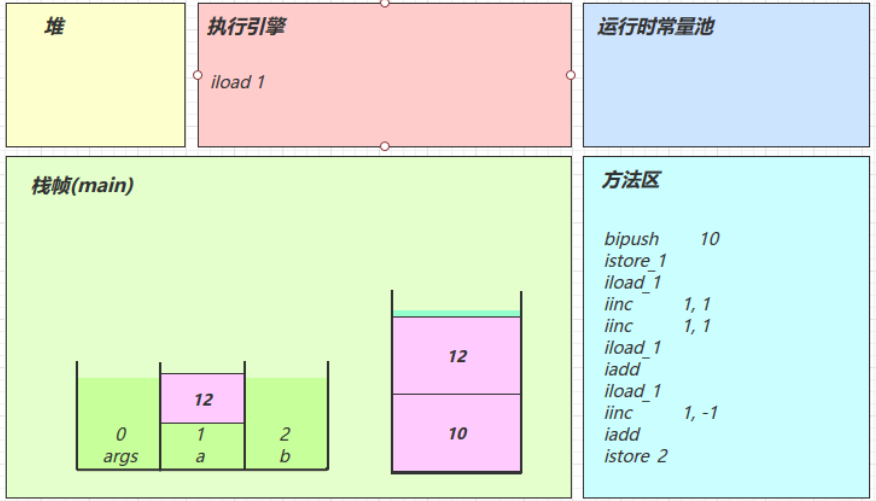
iadd:将操作数栈中的二个元素弹出相加后,重新存入操作数栈

iload 1:将局部变量表中slot=1处的变量值12复制一份到操作数栈中
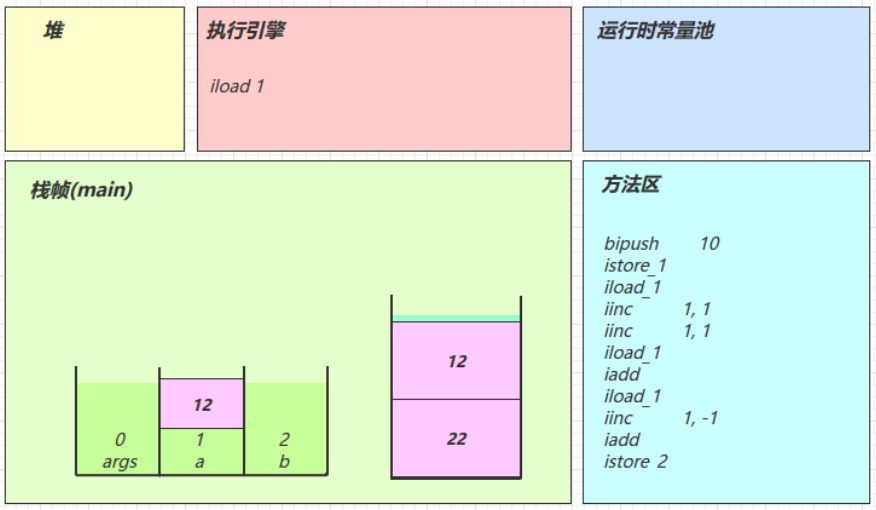
linc 1,-1:将方法区的 -1 与局部变量表中slot = 1处的元素相加
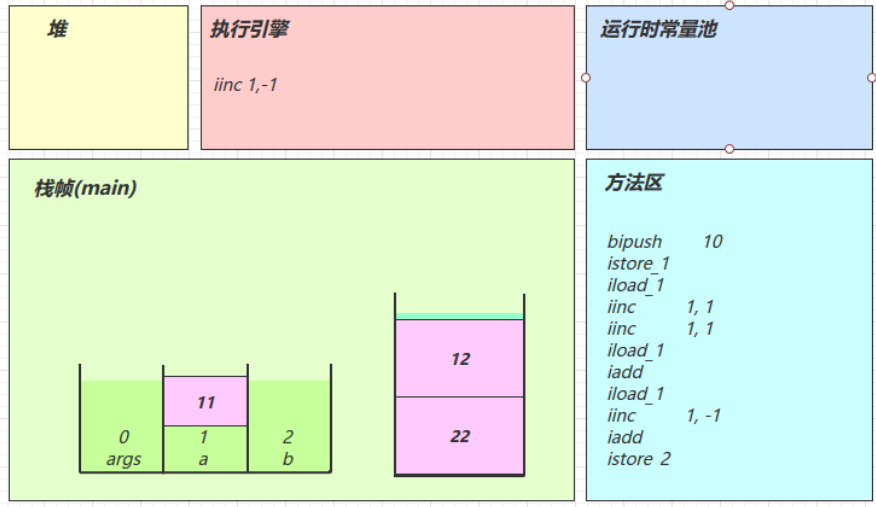
iadd:将操作数栈中的二个元素弹出相加后,重新存入操作数栈
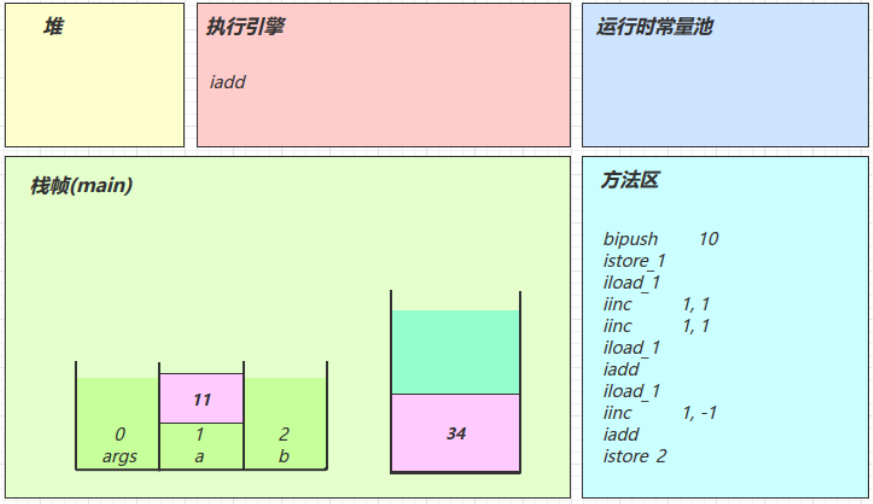
istore:将操作数栈的栈顶元素弹出加入到局部变量表中 slot = 2 处的位置
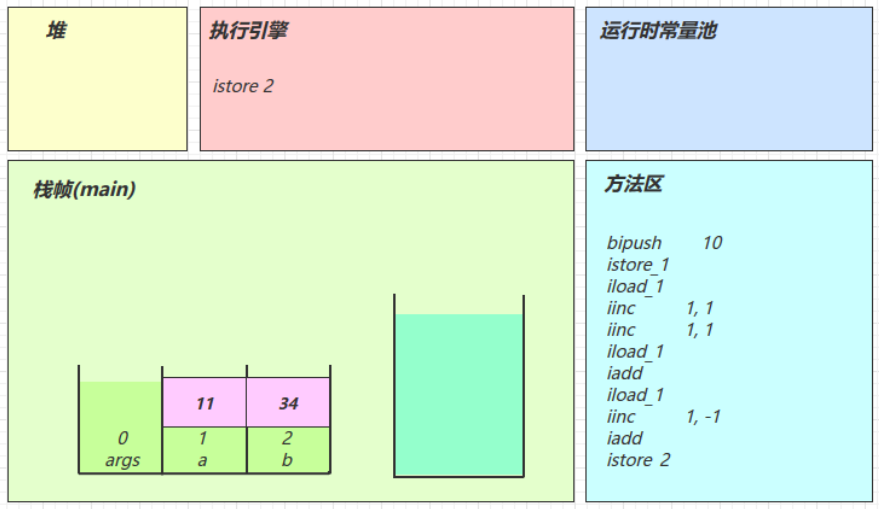
总结:从字节码角度解读分析了 a ++ 和 ++ a 的区别
a++ 是先执行 iload_1,再执行 linc 1,1
++a 是先执行 linc 1,1,再执行 iload_1
a- - 是先执行 iload_1,再执行 linc 1,-1
2.5 条件判断指令
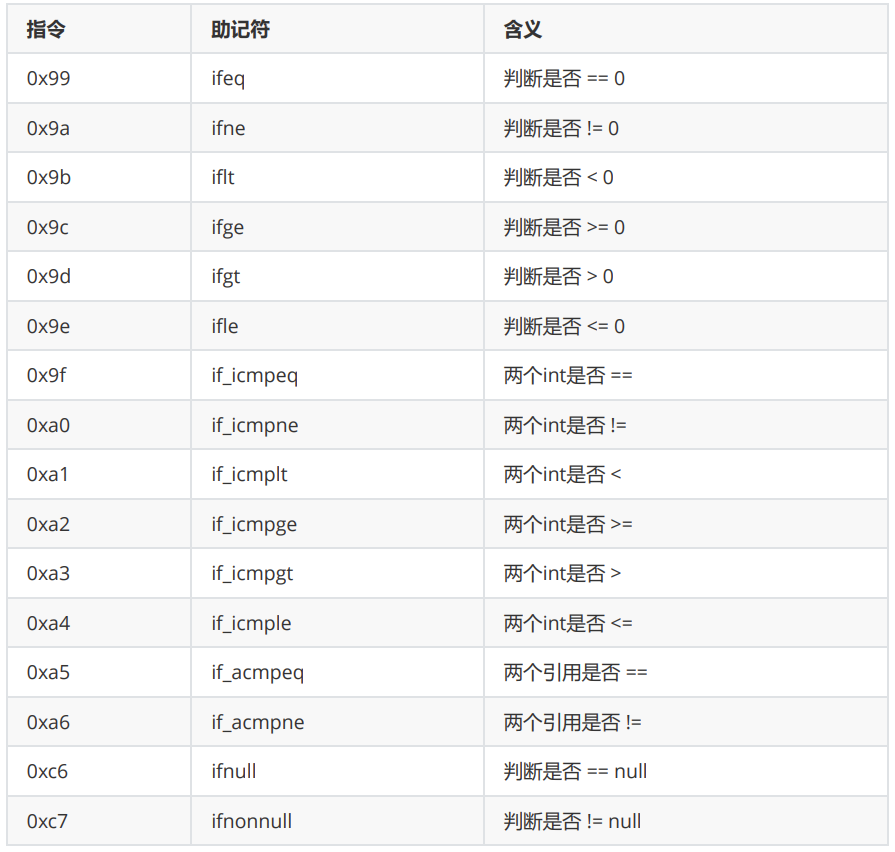
几点说明:
- byte,short,char 都会按 int 比较,因为操作数栈都是 4 字节
- goto 用来进行跳转到指定行号的字节码
条件判断指令的示例:
Java代码
public class Demo3_3 {public static void main(String[] args) {int a = 0;if(a == 0) {a = 10;} else {a = 20;}}
}
字节码:
0: iconst_0
1: istore_1
2: iload_1
3: ifne 12
6: bipush 10
8: istore_1
9: goto 15
12: bipush 20
14: istore_1
15: return注意:以上比较指令中没有 long,float,double 的比较,那么它们要比较怎 么办?
参考 https://docs.oracle.com/javase/specs/jvms/se7/html/jvms-6.html#jvms-6.5.lcmp
2.6 循环控制指令
1.while 循环
Java代码
public class Demo3_4 {public static void main(String[] args) {int a = 0;while (a < 10) {a++;}}
}
字节码
0: iconst_0
1: istore_1
2: iload_1
3: bipush 10
5: if_icmpge 14
8: iinc 1, 1
11: goto 2
14: return
2.do while 循环
Java代码
public class Demo3_5 {public static void main(String[] args) {int a = 0;do {a++;} while (a < 10);}
}
字节码
 0: iconst_01: istore_12: iinc 1, 15: iload_16: bipush 108: if_icmplt 2
11: return
3.for 循环
Java代码
public class Demo3_6 {public static void main(String[] args) {for (int i = 0; i < 10; i++) {}}
}
字节码
0: iconst_0
1: istore_1
2: iload_1
3: bipush 10
5: if_icmpge 14
8: iinc 1, 1
11: goto 2
14: return
比较 while 和 for 的字节码,你发现它们是一模一样的,殊途也能同归😊
2.7 构造方法的原理
1.<init>()V
编译器会按从上至下的顺序,收集所有 {} 代码块和成员变量赋值的代码,形成新的构造方法,但原始构造方法内的代码总是在最后
Java代码
字节码
public cn.itcast.jvm.t3.bytecode.Demo3_8_2(java.lang.String, int);descriptor: (Ljava/lang/String;I)Vflags: ACC_PUBLICCode:stack=2, locals=3, args_size=30: aload_01: invokespecial #1 // super.<init>()V4: aload_05: ldc #2 // <- "s1"7: putfield #3 // -> this.a10: aload_011: bipush 20 // <- 2013: putfield #4 // -> this.b16: aload_017: bipush 10 // <- 1019: putfield #4 // -> this.b22: aload_023: ldc #5 // <- "s2"25: putfield #3 // -> this.a28: aload_0 // ------------------------------29: aload_1 // <- slot 1(a) "s3" |30: putfield #3 // -> this.a |33: aload_0 |34: iload_2 // <- slot 2(b) 30 |35: putfield #4 // -> this.b --------------------38: returnLineNumberTable: ...LocalVariableTable:Start Length Slot Name Signature0    39     0  this Lcn/itcast/jvm/t3/bytecode/Demo3_8_2;0    39     1   a   Ljava/lang/String;0    39     2   b   I
MethodParameters: ...
2.<cinit>()V
编译器会按从上至下的顺序,收集所有 static 静态代码块和静态成员赋值的代码,合并为一个特殊的方法 <cinit>()V
Java代码
public class Demo3_8_1 {static int i = 10;static {i = 20;}static {i = 30;}
}
字节码
0: bipush 10
2: putstatic #2      // Field i:I
5: bipush 20
7: putstatic #2      // Field i:I
10: bipush 30
12: putstatic #2     // Field i:I
15: return
<cinit>()V 方法会在类加载的初始化阶段被调用
2.8 方法调用的原理
通过以下几种不同的方法及其调用来查看对应的字节码指令
Java代码
public class Demo3_9 {public Demo3_9() { }private void test1() { }private final void test2() { }public void test3() { }public static void test4() { }public static void main(String[] args) {Demo3_9 d = new Demo3_9();d.test1();d.test2();d.test3();d.test4();Demo3_9.test4();}}
字节码
0: new #2            // class cn/itcast/jvm/t3/bytecode/Demo3_9
3: dup
4: invokespecial #3  // Method "<init>":()V
7: astore_1
8: aload_1
9: invokespecial #4  // Method test1:()V
12: aload_1
13: invokespecial #5 // Method test2:()V
16: aload_1
17: invokevirtual #6 // Method test3:()V
20: aload_1
21: pop
22: invokestatic #7  // Method test4:()V
25: invokestatic #7  // Method test4:()V
28: return
由字节码可知如下结论:
new 是创建对象,给对象分配堆内存,执行成功会将 对象引用 压入操作数栈
dup 是复制操作数栈栈顶的内容,本例即为对象引用,为什么需要两份引用呢,一个是要配合 invokespecial 调用该对象的构造方法 <init>:()V ,另一个要配合 astore_1 赋值给局部变量
最终方法(final),私有方法(private),构造方法都是由 invokespecial 指令来调用,属于静态绑定。此外,通过 super 调用父类方法也是执行 invokespecial 指令
普通成员方法是由 invokevirtual 调用,属于动态绑定,即支持多态
普通成员方法与静态方法调用的另一个区别是,执行方法前是否需要【对象引用】
比较有意思的是 d.test4(); 是通过【对象引用】调用一个静态方法,可以看到在调用 invokestatic 之前执行了 pop 指令,把【对象引用】从操作数栈弹掉了
2.9 多态的原理
接下来通过以下Java代码和 jps、HSDB工具来说明多态的原理。最后的总结部分是核心,如果总结部分没看懂,可以看看多态原理这部分的过程。
Java代码
package cn.itcast.jvm.t3.bytecode;
import java.io.IOException;
/**
* 演示多态原理,注意加上下面的 JVM 参数,禁用指针压缩
* -XX:-UseCompressedOops -XX:-UseCompressedClassPointers
*/
public class Demo3_10 {public static void test(Animal animal) {animal.eat();System.out.println(animal.toString());}
public static void main(String[] args) throws IOException {test(new Cat());test(new Dog());System.in.read();
}
}
abstract class Animal {public abstract void eat();@Overridepublic String toString() {return "我是" + this.getClass().getSimpleName();}
}
class Dog extends Animal {@Overridepublic void eat() {System.out.println("啃骨头");}
}
class Cat extends Animal {@Overridepublic void eat() {System.out.println("吃鱼");}
}
1.运行代码
当停在 System.in.read() 方法上时,运行 jps 获取当前进程的 id
2.运行 HSDB 工具
进入 JDK 安装目录,执行以下命令打开 HSDB 的图形化界面
java -cp ./lib/sa-jdi.jar sun.jvm.hotspot.HSDB进入图形界面点击 file 选择下图所示的第一项,在输入进程 id
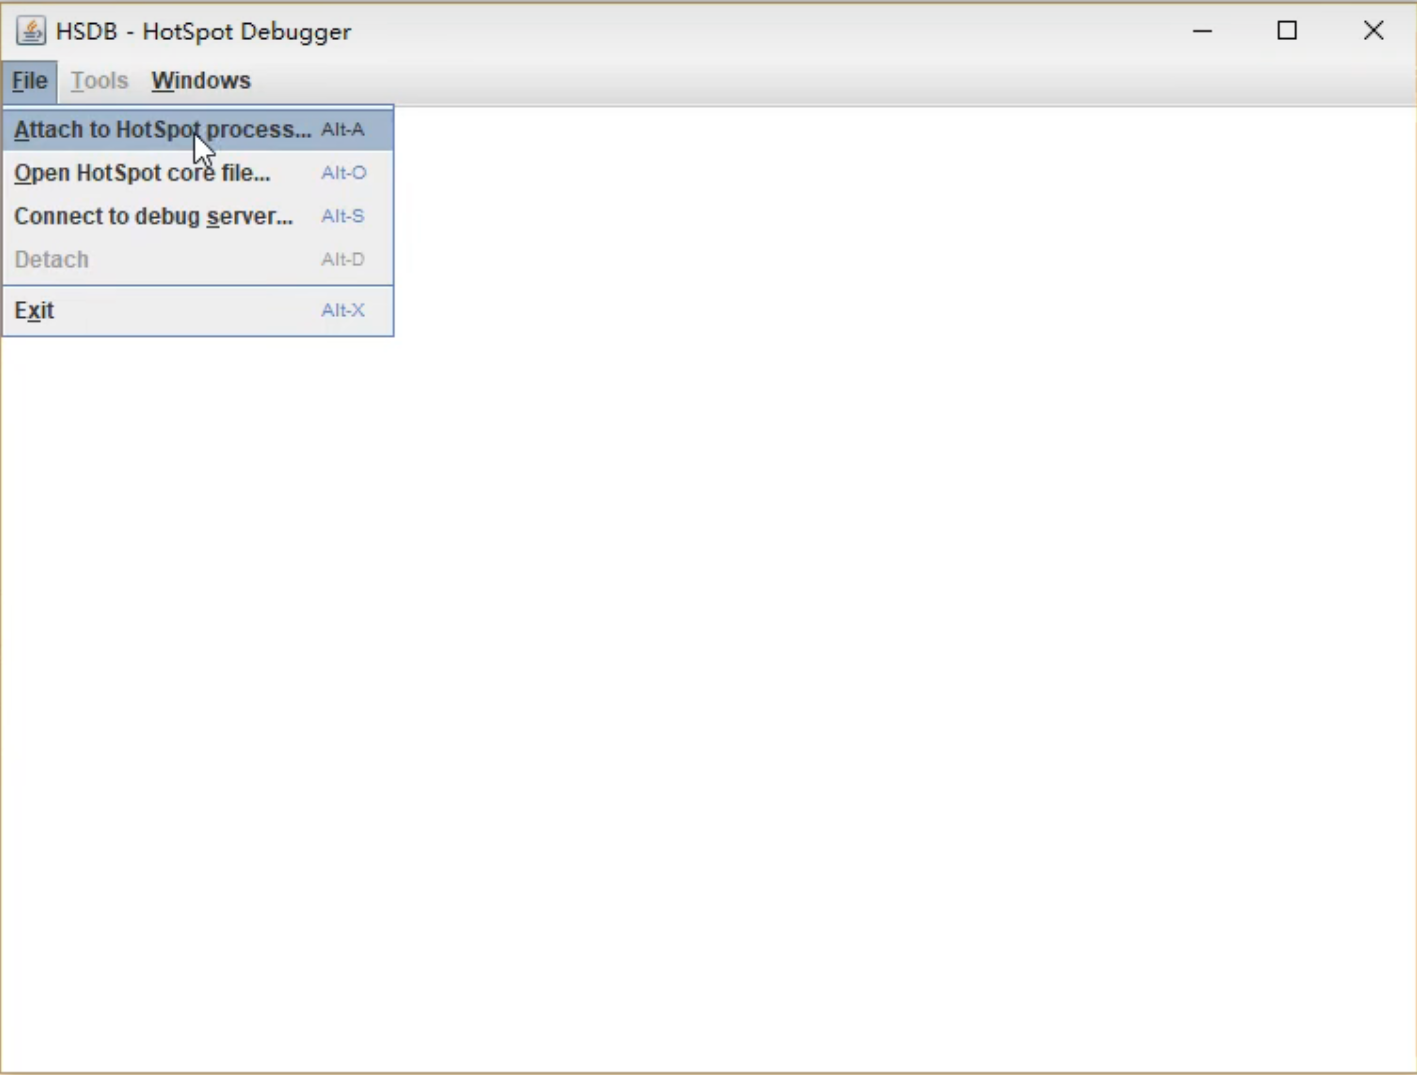
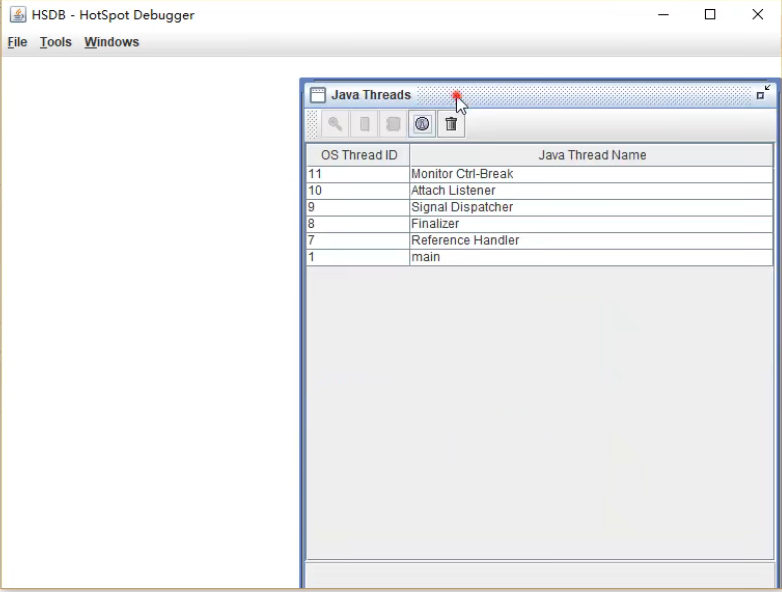
在弹出的界面中输入通过 jps 获得的进程 id,连接到 Demo3_10 这个程序

连接成功后
3.查找某个对象
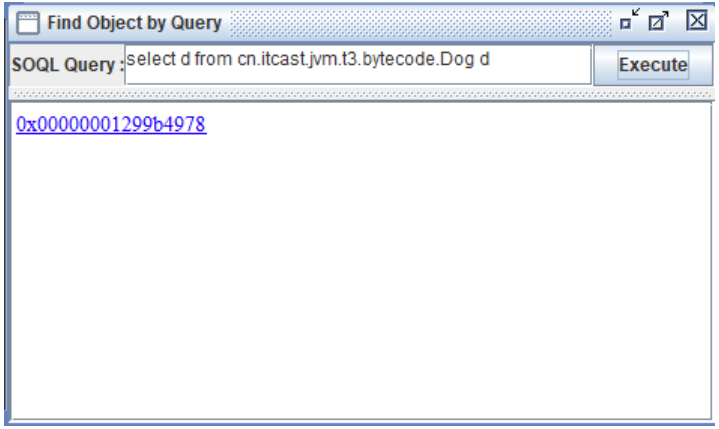
打开 Tools -> Find Object By Query
在弹出的窗口中输入 select d from cn.itcast.jvm.t3.bytecode.Dog d,点击 Execute 执行
4.查看对象内存结构
点击超链接可以看到对象的内存结构,此对象没有任何属性,因此只有对象头的 16 字节,前 8 字节是 MarkWord,后 8 字节就是对象的 Class 指针,但目前看不到它的实际地址
堆内存中的对象分为对象头和对象中的成员变量二部分,对象头总共占16个字节,
前八个字节是对象的哈希码、将来对象加锁时的锁标记等,称为MarkWord;
后八个字节是对象的类型指针,可以根据类型指针找到对象的class类
5.查看对象的 Class 的内存地址
可以通过 Windows -> Console 进入命令行(Command Line)模式,执行
mem 0x00000001299b4978 2
mem 有两个参数,参数 1 是对象地址,参数 2 是查看 2 行(即 16 字节)
结果中第二行 0x000000001b7d4028 即为 Class 的内存地址

6.查看类的 vtable(虚方法表)
点击 Tools 中的Inspector,在打开的窗口中输入 Class 的内存地址并回车,得到的结果便是字节码文件在方法区的完整内容,也就是类的全部信息。
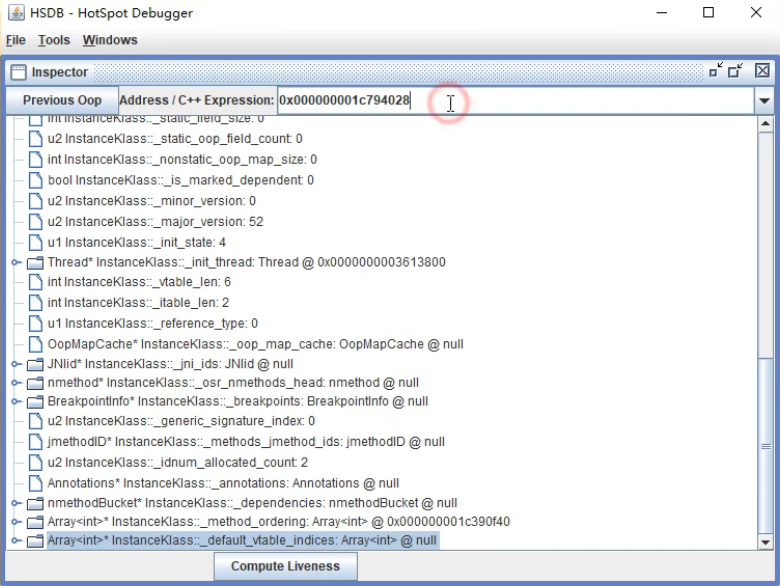
可以找到 Dog Class 的 vtable 长度为 6,意思就是 Dog 类有 6 个虚方法(虚方法都是多态相关的方法,final、static 方法不会列入)
那么这 6 个方法都是谁呢?根据一些资料可知,从 Class 的起始地址开始算,偏移 0x1b8 就是 vtable 的起始地址,进行计算得到:
0x000000001b7d4028
1b8 +
---------------------
0x000000001b7d41e0
通过HSDB中的 Windows -> Console 进入命令行模式,执行如下命令
mem 0x000000001b7d41e0 6
就得到了 6 个虚方法的入口地址
mem 0x000000001b7d41e0 6
0x000000001b7d41e0: 0x000000001b3d1b10
0x000000001b7d41e8: 0x000000001b3d15e8
0x000000001b7d41f0: 0x000000001b7d35e8
0x000000001b7d41f8: 0x000000001b3d1540
0x000000001b7d4200: 0x000000001b3d1678
0x000000001b7d4208: 0x000000001b7d3fa8
7.验证方法地址
通过点击 Tools -> Class Browser 会弹出一个窗口,在窗口中根据类名可以搜索到每个类,查看每个类的方法定义,比较可知
Dog - public void eat() @0x000000001b7d3fa8
Animal - public java.lang.String toString() @0x000000001b7d35e8;
Object - protected void finalize() @0x000000001b3d1b10;
Object - public boolean equals(java.lang.Object) @0x000000001b3d15e8;
Object - public native int hashCode() @0x000000001b3d1540;
Object - protected native java.lang.Object clone() @0x000000001b3d1678;
对号入座,发现
- eat() 方法是 Dog 类自己的
- toString() 方法是继承 String 类的
- finalize() ,equals(),hashCode(),clone() 都是继承 Object 类的
说明调用子类从父类那继承的方法,实际上还是调用的父类在方法区中的方法。这样,不同子类都继承到了父类的方法,但也都有自己独有的方法,这就是多态的原理。
多态原理总结
普通成员方法是由 invokevirtual 指令调用,当执行 invokevirtual 指令时
1. 先通过栈帧中的对象引用找到对象
2. 分析对象头,找到对象的实际 Class
3. Class 结构中有 vtable,它在类加载的链接阶段就已经根据方法的重写规则生成好了
4. 查表得到方法的具体地址
5. 执行方法的字节码
2.10 异常处理的原理
1.try-catch
Java代码
public class Demo3_11_1 {public static void main(String[] args) {int i = 0;try {i = 10;} catch (Exception e) {i = 20;}}
}
字节码
为了观察重点,下面的字节码省略了不重要的部分
public static void main(java.lang.String[]);descriptor: ([Ljava/lang/String;)Vflags: ACC_PUBLIC, ACC_STATICCode:stack=1, locals=3, args_size=10: iconst_01: istore_12: bipush 104: istore_15: goto 128: astore_29: bipush 2011: istore_112: returnException table:from to target type2    5   8    Class java/lang/ExceptionLineNumberTable: ...LocalVariableTable:Start Length Slot Name  Signature9      3      2   e    Ljava/lang/Exception;0      13     0   args [Ljava/lang/String;2      11     1   i     IStackMapTable: ...MethodParameters: ...
}
结论
- 可以看到多出来一个 Exception table 的结构,[from, to) 是前闭后开的检测范围,一旦这个范围内的字节码执行出现异常,则通过 type 匹配异常类型,如果一致,进入 target 所指示行号
- 8 行的字节码指令 astore_2 是将异常对象引用存入局部变量表的 slot 2 位置
2.多个catch 块的情况
Java代码
public class Demo3_11_2 {public static void main(String[] args) {int i = 0;try {//因为异常出现时,只能进入 Exception table 中一个分支,所以局部变量表 slot 2 位置被共用multi-catch 的情况i = 10;} catch (ArithmeticException e) {i = 30;} catch (NullPointerException e) {i = 40;} catch (Exception e) {i = 50;}}
}
字节码
public static void main(java.lang.String[]);descriptor: ([Ljava/lang/String;)Vflags: ACC_PUBLIC, ACC_STATICCode:stack=1, locals=3, args_size=10: iconst_01: istore_12: bipush 104: istore_15: goto 268: astore_29: bipush 3011: istore_112: goto 2615: astore_216: bipush 4018: istore_119: goto 2622: astore_223: bipush 5025: istore_126: returnException table:from to target type2 5 8 Class java/lang/ArithmeticException2 5 15 Class java/lang/NullPointerException2 5 22 Class java/lang/ExceptionLineNumberTable: ...LocalVariableTable:Start Length Slot Name Signature9 3 2 e Ljava/lang/ArithmeticException;16 3 2 e Ljava/lang/NullPointerException;23 3 2 e Ljava/lang/Exception;0 27 0 args [Ljava/lang/String;2 25 1 i IStackMapTable: ...MethodParameters: ...因为异常出现时,只能进入 Exception table 中一个分支,所以局部变量表 slot 2 位置被共用
3.catch 中含有多个异常的情况
Java代码
public class Demo3_11_3 {public static void main(String[] args) {try {Method test = Demo3_11_3.class.getMethod("test");test.invoke(null);} catch (NoSuchMethodException | IllegalAccessException |InvocationTargetException e) {e.printStackTrace();}}public static void test() {System.out.println("ok");}
}
字节码
public static void main(java.lang.String[]);descriptor: ([Ljava/lang/String;)Vflags: ACC_PUBLIC, ACC_STATICCode:stack=3, locals=2, args_size=10: ldc #22: ldc #34: iconst_05: anewarray #48: invokevirtual #511: astore_112: aload_113: aconst_null14: iconst_015: anewarray #618: invokevirtual #721: pop22: goto 3025: astore_126: aload_127: invokevirtual #11 // e.printStackTrace:()V30: returnException table:from to target type0 22 25 Class java/lang/NoSuchMethodException0 22 25 Class java/lang/IllegalAccessException0 22 25 Class java/lang/reflect/InvocationTargetExceptionLineNumberTable: ...LocalVariableTable:Start Length Slot Name Signature12 10 1 test Ljava/lang/reflect/Method;26 4 1 e Ljava/lang/ReflectiveOperationException;0 31 0 args [Ljava/lang/String;StackMapTable: ...MethodParameters: ...
4.finally
Java代码
public class Demo3_11_4 {public static void main(String[] args) {int i = 0;try {i = 10;} catch (Exception e) {i = 20;} finally {i = 30;}}
}
字节码
public static void main(java.lang.String[]);descriptor: ([Ljava/lang/String;)Vflags: ACC_PUBLIC, ACC_STATICCode:stack=1, locals=4, args_size=10: iconst_01: istore_1 // 0 -> i2: bipush 10 // try --------------------------------------4: istore_1 // 10 -> i |5: bipush 30 // finally |7: istore_1 // 30 -> i |8: goto 27 // return -----------------------------------11: astore_2 // catch Exceptin -> e ----------------------12: bipush 20 // |14: istore_1 // 20 -> i |15: bipush 30 // finally |17: istore_1 // 30 -> i |18: goto 27 // return -----------------------------------21: astore_3 // catch any -> slot 3 ----------------------22: bipush 30 // finally |24: istore_1 // 30 -> i |25: aload_3 // <- slot 3 |26: athrow // throw ------------------------------------27: returnException table:from to target type2 5 11 Class java/lang/Exception2 5 21 any // 剩余的异常类型,比如 Error11 15 21 any // 剩余的异常类型,比如 ErrorLineNumberTable: ...LocalVariableTable:Start Length Slot Name Signature12 3 2 e Ljava/lang/Exception;0 28 0 args [Ljava/lang/String;2 26 1 i IStackMapTable: ...MethodParameters: ..总结:可以看到 finally 中的代码被复制了 3 份,分别放入 try 流程,catch 流程以及 catch 剩余的异常类型流程
5.练习 - finally 面试题
Java代码
public class Demo3_12_2 {public static void main(String[] args) {int result = test();System.out.println(result);}public static int test() {try {return 10;} finally {return 20;}}
}
字节码
public static int test();descriptor: ()Iflags: ACC_PUBLIC, ACC_STATICCode:stack=1, locals=2, args_size=00: bipush 10 // <- 10 放入栈顶2: istore_0 // 10 -> slot 0 (从栈顶移除了)3: bipush 20 // <- 20 放入栈顶5: ireturn // 返回栈顶 int(20)6: astore_1 // catch any -> slot 17: bipush 20 // <- 20 放入栈顶9: ireturn // 返回栈顶 int(20)Exception table:from to target type0 3 6 anyLineNumberTable: ...StackMapTable: ...由于 finally 中的 ireturn 被插入了所有可能的流程,因此返回结果肯定以 finally 的为准
至于字节码中第 2 行,似乎没啥用,且留个伏笔,看下个例子
跟上例中的 finally 相比,发现没有 athrow 了,这告诉我们:如果在 finally 中出现了 return,会 吞掉异常😱😱😱,可以试一下下面的代码
public class Demo3_12_1 {public static void main(String[] args) {int result = test();System.out.println(result);}public static int test() {try {int i = 1/0;return 10;} finally {return 20;}}
}
6.finally 对返回值影响
Java代码
public class Demo3_12_2 {public static void main(String[] args) {int result = test();System.out.println(result);}public static int test() {int i = 10;try {return i;} finally {i = 20;}}
}
字节码
public static int test();descriptor: ()Iflags: ACC_PUBLIC, ACC_STATICCode:stack=1, locals=3, args_size=00: bipush 10 // <- 10 放入栈顶2: istore_0 // 10 -> i3: iload_0 // <- i(10)4: istore_1 // 10 -> slot 1,暂存至 slot 1,目的是为了固定返回值5: bipush 20 // <- 20 放入栈顶7: istore_0 // 20 -> i8: iload_1 // <- slot 1(10) 载入 slot 1 暂存的值9: ireturn // 返回栈顶的 int(10)10: astore_211: bipush 2013: istore_014: aload_215: athrowException table:from to target type3 5 10 anyLineNumberTable: ...LocalVariableTable:Start Length Slot Name Signature3 13 0 i IStackMapTable: ...
2.11 synchronized
Java代码
public class Demo3_13 {public static void main(String[] args) {Object lock = new Object();synchronized (lock) {System.out.println("ok");}}
}
字节码
public static void main(java.lang.String[]);descriptor: ([Ljava/lang/String;)Vflags: ACC_PUBLIC, ACC_STATICCode:stack=2, locals=4, args_size=10: new #2 // new Object3: dup4: invokespecial #1 // invokespecial <init>:()V7: astore_1 // lock引用 -> lock8: aload_1 // <- lock (synchronized开始)9: dup10: astore_2 // lock引用 -> slot 211: monitorenter // monitorenter(lock引用)12: getstatic #3 // <- System.out15: ldc #4 // <- "ok"17: invokevirtual #5 // invokevirtual println:
(Ljava/lang/String;)V20: aload_2 // <- slot 2(lock引用)21: monitorexit // monitorexit(lock引用)22: goto 3025: astore_3 // any -> slot 326: aload_2 // <- slot 2(lock引用)27: monitorexit // monitorexit(lock引用)28: aload_329: athrow30: returnException table:from to target type12  22 25     any25  28 25     anyLineNumberTable: ...LocalVariableTable:Start Length Slot Name Signature0    31     0    args [Ljava/lang/String;8    23     1    lock Ljava/lang/Object;StackMapTable: ...MethodParameters: ...
注意:方法级别的 synchronized 不会在字节码指令中有所体现


