一、安装Vant
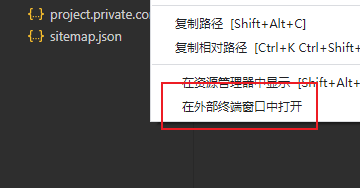
1、在 资源管理器 空白位置,点右键打开 在外部终端窗口打开
2、初始化NPM
npm init -y
3、安装命令
npm i @vant/weapp@1.3.3 -S --production
4、构建NPM包
在 工具 里选择构建NPM包
5、删除style:v2
在app.json里,删除"style":"v2"
6、按需引入
// app.json
"usingComponents": {"van-button": "@vant/weapp/button/index"
}
7、使用
<van-button type="primary">按钮</van-button>二、CSS自定义样式
1、定义
element {--main-bg-color: brown;
}
:root {--main-bg-color: brown;
}2、使用
element {background-color: var(--main-bg-color: brown);
}
三、自定义TabBar
1、配置
在app.json中的 tabBar 配置中加上 "custom": true, 表示要自定义,不再使用list
为了兼容低版本,list虽然作废,但是也不能删
"tabBar": {"custom": true,"list": [{....2、新建自定义文件
在根目录下新建 custom-tab-bar文件夹,在里面新建index文件

3、引入vant依赖
vant中的tabBar组件介绍:
Vant Weapp - 轻量、可靠的小程序 UI 组件库
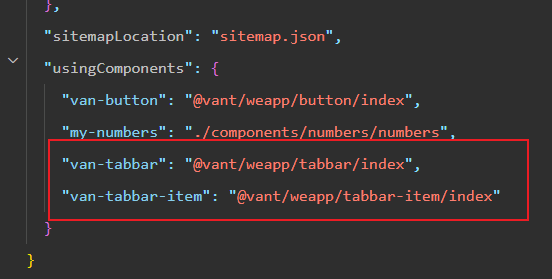
4、基础tabBar
vant中的基本tabBar代码
<van-tabbar active="{{ active }}" bind:change="onChange"><van-tabbar-item icon="home-o">标签</van-tabbar-item><van-tabbar-item icon="search">标签</van-tabbar-item><van-tabbar-item icon="friends-o">标签</van-tabbar-item><van-tabbar-item icon="setting-o">标签</van-tabbar-item>
</van-tabbar>
配套的JS代码
Page({data: {active: 0,},onChange(event) {// event.detail 的值为当前选中项的索引this.setData({ active: event.detail });},
});
自定义图标的使用
icon : 表示未选中 时 显示的图标
icon-active : 表示选中 时 显示的图标
info="3" : 表示图标右上的小数字
<van-tabbar active="{{ active }}" bind:change="onChange"><van-tabbar-item info="3"><imageslot="icon"src="{{ icon.normal }}"mode="aspectFit"style="width: 30px; height: 18px;"/><imageslot="icon-active"src="{{ icon.active }}"mode="aspectFit"style="width: 30px; height: 18px;"/>自定义</van-tabbar-item><van-tabbar-item icon="search">标签</van-tabbar-item><van-tabbar-item icon="setting-o">标签</van-tabbar-item>
</van-tabbar>
配套的JS
Page({data: {active: 0,icon: {normal: 'https://img.yzcdn.cn/vant/user-inactive.png',active: 'https://img.yzcdn.cn/vant/user-active.png',},},onChange(event) {this.setData({ active: event.detail });},
});
最后,把标签的名字和图片都写在list数组里面
data: {"list": [{"pagePath": "/pages/home/home","text": "首页","iconPath": "/images/tabs/home.png","selectedIconPath": "/images/tabs/home-active.png"},{"pagePath": "/pages/message/message","text": "消息","iconPath": "/images/tabs/message.png","selectedIconPath": "/images/tabs/message-active.png",info: 0},{"pagePath": "/pages/contact/contact","text": "联系我们","iconPath": "/images/tabs/contact.png","selectedIconPath": "/images/tabs/contact-active.png"}]}使用时
<van-tabbar active="{{active}}" bind:change="onChange" active-color="#13A7A0"><van-tabbar-item wx:for="{{list}}" wx:key="index" info="{{item.info ? item.info : ''}}"><image slot="icon" src="{{item.iconPath}}" mode="aspectFit" style="width: 25px; height: 25px;" /><image slot="icon-active" src="{{item.selectedIconPath}}" mode="aspectFit" style="width: 25px; height: 25px;" />{{item.text}}</van-tabbar-item>
</van-tabbar>
在自定义组件中使用 Vant Weapp 组件时,需在 options 开启 styleIsolation: 'shared' 选项,不然修改的样式不会生效
实现跳转Tab功能
onChange(event) {// event.detail 的值为当前选中项的索引// this.setData({ active: event.detail })this.updateActive(event.detail)wx.switchTab({url: this.data.list[event.detail].pagePath,})},
