https://www.bilibili.com/video/BV1mV4y1o7fu
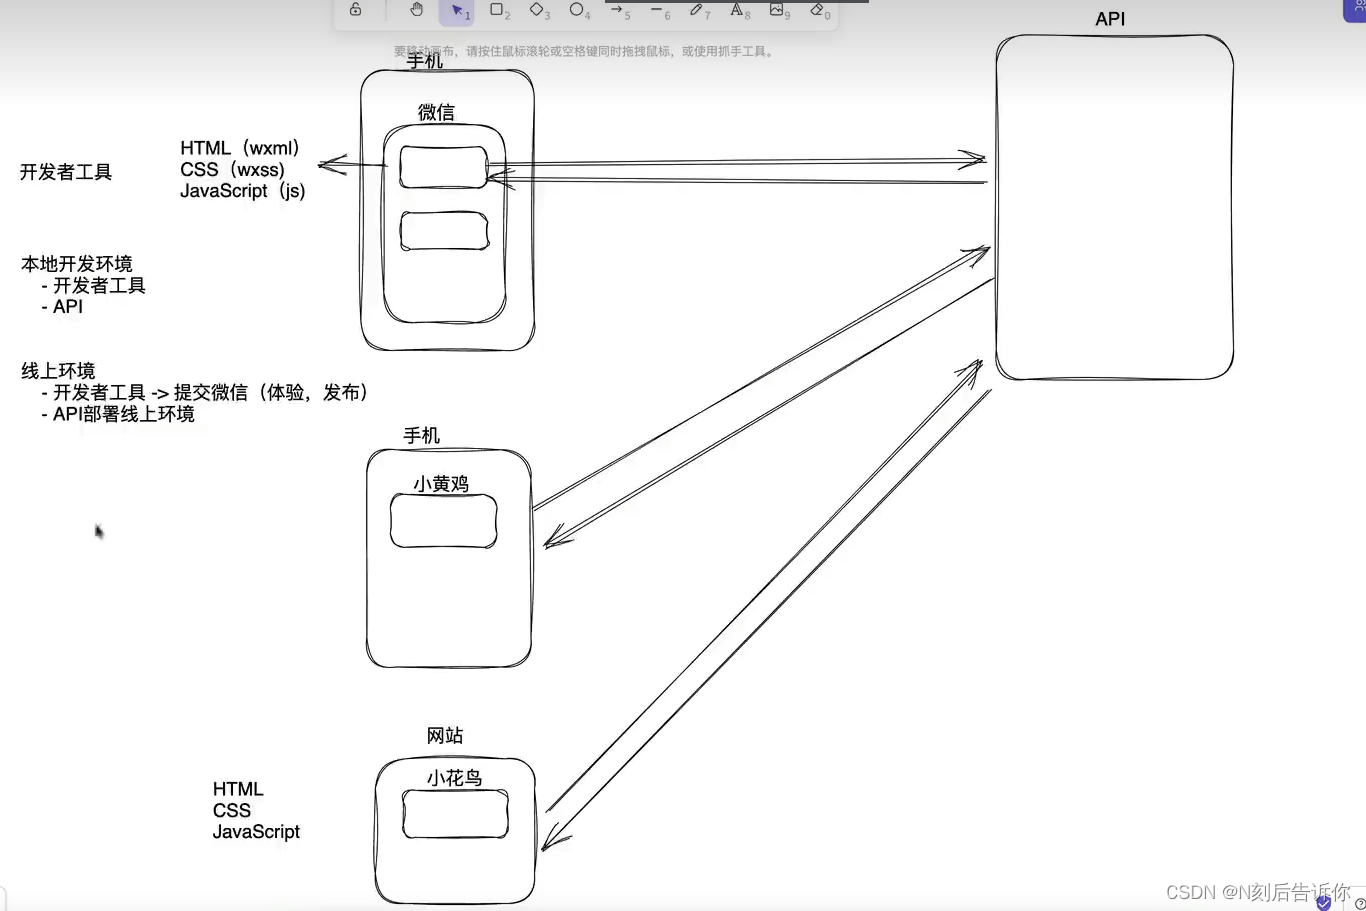
1.整体概述
2.环境搭建
略
4.纯净版项目
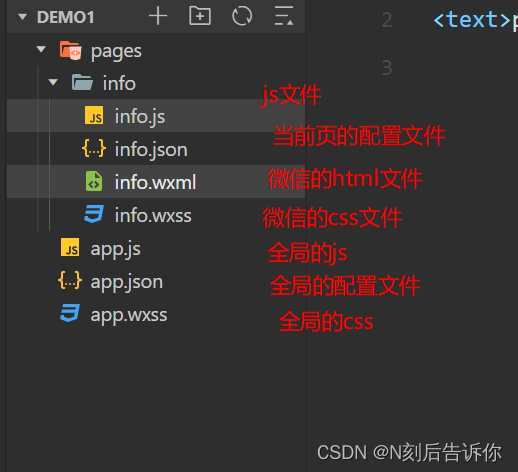
5.快速入门
5.1组件(类似HTML标签)
| wxml中的标签 | html中的标签 |
|---|---|
| text | span |
| view | div |
| image | img |
| icon | |
| navigator | a |
view组件
<view><view class="c0">学生:</view><view class="c1">微信:nkehougaosuni</view>
</view>
text组件
小程序组件文档
- 在text组件中使用函数,并传递参数
# html
<text bindtap="clickMe" data-nid="999" data-name="nkehougaosuni">源代码学城</text>
- 在js中定义函数
# js
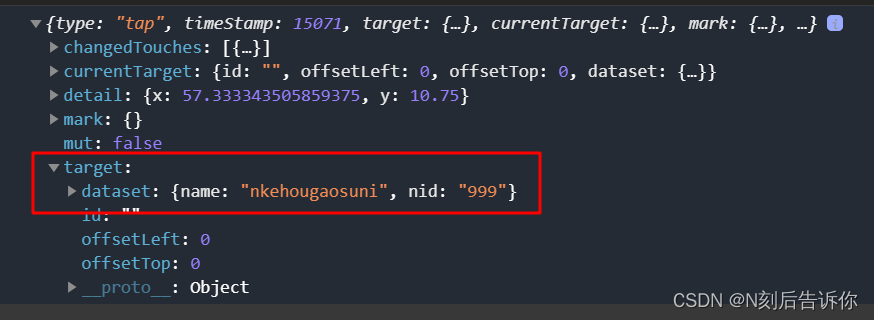
clickMe(e){console.log("点我了")console.log(e.target.dataset);
},
e里面封装了请求传递过来的数据。
上面html传递的data-nid在e.target
image组件
<image src="/images/1.png" style="width: 200rpx; height: 150rpx;"></image>
px是像素,rpx是微信里设置的动态像素点,总共宽度是750rpx,有些手机宽,有些窄,使用rpx会自动适配手机进行缩放。
icon组件-图标
<icon type="info" size="93"></icon>
大小也支持rpx
navigator组件
<navigator url="/pages/mine/mine">跳转</navigator>
- 利用微信API和函数,也可以实现跳转功能
微信API文档
# html
<view bindtap="clickGo">跳转2</view>
# js
clickGo(e){//跳转,微信APIwx.navigateTo({url: '/pages/mine/mine',})
},
注意:只能跳转到页面(非tabBar)
要跳转到tabBar
对于navigator标签,需要加上参数open-type=“switchTab”
对于调用AIP的形式,需要使用wx.switchTab({url: ’ '})
5.2 数据展示和绑定
- 在js的data中写入数据
# jsdata: {city:"北京",nameList: ["张三", "李四", "王五"]},
- html中使用数据
# html
<view><text>{{city}}</text>
</view>
wx:for语法
# html
<view><view wx:for="{{nameList}}" wx:key="index">{{index}}===={{item}}</view>
</view>
<view><view wx:for="{{nameList}}" wx:for-index="idx"wx:for-item="ele"wx:key="idx">{{idx}}-{{ele}}</view>
</view>
wx:for-index='idx’相当于起别名
使用wx:key参数可以提高性能:当数据改变触发渲染层重新渲染的时候,会校正带有 key 的组件,框架会确保他们被重新排序,而不是重新创建,以确保使组件保持自身的状态,并且提高列表渲染时的效率。
wx:if语法
基本使用
<view><text wx:if="{{city=='北京1'}}">开</text><text wx:elif="{{city=='北京2'}}">开开</text><text wx:else>关</text>
</view>
注意wx:if中的双引号里面要用单引号
block
要展现好几个标签,有下面两种方法:
方法1:
<view><view wx:if="{{city}}=='北京'"><text>中国</text><text>北京</text><text>故宫</text></view>
</view>
方法2:
<view><block wx:if="{{city}}=='北京'"><text>中国</text><text>北京</text><text>故宫</text></block>
</view>
方法1展示的三个text标签在第三级,而方法2展示的三个text标签在第二级。因为block只用于处理条件逻辑,而不会渲染,所以会比方法1少一层结构。
hidden
类似于vue中的show
# 在js的data中已经设置isHide: false
<view hidden="{{isHide}}"><icon type="success"></icon>
</view>
用上hidden,会将标签渲染到页面上,只不过会隐藏起来,而对于wx:if,如果条件不满足,则不会渲染到页面上。
10.数据绑定
单值绑定
之前的小程序版本,只支持单向绑定,不支持双向绑定。例如:
- 通过setData实现双向绑定效果
# html
<view><text>{{name}}</text><button bindtap="changeName">修改</button>
</view>
# jschangeName(e){this.setData({name: "张开"});},
这样操作,点击修改会把name变成张开。但这不是双向绑定。而是因为setData修改完数据后,页面发生了变化。
- input单向绑定效果
<view><text>{{name}}</text><button bindtap="changeName">修改</button><input type='text' value="{{name}}" placeholder="请输入"/>
</view>
input标签的value可以设置绑定的变量,这里输入框绑定了name变量
在vue中,如果修改输入框,因为是双向绑定的,所以读取到name的text标签也会跟着变化
但是微信中默认不是双向绑定的,所以修改输入框的内容,并不会修改name
要双向绑定,就需要在input里面加上bindinput参数指定的函数doChange,并在doChange中加入setData函数
- input+bindinput实现双向绑定
# html
<view><text>{{name}}</text><button bindtap="changeName">修改</button><input type='text' value="{{name}}" bindinput="doChange" placeholder="请输入"/>
</view>
# jsdoChange(e){// console.log('doChange', e.detail.value);this.setData({name: e.detail.value})},
- input组件中,利用model:value实现双向绑定(新版本)
# html
<view><text>{{name}}</text><button bindtap="changeName">修改</button><input type='text' value="{{name}}" bindinput="doChange" placeholder="请输入"/><input type='text' model:value="{{name}}" bindinput="doChange2"/>
</view>
# jsdoChange2(e){},
可实现类似vue中的双向绑定的效果,但是存在bug,警告意思是必须再定义一个bindinput的事件(函数doChange2可以啥都不写)。不加会报错
列表绑定
- 基于setData完成列表的双向绑定
# jschangeName(e){// this.data.nameList.push("alex")var info = this.data.nameList;info.push("alex");console.log(info);this.setData({name: "张开",nameList:info});},
11.API
帮助文档-API
clickFunc(e){wx.showToast({title: '成功', // 提示内容icon: 'success', // 图标duration: 2000 // 持续两秒 })},
发送请求
# js
wx.request({url: 'example.php', //仅为示例,并非真实的接口地址data: {x: '',y: ''},header: {'content-type': 'application/json' // 默认值},success (res) {console.log(res.data)}
})
12.样式和icon
文档-icon
文档中的icon内容比较少,所以可以引入第三方icon,fontawesome
更多icon-fontawesome
[微信小程序]在微信小程序中使用fontawesome6
- fontawesome下载(CSS+TTF)
- TTF转换->base64
- 引入项目+CSS
不同版本的fontawesome支持的图标是不同的,视频里用的是v4版本。
13.tabBar
app.json中设置tabBar
全局配置-tabBar
14.案例-菜单-展示
布局-menu.wxml
<view class="container"><navigator class="menu"><label class="fa fa-superpowers" style="color:#32CD32"></label><view>信息采集</view></navigator><navigator class="menu"><label class="fa fa-meh-o" style="color:#FFA500"></label><view>人脸识别</view></navigator><navigator class="menu"><label class="fa fa-bell-o" style="color:#87CEFA"></label><view>社区活动</view></navigator><navigator class="menu"><label class="fa fa-microphone" style="color:#7D9EC0"></label><view>语音识别</view></navigator><navigator class="menu"><label class="fa fa-heartbeat" style="color:#EE0000"></label><view>心率检测</view></navigator><navigator class="menu"><label class="fa fa-credit-card" style="color:#778899"></label><view>积分兑换商城</view></navigator></view>
布局的样式-menu.wxss
/* pages/menu/menu.wxss */page{height: 100%;background-color: #F5F5F5;
}.container{border-top: 1px solid #ddd;display: flex;flex-direction: row;justify-content: flex-start;flex-wrap: wrap;
}.container .menu{width: 374rpx;height: 354rpx;border-bottom: 1px solid #ddd;display: flex;flex-direction: column;justify-content: center;align-items: center;background-color: white;
}.container .menu label{padding: 20rpx 0;
}.container .menu:nth-child(odd){border-right: 1px solid #ddd;
}
弹性盒子参考:https://www.runoob.com/css3/css3-flexbox.html
15.案例-采集-列表
布局-info_collect.wxml
<view class="container"><view class="top"><view class="tip">今日采集数量(人)</view><view class="count">100</view></view><view class="function"><view class='menu' style='border-right: 1rpx solid #ddd;'>信息采集</view><view class="menu">数据统计</view></view><view class="table"><view class="item"><view class="title">社区信息列表(100人)</view></view><view class="item" wx:for="{{dataDict.data}}" wx:for-item="row" wx:key="index"><view class="record"><view class="avatar"><image src="{{row.avatar}}"></image></view><view class="desc"><view class="username">{{row.name}}</view><view><view class='txt-group'><label class="zh">网格区域</label><label calss="en"> | AREA</label></view><view class="area"><label class="fa fa-map-marker">{{row.area}}</label></view></view></view><view class="delete"           data-nid="{{row.id}}" data-index="{{index}}"><label class="fa fa-trash"></label></view></view></view></view>
</view>
样式-info_collect.wxss
.top{background-color: #01ccb6;height: 200rpx;display: flex;flex-direction: column;align-items: center;color: white;
}.top .tip {font-size: 22rpx;font-weight: 100;
}.top .count{padding: 10rpx;font-size: 68rpx;
}.function{display: flex;flex-direction: row;justify-content: space-around;background-color: #02bfae;
}.function .menu{font-size: 28rpx;margin: 25rpx 0;color: white;width: 50%;text-align: center;align-items: center;
}.table .item{border-bottom: 1rpx solid #e7e7e7;
}.table .item .title{margin: 20rpx 30rpx;padding-left: 10rpx;border-left: 5rpx solid #02bfae;font-size: 26rpx;
}.record{margin: 30rpx 40rpx;display: flex;flex-direction: row;justify-content: flex-start;
}.record .avatar{width: 200rpx;height: 200rpx;margin-right: 40rpx;
}.record .avatar image{width: 100%;height: 100%;border-radius: 30rpx;
}.desc{width: 290rpx;display: flex;flex-direction: column;justify-content: space-between;
}.desc .username{margin-top: 25rpx;font-size: 38rpx;
}.txt-group{font-size: 27rpx;margin: 10rpx 0;
}
.txt-group .zh{color: #8c8c8c;
}
.txt-group .en{color: #cccccc
}.area{color: #00c8b6;font-weight: bold;
}.delete{width: 100rpx;color: red;text-align: center;display: flex;flex-direction: column;justify-content: center;
}
数据-info_collect.js
data: {dataDict:{data:[{"id": 45,"name": "谢新雪","area": "#19","avatar": "/images/人物图片1.png"}]}},
16.案例-采集-数据列表
refresh(){//刷新或获取请求//1.发送网络请求//2.数据绑定wx.showLoading({mask:true})wx.request({url: ,method: "GET",success: (res) => {this.setData({dataDict: res.data})}})},
17.案例-采集-删除
<view class="delete" bindtap="doDeleteRow" data-nid="{{row.id}}" data-index="{{index}}">
doDeleteRow(e) {wx.showModal({title: "确认是否删除?",confirmColor: "#ff461f",success: (res) => {if (!res.confirm) {return}console.log(e)var nid = e.currentTarget.dataset.nidvar index = e.currentTarget.dataset.indexvar dataList = this.data.dataDict.datadataList.splice(index, 1)wx.showLoading({title: "删除中",mask: true})wx.request({url: api.bank + nid + '/',method: 'DELETE',success: (res) => {let total_count = this.data.dataDict.total_count - 1if (total_count < 0) {total_count = 0}let today_count = this.data.dataDict.today_count - 1if (today_count < 0) {today_count = 0}this.setData({'dataDict.data': dataList,'dataDict.total_count': total_count,'dataDict.today_count': today_count})},complete() {wx.hideLoading()}})}})},
18.案例-采集-后端API
简易版的API
1.新建项目
2.创建名为api的应用
3.在settings注册api,rest_framework
- 4.创建表结构
models.py
class UserInfo(models.Model):'''用户信息'''uid = models.CharField(verbose_name="ID", max_length=64)area_choices = ((1, '#19'),(2, '#20'),(3, '#21'),(4, '#22'),)area = models.IntegerField(verbose_name='网络', choices=area_choices)name = models.CharField(verbose_name='姓名', max_length=32)avatar = models.FileField(verbose_name='头像', max_length=128, upload_to='bank/%Y/%m/%d/')create_date = models.DateField(verbose_name='日期', auto_now_add=True)face_token = models.CharField(verbose_name='FaceToken', max_length=32)score = models.IntegerField(verbose_name='积分', default=0)
通过make migrations和migrate进行迁移
FileField可以将文件直接上传到文件文件目录
- 5.创建路由
-
- 5.1 项目总的url
from django.contrib import admin
from django.urls import path, re_path, include
from django.views.static import serve
from django.conf import settingsurlpatterns = [re_path("admin/", admin.site.urls),re_path(r'^api/', include('api.urls')),re_path(r'^media/(?P<path>.*)', serve, {'document_root': settings.MEDIA_ROOT}),
]-
- 5.2 settings.py中配置媒体
import os
MEDIA_ROOT = os.path.join(BASE_DIR, 'media')
MEDIA_URL = '/media/'
-
- 5.3 api下的urls.py:接收分发过来的路由请求
from django.urls import path, re_path
from api.views import bankurlpatterns = [re_path(r'^bank$/', bank.BankView.as_view()),re_path(r'^bank/(?P<pk>\d+)/$', bank.BankView.as_view()),
]
这里有个知识点是有名分组
-
- 在应用下新建一个serializers文件夹
根据请求的不同进入不同的序列化器
序列化器统一放在serializers文件夹中
import uuid
import datetime
from rest_framework.serializers import ModelSerializer, Serializer, ListSerializer
from rest_framework import serializers
from rest_framework.utils.serializer_helpers import (BindingDict, BoundField, JSONBoundField, NestedBoundField, ReturnDict,ReturnList
)from api import modelsclass BankListSerializer(ListSerializer):@propertydef data(self):ret = super(ListSerializer, self).datatotal_count = models.UserInfo.objects.all().count()today_count = models.UserInfo.objects.filter(create_date=datetime.datetime.today()).count()info = {'total_count': total_count,'today_count': today_count,'data': ret,}return ReturnDict(info, serializer=self)class BankListModelSerializer(ModelSerializer):area = serializers.CharField(source="get_area_display") # 序列化的字段是执行get_area_display后得到,即area_choices对应内容class Meta:list_serializer_class = BankListSerializer # 里面的每个元素用什么序列化model = models.UserInfofields = ['id', 'name', 'area', 'avatar']class BankCreateModelSerializer(ModelSerializer):area_text = serializers.CharField(source='get_area_display', read_only=True)class Meta:model = models.UserInfoexclude = ['face_token', 'uid', ]def validate(self, data):uid = str(uuid.uuid4()).replace('-', '_')  # 基于随机数来生成UUID. 使用的是伪随机数有一定的重复概率name = data.get('name')avatar_file_object = data.get('avatar')from utils import aidata['face_token'] = ai.register_image(uid, name, avatar_file_object) # 上传到百度云的人脸库,返回face_tokendata['uid'] = uidreturn data
python @property的介绍与使用
-
- 删除views.py文件,添加views.py文件夹,并创建bank.py文件
根据请求的不同走不同的seriealizers
from rest_framework.generics import ListAPIView, CreateAPIView, DestroyAPIView
from api.serializers.bank import BankListSerializer, BankListModelSerializer, BankCreateModelSerializer
from api import modelsclass BankView(ListAPIView, CreateAPIView, DestroyAPIView):queryset = models.UserInfo.objects.all().order_by('-id')def get_serializer_class(self):"""根据请求的不同进入不同的序列化器"""if self.request.method == "POST":return BankCreateModelSerializerreturn BankListModelSerializerdef delete(self, request, *args, **kwargs):user_object = self.get_object()from utils import aiai.delete(user_object.uid, user_object.face_token)response = super().delete(request, *args, **kwargs)return response
super()并不是调用父类的同名函数
super()实际上是super(type, obj):会去obj.mro中的type的下一个类开始找。
MRO,使用C3算法,遇到汇聚点就回到上一个分叉点
参考资料:MROhttps://www.bilibili.com/video/BV1mV4y1o7fu
-
8.在项目目录下创建utils目录,并创建ai.py文件
-
百度云:https://cloud.baidu.com/
免费领取资源-创建应用-…
根据api文档上传图片
import base64
import urllib
import requests
import jsonAPI_KEY = "xxx"
SECRET_KEY = "xxx"def get_access_token():"""使用 AK,SK 生成鉴权签名(Access Token):return: access_token,或是None(如果错误)"""url = "https://aip.baidubce.com/oauth/2.0/token"params = {"grant_type": "client_credentials", "client_id": API_KEY, "client_secret": SECRET_KEY}return str(requests.post(url, params=params).json().get("access_token"))def get_file_content_as_base64(path, urlencoded=False):"""获取文件base64编码:param path: 文件路径:param urlencoded: 是否对结果进行urlencoded:return: base64编码信息"""with open(path, "rb") as f:content = base64.b64encode(f.read())return contentdef register_image(user_id, user_info, file_path, group_id='test'):# 1.获取access token,并拼接得到请求地址url = "https://aip.baidubce.com/rest/2.0/face/v3/faceset/user/add?access_token=" + get_access_token()# 2.图片进行base64编码data = get_file_content_as_base64(file_path, False)# 3.上传图片payload = json.dumps({"group_id": group_id,"image": data,"image_type": "BASE64","user_id": user_id,"user_info": user_info})headers = {'Content-Type': 'application/json'}response = requests.request("POST", url, headers=headers, data=payload)return print(response.text['result']['face_token'])def delete(user_id, face_token, group_id='alex'):# 1.获取access token,并拼接得到请求地址url = "https://aip.baidubce.com/rest/2.0/face/v3/faceset/face/delete?access_token=" + get_access_token()# 2.发送删除请求payload = json.dumps({'user_id': user_id,'group_id': group_id,'face_token': face_token,})headers = {'Content-Type': 'application/json'}response = requests.request("POST", url, headers=headers, data=payload)print(response.text)delete('1', '769eadc7868c14cd6cda2c1cfdbd4704')
- 9.修改settings文件
ALLOWED_HOSTS = ["*"]
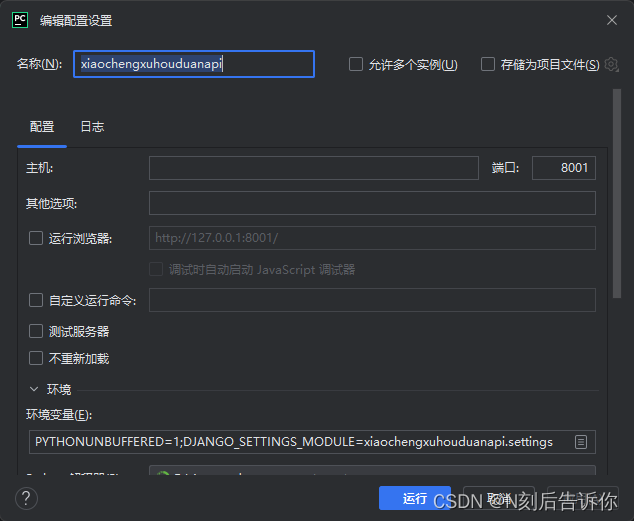
- 10.修改项目的configurations
端口改成8001端口
- 11.在微信小程序开发工具中,项目中创建api.js
const rootUrl = 'http://192.168.1.226:8001/api';module.exports = {bank: rootUrl + '/bank/',bankStatistics: rootUrl + '/bank/',bankFace: rootUrl + '/bank/face/',bankActivity: rootUrl + '/bank/activity',bankApply: rootUrl + '/bank/apply/',bankVoice: rootUrl + '/bank/voice/',bankHrv: rootUrl + '/bank/hrv/',bankExchange: rootUrl + '/bank/exchange/',bankScore: rootUrl + '/bank/score/',bankGoods: rootUrl + '/bank/goods/',bankexchangeRecord: rootUrl + '/bank/exchange/record/',
}
- 12.在info_collect.js中导入api.js
const api = require('../../config/api.js') // 导入url: api.bank,
