FFmpeg 简介
FFmpeg的名称来自MPEG视频编码标准,前面的“FF”代表“Fast Forward”,FFmpeg是一套可以用来记录、转换数字音频、视频,并能将其转化为流的开源计算机程序。可以轻易地实现多种视频格式之间的相互转换。包括如下几个部分:
- libavformat:用于各种音视频封装格式的生成和解析,包括获取解码所需信息以生成解码上下文结构和读取音视频帧等功能,包含demuxers和muxer库。
- libavcodec:用于各种类型声音/图像编解码。
- libavutil:包含一些公共的工具函数。
- libswscale:用于视频场景比例缩放、色彩映射转换。
- libpostproc:用于后期效果处理。
- ffmpeg:是一个命令行工具,用来对视频文件转换格式,也支持对电视卡实时编码。
- ffsever:是一个HTTP多媒体实时广播流服务器,支持时光平移。
- ffplay:是一个简单的播放器,使用ffmpeg 库解析和解码,通过SDL显示。
- ffprobe:收集多媒体文件或流的信息,并以人和机器可读的方式输出。
备注说明:ffmpeg 是本文的学习重点,其他的工具列的使用ffserver\ffplay\ffprobe 请自行检索学习。
FFmpeg 基础概念
容器(Container)
一种文件格式,比如flv,mkv等。包含下面5种流以及文件头信息。
常见容器格式:
- MP4
- MKV
- WebM
- AVI
流(Stream)
一种视频数据信息的传输方式,5种流:音频,视频,字幕,附件,数据。
帧(Frame)
帧代表一幅静止的图像,分为I帧,P帧,B帧。
编解码器(Codec)
是对视频进行压缩或者解压缩,CODEC = COde(编码) +DECode(解码)。
常见视频编码格式:
- H.262
- H.264
- H.265
版权视频编码格式:
- VP8
- VP9
- AV1
常见音频编码格式:
- MP3
- AAC
FFmpeg 内置视频编码器:
- libx264:最流行的开源 H.264 编码器
- NVENC:基于 NVIDIA GPU 的 H.264 编码器
- libx265:开源的 HEVC 编码器
- libvpx:谷歌的 VP8 和 VP9 编码器
- libaom:AV1 编码器
FFmpeg 内置音频编码器:
- libfdk-aac
- aac
复用/解复用(mux/demux)
把不同的流按照某种容器的规则放入容器,这种行为叫做复用(mux)。
把不同的流从某种容器中解析出来,这种行为叫做解复用(demux)。
帧率
帧率也叫帧频率,帧率是视频文件中每一秒的帧数,肉眼想看到连续移动图像至少需要15帧。
码率
比特率(也叫码率,数据率)是一个确定整体视频/音频质量的参数,秒为单位处理的字节数,码率和视频质量成正比,在视频文件中中比特率用bps来表达。
FFmpeg 使用指南
FFmpeg 语法
$ ffmpeg {1} {2} -i {3} {4} {5}上面命令中,五个部分的参数依次如下:
- 全局参数
- 输入文件参数
- 输入文件
- 输出文件参数
- 输出文件
FFmpeg 示例
$ ffmpeg \
-y \ # 全局参数
-c:a libfdk_aac -c:v libx264 \ # 输入文件参数
-i input.mp4 \ # 输入文件
-c:v libvpx-vp9 -c:a libvorbis \ # 输出文件参数
output.webm # 输出文件
功能描述: 上面的命令将 mp4 文件转成 webm 文件,这两个都是容器格式。输入的 mp4 文件的音频编码格式是 aac,视频编码格式是 H.264;输出的 webm 文件的视频编码格式是 VP9,音频格式是 Vorbis。
主要选项
‘-f fmt (input/output)’ 强制输入或输出文件格式。通常,输入文件的格式是自动检测的,输出文件的格式是通过文件扩展名来进行猜测的,所有该选项大多数时候不需要。
‘-i filename (input)’ 输入文件名
‘-y (global)’ 覆盖输出文件而不询问
‘-n (global)’ 不覆盖输出文件,如果一个给定的输出文件已经存在,则立即退出
‘-c[:stream_specifier] codec (input/output,per-stream)’
‘-codec[:stream_specifier] codec (input/output,per-stream)’为一个或多个流选择一个编码器(当使用在一个输出文件之前时)或者一个解码器(当使用在一个输入文件之前时)。codec 是一个编码器/解码器名称或者一个特定值“copy”(只适用输出)。
‘-t duration (output)’ 当到达 duration 时,停止写输出。duration 可以是一个数字(秒),或者使用hh:mm:ss[.xxx]形式。-to 和 -t 是互斥的,-t 优先级更高。
‘-to position (output)’ 在 position 处停止写输出。duration 可以是一个数字(秒),或者使用hh:mm:ss[.xxx]形式。-to 和 -t 是互斥的,-t 优先级更高。
‘-fs limit_size (output)’设置文件大小限制,以字节表示
‘-ss position (input/output)’当作为输入选项时(在 -i 之前),在输入文件中跳转到 position。需要注意的是,在大多数格式中,不太可能精确的跳转,因此,ffmpeg 将跳转到 position 之前最接近的位置。当进行转码并且 ‘-accurate_seek’ 打开时(默认),位于跳转点和 position 之间的额外部分将被解码并且丢弃。当做流拷贝或者当使用‘-noaccurate_seek’时,它将被保留下来。当作为输出选项时(在输出文件名前),解码但是丢弃输入,直到时间戳到达 position。position 可以是秒或者 hh:mm:ss[.xxx] 形式
‘-itsoffset offset (input)’设置输入时间偏移。 offset 将被添加到输入文件的时间戳。指定一个正偏移,意味着相应的流将被延时指定时间。
‘-timestamp date (output)’在容器中设置录音时间戳
‘-metadata[:metadata_specifier] key=value (output,per-metadata)’设置metadata key/value对
‘-target type (output)’指定目标文件类型(vcd, svcd, dvd, dv, dv50)。type 可以带有 pal-, ntsc- 或 film- 前缀,以使用相应的标准。所有的格式选项(bitrate, codecs, buffer sizes)将自动设定。
‘-dframes number (output)’设置要录制数据帧的个数。这是 -frames:d 的别名
‘-frames[:stream_specifier] framecount (output,per-stream)’  framecount 帧以后,停止写流。
‘-q[:stream_specifier] q (output,per-stream)’
‘-qscale[:stream_specifier] q (output,per-stream)’ 使用固定质量范围(VBR)。
‘-filter[:stream_specifier] filtergraph (output,per-stream)’创建filtergraph 指定的过滤图,并使用它来过滤流。
‘-filter_script[:stream_specifier] filename (output,per-stream)’该选项与‘-filter’相似,唯一的不同是,它的参数是一个存放过滤图的文件的名称。
‘-pre[:stream_specifier] preset_name (output,per-stream)’ 指定匹配流的预设
‘-stats (global)’打印编码进程/统计信息。默认打开,可以使用 -nostats 禁用。
‘-stdin’ 开启标准输入交互。默认打开,除非标准输入作为一个输入。可以使用 -nostdin 禁止。
‘-debug_ts (global)’打印时间戳信息。默认关闭。
‘-attach filename (output)’添加一个附件到输出文件中
‘-dump_attachment[:stream_specifier] filename (input,per-stream)’ 提取匹配的附件流到filename指定的文件中。
视频选项
‘-vframes number (output)’设置录制视频帧的个数。这是 -frames:v 的别名
‘-r[:stream_specifier] fps (input/output,per-stream)’设置帧率(Hz 值, 分数或缩写)
‘-s[:stream_specifier] size (input/output,per-stream)’设置帧大小。格式为 ‘wxh’ (默认与源相同)
‘-aspect[:stream_specifier] aspect (output,per-stream)’设置视频显示长宽比
‘-vn (output)’禁止视频录制
‘-vcodec codec (output)’设置视频 codec。这是 -codec:v 的别名
‘-pass[:stream_specifier] n (output,per-stream)’选择pass number (1 or 2)。用来进行双行程视频编码。
‘-passlogfile[:stream_specifier] prefix (output,per-stream)’设置 two-pass 日志文件名前缀,默认为“ffmpeg2pass”。
‘-vf filtergraph (output)’创建 filtergraph 指定的过滤图,并使用它来过滤流。
‘-pix_fmt[:stream_specifier] format (input/output,per-stream)’设置像素格式。
‘-sws_flags flags (input/output)’设置软缩放标志
‘-vdt n’丢弃阈值
‘-psnr’计算压缩帧的 PSNR
‘-vstats’复制视频编码统计信息到‘vstats_HHMMSS.log’
‘-vstats_file file’复制视频编码统计信息到 file
‘-force_key_frames[:stream_specifier] time[,time...] (output,per-stream)’
‘-force_key_frames[:stream_specifier] expr:expr (output,per-stream)’在指定的时间戳强制关键帧
‘-copyinkf[:stream_specifier] (output,per-stream)’当进行流拷贝时,同时拷贝开头的非关键帧
‘-hwaccel[:stream_specifier] hwaccel (input,per-stream)’使用硬件加速来解码匹配的流
‘-hwaccel_device[:stream_specifier] hwaccel_device (input,per-stream)’选择硬件加速所使用的设备。该选项只有‘-hwaccel’同时指定时才有意义。
音频选项
‘-aframes number (output)’设置录制音频帧的个数。这是 -frames:a 的别名
‘-ar[:stream_specifier] freq (input/output,per-stream)’设置音频采样率。
‘-aq q (output)’设置音频质量。这是 -q:a 的别名
‘-ac[:stream_specifier] channels (input/output,per-stream)’设置音频通道数。
‘-an (output)’禁止音频录制
‘-acodec codec (input/output)’设置音频codec。这是-codec:a的别名
‘-sample_fmt[:stream_specifier] sample_fmt (output,per-stream)’设置音频采样格式
‘-af filtergraph (output)’创建filtergraph 所指定的过滤图,并使用它来过滤流
高级选项
‘-map [-]input_file_id[:stream_specifier][,sync_file_id[:stream_specifier]] | [linklabel] (output)’指定一个或多个流作为输出文件的源。命令行中的第一个 -map 选项,指定输出流0的源,第二个 -map 选项,指定输出流1的源,等等。
‘-map_channel [input_file_id.stream_specifier.channel_id|-1][:output_file_id.stream_specifier]’将一个给定输入的音频通道映射到一个输出。
‘-map_metadata[:metadata_spec_out] infile[:metadata_spec_in] (output,per-metadata)’设置下一个输出文件的 metadata 信息。
‘-map_chapters input_file_index (output)’从索引号为 input_file_index 的输入文件中拷贝章节到下一个输出文件中。
‘-timelimit duration (global)’ffmpeg 运行 duration 秒后推出
‘-dump (global)’将每一个输入包复制到标准输出
‘-hex (global)’复制包时,同时复制负载
‘-re (input)’以本地帧率读取数据。主要用来模拟一个采集设备,或者实时输入流(例如:当从一个文件读取时).
‘-vsync parameter’视频同步方法
‘-async samples_per_second’音频同步方法
‘-shortest (output)’当最短的输入流结束时,终止编码
‘-muxdelay seconds (input)’设置最大解封装-解码延时
‘-muxpreload seconds (input)’设置初始解封装-解码延时
‘-streamid output-stream-index:new-value (output)’为一个输出流分配一个新的stream-id。
‘-bsf[:stream_specifier] bitstream_filters (output,per-stream)’为匹配的流设置比特流过滤器
‘-filter_complex filtergraph (global)’定义一个复杂的过滤图
‘-lavfi filtergraph (global)’定义一个复杂的过滤图。相当于‘-filter_complex’
‘-filter_complex_script filename (global)’该选项类似于‘-filter_complex’,唯一的不同是它的参数是一个定义过滤图的文件的文件名
‘-accurate_seek (input)’打开或禁止在输入文件中的精确跳转。默认打开。
FFmpeg 常用命令和用法
FFmpeg 常用命令
-c:指定编码器
-c copy:直接复制,不经过重新编码(这样比较快)
-c:v:指定视频编码器
-c:a:指定音频编码器
-i:指定输入文件
-an:去除音频流
-vn: 去除视频流
-preset:指定输出的视频质量,会影响文件的生成速度,有以下几个可用的值 ultrafast, superfast, veryfast, faster, fast, medium, slow, slower, veryslow。
-y:不经过确认,输出时直接覆盖同名文件。
FFmpeg 常用用法
1、查看文件信息
查看视频文件的元信息,比如编码格式和比特率,可以只使用-i参数。
$ ffmpeg -i input.mp4
上面命令会输出很多冗余信息,加上-hide_banner参数,可以只显示元信息。
$ ffmpeg -i input.mp4 -hide_banner
2、 转换编码格式
转换编码格式(transcoding)指的是, 将视频文件从一种编码转成另一种编码。比如转成 H.264 编码,一般使用编码器libx264,所以只需指定输出文件的视频编码器即可。
$ ffmpeg -i [input.file] -c:v libx264 output.mp4
下面是转成 H.265 编码的写法。
$ ffmpeg -i [input.file] -c:v libx265 output.mp4
3、转换容器格式
转换容器格式(transmuxing)指的是,将视频文件从一种容器转到另一种容器。下面是 mp4 转 webm 的写法。
$ ffmpeg -i input.mp4 -c copy output.webm
上面例子中,只是转一下容器,内部的编码格式不变,所以使用-c copy指定直接拷贝,不经过转码,这样比较快。
4、 调整码率
调整码率(transrating)指的是,改变编码的比特率,一般用来将视频文件的体积变小。下面的例子指定码率最小为964K,最大为3856K,缓冲区大小为 2000K。
$ ffmpeg \
-i input.mp4 \
-minrate 964K -maxrate 3856K -bufsize 2000K \
output.mp4
5、 改变分辨率(transsizing)
下面是改变视频分辨率(transsizing)的例子,从 1080p 转为 480p 。
$ ffmpeg \
-i input.mp4 \
-vf scale=480:-1 \
output.mp4
6、 提取音频
有时,需要从视频里面提取音频(demuxing),可以像下面这样写。
$ ffmpeg \
-i input.mp4 \
-vn -c:a copy \
output.aac
上面例子中,-vn表示去掉视频,-c:a copy表示不改变音频编码,直接拷贝。
7、 添加音轨
添加音轨(muxing)指的是,将外部音频加入视频,比如添加背景音乐或旁白。
$ ffmpeg \
-i input.aac -i input.mp4 \
output.mp4
上面例子中,有音频和视频两个输入文件,FFmpeg 会将它们合成为一个文件。
8、 截图
下面的例子是从指定时间开始,连续对1秒钟的视频进行截图。
$ ffmpeg \
-y \
-i input.mp4 \
-ss 00:01:24 -t 00:00:01 \
output_%3d.jpg
如果只需要截一张图,可以指定只截取一帧。
$ ffmpeg \
-ss 01:23:45 \
-i input \
-vframes 1 -q:v 2 \
output.jpg
上面例子中,-vframes 1指定只截取一帧,-q:v 2表示输出的图片质量,一般是1到5之间(1 为质量最高)。
9、 裁剪
裁剪(cutting)指的是,截取原始视频里面的一个片段,输出为一个新视频。可以指定开始时间(start)和持续时间(duration),也可以指定结束时间(end)。
$ ffmpeg -ss [start] -i [input] -t [duration] -c copy [output]
$ ffmpeg -ss [start] -i [input] -to [end] -c copy [output]
下面是实际的例子。
$ ffmpeg -ss 00:01:50 -i [input] -t 10.5 -c copy [output]
$ ffmpeg -ss 2.5 -i [input] -to 10 -c copy [output]
上面例子中,-c copy表示不改变音频和视频的编码格式,直接拷贝,这样会快很多。
10、 为音频添加封面
有些视频网站只允许上传视频文件。如果要上传音频文件,必须为音频添加封面,将其转为视频,然后上传。
下面命令可以将音频文件,转为带封面的视频文件。
$ ffmpeg \
-loop 1 \
-i cover.jpg -i input.mp3 \
-c:v libx264 -c:a aac -b:a 192k -shortest \
output.mp4
上面命令中,有两个输入文件,一个是封面图片cover.jpg,另一个是音频文件input.mp3。-loop 1参数表示图片无限循环,-shortest参数表示音频文件结束,输出视频就结束。
FFmpeg + PyQt 5 实现视频文件播放
简单视频文件播放器
创建一个QMediaPlayer,然后直接用文件对话框打开视频播放,选择完之后直接进行播放。效果如下:


Python 源码
# _*_ coding : UTF-8_*_
# 开发者 : zhuozhiwengang
# 开发时间 : 2023/8/7 22:28
# 文件名称 : py_player_demo1
# 开发工具 : PyCharmfrom PyQt5.QtWidgets import *
from PyQt5.QtMultimedia import *
from PyQt5.QtMultimediaWidgets import QVideoWidget
import sys
if __name__ == '__main__':app = QApplication(sys.argv)player = QMediaPlayer()vw = QVideoWidget()                       # 定义视频显示的widgetvw.show()player.setVideoOutput(vw)                 # 视频播放输出的widget,就是上面定义的player.setMedia(QMediaContent(QFileDialog.getOpenFileUrl()[0]))  # 选取视频文件player.play()                               # 播放视频sys.exit(app.exec_())
温馨提示:如果发现选择视频文件后,PyQT 5 无法播放视频文件,你需要安装:K-Lite Codec Pack. 安装K-Lite Codec Pack 的原因是:PyQt 5本身不自带视频解码器,所以想要使用QMediaPlayer得自己安装。
播放控制按钮播放器
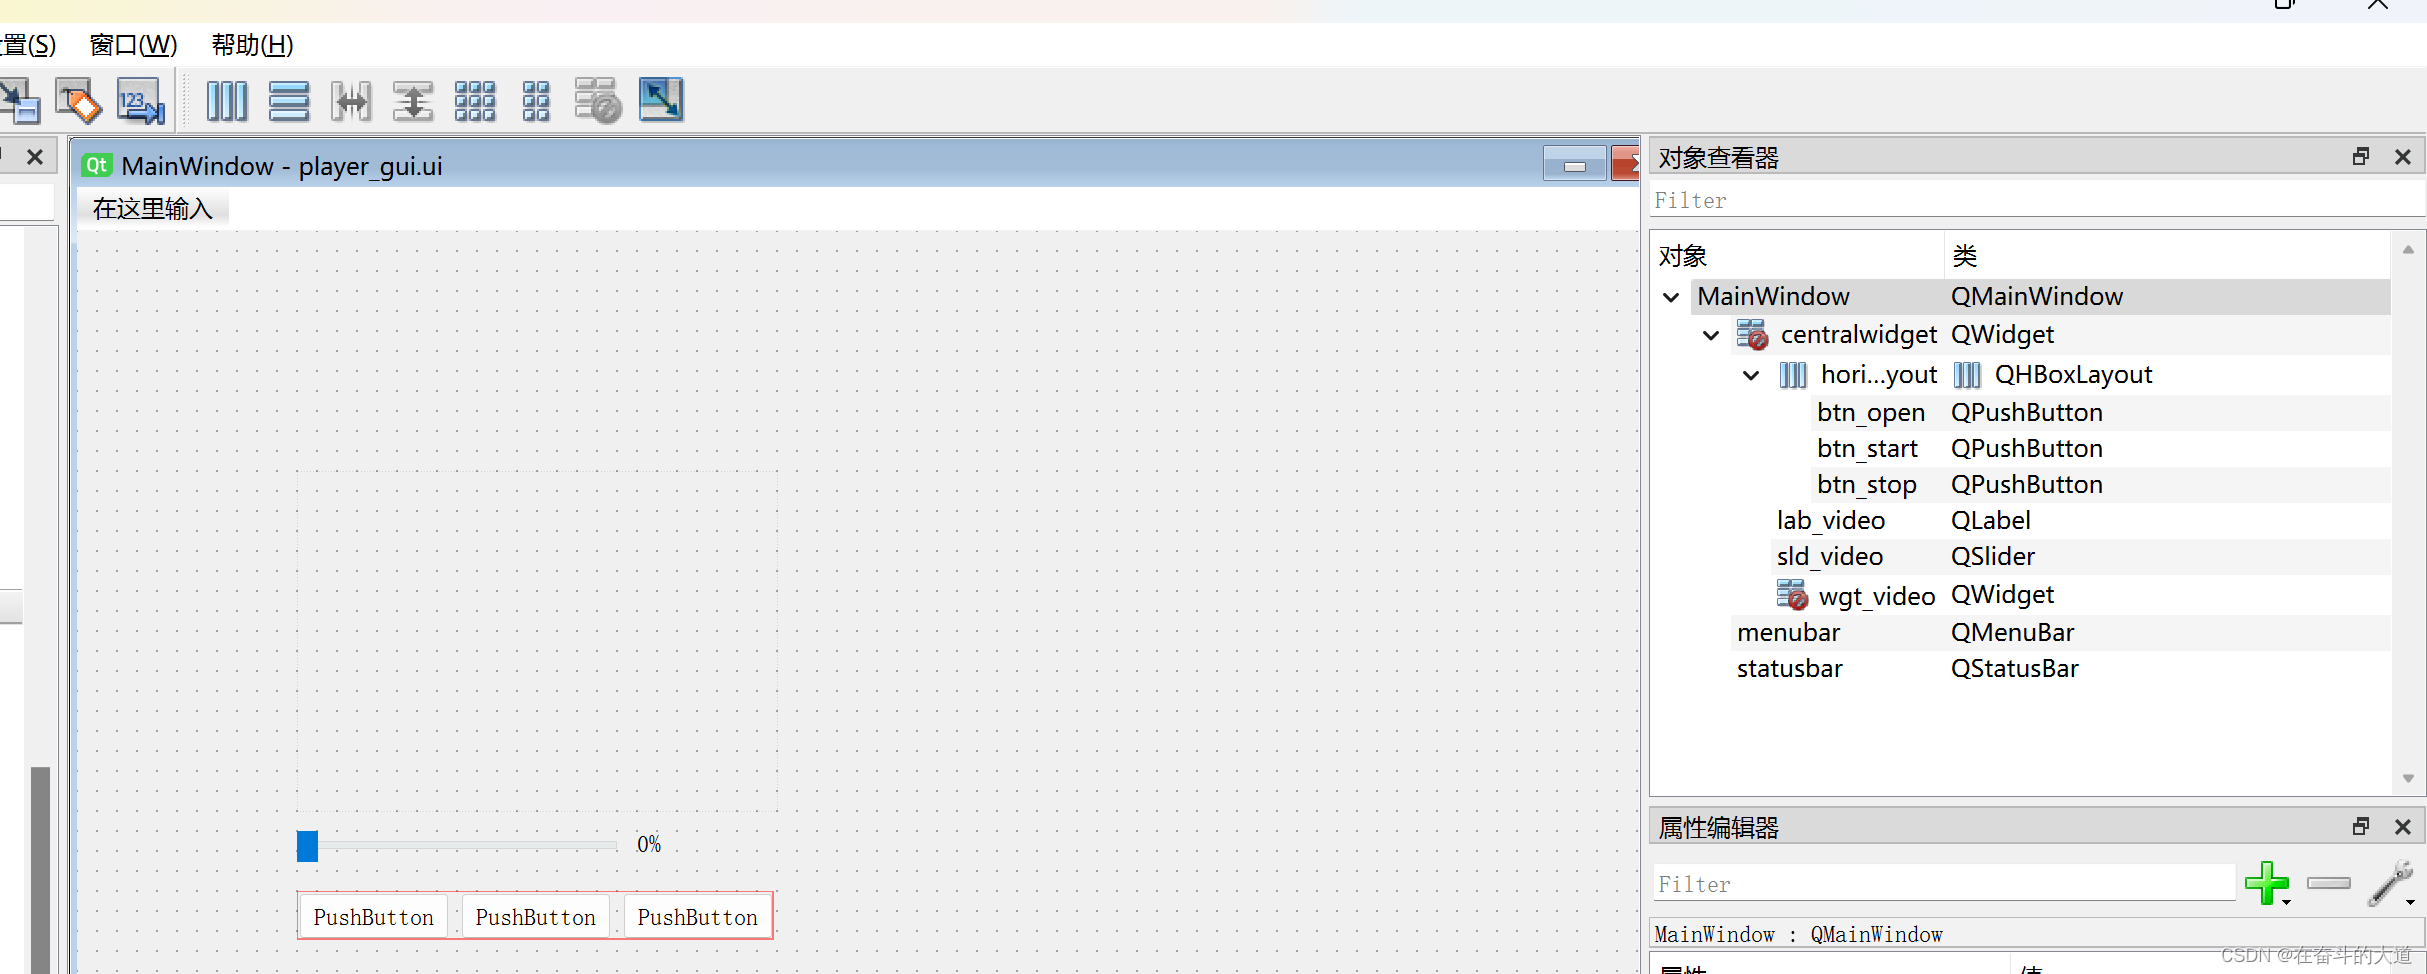
第一步:首先我们在目录下创建一个player_gui.ui的文件,然后右键用External Tools 的QtDesigner打开来构建所需要的界面:
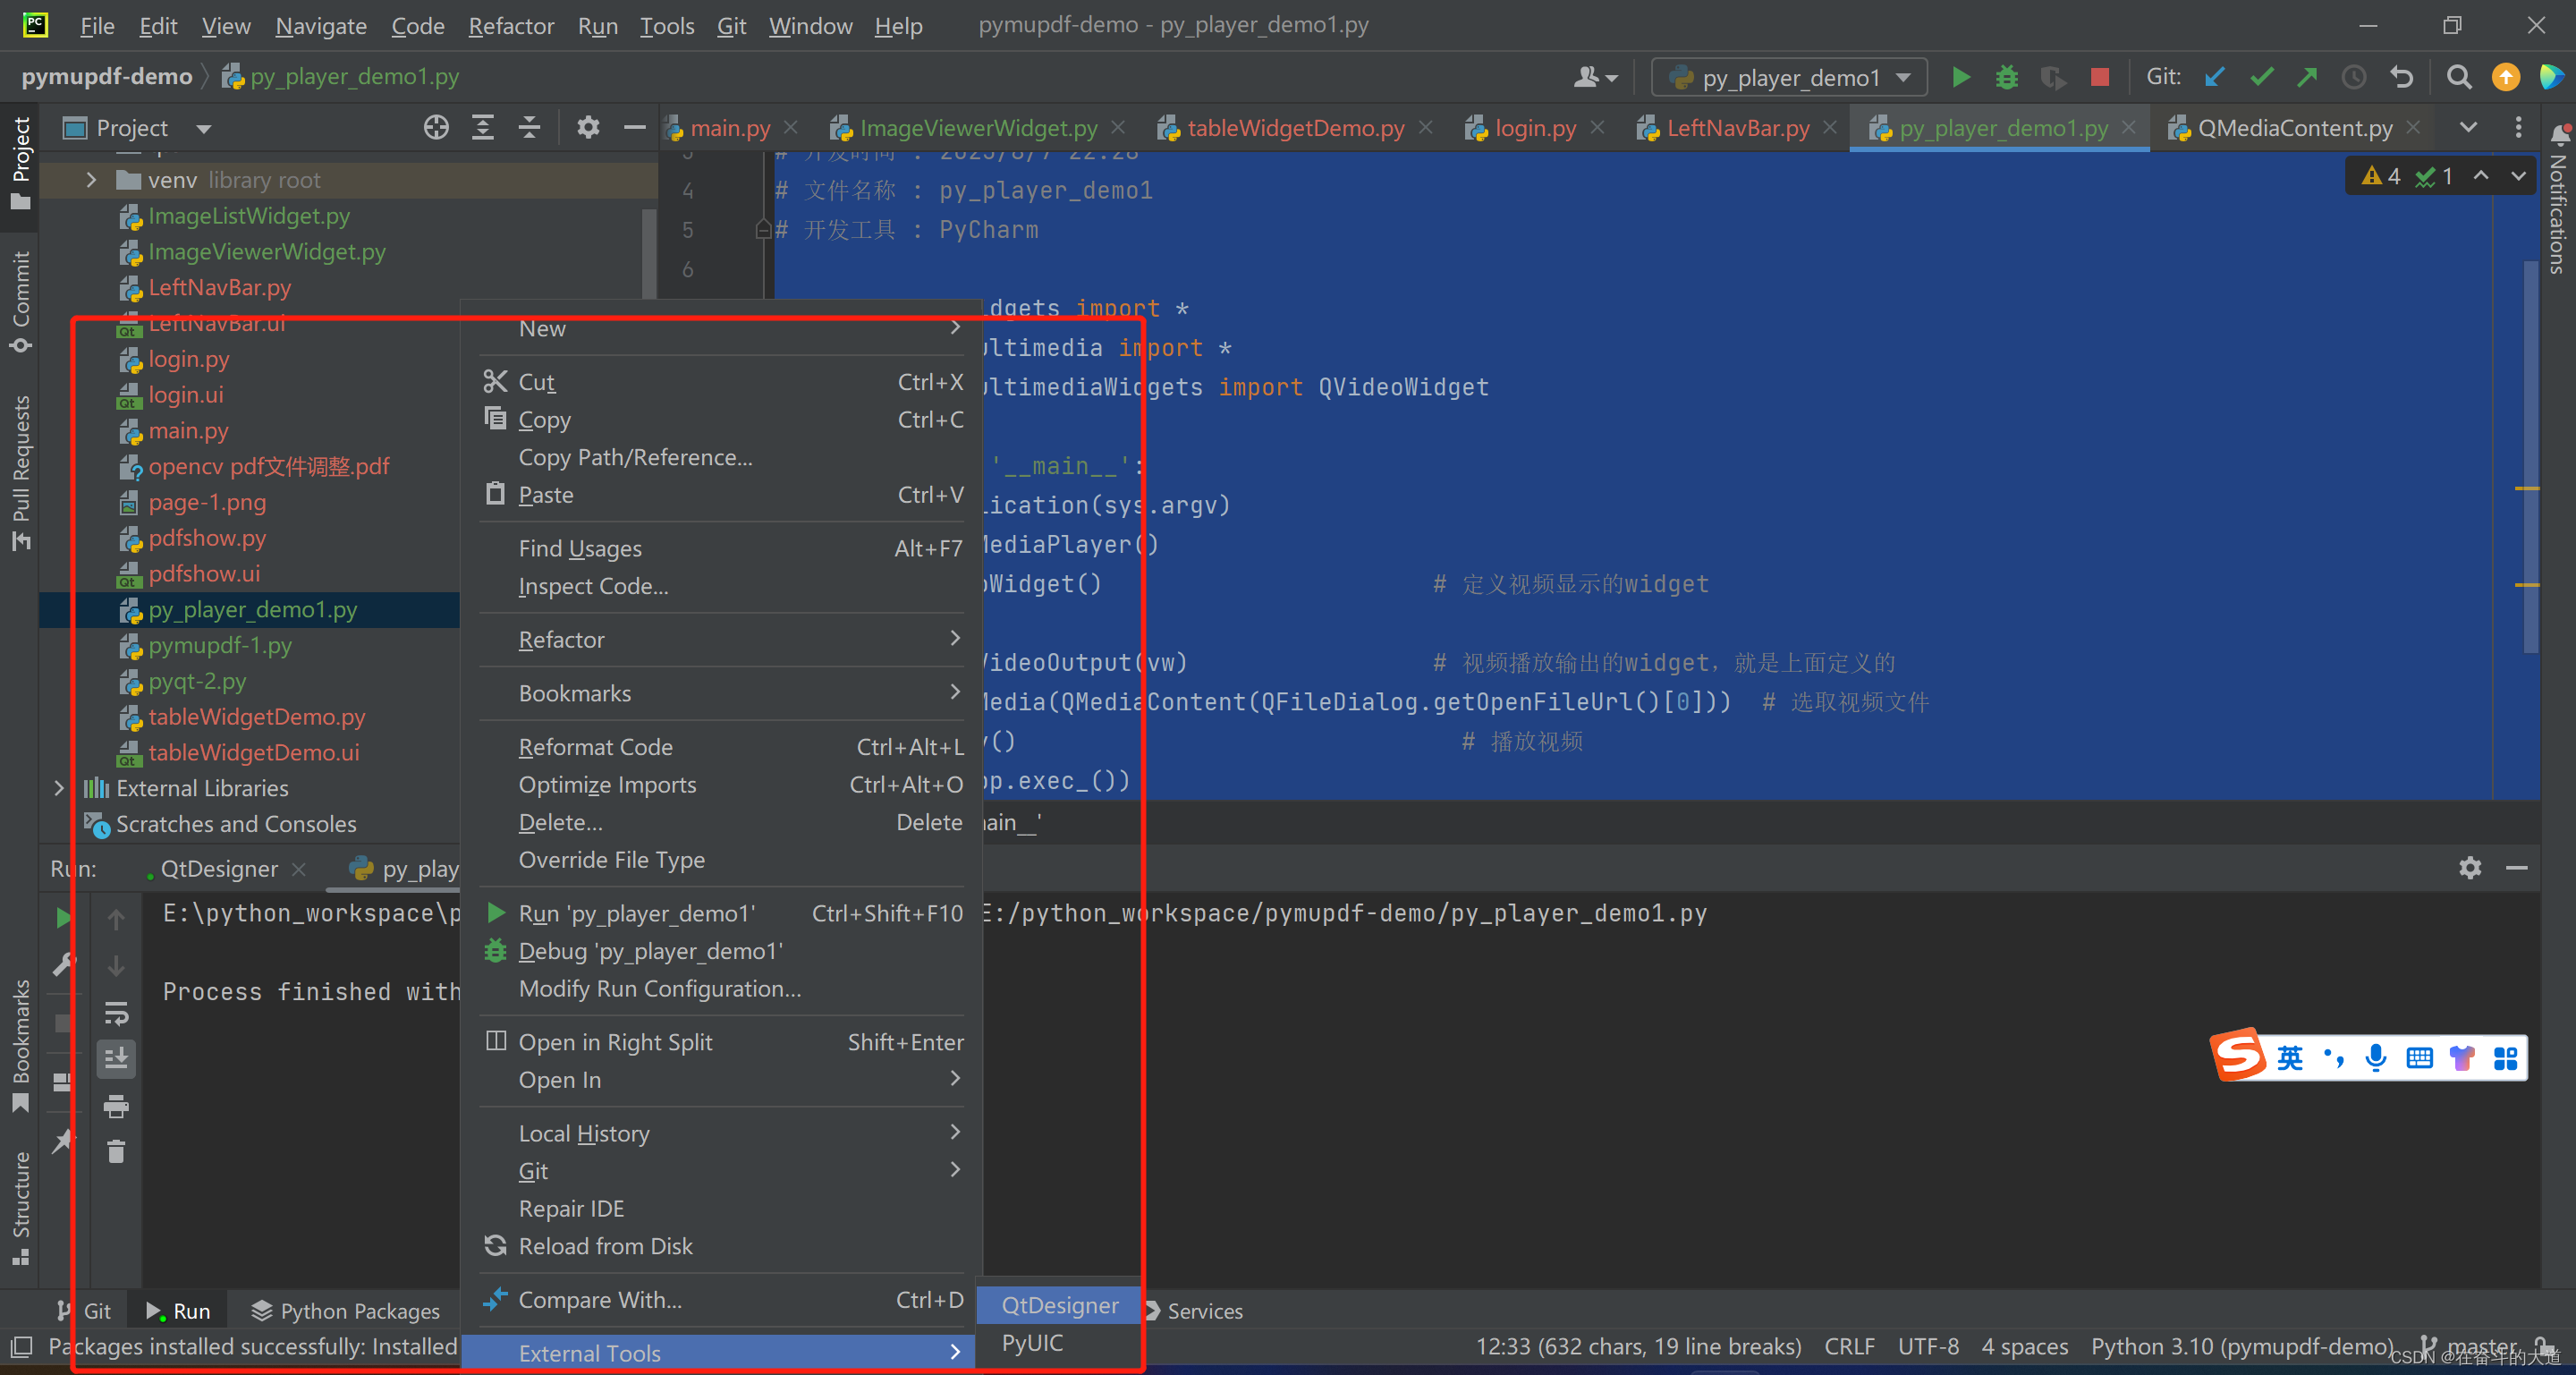

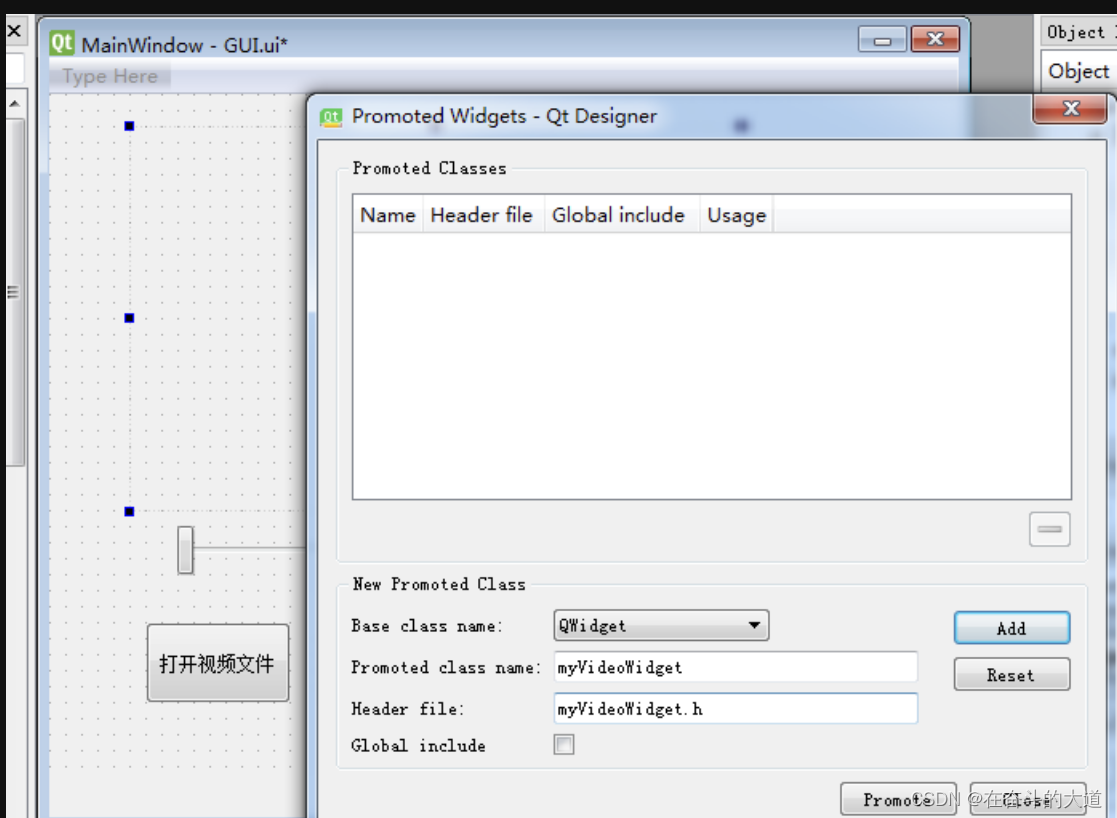
第二步:根据需要直接拖控件,这里只实现了最简单的视屏播放功能,所以放了三个PushButton,一个Horizontal Slider,一个Label,一个widget。 重点:为实现双击播放器实现全屏展示,我们需要重写QVideoWidget 的双击事件效应,把新继承的类名定为myVideoWidget。将刚才拖放界面中的wgt_video(QWidget)组件提示为自定义myVideoWidget组件。(promot 提升的时候promoted class name 填写的就是自己的写的类,比如myVideoWidget,header file 填写的就是类所在的文件名)
然后保存设计好的ui文件,然后用PyUIC 将ui文件转成py文件.
player_gui.py
# -*- coding: utf-8 -*-# Form implementation generated from reading ui file 'player_gui.ui'
#
# Created by: PyQt5 UI code generator 5.15.9
#
# WARNING: Any manual changes made to this file will be lost when pyuic5 is
# run again.  Do not edit this file unless you know what you are doing.
import sysfrom PyQt5 import QtCore, QtGui, QtWidgets
from PyQt5.QtWidgets import QApplicationclass Ui_MainWindow(object):def setupUi(self, MainWindow):MainWindow.setObjectName("MainWindow")MainWindow.resize(800, 600)self.centralwidget = QtWidgets.QWidget(MainWindow)self.centralwidget.setObjectName("centralwidget")self.sld_video = QtWidgets.QSlider(self.centralwidget)self.sld_video.setGeometry(QtCore.QRect(110, 300, 160, 16))self.sld_video.setOrientation(QtCore.Qt.Horizontal)self.sld_video.setObjectName("sld_video")self.lab_video = QtWidgets.QLabel(self.centralwidget)self.lab_video.setGeometry(QtCore.QRect(280, 300, 54, 12))self.lab_video.setObjectName("lab_video")self.wgt_video = myVideoWidget(self.centralwidget)self.wgt_video.setGeometry(QtCore.QRect(110, 120, 241, 171))self.wgt_video.setObjectName("wgt_video")self.widget = QtWidgets.QWidget(self.centralwidget)self.widget.setGeometry(QtCore.QRect(110, 330, 239, 25))self.widget.setObjectName("widget")self.horizontalLayout = QtWidgets.QHBoxLayout(self.widget)self.horizontalLayout.setContentsMargins(0, 0, 0, 0)self.horizontalLayout.setObjectName("horizontalLayout")self.btn_open = QtWidgets.QPushButton(self.widget)self.btn_open.setObjectName("btn_open")self.horizontalLayout.addWidget(self.btn_open)self.btn_start = QtWidgets.QPushButton(self.widget)self.btn_start.setObjectName("btn_start")self.horizontalLayout.addWidget(self.btn_start)self.btn_stop = QtWidgets.QPushButton(self.widget)self.btn_stop.setObjectName("btn_stop")self.horizontalLayout.addWidget(self.btn_stop)MainWindow.setCentralWidget(self.centralwidget)self.menubar = QtWidgets.QMenuBar(MainWindow)self.menubar.setGeometry(QtCore.QRect(0, 0, 800, 22))self.menubar.setObjectName("menubar")MainWindow.setMenuBar(self.menubar)self.statusbar = QtWidgets.QStatusBar(MainWindow)self.statusbar.setObjectName("statusbar")MainWindow.setStatusBar(self.statusbar)self.retranslateUi(MainWindow)QtCore.QMetaObject.connectSlotsByName(MainWindow)def retranslateUi(self, MainWindow):_translate = QtCore.QCoreApplication.translateMainWindow.setWindowTitle(_translate("MainWindow", "MainWindow"))self.lab_video.setText(_translate("MainWindow", "0%"))self.btn_open.setText(_translate("MainWindow", "PushButton"))self.btn_start.setText(_translate("MainWindow", "PushButton"))self.btn_stop.setText(_translate("MainWindow", "PushButton"))from myVideoWidget import *if __name__ == '__main__':app = QApplication(sys.argv)mainWindows = QtWidgets.QMainWindow()vieo_gui = Ui_MainWindow()vieo_gui.setupUi(mainWindows)mainWindows.show()sys.exit(app.exec_())
player_gui.ui
<?xml version="1.0" encoding="UTF-8"?>
<ui version="4.0"><class>MainWindow</class><widget class="QMainWindow" name="MainWindow"><property name="geometry"><rect><x>0</x><y>0</y><width>800</width><height>600</height></rect></property><property name="windowTitle"><string>MainWindow</string></property><widget class="QWidget" name="centralwidget"><widget class="QSlider" name="sld_video"><property name="geometry"><rect><x>110</x><y>300</y><width>160</width><height>16</height></rect></property><property name="orientation"><enum>Qt::Horizontal</enum></property></widget><widget class="QLabel" name="lab_video"><property name="geometry"><rect><x>280</x><y>300</y><width>54</width><height>12</height></rect></property><property name="text"><string>0%</string></property></widget><widget class="myVideoWidget" name="wgt_video" native="true"><property name="geometry"><rect><x>110</x><y>120</y><width>241</width><height>171</height></rect></property></widget><widget class="QWidget" name=""><property name="geometry"><rect><x>110</x><y>330</y><width>239</width><height>25</height></rect></property><layout class="QHBoxLayout" name="horizontalLayout"><item><widget class="QPushButton" name="btn_open"><property name="text"><string>PushButton</string></property></widget></item><item><widget class="QPushButton" name="btn_start"><property name="text"><string>PushButton</string></property></widget></item><item><widget class="QPushButton" name="btn_stop"><property name="text"><string>PushButton</string></property></widget></item></layout></widget></widget><widget class="QMenuBar" name="menubar"><property name="geometry"><rect><x>0</x><y>0</y><width>800</width><height>22</height></rect></property></widget><widget class="QStatusBar" name="statusbar"/></widget><customwidgets><customwidget><class>myVideoWidget</class><extends>QWidget</extends><header location="global">myvideowidget.h</header><container>1</container></customwidget></customwidgets><resources/><connections/>
</ui>
第三步:新建一个文件myVideoWidget.py 然后继承原来的QVideoWidget, 重写鼠标双击事件,当有双击时发送信号:
(温馨提示:这里的文件名和类名要和对应上面widget提升时候的名字。)
# _*_ coding : UTF-8_*_
# 开发者 : zhuozhiwengang
# 开发时间 : 2023/8/7 23:52
# 文件名称 : myVideoWidget
# 开发工具 : PyCharm
from PyQt5.QtMultimediaWidgets import QVideoWidget
from PyQt5.QtCore import *class myVideoWidget(QVideoWidget):doubleClickedItem = pyqtSignal(str)  # 创建双击信号def __init__(self, parent=None):super(QVideoWidget, self).__init__(parent)def mouseDoubleClickEvent(self, QMouseEvent):  # 双击事件self.doubleClickedItem.emit("double clicked")
核心函数设计:py_player_demo2.py
实现全屏的思路就是使用两个myVideoWidget,然后根据双击,进行切换,实现效果基本上看不出有两个widget(如果你切换任务管理器就能明显看到是两个窗口)
# _*_ coding : UTF-8_*_
# 开发者 : zhuozhiwengang
# 开发时间 : 2023/8/7 23:56
# 文件名称 : py_player_demo2
# 开发工具 : PyCharm
import sysfrom PyQt5.QtMultimedia import QMediaPlayer, QMediaContent
from PyQt5.QtWidgets import QMainWindow, QFileDialog, QApplicationfrom myVideoWidget import myVideoWidget
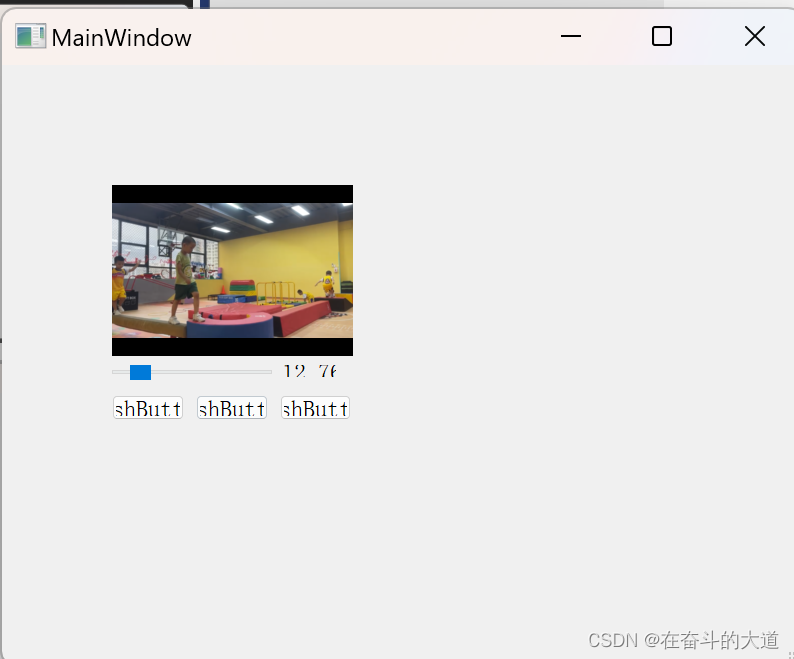
from player_gui import Ui_MainWindowclass myMainWindow(Ui_MainWindow, QMainWindow):def __init__(self):super(Ui_MainWindow, self).__init__()self.setupUi(self)self.sld_video_pressed = False # 判断当前进度条识别否被鼠标点击self.videoFullScreen = False # 判断当前widget是否全屏self.videoFullScreenWidget = myVideoWidget() # 创建一个全屏的widgetself.videoFullScreenWidget.setFullScreen(1)self.videoFullScreenWidget.hide() # 不用的时候隐藏起来self.player = QMediaPlayer()self.player.setVideoOutput(self.wgt_video) # 视频播放输出的widget,就是上面定义的self.btn_open.clicked.connect(self.openVideoFile) # 打开视频文件按钮self.btn_start.clicked.connect(self.playVideo) # playself.btn_stop.clicked.connect(self.pauseVideo) # pauseself.player.positionChanged.connect(self.changeSlide) # change Slideself.videoFullScreenWidget.doubleClickedItem.connect(self.videoDoubleClicked) # 双击响应self.wgt_video.doubleClickedItem.connect(self.videoDoubleClicked) # 双击响应self.sld_video.setTracking(False)self.sld_video.sliderReleased.connect(self.releaseSlider)self.sld_video.sliderPressed.connect(self.pressSlider)self.sld_video.sliderMoved.connect(self.moveSlider)def openVideoFile(self):self.player.setMedia(QMediaContent(QFileDialog.getOpenFileUrl()[0])) # 选取视频文件self.player.play() # 播放视频def playVideo(self):self.player.play()def pauseVideo(self):self.player.pause()def changeSlide(self, position):if not self.sld_video_pressed: # 进度条被鼠标点击时不更新vidoeLength = self.player.duration() + 0.1self.sld_video.setValue(round((position / vidoeLength) * 100))self.lab_video.setText(str(round((position / vidoeLength) * 100, 2)) + '%')def moveSlider(self, position):if self.player.duration() > 0: # 开始播放后才允许进行跳转video_position = int((position / 100) * self.player.duration())self.player.setPosition(video_position)self.lab_video.setText(str(round(position, 2)) + '%')def pressSlider(self):self.sld_video_pressed = Trueprint("pressed")def releaseSlider(self):self.sld_video_pressed = Falsedef videoDoubleClicked(self, text):if self.player.duration() > 0: # 开始播放后才允许进行全屏操作if self.videoFullScreen:self.player.pause()self.videoFullScreenWidget.hide()self.player.setVideoOutput(self.wgt_video)self.player.play()self.videoFullScreen = Falseelse:self.player.pause()self.videoFullScreenWidget.show()self.player.setVideoOutput(self.videoFullScreenWidget)self.player.play()self.videoFullScreen = Trueif __name__ == '__main__':app = QApplication(sys.argv)vieo_gui = myMainWindow()vieo_gui.show()sys.exit(app.exec_())效果截图:


涉及技术点总结:
- PyQt 5 基本组件和布局组件的使用
- PyQt 5 自定义组件和QWidget 组件提升
- PyQt 5 信号和槽的使用
以上仅仅是PyQt 5 掌握的基本功能。
FFmpeg + PyQt 5 音视频文件工具
待补充


![【LeetCode】数据结构题解(9)[复制带随机指针的链表]](https://img-blog.csdnimg.cn/b7bced64771a4215967a8456aa34286d.png)