目录
前言
1--反转单向链表
2--反转单向链表-II
3--反转双向链表
4--打印两个有序链表的公共部分
5--回文链表
6--链表调整
7--复制含有随机指针结点的链表
8--两个单链表相交问题
前言
面经:
针对链表的题目,对于笔试可以不太在乎空间复杂度,以时间复杂度为主(能过就行,对于任何题型都一样,笔试能过就行);对于面试,时间复杂度依然处在第一位,但要力求空间复杂度最低的算法(突出亮点);
链表题的重要技巧包括:使用额外的数据结构记录(例如哈希表等),使用快慢指针的思想;
1--反转单向链表

笔试解法:
借助栈先进后出,可以遍历把结点存到栈中,然后不断出栈,这样结点的顺序就反转了;
时间复杂度为O(n),空间复杂度为O(n);
#include <iostream>
#include <stack>struct ListNode {int val;ListNode *next;ListNode() : val(0), next(nullptr) {}ListNode(int x) : val(x), next(nullptr) {}ListNode(int x, ListNode *next) : val(x), next(next) {}
};class Solution {
public:ListNode* reverseList(ListNode* head) {if(head == NULL) return head;std::stack<ListNode*> st;while(head != NULL){st.push(head);head = head->next;}ListNode *new_head = new ListNode(0);ListNode *tmp = new_head;while(!st.empty()){tmp->next = st.top();st.pop();tmp = tmp->next;}tmp->next = NULL;return new_head->next;}
};int main(int argc, char *argv[]){ListNode *Node1 = new ListNode(1);ListNode *Node2 = new ListNode(2);ListNode *Node3 = new ListNode(3);ListNode *Node4 = new ListNode(4);ListNode *Node5 = new ListNode(5);Node1->next = Node2;Node2->next = Node3;Node3->next = Node4;Node4->next = Node5;Solution S1;ListNode *res = S1.reverseList(Node1);while(res != NULL){std::cout << res->val << " ";res = res->next;}return 0;
}
面试解法:
不借助栈或递归,通过迭代将空间复杂度优化为O(1);
利用一个额外的前驱结点 pre 来存储当前结点 cur 的前一个结点,不断更新 pre 和 cur即可;
#include <iostream>
#include <stack>struct ListNode {int val;ListNode *next;ListNode() : val(0), next(nullptr) {}ListNode(int x) : val(x), next(nullptr) {}ListNode(int x, ListNode *next) : val(x), next(next) {}
};class Solution {
public:ListNode* reverseList(ListNode* head) {if(head == NULL) return head;ListNode *pre = NULL;ListNode *cur = head;while(cur != NULL){ListNode* next = cur->next;cur->next = pre;pre = cur;cur = next;}return pre;}
};int main(int argc, char *argv[]){ListNode *Node1 = new ListNode(1);ListNode *Node2 = new ListNode(2);ListNode *Node3 = new ListNode(3);ListNode *Node4 = new ListNode(4);ListNode *Node5 = new ListNode(5);Node1->next = Node2;Node2->next = Node3;Node3->next = Node4;Node4->next = Node5;Solution S1;ListNode *res = S1.reverseList(Node1);while(res != NULL){std::cout << res->val << " ";res = res->next;}return 0;
}
2--反转单向链表-II
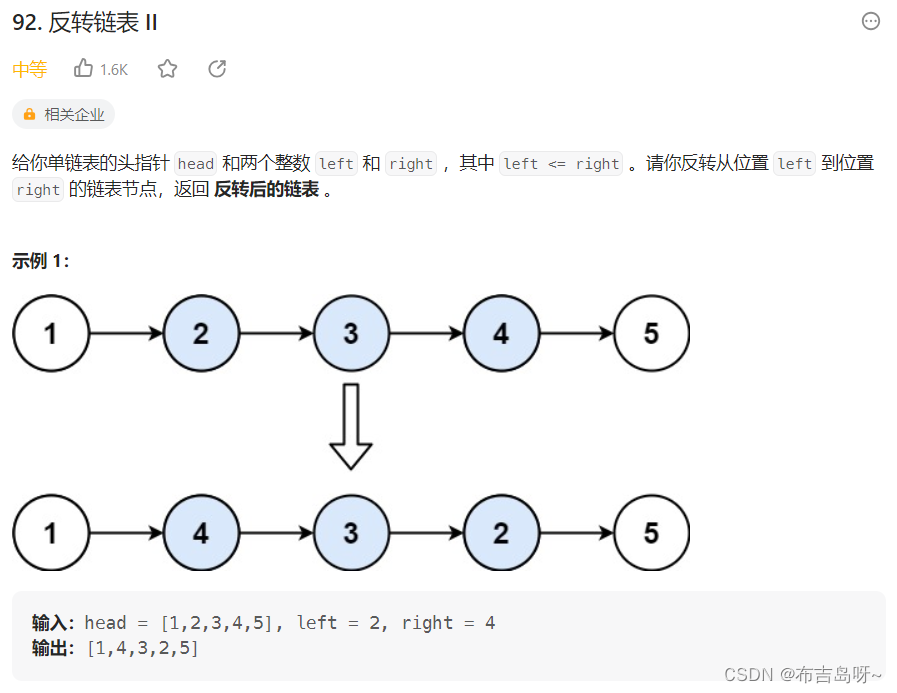
主要思路:
使用三个指针,指针 pre 指向反转区域外的第一个节点,即上图中的 1;指针 cur 指向当前指针,指针 next 指向 cur 的下一个指针;
遍历链表,每次将 next 指针头插,具体过程可以参考官方题解;
#include <iostream>struct ListNode {int val;ListNode *next;ListNode() : val(0), next(nullptr) {}ListNode(int x) : val(x), next(nullptr) {}ListNode(int x, ListNode *next) : val(x), next(next) {}
};class Solution {
public:ListNode* reverseBetween(ListNode* head, int left, int right) {ListNode *dummyNode = new ListNode(-1);dummyNode->next = head;ListNode *pre = dummyNode;ListNode *cur;ListNode *next;// 经过循环之后,pre指向反转区域前的第一个节点for(int i = 0; i < left - 1; i++){pre = pre->next;}cur = pre->next; // cur指向反转区域的第一个节点for(int i = 0; i < right - left; i++){next = cur->next;cur->next = next->next; // cur指向next的下一个节点,因为next节点要头插到pre节点后面next->next = pre->next; // next节点头插,指向原来的第一个节点pre->next = next; // next节点头插到pre节点后面}return dummyNode->next;}
};int main(){ListNode *Node1 = new ListNode(1);ListNode *Node2 = new ListNode(2);ListNode *Node3 = new ListNode(3);ListNode *Node4 = new ListNode(4);ListNode *Node5 = new ListNode(5);Node1->next = Node2;Node2->next = Node3;Node3->next = Node4;Node4->next = Node5;Solution S1;int left = 2, right = 4;ListNode *res = S1.reverseBetween(Node1, left, right);while(res != NULL){std::cout << res->val << " ";res = res->next;}return 0;
}
3--反转双向链表
主要思路:
与反转单向链表类似,使用 pre,cur 和 next 指向前一个节点,当前节点和后一个节点,不断遍历更新三个指针所指向的节点即可,并修改对应的前驱指针和后驱指针;
#include <iostream>
#include <stack>struct ListNode {int val;ListNode *pre;ListNode *next;ListNode() : val(0), pre(nullptr), next(nullptr) {}ListNode(int x) : val(x), pre(nullptr), next(nullptr) {}ListNode(int x, ListNode *next) : val(x), pre(nullptr), next(next) {}
};class Solution {
public:ListNode* reverseList(ListNode* head) {if(head == NULL) return head;ListNode *pre = NULL;ListNode *cur = head;while(cur != NULL){ListNode* next = cur->next;cur->next = pre;cur->pre = next;pre = cur;cur = next;}return pre;}
};int main(int argc, char *argv[]){ListNode *Node1 = new ListNode(1);ListNode *Node2 = new ListNode(2);ListNode *Node3 = new ListNode(3);ListNode *Node4 = new ListNode(4);ListNode *Node5 = new ListNode(5);Node1->next = Node2;Node2->next = Node3;Node3->next = Node4;Node4->next = Node5;Node2->pre = Node1;Node3->pre = Node2;Node4->pre = Node3;Node5->pre = Node4;Solution S1;ListNode *res = S1.reverseList(Node1);while(res != NULL){std::cout << res->val << " ";if(res->pre != NULL) std::cout << res->pre->val;std::cout << std::endl;res = res->next;}return 0;
}
4--打印两个有序链表的公共部分
给定两个有序链表的头指针 head1 和 head2,打印两个链表的公共部分;要求时间复杂度为O(n),额外空间复杂度要求为 O(1);
主要思路:
类似于归并排序,由于两个链表时有序的,因此可以使用两个指针 i 和 j 分别指向两个链表;
对于小的链表节点,指针后移;
当比较到两个指针相等时,打印节点的值,两个指针 i 和 j 同时后移;
#include <iostream>
#include <vector>struct ListNode {int val;ListNode *next;ListNode() : val(0), next(nullptr) {}ListNode(int x) : val(x), next(nullptr) {}ListNode(int x, ListNode *next) : val(x), next(next) {}
};class Solution {
public:std::vector<ListNode*> printlist(ListNode* head1, ListNode* head2) {std::vector<ListNode*> res;if(head1 == NULL || head2 == NULL) return res;ListNode *i = head1;ListNode *j = head2;while(i != NULL && j != NULL){// 小的后移if(i->val < j->val) i = i->next;else if(i->val > j->val) j = j->next;else{ // 相等同时后移res.push_back(i);i = i->next;j = j->next;} }return res;}
};int main(int argc, char *argv[]){ListNode *Node1 = new ListNode(1);ListNode *Node2 = new ListNode(2);ListNode *Node3 = new ListNode(5);ListNode *Node4 = new ListNode(0);ListNode *Node5 = new ListNode(2);ListNode *Node6 = new ListNode(3);ListNode *Node7 = new ListNode(5);Node1->next = Node2;Node2->next = Node3;Node4->next = Node5;Node5->next = Node6;Node6->next = Node7;Solution S1;std::vector<ListNode *> res = S1.printlist(Node1, Node4);for(ListNode * node : res) std::cout << node->val << " ";return 0;
}
5--回文链表
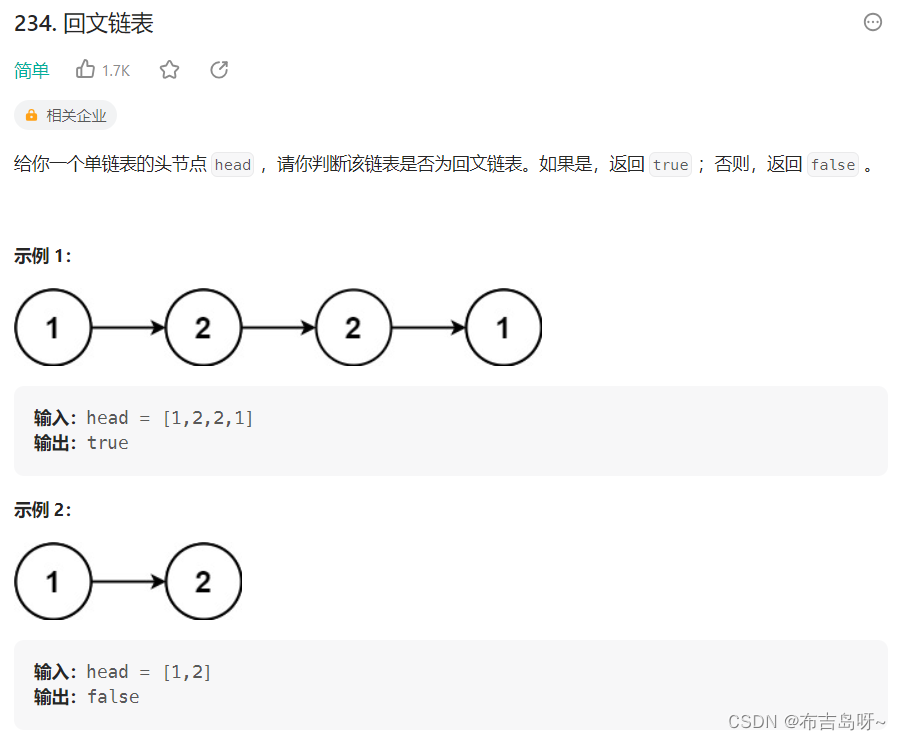
主要思路:
面试做法可以参考反转单向链表,将链表反转,与原链表的结点进行比较即可,当反转链表与原链表的结点不相等,表明不是回文链表;
空间复杂度 O(n),时间复杂度 O(n);
#include <iostream>
#include <stack>struct ListNode {int val;ListNode *next;ListNode() : val(0), next(nullptr) {}ListNode(int x) : val(x), next(nullptr) {}ListNode(int x, ListNode *next) : val(x), next(next) {}
};class Solution {
public:bool isPalindrome(ListNode* head) {if(head == NULL) return true;std::stack<ListNode*> st;ListNode *tmp = head;while(tmp != NULL){st.push(tmp);tmp = tmp->next;}while(!st.empty()){if(head->val != st.top()->val) return false;head = head->next;st.pop();}return true;}
};int main(int argc, char *argv[]){ListNode *Node1 = new ListNode(1);ListNode *Node2 = new ListNode(2);ListNode *Node3 = new ListNode(2);ListNode *Node4 = new ListNode(1);Node1->next = Node2;Node2->next = Node3;Node3->next = Node4;Solution S1;bool res = S1.isPalindrome(Node1);if(res) std::cout << "true" << std::endl;else std::cout << "false" << std::endl;return 0;
}
主要思路:
笔试解法:上述解法的空间复杂度是 O(n),使用快慢指针将空间复杂度优化为 O(1);
主要原理是将链表由 1→2→1→2→1 构建为 1→2→1←2←1 的形式,从两端遍历进行比较;
#include <iostream>struct ListNode {int val;ListNode *next;ListNode() : val(0), next(nullptr) {}ListNode(int x) : val(x), next(nullptr) {}ListNode(int x, ListNode *next) : val(x), next(next) {}
};class Solution {
public:bool isPalindrome(ListNode* head) {if(head == NULL) return true;ListNode *i = head;ListNode *j = head;while(j->next != NULL && j->next->next != NULL){i = i -> next;j = j -> next -> next;}j = i->next; // right part first nodei->next = NULL;ListNode *tmp = NULL;while(j != NULL){tmp = j->next;j->next = i;i = j;j = tmp;}j = i; // 最后一个结点i = head;while(i != NULL && j != NULL){if(i->val != j ->val) return false;i = i->next;j = j->next;}return true;}
};int main(int argc, char *argv[]){ListNode *Node1 = new ListNode(1);ListNode *Node2 = new ListNode(2);ListNode *Node3 = new ListNode(2);ListNode *Node4 = new ListNode(1);Node1->next = Node2;Node2->next = Node3;Node3->next = Node4;Solution S1;bool res = S1.isPalindrome(Node1);if(res) std::cout << "true" << std::endl;else std::cout << "false" << std::endl;return 0;
}
6--链表调整
将单向链表按某值划分成左边小、中间相等、右边大的形式;
题目:给定一个单链表的头结点head,结点的值类型是整型,再给定一个整数pivot,实现一个调整链表的的函数,将链表调整为左部分都是值小于pivot的结点,中间部分都是值等于pivot的结点,右部分都是值大于pivot的结点;
要求:调整后所有小于、等于或大于pivot的结点之间的相对顺序和调整前一样,时间复杂度为O(n),空间复杂度为O(1);
#include <iostream>struct ListNode {int val;ListNode *next;ListNode() : val(0), next(nullptr) {}ListNode(int x) : val(x), next(nullptr) {}ListNode(int x, ListNode *next) : val(x), next(next) {}
};class Solution {
public:ListNode* change(ListNode* head, int pivot) {if(head == NULL) return head;ListNode* SH = NULL; // small headListNode* ST = NULL; // small tailListNode* EH = NULL; // equal headListNode* ET = NULL; // equal tailListNode* LH = NULL; // large headListNode* LT = NULL; // large tailListNode* tmp;while(head != NULL){tmp = head->next; // 下一个结点head->next = NULL;// 抽每一个结点出来进行比较if(head->val < pivot){if(SH == NULL && ST == NULL){SH = head;ST = head;}else{ST->next = head;ST = ST->next;}}else if(head->val == pivot){if(EH == NULL && ET == NULL){EH = head;ET = head;}else{ET->next = head;ET = ET->next;}}else{if(LH == NULL && LT == NULL){LH = head;LT = head;}else{LT->next = head;LT = LT->next;}}head = tmp; // 比较下一个结点}// 首尾相连if(ST != NULL){// 有小于区域ST->next = EH;ET = ET == NULL ? ST : ET; // 没有等于区域,ET变成ST} if(ET != NULL) ET->next = LH;return SH != NULL ? SH : (EH != NULL ? EH : LH);}
};int main(int argc, char *argv[]){ListNode *Node1 = new ListNode(4);ListNode *Node2 = new ListNode(6);ListNode *Node3 = new ListNode(3);ListNode *Node4 = new ListNode(5);ListNode *Node5 = new ListNode(8);ListNode *Node6 = new ListNode(5);ListNode *Node7 = new ListNode(2);Node1->next = Node2;Node2->next = Node3;Node3->next = Node4;Node4->next = Node5;Node5->next = Node6;Node6->next = Node7;Solution S1;int pivot = 5;ListNode* res = S1.change(Node1, pivot);while(res != NULL){std::cout << res->val << " ";res = res->next;}return 0;
}
7--复制含有随机指针结点的链表

主要思路:
笔试解法,利用哈希表存储结点,即 key 表示原来的结点,value 表示复制的结点;
存储完毕后,遍历结点设置复制结点的 next 指针和 value 指针即可;
#include <iostream>
#include <unordered_map>class Node {
public:int val;Node* next;Node* random;Node(int _val) {val = _val;next = NULL;random = NULL;}
};class Solution {
public:Node* copyRandomList(Node* head) {std::unordered_map<Node*, Node*> hash;Node *tmp = head;while(tmp != NULL){hash[tmp] = new Node(tmp->val);tmp = tmp->next;}tmp = head;while(tmp != NULL){hash[tmp]->next = hash[tmp->next];hash[tmp]->random = hash[tmp->random];tmp = tmp->next;}return hash[head];}
};int main(int argc, char *argv[]){Node* Node1 = new Node(7);Node* Node2 = new Node(13);Node* Node3 = new Node(11);Node* Node4 = new Node(10);Node* Node5 = new Node(1);Node1->next = Node2;Node2->next = Node3;Node3->next = Node4;Node4->next = Node5;Node1->random = NULL;Node2->random = Node1;Node3->random = Node5;Node4->random = Node3;Node4->random = Node1;Solution S1;Node* res = S1.copyRandomList(Node1);while(res != NULL){std::cout << res->val << " ";res = res->next;}return 0;
}
主要思路:
面试解法,将空间复杂度优化为 O(1);
将原链表Ori_Node1 → Ori_Node2 → Ori_Node3 构造成 Ori_Node1 → New_Node1 → Ori_Node2 → New_Node2 → Ori_Node3 → New_Node3;
接着一对一对地去遍历链表,构建 random 指针;
最后将新旧链表分离,构建 next 指针即可;
#include <iostream>class Node {
public:int val;Node* next;Node* random;Node(int _val) {val = _val;next = NULL;random = NULL;}
};class Solution {
public:Node* copyRandomList(Node* head) {if (head == NULL) return NULL;Node* tmp = head;Node* next = NULL;while(tmp != NULL){next = tmp->next; // 原链表下一个结点tmp->next = new Node(tmp->val); // 创建新结点tmp->next->next = next; // 新结点指向原链表地下一个结点tmp = next; // 更新tmp}tmp = head; // 遍历构建random指针while(tmp != NULL){next= tmp->next->next; // 一对一对遍历tmp->next->random = tmp->random != NULL ? tmp->random->next : NULL;tmp = next;}// 分离链表并构建next指针tmp = head;Node *res = head->next;Node *copy;while(tmp != NULL){copy = tmp->next;next = tmp->next->next; // 一对一对分离tmp->next= next;copy->next = next != NULL ? next->next : NULL;tmp = next;}return res;}
};int main(int argc, char *argv[]){Node* Node1 = new Node(7);Node* Node2 = new Node(13);Node* Node3 = new Node(11);Node* Node4 = new Node(10);Node* Node5 = new Node(1);Node1->next = Node2;Node2->next = Node3;Node3->next = Node4;Node4->next = Node5;Node1->random = NULL;Node2->random = Node1;Node3->random = Node5;Node4->random = Node3;Node4->random = Node1;Solution S1;Node* res = S1.copyRandomList(Node1);while(res != NULL){std::cout << res->val << " ";res = res->next;}return 0;
}