目录
项目架构
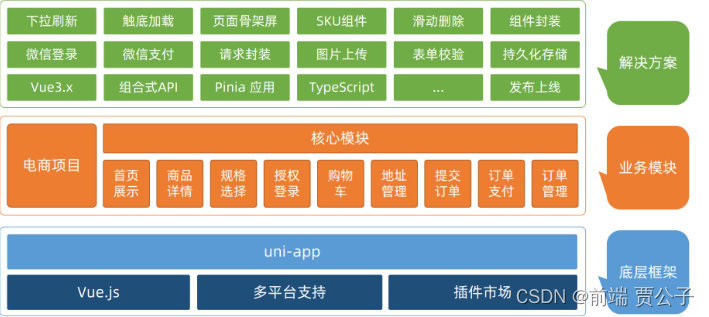
uni-app小兔鲜儿电商项目架构
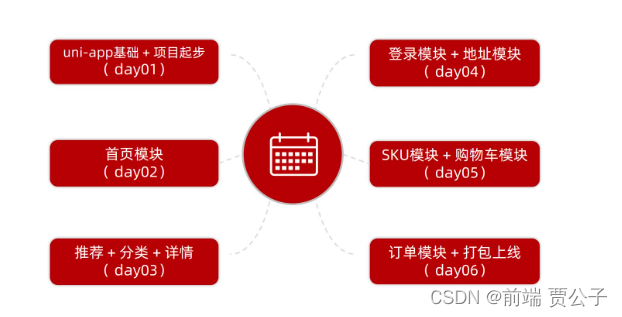
小兔鲜儿电商课程安排
创建uni-app项目
1.通过HBuilderX创建
2.通过命令行创建
pages.json和tabBar案例
uni-app和原生小程序开发区别
用VS Code开发uni-app项目
拉取小兔鲜儿项目模板代码
基础架构–引入uni-ui组件库
操作步骤
安装类型声明文件
配置类型声明文件
基础架构–小程序端Pinia持久化、
持久化存储插件
网页端持久化 API
多端持久化 API
参考代码
基础架构–uni.request请求封装
基础架构–请求和上传文件拦截器
uni.addInterceptor(STRING, OBJECT)
基础架构–封装Promise请求函数
[扩展] pinia需要使用pinia-plugin-persistedstate插件来进行数据的存储
1、安装
2、使用
3、关于全部缓存及部分缓存的说明
TS中的泛型
一、泛型是什么?有什么作用
二、泛型用法
2.1 在函数中使用泛型
2.2 在接口中使用泛型
2.3 在类中使用泛型
三、泛型约束
3.1使用接口约束泛型
3.2 数组泛型
项目架构
uni-app小兔鲜儿电商项目架构
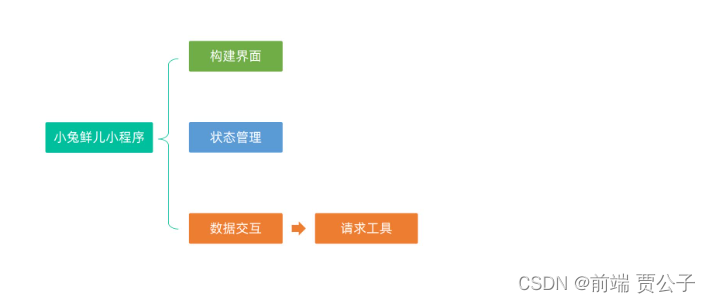
小兔鲜儿电商课程安排
创建uni-app项目
创建uni-app项目
uni-app支持两种方式创建项目:
1.通过HBuilderX创建

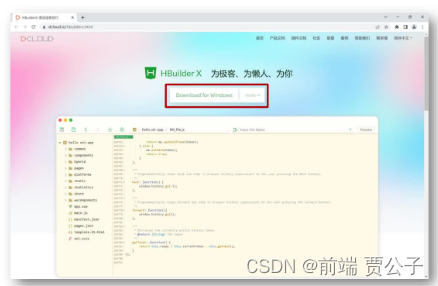
1.1下载安装HbuilderX编辑器
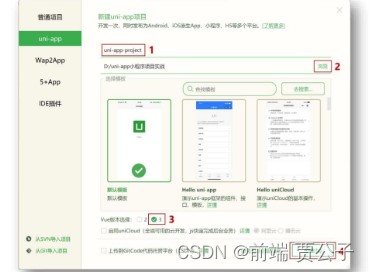
1.2通过HbuilderX创建uni-app vue3项目
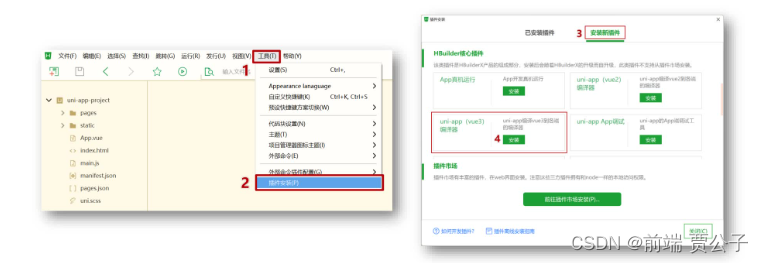
1.3安装uni-app vue3编译器插件
1.4编译成微信小程序端代码
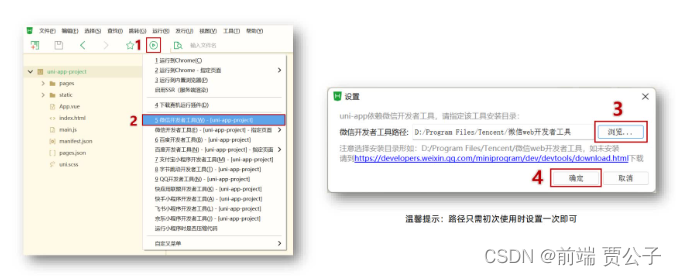
1.5开启服务端口
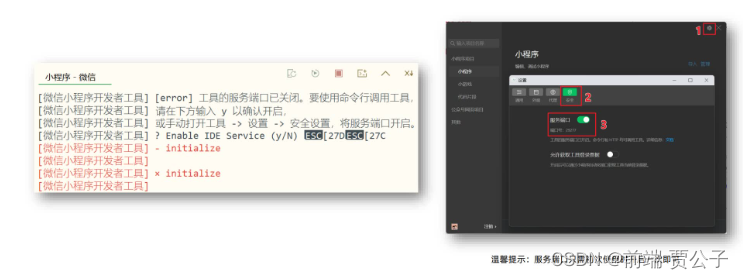
小技巧分享:模拟器窗口分离和置顶
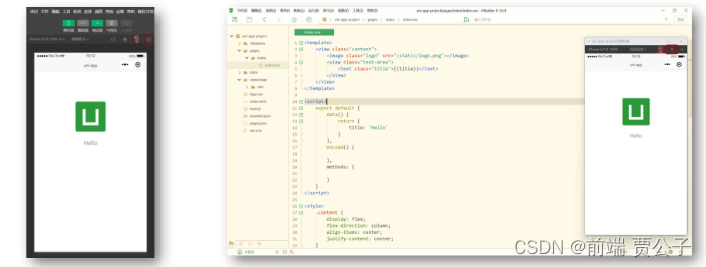
两者关系

2.通过命令行创建
通过命令行创建(不必依赖HBuilderX)
命令行创建uni-app项目:
vue3+ts版:
npx degit dcloudio/uni-preset-vue#vite-ts 项目名称创建其他版本可查看:uni-app 官网![]() https://uniapp.dcloud.net.cn/quickstart-cli.html
https://uniapp.dcloud.net.cn/quickstart-cli.html
编译和运行uni-app项目:

- 安装依赖
pnpm install - 编译成微信小程序
pnpm dev:mp-weixin - 导入微信开发者工具
温馨提示: 在 manifest.json 文件添加小程序 appid 方便真机预览
pages.json和tabBar案例
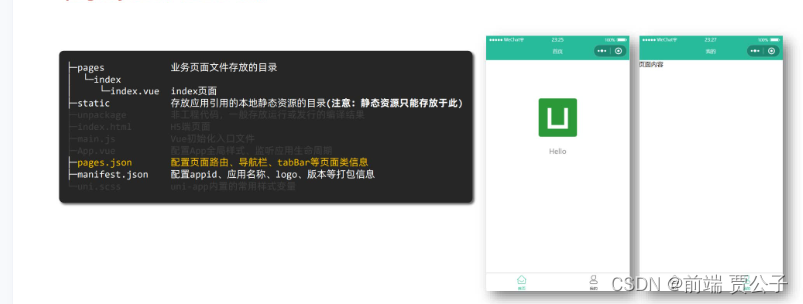
我们先来认识 uni-app 项目的目录结构。
├─pages            业务页面文件存放的目录
│  └─index
│     └─index.vue  index页面
├─static           存放应用引用的本地静态资源的目录(注意:静态资源只能存放于此)
├─unpackage        非工程代码,一般存放运行或发行的编译结果
├─index.html       H5端页面
├─main.js          Vue初始化入口文件
├─App.vue          配置App全局样式、监听应用生命周期
├─pages.json       **配置页面路由、导航栏、tabBar等页面类信息**
├─manifest.json    **配置appid**、应用名称、logo、版本等打包信息
└─uni.scss         uni-app内置的常用样式变量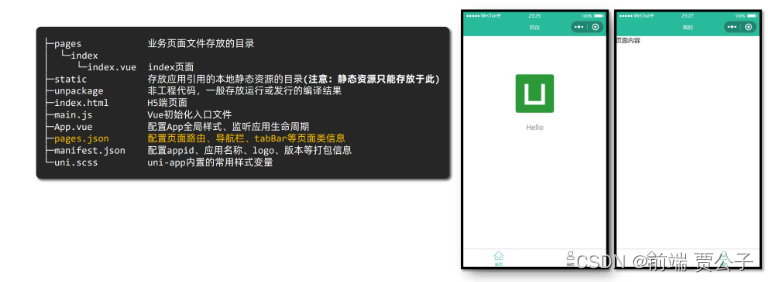
用于配置页面路由、导航栏、tabBar 等页面类信息
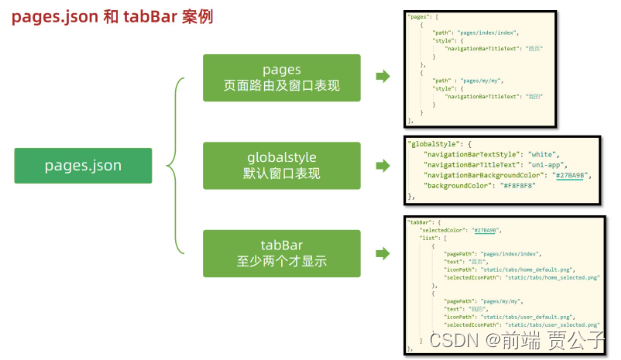
{"pages": [ //页面路径及窗口表现{"path": "pages/index/index", //页面路径"style": { //页面样式"navigationBarTitleText": "首页" //导航栏的标题文字}},{"path": "pages/my/my","style": {"navigationBarTitleText": "我的"}}],"globalStyle": { //全局页面样式"navigationBarTextStyle": "white", //导航栏标题颜色只支持black/white"navigationBarTitleText": "uni-app","navigationBarBackgroundColor": "#27ba9b", //导航栏背景颜色"backgroundColor": "#F8F8F8"},"tabBar": { //底部tab"list": [{ //tab列表"pagePath": "pages/index/index", //页面路径"text": "首页", //tab的文字"iconPath": "static/tabs/home_default.png", //图片路径"selectedIconPath": "static/tabs/home_selected.png" //选中图片的路径},{"pagePath": "pages/my/my","text": "我的","iconPath": "static/tabs/user_default.png","selectedIconPath": "static/tabs/user_selected.png"},]},"uniIdRouter": {}
}
uni-app和原生小程序开发区别
每个页面是一个.vue文件,数据绑定及事件处理同Vue.js规范:

1.属性绑定src="{{ url }}"升级成:src="url"
2.事件绑定bindtap="eventName"升级成@tap="eventName",支持()传参
3.支持Vue常用指令v-for、v-if、v-show、v-model等
温馨提示:调用接口能力,建议前缀wx替换为uni,养成好习惯,这样支持多端开发。
<style></style>样式不需要写scoped生命周期分为三部分:应用生命周期(小程序),页面生命周期(小程序),组件生命周期(Vue)
<template><!--indicator-dots	是否显示面板指示点  :autoplay	是否自动切换  circular	是否采用衔接滑动,即播放到末尾后重新回到开头--><swiper indicator-dots :autoplay="false" circular><swiper-item class='banner' v-for="item in picurls" :key='item.id'><image :src="item.url" @tap='onImageChange(item.url)' mode=""></image></swiper-item></swiper>
</template><script>export default {data() {return {title: 'Hello',picurls: [{id: 1,url: 'https://img0.baidu.com/it/u=3021883569,1259262591&fm=253&app=120&size=w931&n=0&f=JPEG&fmt=auto?sec=1691600400&t=923ddedd0e2c4310685b4603e1d3b3c3'}, {id: 2,url: 'https://img0.baidu.com/it/u=3021883569,1259262591&fm=253&app=120&size=w931&n=0&f=JPEG&fmt=auto?sec=1691600400&t=923ddedd0e2c4310685b4603e1d3b3c3'}, {id: 3,url: 'https://img0.baidu.com/it/u=3021883569,1259262591&fm=253&app=120&size=w931&n=0&f=JPEG&fmt=auto?sec=1691600400&t=923ddedd0e2c4310685b4603e1d3b3c3'}, {id: 4,url: 'https://img0.baidu.com/it/u=3021883569,1259262591&fm=253&app=120&size=w931&n=0&f=JPEG&fmt=auto?sec=1691600400&t=923ddedd0e2c4310685b4603e1d3b3c3'}, {id: 5,url: 'https://img0.baidu.com/it/u=3021883569,1259262591&fm=253&app=120&size=w931&n=0&f=JPEG&fmt=auto?sec=1691600400&t=923ddedd0e2c4310685b4603e1d3b3c3'}]}},onLoad() {},methods: {onImageChange(url) {console.log(url);uni.previewImage({ //在新页面中全屏预览图片。预览的过程中用户可以进行保存图片、发送给朋友等操作。urls: this.picurls.map(v => v.url), //需要预览的图片链接列表。2.2.3 起支持云文件ID。	current: url //	当前显示图片的链接})}}}
</script><style>.banner,.banner image {width: 750rpx;height: 750rpx;}
</style>
用VS Code开发uni-app项目
用VS Code开发uni-app项目
为什么选择VS Code?
- HbuilderX对TS类型支持暂不完善
- VS Code对TS类型支持友好,熟悉的编辑器


用 VS Code 开发配置
- 安装 uni-app 插件
- uni-create-view :快速创建 uni-app 页面
- uni-helper uni-app :代码提示
- uniapp 小程序扩展 :鼠标悬停查文档
- TS 类型校验
- 安装类型声明文件
pnpm i -D @types/wechat-miniprogram @uni-helper/uni-app-types - 配置
tsconfig.json
- 安装类型声明文件
- JSON 注释问题
- 设置文件关联,把
manifest.json和pages.json设置为jsonc
- 设置文件关联,把
// tsconfig.json
{"extends": "@vue/tsconfig/tsconfig.json","compilerOptions": {"sourceMap": true,"baseUrl": ".","paths": {"@/*": ["./src/*"]},"lib": ["esnext", "dom"],"types": ["@dcloudio/types",
+      "@types/wechat-miniprogram",
+      "@uni-helper/uni-app-types"]},"include": ["src/**/*.ts", "src/**/*.d.ts", "src/**/*.tsx", "src/**/*.vue"]
}
注意:原配置 experimentalRuntimeMode 现无需添加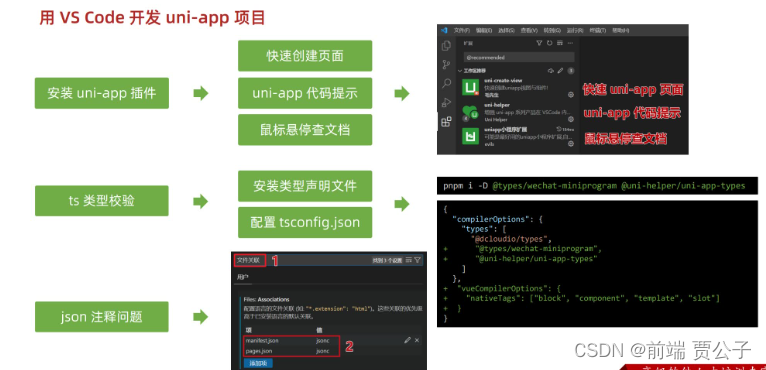
温馨提示:
VS Code可通过快捷键Ctrl + i唤起代码提示。
拉取小兔鲜儿项目模板代码
拉取小兔鲜儿项目模板代码
项目模板包含:目录结构,项目素材,代码风格。
git clone http://git.itcast.cn/heimaqianduan/erabbit-uni-app-vue3-ts.git
heima-shop
注意事项
- 在
manifest.json中添加微信小程序的appid

基础架构–引入uni-ui组件库
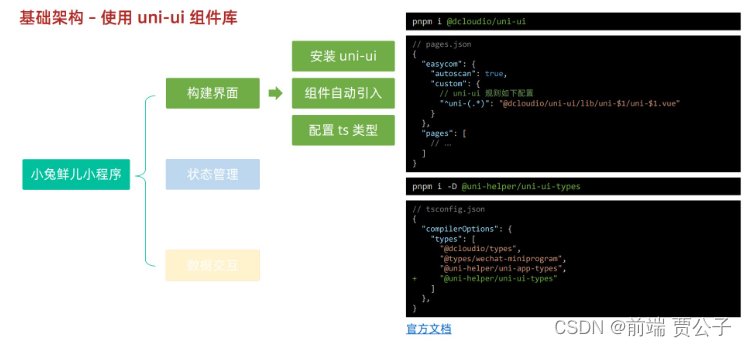
操作步骤
安装 uni-ui 组件库![]() https://uniapp.dcloud.net.cn/component/uniui/quickstart.html#npm%E5%AE%89%E8%A3%85
https://uniapp.dcloud.net.cn/component/uniui/quickstart.html#npm%E5%AE%89%E8%A3%85
pnpm i @dcloudio/uni-ui配置自动导入组件
// pages.json
{// 组件自动导入"easycom": {是否开启自动导入"autoscan": true,"custom": {// 提取uni的后缀名替换到$1找到正确文件// uni-ui 规则如下配置  // [!code ++]"^uni-(.*)": "@dcloudio/uni-ui/lib/uni-$1/uni-$1.vue" // [!code ++]}},"pages": [// …省略]
}
安装类型声明文件
pnpm i -D @uni-helper/uni-ui-types
配置类型声明文件
// tsconfig.json
{"compilerOptions": {"types": ["@dcloudio/types","@uni-helper/uni-app-types", // [!code ++]"@uni-helper/uni-ui-types" // [!code ++]]}
}
基础架构–小程序端Pinia持久化、
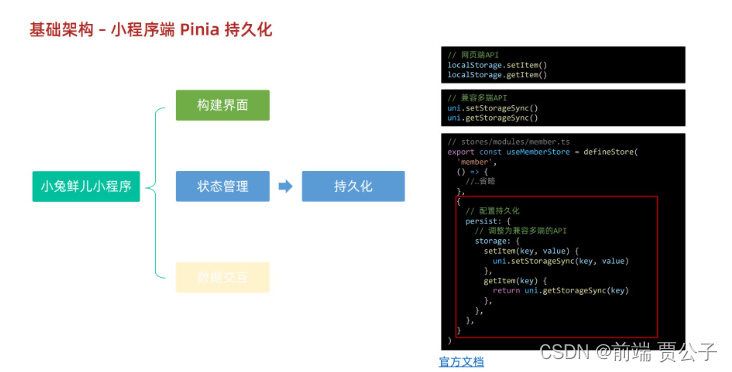
说明:项目中 Pinia 用法平时完全一致,主要解决持久化插件兼容性问题。
持久化存储插件
持久化存储插件: pinia-plugin-persistedstate![]() https://prazdevs.github.io/pinia-plugin-persistedstate/guide/config.html#storage
https://prazdevs.github.io/pinia-plugin-persistedstate/guide/config.html#storage
插件默认使用 localStorage 实现持久化,小程序端不兼容,需要替换持久化 API。
网页端持久化 API
// 网页端API
localStorage.setItem()
localStorage.getItem()
多端持久化 API
// 兼容多端API
uni.setStorageSync()
uni.getStorageSync()
参考代码
// stores/modules/member.ts
export const useMemberStore = defineStore('member',() => {//…省略},{// 配置持久化persist: {// 调整为兼容多端的APIstorage: {setItem(key, value) {uni.setStorageSync(key, value) // [!code warning]},getItem(key) {return uni.getStorageSync(key) // [!code warning]},},},},
)
基础架构–uni.request请求封装
基础架构–请求和上传文件拦截器
uniapp 拦截器: uni.addInterceptor![]() https://uniapp.dcloud.net.cn/api/interceptor.html
https://uniapp.dcloud.net.cn/api/interceptor.html
接口说明:接口文档![]() https://www.apifox.cn/apidoc/shared-0e6ee326-d646-41bd-9214-29dbf47648fa/doc-1521513
https://www.apifox.cn/apidoc/shared-0e6ee326-d646-41bd-9214-29dbf47648fa/doc-1521513
uni.addInterceptor(STRING, OBJECT)
添加拦截器
STRING 参数说明
需要拦截的api名称,如:uni.addInterceptor('request', OBJECT) ,将拦截 uni.request()
注意:
- 仅支持异步接口,如:
uni.setStorage(OBJECT),暂不支持同步接口如:uni.setStorageSync(KEY,DATA) - uniCloud请求云端接口时(callFunction、uploadFile等)也会使用uni.request发送请求,请确保拦截器内不错误的处理此类请求
OBJECT 参数说明
| 参数名 | 类型 | 必填 | 默认值 | 说明 | 平台差异说明 |
|---|---|---|---|---|---|
| invoke | Function | 否 | 拦截前触发 | ||
| returnValue | Function | 否 | 方法调用后触发,处理返回值 | ||
| success | Function | 否 | 成功回调拦截 | ||
| fail | Function | 否 | 失败回调拦截 | ||
| complete | Function | 否 | 完成回调拦截 |
uni.request({url: 'request/login', //仅为示例,并非真实接口地址。success: (res) => {console.log(res.data);// 打印: {code:1,...}}
});uni.addInterceptor('request', {invoke(args) {// request 触发前拼接 url args.url = 'https://www.example.com/'+args.url},success(args) {// 请求成功后,修改code值为1args.data.code = 1}, fail(err) {console.log('interceptor-fail',err)}, complete(res) {console.log('interceptor-complete',res)}
})uni.addInterceptor({returnValue(args) {// 只返回 data 字段return args.data}
})
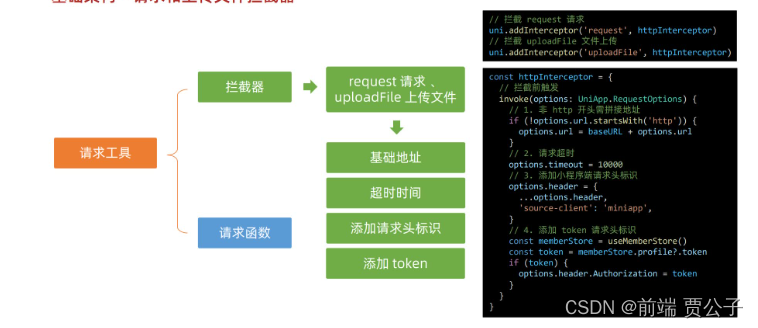
实现步骤
- 基础地址
- 超时时间
- 请求头标识
- 添加 token
// src/utils/http.ts
const httpInterceptor = {// 拦截前触发invoke(options: UniApp.RequestOptions) {// 1. 非 http 开头需拼接地址if (!options.url.startsWith('http')) {options.url = baseURL + options.url}// 2. 请求超时options.timeout = 10000// 3. 添加小程序端请求头标识options.header = {...options.header,'source-client': 'miniapp',}// 4. 添加 token 请求头标识const memberStore = useMemberStore()const token = memberStore.profile?.tokenif (token) {options.header.Authorization = token}},
}// 拦截 request 请求
uni.addInterceptor('request', httpInterceptor)
// 拦截 uploadFile 文件上传
uni.addInterceptor('uploadFile', httpInterceptor) 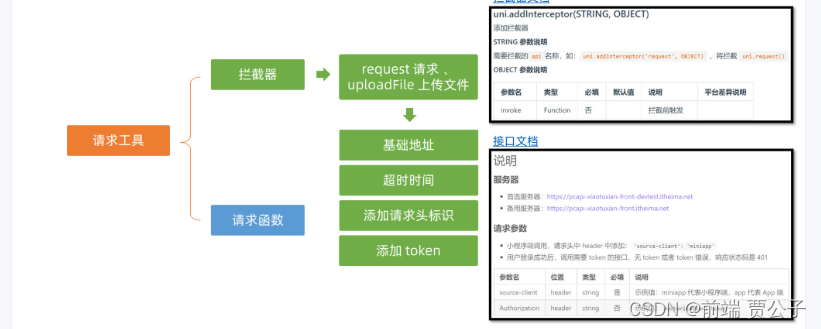
基础架构–封装Promise请求函数
实现步骤
- 返回 Promise 对象
- 成功 resolve
- 提取数据
- 添加泛型
- 失败 reject
- 401 错误
- 其他错误
- 网络错误
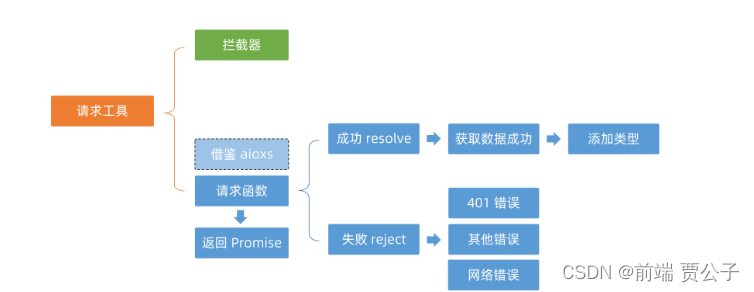
请求函数–请求成功提取数据和设置类型
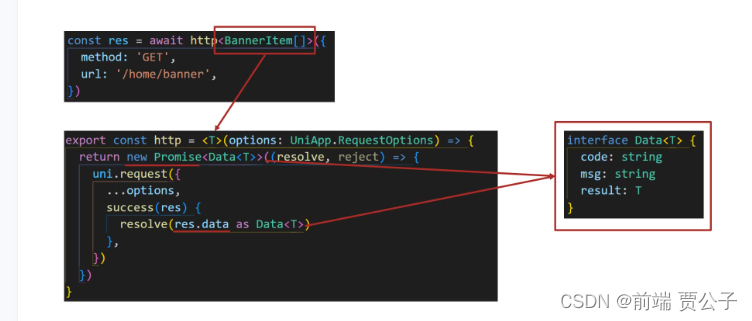
基础架构–封装Promise请求函数
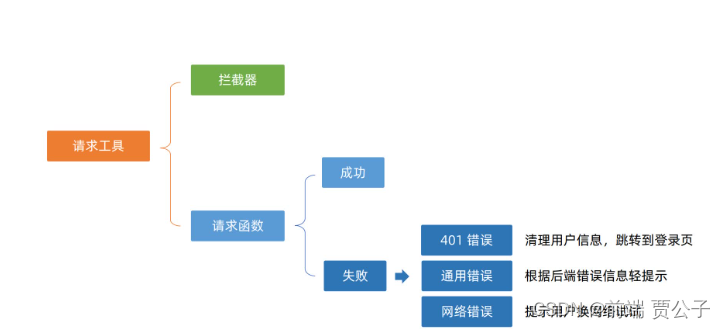
请求函数–获取数据失败
- uni.request的success回调函数只是表示服务器响应成功,没处理响应状态码,业务中使用不方便
- axios函数是只有响应状态码是2xx才调用resolve函数,表示获取数据成功,业务中使用更准确

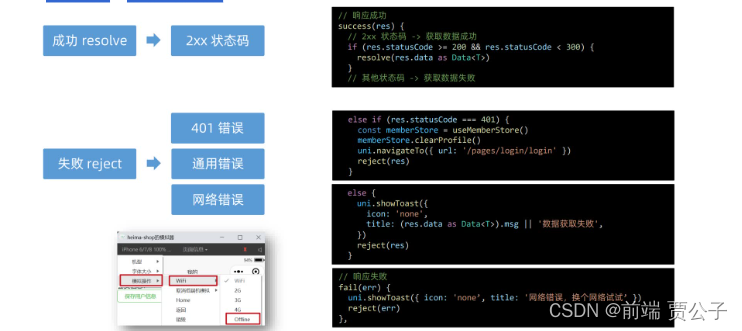
参考代码
/*** 请求函数* @param  UniApp.RequestOptions* @returns Promise*  1. 返回 Promise 对象*  2. 获取数据成功*    2.1 提取核心数据 res.data*    2.2 添加类型,支持泛型*  3. 获取数据失败*    3.1 401错误  -> 清理用户信息,跳转到登录页*    3.2 其他错误 -> 根据后端错误信息轻提示*    3.3 网络错误 -> 提示用户换网络*/
type Data<T> = {code: stringmsg: stringresult: T
}
// 2.2 添加类型,支持泛型
export const http = <T>(options: UniApp.RequestOptions) => {// 1. 返回 Promise 对象return new Promise<Data<T>>((resolve, reject) => {uni.request({...options,// 响应成功success(res) {// 状态码 2xx, axios 就是这样设计的if (res.statusCode >= 200 && res.statusCode < 300) {// 2.1 提取核心数据 res.dataresolve(res.data as Data<T>)} else if (res.statusCode === 401) {// 401错误  -> 清理用户信息,跳转到登录页const memberStore = useMemberStore()memberStore.clearProfile()uni.navigateTo({ url: '/pages/login/login' })reject(res)} else {// 其他错误 -> 根据后端错误信息轻提示uni.showToast({icon: 'none',title: (res.data as Data<T>).msg || '请求错误',})reject(res)}},// 响应失败fail(err) {uni.showToast({icon: 'none',title: '网络错误,换个网络试试',})reject(err)},})})
}
[扩展] pinia需要使用pinia-plugin-persistedstate插件来进行数据的存储
插件官网地址:
https://prazdevs.github.io/pinia-plugin-persistedstate/guide/config.html
1、安装
这里对插件的安装就不多赘述了,放两张官网的截图
使用命令:npm i pinia-plugin-persistedstate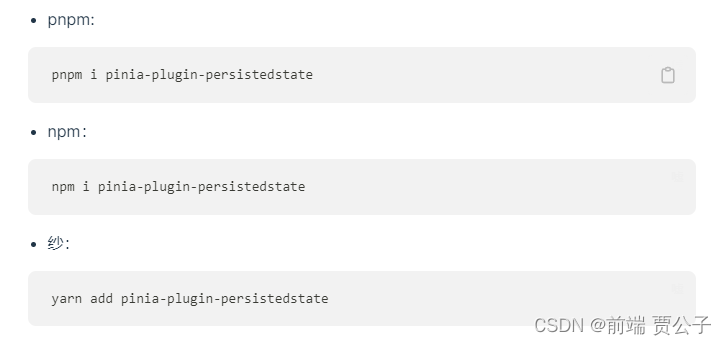

2、使用
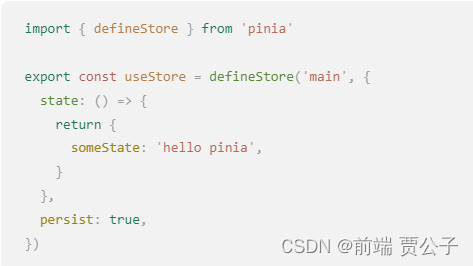
3、关于全部缓存及部分缓存的说明
(1)将store的state中的全部数据进行缓存,直接在state同级下面添加persist对象
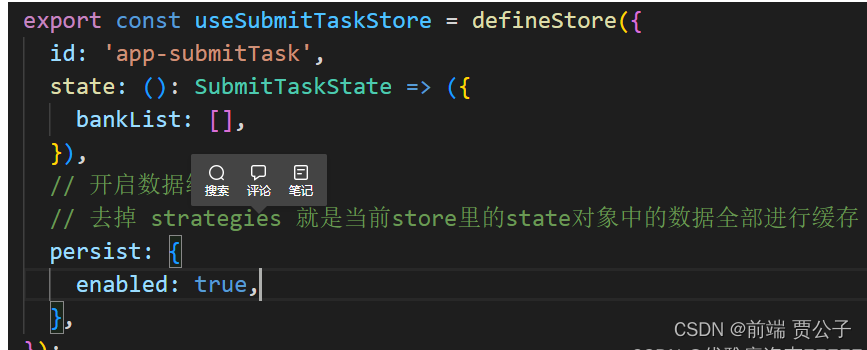
此时,默认将数据存放在浏览器的SessionStorage中,key为store的名称,value为该store中所有的数据。

(2)将store的state中的数据进行部分缓存
此时需要在persist中添加strategies数组,、
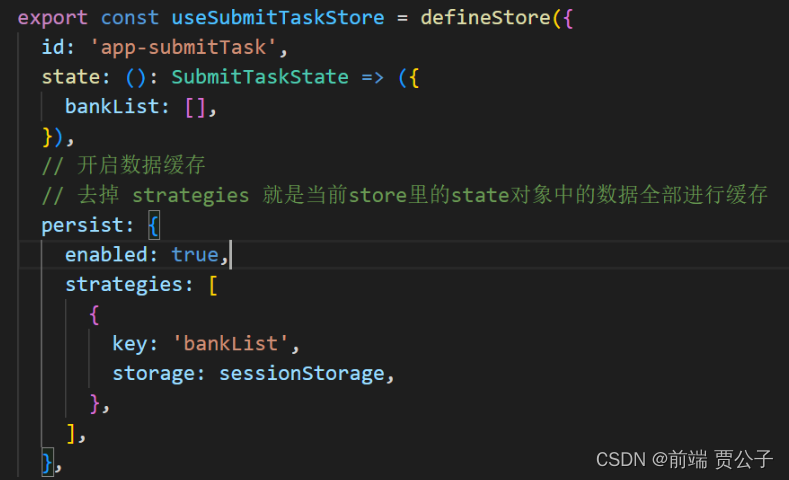
每个元素的key是想要储存的数据变量名(在state中定义的),storage可以写sessionStorage或者localStorage,此时,sessionStorage中的key就是变量名,value就是该变量的值

TS中的泛型
一、泛型是什么?有什么作用
当我们定义一个变量不确定类型的时候有两种解决方式:
使用any
使用any定义时存在的问题:虽然 以 知道传入值的类型但是无法获取函数返回值的类型;另外也失去了ts类型保护的优势
使用泛型
泛型指的是在定义函数/接口/类型时,不预先指定具体的类型,而是在使用的时候在指定类型限制的一种特性
二、泛型用法
2.1 在函数中使用泛型
function test <T> (arg:T):T{console.log(arg);return arg;
}
test<number>(111);// 返回值是number类型的 111
test<string | boolean>('hahaha')//返回值是string类型的 hahaha
test<string | boolean>(true);//返回值是布尔类型的 true
使用方式类似于函数传参,传什么数据类型,T就表示什么数据类型, 使用表示,T也可以换成任意字符串。
2.2 在接口中使用泛型
// 注意,这里写法是定义的方法哦
interface Search {<T,Y>(name:T,age:Y):T
}let fn:Search = function <T, Y>(name: T, id:Y):T {console.log(name, id)return name;
}
fn('li',11);//编译器会自动识别传入的参数,将传入的参数的类型认为是泛型指定的类型
2.3 在类中使用泛型
class Animal<T> {name:T;constructor(name: T){this.name = name;}action<T>(say:T) {console.log(say)}
}
let cat = new Animal('cat');
cat.action('mimi')
三、泛型约束
3.1使用接口约束泛型
interface Person {name:string;age:number;
}
function student<T extends Person>(arg:T):T {return arg;
}student({name:'lili'});//类型 "{ name: string; }" 中缺少属性 "age",但类型 "Person" 中需要该属性
student({ name: "lili" , age:'11'});//不能将类型“string”分配给类型“number”
student({ name: "lili" , age:11});
3.2 数组泛型
let arr:Array<number> =[1,2,3] === let arr:number[]=[1,2,3]



![[保研/考研机试] KY163 素数判定 哈尔滨工业大学复试上机题 C++实现](https://img-blog.csdnimg.cn/img_convert/ade46a7d882bbe21b083c568891aad74.png)
