前言
欢迎阅读本文,本文将向您介绍如何使用Unity游戏引擎来实现一个简单而有趣的2D抓勾效果,类似于蜘蛛侠的独特能力。抓勾效果是许多动作游戏和平台游戏中的常见元素,给玩家带来了无限的想象和挑战。


不需要担心,即使您是一位新手,也可以轻松跟随本文学习。我们将从头开始,从创建一个新的Unity项目开始,一直到最终的完成效果。
借助本文提供的步骤和技巧,您将能够为您的游戏增添一个的特色。希望您能享受这个过程,并从中获得灵感,探索更多关于游戏开发的乐趣。
照例,我们先来看看本文实现的最终效果,以决定你是否继续往下看

源码我放在文章末尾了
开始
1. 实现简单的抓勾效果
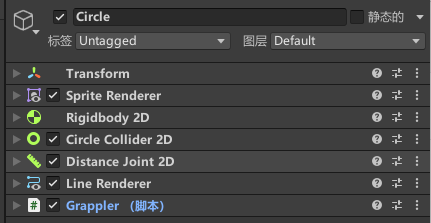
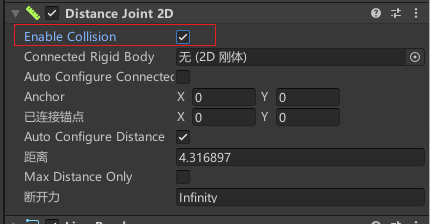
新建一个2d项目,添加一个2对象作为我们的角色物体,并挂载rigidbody 2d、碰撞器、Distance Joint 2d、Line Renderer(记得配置好材质和线宽)
书写脚本代码,代码已经加了详细的解释了,这里就不得过多介绍了
using System.Collections;
using System.Collections.Generic;
using UnityEngine;// Grappler类,用于处理角色的抓取动作
public class Grappler : MonoBehaviour
{// 主摄像机public Camera mainCamera;// 线渲染器,用于渲染抓取线public LineRenderer _lineRenderer;// 距离关节,用于处理抓取物体的物理效果public DistanceJoint2D _distanceJoint;void Start(){// 初始化时,禁用距离关节_distanceJoint.enabled = false;}void Update(){// 检测鼠标左键是否按下if (Input.GetKeyDown(KeyCode.Mouse0)){// 获取鼠标在世界坐标中的位置Vector2 mousePos = (Vector2)mainCamera.ScreenToWorldPoint(Input.mousePosition);// 设置线渲染器的起始和结束位置_lineRenderer.SetPosition(0, mousePos);_lineRenderer.SetPosition(1, transform.position);// 设置距离关节的连接点_distanceJoint.connectedAnchor = mousePos;// 启用距离关节和线渲染器_distanceJoint.enabled = true;_lineRenderer.enabled = true;}// 检测鼠标左键是否松开else if (Input.GetKeyUp(KeyCode.Mouse0)){// 禁用距离关节和线渲染器_distanceJoint.enabled = false;_lineRenderer.enabled = false;}// 如果距离关节启用if (_distanceJoint.enabled){// 更新线渲染器的结束位置_lineRenderer.SetPosition(1, transform.position);}}
}
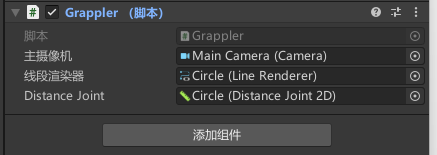
挂载脚本和绑定对象
简单配置一下环境
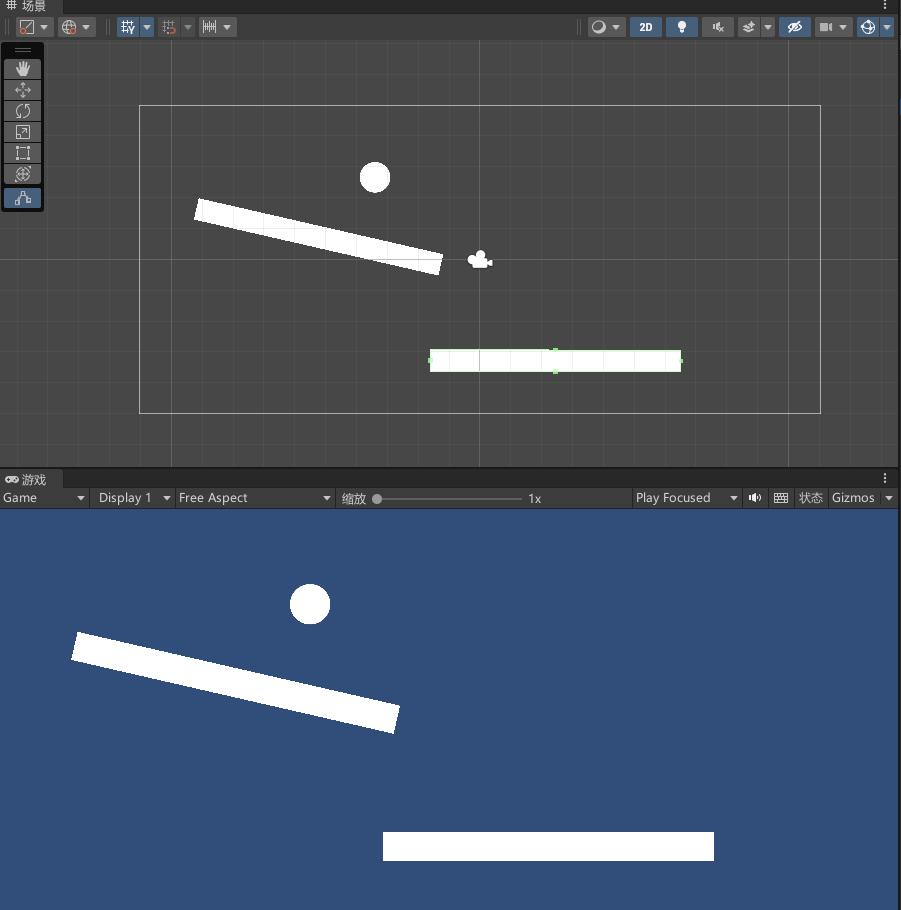
运行效果
可以看到,如果连线时碰撞会出现问题,如果你先实现好的碰撞效果,可以勾选Distance Joint 2d的Enable Collision及开启碰撞
效果
2. 高阶钩爪效果
在场景中创建GameObject如下(由父对象到子对象一一进行讲解):
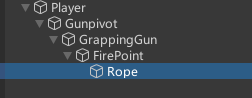
Player:(示例中是一个 圆形的sprite)对其添加RigidBody2D、Circle Collider2D 、Spring Joint2D组件(跟前面一样Spring Joint2D组件开启Enable Collision碰撞)
Gunpivot:钩锁枪的锚点,其为空对象,位置设置在Player的中心即0.0位置(后续用于实现钩锁枪随着鼠标旋转的效果)
GrapplingGun:(示例中为一个长方形的sprite)钩锁枪,用于后期实现发射钩锁,仅添加Box Collider2D即可
FirePoint:钩锁的发射点,空对象,即钩锁发射的起始位置,设置在钩锁枪的边缘即可
Rope:在空对象上添加LineRenderer并适当改变宽度和材质即可。
下有两个脚本分别添加给GrapplingGun和Rope即可
脚本1:Perfecter_Grapple添加给GrapplingGun
using System.Collections;
using System.Collections.Generic;
using UnityEngine;public class Perfecter_Grapple : MonoBehaviour
{[Header("脚本引用:")]public Grappling_Rope grappleRope;[Header("层设置:")][SerializeField] private bool grappleToAll = false;[SerializeField] private int grappableLayerNumber = 9;[Header("主摄像机:")]public Camera m_camera;[Header("变换引用:")]public Transform gunHolder;public Transform gunPivot;public Transform firePoint;[Header("物理引用:")]public SpringJoint2D m_springJoint2D;public Rigidbody2D m_rigidbody;[Header("旋转:")][SerializeField] private bool rotateOverTime = true;[Range(0, 60)] [SerializeField] private float rotationSpeed = 4;[Header("距离:")][SerializeField] private bool hasMaxDistance = false;[SerializeField] private float maxDistnace = 20;private enum LaunchType //发射类型{Transform_Launch,Physics_Launch}[Header("发射:")][SerializeField] private bool launchToPoint = true;[SerializeField] private LaunchType launchType = LaunchType.Physics_Launch;[SerializeField] private float launchSpeed = 1;[Header("无发射点")][SerializeField] private bool autoConfigureDistance = false;[SerializeField] private float targetDistance = 3;[SerializeField] private float targetFrequncy = 1;[HideInInspector] public Vector2 grapplePoint;[HideInInspector] public Vector2 grappleDistanceVector;private void Start() //开始{grappleRope.enabled = false;m_springJoint2D.enabled = false;}private void Update() //更新函数,控制输入{if (Input.GetKeyDown(KeyCode.Mouse0)) //通过Input的顺序设定函数的执行顺序,先进行钩爪选取点的定位{SetGrapplePoint();          }else if (Input.GetKey(KeyCode.Mouse0)) //从上一步的定位中把grapplerope启用{if (grappleRope.enabled){RotateGun(grapplePoint, false); //进行钩锁枪的旋转}else{Vector2 mousePos = m_camera.ScreenToWorldPoint(Input.mousePosition);RotateGun(mousePos, true);}if (launchToPoint && grappleRope.isGrappling) //如果选择点对点发射且正在钩中目标{if (launchType == LaunchType.Transform_Launch) //如果发射类型是使用Transform类型发射{Vector2 firePointDistnace = firePoint.position - gunHolder.localPosition;Vector2 targetPos = grapplePoint - firePointDistnace;gunHolder.position = Vector2.Lerp(gunHolder.position, targetPos, Time.deltaTime * launchSpeed); //采用插值的形式,模拟绳索命中的物理效果}}}else if (Input.GetKeyUp(KeyCode.Mouse0)) //若抬起左键,则将一切启用的相关布尔置否,恢复原状{grappleRope.enabled = false;m_springJoint2D.enabled = false;m_rigidbody.gravityScale = 1;}else //时刻获取鼠标的屏幕信息位置{Vector2 mousePos = m_camera.ScreenToWorldPoint(Input.mousePosition);RotateGun(mousePos, true);}}void RotateGun(Vector3 lookPoint, bool allowRotationOverTime) //实现绳索枪根据鼠标进行旋转功能{Vector3 distanceVector = lookPoint - gunPivot.position; //定义三维距离向量=朝向点-枪锚点位置float angle = Mathf.Atan2(distanceVector.y, distanceVector.x) * Mathf.Rad2Deg; //定义一个角度,其值等于距离向量tan所对应的弧度值*弧度值转化为角度值的常量if (rotateOverTime && allowRotationOverTime) //当采用根据时间延迟旋转时,采用四元数的插值旋转,在原本的旋转角和获得的绕轴的新角度中进行随时间{gunPivot.rotation = Quaternion.Lerp(gunPivot.rotation, Quaternion.AngleAxis(angle, Vector3.forward), Time.deltaTime * rotationSpeed);}else{gunPivot.rotation = Quaternion.AngleAxis(angle, Vector3.forward); //不采用时间插值变化时时,直接让强旋转角角度等于计算出的角度绕轴的四元数即可}}void SetGrapplePoint() //设定钩取点(主要是位置的计算和注意某些添加的限定条件){Vector2 distanceVector = m_camera.ScreenToWorldPoint(Input.mousePosition) - gunPivot.position; //设置一个二维向量distance用于记录鼠标点击的点和枪锚点之间的距离if (Physics2D.Raycast(firePoint.position, distanceVector.normalized)) //发射一条射线,起始点为开火点,方向为distance的方向向量{RaycastHit2D _hit = Physics2D.Raycast(firePoint.position, distanceVector.normalized); //保存刚才的射线为hitif (_hit.transform.gameObject.layer == grappableLayerNumber || grappleToAll) //选择是否选中任意的可抓取图层或是某一指定图层{if (Vector2.Distance(_hit.point, firePoint.position) <= maxDistnace || !hasMaxDistance) //当命中点和开火电站之间的距离小于最大距离或者不限定最大距离时{grapplePoint = _hit.point; //将命中点位置赋予抓取点位置grappleDistanceVector = grapplePoint - (Vector2)gunPivot.position; //抓钩的距离向量等于钩锁点减去钩锁枪的锚点位置grappleRope.enabled = true; //打开绳索变量}}}}public void Grapple() //钩锁执行(真正决定移动)                              {m_springJoint2D.autoConfigureDistance = false; //设定弹簧关节组建的自动计算距离属性为假if (!launchToPoint && !autoConfigureDistance) //当对点发射和自动计算距离均为假时,将目标距离和目标频率赋给弹簧组件的属性{m_springJoint2D.distance = targetDistance;m_springJoint2D.frequency = targetFrequncy;}if (!launchToPoint) //如果仅为不对点发射{if (autoConfigureDistance) //若自动计算距离{m_springJoint2D.autoConfigureDistance = true;m_springJoint2D.frequency = 0; //弹簧组件频率属性为0,该值越大,弹簧越硬}m_springJoint2D.connectedAnchor = grapplePoint; //不自动计算距离且不对点发射时m_springJoint2D.enabled = true;}else //对点发射时,选择发射类型,有物理类发射和Transform类发射{switch (launchType){case LaunchType.Physics_Launch:m_springJoint2D.connectedAnchor = grapplePoint; //当使用物理发射时,将钩取点赋予弹簧的连接锚点Vector2 distanceVector = firePoint.position - gunHolder.position; //长度变量等于开火点距离减去持枪距离m_springJoint2D.distance = distanceVector.magnitude; //将长度变量赋给弹簧组建的距离属性,保证钩爪拉到尽头时有一定的距离m_springJoint2D.frequency = launchSpeed; //弹簧频率(强度)等于发射速度m_springJoint2D.enabled = true; //打开弹簧组件,进行拉伸break;case LaunchType.Transform_Launch:m_rigidbody.gravityScale = 0; //当使用Transform发射时,将物体的重力设置为0m_rigidbody.velocity = Vector2.zero; //启动钩爪时,将物体速度清零break;}}}private void OnDrawGizmosSelected() //始终在场景中绘制可视的Gizmo,On方法{if (firePoint != null && hasMaxDistance){Gizmos.color = Color.green;Gizmos.DrawWireSphere(firePoint.position, maxDistnace);}}}
脚本2:Grappling_Rope 添加给Rope即可
using System.Collections;
using System.Collections.Generic;
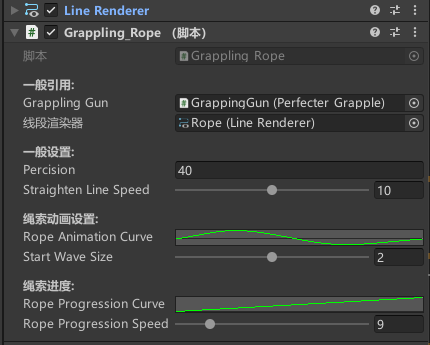
using UnityEngine;public class Grappling_Rope : MonoBehaviour
{[Header("一般引用:")]public Perfecter_Grapple grapplingGun; //抓钩枪public LineRenderer m_lineRenderer; //线渲染器[Header("一般设置:")][SerializeField] private int percision = 40; //精度[Range(0, 20)] [SerializeField] private float straightenLineSpeed = 5; //直线速度[Header("绳索动画设置:")]public AnimationCurve ropeAnimationCurve; //绳索动画曲线[Range(0.01f, 4)] [SerializeField] private float StartWaveSize = 2; //起始波动大小float waveSize = 0; //波动大小[Header("绳索进度:")]public AnimationCurve ropeProgressionCurve; //绳索进度曲线[SerializeField] [Range(1, 50)] private float ropeProgressionSpeed = 1; //绳索进度速度float moveTime = 0; //移动时间[HideInInspector] public bool isGrappling = true; //是否正在抓取bool strightLine = true; //是否为直线private void OnEnable() //启用时执行{moveTime = 0;m_lineRenderer.positionCount = percision;waveSize = StartWaveSize;strightLine = false;LinePointsToFirePoint(); //线点对准发射点m_lineRenderer.enabled = true;}private void OnDisable() //禁用时执行{m_lineRenderer.enabled = false;isGrappling = false;}private void LinePointsToFirePoint() //线点对准发射点{for (int i = 0; i < percision; i++){m_lineRenderer.SetPosition(i, grapplingGun.firePoint.position); //绘制连接抓取点和抓钩枪位置的绳子}}private void Update() //更新函数{moveTime += Time.deltaTime;DrawRope(); //绘制绳索}void DrawRope() //绘制绳索{if (!strightLine){if (m_lineRenderer.GetPosition(percision - 1).x == grapplingGun.grapplePoint.x){strightLine = true;}else{DrawRopeWaves(); //绘制绳索波动}}else{if (!isGrappling){grapplingGun.Grapple(); //抓取isGrappling = true;}if (waveSize > 0){waveSize -= Time.deltaTime * straightenLineSpeed;DrawRopeWaves(); //绘制绳索波动}else{waveSize = 0;if (m_lineRenderer.positionCount != 2) { m_lineRenderer.positionCount = 2; }DrawRopeNoWaves(); //绘制无波动的绳索}}}void DrawRopeWaves() //绘制绳索波动{for (int i = 0; i < percision; i++){float delta = (float)i / ((float)percision - 1f);Vector2 offset = Vector2.Perpendicular(grapplingGun.grappleDistanceVector).normalized * ropeAnimationCurve.Evaluate(delta) * waveSize; //计算偏移量Vector2 targetPosition = Vector2.Lerp(grapplingGun.firePoint.position, grapplingGun.grapplePoint, delta) + offset; //目标位置Vector2 currentPosition = Vector2.Lerp(grapplingGun.firePoint.position, targetPosition, ropeProgressionCurve.Evaluate(moveTime) * ropeProgressionSpeed); //当前位置m_lineRenderer.SetPosition(i, currentPosition); //设置线的位置}}void DrawRopeNoWaves() //绘制无波动的绳索{m_lineRenderer.SetPosition(0, grapplingGun.firePoint.position); //设置线的起始位置m_lineRenderer.SetPosition(1, grapplingGun.grapplePoint); //设置线的结束位置}
}
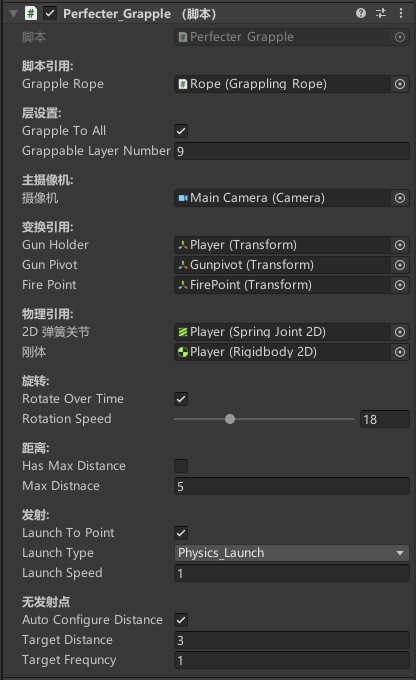
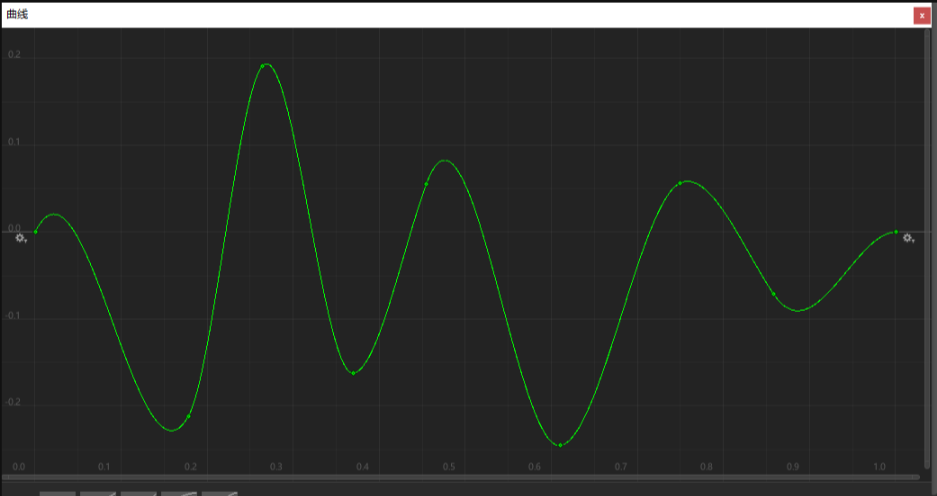
注意:脚本赋予对象后注意赋值,在Rope中的函数曲线绘制以及添加点时一定要注意不能逾越(0,0)以及(1,1)否则会出现钩锁无法发射的问题。
代码赋值部分参数可以参照:
绳索发射曲线样式参照:
最终效果
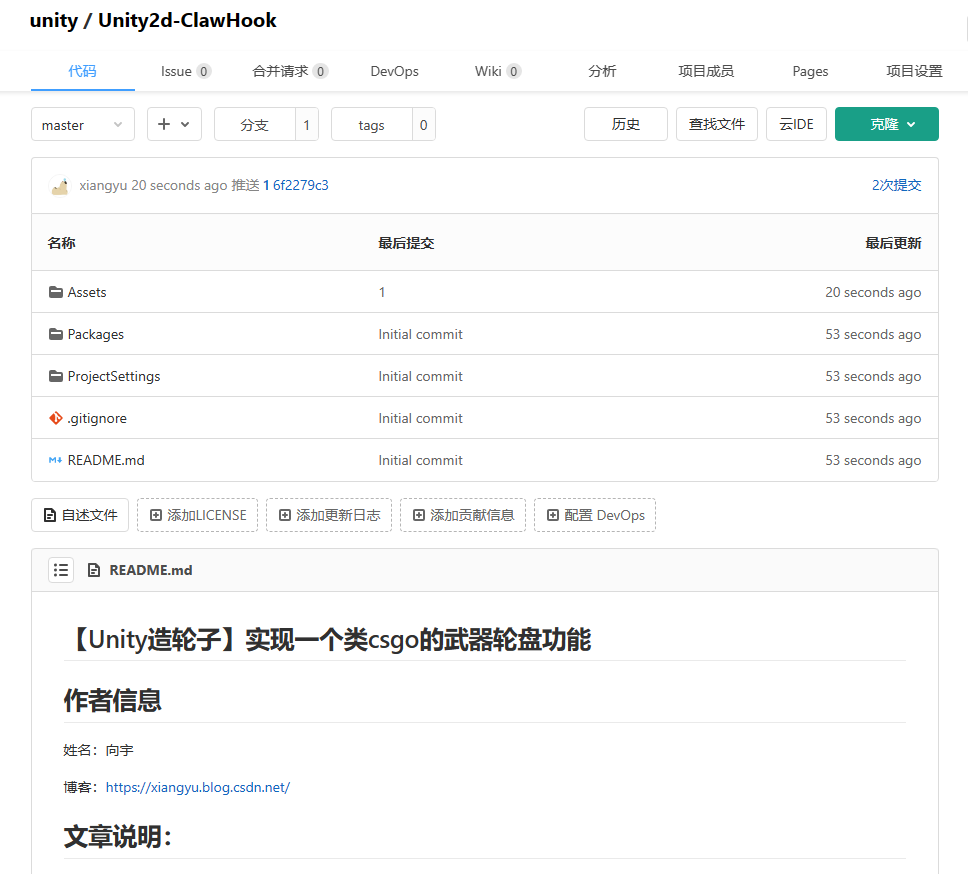
源码
https://gitcode.net/unity1/unity2d-clawhook
参考
【视频】https://www.youtube.com/watch?v=dnNCVcVS6uw
完结
赠人玫瑰,手有余香!如果文章内容对你有所帮助,请不要吝啬你的点赞评论和关注,以便我第一时间收到反馈,你的每一次支持都是我不断创作的最大动力。当然如果你发现了文章中存在错误或者有更好的解决方法,也欢迎评论私信告诉我哦!
好了,我是向宇,https://xiangyu.blog.csdn.net
一位在小公司默默奋斗的开发者,出于兴趣爱好,于是最近才开始自习unity。如果你遇到任何问题,也欢迎你评论私信找我, 虽然有些问题我可能也不一定会,但是我会查阅各方资料,争取给出最好的建议,希望可以帮助更多想学编程的人,共勉~