一:摘要
通过制作一个模型GPU消散效果来学习GPU Instancing 也就是实例化。
目标效果是杨超大佬文章《GPU shatter》里面的消散效果如图:
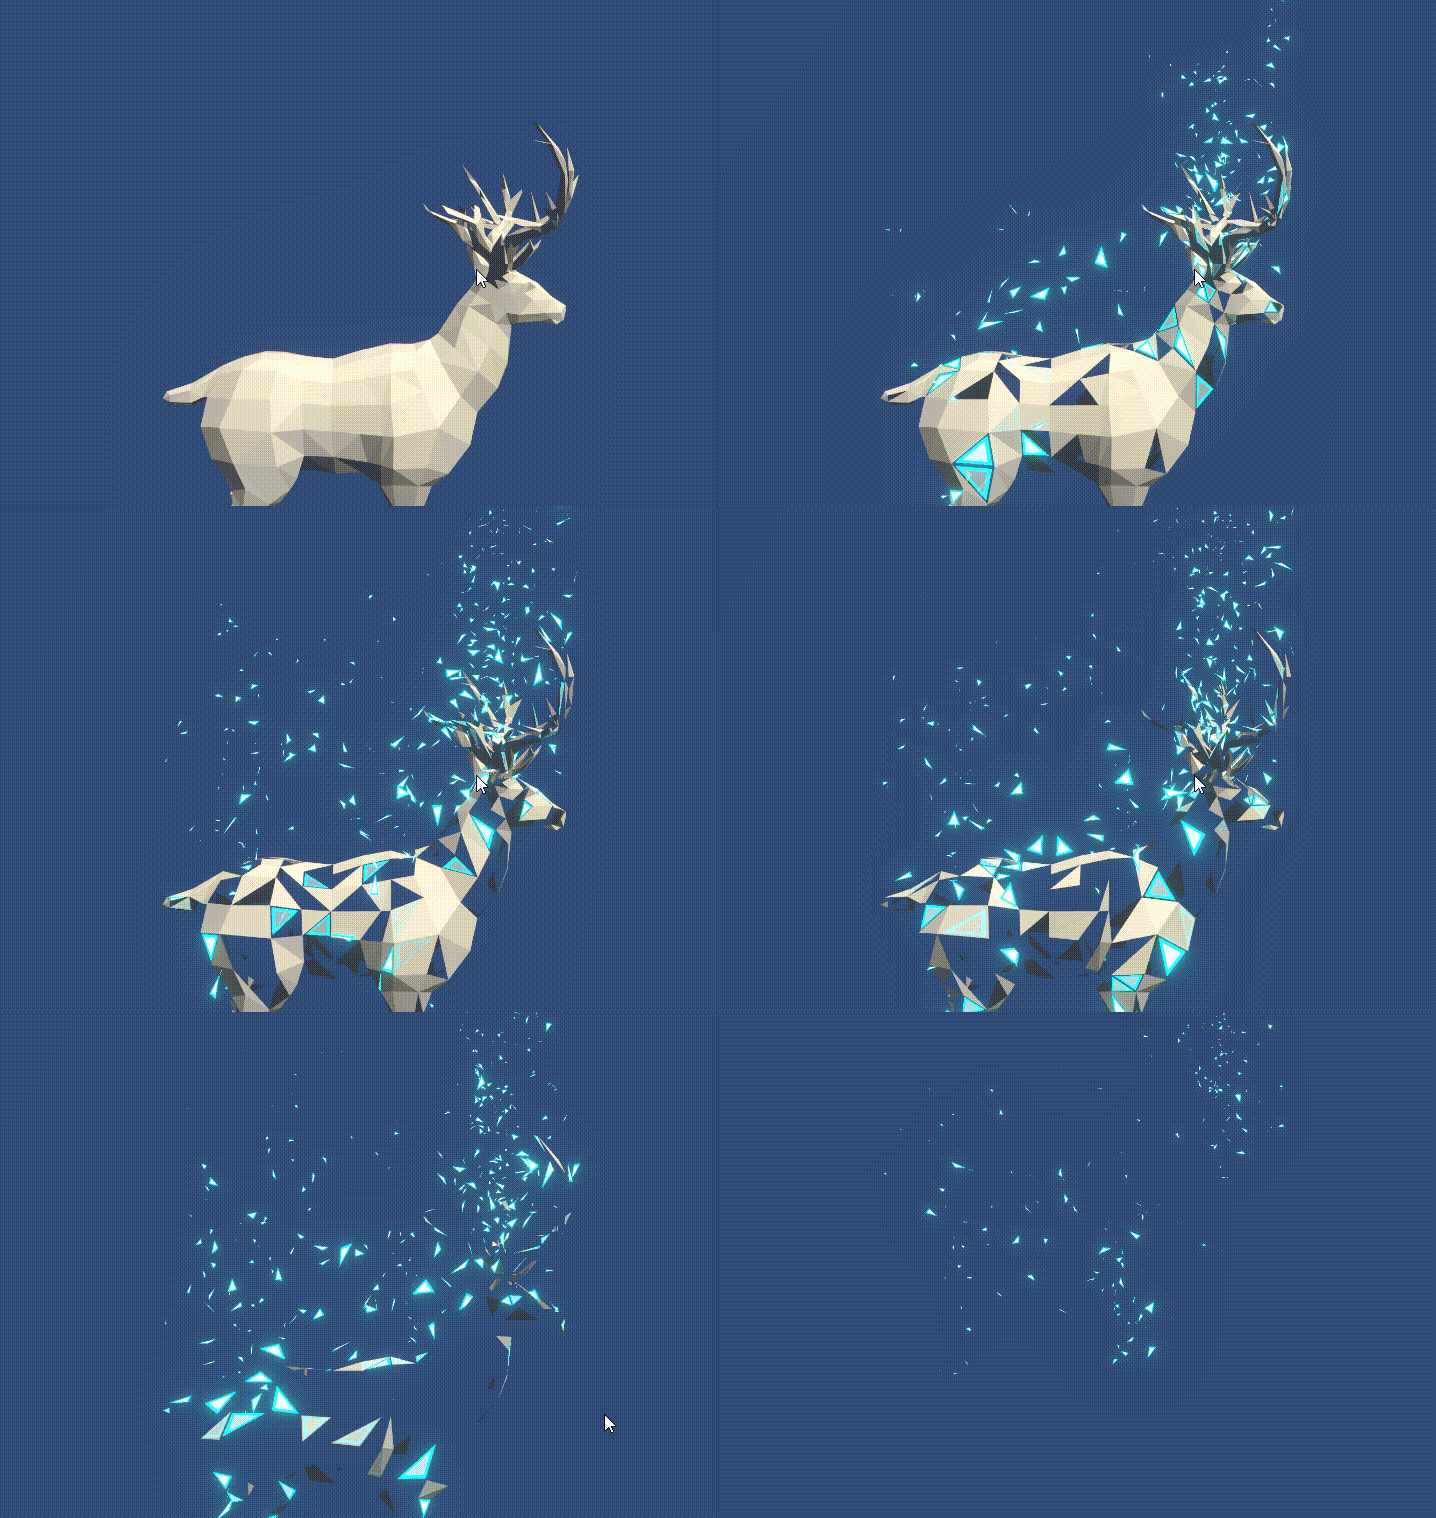
Tags:模型顶点分裂(Mesh Vertex Splitting), 实例化绘制(GPU Instancing Drawing),顶点运动(Vertex Anim)。
二:实现原理简述
1:构建获取数据:(instancing数据及模型信息)
instancing数据需要的M矩阵,及自己想要传递的信息。
鹿模型mesh的顶点信息(mesh.vertices)和索引信息(mesh.triangles)以及面数(N)等信息,通过computerBuffer传递给材质。
2:构建instancing用的Triangle mesh(uv and vertices)
3:Render
正常render鹿模型。
通过instancing绘制三角面,数量位置等信息已通过鹿模型获取并传递,M矩阵也构建,隐藏可以得到另一个鹿模型。
4:构建动画(compute shader anim or vertex anim)
最简单的就是使用vertex anim顶点动画。方便易懂。
compute shader动画复杂一点但是性能应该会更好。
5:调参
把效果跳的稍微能看一点
三:实现
1:获取模型数据
第一步:构建instaning数据(M矩阵构建)
//创建对应结构体private struct MeshProperties{public Matrix4x4 drawMeshInsM;}//在初始化时构建M矩阵void OnEnable(){//num为面数for (int i = 0; i < num; i++){Vector3 pos = commonDrawGO.transform.position;pos.x = -pos.x;Quaternion rotation = commonDrawGO.transform.rotation;Vector3 scale = commonDrawGO.transform.localScale;//通过Transform信息构建对应模型tmpProperties.drawMeshInsM = Matrix4x4.TRS(pos, rotation, scale);properties[i] = tmpProperties;}// 通过computeBuffer传参给Material//(使用computeBuffer是因为之前写的用到了CS)meshPropertiesBuffer = new ComputeBuffer(num, meshPropertiesSize);meshPropertiesBuffer.SetData (properties);GPUDrawMat.SetBuffer("_Properties", meshPropertiesBuffer);}第二步:构建mesh数据(顶点等)
//mesh起始索引等信息uint[] args = new uint[5] { 0, 0, 0, 0, 0 };args[0] = (uint) mesh.GetIndexCount(0);args[1] = (uint) num;args[2] = (uint) mesh.GetIndexStart(0);args[3] = (uint) mesh.GetBaseVertex(0);//verticesGPUDrawMat.SetBuffer("_Properties", meshPropertiesBuffer);meshVerticesBuffer =new ComputeBuffer(TargetMesh.vertexCount, sizeof(float) * 3);meshVerticesBuffer.SetData(TargetMesh.vertices);GPUDrawMat.SetBuffer("_Vertices", meshVerticesBuffer);//triangles meshindicesBuffer =new ComputeBuffer(TargetMesh.triangles.Length, sizeof(int));meshindicesBuffer.SetData(TargetMesh.triangles);GPUDrawMat.SetBuffer("_Indices", meshindicesBuffer);2:构建Triangle
构建triangle时为了实现边线亮中间暗淡效果,同时为了解决边界锯齿以及边界线不等宽问题对uv进行了设计。看采样贴图及很好理解。
构建等边三角形以及渐变贴图解决(图片是求美术大佬用sp生成的)

uv信息其实和顶点位置是一样的,但是顶点位置原点在三角形中心,顶点uv在左下角。
private Mesh CreateTriMesh(){Mesh ans = new Mesh();//等边三角形三点位置Vector3[] vertices = new Vector3[3];vertices[0] = new Vector3(0, 0.134f, 0) - Vector3.one * 0.5f;vertices[1] = new Vector3(1, 0.134f, 0) - Vector3.one * 0.5f;vertices[2] = new Vector3(0.5f, 1, 0) - Vector3.one * 0.5f;//等边三角形三点UVVector2[] uvs = new Vector2[3];uvs[0] = new Vector2(0, 0.134f);uvs[1] = new Vector2(1, 0.134f);uvs[2] = new Vector2(0.5f, 1);int[] indices = new int[3];indices[0] = 0;indices[1] = 1;indices[2] = 2;ans.vertices = vertices;ans.uv = uvs;ans.triangles = indices;return ans;}3:Render
第一步:C++++端
//instancing绘制
Graphics.DrawMeshInstancedIndirect(mesh, 0, GPUDrawMat, bounds, argsBuffer);
//另外一个走默认渲染就行
第二步:shader端(Vert And Frag)
struct MeshProperties{float4x4 drawMeshInsM;};
StructuredBuffer<MeshProperties> _Properties;StructuredBuffer<float3> _Vertices;StructuredBuffer<int> _Indices;v2f vert(appdata_t i, uint instanceID: SV_InstanceID,uint vertexID : SV_VertexID) {//通过vertexID(0,1,2)和instanceID去_Vertices获取真实的顶点信息//然后再乘上对应的M矩阵。float4 pos = mul(_Properties[instanceID].drawMeshInsM,float4(_Vertices[_Indices[vertexID + instanceID * 3.0]]  - center,1));//}
4:构建动画及着色
这里直接以顶点动画为例,其实也写了computershader的但是写的有瑕疵
第一步:构建旋转函数(Rotate)
前面有提到原点再三角中心,所以先构建一个旋转函数
经典的构建旋转矩阵,先把点移动到原点,然后再乘以旋转函数,再移动回自己的位置
void Rotate(inout float4 vertex, float3 center, float3 around, float angle){float4x4 translation = float4x4(1, 0, 0, -center.x,0, 1, 0, -center.y,0, 0, 1, -center.z,0, 0, 0, 1);float4x4 translationT = float4x4(1, 0, 0, center.x,0, 1, 0, center.y,0, 0, 1, center.z,0, 0, 0, 1);around.x = -around.x;around = normalize(around);float s = sin(angle);float c = cos(angle);float ic = 1.0 - c;float4x4 rotation = float4x4(ic * around.x * around.x + c , ic * around.x * around.y - s * around.z, ic * around.z * around.x + s * around.y, 0.0,ic * around.x * around.y + s * around.z, ic * around.y * around.y + c , ic * around.y * around.z - s * around.x, 0.0,ic * around.z * around.x - s * around.y, ic * around.y * around.z + s * around.x, ic * around.z * around.z + c , 0.0,0.0 , 0.0 , 0.0 , 1.0);vertex = mul(translationT, mul(rotation, mul(translation, vertex)));if((instanceID + 1.0) % _BatchCount < _BatchCount * _Range){o.insID = 1;}else{o.insID = 0;}}第二步:构建位移动画(Pos And Scale)
//构建中心点float3 center = _Vertices[_Indices[ instanceID * 3.0]] +_Vertices[_Indices[ instanceID * 3.0 + 1]] + _Vertices[_Indices[ instanceID * 3.0 + 2]];center /=3;//构建位置float4 pos = mul(_Properties[instanceID].drawMeshInsM,float4(_Vertices[_Indices[vertexID + instanceID * 3.0]] - center,1));float4 pos1 = float4(_Vertices[_Indices[vertexID + instanceID * 3.0]],1);float3 around = normalize(GetRandomF3(pos.xyz));//float3(0.0,1.0,0.0);//动画时间数据float statyTime = 0.4;float offsetIntensity = saturate((_BatchCount * _Range - (instanceID + 1.0)%_BatchCount)/10 -statyTime);float offsetIntensity1 = max(-statyTime,((_BatchCount * _Range - (instanceID + 1.0)%_BatchCount)/10 - statyTime)) + statyTime;offsetIntensity1 = min(offsetIntensity1 * 3 ,1.0);o.alphaLerp = offsetIntensity1;pos1.xyz = (1 - offsetIntensity) * pos1.xyz + offsetIntensity * center;float angle = _Speed * offsetIntensity;float3 positionWS = pos1;float3 viewDir = normalize(_WorldSpaceCameraPos.xyz - positionWS);//around = viewDir;Rotate(pos1,center,around,angle );pos1 = mul(_Properties[instanceID].drawMeshInsM,pos1);pos1.y += offsetIntensity * _FlowSpeed * 0.1;第四步:着色
没有技巧全是smoothstep出来(按理不该这么做,性能很差)
//frag //使用insID来表示当前Tri是否还需要显示是否消失half4 frag(v2f i, uint instanceID: SV_InstanceID) : SV_Target {float insID = i.insID;if(insID > 0.9){fixed4 col = tex2D(_MainTex, i.uv);float uuu1 = smoothstep(_Pos - _Width * 0.5 - _SmoothRange,_Pos - _Width * 0.5,col.r);float uuu2 = 1 - smoothstep(_Pos + _Width * 0.5 ,_Pos + _Width * 0.5+ _SmoothRange,col.r);float lines = uuu1 * uuu2;float tris = saturate((uuu2 - uuu1) * uuu2);return (lines * _LineColor + tris * _TriColor) * i.alphaLerp;}return 0;}5:调参
略
四:总结
通过对模型进行拆分使用instancing进行重绘制,对模型数据结构以及instancing做了简单了解,还有用到的顶点动画较为简单,以及有很多可以优化的地方,比如M矩阵其实都是一样的,有些位置数据是没用的可以省略等等等。
后续会补上源代码链接
