从浅入深 学习 SpringCloud 微服务架构(七)Hystrix(4)
一、hystrix:使用 turbine 聚合所有的 hytrix 的监控数据测试。创建父工程 spring_cloud_hystrix_demo,导入相关依赖坐标。并在父工程 spring_cloud_hystrix_demo 下,创建子工程 hystrix_turbine (子模块)。
1、打开 idea 创建父工程
创建 artifactId 名为 spring_cloud_hystrix_demo 的 maven 工程。
父工程,不写代码,可以删除 src 目录。
--> idea --> File --> New --> Project --> Maven Project SDK: ( 1.8(java version "1.8.0_131" ) --> Next --> Groupld : ( djh.it )Artifactld : ( spring_cloud_hystrix_demo )Version : 1.0-SNAPSHOT--> Name: ( spring_cloud_hystrix_demo )Location: ( \spring_cloud_hystrix_demo\ ) --> Finish2、在父工程 spring_cloud_hystrix_demo 的 pom.xml 文件中导入依赖坐标。
<?xml version="1.0" encoding="UTF-8"?>
<project xmlns="http://maven.apache.org/POM/4.0.0"xmlns:xsi="http://www.w3.org/2001/XMLSchema-instance"xsi:schemaLocation="http://maven.apache.org/POM/4.0.0 http://maven.apache.org/xsd/maven-4.0.0.xsd"><modelVersion>4.0.0</modelVersion><groupId>djh.it</groupId><artifactId>spring_cloud_hystrix_demo</artifactId><packaging>pom</packaging><version>1.0-SNAPSHOT</version><modules><module>hystrix_turbine</module></modules><parent><groupId>org.springframework.boot</groupId><artifactId>spring-boot-starter-parent</artifactId><version>2.1.6.RELEASE</version></parent><properties><project.build.sourceEncoding>UTF-8</project.build.sourceEncoding><project.reporting.outputEncoding>UTF-8</project.reporting.outputEncoding><java.version>1.8</java.version></properties><dependencies><dependency><groupId>org.springframework.boot</groupId><artifactId>spring-boot-starter-web</artifactId></dependency><dependency><groupId>org.springframework.boot</groupId><artifactId>spring-boot-starter-logging</artifactId></dependency><dependency><groupId>org.springframework.boot</groupId><artifactId>spring-boot-starter-test</artifactId><scope>test</scope></dependency><dependency><groupId>org.projectlombok</groupId><artifactId>lombok</artifactId><version>1.18.4</version><scope>provided</scope></dependency></dependencies><dependencyManagement><dependencies><dependency><groupId>org.springframework.cloud</groupId><artifactId>spring-cloud-dependencies</artifactId><version>Greenwich.RELEASE</version><type>pom</type><scope>import</scope></dependency></dependencies></dependencyManagement><repositories><repository><id>spring-snapshots</id><name>Spring Snapshots</name><url>http://repo.spring.io/libs-snapshot-local</url><snapshots><enabled>true</enabled></snapshots></repository><repository><id>spring-milestones</id><name>Spring Milestones</name><url>http://repo.spring.io/libs-milestone-local</url><snapshots><enabled>false</enabled></snapshots></repository><repository><id>spring-releases</id><name>Spring Releases</name><url>http://repo.spring.io/libs-release-local</url><snapshots><enabled>false</enabled></snapshots></repository></repositories><pluginRepositories><pluginRepository><id>spring-snapshots</id><name>Spring Snapshots</name><url>http://repo.spring.io/libs-snapshot-local</url><snapshots><enabled>true</enabled></snapshots></pluginRepository><pluginRepository><id>spring-milestones</id><name>Spring Milestones</name><url>http://repo.spring.io/libs-milestone-local</url><snapshots><enabled>false</enabled></snapshots></pluginRepository></pluginRepositories><build><plugins><plugin><groupId>org.springframework.boot</groupId><artifactId>spring-boot-maven-plugin</artifactId></plugin></plugins></build></project>
<!-- \spring_cloud_hystrix_demo\pom.xml -->
3、在父工程 spring_cloud_hystrix_demo 下,创建子工程(子模块)hystrix_turbine
创建 子工程(子模块)
--> 右键 spring_cloud_hystrix_demo 父工程--> Modules --> Maven --> Groupld : ( djh.it )Artifactld : ( hystrix_turbine )Version : 1.0-SNAPSHOT--> Next --> Module name: ( hystrix_turbine )Content root : ( \spring_cloud_hystrix_demo\hystrix_turbine )Module file location: ( \spring_cloud_hystrix_demo\hystrix_turbine )--> Finish4、在子工程 hystrix_turbine (子模块)中的 pom.xml 中导入依赖
<?xml version="1.0" encoding="UTF-8"?>
<project xmlns="http://maven.apache.org/POM/4.0.0"xmlns:xsi="http://www.w3.org/2001/XMLSchema-instance"xsi:schemaLocation="http://maven.apache.org/POM/4.0.0 http://maven.apache.org/xsd/maven-4.0.0.xsd"><parent><artifactId>spring_cloud_hystrix_demo</artifactId><groupId>djh.it</groupId><version>1.0-SNAPSHOT</version></parent><modelVersion>4.0.0</modelVersion><artifactId>hystrix_turbine</artifactId><dependencies><dependency><groupId>org.springframework.cloud</groupId><artifactId>spring-cloud-starter-netflix-turbine</artifactId></dependency><dependency><groupId>org.springframework.cloud</groupId><artifactId>spring-cloud-starter-netflix-hystrix</artifactId></dependency><dependency><groupId>org.springframework.cloud</groupId><artifactId>spring-cloud-starter-netflix-hystrix-dashboard</artifactId></dependency></dependencies></project>
<!-- \spring_cloud_hystrix_demo\hystrix_turbine\pom.xml -->
5、在子工程 hystrix_turbine (子模块)中,创建配置文件 application.yml 配置文件。
##  \spring_cloud_hystrix_demo\hystrix_turbine\src\main\resources\application.ymlserver:port: 8031
spring:application:name: hystrix-turbine
eureka:client:service-url:defaultZone: http://localhost:9000/eurekainstance:prefer-ip-address: true
turbine:  # 配置 turbine 聚合 hystrix 所有监控数据appConfig: service-order  # 要监控的微服务列表,多个用 , 逗号分隔。clusterNameExpression: "'default'"
6、在子工程 hystrix_turbine (子模块)中,创建 启动类 TurbinApplication.java
/***   spring_cloud_hystrix_demo\hystrix_turbine\src\main\java\djh\it\TurbinApplication.java**   2024-5-1  启动类 TurbinApplication.java*/
package djh.it;import org.springframework.boot.SpringApplication;
import org.springframework.boot.autoconfigure.SpringBootApplication;
import org.springframework.cloud.netflix.hystrix.dashboard.EnableHystrixDashboard;
import org.springframework.cloud.netflix.turbine.EnableTurbine;@SpringBootApplication
@EnableTurbine  //激活Turbine
@EnableHystrixDashboard  //激活Dashboard
public class TurbinApplication {public static void main(String[] args) {SpringApplication.run(TurbinApplication.class, args);}
}
二、在父工程 spring_cloud_hystrix_demo 下,创建子工程(子模块)eureka_service
1、创建 子工程 eureka_service(子模块)
--> 右键 spring_cloud_hystrix_demo 父工程--> Modules --> Maven --> Groupld : ( djh.it )Artifactld : ( eureka_service )Version : 1.0-SNAPSHOT--> Next --> Module name: ( eureka_service )Content root : ( \spring_cloud_hystrix_demo\eureka_service )Module file location: ( \spring_cloud_hystrix_demo\eureka_service )--> Finish2、在子工程 eureka_service (子模块)中的 pom.xml 中导入依赖
<?xml version="1.0" encoding="UTF-8"?>
<project xmlns="http://maven.apache.org/POM/4.0.0"xmlns:xsi="http://www.w3.org/2001/XMLSchema-instance"xsi:schemaLocation="http://maven.apache.org/POM/4.0.0 http://maven.apache.org/xsd/maven-4.0.0.xsd"><parent><artifactId>spring_cloud_hystrix_demo</artifactId><groupId>djh.it</groupId><version>1.0-SNAPSHOT</version></parent><modelVersion>4.0.0</modelVersion><artifactId>eureka_service</artifactId><dependencies><dependency><groupId>org.springframework.cloud</groupId><artifactId>spring-cloud-starter-netflix-eureka-server</artifactId></dependency></dependencies></project>
<!-- spring_cloud_hystrix_demo\eureka_service\pom.xml -->
3、在子工程 eureka_service (子模块)中,创建配置文件 application.yml 配置文件。
##  spring_cloud_hystrix_demo\eureka_service\src\main\resources\application.yml# 如果演示 eureka 高可用,可以模拟两个 EurekaServer, 一个端口 9000,一个端口 8000,两个需要相互注册。server:port: 9000  # 启动端口 命令行注入。spring:application:name: service-eureka  #spring应用名, # 注意 FeignClient 不支持名字带下划线eureka: # 配置 eureka_serverinstance:hostname: localhostclient:register-with-eureka: false  # 是否将自己注册到注册中心,不配置时,默认 true。 配置高可用时,须注销此行,或配置为 truefetch-registry: false  # 是否从 Eureka 中获取注册信息,不配置时,默认 true。 配置高可用时,须注销此行,或配置为 trueservice-url: # 配置暴露给 EurekaClient 的请求地址defaultZone: http://${eureka.instance.hostname}:${server.port}/eureka/
#      defaultZone: http://127.0.0.1:9000/eureka/  # 配置高可用时,须配置为另一个 EurekaServerApplication 的端口号,如:8000server:enable-self-preservation: false  # 关闭自我保护机制eviction-interval-timer-in-ms: 4000  # 设置剔除服务间隔时间为 4000 毫秒(4秒)。此参数默认为 true。
4、在子工程 eureka_service (子模块)中,创建 启动类 EurekaServerApplication.java
/***   spring_cloud_hystrix_demo\eureka_service\src\main\java\djh\it\eureka\EurekaServerApplication.java**   2024-5-1  eureka 注册中心,启动类 EurekaServerApplication.java*/package djh.it.eureka;import org.springframework.boot.SpringApplication;
import org.springframework.boot.autoconfigure.SpringBootApplication;
import org.springframework.cloud.netflix.eureka.server.EnableEurekaServer;@SpringBootApplication
@EnableEurekaServer  //激活 Eureka
public class EurekaServerApplication {public static void main(String[] args) {SpringApplication.run(EurekaServerApplication.class, args);}
}
三、在父工程 spring_cloud_hystrix_demo 下,创建子工程(子模块)product_service
1、在父工程 spring_cloud_hystrix_demo 下,创建 生产者 子工程 product_service(子模块)
--> 右键 spring_cloud_hystrix_demo 父工程--> Modules --> Maven --> Groupld : ( djh.it )Artifactld : ( product_service )Version : 1.0-SNAPSHOT--> Next --> Module name: ( product_service )Content root : ( spring_cloud_hystrix_demo\product_service )Module file location: ( spring_cloud_hystrix_demo\product_service )--> Finish2、在 生产者 子工程 product_service (子模块)中的 pom.xml 中导入依赖
<?xml version="1.0" encoding="UTF-8"?>
<project xmlns="http://maven.apache.org/POM/4.0.0"xmlns:xsi="http://www.w3.org/2001/XMLSchema-instance"xsi:schemaLocation="http://maven.apache.org/POM/4.0.0 http://maven.apache.org/xsd/maven-4.0.0.xsd"><parent><artifactId>spring_cloud_hystrix_demo</artifactId><groupId>djh.it</groupId><version>1.0-SNAPSHOT</version></parent><modelVersion>4.0.0</modelVersion><artifactId>product_service</artifactId><dependencies><dependency><groupId>mysql</groupId><artifactId>mysql-connector-java</artifactId><!--            <version>5.1.32</version>--><version>8.0.26</version></dependency><dependency><groupId>org.springframework.boot</groupId><artifactId>spring-boot-starter-data-jpa</artifactId></dependency><!-- 导入 eureka 注册中心 --><dependency><groupId>org.springframework.cloud</groupId><artifactId>spring-cloud-starter-netflix-eureka-client</artifactId></dependency></dependencies>
</project>
<!-- spring_cloud_hystrix_demo\product_service\pom.xml -->
3、在 生产者 子工程 product_service (子模块)中,创建 商品实体类 Product.java
/***  spring_cloud_consul_demo\product_service\src\main\java\djh\it\product\domain\Product.java**  2024-4-27 商品实体类 Product.java*/
package djh.it.product.domain;import lombok.Data;
import javax.persistence.Entity;
import javax.persistence.Id;
import javax.persistence.Table;
import java.math.BigDecimal;@Data
@Entity
@Table(name="tb_product")  //对应数据库中的数据表
public class Product {@Idprivate Long id;private String productName;private Integer status;private BigDecimal price;private String productDesc;private String caption;private Integer inventory;
}
4、在 生产者 子工程 product_service (子模块)中,创建 dao 持久层接口类 ProductDao.java
/***   spring_cloud_hystrix_demo\product_service\src\main\java\djh\it\product\dao\ProductDao.java**  2024-5-1  dao 持久层接口 ProductDao.java*/
package djh.it.product.dao;import djh.it.product.domain.Product;
import org.springframework.data.jpa.repository.JpaRepository;
import org.springframework.data.jpa.repository.JpaSpecificationExecutor;public interface ProductDaoextends JpaRepository<Product, Long>, JpaSpecificationExecutor<Product> {}
5、在 生产者 子工程 product_service (子模块)中,创建 service 服务层 接口类 ProductService.java
/***   spring_cloud_hystrix_demo\product_service\src\main\java\djh\it\product\service\ProductService.java**  2024-5-1  service 服务层 接口 ProductService.java*/
package djh.it.product.service;import djh.it.product.domain.Product;public interface ProductService {//根据id查询Product findById(Long id);//保存void save(Product product);//更新void update(Product product);//删除void delete(Long id);
}
6、在 生产者 子工程 product_service (子模块)中,创建 service 服务层 实现类 ProductServiceImpl.java
/***  spring_cloud_consul_demo\product_service\src\main\java\djh\it\product\service\Impl\ProductServiceImpl.java**  2024-4-27  service 服务层 实现类*/
package djh.it.product.service.Impl;import djh.it.product.domain.Product;
import djh.it.product.dao.ProductDao;
import djh.it.product.service.ProductService;
import org.springframework.beans.factory.annotation.Autowired;
import org.springframework.stereotype.Service;@Service
public class ProductServiceImpl implements ProductService {@Autowiredprivate ProductDao productDao;@Overridepublic Product findById(Long id) {return productDao.findById(id).get();}@Overridepublic void save(Product product) {productDao.save(product);}@Overridepublic void update(Product product) {productDao.save(product);}@Overridepublic void delete(Long id) {productDao.deleteById(id);}
}
7、在 生产者 子工程 product_service (子模块)中,创建 商品的 controller 类 ProductController.java
/***   spring_cloud_hystrix_demo\product_service\src\main\java\djh\it\product\controller\ProductController.java**  2024-5-1 商品的 controller 类 ProductController.java*/
package djh.it.product.controller;import djh.it.product.domain.Product;
import djh.it.product.service.ProductService;
import org.springframework.beans.factory.annotation.Autowired;
import org.springframework.beans.factory.annotation.Value;
import org.springframework.web.bind.annotation.*;@RestController
@RequestMapping("/product")
public class ProductController {@Autowiredprivate ProductService productService;//获取服务器端口号@Value("${server.port}")private String port;//获取服务器IP地址@Value("${spring.cloud.client.ip-address}")   //springcloud 自动获取当前应用的IP地址private String ip;@RequestMapping(value = "/{id}", method = RequestMethod.GET)public Product findById(@PathVariable Long id){try {Thread.sleep(2000l);  //延迟2秒} catch (InterruptedException e) {e.printStackTrace();}Product product = productService.findById(id);product.setProductName("访问的服务地址:"+ip+":"+port);return product;}@RequestMapping(value = "", method = RequestMethod.POST)public String save (@RequestBody Product product){productService.save(product);return "保存成功";}
}
8、在 生产者 子工程 product_service (子模块)中,创建配置文件 application.yml
##  spring_cloud_hystrix_demo\product_service\src\main\resources\application.ymlserver:port: 9001  # 启动端口 命令行注入。
#  port: ${port:9001}  # 启动端口设置为动态传参,如果未传参数,默认端口为 9001spring:application:name: service-product  #spring应用名, # 注意 FeignClient 不支持名字带下划线
#  main:
#    allow-bean-definition-overriding: true # SpringBoot2.1 需要设定。datasource:driver-class-name: com.mysql.jdbc.Driver  # mysql 驱动url: jdbc:mysql://localhost:3306/shop?useUnicode=true&characterEncoding=utf8&useSSL=false&serverTimezone=Asia/Shanghaiusername: rootpassword: 12311jpa:database: MySQLshow-sql: trueopen-in-view: trueeureka:  # 配置 Eurekaclient:service-url:defaultZone: http://localhost:9000/eureka/  # 多个 eurekaserver 用 , 隔开。instance:prefer-ip-address: true  # 使用 ip 地址注册instance-id: ${spring.cloud.client.ip-address}:${server.port}
9、在 生产者 子工程 product_service (子模块)中,创建 启动类 ProductApplication.java
/***   spring_cloud_hystrix_demo\product_service\src\main\java\djh\it\product\ProductApplication.java**   2024-5-1  启动类 ProductApplication.java*/
package djh.it.product;import org.springframework.boot.SpringApplication;
import org.springframework.boot.autoconfigure.SpringBootApplication;
import org.springframework.boot.autoconfigure.domain.EntityScan;
import org.springframework.cloud.netflix.eureka.EnableEurekaClient;@SpringBootApplication
@EntityScan("djh.it.product.domain")
@EnableEurekaClient  //激活 EurekaClient 同 @EnableDiscoveryClient 注解
public class ProductApplication {public static void main(String[] args) {SpringApplication.run(ProductApplication.class, args);}
}
四、在父工程 spring_cloud_hystrix_demo 下,创建子工程(子模块)order_service
1、创建 消费者 子工程 order_service(子模块)
--> 右键 spring_cloud_hystrix_demo 父工程--> Modules --> Maven --> Groupld : ( djh.it )Artifactld : ( order_service )Version : 1.0-SNAPSHOT--> Next --> Module name: ( order_service )Content root : ( \spring_cloud_hystrix_demo\order_service )Module file location: ( \spring_cloud_hystrix_demo\order_service )--> Finish2、在消费者子工程(子模块) order_service 的 pom.xml 中导入依赖
<?xml version="1.0" encoding="UTF-8"?>
<project xmlns="http://maven.apache.org/POM/4.0.0"xmlns:xsi="http://www.w3.org/2001/XMLSchema-instance"xsi:schemaLocation="http://maven.apache.org/POM/4.0.0 http://maven.apache.org/xsd/maven-4.0.0.xsd"><parent><artifactId>spring_cloud_hystrix_demo</artifactId><groupId>djh.it</groupId><version>1.0-SNAPSHOT</version></parent><modelVersion>4.0.0</modelVersion><artifactId>order_service</artifactId><dependencies><dependency><groupId>mysql</groupId><artifactId>mysql-connector-java</artifactId><!--            <version>5.1.32</version>--><version>8.0.26</version></dependency><dependency><groupId>org.springframework.boot</groupId><artifactId>spring-boot-starter-data-jpa</artifactId></dependency><!-- 导入 eureka 注册中心 --><dependency><groupId>org.springframework.cloud</groupId><artifactId>spring-cloud-starter-netflix-eureka-client</artifactId></dependency><!-- springcloud 整合 openFeign --><dependency><groupId>org.springframework.cloud</groupId><artifactId>spring-cloud-starter-openfeign</artifactId></dependency><!-- Hystrix 组件 对 RestTemplate 的支持4步:1)引入 Hystrix 依赖坐标 --><dependency><groupId>org.springframework.cloud</groupId><artifactId>spring-cloud-starter-netflix-hystrix</artifactId></dependency><!-- 引入 hystrix 的监控信息 --><dependency><groupId>org.springframework.boot</groupId><artifactId>spring-boot-starter-actuator</artifactId></dependency><dependency><groupId>org.springframework.cloud</groupId><artifactId>spring-cloud-starter-netflix-hystrix-dashboard</artifactId></dependency></dependencies>
</project>
<!--  spring_cloud_hystrix_demo\order_service\pom.xml -->
3、在消费者子工程(子模块) order_service 中,创建配置文件 application.yml
##  spring_cloud_hystrix_demo\order_service\src\main\resources\application.ymlserver:port: 9002  # 启动端口 命令行注入。
#  port: ${port:9002}  # 启动端口设置为动态传参,如果未传参数,默认端口为 9002spring:application:name: service-order  #spring应用名, # 注意 FeignClient 不支持名字带下划线
#  main:
#    allow-bean-definition-overriding: true # SpringBoot2.1 需要设定。datasource:driver-class-name: com.mysql.jdbc.Driver  # mysql 驱动url: jdbc:mysql://localhost:3306/shop?useUnicode=true&characterEncoding=utf8&useSSL=false&serverTimezone=Asia/Shanghai# MySQL8.0 可以写成  root, 012311 或  'root', '012311'   # MySQL5.7 只能写成 'root', '012311'  # 注意用户名和密码后一定不能有空格。username: 'root'password: '12311'jpa:database: MySQLshow-sql: trueopen-in-view: trueeureka:  # 配置 Eurekaclient:service-url:defaultZone: http://localhost:9000/eureka/  # 多个 eurekaserver 用 , 隔开。instance:prefer-ip-address: true  # 使用 ip 地址注册instance-id: ${spring.cloud.client.ip-address}:${server.port}# 配置 feign 日志的输出。
# 日志配置:NONE:GI 不输出日志,BASIC:适用于生产环境追踪问题,HEADERS:在BASIC基础上,记录请求和响应头信息,FULL:记录所有。
logging:level:djh.it.order.feign.ProductFeignClient: debugfeign:client:config:default:connectTimeout: 5000   #服务之间建立连接所用的时间  #不设置 connectTimeout 会导致 readTimeout 设置不生效readTimeout: 5000   #建立连接后从服务端读取到数据用的时间service-product:  # 需要调用的服务名称loggerLevel: FULLhystrix:  # 开启对 hystrix 的支持。enabled: truehystrix:  # 配置 hystrix 熔断(Hystrix:基于 RestTemplate 的统一降级配置)command:default:execution:isolation:thread:timeoutInMilliseconds: 5000  # 默认的熔断超时时间为1秒,若1秒没有返回数据,会自动触发降级逻辑。management:   # 配置 Actuator 获取 hystrix 的监控数据 暴躁端点。endpoints:web:exposure:include: '*'   # 暴露所有端点。
4、在消费者子工程(子模块) order_service 中,创建 商品实体类 Product.java
/***   spring_cloud_hystrix_demo\order_service\src\main\java\djh\it\order\domain\Product.java**  2024-5-1  商品实体类 Product.java*/
package djh.it.order.domain;import lombok.Data;
import java.math.BigDecimal;@Data
public class Product {private Long id;private String productName;private Integer status;private BigDecimal price;private String productDesc;private String caption;private Integer inventory;
}
5、在消费者子工程(子模块) order_service 中,创建 controller 类 OrderController.java
/***   spring_cloud_hystrix_demo\order_service\src\main\java\djh\it\order\controller\OrderController.java**  2024-5-1 订单的 controller 类 OrderController.java*/
package djh.it.order.controller;import com.netflix.hystrix.contrib.javanica.annotation.HystrixCommand;
import djh.it.order.domain.Product;
import djh.it.order.feign.ProductFeignClient;
import org.springframework.web.bind.annotation.PathVariable;
import org.springframework.web.bind.annotation.RequestMapping;
import org.springframework.web.bind.annotation.RequestMethod;
import org.springframework.web.bind.annotation.RestController;import javax.annotation.Resource;@RestController
@RequestMapping("/order")
public class OrderController {@Resource    //按类型名称注入 调用 feign 组件的接口类 ProductFeignClient//@Autowired   //自动注入 调用 feign 组件的接口类 ProductFeignClient //有时变量名报红,可替换为 @Resource 注解private ProductFeignClient productFeignClient;/***  Hystrix 组件 对 RestTemplate 的支持4步:4)使用注解配置熔断保护*      fallbackmethod : 配置熔断之后的降级方法* @param id* @return*/@HystrixCommand  //配置了公共的熔断设置后,就不需要传参数。@RequestMapping(value = "/buy/{id}", method = RequestMethod.GET)public Product findById(@PathVariable Long id){Product product = null;//调用 feign 组件的接口类 的方法product = productFeignClient.findById(id);return product;}}
6、在消费者子工程(子模块) order_service 中,创建 feign 组件的接口类 ProductFeignClient.java
/***   spring_cloud_hystrix_demo\order_service\src\main\java\djh\it\order\feign\ProductFeignClient.java**   2024-5-1  创建 调用 feign 组件的接口类 ProductFeignClient.java*   声明需要调用的微服务名称 @FeignClient, name: 服务提供者的名称, fallback:配置熔断发生的降级方法。*/package djh.it.order.feign;import djh.it.order.domain.Product;
import org.springframework.cloud.openfeign.FeignClient;
import org.springframework.web.bind.annotation.PathVariable;
import org.springframework.web.bind.annotation.RequestMapping;
import org.springframework.web.bind.annotation.RequestMethod;@FeignClient(name="service-product", fallback = ProductFeignClientCallBack.class)  //调用 FeignClient 并添加降级方法的支持
public interface ProductFeignClient {//配置需要调用的微服务接口@RequestMapping(value = "/product/{id}", method = RequestMethod.GET)public Product findById(@PathVariable("id") Long id);
}
7、在消费者子工程(子模块) order_service 中,创建 feign 组件的实现类 ProductFeignClient.java
/***   spring_cloud_hystrix_demo\order_service\src\main\java\djh\it\order\feign\ProductFeignClientCallBack.java**   2024-5-1  创建 feign 组件的接口类 ProductFeignClient 的实现类 ProductFeignClientCallBack.java*   配置熔断触发的降级逻辑。*/package djh.it.order.feign;import djh.it.order.domain.Product;
import org.springframework.stereotype.Component;@Component
public class ProductFeignClientCallBack implements ProductFeignClient{// 熔断降级的方法public Product findById(Long id) {Product product = new Product();product.setProductName("hystrix:基于 feign 调用的熔断配置 -- feign 调用触发熔断降级的方法。");return product;}
}
8、在消费者子工程(子模块) order_service 中,创建 启动类 OrderApplication.java
/***    spring_cloud_hystrix_demo\order_service\src\main\java\djh\it\order\OrderApplication.java**   2024-5-1  启动类 OrderApplication.java*/
package djh.it.order;import org.springframework.boot.SpringApplication;
import org.springframework.boot.autoconfigure.SpringBootApplication;
import org.springframework.boot.autoconfigure.domain.EntityScan;
import org.springframework.cloud.client.circuitbreaker.EnableCircuitBreaker;
import org.springframework.cloud.netflix.eureka.EnableEurekaClient;
import org.springframework.cloud.netflix.hystrix.dashboard.EnableHystrixDashboard;
import org.springframework.cloud.openfeign.EnableFeignClients;@SpringBootApplication
@EntityScan("djh.it.order.domain")
@EnableEurekaClient  //激活 EurekaClient,同 @EnableDiscoveryClient 注解相同。
@EnableFeignClients  //激活 Feign
@EnableCircuitBreaker  // 2)激活 hystrix,  Hystrix 组件 对 RestTemplate 的支持4步:
@EnableHystrixDashboard  // 激活 Hystrix 基于图形化的 DashBoard(仪表板)监控平台
public class OrderApplication {public static void main(String[] args) {SpringApplication.run(OrderApplication.class, args);}
}
9、运行启动类,进行测试
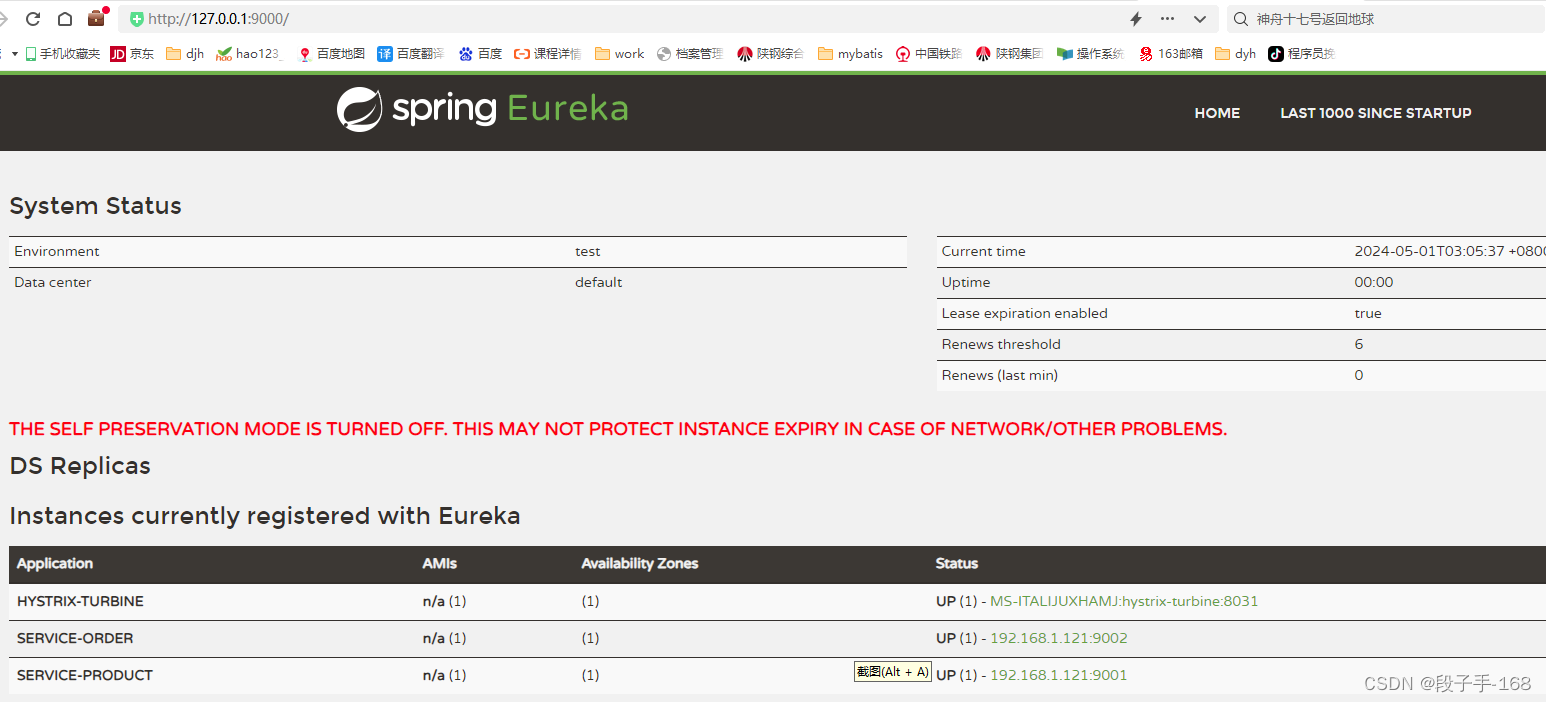
1)浏览器地址栏输入:http://127.0.0.1:9000 发现3个服务注册。
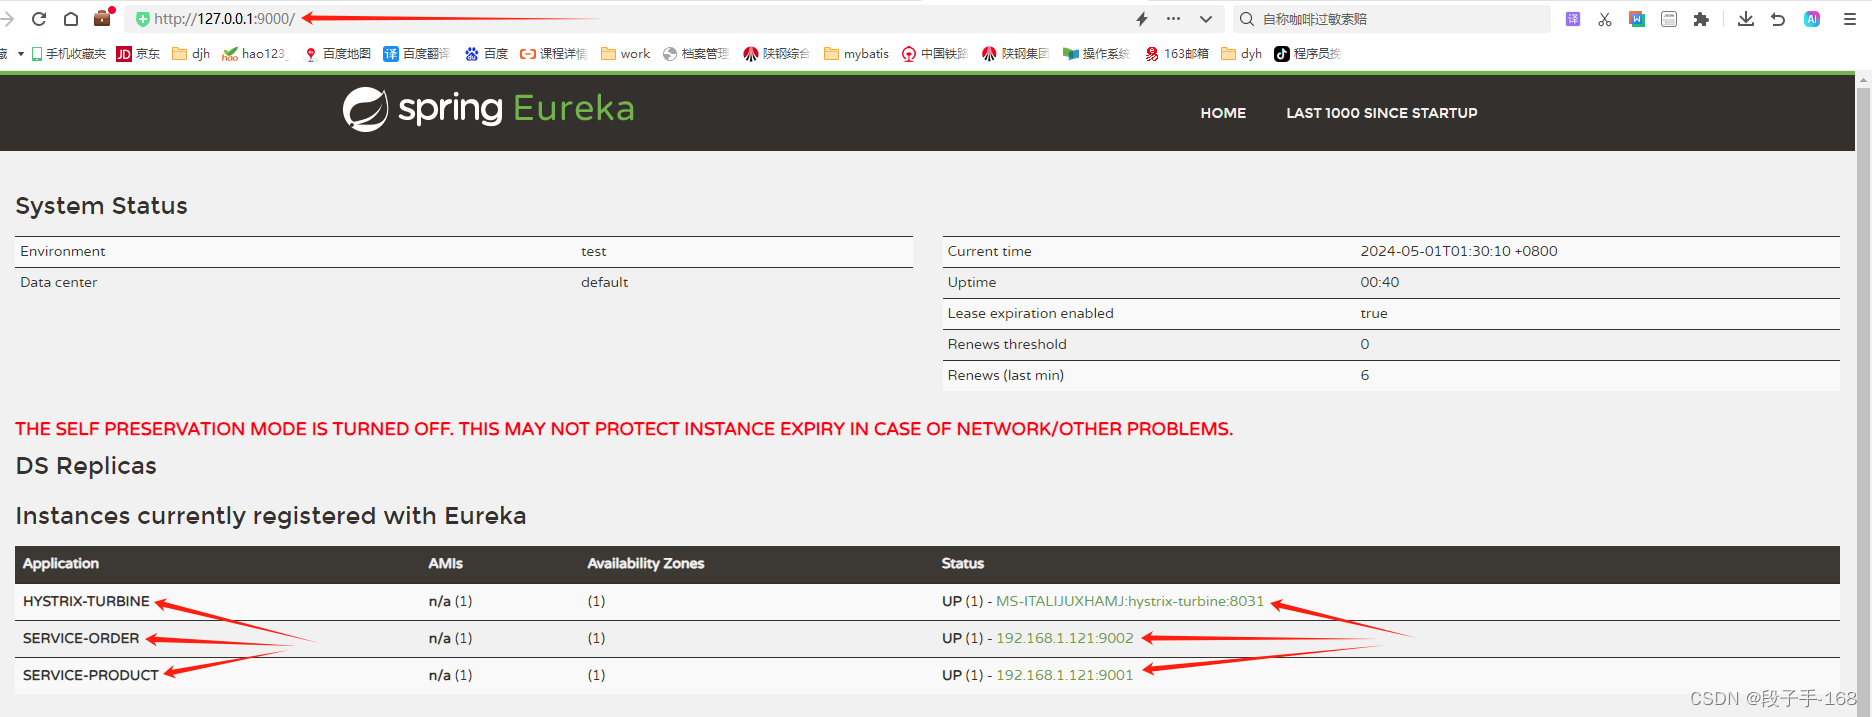
2)浏览器地址栏输入:http://127.0.0.1:9001/product/1
正常输出 mysql 数据库的第一条记录:

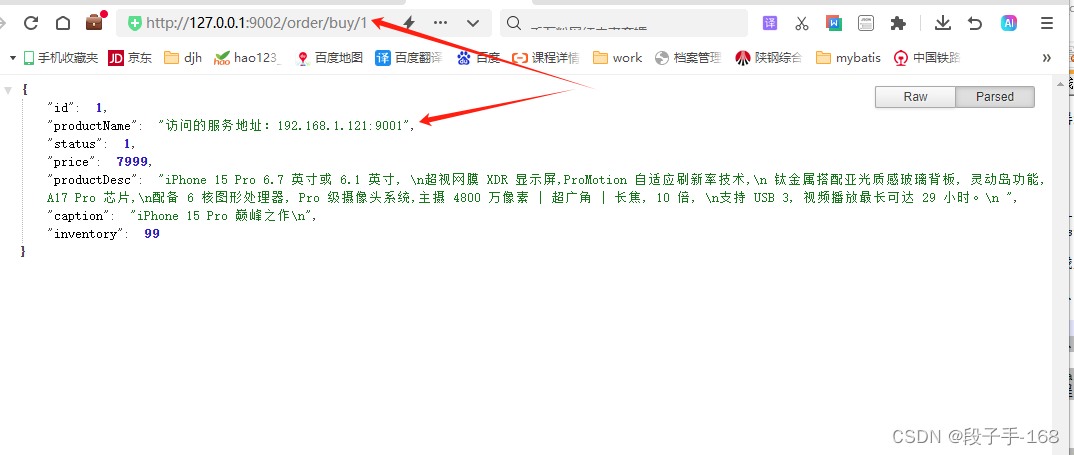
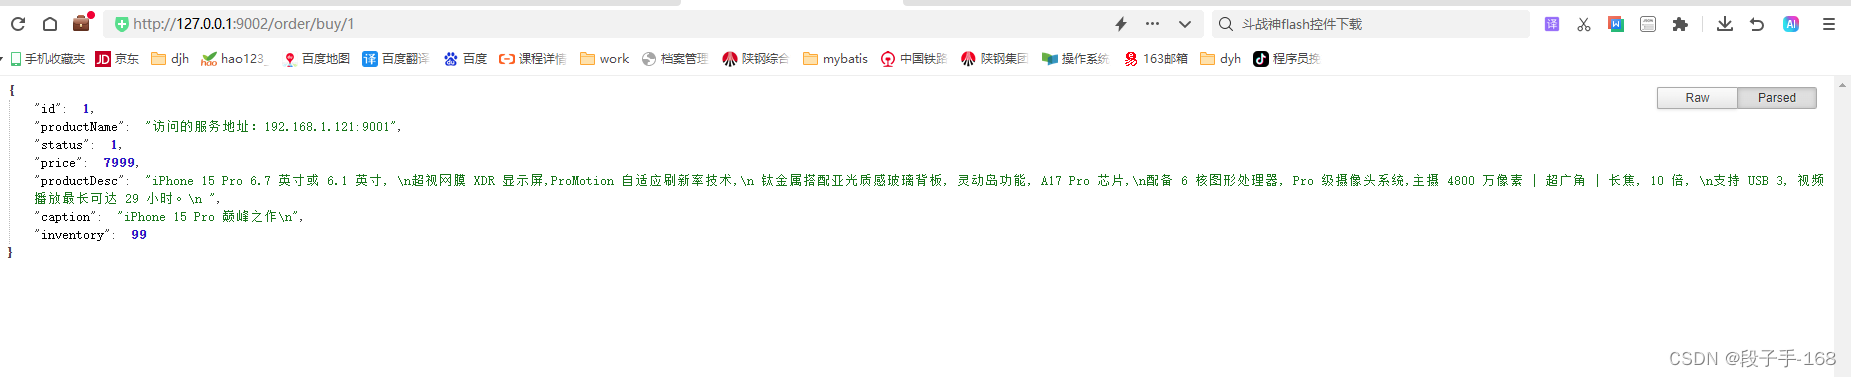
3)浏览器地址栏输入:http://127.0.0.1:9002/order/buy/1
正常输出 mysql 数据库的第一条记录:
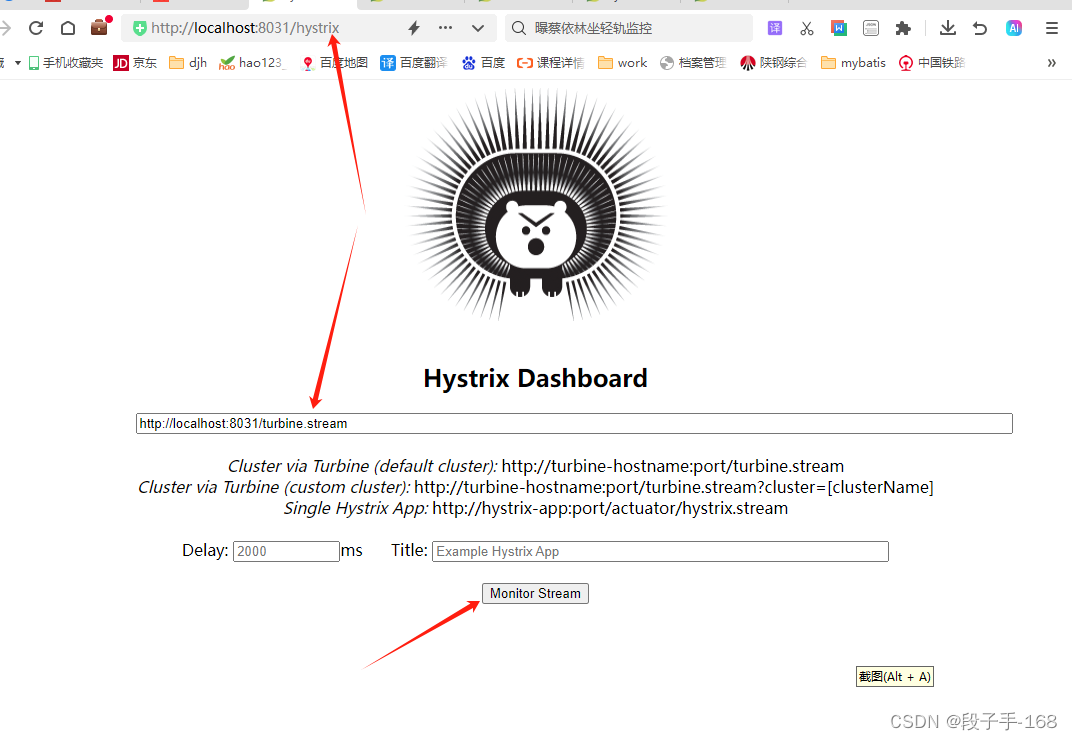
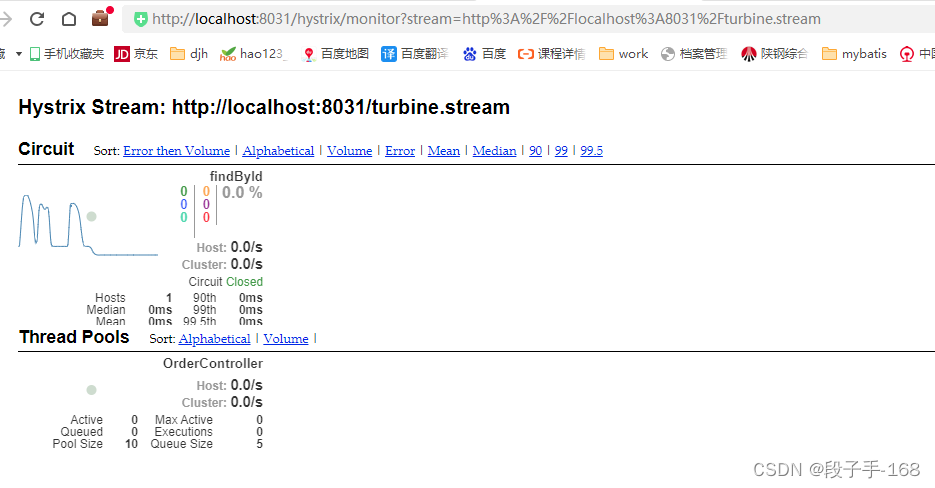
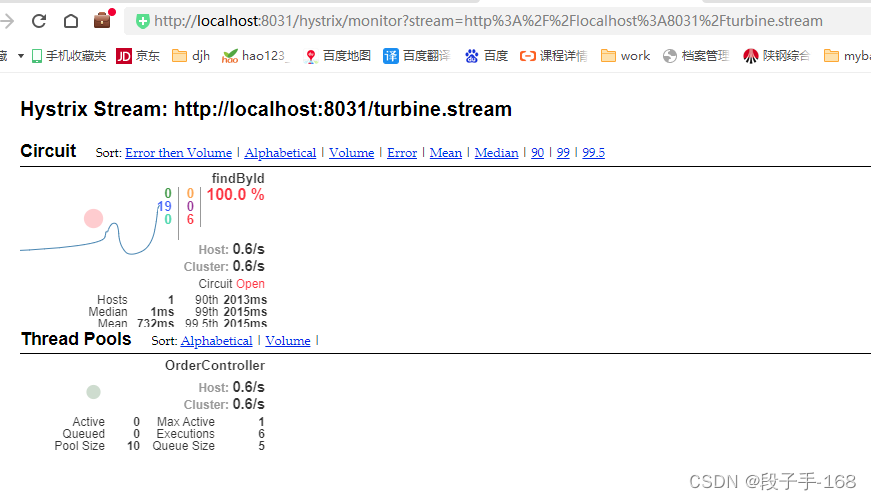
4)浏览器地址栏输入:http://localhost:8031/hystrix
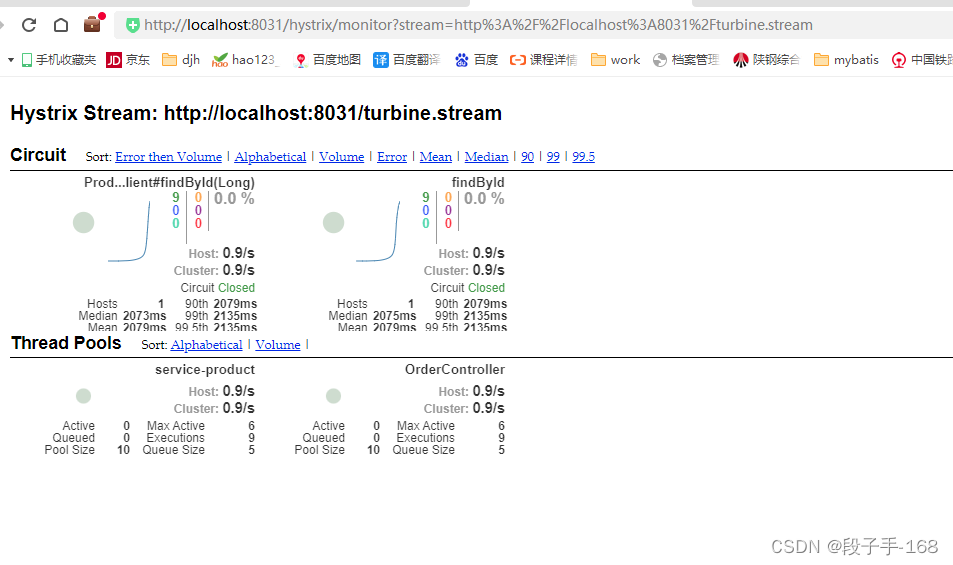
在 Hystrix Dashboard 地址框输入:http://localhost:8031/turbine.stream 点击 【Monitor Stream】
刷新几次请求数据(http://127.0.0.1:9002/order/buy/1)会看到数据变化。
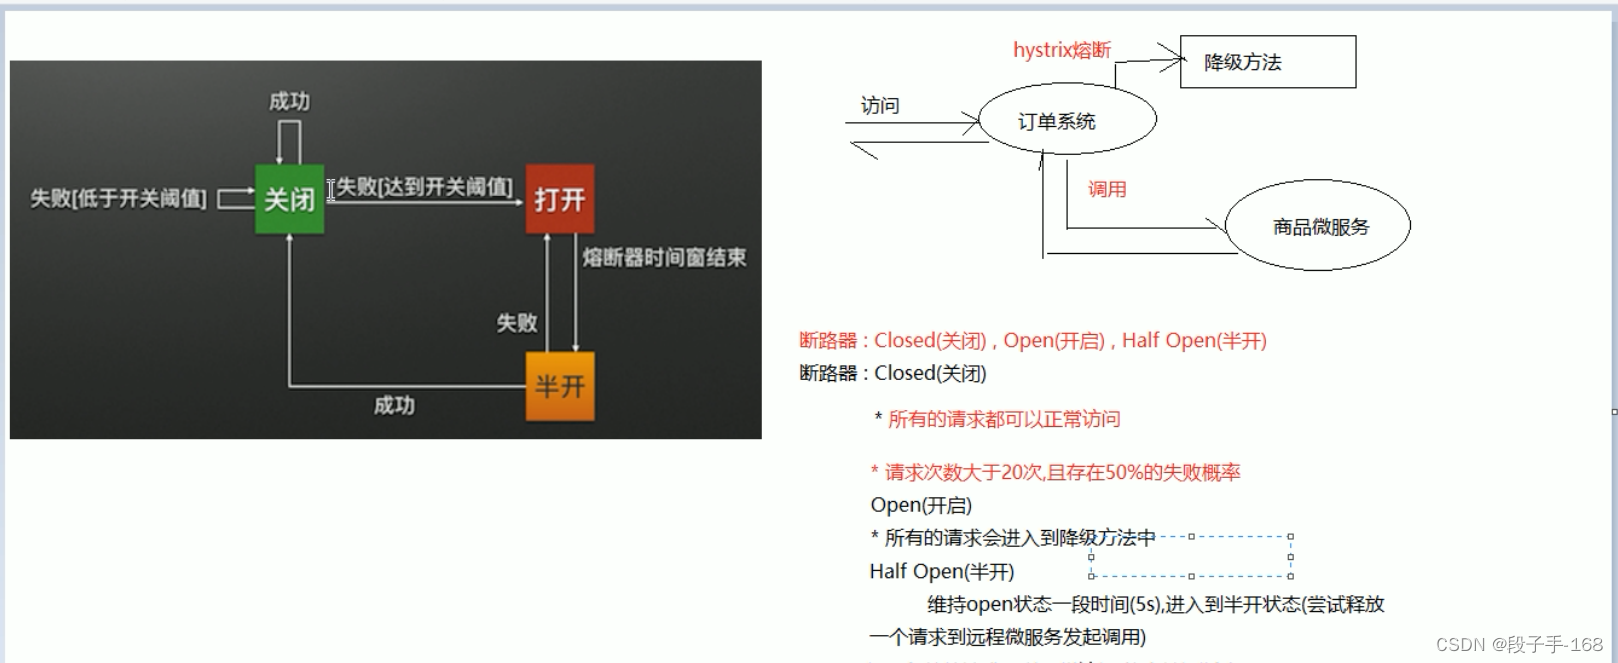
五、hystrix:hystrix 断路器的工作状态
1、熔断器有三个状态 CLOSED、OPEN、 HALF_OPEN 熔断器默认关闭状态,
当触发熔断后状态变更为 OPEN,在等待到指定的时间,Hystrix 会放请求检测服务是否开启,
这期间熔断器会变为 HALF_OPEN 半开启状态,熔断探测服务可用则继续变更为CLOSED 关闭熔断器。
2、Closed: 关闭状态(断路器关闭),所有请求都正常访问。
代理类维护了最近调用失败的次数如果某次调用失败,则使失败次数加1。
如果最近失败次数超过了在给定时间内允许失败的值则代理类切换到断开(Open)状态。
此时代理开启了一个超时时钟,当该时钟超过了该时间,则切换到半断开(Half-Open)状态。
该超时时间的设定是给了系统一次机会来修正导致调用失败的错误。
3、Open: 打开状态(断路器打开),所有请求都会被降级。
Hystix 会对请求情况计数,当一定时间内失败请求百分比达到阈值,则触发熔断,断路器会完全关闭。
默认失败比例的值是 50%,请求次数最少不低于20次。
4、Half Open: 半开状态,open 状态不是永久的,打开后会进入休眠时间(默认是5S)。
随后断路器会自动进入半开状态。此时会释放1次请求通过,若这个请求是健康的,则会关闭断路器,
否则会开启断路器。
六、hystrix:hystrix 测试 断路器的工作状态
1、hystrix 测试 断路器的工作状态,模拟环境准备:
1)在订单系统中(服务消费者模块 order_service)加入逻辑判断请求的 id
如果 id=1 : 正常执行(正常调用商品微服务)
如果 id=2 : 抛出异常
2)默认 hystrix 中有触发断路器状态转化的阈值,我们可以修改这些值,让测试体现明显一些。
- 修改 触发熔断的最小请求次数 : 默认是 20
- 修改 触发熔断的请求失败的比率: 默认是 50%
- 修改 断路器开启的时长 : 默认 5秒
2、在消费都子工程(子模块) order_service 中,修改 application.yml 配置类
##  spring_cloud_hystrix_demo\order_service\src\main\resources\application.ymlserver:port: 9002  # 启动端口 命令行注入。
#  port: ${port:9002}  # 启动端口设置为动态传参,如果未传参数,默认端口为 9002spring:application:name: service-order  #spring应用名, # 注意 FeignClient 不支持名字带下划线
#  main:
#    allow-bean-definition-overriding: true # SpringBoot2.1 需要设定。datasource:driver-class-name: com.mysql.jdbc.Driver  # mysql 驱动url: jdbc:mysql://localhost:3306/shop?useUnicode=true&characterEncoding=utf8&useSSL=false&serverTimezone=Asia/Shanghai# MySQL8.0 可以写成  root, 012311 或  'root', '012311'   # MySQL5.7 只能写成 'root', '012311'  # 注意用户名和密码后一定不能有空格。username: 'root'password: '12311'jpa:database: MySQLshow-sql: trueopen-in-view: trueeureka:  # 配置 Eurekaclient:service-url:defaultZone: http://localhost:9000/eureka/  # 多个 eurekaserver 用 , 隔开。instance:prefer-ip-address: true  # 使用 ip 地址注册instance-id: ${spring.cloud.client.ip-address}:${server.port}# 配置 feign 日志的输出。
# 日志配置:NONE:GI 不输出日志,BASIC:适用于生产环境追踪问题,HEADERS:在BASIC基础上,记录请求和响应头信息,FULL:记录所有。
logging:level:djh.it.order.feign.ProductFeignClient: debug#feign:
#  client:
#    config:
#      default:
#        connectTimeout: 5000   #服务之间建立连接所用的时间  #不设置 connectTimeout 会导致 readTimeout 设置不生效
#        readTimeout: 5000   #建立连接后从服务端读取到数据用的时间
#      service-product:  # 需要调用的服务名称
#        loggerLevel: FULL
#  hystrix:  # 开启对 hystrix 的支持。
#    enabled: truehystrix:  # 配置 hystrix 熔断(Hystrix:基于 RestTemplate 的统一降级配置)command:default:execution:isolation:thread:timeoutInMilliseconds: 5000  # 默认的熔断超时时间为1 秒,若1秒没有返回数据,会自动触发降级逻辑。circuitBreaker:requestVolumeThreshold: 5  # 触发熔断的最小请求次数,默认 20 次/秒。sleepWindbwInMilliseconds: 10000  # 熔断多少秒后去尝试请求。默认打开状态的时间是 5秒errorThresholdPercentage: 50  # 触发熔断的失败请求最小占比,默认 50%
management:   # 配置 Actuator 获取 hystrix 的监控数据 暴躁端点。endpoints:web:exposure:include: '*'   # 暴露所有端点。
3、在消费都子工程(子模块) order_service 中,修改 controller 类 OrderController.java
/***   spring_cloud_hystrix_demo\order_service\src\main\java\djh\it\order\controller\OrderController.java**  2024-5-1 订单的 controller 类 OrderController.java*/
package djh.it.order.controller;import com.netflix.hystrix.contrib.javanica.annotation.DefaultProperties;
import com.netflix.hystrix.contrib.javanica.annotation.HystrixCommand;
import djh.it.order.domain.Product;
import djh.it.order.feign.ProductFeignClient;
import org.springframework.beans.factory.annotation.Autowired;
import org.springframework.web.bind.annotation.PathVariable;
import org.springframework.web.bind.annotation.RequestMapping;
import org.springframework.web.bind.annotation.RequestMethod;
import org.springframework.web.bind.annotation.RestController;
import org.springframework.web.client.RestTemplate;import javax.annotation.Resource;@RestController
@RequestMapping("/order")
//@DefaultProperties(defaultFallback = "defaultFallBack")
public class OrderController {@Autowired  //注入 restTemplate 对象private RestTemplate restTemplate;//    @Resource    //按类型名称注入 调用 feign 组件的接口类 ProductFeignClient
//    //@Autowired   //自动注入 调用 feign 组件的接口类 ProductFeignClient //有时变量名报红,可替换为 @Resource 注解
//    private ProductFeignClient productFeignClient;/***  Hystrix 组件 对 RestTemplate 的支持4步:4)使用注解配置熔断保护*      fallbackmethod : 配置熔断之后的降级方法* @param id* @return*/
//    @HystrixCommand  //配置了公共的熔断设置后,就不需要传参数。@HystrixCommand(fallbackMethod = "orderFallBack")@RequestMapping(value = "/buy/{id}", method = RequestMethod.GET)public Product findById(@PathVariable Long id){if(id != 1){throw new RuntimeException("服务器异常");}Product product = null;//product = restTemplate.getForObject("http://127.0.0.1:9001/product/1", Product.class);product = restTemplate.getForObject("http://service-product/product/1", Product.class);//       //调用 feign 组件的接口类 的方法
//        product = productFeignClient.findById(id);return product;}/***  Hystrix 组件 对 RestTemplate 的支持4步:3)降级方法*   例如:如果访问的 service-product 服务器宕机,就会触发此降级方法* @param id* @return*/public Product orderFallBack(Long id){Product product = new Product();product.setProductName("触发降级方法");return product;}/***  指定统一的降级方法:无参数*/
//    public Product defaultFallBack(){
//        Product product = new Product();
//        product.setProductName("触发了 统一 的降级方法");
//        return product;
//    }
}
4、在消费都子工程(子模块) order_service 中,修改 启动类 OrderApplication.java 使用 RestTemplate 调用微服务。
/***    spring_cloud_hystrix_demo\order_service\src\main\java\djh\it\order\OrderApplication.java**   2024-5-1  启动类 OrderApplication.java*/
package djh.it.order;import org.springframework.boot.SpringApplication;
import org.springframework.boot.autoconfigure.SpringBootApplication;
import org.springframework.boot.autoconfigure.domain.EntityScan;
import org.springframework.cloud.client.circuitbreaker.EnableCircuitBreaker;
import org.springframework.cloud.client.loadbalancer.LoadBalanced;
import org.springframework.cloud.netflix.eureka.EnableEurekaClient;
import org.springframework.cloud.netflix.hystrix.dashboard.EnableHystrixDashboard;
//import org.springframework.cloud.openfeign.EnableFeignClients;
import org.springframework.context.annotation.Bean;
import org.springframework.web.client.RestTemplate;@SpringBootApplication
@EntityScan("djh.it.order.domain")
@EnableEurekaClient  //激活 EurekaClient,同 @EnableDiscoveryClient 注解相同。
//@EnableFeignClients  //激活 Feign
@EnableCircuitBreaker  // 2)激活 hystrix,  Hystrix 组件 对 RestTemplate 的支持4步:
@EnableHystrixDashboard  // 激活 Hystrix 基于图形化的 DashBoard(仪表板)监控平台
public class OrderApplication {@LoadBalanced@Beanpublic RestTemplate restTemplate(){return new RestTemplate();}public static void main(String[] args) {SpringApplication.run(OrderApplication.class, args);}
}
9、运行启动类,进行测试
1)浏览器地址栏输入:http://127.0.0.1:9000 发现3个服务注册。
2)浏览器地址栏输入:http://127.0.0.1:9001/product/1
正常输出 mysql 数据库的第一条记录:

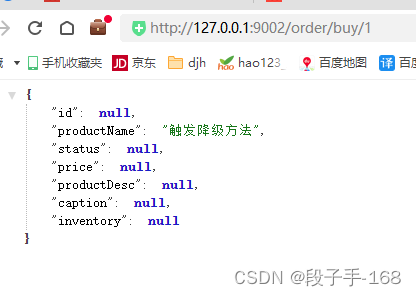
3)浏览器地址栏输入:http://127.0.0.1:9002/order/buy/1
正常输出 mysql 数据库的第一条记录:
4)浏览器地址栏输入:http://localhost:8031/hystrix
在 Hystrix Dashboard 地址框输入:http://localhost:8031/turbine.stream 点击 【Monitor Stream】
刷新几次请求数据(http://127.0.0.1:9002/order/buy/1)会看到数据变化。
再输入 http://127.0.0.1:9002/order/buy/2 错误请求,会触发降级方法,多刷新几次,
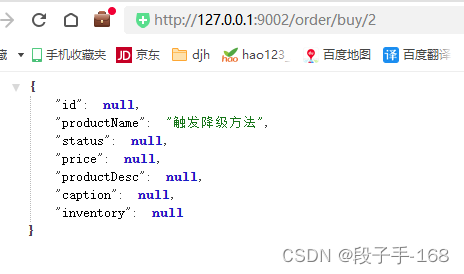
会发现,偶尔 http://127.0.0.1:9002/order/buy/1 也会触发降级方法,这就是熔断器的作用。
七、hystrix:隔离策略的说明 与 总结。
1、熔断器的隔离策略
微服务使用 Hystrix 熔断器实现了服务的自动降级,让微服务具备自我保护的能力,提升了系统的稳定性,也较好的解决雪崩效应。其使用方式目前支持两种策略:
-
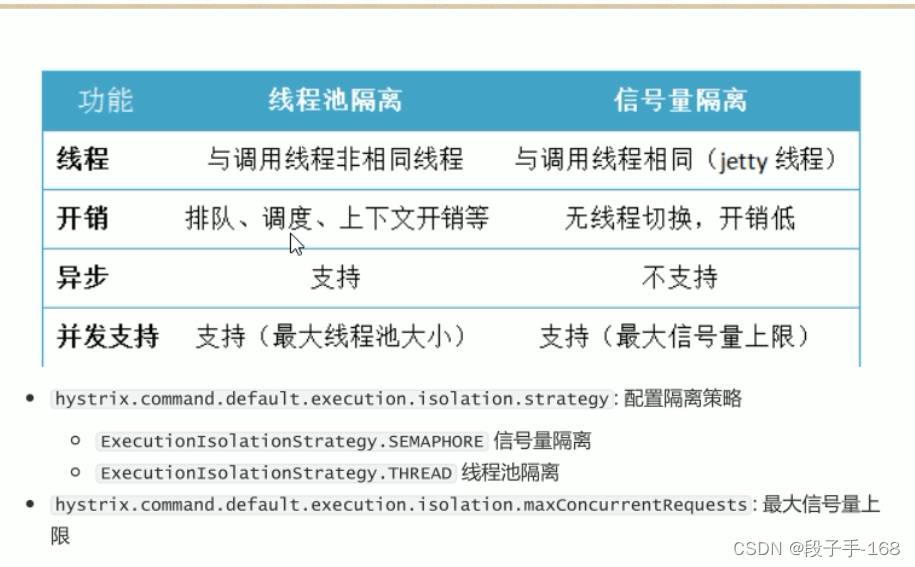
线程池隔离策略: 使用一个线程池来存储当前的请求,线程池对请求作处理,设置任务返回处理超时时间,堆积的请求堆积入线程池队列。
这种方式需要为每个依赖的服务申请线程池,有一定的资源消耗,好处是可以应对突发流量(流量洪峰来临时,处理不完可将数据存储到线程池队里慢慢处理 ) -
信号量隔离策略: 使用一个原子计数器(或信号量)来记录当前有多少个线程在运行,请求来先判断计数器的数值,若超过设置的最大线程个数则丢弃改类型的新请求,若不超过则执行计数操作请求来计数器+1,请求返回计数器-1。
这种方式是严格的控制线程且立即返回模式,无法应对突发流量(流量洪峰来临时,处理的线程超过数量,其他的请求会直接返回,不继续去请求依赖的服务)。
2、线程池和信号量两种策略功能支持对比如下:
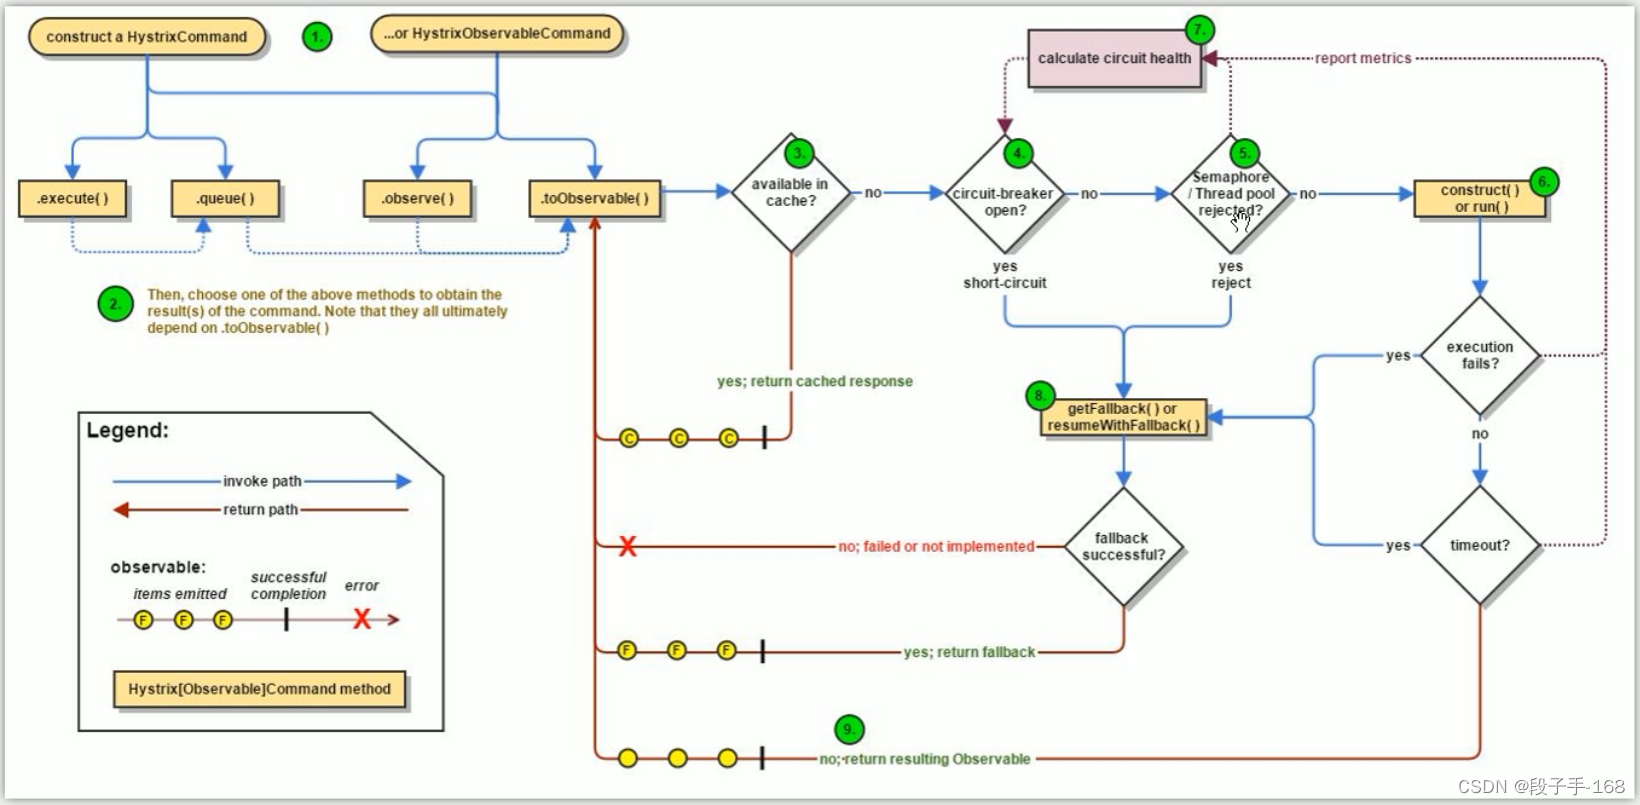
3、Hystrix 的核心源码
Hystrix 底层基于 Rxjava,Rxjava 是响应式编程开发库,
因此 Hystrix 的整个实现策略简单说即:把一个 HystrixCommand 封装成一个 Observable(待观察者),
针对自身要实现的核心功能,对 Observable 进行各种装饰,并在订阅各步装饰的 0bservable,以便在指定事件到达时,添加自己的业务。
4、hystrix 的执行过程如下:
5、hystrix 总结:
1)服务容错的核心知识:雪崩效应、服务隔离、熔断降级、服务限流。
2)hystrix 可以对 RestTemplate 调用进行熔断,也可以对 Feign 远程调用进行熔断。
使用方法是:使用注解,配置降级方法。
3)为了方便监控熔断信息,可以 搭建 Hystrix 监控平台。
4)可以通过 Turbine 形式 对 Hystrix 断路器进行聚合监控。
5)熔断器的状态与状态转换:CLOSED, OPEN, HALF_OPEN 状态。
6)hystrix 熔断器的隔离策略有:线程池隔离策略、信号量隔离策略。
上一节链接请点击:
# 从浅入深 学习 SpringCloud 微服务架构(七)Hystrix(3)