环境准备:
每个节点提供20G共享存储
| web1 | 192.168.134.176 | node7 |
| web2 | 192.168.134.177 | node8 |
一、准备web环境(两台web测试机都要准备)
yum install httpd -y
echo " web test page ,ip is `hostname -I`." > /var/www/html/index.html
systemctl start httpd
二、做两个节点免密登录,和配置其互相通信
vim /etc/hosts
内容如下:
192.168.134.176 node7
192.168.134.177 node8
备节点
ssh-keygen -f ~/.ssh/id_rsa -P '' -q
ssh-copy-id node1
主节点
ssh-keygen -f ~/.ssh/id_rsa -P '' -q
ssh-copy-id node3
三、安装环境(pacemaker,corosync,pcs)==>两个节点上都要配置
yum install corosync pacemaker pcs
systemctl enable --now pcsd在软件安装完成之后,会生成一个用户名为hacluster
id hacluster  # 查看用户信息
echo 123456 | passwd --stdin hacluster  # 给用户设置密码
四、集群配置
对集群进行认证配置
pcs cluster auth node7 node8
创建集群
pcs cluster setup --name web_cluster node7 node8
启动并加入自启动
pcs cluster start --all
pcs cluster enable --all查看节点是否启动
corosync-cfgtool -s
查看集群的信息和当前的状态
corosync-cmapctl | grep members
pcs status检查配置文件
crm_verify -L -V
此处会出现三个报错。原因:stonith没有禁用,在pacemaker中为了保证数据安全,默认开启stonith,但由于此处没有配置相关命令,所以需要禁用。
pcs property set stonith-enabled=false补充:介绍一些查看集群状态的命令
pcs status resources 显示集群资源状态
pcs status nodes  节点状态
pcs status groups  已配置资源组和资源
pcs status pcsd  已配置节点和pcsd状态
五、集群资源的配置
添加vip:帮助文件,pcs resource help
pcs resource create VIP ocf:heartbeat:IPaddr2 ip=192.168.134.200 cidr_netmask=32 op monitor interval=30s
查看可以配置的资源文件
pcs resource providers
查看可配置的http资源
pcs resource list | grep httpd
添加httpd资源到集群
pcs resource create WEB systemd:httpd
此时查看集群状态可以看到许多VIP与WEB不在同一节点上,即调整使其处于同一节点上,来方便使用。
pcs constraint colocation add WEB with VIP  # 这样配置后,利用VIP访问会重新变为正常情况。这是排列约束,主要是绑定资源到同一个节点上。
配置先启动VIP再启动WEB
pcs constraint order VIP then WEB
清除集群的错误日志:pcs resource cleanup摧毁集群:pcs cluster destroy --all
六、配置drbd
1、导入elrepo源rpm --import https://www.elrepo.org/RPM-GPG-KEY-elrepo.org
rpm -Uvh https://www.elrepo.org/elrepo-release-7.el7.elrepo.noarch.rpm2、安装扩展源wget -O /etc/yum.repos.d/epel.repo https://mirrors.aliyun.com/repo/epel-7.repo3、安装软件包、yum install -y drbd90-utils kmod-drbd904、启动drbd的内核模块modprobe drbd
echo drbd > /etc/modules-load.d/drbd.conf
lsmod | grep drbd # 显示已经载入系统的模块 ,做检查使用5、修改全局配置文件(两台机器都执行)vim /etc/drbd.d/global_common.conf global {usage-count no; # 版本控制
}
common {handlers {pri-on-incon-degr "/usr/lib/drbd/notify-pri-on-incon-degr.sh; /usr/lib/drbd/notify-emergency-reboot.sh; echo b > /proc/sysrq-trigger ; reboot -f";pri-lost-after-sb "/usr/lib/drbd/notify-pri-lost-after-sb.sh; /usr/lib/drbd/notify-emergency-reboot.sh; echo b > /proc/sysrq-trigger ; reboot -f";local-io-error "/usr/lib/drbd/notify-io-error.sh; /usr/lib/drbd/notify-emergency-shutdown.sh; echo o > /proc/sysrq-trigger ; halt -f";}startup {}options {}disk { on-io-error detach;}net {protocol C; # 指定使用协议C,在common中配置也可以}
}6、修改资源文件(两台机器都执行)vim /etc/drbd.d/nfs.resresource nfs {disk /dev/sdb;device /dev/drbd0;meta-disk internal;on node1 {address 192.168.134.170:8822;}on node3 {address 192.168.134.172:8822;}
}7、首次启用资源(1)创建元数据(两台都要配)drbdadm create-md nfs
内容如下:
initializing activity log
initializing bitmap (640 KB) to all zero
Writing meta data...
New drbd meta data block successfully created.(2)启用资源(两台都要配)drbdadm up nfs(3)启动初始化全量同步(在主节点上启动)drbdadm primary --force nfs # 启动全量同步drbdadm status # 可以查看同步状态(一段时间后状态才会变化)nfs role:Primarydisk:UpToDatenode1 role:Secondaryreplication:SyncSource peer-disk:Inconsistent done:3.58nfs role:Primarydisk:UpToDatenode1 role:Secondarypeer-disk:UpToDate8、测试drbd是否成功启动
在主节点上mkdir /data
ls /dev/drbd
mkfs.xfs /dev/drbd0 # 初始化
meta-data=/dev/drbd0 isize=512 agcount=4, agsize=1310678 blks= sectsz=512 attr=2, projid32bit=1= crc=1 finobt=0, sparse=0
data = bsize=4096 blocks=5242711, imaxpct=25= sunit=0 swidth=0 blks
naming =version 2 bsize=4096 ascii-ci=0 ftype=1
log =internal log bsize=4096 blocks=2560, version=2= sectsz=512 sunit=0 blks, lazy-count=1
realtime =none extsz=4096 blocks=0, rtextents=0
mount /dev/drbd0 /data # 将磁盘挂载到data目录下
cp /etc/hos* /data/ # 将文件copy入data目录下
umount /data # 卸载data目录
drbdadm secondary nfs # 资源降级在备节点上mkdir /data # 创建data目录
ls /dev/drbd
drbdadm primary nfs # 资源升级
drbdadm status # 查看资源状态
nfs role:Primarydisk:UpToDatenode3 role:Secondarypeer-disk:UpToDatemount /dev/drbd0 /data # 将磁盘重新挂入data目录
[root@node1 ~]# ls /data # 查看data目录下内容,观察是否同步成功,出现以下情况即同步成功
host.conf hostname hosts hosts.allow hosts.deny9、启动服务
systemctl start drbd
systemctl enable drbd
八、配置nfs资源
pcs resource create NfsShare ocf:heartbeat:nfsserver nfs_ip=192.168.134.100  # 设置VIP
resource create ClusterIP ocf:heartbeat:IPaddr2 ip=192.168.134.100 cidr_netmask=32  # 创建NfsShare资源
pcs constraint colocation add NfsShare with ClusterIP  # 绑定到同一个节点上
pcs constraint order ClusterIP then NfsShare  # 设置启动顺序,先VIP,再资源创建DRBD的设备集群
pcs cluster cib drbd_cfg  # 生成drbd_cfg文件
pcs -f drbd_cfg resource create NfsData ocf:linbit:drbd drbd_resourconf=/etc/drbd.conf" # 创建nfsdata资源
pcs -f drbd_cfg resource master NfsDataClone NfsData master-max=1 master-node-max=1 clone max=2 clone-node-max=2 notify=true  # 将其推送到实时cib来实现一次提交更改
pcs cluster cib-push drbd_cfg --config创建文件系统集群(自动在主节点挂载共享设备) ==>节点要在VIP所在的设备,不然会出问题pcs cluster cib fs_cfgpcs -f fs_cfg resource create NfsFs ocf:heartbeat:Filesystem device="/dev/drbd0" directory="/data" fstype="xfs" pcs -f fs_cfg constraint colocation add NfsFs with NfsDataClone INFINITY with-rsc-role=Masterpcs -f fs_cfg constraint order promote NfsDataClone then start NfsFspcs -f fs_cfg constraint colocation add NfsShare with NfsFs INFINITY  # 让NFs服务与共享目录在同一个服务器上pcs -f fs_cfg constraint order NfsFs then NfsShare  # 设置启动顺序pcs cluster cib-push fs_cfg --config # 提交配置
九、测试
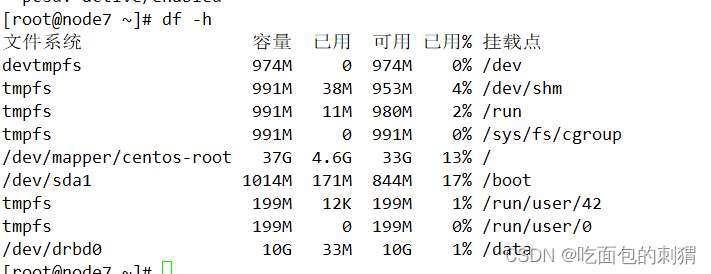
正常配置结果

此时已经自动挂载
模拟异常情况
pcs cluster standby node7

此时,挂载位置切换,主从切换,vip自动漂移,达到实验目标。

