一.ansible 背景介绍
- Ansible 是一个广受欢迎的 IT 自动化系统。可以用来处理配置管理、应用自动化部署、云资源配给、网络
自动化和多借点部署等任务。其也可以使得复杂的变更如带负载均衡的零停机滚动更新更加容易。Ansible.com
1.1 自动化运维概念
1.1.1 运维自动化的内容
- 运维自动化是指将 IT 运维中的大量手工的日常任务(日常检查、配置变更、软件安装等)转为自动化完成。
高度的自动化是 IT 运维追求的目标,是未来 IT 运维发展的趋势。简单的说,IT 自动化就是基于事先建立的
框架和流程,将某些不可预测的事件与 IT 流程关联起来,一旦某个系统一有风吹草动,就会被相应的监控
系统检测到,并根据相关的预定义的流程执行相应的补救措施,这些自动补救的措施都是在无人干涉的情
况下自动完成的。从而大幅减少系统不可用时间。
1.1.2 运维工程师核心职能
-
平台架构组件
负责参与并审核架构设计的合理性和可运维性,搭建运维平台技术架构,通过开源解决方案,以确保在
产品发布之后能高效稳定的运行,保障并不断提升服务的可用性,确保用户数据安全,提升用户体验。 -
日常运营保障
负责用运维技术或者运维平台确保产品可以高效的发布上线,负责保障产品 7*24H 稳定运行,在此期间
对出现的各种问题可以快速定位并解决;在日常工作中不断优化系统架构和部署的合理性,以提升系统服务
的稳定性。 -
性能、效率优化
用自动化的工具/平台提升软件在研发生命周期中的工程效率。不断优化系统架构、提升部署效率、优化
资源利用率支持产品的不断迭代,需要不断的进行架构优化调整。以确保整个产品能够在功能不断丰富和
复杂的条件下,同时保持高可用性。
运维开发工程师的职能和使用的工具 -
对于运维工程师来说,掌握这些自动化运维工具并能够相应的扩展功能是必备的技能。
1.2 常见自动化运维工具介绍
- 常见自动化运维工具在 Github 的受欢迎程度–统计于 2019.12.8
| 自动化运维工具 | Github Watch | Star | Fork | Contributors | Used by | Build language |
|---|---|---|---|---|---|---|
| Ansible | 2000 | 40800 | 17700 | 4800 | 9400 | Python |
| Saltstack | 596 | 10500 | 4700 | 2163 | not included | Python |
| Puppet | 489 | 5600 | 2100 | 528 | 7300 | Ruby |
| Chef | 420 | 6000 | 2400 | 581 | 5800 | Ruby |
| Fabric | 519 | 11900 | 1800 | 9 | not include | Python |
-
能看出 ansible 和 saltstack 是比较受欢迎的工具。
-
各工具的源码托管地址:
Github-Ansible
Github-Saltstack
Github-Puppet
Github-Chef
Github-Fabric
1.3 ansible 背景
-
Ansible 由 Michael DeHaan(Cobbler 与 Func 作者)使用 Python 在 2012 年开发,ansible 的名称来自
《安德的游戏》中跨越时空的即时通信工具。 于 2012-03-09,发布 0.0.1 版。在 2015-10-17,Red Hat
宣布 1.5 亿美元收购 Ansible。新版本的 RedHt 系统集成 Ansible。可以工作在 Linu、BSD、Mac OS 等
平台,目前是三大自动化运维工具(Ansible,Saltstack,Puppet)中最受欢迎的工具。 -
Andible 官网和官方文档
官网
官方文档
Ansible 中文文档 -
Michael DeHaan 信息和博客
Linkedin-MichaelDehaan
Medium
ansible.com
二.ansible 特性介绍
- ansible 特性
- 模块化:调用特定的模块,完成特定任务
- Paramiko(python 对 ssh 的实现),PyYAML,Jinja2(模板语言)三个关键模块
- 支持自定义模块,可使用任何编程语言写模块
- 基于 Python 语言实现
- 部署简单,基于 python 和 SSH(默认已安装),agentless,无需代理不依赖 PKI(无需 ssl),
去中心化部署 - 安全,基于 OpenSSH
- 幂等性:一个任务执行 1 遍和执行 n 遍效果一样,不因重复执行带来意外情况
- 支持 playbook 编排任务,YAML 格式,编排任务,支持丰富的数据结构
- 较强大的多层解决方案 role
三.ansible 架构介绍
3.1 Ansible 整体架构

3.2 Ansible 的核心模块
-
ansible 核心模块包括:
INVENTRY:ansible 控制和管理的主机清单默认使用的文件为/etc/ansible/hosts
API: 供第三方程序调用的应用程序编程接口
MODULES:ansible 执行命令的功能模块,多数为内置核心,也可以自定义(基于 Python)
PLUGINS:模块功能的补充,如连接类的插件、循环插件、过滤插件等。 -
ANSIBLE 命令执行来源
USER:普通用户,即 SYSTEM ADMINISTRATOR
PLAYBOOKS:任务剧本(任务集),编排定义 Ansible 任务集的配置文件,由 Ansible 顺序依次
执行,通常是 JSON 格式的 YML 文件
CMDB(配置管理数据库): API 调用
PUBLIC/PRIVATE CLOUD: API 调用
USER-> Ansible Playbook -> Ansibile -
Tips
执行 ansible 的主机一般称为主控端,中控,master 或堡垒机
主控端 Python 版本需要 2.6 或以上
被控端 Python 版本小于 2.4 需要安装 python-simplejson
被控端如开启 SELinux 需要安装 libselinux-python
windows 不能做为主控端
四.Ansible 安装和入门
4.1 Ansible 安装
-
RedHat 系列系统配置各版本的 epel 源直接 yum 安装
yum install ansible -
编译安装
$yum -y install python-jinja2 PyYAML python-paramiko python-babel python-crypto
$tar xf ansible-1.5.4.tar.gz
$cd ansible-1.5.4
$python setup.py build
$python setup.py install
$mkdir /etc/ansible
$cp -r examples/* /etc/ansible
- Git 安装
$git clone git://github.com/ansible/ansible.git --recursive
$cd ./ansible
$source ./hacking/env-setup
- 使用 Python 包管理器 pip 安装
yum install python-pip python-devel
yum install gcc glibc-devel zibl-devel  rpm-bulid openssl-devel
pip install  --upgrade pip
pip install ansible --upgrade
4.2 Ansible 配置
- 相关配置文件
/etc/ansible/ansible.cfg 主配置文件,配置 ansible 工作特性
/etc/ansible/hosts       默认的Inventory主机清单
/etc/ansible/roles/      存放角色的目录
- Ansible 主配置文件
/etc/ansible/ansible.cfg
# config file for ansible -- https://ansible.com/
# ===============================================# nearly all parameters can be overridden in ansible-playbook
# or with command line flags. ansible will read ANSIBLE_CONFIG,
# ansible.cfg in the current working directory, .ansible.cfg in
# the home directory or /etc/ansible/ansible.cfg, whichever it
# finds first[defaults]# some basic default values...#inventory      = /etc/ansible/hosts
#library        = /usr/share/my_modules/
#module_utils   = /usr/share/my_module_utils/
#remote_tmp     = ~/.ansible/tmp
#local_tmp      = ~/.ansible/tmp
#plugin_filters_cfg = /etc/ansible/plugin_filters.yml
#forks          = 5
#poll_interval  = 15
#sudo_user      = root
#ask_sudo_pass = True
#ask_pass      = True
#transport      = smart
#remote_port    = 22
#module_lang    = C
#module_set_locale = False# implicit - gather by default, turn off with gather_facts: False
# explicit - do not gather by default, must say gather_facts: True
#gathering = implicit | explicit
#gather_subset = all | network | hardware | virtual | facter | ohai
# gather_timeout = 10
# inject_facts_as_vars = True
#roles_path    = /etc/ansible/roles
#host_key_checking = False
host_key_checking = False
#stdout_callback = skippy
#callback_whitelist = timer, mail
#task_includes_static = False
#handler_includes_static = False
#error_on_missing_handler = True
#sudo_exe = sudo
#sudo_flags = -H -S -n# SSH timeout
#timeout = 10# default user to use for playbooks if user is not specified
# (/usr/bin/ansible will use current user as default)
#remote_user = root# logging is off by default unless this path is defined
# if so defined, consider logrotate
log_path = /var/log/ansible.log# default module name for /usr/bin/ansible
module_name = shell# use this shell for commands executed under sudo
# you may need to change this to bin/bash in rare instances
# if sudo is constrained
#executable = /bin/sh# if inventory variables overlap, does the higher precedence one win
# or are hash values merged together?  The default is 'replace' but
# this can also be set to 'merge'.
#hash_behaviour = replace# by default, variables from roles will be visible in the global variable
# scope. To prevent this, the following option can be enabled, and only
# tasks and handlers within the role will see the variables there
#private_role_vars = yes# list any Jinja2 extensions to enable here:
#jinja2_extensions = jinja2.ext.do,jinja2.ext.i18n# if set, always use this private key file for authentication, same as
# if passing --private-key to ansible or ansible-playbook
#private_key_file = /path/to/file# If set, configures the path to the Vault password file as an alternative to
# specifying --vault-password-file on the command line.
#vault_password_file = /path/to/vault_password_file# format of string {{ ansible_managed }} available within Jinja2
# templates indicates to users editing templates files will be replaced.
# replacing {file}, {host} and {uid} and strftime codes with proper values.
#ansible_managed = Ansible managed: {file} modified on %Y-%m-%d %H:%M:%S by {uid} on {host}
# {file}, {host}, {uid}, and the timestamp can all interfere with idempotence
# in some situations so the default is a static string:
#ansible_managed = Ansible managed#display_skipped_hosts = True
#display_args_to_stdout = False
#error_on_undefined_vars = False
#system_warnings = True
#deprecation_warnings = True
# command_warnings = False# set plugin path directories here, separate with colons
#action_plugins     = /usr/share/ansible/plugins/action
#cache_plugins      = /usr/share/ansible/plugins/cache
#callback_plugins   = /usr/share/ansible/plugins/callback
#connection_plugins = /usr/share/ansible/plugins/connection
#lookup_plugins     = /usr/share/ansible/plugins/lookup
#inventory_plugins  = /usr/share/ansible/plugins/inventory
#vars_plugins       = /usr/share/ansible/plugins/vars
#filter_plugins     = /usr/share/ansible/plugins/filter
#test_plugins       = /usr/share/ansible/plugins/test
#terminal_plugins   = /usr/share/ansible/plugins/terminal
#strategy_plugins   = /usr/share/ansible/plugins/strategy#strategy = free
#bin_ansible_callbacks = False
#nocows = 1
#cow_selection = default
#cow_selection = random
#cow_whitelist=bud-frogs,bunny,cheese,daemon,default,dragon,elephant-in-snake,elephant,eyes,\
#              hellokitty,kitty,luke-koala,meow,milk,moofasa,moose,ren,sheep,small,stegosaurus,\
#              stimpy,supermilker,three-eyes,turkey,turtle,tux,udder,vader-koala,vader,www
#nocolor = 1
#fact_caching = memory
#For the redis plugin, the value is a host:port:database triplet: fact_caching_connection = localhost:6379:0
#fact_caching_connection=/tmp
#retry_files_enabled = False
#retry_files_save_path = ~/.ansible-retry
#squash_actions = apk,apt,dnf,homebrew,pacman,pkgng,yum,zypper# prevents logging of task data, off by default
#no_log = False# prevents logging of tasks, but only on the targets, data is still logged on the master/controller
#no_target_syslog = False# controls whether Ansible will raise an error or warning if a task has no
# choice but to create world readable temporary files to execute a module on
# the remote machine.  This option is False by default for security.  Users may
# turn this on to have behaviour more like Ansible prior to 2.1.x.  See
# https://docs.ansible.com/ansible/become.html#becoming-an-unprivileged-user
# for more secure ways to fix this than enabling this option.
#allow_world_readable_tmpfiles = False# controls the compression level of variables sent to
# worker processes. At the default of 0, no compression
# is used. This value must be an integer from 0 to 9.
#var_compression_level = 9# controls what compression method is used for new-style ansible modules when
# they are sent to the remote system.  The compression types depend on having
# support compiled into both the controller's python and the client's python.
# The names should match with the python Zipfile compression types:
# * ZIP_STORED (no compression. available everywhere)
# * ZIP_DEFLATED (uses zlib, the default)
# These values may be set per host via the ansible_module_compression inventory
# variable
#module_compression = 'ZIP_DEFLATED'# This controls the cutoff point (in bytes) on --diff for files
# set to 0 for unlimited (RAM may suffer!).
#max_diff_size = 1048576# This controls how ansible handles multiple --tags and --skip-tags arguments
# on the CLI.  If this is True then multiple arguments are merged together.  If
# it is False, then the last specified argument is used and the others are ignored.
# This option will be removed in 2.8.
#merge_multiple_cli_flags = True# Controls showing custom stats at the end, off by default
#show_custom_stats = True# Controls which files to ignore when using a directory as inventory with
# possibly multiple sources (both static and dynamic)
#inventory_ignore_extensions = ~, .orig, .bak, .ini, .cfg, .retry, .pyc, .pyo# This family of modules use an alternative execution path optimized for network appliances
# only update this setting if you know how this works, otherwise it can break module execution
#network_group_modules=eos, nxos, ios, iosxr, junos, vyos# When enabled, this option allows lookups (via variables like {{lookup('foo')}} or when used as
# a loop with `with_foo`) to return data that is not marked "unsafe". This means the data may contain
# jinja2 templating language which will be run through the templating engine.
# ENABLING THIS COULD BE A SECURITY RISK
#allow_unsafe_lookups = False# set default errors for all plays
#any_errors_fatal = False[inventory]
# enable inventory plugins, default: 'host_list', 'script', 'yaml', 'ini', 'auto'
#enable_plugins = host_list, virtualbox, yaml, constructed# ignore these extensions when parsing a directory as inventory source
#ignore_extensions = .pyc, .pyo, .swp, .bak, ~, .rpm, .md, .txt, ~, .orig, .ini, .cfg, .retry# ignore files matching these patterns when parsing a directory as inventory source
#ignore_patterns=# If 'true' unparsed inventory sources become fatal errors, they are warnings otherwise.
#unparsed_is_failed=False[privilege_escalation]
#become=True
#become_method=sudo
#become_user=root
#become_ask_pass=False[paramiko_connection]# uncomment this line to cause the paramiko connection plugin to not record new host
# keys encountered.  Increases performance on new host additions.  Setting works independently of the
# host key checking setting above.
#record_host_keys=False# by default, Ansible requests a pseudo-terminal for commands executed under sudo. Uncomment this
# line to disable this behaviour.
#pty=False# paramiko will default to looking for SSH keys initially when trying to
# authenticate to remote devices.  This is a problem for some network devices
# that close the connection after a key failure.  Uncomment this line to
# disable the Paramiko look for keys function
#look_for_keys = False# When using persistent connections with Paramiko, the connection runs in a
# background process.  If the host doesn't already have a valid SSH key, by
# default Ansible will prompt to add the host key.  This will cause connections
# running in background processes to fail.  Uncomment this line to have
# Paramiko automatically add host keys.
#host_key_auto_add = True[ssh_connection]# ssh arguments to use
# Leaving off ControlPersist will result in poor performance, so use
# paramiko on older platforms rather than removing it, -C controls compression use
#ssh_args = -C -o ControlMaster=auto -o ControlPersist=60s# The base directory for the ControlPath sockets.
# This is the "%(directory)s" in the control_path option
#
# Example:
# control_path_dir = /tmp/.ansible/cp
#control_path_dir = ~/.ansible/cp# The path to use for the ControlPath sockets. This defaults to a hashed string of the hostname,
# port and username (empty string in the config). The hash mitigates a common problem users
# found with long hostames and the conventional %(directory)s/ansible-ssh-%%h-%%p-%%r format.
# In those cases, a "too long for Unix domain socket" ssh error would occur.
#
# Example:
# control_path = %(directory)s/%%h-%%r
#control_path =# Enabling pipelining reduces the number of SSH operations required to
# execute a module on the remote server. This can result in a significant
# performance improvement when enabled, however when using "sudo:" you must
# first disable 'requiretty' in /etc/sudoers
#
# By default, this option is disabled to preserve compatibility with
# sudoers configurations that have requiretty (the default on many distros).
#
#pipelining = False# Control the mechanism for transferring files (old)
#   * smart = try sftp and then try scp [default]
#   * True = use scp only
#   * False = use sftp only
#scp_if_ssh = smart# Control the mechanism for transferring files (new)
# If set, this will override the scp_if_ssh option
#   * sftp  = use sftp to transfer files
#   * scp   = use scp to transfer files
#   * piped = use 'dd' over SSH to transfer files
#   * smart = try sftp, scp, and piped, in that order [default]
#transfer_method = smart# if False, sftp will not use batch mode to transfer files. This may cause some
# types of file transfer failures impossible to catch however, and should
# only be disabled if your sftp version has problems with batch mode
#sftp_batch_mode = False# The -tt argument is passed to ssh when pipelining is not enabled because sudo
# requires a tty by default.
#use_tty = True# Number of times to retry an SSH connection to a host, in case of UNREACHABLE.
# For each retry attempt, there is an exponential backoff,
# so after the first attempt there is 1s wait, then 2s, 4s etc. up to 30s (max).
#retries = 3[persistent_connection]# Configures the persistent connection timeout value in seconds.  This value is
# how long the persistent connection will remain idle before it is destroyed.
# If the connection doesn't receive a request before the timeout value
# expires, the connection is shutdown. The default value is 30 seconds.
#connect_timeout = 30# Configures the persistent connection retry timeout.  This value configures the
# the retry timeout that ansible-connection will wait to connect
# to the local domain socket. This value must be larger than the
# ssh timeout (timeout) and less than persistent connection idle timeout (connect_timeout).
# The default value is 15 seconds.
#connect_retry_timeout = 15# The command timeout value defines the amount of time to wait for a command
# or RPC call before timing out. The value for the command timeout must
# be less than the value of the persistent connection idle timeout (connect_timeout)
# The default value is 10 second.
#command_timeout = 10[accelerate]
#accelerate_port = 5099
#accelerate_timeout = 30
#accelerate_connect_timeout = 5.0# The daemon timeout is measured in minutes. This time is measured
# from the last activity to the accelerate daemon.
#accelerate_daemon_timeout = 30# If set to yes, accelerate_multi_key will allow multiple
# private keys to be uploaded to it, though each user must
# have access to the system via SSH to add a new key. The default
# is "no".
#accelerate_multi_key = yes[selinux]
# file systems that require special treatment when dealing with security context
# the default behaviour that copies the existing context or uses the user default
# needs to be changed to use the file system dependent context.
#special_context_filesystems=nfs,vboxsf,fuse,ramfs,9p# Set this to yes to allow libvirt_lxc connections to work without SELinux.
#libvirt_lxc_noseclabel = yes[colors]
#highlight = white
#verbose = blue
#warn = bright purple
#error = red
#debug = dark gray
#deprecate = purple
#skip = cyan
#unreachable = red
#ok = green
#changed = yellow
#diff_add = green
#diff_remove = red
#diff_lines = cyan[diff]
# Always print diff when running ( same as always running with -D/--diff )
# always = no# Set how many context lines to show in diff
# context = 3- Ansible 默认被控主机清单
/etc/ansible/hosts - ansible 的主要功用在于批量主机操作,为了便捷地使用其中的部分主机,可以在 inventory file 中将其
分组命名。默认的 inventory file 为/etc/ansible/hosts,inventory file 可以有多个,且也可以通过
Dynamic Inventory 来动态生成 - 主机清单文件格式
inventory 文件遵循 INI 文件风格,中括号中的字符为组名。可以将同一个主机同时归并到多个不同的组中。
此外, 当如若目标主机使用了非默认的 SSH 端口,还可以在主机名称之后使用冒号加端口号来标明如果
主机名称遵循相似的命名模式,还可以使用列表的方式标识各主机。如下面的例子:
# websrvs 组的主机清单
[websrvs]
172.20.1.67
172.20.1.68
172.20.1.69# websrvs 组的主机变量
[websrvs:vars]
web67=172.20.1.67
web68=172.20.1.68
web69=172.20.1.69# appsrvs 组的主机清单
[appsrvs]
172.20.1.84
172.20.1.86
172.20.1.87# appsrvs 组的主机变量
[appsrvs:vars]
app84=172.20.1.84
app86=172.20.1.86
app87=172.20.1.87# dnssrvs 组的主机清单
[dnssrvs]
172.20.1.79
172.20.1.88
172.20.1.89# dnssrvs 组的主机别名(变量)
[dnssrvs:vars]
dns79=172.20.1.79
dns88=172.20.1.88
dns89=172.20.1.89
4.3 Ansible 附带的工具
- 安装 Ansible 时会附带一些必要的工具
- 加粗的工具经常使用,其它不常使用
| /usr/bin/ansible | 主程序,临时命令执行工具 |
| /usr/bin/ansible-doc | 查看配置文档,模块功能查看工具 |
| /usr/bin/ansible-galaxy | 下载/上传优秀代码或 Roles 模块的官网平台 |
| /usr/bin/ansible-playbook | 定制自动化任务,编排剧本工具 |
| /usr/bin/ansible-pull | 远程执行命令的工具 |
| /usr/bin/ansible-vault | 文件加密工具 |
| /usr/bin/ansible-console | 基于 Console 界面与用户交互的执行工具 |
- ansible-doc 命令,用来显示个模块的帮助,一般直接跟模块名即可
ansible-doc [options] [module...]
-l, --list          #列出可用模块
-s, --snippet       #显示指定模块的playbook片段
#列出所有模块
ansible-doc -l
#查看指定模块帮助用法
ansible-doc ping
#查看指定模块帮助用法
ansible-doc -s  pineg:
root@ubuntu1904:~#ansible-doc ping -s
- name: Try to connect to host, verify a usable python and return `pong' on successping:data:                  # Data to return for the `ping' return value. If this parameter is set to `crash', the module will cause an exception.
4.4 ansible 命令
- ansible 命令通过 ssh 协议,实现对远程主机的配置管理、应用部署、任务执行等功能,使用-k 选项来输入
远程主机的密码。由于每台主机的密码可能不一样。建议:使用此工具前,先配置 ansible 主控端能基于
密钥认证的方式联系各个被管理节点。如下面的脚本可以实现 ansible 主控机与被控主机基于 Key 验证
范例:利用 sshpass 批量实现基于 key 验证
#!/bin/bash
#
#*******************************************************************************
#Author:            steveli
#QQ:                1049103823
#Data:              2019-12-08
#FileName:          key_cert.sh
#URL:               https://blog.csdn.net/YouOops
#Description:       Test scrpting.
#Copyright (C):     2019 All rights reserved
#*******************************************************************************
ssh-keygen -f /root/.ssh/id_rsa  -P ''
NET=172.20.1
export SSHPASS=stevenux
for IP in {80..99}; dosshpass -e ssh-copy-id  ${NET}.${IP}
done
- ansible 命令用法
ansible <host-pattern> [ options [-m module_name] [-a args] ]
- options
--version           #显示版本
-m module           #指定模块,默认为command
-v                  #详细过程 –vv  -vvv更详细
--list-hosts        #显示主机列表,可简写 --list
-k, --ask-pass      #提示输入ssh连接密码,默认Key验证
-C, --check         #检查,并不执行
-T, --timeout=TIMEOUT #执行命令的超时时间,默认10s
-u, --user=REMOTE_USER #执行远程执行的用户
-b, --become        #代替旧版的sudo 切换
--become-user=USERNAME  #指定sudo的runas用户,默认为root
-K, --ask-become-pass #提示输入sudo时的口令- <host-pattern> 用于匹配控制的主机列表,筛选出特定的主机来执行特定任务
| 模式 | 意义 | 例子 |
|---|---|---|
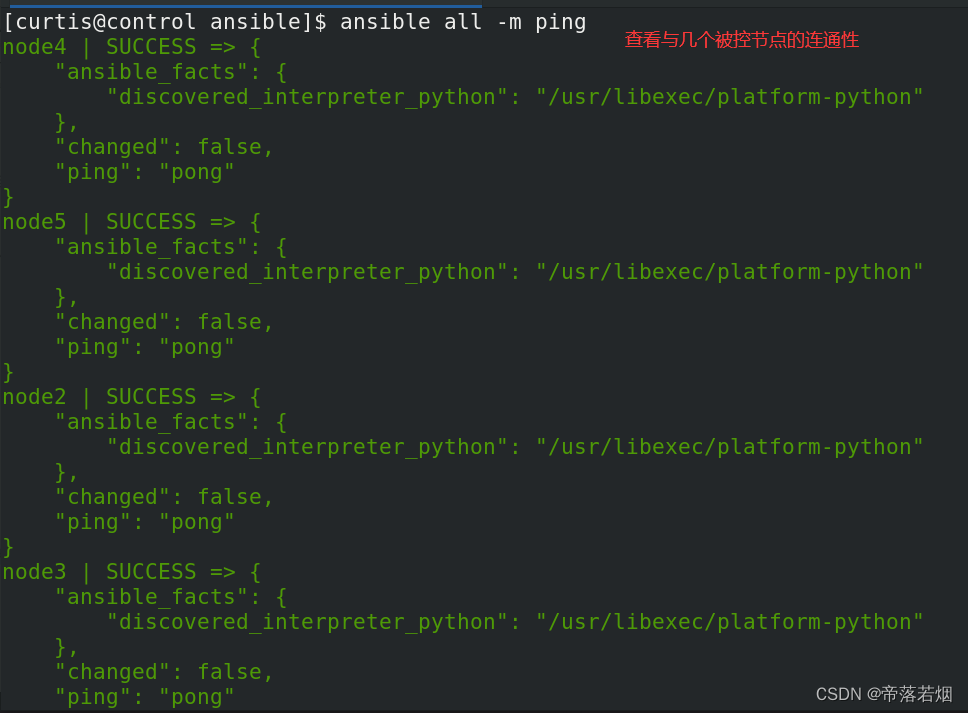
| all | 所有 Inventory 中定义的主机 | ansible all –m ping |
| * | 通配符 | ansible “*” -m ping |
| ansible 192.168.1.* -m ping | ||
| ansible “websrvss” -m ping | ||
| : | 逻辑或关系 | ansible “webwebsrvss:appwebsrvss” -m ping |
| ansible “192.168.1.10:192.168.1.20” -m ping | ||
| :& | 逻辑与关系 | ansible “webwebsrvss:&dbwebsrvss” –m ping #在 webwebsrvss 组并且在 dbwebsrvss 组中的主机 |
| :! | 逻辑非关系 | ansible ‘webwebsrvss:!dbwebsrvss’ –m ping #在 webwebsrvss 组,但不在 dbwebsrvss 组中的主机。 注意:此处为单引号 |
| 正则表达式 | ansible “webwebsrvss:&dbwebsrvss” –m ping | |
| 正则表达式 | ansible “~(web | db).*.magedu.com” –m ping |
- Ansible 实际管理的主要方式有两种
1.Ad-Hoc 方式,即是利用 ansible 命令临时管理的方式
2.Ansible-playbook 命令,用于长期规划好的大型项目使用,需要编写相应的 playbook
- ansible 命令执行过程
- 加载自己的配置文件 默认/etc/ansible/ansible.cfg
- 加载自己对应的模块文件,如:command
- 通过 ansible 将模块或命令生成对应的临时 py 文件,并将该文件传输至远程服务器的对应执行用户
$HOME/.ansible/tmp/ansible-tmp-数字/XXX.PY 文件 - 给文件加执行权限执行
- 执行并返回结果
- 删除临时 py 文件,退出
- ansible 执行后返回状态可以在配置文件自定义
/ect/ansible/ansible.cfg
green:绿色表示执行成功且不需要做改变
yellow:执行成功并且对被控主机有改动
red:执行失败
root@ubuntu1904:~#grep -A 15 '\[colors\]' /etc/ansible/ansible.cfg
[colors]
#highlight = white
#verbose = blue
#warn = bright purple
#error = red
#debug = dark gray
#deprecate = purple
#skip = cyan
#unreachable = red
#ok = green
#changed = yellow
#diff_add = green
#diff_remove = red
#diff_lines = cyan
- ansible 使用范例
#以stevenux用户执行ping存活检测
ansible all -m ping -u stevenux  -k
#以stevenux sudo至root执行ping存活检测
ansible all -m ping -u stevenux -k -b
#以stevenux sudo至mage用户执行ping存活检测
ansible all -m ping -u stevenux -k -b --become-user=mage
#以stevenux sudo至root用户执行ls
ansible all -m command  -u stevenux -a 'ls /root' -b --become-user=root -k -K
- ansible-galaxy 此工具用来下载网上的 roles
此工具连接到:galaxy.ansibl.com下载 roles
下载的 roles 默认放到~/.ansible/roles
#列出所有已安装的galaxy
ansible-galaxy list#安装galaxy
ansible-galaxy install geerlingguy.redisroot@ubuntu1904:~/.ansible#tree roles/
roles/
└── geerlingguy.redis├── defaults│   └── main.yml├── handlers│   └── main.yml├── LICENSE├── meta│   └── main.yml├── README.md├── tasks│   ├── main.yml│   ├── setup-Archlinux.yml│   ├── setup-Debian.yml│   └── setup-RedHat.yml├── templates│   └── redis.conf.j2├── tests│   ├── README.md│   └── test.yml└── vars├── Archlinux.yml├── Debian.yml└── RedHat.yml#删除galaxy
ansible-galaxy remove geerlingguy.redis
-
ansible-pull
此工具会推送 ansible 的命令至远程,效率无限提升,对运维要求较高 -
ansible-playbook
此工具用于执行编写好的 playbook 任务 -
Playbook 例子
root@ubuntu1904:~#cat .ansible/roles/geerlingguy.redis/tasks/main.yml
---
# Variable setup.
- name: Include OS-specific variables.include_vars: "{{ ansible_os_family }}.yml"- name: Define redis_package.set_fact:redis_package: "{{ __redis_package }}"when: redis_package is not defined# Setup/install tasks.
- include_tasks: setup-RedHat.ymlwhen: ansible_os_family == 'RedHat'- include_tasks: setup-Debian.ymlwhen: ansible_os_family == 'Debian'- include_tasks: setup-Archlinux.ymlwhen: ansible_os_family == 'Archlinux'- name: Ensure Redis is configured.template:src: redis.conf.j2dest: "{{ redis_conf_path }}"mode: 0644notify: restart redis- name: Ensure Redis is running and enabled on boot.service: "name={{ redis_daemon }} state=started enabled=yes"
- ansible-vault
此工具可以用于加和密解密 yml 文件
ansible-vault [create|decrypt|edit|encrypt|rekey|view]
例子:
ansible-vault encrypt hello.yml     #加密
ansible-vault decrypt hello.yml     #解密
ansible-vault view hello.yml        #查看
ansible-vault edit  hello.yml       #编辑加密文件
ansible-vault rekey  hello.yml      #修改口令
ansible-vault create new.yml        #创建新文件
- ansible-console
- 此工具可交互执行命令,支持 tab,ansible 2.0+新增的功能
- 进入交互界面后的提示符格式:
执行用户@当前操作的主机组 (当前组的主机数量)[f:并发数]$ - 常用子命令
设置并发数: forks n 例如: forks 10
切换组: cd 主机组 例如: cd web
列出当前组主机列表: list
列出所有的内置命令: ?或 help
root@ubuntu1904:~#ansible-console
Welcome to the ansible console.
Type help or ? to list commands.root@all (9)[f:5]$ ls
172.20.1.68 | CHANGED | rc=0 >>
anaconda-ks.cfg
auto_install_mysql_v03.sh
hello.txt
......
oot@all (9)[f:5]$ pwd
172.20.1.67 | CHANGED | rc=0 >>
/root
172.20.1.68 | CHANGED | rc=0 >>
/root
172.20.1.69 | CHANGED | rc=0 >>
/root
......
root@all (9)[f:5]$ list
172.20.1.67
172.20.1.68
172.20.1.69
172.20.1.79
172.20.1.88
172.20.1.89
172.20.1.84
172.20.1.86
172.20.1.87
4.5 Ansible 常用模块使用
常用模块参考
4.5.1 Command 模块
-
功能: 在远程主机执行命令,此为默认模块,可忽略-m 选项
-
注意点: 此命令不支持 $VARNAME < > | ; & 等符号和相应功能,用 shell 模块实现
-
例子:
root@ubuntu1904:~#ansible all -m command -a "echo 'Hello ansibleansible'"
172.20.1.79 | CHANGED | rc=0 >>
Hello ansibleansible172.20.1.67 | CHANGED | rc=0 >>
Hello ansibleansible172.20.1.68 | CHANGED | rc=0 >>
Hello ansibleansible
4.5.2 Shell 模块
- 功能: 和 command 功能类似,使用 shell 来在被控主机执行命令
- 注意点: 调用 bash 执行命令 类似 cat /tmp/test.md | awk -F‘|’ ‘{print $1,$2}’ &> /tmp/example.txt
这些复杂命令,即使使用 shell 也可能会失败。解决办法:写到脚本–>copy 到远程主机–>执行;再把
需要的结果 fetch 回来主控机器。 - 例子:
root@ubuntu1904:~#ansible all -m shell -a 'ip addr | sed -nr "s#.*(1
72.20.1...).*#\1#p"'
172.20.1.67 | CHANGED | rc=0 >>
172.20.1.67172.20.1.68 | CHANGED | rc=0 >>
172.20.1.68172.20.1.84 | CHANGED | rc=0 >>
172.20.1.84
4.5.3 Script 模块
- 功能: 在本地指定脚本,自动传输到远程执行并返回结果
- 注意点:
- 例子:
root@ubuntu1904:~#cat script.sh
#!/bin/bash
echo `ip a | sed -nr 's/inet (172.20.*\/..) .*/\1/p'`root@ubuntu1904:~#ansible webwebsrvss -m script -a './script.sh'
172.20.1.67 | CHANGED => {"changed": true,"rc": 0,"stderr": "Shared connection to 172.20.1.67 closed.\r\n","stderr_lines": ["Shared connection to 172.20.1.67 closed."],"stdout": "172.20.1.67/16\r\n","stdout_lines": ["172.20.1.67/16"   # 返回ip地址]
}
172.20.1.68 | CHANGED => {"changed": true,"rc": 0,"stderr": "Shared connection to 172.20.1.68 closed.\r\n","stderr_lines": ["Shared connection to 172.20.1.68 closed."],"stdout": "172.20.1.68/16\r\n","stdout_lines": ["172.20.1.68/16"]
}
172.20.1.69 | CHANGED => {"changed": true,"rc": 0,"stderr": "Shared connection to 172.20.1.69 closed.\r\n","stderr_lines": ["Shared connection to 172.20.1.69 closed."],"stdout": "172.20.1.69/16\r\n","stdout_lines": ["172.20.1.69/16"]
}
4.5.4 Copy 模块
- 功能: 从 ansible 主控端复制文件到远程被控主机
- 注意点: 文件源在 ansible 主控机,目标是远程被控机
- 例子:
root@ubuntu1904:~#ansible all -m copy -a 'src=~/script.sh dest=/data/'
172.20.1.67 | CHANGED => {"changed": true,"checksum": "c3e89fbe08ae1d3edfa22b1c9968abd470ba8e81","dest": "/data/script.sh","gid": 0,"group": "root","md5sum": "6a33896eae3ee660a6b0c0bb60a5b326","mode": "0644","owner": "root","size": 67,"src": "/root/.ansible/tmp/ansible-tmp-1575851039.0323763-219776225171533/source","state": "file","uid": 0
}
......# 将文本内容直接在被控机生成文件
root@ubuntu1904:~#ansible all -m copy -a 'content="Hello asible" dest=/data/hello.txt'
172.20.1.87 | CHANGED => {"changed": true,"checksum": "8754e6aac9f6b9b741c3bdf974e6a33bbc72b321","dest": "/data/hello.txt","gid": 0,"group": "root","md5sum": "a131edb4211ac4a39aac74d8a04126f6","mode": "0644","owner": "root","size": 12,"src": "/root/.ansible/tmp/ansible-tmp-1575851292.1085637-80128185007427/source","state": "file","uid": 0
}root@ubuntu1904:~#ansible all -a  'cat /data/hello.txt'
172.20.1.89 | CHANGED | rc=0 >>
Hello asible172.20.1.67 | CHANGED | rc=0 >>
Hello asible172.20.1.68 | CHANGED | rc=0 >>
Hello asible# 拷贝/etc/sysconfig/文件夹下的文件,不包括文件夹本身
root@ubuntu1904:~#ansible all -m copy -a 'src=/etc/sysconfig/ dest=/backup'
4.5.5 Fetch 模块
- 功能: 从远程被控主机拷贝文件到主控端,与 copy 模块方向相反
- 注意点: 不支持将远程被控机的问价夹拷贝到主控机
- 例子:
root@ubuntu1904:~#ansible all -m fetch -a  'src=/data/hello.txt dest=/data/'
172.20.1.87 | CHANGED => {"changed": true,"checksum": "8754e6aac9f6b9b741c3bdf974e6a33bbc72b321","dest": "/data/172.20.1.87/data/hello.txt","md5sum": "a131edb4211ac4a39aac74d8a04126f6","remote_checksum": "8754e6aac9f6b9b741c3bdf974e6a33bbc72b321","remote_md5sum": null
}
root@ubuntu1904:~#cat /data/172.20.1.67/data/hello.txt
Hello asible
4.5.6 File 模块
- 功能: 设置远程被控主机的文件、符号链接、文件夹的属性;也可以删除其
- 注意点: 创建软连接时,目标文件或文件夹是在远程被控主机上,软连接也是位于远程主机
- 例子:
# 创建文件
root@ubuntu1904:~#ansible all -m file -a 'path=/data/hello.txt state=touch'
# 删除文件
root@ubuntu1904:~#ansible all -m file -a 'path=/data/hello.txt state=absent'
# 修改文件属主和权限
root@ubuntu1904:~#ansible all -m file -a 'path=/data/hello.txt owner=steve mode=0700'
# 创建文件夹
root@ubuntu1904:~#ansible all -m file -a 'path=/data/dir state=directory mode=0700'
# 为远程主机某个文件创建文件夹
root@ubuntu1904:~#ansible all -m file -a 'src=/data/hello.txt dest=/data/hello-link state=link'
4.5.7 unarchive 模块
- 功能: 将打包压缩的文件解压缩
- 注意点: 参数 copy=yes 表示将 ansible 主控机的打包压缩文件传输到远程被控机再解压缩;copy=no 表示
直接将远程主机某个压缩包解压缩。 - 常用参数:
- copy:默认为 yes,当 copy=yes,拷贝的文件是从 ansible 主机复制到远程主机上,如果设置为
copy=no,会在远程主机上寻找 src 源文件 - remote_src:和 copy 功能一样且互斥,yes 表示在远程主机,不在 ansible 主机,no 表示文件在
ansible 主机上;官方更推荐使用 remote_src 参数代替 copy 参数 - src:源路径,可以是 ansible 主机上的路径,也可以是远程主机上的路径,如果是远程主机上的路
径,则需要设置 copy=no - dest:远程主机上的目标路径
- mode:设置解压缩后的文件权限
- copy:默认为 yes,当 copy=yes,拷贝的文件是从 ansible 主机复制到远程主机上,如果设置为
- 例子:
root@ubuntu1904:~#ansible all -m unarchive -a 'src=/data/bar.tar.gz dest=/var/lib/bar'
root@ubuntu1904:~#ansible all -m unarchive -a 'src=/data/bar.zip dest=/data copy=no mode=0700'
root@ubuntu1904:~#ansible all -m unarchive -a 'src=https://suosuoli.cn/god-of-editor.pdf.zip dest=/data'
4.5.8 Archive 模块
- 功能: 打包压缩,和 unarchive 方向相反。默认,该模块认为压缩的源文件在远程被控主机。
压缩后指定remove=True可以删除源文件。 - 注意点:
- 例子:
root@ubuntu1904:~#ansible all -m archive  -a 'path=/data/ dest=/data/dir.tar.bz2 format=bz2 mode=0700'
172.20.1.87 | CHANGED => {"archived": [],"arcroot": "/data/","changed": true,"dest": "/data/dir.tar.bz2","expanded_exclude_paths": [],"expanded_paths": ["/data/"],"gid": 0,"group": "root","missing": [],"mode": "0700","owner": "root","size": 115,"state": "file","uid": 0
}
......
root@ubuntu1904:~#ansible all -m fetch -a 'src=/data/dir.tar.bz2 dest=/data'
172.20.1.87 | CHANGED => {"changed": true,"checksum": "e74d1ab8aad31d62cacad3a65a2a0ccc5623871c","dest": "/data/172.20.1.87/data/dir.tar.bz2","md5sum": "706f8ee46597a3c62e6c4597f37739a5","remote_checksum": "e74d1ab8aad31d62cacad3a65a2a0ccc5623871c","remote_md5sum": null
}
......
oot@ubuntu1904:~#ll /data/172.20.1.87/data/
total 8
-rwx------ 1 root root 116 Dec  9 09:04 dir.tar.bz2
-rw-r--r-- 1 root root  12 Dec  9 08:35 hello.txt
4.5.9 Hostname 模块
- 功能: hostname 模块用来管理主机名
- 注意点:
- 例子:
root@ubuntu1904:~#ansible webwebsrvss -m hostname -a 'name=webhost'
172.20.1.69 | CHANGED => {"ansible_facts": {"ansible_domain": "","ansible_fqdn": "webhost","ansible_hostname": "webhost","ansible_nodename": "webhost"},"changed": true,"name": "webhost"
}
172.20.1.67 | CHANGED => {"ansible_facts": {"ansible_domain": "","ansible_fqdn": "webhost","ansible_hostname": "webhost","ansible_nodename": "webhost"},"changed": true,"name": "webhost"
}
172.20.1.68 | CHANGED => {"ansible_facts": {"ansible_domain": "","ansible_fqdn": "webhost","ansible_hostname": "webhost","ansible_nodename": "webhost"},"changed": true,"name": "webhost"
}
root@ubuntu1904:~#ansible webwebsrvss  -a 'hostname'
172.20.1.68 | CHANGED | rc=0 >>
webhost172.20.1.69 | CHANGED | rc=0 >>
webhost172.20.1.67 | CHANGED | rc=0 >>
webhost
4.5.10 Cron 模块
- 功能: 管理和删除计划任务
- 注意点:
- 例子:
#备份数据库脚本
[root@centos8 ~]#cat mysql_backup.sh
mysqldump -A -F --single-transaction --master-data=2 -q -uroot |gzip >
/data/mysql_`date +%F_%T`.sql.gz
#创建任务
ansible 192.168.39.28 -m cron -a 'hour=2 minute=30 weekday=1-5 name="backup
mysql" job=/root/mysql_backup.sh'
ansible websrvs   -m cron -a "minute=*/5 job='/usr/sbin/ntpdate 172.20.0.1
&>/dev/null' name=Synctime"
#禁用计划任务
ansible websrvs   -m cron -a "minute=*/5 job='/usr/sbin/ntpdate 172.20.0.1
&>/dev/null' name=Synctime disabled=yes"
#启用计划任务
ansible websrvs   -m cron -a "minute=*/5 job='/usr/sbin/ntpdate 172.20.0.1
&>/dev/null' name=Synctime disabled=no"
#删除任务
ansible websrvs -m cron -a "name='backup mysql' state=absent"
ansible websrvs -m cron -a ‘state=absent name=Synctime’
4.5.11 Yum 模块
- 功能: 使用 yum 安装、升级、降级、删除和列出软件包。
- 注意点: 该软件包只适用于 python2,如果需要 python3 的支持,使用 dnf 模块
- 例子:
# 安装
root@ubuntu1904:~#ansible webwebsrvss -m yum -a 'name=nginx state=present'
# 删除
root@ubuntu1904:~#ansible webwebsrvss -m yum -a 'name=nginx state=absent'
4.5.12 Service 模块
- 功能: 控制远程被控机的服务。支持 init 启动服务的系统(包括 BSD init,OpenRC,SysV,
Solaris SMF,systemd,upstart)。 - 注意点:
- 例子:
root@ubuntu1904:~#ansible webwebsrvss -m service -a 'name=httpd state=started enabled=yes'
root@ubuntu1904:~#ansible webwebsrvss -m service -a 'name=httpd state=stopped'
root@ubuntu1904:~#ansible webwebsrvss -m service -a 'name=httpd state=reloaded'
root@ubuntu1904:~#ansible webwebsrvss -m service -a 'name=httpd state=restarted'
4.5.13 User 模块
- 功能: 管理用户账号和属性
- 注意点:
- 例子:
# 创建系统用户nginx
root@ubuntu1904:~#ansible webwebsrvss -m user -a 'name=nginx  groups="root,daemon" system=yes shell=/sbin/nologin createhome=no home=/data/nginx non_unique=yes'
172.20.1.67 | CHANGED => {"changed": true,"comment": "","create_home": false,"group": 995,"groups": "root,daemon","home": "/data/nginx","name": "nginx","shell": "/sbin/nologin","state": "present","system": true,"uid": 995
}
172.20.1.69 | CHANGED => {"changed": true,"comment": "","create_home": false,"group": 992,"groups": "root,daemon","home": "/data/nginx","name": "nginx","shell": "/sbin/nologin","state": "present","system": true,"uid": 994
}
172.20.1.68 | CHANGED => {"changed": true,"comment": "","create_home": false,"group": 995,"groups": "root,daemon","home": "/data/nginx","name": "nginx","shell": "/sbin/nologin","state": "present","system": true,"uid": 995
}
# 删除用户
root@ubuntu1904:~#ansible webwebsrvss -m user -a 'name=nginx state=absent remove=yes'
172.20.1.69 | CHANGED => {"changed": true,"force": false,"name": "nginx","remove": true,"state": "absent","stderr": "userdel: nginx mail spool (/var/spool/mail/nginx) not found\nuserdel: nginx home directory (/data/nginx) not found\n","stderr_lines": ["userdel: nginx mail spool (/var/spool/mail/nginx) not found","userdel: nginx home directory (/data/nginx) not found"]
}
......
4.5.14 Group 模块
- 功能: 管理用户组
- 注意点:
- 例子:
# 创建组
root@ubuntu1904:~#ansible webwebsrvss -m group -a 'name=nginx gid=123 state=present system=yes'
172.20.1.69 | CHANGED => {"changed": true,"gid": 123,"name": "nginx","state": "present","system": true
}
172.20.1.67 | CHANGED => {"changed": true,"gid": 123,"name": "nginx","state": "present","system": true
}
172.20.1.68 | CHANGED => {"changed": true,"gid": 123,"name": "nginx","state": "present","system": true
}
root@ubuntu1904:~#ansible webwebsrvss -a 'getent group nginx'
172.20.1.69 | CHANGED | rc=0 >>
nginx:x:123:172.20.1.68 | CHANGED | rc=0 >>
nginx:x:123:172.20.1.67 | CHANGED | rc=0 >>
nginx:x:123:# 删除组
root@ubuntu1904:~#ansible webwebsrvss -m group -a 'name=nginx state=absent'
4.5.15 Setup 模块
- 功能: setup 模块会手机远程被控主机的详细信息,其自带的记录远程主机的变量可以用于 playbook
- 注意点:
- 例子:
root@ubuntu1904:~#ansible webwebsrvss -m setup
172.20.1.67 | SUCCESS => {"ansible_facts": {"ansible_all_ipv4_addresses": ["172.20.1.67"],"ansible_all_ipv6_addresses": ["fe80::4d59:6b61:25f9:d67d"],"ansible_apparmor": {"status": "disabled"},
......
root@ubuntu1904:~#ansible websrvs -m setup -a "filter=ansible_nodename"
root@ubuntu1904:~#ansible websrvs -m setup -a "filter=ansible_hostname"
root@ubuntu1904:~#ansible websrvs -m setup -a "filter=ansible_domain"
root@ubuntu1904:~#ansible websrvs -m setup -a "filter=ansible_memtotal_mb"
root@ubuntu1904:~#ansible websrvs -m setup -a "filter=ansible_memory_mb"
root@ubuntu1904:~#ansible websrvs -m setup -a "filter=ansible_memfree_mb"
root@ubuntu1904:~#ansible websrvs -m setup -a "filter=ansible_os_family"
root@ubuntu1904:~#ansible websrvs -m setup -a "filter=ansible_distribution_major_version"
root@ubuntu1904:~#ansible websrvs -m setup -a "filter=ansible_distribution_version"
root@ubuntu1904:~#ansible websrvs -m setup -a "filter=ansible_processor_vcpus"
root@ubuntu1904:~#ansible websrvs -m setup -a "filter=ansible_all_ipv4_addresses"
root@ubuntu1904:~#ansible websrvs -m setup -a "filter=ansible_architecture"# 一些比较有用的参数
{{ ansible_default_ipv4.address }}
{{ansible_distribution}}
{{ansible_distribution_major_version}}
{{ansible_fqdn}}
{{ansible_hostname}}
{{ansible_machine}}
{{ansible_memtotal_mb}}
{{ansible_memory_mb.nocache.free}}
{{ansible_memory_mb.nocache.used}}
{{ansible_memory_mb.real.total}}
{{ansible_memory_mb.real.free}}
{{ansible_memory_mb.real.used}}
{{ansible_service_mgr}}
{{ansible_processor_cores}}
{{ansible_processor_count}}
{{ansible_processor_threads_per_core}}
{{ansible_pkg_mgr}}