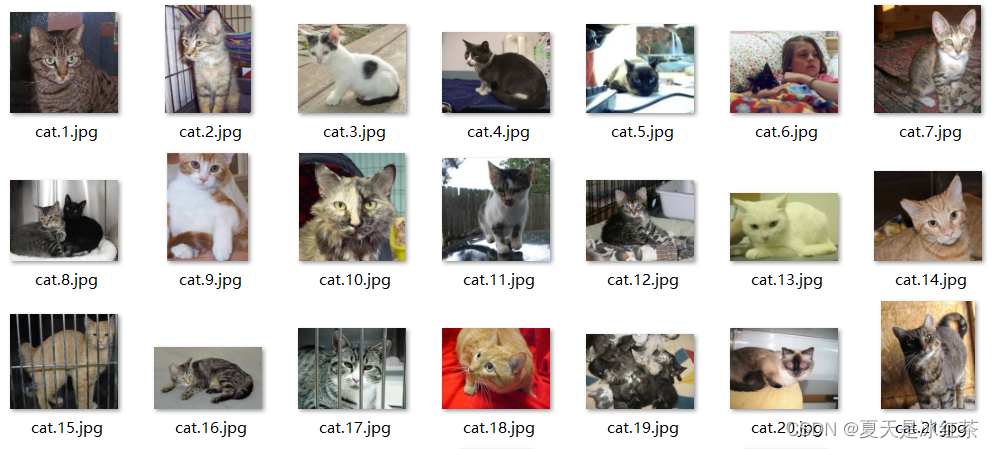
关于数据集
数据集选择的是Kaggle上的Cat and Dog,猫狗图片数量上达到了上万张。你可以通过这里进入Kaggle下载数据集Cat and Dog | Kaggle。
在我的Github仓库当中也放了猫狗图片各666张。
VGG网络
VGG的主要特点是使用了一系列具有相同尺寸 3x3 大小的卷积核进行多次卷积操作。这种结构的一个优势是可以堆叠更多的卷积层,使得网络能够学习到更复杂的特征。
详情请看此篇VGG16模型详解_夏天是冰红茶的博客-CSDN博客。
今天让我们来探究一下在2014年的ImageNet图像分类竞赛中取得显著成绩的VGG模型效果如何。
# net.pyimport torch
import torchvision
import torch.nn as nn
import torchsummaryfrom torch.hub import load_state_dict_from_url
# model = torchvision.models.vgg16()model_urls = {"vgg16": "https://download.pytorch.org/models/vgg16-397923af.pth","vgg19": "https://download.pytorch.org/models/vgg19-dcbb9e9d.pth"
}
cfgs = {"vgg16": [64, 64, "M", 128, 128, "M", 256, 256, 256, "M", 512, 512, 512, "M", 512, 512, 512, "M"],"vgg19": [64, 64, "M", 128, 128, "M", 256, 256, 256, 256, "M", 512, 512, 512, 512, "M", 512, 512, 512, 512, "M"],
}class VGG(nn.Module):def __init__(self, features, num_classes = 1000, init_weights= True, dropout = 0.5):super(VGG,self).__init__()self.features = featuresself.avgpool = nn.AdaptiveAvgPool2d((7, 7))self.classifier = nn.Sequential(nn.Linear(512 * 7 * 7, 4096),nn.ReLU(True),nn.Dropout(p=dropout),nn.Linear(4096, 4096),nn.ReLU(True),nn.Dropout(p=dropout),nn.Linear(4096, num_classes),)if init_weights:for m in self.modules():if isinstance(m, nn.Conv2d):nn.init.kaiming_normal_(m.weight, mode="fan_out", nonlinearity="relu")if m.bias is not None:nn.init.constant_(m.bias, 0)elif isinstance(m, nn.BatchNorm2d):nn.init.constant_(m.weight, 1)nn.init.constant_(m.bias, 0)elif isinstance(m, nn.Linear):nn.init.normal_(m.weight, 0, 0.01)nn.init.constant_(m.bias, 0)def forward(self, x):x = self.features(x)x = self.avgpool(x)x = torch.flatten(x, 1)x = self.classifier(x)return xdef make_layers_with_vgg(cfg, batch_norm = False):layers = []in_channels = 3for v in cfg:if v == "M":layers += [nn.MaxPool2d(kernel_size=2, stride=2)]else:conv2d = nn.Conv2d(in_channels, v, kernel_size=(3,3), padding=1)if batch_norm:layers += [conv2d, nn.BatchNorm2d(v), nn.ReLU(inplace=True)]else:layers += [conv2d, nn.ReLU(inplace=True)]in_channels = vreturn nn.Sequential(*layers)def vgg(mode='vgg16',pretrained=False, progress=True, num_classes=2):model = VGG(make_layers_with_vgg(cfgs[mode]))if pretrained:state_dict = load_state_dict_from_url(model_urls[mode], model_dir='./model', progress=progress)#预训练模型地址model.load_state_dict(state_dict)if num_classes != 1000:model.classifier = nn.Sequential(nn.Linear(512 * 7 * 7, 4096),nn.ReLU(True),nn.Dropout(p=0.5),nn.Linear(4096, 4096),nn.ReLU(True),nn.Dropout(p=0.5),nn.Linear(4096, num_classes),)return modelif __name__=='__main__':in_data = torch.ones(2, 3, 224, 224)net = vgg(mode='vgg16', pretrained=False, progress=True, num_classes=2)  # 使用默认的 VGG-16 架构# net = vgg(mode='vgg19', pretrained=False, progress=True, num_classes=2)  # 使用 VGG-19 架构out = net(in_data)print(out)torchsummary.summary(net, input_size=(3, 224, 224))
与前面纯手打的VGG16网络不同,这里还添加了VGG19网络结构以及预训练权重。
import torchvisionmodel = torchvision.models.vgg16()你可以通过这里来查看VGG16的模型结构与预训练权重的url,上面也是从pytorch实现的网络中更改过的,所有你也可以去pytorch的官网查找。
创建分类数据列表
将指定路径中的图像文件的类别和类型信息写入到名为 class_data.txt 的文件中,以便后续用于分类任务或其他需要这些信息的应用。
清华源安装
pip install pyzjr==1.1.1 --user -i https://pypi.tuna.tsinghua.edu.cn/simple
猫狗分类任务的数据列表的脚本
# annotation_txt.pyimport os
import pyzjr as pzclasses = ['cat', 'dog']
path = 'train'if __name__ == '__main__':with open('class_data.txt', 'w') as txt_file:  # 打开文件,注意使用 'w' 模式file_list = [os.path.join(path, i) for i in os.listdir(path)]for data_path in file_list:types_name, _ = pz.getPhotopath(data_path, True)cls_id = classes.index(os.path.basename(data_path))for type_name in types_name:line = f"{str(cls_id)};{str(type_name)}"txt_file.write(line + '\n')  # 追加写入数据
txt文件大致内容如下:
0;D:/deeplearning/VGGnet/train/cat/cat000.jpg
0;D:/deeplearning/VGGnet/train/cat/cat001.jpg
0;D:/deeplearning/VGGnet/train/cat/cat002.jpg
......
1;D:/deeplearning/VGGnet/train/dog/dog198.jpg
1;D:/deeplearning/VGGnet/train/dog/dog199.jpg
1;D:/deeplearning/VGGnet/train/dog/dog200.jpg
由于我本人的笔记本类型不是很好,所以就仅仅各自取了200张进行一个测试。
文件批量重命名(可选)
才下载的数据,它是这样的:
import pyzjr as pz
import os
import shutil
# 原始图片所在路径、保存指定图片路径
image_folder_path = r"D:\pythonprojects\deeplabv3_pytorch\img"
save_image_folder_path = pz.CreateFolder(r"D:\pythonprojects\deeplabv3_pytorch\imgs")newbasename = 'Crack'if __name__=="__main__":imglist,allist=pz.getPhotopath(image_folder_path,debug=False)print(imglist)for i,file in enumerate(imglist):print(i,file)properties = pz.ImageAttribute(file)name, ext = os.path.splitext(properties['name'])# -----------------------------------------------# 格式可以在这里修改   i:03d ——> 001# 扩展名也可以自己定义,默认采用原本的ext(.png,.jpg这种)#newname = f"{newbasename}{i:03d}{ext}"## -----------------------------------------------new_path = os.path.join(save_image_folder_path, newname)shutil.copy(file, new_path)print("文件批量重命名和保存完成")
只需要修改newbasename以及具体的格式即可,而扩展名我是默认使用的原本的ext,但要记住的是,修改扩展名时候要把“ . ”加上。
你也可以调用pyzjr.RenameFile进行批量化的重命名。
数据预处理与损失历史记录
这两个功能均在dataoperation.py文件当中,为深度学习模型的训练提供了一些辅助功能。可以在深度学习模型的训练过程中使用,以便更好地监控训练的进展和效果。
# dataoperation.pyimport cv2
import numpy as np
import torch.utils.data as data
import matplotlib
import torch
matplotlib.use('Agg')
from matplotlib import pyplot as plt
import scipy.signal
from PIL import Image
from torch.utils.tensorboard import SummaryWriter
import osdef preprocess_input(x):x/=127.5x-=1.return x
def cvtColor(image):if len(np.shape(image))==3 and np.shape(image)[-2]==3:return imageelse:image=image.convert('RGB')return imageclass DataGenerator(data.Dataset):def __init__(self,annotation_lines,inpt_shape,random=True):self.annotation_lines=annotation_linesself.input_shape=inpt_shapeself.random=randomdef __len__(self):return len(self.annotation_lines)def __getitem__(self, index):annotation_path=self.annotation_lines[index].split(';')[1].split()[0]image=Image.open(annotation_path)image=self.get_random_data(image,self.input_shape,random=self.random)image=np.transpose(preprocess_input(np.array(image).astype(np.float32)),[2,0,1])y=int(self.annotation_lines[index].split(';')[0])return image,ydef rand(self,a=0.,b=1.):return np.random.rand()*(b-a)+adef get_random_data(self,image,inpt_shape,jitter=.3,hue=.1,sat=1.5,val=1.5,random=True):image=cvtColor(image)iw,ih=image.sizeh,w=inpt_shapeif not random:scale=min(w/iw,h/ih)nw=int(iw*scale)nh=int(ih*scale)dx=(w-nw)//2dy=(h-nh)//2image=image.resize((nw,nh),Image.BICUBIC)new_image=Image.new('RGB',(w,h),(128,128,128))new_image.paste(image,(dx,dy))image_data=np.array(new_image,np.float32)return image_datanew_ar=w/h*self.rand(1-jitter,1+jitter)/self.rand(1-jitter,1+jitter)scale=self.rand(.75,1.25)if new_ar<1:nh=int(scale*h)nw=int(nh*new_ar)else:nw=int(scale*w)nh=int(nw/new_ar)image=image.resize((nw,nh),Image.BICUBIC)dx=int(self.rand(0,w-nw))dy=int(self.rand(0,h-nh))new_image=Image.new('RGB',(w,h),(128,128,128))new_image.paste(image,(dx,dy))image=new_imageflip=self.rand()<.5if flip: image=image.transpose(Image.FLIP_LEFT_RIGHT)rotate=self.rand()<.5if rotate:angle=np.random.randint(-15,15)a,b=w/2,h/2M=cv2.getRotationMatrix2D((a,b),angle,1)image=cv2.warpAffine(np.array(image),M,(w,h),borderValue=[128,128,128])hue=self.rand(-hue,hue)sat=self.rand(1,sat) if self.rand()<.5 else 1/self.rand(1,sat)val=self.rand(1,val) if self.rand()<.5 else 1/self.rand(1,val)x=cv2.cvtColor(np.array(image,np.float32)/255,cv2.COLOR_RGB2HSV)#颜色空间转换x[..., 1] *= satx[..., 2] *= valx[x[:, :, 0] > 360, 0] = 360x[:, :, 1:][x[:, :, 1:] > 1] = 1x[x < 0] = 0image_data=cv2.cvtColor(x,cv2.COLOR_HSV2RGB)*255return image_dataclass LossHistory():def __init__(self, log_dir, model, input_shape):self.log_dir = log_dirself.losses = []self.val_loss = []os.makedirs(self.log_dir,True)self.writer = SummaryWriter(self.log_dir)try:dummy_input = torch.randn(2, 3, input_shape[0], input_shape[1])self.writer.add_graph(model, dummy_input)except:passdef append_loss(self, epoch, loss, val_loss):if not os.path.exists(self.log_dir):os.makedirs(self.log_dir)self.losses.append(loss)self.val_loss.append(val_loss)with open(os.path.join(self.log_dir, "epoch_loss.txt"), 'a') as f:f.write(str(loss))f.write("\n")with open(os.path.join(self.log_dir, "epoch_val_loss.txt"), 'a') as f:f.write(str(val_loss))f.write("\n")self.writer.add_scalar('loss', loss, epoch)self.writer.add_scalar('val_loss', val_loss, epoch)self.loss_plot()def loss_plot(self):iters = range(len(self.losses))plt.figure()# plt.plot(iters, self.losses, 'red', linewidth=2, label='train loss')# plt.plot(iters, self.val_loss, 'coral', linewidth=2, label='val loss')plt.plot(iters, [loss.item() for loss in self.losses], 'red', linewidth=2, label='train loss')plt.plot(iters, [loss.item() for loss in self.val_loss], 'coral', linewidth=2, label='val loss')try:if len(self.losses) < 25:num = 5else:num = 15plt.plot(iters, scipy.signal.savgol_filter(self.losses, num, 3), 'green', linestyle='--', linewidth=2,label='smooth train loss')plt.plot(iters, scipy.signal.savgol_filter(self.val_loss, num, 3), '#8B4513', linestyle='--', linewidth=2,label='smooth val loss')except:passplt.grid(True)plt.xlabel('Epoch')plt.ylabel('Loss')plt.legend(loc="upper right")plt.savefig(os.path.join(self.log_dir, "epoch_loss.png"))plt.cla()plt.close("all")
训练主文件
import torch.nn as nn
from net import vgg
from torch.utils.data import DataLoader
from tqdm import tqdm
import datetime
from dataoperation import *if __name__=="__main__":#---------------------------------## Cuda       是否使用Cuda#            没有GPU可以设置成False#---------------------------------#Cuda = False# ---------------------------------## 'vgg16' and  'vgg19'# ---------------------------------#Net = 'vgg16'# ---------------------------------## 先运行annotation_txt脚本# ---------------------------------#annotation_path='class_data.txt'# ---------------------------------## 输入图片尺寸# ---------------------------------#input_shape = [224, 224]# ---------------------------------##  分类个数,比如这里只要猫和狗两类# ---------------------------------#num_classes = 2# -------------------------------------------------------##   lr         模型的最大学习率#              当使用Adam优化器时建议设置  lr=5e-4#              当使用SGD优化器时建议设置   lr=7e-3# -------------------------------------------------------#lr = 0.0001# ---------------------------------## 优化器选择 SGD 与 Adam# ---------------------------------#optimizer_type = "Adam"# ---------------------------------## 验证集所占百分比# ---------------------------------#percentage = 0.2# ---------------------------------## 训练轮次# ---------------------------------#epochs = 80# ---------------------------------##   save_period 多少个epoch保存一次权值# ---------------------------------#save_period = 1# ------------------------------------------------------------------##   save_dir        权值与日志文件保存的文件夹# ------------------------------------------------------------------#save_dir = 'log'if not os.path.exists(save_dir):os.makedirs(save_dir)time_str = datetime.datetime.strftime(datetime.datetime.now(), '%Y_%m_%d_%H_%M_%S')log_dir = os.path.join(save_dir, "loss_" + str(time_str))loss_history = LossHistory(log_dir=log_dir, model=Net, input_shape=input_shape)with open(annotation_path,'r') as f:lines=f.readlines()np.random.seed(10101)np.random.shuffle(lines)np.random.seed(None)num_val=int(len(lines) * percentage)num_train=len(lines) - num_valtrain_data=DataGenerator(lines[:num_train],input_shape,True)val_data=DataGenerator(lines[num_train:],input_shape,False)val_len=len(val_data)print(val_len)gen_train=DataLoader(train_data,batch_size=4)gen_test=DataLoader(val_data,batch_size=4)device=torch.device('cuda'if torch.cuda.is_available() and Cuda else "cpu")net=vgg(mode=Net, pretrained=True, progress=True, num_classes=num_classes)net.to(device)if optimizer_type == 'Adam':optim = torch.optim.Adam(net.parameters(), lr=lr)elif optimizer_type == 'SGD':optim = torch.optim.SGD(net.parameters(), lr=lr, momentum=0.9)else:raise ValueError("Unsupported optimizer type: {}".format(optimizer_type))sculer=torch.optim.lr_scheduler.StepLR(optim,step_size=1)for epoch in range(epochs):total_train=0for data in tqdm(gen_train, desc=f"Epoch{epoch + 1}/Train"):img,label=datawith torch.no_grad():img =img.to(device)label=label.to(device)optim.zero_grad()output=net(img)train_loss=nn.CrossEntropyLoss()(output,label).to(device)train_loss.backward()optim.step()total_train+=train_losssculer.step()total_test=0total_accuracy=0for data in tqdm(gen_test, desc=f"Epoch{epoch + 1}/Test"):img,label =datawith torch.no_grad():img=img.to(device)label=label.to(device)optim.zero_grad()out=net(img)test_loss=nn.CrossEntropyLoss()(out,label).to(device)total_test+=test_lossaccuracy=((out.argmax(1)==label).sum()).clone().detach().cpu().numpy()total_accuracy += accuracyprint("训练集上的损失:{}".format(total_train))print("测试集上的损失:{}".format(total_test))print("测试集上的精度:{:.1%}".format(total_accuracy/val_len))loss_history.append_loss(epoch + 1, total_train, total_test)if (epoch+1) % save_period == 0:modepath = os.path.join(log_dir,"DogandCat{}.pth".format(epoch+1))torch.save(net.state_dict(),modepath)print("模型已保存")
设置相关参数:
Cuda: 是否使用GPU加速,默认为False。Net: 选择要使用的VGG网络版本,可以是'vgg16'或'vgg19'。annotation_path: 数据集的注释文件路径,这是一个包含图像路径和标签的文本文件。input_shape: 输入图像的尺寸。num_classes: 分类的类别数量。lr: 学习率。optimizer_type: 选择优化器,可以是'Adam'或'SGD'。percentage: 验证集所占百分比。epochs: 训练轮次。save_period: 多少个epoch保存一次模型权重。save_dir: 模型权重和日志文件保存的目录。
接下来是进行数据准备将数据随机打乱并划分为训练集和验证集,创建训练集和验证集的数据生成器,然后实例化VGG模型,并根据选择的网络版本加载预训练权重,根据选择的优化器类型创建优化器,并设置学习率调度器,最后,每个epoch中计算训练集和验证集上的损失和精度,并记录到损失历史记录器中。
由于比较的费时间,这里我仅仅就进行了猫狗图片各自200张进行训练,主要是看看VGG的一个分类效果,所以就尽可能的快点。
模型预测
# predict.pyfrom torchvision import transforms
from PIL import Image
import matplotlib.pyplot as plt
import torch
import torch.nn.functional as F
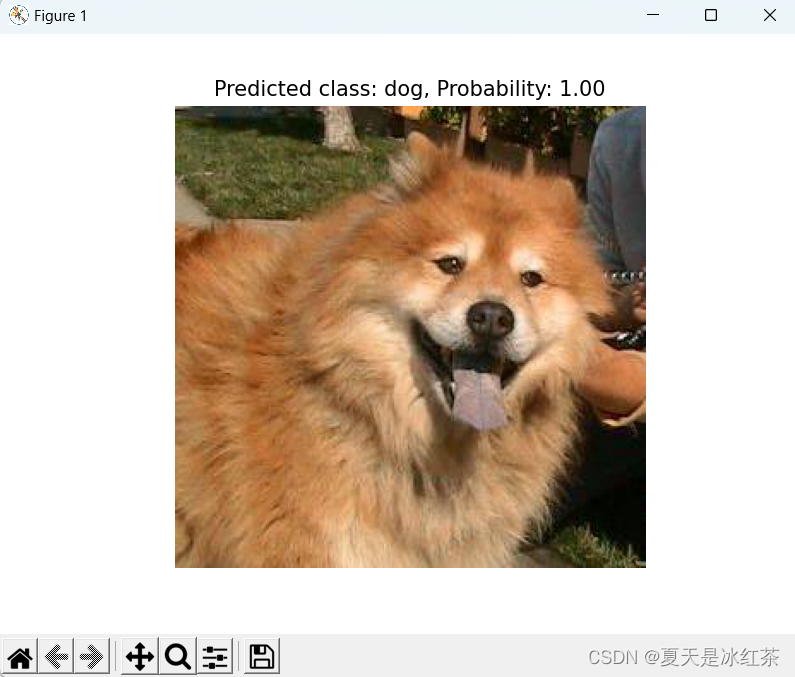
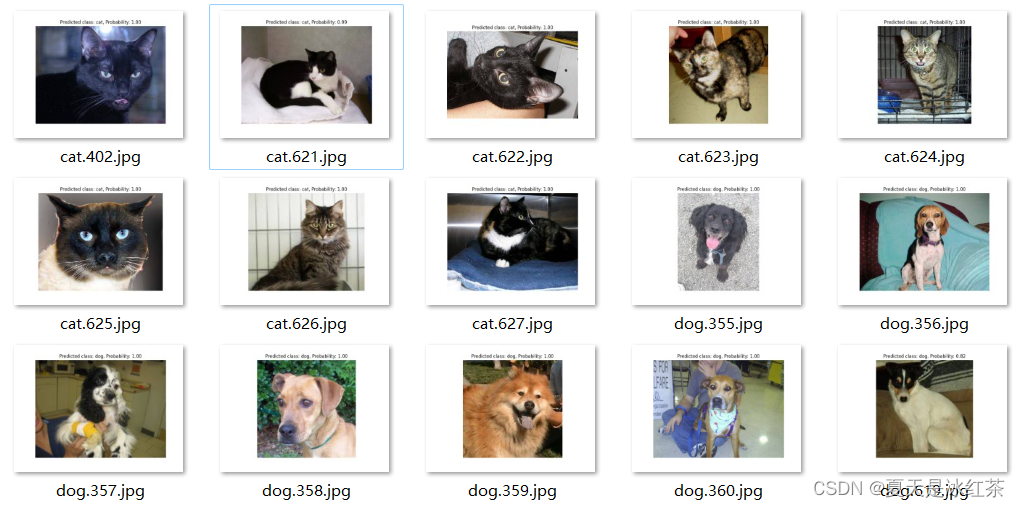
from VGGnet.net import vggif __name__=="__main__":# ---------------------------------## Cuda 是否使用Cuda# 没有GPU可以设置成False# ---------------------------------#Cuda = False# ---------------------------------## 分类类型# ---------------------------------#num_classes = ['cat', 'dog']# ---------------------------------## 'vgg16' and 'vgg19'# ---------------------------------#Netmode = 'vgg16'# ------------------------------------------------------------------------------## detection_mode用于指定测试的模式:## 'predict' 表示单张图片预测# 'dir_predict' 表示遍历文件夹进行检测并保存。默认遍历img文件夹,保存img_out文件夹# ------------------------------------------------------------------------------#detection_mode = "dir_predict"# -------------------------------------------------------## model_path指向log文件夹下的权值文件# 训练好后log文件夹下存在多个权值文件,选择验证集损失较低的即可。# -------------------------------------------------------#model_path = r"log\loss_2023_08_16_13_52_51\DogandCat30.pth"#-------------------------------------------------------------------------## dir_origin_path 指定了用于检测的图片的文件夹路径# dir_save_path 指定了检测完图片的保存路径## dir_origin_path和dir_save_path仅在 detection_mode='dir_predict'时有效#-------------------------------------------------------------------------#dir_origin_path = "img/"dir_save_path = "img_out/"device = torch.device("cuda" if torch.cuda.is_available() and Cuda else "cpu")model = vgg(mode=Netmode,num_classes=len(num_classes))model.load_state_dict(torch.load(model_path, map_location=device))model.to(device)model.eval()transform = transforms.Compose([transforms.Resize((224, 224)),transforms.ToTensor(),transforms.Normalize(mean=[0.485, 0.456, 0.406], std=[0.229, 0.224, 0.225]),])def predict_single_image(image_path):image = Image.open(image_path)image = transform(image).unsqueeze(0).to(device)with torch.no_grad():model.eval()output = model(image)probabilities = F.softmax(output, dim=1)predicted_class = torch.argmax(probabilities).item()predicted_label = num_classes[predicted_class]predicted_prob = probabilities[0][predicted_class].item()print("Output tensor:", output)print("Probabilities tensor:", probabilities)print(f"Predicted class: {predicted_label}, Probability: {predicted_prob:.2f}")plt.imshow(Image.open(image_path))plt.title(f"Predicted class: {predicted_label}, Probability: {predicted_prob:.2f}")plt.axis('off')plt.show()def predict_images_in_directory(origin_path, save_path):import osos.makedirs(save_path, exist_ok=True)image_files = [f for f in os.listdir(origin_path) if f.lower().endswith(('.jpg', '.jpeg', '.png', '.gif'))]for image_file in image_files:image_path = os.path.join(origin_path, image_file)result_image_path = os.path.join(save_path, image_file)image = Image.open(image_path)image = transform(image).unsqueeze(0).to(device)with torch.no_grad():model.eval()output = model(image)probabilities = F.softmax(output, dim=1)predicted_class = torch.argmax(probabilities).item()predicted_label = num_classes[predicted_class]predicted_prob = probabilities[0][predicted_class].item()print("Predicted class:", predicted_label)print("Predicted probability:", predicted_prob)plt.imshow(Image.open(image_path))plt.title(f"Predicted class: {predicted_label}, Probability: {predicted_prob:.2f}")plt.axis('off')plt.savefig(result_image_path)# plt.show()print("Prediction and saving complete.")if detection_mode == "predict":while True:image_path = input('Input image filename (or "exit" to quit): ')if image_path.lower() == "exit":breakpredict_single_image(image_path)elif detection_mode == "dir_predict":predict_images_in_directory(dir_origin_path, dir_save_path)else:raise ValueError("Invalid detection_mode")单张检测模式

文件夹检测模式
资源链接
Auorui/VGG16-CatandDog: Explore the effectiveness of the VGG model, which achieved significant results in the ImageNet image classification competition in 2014, and use VGG for cat and dog classification (github.com)