目录
- 一、axios 的理解和使用
- 1.1 axios 是什么?
- 1.2 axios 特点
- 1.3 axios 常用语法
- 1.4 axios基本使用
- 1.5 axios.request()使用
- 1.6 axios默认配置
- 1.7 axios创建实例对象
- 1.8 拦截器
- 1.9 取消请求
- 二、axios 运行的整体流程
- 三、如何取消未完成的请求
一、axios 的理解和使用
1.1 axios 是什么?
- 前端最流行的 ajax 请求库
- react/vue 官方都推荐使用 axios 发 ajax 请求
- 文档: https://github.com/axios/axios
1.2 axios 特点
- 基于 xhr + promise 的异步 ajax 请求库
- 浏览器端/node 端都可以使用
- 支持请求/响应拦截器
- 支持请求取消
- 请求/响应数据转换
- 批量发送多个请求
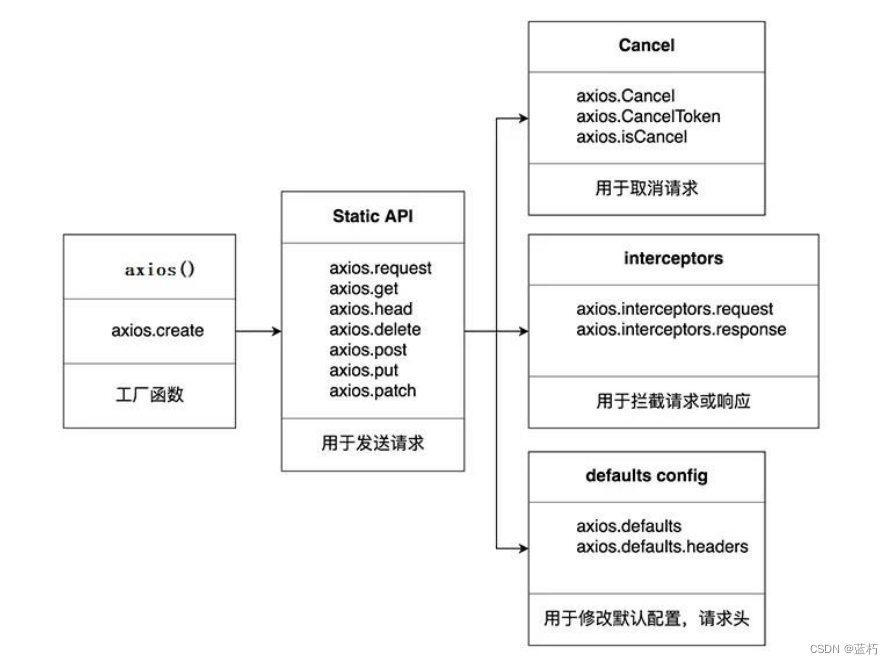
1.3 axios 常用语法
axios(config): 通用/最本质的发任意类型请求的方式
axios(url[, config]): 可以只指定 url 发 get 请求
axios.request(config): 等同于 axios(config)
axios.get(url[, config]): 发 get 请求
axios.delete(url[, config]): 发 delete 请求
axios.post(url[, data, config]): 发 post 请求
axios.put(url[, data, config]): 发 put 请求
axios.defaults.xxx: 请求的默认全局配置
axios.interceptors.request.use(): 添加请求拦截器
axios.interceptors.response.use(): 添加响应拦截器
axios.create([config]): 创建一个新的 axios(它没有下面的功能)
axios.Cancel(): 用于创建取消请求的错误对象
axios.CancelToken(): 用于创建取消请求的 token 对象
axios.isCancel(): 是否是一个取消请求的错误
axios.all(promises): 用于批量执行多个异步请求
axios.spread(): 用来指定接收所有成功数据的回调函数的方法
1.4 axios基本使用
//获取按钮let btns = document.getElementsByTagName('button');//绑定事件btns[0].addEventListener('click',function() {//发送GET AJAX请求axios({method:'GET',url:'http://localhost:3000/posts/1'}).then(response=>{console.log(response);})})//添加一篇新的文章btns[1].addEventListener('click',function() {//发送POST AJAX请求axios({method:'POST',url:'http://localhost:3000/posts',//设置请求体data:{title:"马上快开学了!",author:"蓝朽"}}).then(response=>{console.log(response);})})//更新数据btns[2].addEventListener('click',function() {//发送PUT AJAX请求axios({method:'PUT',url:'http://localhost:3000/posts/3',//设置请求体data:{title:"马上快开学了!",author:"王五"}}).then(response=>{console.log(response);})})//删除文章btns[3].addEventListener('click',function() {//发送delete AJAX请求axios({method:'DELETE',url:'http://localhost:3000/posts/3',}).then(response=>{console.log(response);})})
1.5 axios.request()使用
btns[0].addEventListener('click',function(){axios.request({method:"get",url:"http://localhost:3000/comments"}).then(response=>{console.log(response)})})
1.6 axios默认配置
//获取按钮const btns = document.querySelectorAll('button');//默认配置axios.defaults.method = 'GET';//设置默认的请求类型为 GETaxios.defaults.baseURL = 'http://localhost:3000';//设置基础 URLaxios.defaults.params = {id:100};axios.defaults.timeout = 3000;//btns[0].onclick = function(){axios({url: '/posts'}).then(response => {console.log(response);})}
1.7 axios创建实例对象
- 根据指定配置创建一个新的 axios, 也就就每个新 axios 都有自己的配置
- 新 axios 只是没有取消请求和批量发请求的方法, 其它所有语法都是一致的
- 为什么要设计这个语法?
(1) 需求: 项目中有部分接口需要的配置与另一部分接口需要的配置不太一
样, 如何处理
(2) 解决: 创建 2 个新 axios, 每个都有自己特有的配置, 分别应用到不同要
求的接口请求中
//获取按钮const btns = document.querySelectorAll('button');//创建实例对象let aServer = axios.create({baseURL:'http://localhost:3000',timeout: 3000})//第二个服务器的配置let bServer = axios.create({baseURL:'http://localhost:3000',timeout: 3000})//这里aServer和axios对象的功能几乎一样aServer({url:'/comments'}).then(res=>{console.log(res)})//发送get请求aServer.get('/comments').then(res=>{console.log(res.data)})
1.8 拦截器
- 说明: 调用 axios()并不是立即发送 ajax 请求, 而是需要经历一个较长的流程
- 流程: 请求拦截器2 => 请求拦截器1 => 发ajax请求 => 响应拦截器1 => 响
应拦截器 2 => 请求的回调 - 注意: 此流程是通过 promise 串连起来的, 请求拦截器传递的是 config, 响应
拦截器传递的是 response
// Promise// 设置请求拦截器 config 配置对象axios.interceptors.request.use(function (config) {console.log("请求拦截器 成功 1号");//修改config中的参数config.params={a:100}return config;}, function (error) {console.log("请求拦截器 失败 1号");return Promise.reject(error);});axios.interceptors.request.use(function (config) {console.log("请求拦截器 成功 2号");//修改config中的参数config.timeout=2000return config;}, function (error) {console.log("请求拦截器 失败 2号");return Promise.reject(error);});// 设置响应拦截器axios.interceptors.response.use(function (response) {console.log("响应拦截器 成功 -1号");return response.data;// return response;}, function (error) {console.log("响应拦截器 失败 -1号");return Promise.reject(error);});axios.interceptors.response.use(function (response) {console.log("响应拦截器 成功 -2号");return response;}, function (error) {console.log("响应拦截器 失败 -2号");return Promise.reject(error);});//发送请求axios({method: 'GET',url: 'http://localhost:3000/posts'}).then(response => {console.log('自定义回调处理成功的结果');console.log(response);}).catch(e=>{console.log("自定义失败回调");});
1.9 取消请求
- 基本流程
配置 cancelToken 对象
缓存用于取消请求的 cancel 函数
在后面特定时机调用 cancel 函数取消请求
在错误回调中判断如果 error 是 cancel, 做相应处理 - 实现功能
点击按钮, 取消某个正在请求中的请求
//获取按钮const btns = document.querySelectorAll('button');//2.声明全局变量let cancel = null;//发送请求btns[0].onclick = function(){//检测上一次请求是否完成if(cancel !==null){//取消上一次的请求cancel();}axios({method: 'GET',url: 'http://localhost:3000/posts',//1. 添加配置对象的属性cancelToken: new axios.CancelToken(function(c){//3. 将 c 的值赋值给 cancelcancel = c;})}).then(response => {console.log(response);//将 cancel 的值初始化cancel = null;})}//绑定第二个事件取消请求btns[1].onclick = function(){cancel();}
二、axios 运行的整体流程
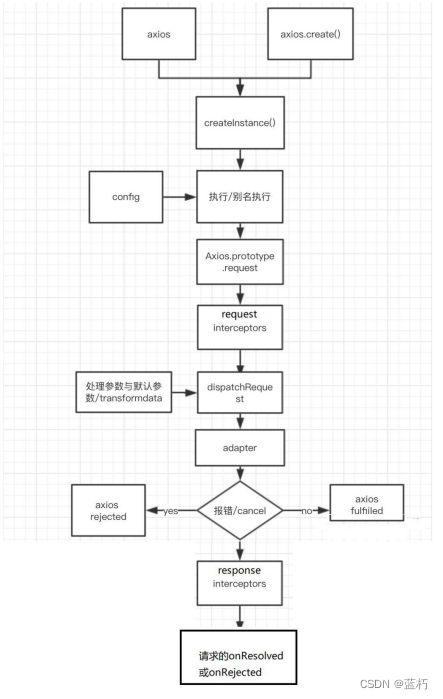
- 整体流程:
request(config) ==> dispatchRequest(config) ==> xhrAdapter(config) - request(config):
将请求拦截器 / dispatchRequest() / 响应拦截器 通过 promise 链串连起来,
返回 promise - dispatchRequest(config):
转换请求数据 ===> 调用 xhrAdapter()发请求 ===> 请求返回后转换响应数
据. 返回 promise - xhrAdapter(config):
创建 XHR 对象, 根据 config 进行相应设置, 发送特定请求, 并接收响应数据,
返回 promise
三、如何取消未完成的请求
- 当配置了 cancelToken 对象时, 保存 cancel 函数
(1) 创建一个用于将来中断请求的 cancelPromise
(2) 并定义了一个用于取消请求的 cancel 函数
(3) 将 cancel 函数传递出来 - 调用 cancel()取消请求
(1) 执行 cacel 函数, 传入错误信息 message
(2) 内部会让 cancelPromise 变为成功, 且成功的值为一个 Cancel 对象
(3) 在 cancelPromise 的成功回调中中断请求, 并让发请求的 proimse 失败,
失败的 reason 为 Cancel 对象

