保姆级 Keras 实现 Faster R-CNN 十
- 一. 建议区域矩形
- 二. 定义 ProposalLyaer
- 1. __init__函数
- 2. build 函数
- 3. call 函数
- 3.1 生成 anchor_box
- 3.2 找出 anchor 处最大分数, 最大分数对应的 anchor_box 和修正参数
- 3. 3 修正 anchor_box
- 3.4 完成 call 函数
- 4. compute_output_shape 函数
- 三. 将 ProposalLayer 加入模型
- 四. 代码下载
上一篇 文章中我们看到了 RPN 网络的预测效果还是不错的, 但是还是有很多目标是判断错误的, 而且回归修正还有一定的偏差. 这两个问题是正常的, 因为 RPN 的功能就是尽可能地找出可能是目标的区域, 来代替 Selective Search 的功能. 所以也不期望它能把分类和回归的事情都做完了. 接下来就是把 RPN 的输出变成下一阶段 Fast R-CNN 的输入来分类目标和再次调整其位置. 在这之前, 需要实现计算建议区域矩形的功能
警告: 因为要将 建议区域矩形 的计算过程中放到 Keras Layer 中进行, 才能前后串成一个模型. 不然像之前的文章中那个易于理解 “散装” 方式定义函数并不能放到 Layer 中, 所以接下来要用 TensorFlow 中的 Tensor 与 相关函数 来实现相应的功能. 如果没有掌握 TensorFlow 相关的函数功能的话, 文章接下来的代码你可能会看不懂
一. 建议区域矩形
先贴一张论文中的说明 Faster R-CNN 中的图, 本文要实现的就是从 NMS 后得到建议区域矩形, 如图中画框的部分
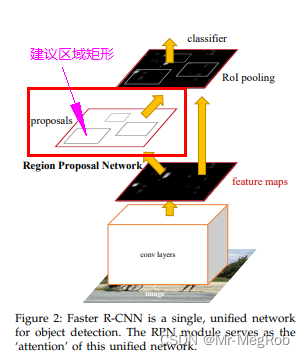
上一篇 文章中, 我们完成了 NMS 的功能, 但是只是用 “散装” 的方式在模型外定义了一个函数, 并且接收的参数也是模型预测完的结果, 现在我们要把这个过程放到一个自定义层中, 并让这个层输出建议区域矩形的坐标, 这个坐标是给后面 RoI pooling 用的
二. 定义 ProposalLyaer
Keras 定义一个层很简单, 就像把大象放冰箱一样, 按套路来就可以
- 从 Layer 继承并定义一个 Layer
- 实现必须重写的几个函数
- 添加必要的成员变量与函数
如下代码:
# 定义 Proposal Layer
class ProposalLayer(Layer):def __init__(self,**kwargs):super(ProposalLayer, self).__init__(**kwargs)def build(self, input_shape):super(ProposalLayer, self).build(input_shape)def call(self, inputs):passdef compute_output_shape(self, input_shape):pass
自定义层必需的是上面这几个函数, 接下来我们将其填充完整
1. __init__函数
在这个函数中, 需要给函数添加一些输入参数和一些成员变量来记录这些参数, 方便在成员函数中使用, 添加后如下
# base_anchors: 9 个大小长宽不一的 anchor_box 列表
# stride: 特征图相对于原始输入图像的缩小的倍数
# num_rois: 输出的建议区域的个数
# iou_thres: 做 nms 时 IoU 阈值
def __init__(self,base_anchors, stride = FEATURE_STRIDE,num_rois = 256, iou_thres = 0.7, **kwargs):self.base_anchors = tf.constant(base_anchors, dtype = tf.float32)self.stride = strideself.num_rois = num_roisself.iou_thres = iou_thresself.ANCHOR_DIMS = 4 # 一个 anchor_box 需要 4 个值, 这个不需要传入, 只是做成一个各成员函数可以访问的量self.K = len(self.base_anchors) # 一个 anchor 对应的 anchor_box 数量super(ProposalLayer, self).__init__(**kwargs)
2. build 函数
因为这个层不需要训练的参数, 所以不需要修改
3. call 函数
这个函数主要实现各种计算逻辑, 是本文最复杂的地方. 功能是由输入的参数计算出建议框的坐标并输出. 要处理的问题有
- 前面文章中生成 anchor_box 的方式在这里不适用, 要改成在层里根据当前输入图像的大小用 TensorFlow 的函数生成相应的 anchor_box
- 前面文章中对 anchor_box 回归修正的方式在这里不适用, 要改成在层里用 TensorFlow 的函数来修正 anchor_box
- 前面文章中定义的 nms 函数在这里不适用, 要改成在层里用 TensorFlow 的函数做 nms
- 批量处理图像, 也就是说不管是训练还是预测输入的图像都可以 ≥ 1, 这也是最难处理的地方
下面就对上面的功能一个一个的修改
3.1 生成 anchor_box
在层中定义一个成员函数专门来做这件事, 可以看到代码和之前文章中的完全不一样
# 将 base_anchors 加到各 anchor(点) 映射回原图的坐标点上, 每个坐标点形成 k 个 anchor box
def create_tensor_anchors(self, batch_size, feature_shape):feature_rows = feature_shape[0]feature_cols = feature_shape[1]ax = (tf.cast(tf.range(feature_cols), tf.float32)) * self.stride + 0.5 * self.strideay = (tf.cast(tf.range(feature_rows), tf.float32)) * self.stride + 0.5 * self.strideax, ay = tf.meshgrid(ax, ay)# 变换形状方便下面的 tf.stackax = tf.reshape(ax, (-1, 1))ay = tf.reshape(ay, (-1, 1))# 这里 anchor 只是像素点坐标(anchor box 中心坐标),# stack([ax, ay, ax, ay]) 成这样的格式, 是为了分别加上 base_anchor 的左上角坐标和右下角坐标anchors = tf.stack([ax, ay, ax, ay], axis = -1)# anchro box (x1, y1, x2, y2) = 中心坐标 + base_anchors# 此时 shape == (feature_shape[0] × feature_shape[1], 9, 4)anchor_boxes = anchors + self.base_anchorsreturn anchor_boxes
create_tensor_anchors 函数生成的 anchor_box 就是 Tensor 了, 而不是之前的 list. 但是此时生成的 anchor_box 的 shape 为
(feature_shape[0] × feature_shape[1], 9, 4), 只能适用于一张图像, 当 batch_size > 1 时就不适用了. 但是还有一个 batch_size 的参数还没有用, 现在将其用起来, 将其添加到 return anchor_boxes 之前
# 同一 batch 内, 图像大小一样,
# 所以 anchor_box 在没有调整前是一样的, 就可以复制成 batch_size 数量
# 完成后 shape = (batch_size, feature_shape[0], feature_shape[1], 9, 4)
anchor_boxes = tf.reshape(anchor_boxes, (feature_shape[0], feature_shape[1], self.K, self.ANCHOR_DIMS))
anchor_boxes = tf.expand_dims(anchor_boxes, axis = 0)
anchor_boxes = tf.tile(anchor_boxes, [batch_size, 1, 1, 1, 1])
经过上面的操作之后, anchor_boxes 的 shape 为 (batch_size, feature_shape[0], feature_shape[1], 9, 4), 就符合批量操作的形状了
3.2 找出 anchor 处最大分数, 最大分数对应的 anchor_box 和修正参数
上一篇 文章中的 Rpn 模型输出的是各 anchor(点) 的 9 个分数与各 anchor_box 的修正参数, 现在依据这个分数找现最大分数对应的 anchor_box 和修正参数. 这个最大分数还会用于 NMS. 现在定义一个成员函数来做这件事
# 找出 anchor 处最大分数, 最大分数对应的 anchor_box 和修正参数
# targets: 各 anchor 处 9 个分数
# boxes: create_tensor_anchors 生成的 anchor_boxe
# deltas: 回归修正参数
def get_boxes_deltas(self, batch_size, feature_shape, targets, boxes, deltas):# k 个 anchor 中最大分数scores = tf.reduce_max(targets, axis = -1)scores_repeat = tf.repeat(scores, self.K, axis = -1)scores_repeat = tf.reshape(scores_repeat, (batch_size, feature_shape[0], feature_shape[1], self.K))# 提取分数最大的 anchor_box 和对应的修正量需要的 mask,# 完成后 valid_mask 的 shape == (batch_size, feature_shape[0], feature_shape[1], 9)# valid_mask.shpe 也和 scores_repeat.shape 一样valid_mask = tf.greater_equal(targets, scores_repeat)# 提取分数最大的 anchor_box# 得到的 shape == (batch_size × feature_shape[0] × feature_shape[1], 4)boxes = tf.boolean_mask(boxes, valid_mask, axis = 0)# deltas 未变形前的 shape == (batch_size, feature_shape[0], feature_shape[1], 36)# 做 boolean_mask 时不兼容, 所以需要变形为 (batch_size, feature_shape[0], feature_shape[1], 9, 4)deltas = tf.reshape(deltas, (batch_size, feature_shape[0], feature_shape[1], self.K, self.ANCHOR_DIMS))# 提取分数最大的 anchor_box 对应的修参数# 得到的 shape == (batch_size × feature_shape[0] × feature_shape[1], 4)deltas = tf.boolean_mask(deltas, valid_mask, axis = 0)return scores, boxes, deltas
三个返回值分别是:
- scores: 各 anchor 处 9 个分数中的最大值, shape == (batch_size, feature_shape[0], feature_shape[1])
- boxes: 最大分数对应的 anchor_box, shape == (batch_size × feature_shape[0] × feature_shape[1], 4)
- deltas: 最大分数 anchor_box 对应的修正参数, shape == (batch_size × feature_shape[0] × feature_shape[1], 4)
上面的代码要是新手的话, 看起来绝对会蒙圈, 接下就解释一下
# k 个 anchor 中最大分数
scores = tf.reduce_max(targets, axis = -1)
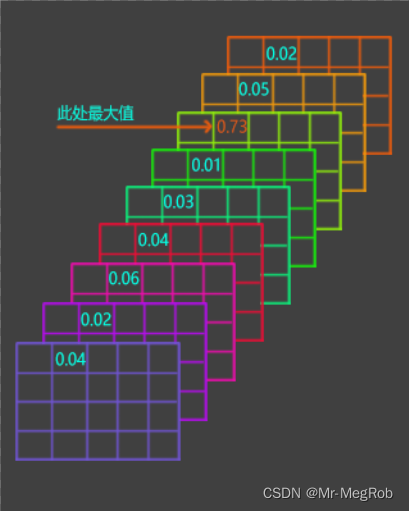
这一句是找出各 anchor 处 9 个分数中的最大值, tf.reduce_max 的功能是计算指定维度的最大值, -1 是最后一维. targets.shape == (batch_size, feature_shape[0], feature_shape[1], 9), 解释起来就是有 batch 张特征图, 每张图有 feature_shape[0] 行, feature_shape[1] 列, 每个 “像素” 位置有 9 个值, 最后一维就是计算这 9 个值的最大值, 如下图
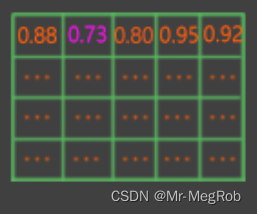
此时 tf.reduce_max(targets, axis = -1) 返回的 shape 是 (batch_size, feature_shape[0], feature_shape[1]), 如下图
scores_repeat = tf.repeat(scores, self.K, axis = -1)
scores_repeat = tf.reshape(scores_repeat, (batch_size, feature_shape[0], feature_shape[1], self.K))
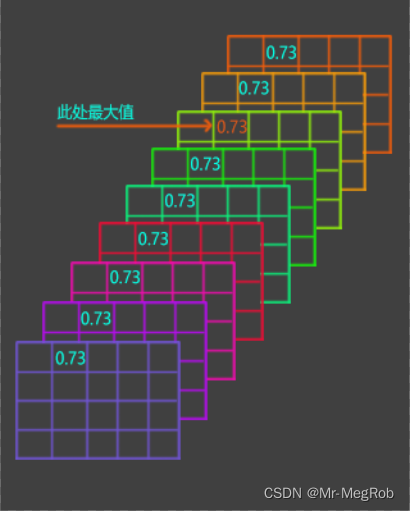
上面两行的作用是把 scores 变成 scores_repeat, 再将 scores_repeat 转换成 (batch_size, feature_shape[0], feature_shape[1], 9) 这样的形状, 意思就是和 targets 一样的 shape. 只是 9 个分数都一样, 如下图
# 提取分数最大的 anchor_box 和对应的修正量需要的 mask,
# 完成后 valid_mask 的 shape == (batch_size, feature_shape[0], feature_shape[1], 9)
# valid_mask.shpe 也和 scores_repeat.shape 一样
valid_mask = tf.greater_equal(targets, scores_repeat)
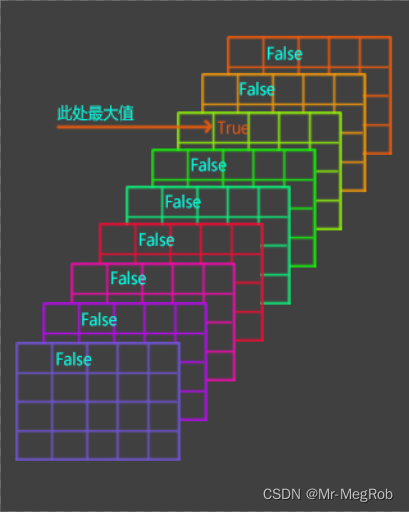
上面这句的作用是用 targets 和 scores_repeat 比较大小, 在各 “像素” 点处, 最大值的地方变成 True, 其他地方变成 False, 如下图
anchor_box 的结构如下, deltas 的结构也一样, 只是里面装的是 [ Δ x , Δ y , Δ w , Δ h ] [Δx, Δy, Δw, Δh] [Δx,Δy,Δw,Δh]
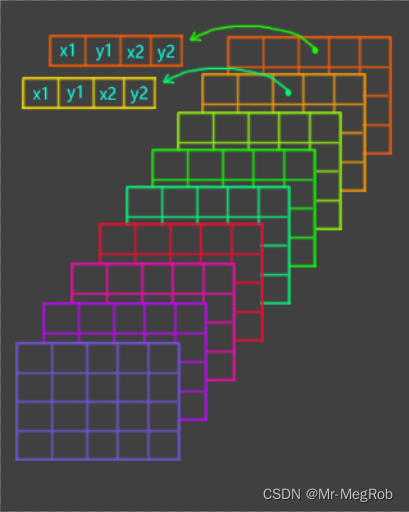
有了这个 valid_mask 后, 就可以把想要的 anchor_box 和 修正参数提取出来了
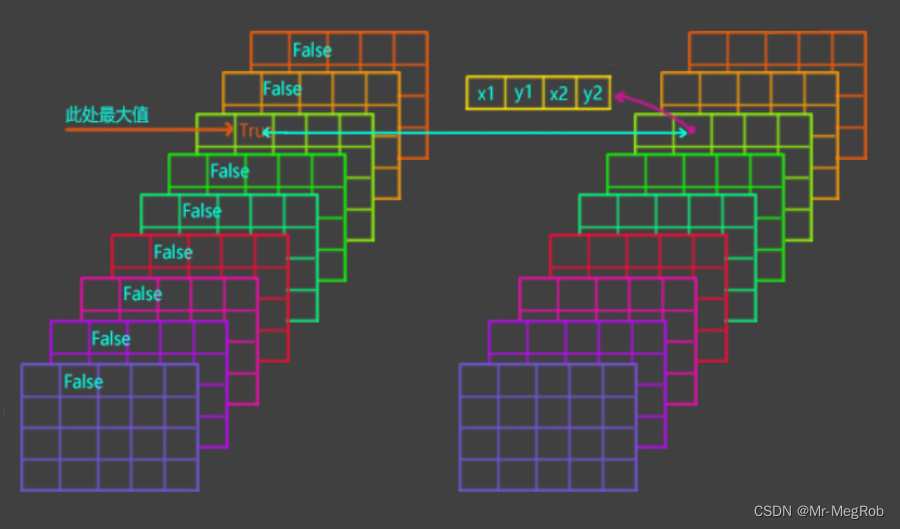
下面的代码中 tf.boolean_mask 就是干这个事的, 它的作用时取出 True 位置的值
# 提取分数最大的 anchor_box
# 得到的 shape == (batch_size × feature_shape[0] × feature_shape[1], 4)
boxes = tf.boolean_mask(boxes, valid_mask, axis = 0)# deltas 未变形前的 shape == (batch_size, feature_shape[0], feature_shape[1], 36)
# 做 boolean_mask 时不兼容, 所以需要变形为 (batch_size, feature_shape[0], feature_shape[1], 9, 4)
deltas = tf.reshape(deltas, (batch_size, feature_shape[0], feature_shape[1], self.K, self.ANCHOR_DIMS))
# 提取分数最大的 anchor_box 对应的修参数
# 得到的 shape == (batch_size × feature_shape[0] × feature_shape[1], 4)
deltas = tf.boolean_mask(deltas, valid_mask, axis = 0)
因为生成的 anchor_box.shape == (batch_size, feature_shape[0], feature_shape[1], 9, 4), deltas.shape == (batch_size, feature_shape[0], feature_shape[1], 9, 4), 而 valid_mask.shape == (batch_size, feature_shape[0], feature_shape[1], 9), 所以刚好可以把 True 位置对应的 4 个anchor_box 的坐标值和修正值提取出来, 提取后
anchor_box.shape == (batch_size × feature_shape[0] × feature_shape[1], 4)
deltas.shape == (batch_size × feature_shape[0] × feature_shape[1], 4)
3. 3 修正 anchor_box
上面找出了最大分数的 anchor_box, 还有对应的修正量, 就可以实现建议框的调整了. 也需要定义一个成员函数
# 修正 anchor_box
def apply_box_deltas(self, image_shape, anchor_boxes, deltas):# 宽度和高度w = anchor_boxes[..., 2] - anchor_boxes[..., 0]h = anchor_boxes[..., 3] - anchor_boxes[..., 1]# 中心坐标x = anchor_boxes[..., 0] + w * 0.5y = anchor_boxes[..., 1] + h * 0.5# 修正 anchor_boxx += deltas[..., 0] * wy += deltas[..., 1] * hw *= tf.exp(deltas[..., 2])h *= tf.exp(deltas[..., 3])# 转换成 y1, x1, y2, x2 格式x1 = x - w * 0.5y1 = y - h * 0.5x2 = x + w * 0.5y2 = y + h * 0.5# 不管是训练还是预测, 超出范围的框分数也可能比较大, 所以都截断保留x1 = tf.maximum(x1, 0)y1 = tf.maximum(y1, 0)x2 = tf.minimum(x2, tf.cast(image_shape[1], dtype = tf.float32))y2 = tf.minimum(y2, tf.cast(image_shape[0], dtype = tf.float32))# 如果用 tf.image.non_max_suppression 的话, 要按 y1, x1, y2, x2 的格式anchor_boxes = tf.stack([y1, x1, y2, x2], axis = -1)return anchor_boxes
上面的代码需要解释的地方有三点, 一是 anchor_boxes[…, 2] 这样的语法. 三个点表示不管前面有几个维度, 最后一个 2 表示最后一维的第 2 个元素. 因为 get_boxes_deltas 函数返回的 boxes(也就是 anchor_boxes) 的 shape 是 (batch_size × feature_shape[0] × feature_shape[1], 4), 最后一维有 4 个元素, 表示 ( x 1 , y 1 , x 2 , y 2 ) (x_1, y_1, x_2, y_2) (x1,y1,x2,y2). 那 anchor_boxes[…, 2] 就表示取出 x 2 x_2 x2. 因为 anchor_boxes 不只一个. 最终的意思是取出所有的 x 2 x_2 x2, 取出来后的 shape == (batch_size × feature_shape[0] × feature_shape[1], 1). 如果用数学的视图看的话就像下面这样
[
x 2 x_2 x2
x 2 x_2 x2
…
x 2 x_2 x2
x 2 x_2 x2
]
同理 anchor_boxes[…, 0] 表示取出所有的 x 1 x_1 x1 如下
[
x 1 x_1 x1
x 1 x_1 x1
…
x 1 x_1 x1
x 1 x_1 x1
]
w w w = anchor_boxes[…, 2] - anchor_boxes[…, 0] 就是上面的所有 x 2 x_2 x2 减对应位置的所有 x 1 x_1 x1, 就得到了所有的 w w w
[
w w w
w w w
…
w w w
w w w
]
其他按相同的逻辑就可以理解了
最后的 tf.stack 函数就是将 x 1 , y 1 , x 2 , y 2 x_1, y_1, x_2, y_2 x1,y1,x2,y2 组合在一起, 变成下面的形式. 注意顺序是 [ y 1 , x 1 , y 2 , x 2 ] [y_1, x_1, y_2, x_2] [y1,x1,y2,x2], 不是我写错了, 下面有解释
[
[ y 1 , x 1 , y 2 , x 2 ] [y_1, x_1, y_2, x_2] [y1,x1,y2,x2]
[ y 1 , x 1 , y 2 , x 2 ] [y_1, x_1, y_2, x_2] [y1,x1,y2,x2]
…
[ y 1 , x 1 , y 2 , x 2 ] [y_1, x_1, y_2, x_2] [y1,x1,y2,x2]
[ y 1 , x 1 , y 2 , x 2 ] [y_1, x_1, y_2, x_2] [y1,x1,y2,x2]
]
第二点是我打算修正后超出范围的建议框做截断保留, 因为既然有存在超过范围的框存在, 则说明这个框的分数高, 是目标的可能性就很大, 需要保留下来
第三点是之前我们对 anchor_box 的坐标排列顺序是 [ x 1 , y 1 , x 2 , y 2 ] [x_1, y_1, x_2, y_2] [x1,y1,x2,y2], 这样更符合我们对坐标的习惯排列. 但是接下来我们要用 TensorFlow 的 nms 函数 tf.image.non_max_suppression, 这个函数的坐标排列顺序却是 [ y 1 , x 1 , y 2 , x 2 ] [y_1, x_1, y_2, x_2] [y1,x1,y2,x2]. 因为在矩阵或者 Tensor 操作中, 我们又习惯先说行, 后说列. 所以在上面的顺序变成了 [ y 1 , x 1 , y 2 , x 2 ] [y_1, x_1, y_2, x_2] [y1,x1,y2,x2]
3.4 完成 call 函数
有了上面的函数后, 我们可以先完成 call 函数的一部分功能, 代码如下
def call(self, inputs): # inputs 是一个列表, 可以拆分为下面的参数# image: 输入的原始图像# targets: rpn 输出的分类部分# adjust: rpn 输出的回归部分image, targets, deltas = inputsbatch_size = tf.shape(image)[0]image_shape = tf.shape(image)[1: 3]feature_shape = tf.shape(targets)[1: 3]# 依据当前图像大小生成 anchor_boxeanchor_boxes = self.create_tensor_anchors(batch_size, feature_shape) # 提取分数最大的 anchor_box 和对应的修正量scores, anchor_boxes, deltas = self.get_boxes_deltas(batch_size, feature_shape,targets, anchor_boxes, deltas)# 回归修正, 修正后的 anchor_boxes 的 shape == (feature_shape[0] × feature_shape[1] , 4)anchor_boxes = self.apply_box_deltas(image_shape, anchor_boxes, deltas)
先要说明的是 inputs 参数, 前面的文章中, 这个输入的参数只有一个, 所以好像不用管它. 如果输入参数有多个的时候, 它是可以拆分的, 因为它是层输入的所有参数组合成的一个列表. 后面在定义模型的时候会发现, 我们用到了三个输入, 这里我们就将其拆为三个输入 Tensor, 分别是:
- image: 输入的原始图像, shape == [batch_size, image_rows, image_cols, channels] 这里用它来计算输入图像的大小, 因为不同 batch 的图像大小可能是变化的, 就需要动态的计算
- targets: rpn 输出分类部分的分数, shape == [batch_size, feature_rows, feature_cols, 9]
- adjust: rpn 输出回归部分的修正值, shape == [batch_size, feature_rows, feature_cols, 36]
既然提到了我们要处理 batch 的问题, 以适应 batch_size > 1 的情况, 所以首先要将 batch_size 从输入的参数中提取出来. 上面的三个 shape 第一维的数字就是 batch_size, 所以不管用哪个 shape 都可以提取出来. 这里用的是 batch_size = tf.shape(image)[0]. image_shape 和 feature_shape 分别对相应的 shape 做切片操作就可以了. 其他代码很简单, 就不用解释了
接下来就是 非极大值抑制(Non-Maximum Suppression) 了. 这个可以用 TensorFlow 现成的函数 tf.image.non_max_suppression, 要提供的参数有 anchor_boxes, scores, self.num_rois, self.iou_thres. 这些参数我们上面都准备好了. 似乎是可以直接调用. 这个想法也没有错, 只是要处理一些问题
- tf.image.non_max_suppression 返回的 Proposal box(建议框) 的个数可能小于我们设置的 self.num_rois(输出的建议区域的个数)
- tf.image.non_max_suppression 只能处理 batch_size == 1 的情况
第 1 个问题相对简单一点, 如果 建议框 小于我们指定的数量, 那就对其进行填充随机大小和形状的矩形以到达需要的数量, 代码也简单, 可以定义一个函数来处理
# 填充随机矩形
# boxes: 需要填充的建议框矩形
# pad_num: 填充数量
def box_pad(self, image_shape, boxes, pad_num):image_rows = tf.cast(image_shape[0], dtype = tf.float32)image_cols = tf.cast(image_shape[1], dtype = tf.float32)# 保证 x2 > x1, y2 > y1, 也就是最小宽度与高度, 也是一个随机值space = tf.cast(tf.random.uniform(shape = (),minval = 16, maxval = 64), dtype = tf.float32)x1 = tf.random.uniform(shape = (pad_num, 1), minval = 0, maxval = image_cols - space)y1 = tf.random.uniform(shape = (pad_num, 1), minval = 0, maxval = image_rows - space)x2 = tf.random.uniform(shape = (pad_num, 1), minval = x1 + space, maxval = image_cols)y2 = tf.random.uniform(shape = (pad_num, 1), minval = y1 + space, maxval = image_rows)random_boxes = tf.concat((y1, x1, y2, x2), axis = -1)random_boxes = tf.reshape(random_boxes, (-1, self.ANCHOR_DIMS))boxes = tf.concat((boxes, random_boxes), axis = 0)return boxes
这个函数的作用就是产生随机大小和形状的矩形添加到 tf.image.non_max_suppression 返回的建议框的末尾以达到需要数量
第 2 个问题相对复杂一点, 我们需要将一个 batch 内的数据再拆分成单个, 以适应 tf.image.non_max_suppression 函数. 定义一个函数来处理单个数据
# 处理 batch 内一个数据
# boxes: 修正后的建议区域矩形
# scores: 建议框矩形对应的分数
# i: batch 内第几个数据
def batch_process(self, image_shape, boxes, scores, i):selected_indices = tf.image.non_max_suppression(boxes[i], scores[i], self.num_rois, self.iou_thres)selected_boxes = tf.gather(boxes[i], selected_indices)num_selected_boxes = tf.shape(selected_boxes)[0]pad_num = self.num_rois - num_selected_boxesselected_boxes = tf.cond(num_selected_boxes < self.num_rois,lambda: self.box_pad(image_shape, selected_boxes, pad_num),lambda: selected_boxes)return selected_boxes
tf.image.non_max_suppression 函数返回的是 nms 后剩下的 建议区域矩形 在 boxes 中的索引序号, 我们只需要用这个索引序号就可以从 boxes 将建议区域矩形提取出来, tf.gather 函数就是用索引序号去提取, 再将提取出来的矩形组合在一起, 就和点名差不多意思. 提取完了这后要判断数量够不够, 不够就需要填充 tf.cond 是条件判断的意思, 不能用 if 来判断. 函数返回的是 batch 内拆分后的一个数据
那要怎么拆分数据, 又怎么组合在一起, 就要用到一个很有用, 但是又不好理解的函数 tf.map_fn, 下面将 call 函数补全
def call(self, inputs): # inputs 是一个列表, 可以拆分为下面的参数# image: 输入的原始图像# targets: rpn 输出的分类部分# adjust: rpn 输出的回归部分image, targets, deltas = inputsbatch_size = tf.shape(image)[0]image_shape = tf.shape(image)[1: 3]feature_shape = tf.shape(targets)[1: 3]# 依据当前图像大小生成 anchor_boxeanchor_boxes = self.create_tensor_anchors(batch_size, feature_shape) # 提取分数最大的 anchor_box 和对应的修正量scores, anchor_boxes, deltas = self.get_boxes_deltas(batch_size, feature_shape,targets, anchor_boxes, deltas)# 回归修正, 修正后的 anchor_boxes 的 shape == (feature_shape[0] × feature_shape[1] , 4)anchor_boxes = self.apply_box_deltas(image_shape, anchor_boxes, deltas)# 拆分与组合操作selected_boxes = tf.map_fn(lambda i: self.batch_process(image_shape,tf.reshape(anchor_boxes, (batch_size, -1, self.ANCHOR_DIMS)),tf.reshape(scores, (batch_size, -1)),i),tf.range(batch_size, dtype = tf.int32),dtype = tf.float32,back_prop = False)anchor_boxes = tf.reshape(selected_boxes, (batch_size, -1, self.ANCHOR_DIMS))return anchor_boxes
添加的代码是 拆分与组合操作 以下的部分, 对于 tf.map_fn 的参数中 lamdba 为拆分后的处理函数, 需要一个参数 i 来指明是第几个数据, i 从哪里来? tf.range(batch_size, dtype = tf.int32) 函数产生的. 从 0 开始到 batch_size - 1 整数 back_prop 设置成不需要反向传播, 因为这个层没有可训练的参数. tf.map_fn 本身就有将拆分的数据组合的功能, 所以 selected_boxes 就是已经组合好的数据, 最后变形为 (batch_size, -1, 4) , 为什么要变成这个 shape? batch_size 本身就是要按 batch 操作, 这个是要还原的. 最后的 4 表示一个 建议框 坐标有 4 个值, -1 就是自动计算了. 如果要是具体的数字的话, 就是 self.num_rois. 翻译过来就是 (batch_size, self.num_rois, 4) 这就是最终要输出的数据形状
4. compute_output_shape 函数
上面的 call 函数输出的 shape == (batch_size, self.num_rois, 4) , 而 compute_output_shape 这个函数就是其字面意思, 模型中下一层就是因为这个函数才知道了上一层的输出情况, 而不用明确的指定输入形状. 所以在定义函数的时候直接返回指定的 shape 就可以了
def compute_output_shape(self, input_shape):return (input_shape[0][0], self.num_rois, self.ANCHOR_DIMS)
要说明的一点是 input_shape 就是 call 函数输入参数 inputs 的 shape. 所以 input_shape[0][0] 就是 batch_size
至此, ProposalLyaer 定义完成
三. 将 ProposalLayer 加入模型
保姆级 Keras 实现 Faster R-CNN 七 中定义的模型是这样的
# 组合成 rpn 模型
# 输入层, shape = (None, None, 3) 表示可接受任意大小的 3 通道图像输入
# 如果把 None 换成具体的数字, 那就只能输入指定大小的图像了
x = keras.layers.Input(shape = (None, None, 3), name = "input")
feature = vgg16_conv(x)
# 两个输出
rpn_cls, rpn_reg = rpn(feature)
rpn_model = keras.Model(x, [rpn_cls, rpn_reg], name = "rpn_model")
现在我们在 rpn_model 基础上增加 ProposalLayer 如下
# proposal 模型
x = keras.layers.Input(shape = (None, None, 3), name = "input")feature = vgg16_conv(x)
rpn_cls, rpn_reg = rpn(feature)proposal_layer = ProposalLayer(base_anchors, num_rois = TRAIN_NUM, iou_thres = 0.7,name = "proposal")([x, rpn_cls, rpn_reg])
proposal_model = keras.Model(x, proposal_layer, name = "proposal_model")proposal_model.summary()
rpn 的两个输出变成了 proposal_layer 的其中两个输入, x 也为其中一个输入. 这样 proposal_layer 就有了 3 个输入. 并且 proposal_layer 还设置了需要的参数, 如 num_rois, iou_thres 等
有了模型, 就要以测试一下效果了, 不过在之前, 要加载 保姆级 Keras 实现 Faster R-CNN 八 训练好的参数
# 加载训练好的参数
proposal_model.load_weights(osp.join(log_path, "faster_rcnn_weights.h5"), True)
再定义一个预测函数
# proposal 模型预测
# 一次预测一张图像
# x: 输入图像或图像路径
# 返回值: 返回原图像和预测结果
def proposal_predict(x):# 如果是图像路径, 那要将图像预处理成网络输入格式# 如果不是则是 input_reader 返回的图像, 已经满足输入格式if isinstance(x, str):img_src = cv.imread(x)img_new, scale = new_size_image(img_src, SHORT_SIZE)x = [img_new]x = np.array(x).astype(np.float32) / 255.0y = proposal_model.predict(x)return y
# 利用训练时划分的测试集
test_reader = input_reader(test_set, CATEGORIES, batch_size = 8, train_mode = False)
接下来就是见证奇迹的时刻了
# proposal 测试
x, y = next(test_reader)
outputs = proposal_predict(x)
print(x.shape, outputs.shape)image_shape = x[0].shape
batch_size = outputs.shape[0]
plt.figure("proposal", figsize = (max(6, image_shape[1] // 50), max(4, image_shape[0] * batch_size // 200)))for i, batch in enumerate(outputs):img_show = x[i].copy()for a in batch[: 32]: # 只显示前 32 个, 不然全部画满了rgb = (random.randint(128, 255) / 255, random.randint(128, 255) / 255,random.randint(128, 255) / 255)cv.rectangle(img_show, (a[1], a[0]), (a[3], a[2]), rgb, 2)if batch_size > 1:plt.subplot(max(1, batch_size // 2), 2, i + 1)plt.imshow(img_show[..., : : -1])plt.show()
效果如下
(8, 300, 450, 3) (8, 128, 4)

四. 代码下载
示例代码可下载 Jupyter Notebook 示例代码(还未上传)
上一篇: 保姆级 Keras 实现 Faster R-CNN 九
下一篇: 保姆级 Keras 实现 Faster R-CNN 十一

![[完美解决]Vue项目运行时出现this[kHandle] = new _Hash(algorithm, xofLen)](https://img-blog.csdnimg.cn/e5923ffacb5544fca808504408ea9cbe.png)
